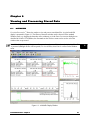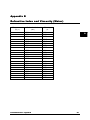
1
PrecisionDeconvolve 32 Application Software for Collecting, Processing, Storing and Printing Dynamic Light Scattering Data for use in Research Laboratories, QC and Production Installations User Manual Created by Precision Detectors, Inc. Notices: This product is covered by a limited warranty. A copy of the warranty is included in this manual. No part of this document may be reproduced in any form or by any means, electronic or mechanical, including photocopying without written permission from Precision Detectors, Inc. Information in this document is subject to change without notice and does not represent a commitment on the part of Precision Detectors, Inc. No responsibility is assumed by Precision Detectors for the use of this software or other rights of third parties resulting from its use. The software described in this document is furnished under a license agreement and may be used or copied only in accordance with the terms of the agreement. The user may make a single copy of the software for archival purposes. Precision Detectors products are covered by US Patents 5,305,073 and 5,701,176. Additional patents applied for. Precision Detectors, PrecisionDeconvolve 32 , PDDLS Batch and PDDLS CoolBatch are trademarks of Precision Detectors, Inc. All other brands and products mentioned are trademarks or registered trademarks of their respective holders. Precision Detectors, Inc. 34 Williams Way Bellingham, Massachusetts 02019 USA Tel: 508-966-3847 Fax: 508-966-3758 e-mail: info@ precisiondetectors.com Web site: www.precisiondetectors.com Copyright 1997, 1998, 1999, 2000, 2002, 2003 by Precision Detectors, Inc. Printed in the United States of America Precision Detectors, Inc., Electronic End User License Agreement NOTICE TO USER: THIS IS A CONTRACT. BY INDICATING YOUR ACCEPTANCE DURING INSTALLATION, YOU WILL BE ASKED TO ACCEPT ALL THE TERMS AND CONDITIONS OF THIS AGREEMENT. This Precision Detectors, Inc. (PDI) End User License Agreement accompanies a Precision Detectors software product and related explanatory materials. The term "Software" shall include all software packages delivered to you by PDI and any upgrades, modified versions or updates of the Software licensed to you by PDI. This copy of the Software is licensed to you as the end user for use by you and other users of a specific PDI hardware System purchased, leased or rented by you. Please read this Agreement carefully. PDI grants to you a non-exclusive license to use the Software, provided that you agree to the following: 1. Use of the Software. a) You may install the Software in a single location on a hard disk or other storage device; install and use the Software on a file server for local execution over your network (but not for the purpose of copying onto a local disk or other storage device); for use only with the specific system; b) You may make backup copies of the Software; c) You may transfer the Software from one computer to another over your network, or relocate the Software on your site, but you may not copy it to additional sites over the network or make additional copies for use on additional networks or sites for use with other hardware; d) You may copy the Software to the personal computer of Users and such Users may use the software to examine, recompute and print out files collected in conjunction with the System; e) You may obtain additional electronic copies of the Software directly from PDI for the cost of media, handling and shipping. 2. Copyright. The Software is owned by PDI and its suppliers, and its structure, organization and code are valuable trade secrets of PDI and its suppliers. The Software is also protected by United States Copyright Law and International Treaty provisions. You agree not to modify, adapt, translate, reverse engineer, decompile, disassemble or otherwise attempt to discover the source code of the Software. You may use trademarks only to identify printed output produced by the Software, in accordance with accepted trademark practice, including identification of trademark owner's name. Such use of any trademark does not give you any rights of ownership in that trademark. Except as stated above, this Agreement does not grant you any intellectual property rights in the Software. 32 – PrecisionDeconvolve PrecisionDeconvolve32 – License License Agreement Agreement ii ii ii 3. Transfer. You may not rent, lease, or sublicense the Software. You may, however, transfer all your rights to use the Software to another person or entity, provided that you transfer this Agreement with the Software. 4. Warranty. The Software delivered to you is PDI's current standard version and performs as described in PDI's brochures. For a period of one year from the date of delivery, PDI agrees to correct defects that the user identifies as not performing as described in PDI's brochures. PDI DOES NOT AND CANNOT WARRANT THE PERFORMANCE OR RESULTS YOU MAY OBTAIN BY USING THE SOFTWARE OR DOCUMENTATION. PDI MAKES NO WARRANTIES, EXPRESS OR IMPLIED, AS TO MERCHANTABILITY, OR FITNESS FOR ANY PARTICULAR PURPOSE. IN NO EVENT WILL PDI BE LIABLE TO YOU FOR ANY CONSEQUENTIAL, INCIDENTAL OR SPECIAL DAMAGES, INCLUDING ANY LOST PROFITS OR LOST SAVINGS, EVEN IF A PDI REPRESENTATIVE HAS BEEN ADVISED OF THE POSSIBILITY OF SUCH DAMAGES, OR FOR ANY CLAIM BY ANY THIRD PARTY. Some states or jurisdictions do not allow the exclusion or limitation of incidental, consequential or special damages, or the exclusion of implied warranties or limitations on how long an implied warranty may last, so the above limitations may not apply to you. 5. Governing Law and General Provisions. This Agreement will be governed by the laws of the State of Massachusetts, United States of America, excluding the application of its conflicts of law rules. This Agreement will not be governed by the United Nations Convention on Contracts for the International Sale of Goods, the application of which is expressly excluded. If any part of this Agreement is found void and unenforceable, it will not affect the validity of the balance of the Agreement, which shall remain valid and enforceable according to its terms. You agree that the Software will not be shipped, transferred or exported into any country or used in any manner prohibited by the United States Export Administration Act or any other export laws, restrictions or regulations. This Agreement shall automatically terminate upon failure by you to comply with its terms. This Agreement may only be modified in writing signed by the President of PDI. 6. Notice to Government End Users. If this product is acquired under the terms of; (i) a GSA contract - Use, reproduction or disclosure is subject to the restrictions set forth in the applicable ADP Schedule contract; (ii) a DOD contract - Use, duplication or disclosure by the Government is subject to restrictions as set forth in subparagraph (c) (1) (ii) of 252.227-7013; (iii) a Civilian agency contract - Use, reproduction, or disclosure is subject to 52. 227-19 (a) through (d) and restrictions set forth in the accompanying end user agreement. iivv P P rr e ec c ii ss ii o on nD De ec co on n vv o o ll vv e e 33 22 –– L L ii c ce en n ss e e A Ag g rr e ee em me en n tt 7. Only Terms and Conditions. These Terms and Conditions are the only terms and conditions related to the use of this software, they supercede any previous agreement with respect to the software, and may only be altered in a written agreement signed by PDI and you. Unpublished rights reserved under the copyright laws of the United States. Precision Detectors, Inc., 34 Williams Way, Bellingham MA 02019. Your acceptance or decline of the foregoing Agreement [was or will be] indicated during installation. 32 – PrecisionDeconvolve PrecisionDeconvolve32 – License License Agreement Agreement vv [This page intentionally left blank] vi vi P P rr e ec c ii ss ii o on nD De ec co on n vv o o ll vv e e 33 22 –– L L ii c ce en n ss e e A Ag g rr e ee em me en n tt Table of Contents Precision Detectors, Inc. - Electronic End User License Agreement.................................................iii Chapter 1 Introduction.............................................................................................................. 1-1 1.1 Overview .........................................................................................................................1-1 1.2 Introduction to Light Scattering .........................................................................................1-2 1.3 General Conventions used in this Manual...........................................................................1-3 1.4 For Additional Information ...............................................................................................1-4 1.5 Contents of this Manual ....................................................................................................1-4 Chapter 2 Installation ................................................................................................................ 2-1 2.1 Overview .........................................................................................................................2-1 2.2 Loading the Software and Configuring the Communic ations Port on the Personal Computer ...........................................................................................................2-1 2.3 A Test Run.......................................................................................................................2-8 Chapter 3 Introduction to PrecisionDeconvolve 32 ....................................................................... 3-1 3.1 Overview .........................................................................................................................3-1 3.2 The Main Window ............................................................................................................3-1 3.2.1 Introduction to the Main Window............................................................................................................. 3-1 3.2.2 The Menu Bar............................................................................................................................................... 3-2 3.2.2.1 File ................................................................................................................................................. 3-2 3.2.2.2 Measure......................................................................................................................................... 3-3 3.2.2.3 Data................................................................................................................................................ 3-5 3.2.2.4 Setup.............................................................................................................................................. 3-6 3.2.2.5 Window......................................................................................................................................... 3-8 3.2.2.6 Help ............................................................................................................................................... 3-9 3.2.3 The Tool Bar................................................................................................................................................. 3-9 3.2.4 The Data Display Window....................................................................................................................... 3-11 3.2.5 The Status Bar............................................................................................................................................. 3-12 3.3 The Data Acquisition Windows ....................................................................................... 3-13 3.3.1 Overview ..................................................................................................................................................... 3-13 3.3.2 The Intensity Window............................................................................................................................... 3-13 3.3.3 The Correlation Window .......................................................................................................................... 3-14 3.4 The Distribution Window ................................................................................................ 3-15 3.5 Active Data Dialog Box .................................................................................................. 3-16 3.6 The Smoothness Dialog Box ........................................................................................... 3-21 Chapter 4 Selecting Operating Parameters ................................................................................ 4-1 4.1 Overview .........................................................................................................................4-1 4.2 The Measurement Setting Dialog Box ................................................................................4-2 4.2.1 The Measurement Tab................................................................................................................................. 4-2 4.2.1.1 The Sample Time ........................................................................................................................ 4-2 4.2.1.2 Channels ....................................................................................................................................... 4-3 4.2.1.3 Last ................................................................................................................................................ 4-4 4.2.1.4 The Run Time .............................................................................................................................. 4-5 4.2.1.5 Accumulate................................................................................................................................... 4-5 4.2.1.6 Repeat............................................................................................................................................ 4-5 4.2.1.7 Smoothness Parameter ............................................................................................................... 4-6 32 – PrecisionDeconvolve PrecisionDeconvolve32 – Table Table of of Contents Contents vv ii ii 4.2.2 The Intensity Tab......................................................................................................................................... 4-7 4.2.3 The Sample Data Tab .................................................................................................................................. 4-8 4.2.4 The Sample Record Tab.............................................................................................................................. 4-8 4.2.4.1 Path................................................................................................................................................ 4-9 4.2.4.2 Next File ....................................................................................................................................... 4-9 4.3 The Sample Parameters.....................................................................................................4-9 4.3.1 4.3.2 4.3.3 4.3.4 Viscosity........................................................................................................................................................ 4-9 Temperature .................................................................................................................................................. 4-9 Refraction .................................................................................................................................................... 4-10 Annotative Information............................................................................................................................. 4-10 4.4 Positioning the Stirrer ..................................................................................................... 4-10 4.5 Selecting the Appropriate Concentration .......................................................................... 4-11 Chapter 5 Collecting Data.......................................................................................................... 5-1 5.1 Overview .........................................................................................................................5-1 5.2 Starting the Measurement..................................................................................................5-1 5.3 Monitoring Data Collection ...............................................................................................5-3 Chapter 6 Viewing and Processing Stored Data......................................................................... 6-1 6.1 Overview .........................................................................................................................6-1 6.2 Selecting the Desired Data Presentation Format..................................................................6-2 6.2.1 6.2.2 6.2.3 6.2.4 6.2.5 6.2.6 6.2.7 Data Presentation Dialog Box.................................................................................................................... 6-2 Distribution Tab ........................................................................................................................................... 6-3 Correlation Tab............................................................................................................................................. 6-5 Panels Tab ..................................................................................................................................................... 6-7 Intensity Record ........................................................................................................................................... 6-8 Data Printout................................................................................................................................................. 6-9 Text File Content Tab................................................................................................................................ 6-10 6.3 Parameter Lists............................................................................................................... 6-11 6.4 The Role of the Data Menu with Stored Data Display ....................................................... 6-12 6.4.1 Plots .............................................................................................................................................................. 6-14 Chapter 7 Storing and Printing Data.......................................................................................... 7-1 7.1 Overview .........................................................................................................................7-1 7.2 Saving Data......................................................................................................................7-1 7.2.1 Saving Data as a Binary File ...................................................................................................................... 7-1 7.2.2 The Save Command..................................................................................................................................... 7-2 7.3 Printing a Report ..............................................................................................................7-4 Appendix A General Principles...................................................................................................A-1 Appendix B Refractive Index and Viscosity (Water)...................................................................B-1 Index..............................................................................................................................................I-1 viii viii P P rr e ec c ii ss ii o on nD De ec co on n vv o o ll vv e e 33 22 –– T Ta ab b ll e e o o ff C Co on n tt e en n tt ss Chapter 1 Introduction 1 1.1 OVERVIEW The Precision Detectors PrecisionDeconvolve32 software application package is designed to provide for: • Collection of dynamic light scattering data with the Precision Detectors Model PDDLS/Batch Light Scattering System, the Precision Detectors Expert Series with the Dynamic Light Scattering Module, the Precision Detectors Model ALS3000 Automated DLS System and the Precision Detectors Model ALS4000 Automated Expert DLS System. • Display, reporting and exporting of raw and processed data from the above detectors. • Processing of dynamic light scattering data from the above detectors and data from other detectors. These systems are designed to collect and process dynamic light scattering data for macromolecules and particles greater than 1 nm in diameter. • The PDDLS/Batch and PDDLS/CoolBatch Systems use a cuvette to contain the sample, and a static measurement is made. These systems provide batch measurements of the diffusion coefficient and related parameters. The CoolBatch system includes temperature control. • The PD-Expert Laser Light Scattering DLS Workstation provides molecular size and conformation data from the autocorrelation of dynamic light scattering signals at any userselectable angle in 5 degree increments on a 360o platform. The “angular-choice” scattering capabilities provide exceptionally accurate measurements for hydrodynamic radius (Rh) and hydrodynamic radius distributions from any type of sample ranging from molecules (protein and antibody) to nanoparticles such as liposomes, sols, magnetic particles, emulsions etc. The 360degree platform is a new concept of DLS measurement in a goniometer-like instrument, and provides ease of use and flexibility for all applications. Many manually placed detectors can be multiplexed and, with the unique shuttering mechanism, measurements can be obtained at different angles in sequence. The DLS detectors are interfaced with a single APD (avalanche photodiode detector) for fast, efficient and economical operation. • ALS3000 Automated DLS System incorporates an automated sample preparation device that is integrated and computer controlled for maximum throughput. It includes a Peltier cooled/heated autosampler with provision for 96 well plates that injects into the DLS system. The system is completely controlled through the serial port. The temperature is displayed on the front panel but can be set and monitored in the software. The automated sample preparation system has access to larger volume containers allowing for automated step titration, serial dilutions, and kinetic studies. 32-- Chapter PrecisionDeconvolve PrecisionDeconvolve32 Chapter 1 1 1 1 -- 1 1 • ALS4000 Automated Expert DLS System employs the Automated Sample preparative system used in the ALS3000, but directly injects into the Expert DLS system. The system can automatically collect correlation functions from three detectors at angles from 5 to 355 degrees in 5-degree increments, allowing for the monitoring of the nucleation of aggregates in the presence of larger particles. In addition, it fully characterizes nanoparticles and also is able to measure slow diffusion characteristics in and out of a sophisticated matrix. The fluctuations in scattered light intensity caused by the sample are monitored; their correlation function calculated and deconvoluted into a distribution of diffusion coefficients and the corresponding radii for the scattering particles. 1.2 INTRODUCTION TO LIGHT SCATTERING Note: This section provides the analyst with a qualitative description of the Dynamic Light Scattering method. A detailed discussion of the technology is presented in Appendix A. The term "Light Scattering" is used to describe the process in which light from an incident light beam is scattered in all directions upon interaction with particles in the beam. Light is an electromagnetic wave and the light scattered by an ensemble of particles is the sum of light scattered by individual particles. When the incident light is coherent, the intensity variations or “speckles” are produced at the observation plane. These speckles are due to the variation in phases of the waves scattered by different particles. At one point, waves arriving at different phases cancel each other more fully than at another. As the scattering particles move over distances that are comparable to the wavelength of the incident beam, the phases of the scattered waves and the speckle pattern are dramatically changed. Monitoring the fluctuations of intensity of the scattered light passing through a small pinhole (smaller than the size of the speckle) make it possible to tell how fast the scattering particles diffuse over a distance equal to the wavelength of the scattered light. In Precision Detectors systems; this task is achieved by detecting the intensity of scattered light by an avalanche photodiode, computing the correlation function of the photocurrent by a specialized correlator and deconvoluting this correlation function into contributions from particles with different diffusion coefficients. Note: A sample usually consists of a collection of particles with different molecular weights and sizes, thus the Dynamic Light Scattering experiment leads to a distribution for the diffusion coefficients. The diffusion coefficient depends on particle size and shape and can be converted into related parameters such as: • the hydrodynamic radius (Rh ) of the macromolecule • the molecular weight of the molecule (when the concentration is known) • the diameter of the macromolecule In this manual, we will display data that refer to the hydrodynamic radius. The reader should recognize that molecular weight distributions, the diameter, relaxation time and the rate of diffusion are also readily obtained. A typical distribution for the hydrodynamic radius is shown in Figure 1-1. 1 1--2 2 P P rr e ec c ii ss ii o on nD De ec co on n vv o o ll vv e e 33 22 –– C Ch ha ap p tt e e rr 1 1 1 Figure 1-1: A Hydrodynamic Radius Distribution 1.3 GENERAL CONVENTIONS USED IN THIS MANUAL PrecisionDeconvolve32 is a Windows application that follows the general Windows conventions. All windows, dialog boxes, controls, short cut keys, scroll bars, etc. operate according to standard Windows procedures. For the sake of brevity, we use the following conventions: • It is understood that the OK button is to be clicked (or the ENTER key on the keyboard is to be pressed) to accept the settings and close the dialog box. • It is understood that the CANCEL button is to be clicked (or the ESC key on the keyboard is to be pressed) to close the dialog box and preserve the original settings. • The APPLY button is to be clicked to change settings without closing the dialog box. • Common dialog boxes and commands that are similar to other Windows programs are not described (e.g., the Open dialog box, is identical to that used in programs such as Word). When we are describing a dialog box or window, the name of the window will appear in italics: Access the Correlation Function dialog box … When a button (or a command from a menu), is to be chosen, the button (command) is shown in italics: To initiate data collection, click Start on the menu bar. On-line help is available by pointing to the field of interest and pressing F1. 32-- Chapter PrecisionDeconvolve PrecisionDeconvolve32 Chapter 1 1 1 1 -- 3 3 1.4 FOR ADDITIONAL INFORMATION Precision Detectors maintains a number of facilities to provide additional assistance to the user. Technical assistance and service assistance can be obtained from: Precision Detectors, Inc. 34 Williams Way Bellingham MA 02019 Tel: (508) 966-3847 Tel: (800) 472-6934 (US only) Fax: (508) 966-3758 e-mail: [email protected] website: www.precisiondetectors.com or your local distributor. Precision Detectors publishes Biomolecular Characterization Notes and Polymer Characterization Notes, which are newsletters that provide a discussion of light scattering issues of current interest. Please contact Precision Detectors to be added to the mailing list. 1.5 CONTENTS OF THIS MANUAL • Chapter 2, Installation describes how the software is installed. • Chapter 3, Introduction to PrecisionDeconvolve32 describes the main window and all of the commands that are provided in the program. In addition, it describes the windows that that are presented during data acquisition. • Chapter 4, Selecting Operating Parameters describes the various factors that should be considered in selecting data acquisition and display parameters. • Chapter 5, Collecting Data describes the data acquisition process. • Chapter 6, Viewing and Processing Stored Data discusses the various ways in which stored data can be processed (reprocessed) to meet the needs of the laboratory. • Chapter 7, Saving and Printing Data describes how you can save data and generate reports. In addition, an appendix that describes the theory of light scattering measurements is included and an appendix with the Refractive Index and Viscosity of water as a function of temperature is included. 1 1--4 4 P P rr e ec c ii ss ii o on nD De ec co on n vv o o ll vv e e 33 22 –– C Ch ha ap p tt e e rr 1 1 Chapter 2 Installation 2.1 OVERVIEW 2 This chapter describes the steps required to install PrecisionDeconvolve32 application software in your personal computer. 2.2 LOADING THE SOFTWARE SOFTWARE AND CONFIGURING THE COMMUNICATIONS PORT PORT ON THE PERSONAL COMPUTER To load the software onto the personal computer: a) Place the distribution diskette in the CD-ROM drive. If your computer is configured for Autorun, a Welcome screen will be presented (if your computer is not configured for Autorun, select Setup.exe on the CD to access the Welcome screen). b) The Install program presents a series of dialog boxes that are self-explanatory. When you access the dialog box that presents the programs to load, select PrecisionDeconvolve32 . The password that is provided with the system will allow you to load the program. Once you have loaded the software, start PrecisionDeconvolve32 and select Hardware on the Configuration drop down menu to open the Hardware configuration dialog box (Figure 2-1). 32 – PrecisionDeconvolve PrecisionDeconvolve32 – Chapter Chapter 2 2 2 2 -- 1 1 a) The Input/Output Tab Figure 2-1: The Hardware Configuration Dialog Box - Input/Output Tab Indicate the system type in the Data Input field. The options are: • PD200DLS is used when the Precision Detectors PD2000DLS detector is employed. • From File Only, The option From File Only is used for analysis of data from third party correlators. In this mode, functions of PrecisionDeconvolve32 that are related to the collection of data and saving data are disabled. For additional information on what data formats are acceptable, contact Precision Detectors. • Langley-Ford 1096, which should be used when that correlator is used. The Do not save distribution, recompute while loading check box is used to indicate that the raw data is to be saved but the distribution should not be saved. If this box is selected, the program will re-compute the distribution whenever the file is loaded (reloaded). This option is used to save disk space when you store data for archival purposes after you have finished analyzing it. If this option is selected, it may take some time to load stored files on a slow computer. It should be noted that when you save data without distribution, information on what part of distribution was highlighted is lost. 2 2--2 2 P P rr e ec c ii ss ii o on nD De ec co on n vv o o ll vv e e 33 22 –– C Ch ha ap p tt e e rr 2 2 The Do not save intensity check box is used to indicate that the raw data points should not be saved in the data file. The intensity record is useful if you want to see if dust particles or large aggregates were present in the scattering volume, and if they were, whether the intensity fluctuations management was adequate. However, if there are no intensity fluctuations in the data, there is little reason to store intensity record. The average intensity is always stored. The Allow duplicates of the same measurements check box is used to indicate duplicate data files can be loaded. Duplicate files are those that contain the same measurements, but have been saved under different names. If you want to get eliminate duplicate files that are already loaded, use the Remove duplicates command in the Data menu. The Test mode check box indicates if the system should operate in Test Mode, which generates test data without the need for a sample. A series of runs in Test Mode is useful to become familiar with the general operation of the PrecisionDeconvolve32 software and will show you what you can expect in a live measurement situation. If a check mark is present in this field, it will not be possible to collect actual data. b) The Hardware settings tab The Hardware settings tab (Figure 2-2) is used to set a variety of instrument and communication parameters. Figure 2-2: The Hardware Settings Dialog Box - Hardware Settings Tab Set the Port setting to match the communication port to which the correlator board is connected. The Baud rate should be set to 38400; the Wavelength should be set to the laser wavelength and the Angle should be set to 90 and should not be edited. 32 – PrecisionDeconvolve PrecisionDeconvolve32 – Chapter Chapter 2 2 2 2 -- 3 3 2 Note: In order to use a Baud rate other than 38,400, an internal change must be made to the detector. This change requires the assistance of Precision Detectors or an authorized Precision Detectors distributor. The Laser Switch field is used to turn the laser on/off. This switch is provided for used with other Precision Detectors systems (Model 2000/DLS, Model 2010/DLS, Model 2020/DLS, Model 2030/DLS). To avoid receiving the “Laser is OFF” message, this box should not be checked. c) The Laser switch Tab The Laser Switch tab (Figure 6-3) is used to set a variety of laser protection features. Figure 2-3: The Hardware Settings Dialog Box - Laser switch Tab The LASER radio buttons are used to indicate the status of the laser, and should be set to ON The Overload shutoff check box is used to indicate if the laser should automatically be turned off if the detector observes the number of counts entered below. This option is used to protect the detector from being damaged from too much light. The Switch laser OFF on exit check box is used if it is desired that power to the laser is turned off when the application program is terminated. The Switch Laser ON on start field is used to indicate that the laser should be automatically powered up when the unit is powered up. 2 2--4 4 P P rr e ec c ii ss ii o on nD De ec co on n vv o o ll vv e e 33 22 –– C Ch ha ap p tt e e rr 2 2 d) The Calibration Tab The Calibration tab (Figure 2-4) is used to set a number of fundamental instrument parameters. The parameters are set during manufacture and testing and should not be changed by the user. 2 Figure 2-4: The Hardware Settings Dialog Box - Calibration Tab 32 – PrecisionDeconvolve PrecisionDeconvolve32 – Chapter Chapter 2 2 2 2 -- 5 5 e) The Communications diagnostics Tab The Communication diagnostics tab (Figure 2-5) is used to set a number of parameters for communication between the computer and the detector. The parameters are set during manufacture and testing and should not be changed by the user. Figure 2-5: The Hardware Settings Dialog Box - Communication diagnostics Tab 2 2--6 6 P P rr e ec c ii ss ii o on nD De ec co on n vv o o ll vv e e 33 22 –– C Ch ha ap p tt e e rr 2 2 f) The PD Expert Tab The PD Expert tab (Figure 2-6) is used if the PD Expert multi angle detector system is incorporated into the detector. 2 Figure 2-6: The Hardware Settings Dialog Box - PD Expert Tab The Main laser power % field indicates the fraction of the laser power that should be employed. The Set temperature field indicates the present temperature of the sample cell. The Record temperature field is the temperature used in calculations (i.e. the expected temperature). The Sample Temperature field indicates the present temperature of the sample cell. The Laser ON check box is used to indicate that power should be supplied to la ser. The Align laser check box is used to provide power to the alignment laser when the sample platform is being aligned. This procedure is done during manufacturing and is not normally performed by the user. It is recommended that you contact PDI service before you attempt to align (re-align) the system. The Enable T enables temperature control. The Shutter/Gain check boxes are used to indicate which shutters should be opened to collect data. The Get Temp button measures the present temperature and displays it in the Sample temperature field. 32 – PrecisionDeconvolve PrecisionDeconvolve32 – Chapter Chapter 2 2 2 2 -- 7 7 2.3 A TEST RUN While you may begin to collect data at this point, we suggest that you make a few runs in Test Mode to verify that your software is working properly and to familiarize yourself with the various parameters to be set. For this exercise, make certain that the Test Mode check box in the Input/Output tab of the Hardware settings dialog box is checked. After you have run a few test runs to familiarize yourself with the program, we recommend that you make a few test measurements of a well-defined standard. A good sample to use for this purpose is Bovine Serum Albumin [BSA] (e.g. Sigma Chemical Co, St. Louis, MO, part number P-0834). Settings appropriate for this sample are indicated below. Once you have collected some data, we recommend that you refer to Chapter 3 and determine the effect of changing each parameter in a controlled fashion. Note: Let the system warm up for at least 30 minutes before collecting data. To set up the appropriate parameters: a) Start PrecisionDeconvolve32 . b) Select the Setup command on the Measure menu to display the Measurement tab of the Measurement Setup dialog box (Figure 2-7). Figure 2-7: The Measurement Setup Dialog Box 2 2--8 8 P P rr e ec c ii ss ii o on nD De ec co on n vv o o ll vv e e 33 22 –– C Ch ha ap p tt e e rr 2 2 c) Set the following parameters: • Sample Time = 3 • Last = 220 • Run Time = 1 • Accumulate = 50 • Repeat = 1 • Smoothness = 10 2 Verify that the Don’t Save and Keep in Memory boxes are not checked. d) Open the Intensity tab (Figure 2-8) and select the settings as indicated in Figure 2-4 (the value in the absolute Counts/sec is not relevant). Figure 2-8: Intensity Tab e) Open the Sample tab to access the Sample dialog box (Figure 2-9) and enter the Viscosity, Temperature and Refraction (Refractive Index) values indicated in Figure 2-9. If desired, you can enter the information in the left column. 32 – PrecisionDeconvolve PrecisionDeconvolve32 – Chapter Chapter 2 2 2 2 -- 9 9 Figure 2-9: The Sample Data Tab f) Open the Sample record tab (Figure 2-10) and enter the information as described in the figure. The operator and info fields need not be edited. Figure 2-10: The Sample Record Tab 2 2--10 10 P P rr e ec c ii ss ii o on nD De ec co on n vv o o ll vv e e 33 22 –– C Ch ha ap p tt e e rr 2 2 g) Prepare a sample containing 2.00 mg/ml of BSA, centrifuge it for 10 minutes at 5000g to remove any particulate matter, place it in the cuvette and insert the cuvette in the instrument, or inject it into the flow cell. h) Access the Layout command on the Window menu and select Measurement. The window should appear as shown in Figure 2-11. The specific windows that are presented in the main window when the program is opened will depend on the configuration that was present used when the program was previously used. If a different configuration is presented, select the Layout command on the Window menu and choose the Measurement option. 2 Figure 2-11: The Measurement Window i) Press the Go button. After the data acquisition is complete, the display should appear similar to that shown in Figure 2-12. 32 – PrecisionDeconvolve PrecisionDeconvolve32 – Chapter Chapter 2 2 2 2 -- 1 11 1 Figure 2-12: The Measurement Window after Measurement 2 2--12 12 P P rr e ec c ii ss ii o on nD De ec co on n vv o o ll vv e e 33 22 –– C Ch ha ap p tt e e rr 2 2 Chapter 3 Introduction to P r e c i s i o n D e c o n v o l v e 32 3.1 OVERVIEW PrecisionDeconvolve32 is used to collect, process, store and print light scattering data. The program can be opened by clicking on the PrecisionDeconvolve32 icon or by selecting it on the Program list (which is accessed from the Start menu). This manual describes Version 4.4 of PrecisionDeconvolve32 . This chapter discusses: • The format of the Main window of PrecisionDeconvolve32 and the role of the various commands (Section 3.2). • The format of the windows used during data acquisition (Section 3.3). 3.2 THE MAIN WINDOW 3.2.1 Introduction to the Main Window When PrecisionDeconvolve32 is opened, the Main window (Figure 3-1) is presented. The specific windows that are presented in the main window when the program is opened will depend on the configuration that was present when the program was previously used. If a different configuration is presented, the configuration shown in Figure 3-1 can be presented by selecting the Layout command on the Window menu and then choosing the Measurement option. Menu Bar Tool Bar Data Display Status Bar Figure 3-1: The Main Window 32 – PrecisionDeconvolve PrecisionDeconvolve32 – Chapter Chapter 3 3 3 3 -- 1 1 3 There are four regions of the Main window: • The Menu bar (Section 3.2.2) • The Tool bar (Section 3.2.3) • The Data Display region (Section 3.2.4) • The Status bar (Section 3.2.5) 3.2.2 The Menu Bar The Menu bar includes a series of menus that are used to access various functions of the program. 3.2.2.1 File The File menu (Figure 3-2) includes the following commands: Figure 3-2: The File Menu Note: The commands that are active at a given instant depends on the status of the program. As an example, the Save data command will not be active unless a data file is open. Inactive commands are indicated in gray on the menu; for the sake of clarity, all commands on the menus are presented in black in this manual. 3 3--2 2 • Open - Presents a standard Windows Open dialog box, which lists files in the indicated directory. PrecisionDeconvolve32 data files have the pdi suffix (e.g. 123456789.pdi). Two (or more) files can be open at one time. The last file that was opened is determined to be the active file. • Save data - Stores the current data as a binary file that can be opened via the Open command. The data is automatically stored in the file and directory indicated on the Sample record tab of the Measurement Settings dialog box (Section 4.3) unless the Don’t Save check box on that tab is selected or the measurement process was terminated by the Stop command. The Save Data command cannot be executed while the correlator is running. • Save data As - Presents the standard Windows Save Data as dialog box to allow the user to name the data file and store it in the desired folder, or to save a duplicate copy of the data file in another directory. The data will be stored as a pdi file (e.g. 123456789.pdi). The correlation function, the distribution (in the same mode as it is presented in the Distribution window) and the intensity record are saved as columns of ASCII numbers ready to be imported or cut and pasted into an external program (e.g. Microsoft Excel). P P rr e ec c ii ss ii o on nD De ec co on n vv o o ll vv e e 33 22 –– C Ch ha ap p tt e e rr 3 3 • Save - accesses a sub menu which includes the As a text file, Update all files, Selected Data, Update and Intensity options to save the present data. A detailed discussion of these options is presented in Section 7.2. • Print - presents the Printer Output Properties dialog box (Figure 3-3), which is used to select the information to be printed and initiate printing. A detailed discussion of the printing is presented in Section 7.3. 3 Figure 3-3: The Printer Output Properties Dialog Box • Exit - Closes the program 3.2.2.2 Measure The Measure menu (Figure 3-4) includes the following commands: Figure 3-4: The Measure Menu • Setup - accesses the Measurement Setup dialog box (Figure 3-5), which is used to establish data acquisition parameters. A detailed discussion of data acquisition is presented in Chapter 4. 32 – PrecisionDeconvolve PrecisionDeconvolve32 – Chapter Chapter 3 3 3 3 -- 3 3 Figure 3-5: The Measurement Setup Dialog Box 3 3--4 4 • Start - initiates a run using the parameters indicated in the Measurement Setup dialog box. • Stop - halts the present run. The current data is not automatically saved when this command is used. If you want to save the data, it will be necessary to use the Save data command. • Make Active - makes the data that is being collected the active file in the data panel at the end of the data collection process. • Motor - accesses the Positioning dialog box, which is used to select the position of the stirrer in the cuvette. This dialog box is described in Section 4.4. P P rr e ec c ii ss ii o on nD De ec co on n vv o o ll vv e e 33 22 –– C Ch ha ap p tt e e rr 3 3 3.2.2.3 Data The Data menu (Figure 3-6) includes the following: 3 Figure 3-6: Data Menu • Active Data - presents the Properties dialog box for the active file (Figure 3-7) and is used for viewing/processing stored data. This dialog box is described in detail in Section 3.5. Figure 3-7: Properties Dialog Box • Remove Active - erases the present data from the display window, but leaves the data in memory. • Delete Active - erases the present data from the window and from memory. If you only want to remove active data from display, use the Remove Active command. 32 – PrecisionDeconvolve PrecisionDeconvolve32 – Chapter Chapter 3 3 3 3 -- 5 5 • Insert Blank - inserts a blank space after active data in the Panels window. This command is useful for proper alignment of data panes. • Select All - selects all files for the generation of a plot (Section 6.4). • Inverse Selection - reverses selection of the files in a plot (e.g. files which are presently selected for a plot are deselected and vice versa). • Remove Selected - removes the indicated file. • Remove Duplicates - removes duplicate files. This command removes all but one duplicate data files from display and from computer memory, but does not delete them from hard drive. Duplicate files are modified versions of one and the same original data file saved under different names. • Reset - resets selected parameters to that of the active file (see Section 6.4h). • Sort - sorts files based on the selected parameters (see Section 6.4i). • Find - presents the Find Data dialog box (see Section 6.4j). • Smoothness - presents a dialog box to smooth correlation data (see Section 3.6). 3.2.2.4 Setup The Setup menu (Figure 3-8) presents the following commands: Figure 3-8: Setup Menu • 3 3--6 6 Data View - presents the Data Presentation dialog box (Figure 3-9), which is used to indicate the information to be shown on the window. A detailed discussion is presented in Section 6.2. P P rr e ec c ii ss ii o on nD De ec co on n vv o o ll vv e e 33 22 –– C Ch ha ap p tt e e rr 3 3 3 Figure 3-9: Data Presentation Dialog Box • Load Settings - Used to access the Load settings dialog box, which allows you to select the Data Presentation Settings file (configuration) that you want to use. This is a standard Windows Open file dialog box. • Save Settings – Presents the Save settings as dialog box, which is used to save the present settings as a file. This is a standard Windows Save as dialog box. • Parameters List – Presents the Configure parameter list dialog box (Figure 3-10), which is used indicate the parameters and general display. The Configure parameter list dialog box is described in detail in Section 6.3. Figure 3-10: Configure Parameter Lists Dialog Box 32 – PrecisionDeconvolve PrecisionDeconvolve32 – Chapter Chapter 3 3 3 3 -- 7 7 • Hardware - presents the Hardware configuration dialog box (Figure 3-11), which is used to set communication parameters and indicate the nature of the detector. It is normally used only when the instrument and software are installed and is described in Section 2.2. Figure 3-11: Hardware Configuration Dialog Box • Toolbar - used to indicate if the Toolbar (Section 3.3) should be presented on the display. • Status Bar - used to indicate if the status bar (Section 3.4) should be presented on the display. 3.2.2.5 Window The Window menu (Figure 3-12) is used to indicate what data should be displayed on the monitor. PrecisionDeconvolve32 provides exceptional flexibility to allow you to format the display to optimize the viewing of data. The commands that are indicated on the menu depends on the present activity (when a window is open, the command does not appear on the list). If a specific window is not open (e.g. the Intensity window, it will appear on the Window menu. Figure 3-12: Window Menu 3 3--8 8 P P rr e ec c ii ss ii o on nD De ec co on n vv o o ll vv e e 33 22 –– C Ch ha ap p tt e e rr 3 3 • Panels Window - presents a window in which the distribution for a number of files can be shown (Chapter 6). • Plot Window - presents the Plot dialog box, which is used to indicate the format of the Plot (Section 6.4j). • Layouts - accesses a sub-menu which includes: w Measurement - presents the windows normally used during data acquisition (Correlation Function, Distribution and Intensity). w Data Analysis - presents the windows normally used for data processing (Panel, Correlation Function and Distribution). w Restore Custom - presents the Window format that was stored with Store As Custom. w Store as Custom - saves the present Window format. 3 • Cascade - standard Windows function, whereby windows partially overlay others. • Tile - standard windows function where all open windows are positioned so that the contents are visible. 3.2.2.6 Help The Help command (Figure 3-13) presents a drop down menu, which can be used to access the following: Figure 3-13: The Help Menu • Help - presents a drop down menu, which can be used to access information to assist the user. • About PrecisionDeconvolve - presents a dialog box with the version number of the program. Note: Context sensitive help is available for most controls within each dialog box. To access help files, follow standard Windows procedure (i.e. right click the item for which help is desired and then click the “What’s This” button, or move the cursor to the item and press F1).the In addition, a complete help file can be accessed by clicking Content on the Help menu. 3.2.3 The Tool Bar The Tool Bar (Figure 3-14) includes the following: Figure 3-14: Tool Bar 32 – PrecisionDeconvolve PrecisionDeconvolve32 – Chapter Chapter 3 3 3 3 -- 9 9 Open - equivalent to Open on the File menu. Save - equivalent to Update all files (Save command on the File dialog box). Print - print the data using the settings indicated in the Print dialog box (File menu). Measurement Settings - presents the Measurement tab of the Settings dialog box to allow for settings for the correlator board and the sample. Start Measurements - initiates the collection of data using the settings in the Measurement tab of the Settings dialog box. Shows the Accumulating Data - makes the data that is being collected the active data (to show the data which is currently being measured). This command is enabled only during measurements. Stop - equivalent to Stop on the Measure menu (active when a run has started). Show Parameters - presents parameters of the active data, equivalent to Active Data on the Data menu. Remove Active Data file from Display - equivalent to Remove Active command on the Data menu. Configure Appearance of the Data - equivalent to the Data Presentation command on the Setup menu. Hardware Setup - equivalent to the Hardware command on the Setup menu. Default Measurement Layout - presents the windows normally used during data acquisition (Correlation Function, Distribution and Intensity). Default Layout for Data Screening and Analysis - presents the windows normally used for data processing (Panel, Correlation Function and Distribution). Custom - saves the present window format. 3 3--10 10 P P rr e ec c ii ss ii o on nD De ec co on n vv o o ll vv e e 33 22 –– C Ch ha ap p tt e e rr 3 3 3.2.4 The Data Display Window The format of the data display window is dependent on the selections made on the Windows menu. The default display when data is being acquired is presented in Figure 3-15 and is discussed in Chapter 5. The default display for post run data processing is presented in Figure 3-16, and is discussed in Chapter 6. 3 Figure 3-15: Display - Data Collection 32 – PrecisionDeconvolve PrecisionDeconvolve32 – Chapter Chapter 3 3 3 3 -- 1 11 1 Figure 3-16: Display - Multichannel Data Processing 3.2.5 The Status Bar The Status bar contains information about the operation of the system. If you select a command on a menu or move the pointer to a button on the toolbar, the status line will present a short discussion of the role of that tool. 3 3--12 12 P P rr e ec c ii ss ii o on nD De ec co on n vv o o ll vv e e 33 22 –– C Ch ha ap p tt e e rr 3 3 3.3 THE DATA ACQUISITION WINDOWS 3.3.1 Overview When data acquisition is initiated, the display presents the correlation function window, distribution window and the intensity window (unless you have customized the display as described in Section 2.2.4). 3.3.2 The Intensity Window The Intensity window (Figure 3-17) serves two roles: • To show the intensity of individual data. • To support intensity fluctuations management during measurements. 3 Figure 3-17: The Intensity Window Three types of information are presented in three different colors • Black: photo-count rate in counts per second averaged over each individual run. The black horizontal line is provided as a reference guide. If the Intensity window is the active window, pressing the space bar will shift the whole intensity curve so that the next point will be on this line. Closing and reopening the Intensity window removes previous intensity data. If intensity data becomes too long to fit into the Intensity window, a horizontal scroll bar will automatically appear. When the window is when the length of the history record requires scrolling, points for the current run appear next to the right edge of the window, and the whole graph is scrolled to the left. • Red: cutoff level. If the run has the intensity above the cutoff level, it is discarded. The cutoff level is reported (in counts per second) in the left top corner of the window in red. • Green: intensity exponentially averaged over a number runs specified in the Intensity Management dialog box. The photon count rate of the last run is reported (in counts per second) in the right top corner of the window. 32 – PrecisionDeconvolve PrecisionDeconvolve32 – Chapter Chapter 3 3 3 3 -- 1 13 3 Each point in the intensity history plot represents one run. The duration of the run is determined by Parameter Run time in the Measurement setup dialog box and may vary from one measurement to another. In addition, it should be noted that intervals between measurements are not shown, so that the intensity history plot may not be a proper representation of the intensity time dependence and you cannot print the intensity history. If you want to preserve and plot the intensity as a function of time during your measurements, use the Intensity command on the Save sub-menu of the File menu. The vertical scale in the intensity window can be changed using up and down arrow keys; an expanded display is shown in Figure 3-18. Figure 3-18: Expanded Vertical Scale The black horizontal line is provided as a reference guide. If the Intensity window is the active window, pressing the space bar will shift the whole intensity curve so that the next point will be on this line. Closing and reopening the Intensity window removes previous intensity data. If intensity data becomes too long to fit into the Intensity window, a horizontal scroll bar will automatically appear. When the intensity window is active: • Clicking the right button the mouse sets the cutoff level to the Y coordinate of the point where the mouse was clicked. • Pressing the space bar moves the whole graph up or down so that the current average intensity (green line) is on the black horizontal eye-guide line. • The left and right arrow keys scroll the display if scrolling is necessary. 3.3.3 The Correlation Window The Correlation window shows the correlation function and is updated after each run. A typical correlation window is presented in Figure 3-19. Figure 3-19: The Correlation Window 3 3--14 14 P P rr e ec c ii ss ii o on nD De ec co on n vv o o ll vv e e 33 22 –– C Ch ha ap p tt e e rr 3 3 The correlation curve presents the following information: • Black trace - The correlation function of the active data. • Red trace - The fit of the correlation function, re-computed from the distribution shown in the Distribution window (shown if Show fit box is checked on the Correlation tab of Data Presentation dialog box (Section 6.2.3)). • Green trace - The deviation (difference) between the correlation function and the fit, magnified by Scale factor (shown if Show deviation check box is checked on the Correlation tab of Data Presentation dialog box (Section 6.2.3)). • Grey trace - The correlation functions of all selected data (shown if Overlay selected data check box is checked on the Correlation tab of Data Presentation dialog box (Section 6.2.3)). When new data is being collected, this correlation function window updates after every run. Duration of a run is determined by the Run time parameter in the Measurement dialog box. Note: You can change the scale of delay time axis via the left/right arrows. 3.4 THE DISTRIBUTION WINDOW The Distribution window (Figure 3-20) shows the distribution of scattering particles computed from the correlation function of the active data. The histogram represents the intensity of scattering from particles of a certain diffusion coefficient, Hydrodynamic radius, diameter, or molecular weight, depending on which option is chosen in the Distribution over list in the Distribution dialog box (Section 6.2.2). A discussion on how the distribution is calculated is presented in Appendix A. As an alternative, you can view the relaxation time distribution. Figure 3-20: Typical Distribution Window Contribution of intensity fluctuations that are so slow that their correlation function does not decay notably at the delay times measured is not included into distribution. Instead, it is reported as fluctuations parameter in the Fit dialog box. Adjacent columns of the distribution differ in relaxation times by a factor of 1.2. 32 – PrecisionDeconvolve PrecisionDeconvolve32 – Chapter Chapter 3 3 3 3 -- 1 15 5 3 Part of the distribution can be selected by dragging mouse cursor across the distribution window while holding the left mouse button down. Selected part of the distribution is shown as dark columns. To see what fraction of the distribution is highlighted and the average abscissa (radius, diameter, diffusion coefficient, or molecular weight) of the highlighted part of the distribution, check Show average box in Distribution dialog box. The total area of the distribution is normalized to 1 unless Mass normalization is in effect (Section 6.2.2). When mass normalization is in effect, the distribution represents the weight fraction of the particles of a particular size. To compute the weight fraction from scattering intensity, it is assumed that the scattering intensity by a particle is proportional to its mass squared. The relationship between the molecular mass and the hydrodynamic radius defined in the Distribution dialog box or the Normalization dialog box is used. Only contributions from particles above certain size are shown and used for normalization. This domain is marked by red segment of the abscissa and can be changed by right click of the mouse. The contributions outside marked domain are indicated by small black triangles. Selection of the part of the distribution is effective only within marked domain. It is updated when a new data file is selected as the active file or if the distribution of the current active file is recalculated (e.g. when the Smoothness parameter is changed, either in the Fit dialog box or as a result of executing the Smoothness command in the Data menu. In addition, new data is in a constant re-calculation loop as it accumulates. If new data is active data, every time the calcula tion of its distribution is completed the distribution window is updated. During measurements, the distribution function is recalculated after every update of the correlation function. To highlight a part of the distribution, Hold left button and drag to highlight part of the distribution. Double left click to remove all highlighting; Right click to set the lower size cutoff of the mass normalization domain. To change the scale of the distribution, use the up/down arrows to change the scale of the distribution. 3.5 ACTIVE DATA DIALOG BOX The Active Data dialog box (Figure 3-21) presents a complete description of the active file. The Sample tab describes the file name, data collected and path. If desired, the Operator name and Comments can be added. 3 3--16 16 P P rr e ec c ii ss ii o on nD De ec co on n vv o o ll vv e e 33 22 –– C Ch ha ap p tt e e rr 3 3 3 Figure 3-21: Active Data Dialog Box - Sample Tab The Fit tab (Figure 3-22) presents general information about the fit. The smoothness parameter can be edited (Section 3.6). Figure 3-22: Active Data Dialog Box - Fit Tab 32 – PrecisionDeconvolve PrecisionDeconvolve32 – Chapter Chapter 3 3 3 3 -- 1 17 7 • Smoothness - the smoothness parameter with which the distribution of active data was computed. It is the only parameter in this dialog that can be changed. If it is changed, the distribution will be re-computed. The smoothness parameter is described in Section 4.2.1.6. • Background - the ratio of the square of the average count rate to the correlation function at zero time, in percent. Ideally, if light is collected from less then one coherence area, background is 50%. If this parameter exceeds 50% by a significant amount, it may be an indication of misalignment. • Intensity - shows average count rate during accepted runs, in counts/second. • Fluctuations - the difference between the value of the normalized correlation function at infinite delay time and Background. If this parameter exceeds few percent, the shape of reconstructed distribution is not reliable. This parameter is indicative of intensity fluctuations due to dust particles and/or use of too small a sample time. • 1st cumulant - average relaxation time. • 2nd cumulant - square of dispersion of relaxation times. • Average error -Average deviation between measured correlation function and the best fit calculated from distribution computed with zero smoothness parameter. The Results tab (Figure 3-23) presents the analytical results and cannot be edited. Figure 3-23: Active Data Dialog Box - Results Tab 3 3--18 18 P P rr e ec c ii ss ii o on nD De ec co on n vv o o ll vv e e 33 22 –– C Ch ha ap p tt e e rr 3 3 • % selected - fraction of distribution that is selected. • Radius - average hydrodynamic radius of the selected part of the distribution, in nanometers • Diffusion - average diffusion coefficient of the selected part of the distribution, in cm2/sec. • Mol weight - average molecular weight of the selected part of the distribution, in KiloDaltons. Molecular weight is computed using a relationship between particle size and its molecular weight supplied by user in Normalization dialog. • Relaxation Time - average relaxation time of the contribution of the selected part of the distribution into the correlation function. • Polydispersity (R) - relative dispersion (the ratio of the mean square width to the average value) of the selected part of the distribution over radius or diameter. • Polydispersity (D) - relative dispersion of the selected part of the distribution over diffusion coefficient. If all distribution is selected and smoothness parameter is close to zero, this parameter is close to the ratio of square root of the 2nd cumulant to the 1st cumulant. • Mw/Mz - ratio of weight concentration averaged molecular mass to molar concentration averaged molecular mass. This is one of the standard indicators of polydispersity in polymer science. This value is computed using a relationship between particle size and its molecular weight supplied in the Normalization tab. 3 The Conditions tab (Figure 3-24) presents analytical conditions. These values can be changed by the user as appropriate. Figure 3-24: Active Data Dialog Box - Conditions Tab 32 – PrecisionDeconvolve PrecisionDeconvolve32 – Chapter Chapter 3 3 3 3 -- 1 19 9 The Measurement tab (Figure 3-25) presents information about the parameters used to obtain the data. This tab cannot be edited by the operator. Figure 3-25: Active Data Dialog Box - Measurements Tab The Normalization tab (Figure 3-26) presents information about the scaling of the data. A detailed discussion about scaling is presented in Section 4.4.4. Figure 3-26: Active Data Dialog Box - Normalization Tab 3 3--20 20 P P rr e ec c ii ss ii o on nD De ec co on n vv o o ll vv e e 33 22 –– C Ch ha ap p tt e e rr 3 3 3.6 THE SMOOTHNESS DIALOG BOX The Reset Smoothness dialog box (Figure 3-27), which is accessed by selecting the distribution function window and selecting Smoothness from the Data menu, is used to change the smoothness of the correlation. The Smoothness parameter is used to eliminate false spikes or transients in the distribution. 3 Figure 3-27: Reset Smoothness Dialog Box We recommend that a small value (e.g. 10) should be used at first. If you see bimodality, spikes or transients, raise the value until the bimodality disappears and then back off slightly. If the smoothness factor is too large, the resulting distribution will be broad and stable (reproducible); but will lack detail, which may contain important information. On the other hand, if the smoothness factor is too small, the deconvolution procedure will be less stable and in polydisperse system may produce set of narrow spikes instead of one wide distribution (the value should normally be kept below 20, Table 4-2 presents suggested starting smoothness values for different situations). The Smoothness parameter can range from 1 to 40, and the Relative increase in mean square difference between the data and the fit due to the smoothing requirement can range from 1-3. A detailed discussion of this parameter is presented in Section 4.2.1.7. 32 – PrecisionDeconvolve PrecisionDeconvolve32 – Chapter Chapter 3 3 3 3 -- 2 21 1 Chapter 4 Selecting Operating Parameters 4.1 OVERVIEW This chapter describes how to: • choose appropriate values for data collection parameters (Section 4.2) • enter sample parameters (Section 4.3) • determine the appropriate sample concentration (Section 4.4) 4 Parameters that are essential for the measurement process are found in the Measurement Settings dialog box (Section 4.2), which is accessed by selecting Setup on the Measure menu. The user is strongly encouraged to determine the effect of making small changes in the various parameters to see the effect of each parameter. The guidelines described below will generally provide good results, but it should be recognized that no one set of parameters will be appropriate for all samples and experimentation is required. Changing each parameter on a controlled basis may improve the overall quality of the data. An additional advantage of “tweaking” is that the analyst will get a better understanding of data acquisition and data processing. In addition, a “Test Mode” is provided (via the Input/Output tab of the Hardware Settings dialog box) to allow the user to determine the effect of each parameter on the collection/processing of data). Note: This chapter describes the role of each parameter from an experimental perspective. A discussion of the fundamental concepts of dynamic light scattering and the analysis of the correlation function is presented in Appendix A. Note: Most of the parameters described in this chapter are saved in the Config file upon normal exit from the program. The Config file is located in the same directory as the operating file (Decon.exe). When the program is started, the values for these parameters are restored. If the Config file is absent, all parameters are set to the default values. 32 – PrecisionDeconvolve PrecisionDeconvolve32 – Chapter Chapter 4 4 4 4 -- 1 1 4.2 THE MEASUREMENT SETTING DIALOG BOX The Measurement Setup dialog box (Figure 4-1) is used to select data collection parameters as well as the name and location of the data file to be stored. Figure 4-1: The Measurement Setting Dia log Box Note: Correlator parameters, Run Time parameters and the Path cannot be changed while the correlator is running. All other parameters can be changed at any time. The Apply button is used to accept a change in the Smoothness parameter for data from a completed run. 4.2.1 The Measurement Tab 4.2.1.1 The Sample Time The instantaneous intensity of the scattered light is represented by the number of photons detected by the photodetector during one Sample Time interval. The sample time interval is the delay time for the first channel of the correlation function, in microseconds. All other channels are delayed by integral numbers of sample times, as described in the Allocation of channels topic. The minimum sample time is 1 µsec. The set of intensities over the Sample Time interval is the time dependent intensity of the scattered light that is used to calculate the correlation function. The range for the sample time is from 1 µsec to 30 msec; and the sample time should be short compared to the correlation time of the intensity fluctuations. Short sample times are used for very small particles or molecules that move rapidly and therefore have a small correlation time. On the other hand, the maximum delay time in the correlation function corresponds to 1024 sample times. When very large macromolecules (which move slowly) are studied, long sample times must be used. We suggest that you start with a relatively large value for the sample time so that you can get an overview of the data. As a rough rule of thumb, the numerical value of the expected Rh (in nanometers) can be used (if Rh is unknown, 3-5 µsec is a good starting point). 4 4--2 2 P P rr e ec c ii ss ii o on nD De ec co on n vv o o ll vv e e 33 22 –– C Ch ha ap p tt e e rr 4 4 To change the sample time, use the up/down arrows adjacent to the field or highlight the field and enter the desired value. After you have run a short preliminary measurement of your sample, note the period of time required for the correlation function to decrease to about 0.4 (e times). Ideally, this time should be approximately between 25-35 % of the time scale (e.g. see Figure 4-2), as this is the optimum for the accurate reconstruction of the distribution of the scattering particles. If the curve falls too rapidly, reduce the sample time and repeat the process until an acceptable time scale for the correlation function is obtained. Note: In the case of small particles (Rh < 10 nm), do not reduce the sample time (in µsec) to less than the expected value of Rh (in nm). As an example, if the expected Rh is 5 nm, the sample time should not be less than 5 µsec). 4 Figure 4-2: Correlation Curve 4.2.1.2 Channels The Channels field is the number of channels in which the correlation function is calculated during measurements. All channels are updated every sample time. The number of channels that can be processed depends on the sample time as shown in Table 4-1; the operator cannot set this number directly. The maximum number of channels is 256; this number is available when the sample time greater than 14 µsec. If you increase the Sample Time above 14 µsec, the number of channels will remain constant at 256, which is the maximum number of physical channels provided by the correlator in the system. Note: Although the chip used to collect data has 1024 memory spaces, a maximum of 256 channels are used by the correlator to process data to optimize the data processing. 32 – PrecisionDeconvolve PrecisionDeconvolve32 – Chapter Chapter 4 4 4 4 -- 3 3 Table 4-1: Available Channels SAMPLE TIME 14 + 13 12 11 10 9 8 7 6 5 4 3 2 1 Number of Channels Used 256 249 229 210 190 171 151 132 121 93 73 54 34 15 4.2.1.3 Last Time delays in correlator channels can be set between 1 and 1024 sample times. The Last field is used to set the last channel of the correlation curve. All other channels are then allocated automatically to maximize the resolution of the subsequent deconvolution procedure. In most cases, set Last to 4-6 times the total number of channels. The Last value cannot be less than number of channels or more than 1024. Note: If the correlation function looks too broad, the sample time should be increased, rather than the Last parameter. A reduction in the Last channel number should be made if there are significant long term fluctuations in the intensity, which may be due to: • thermal gradients • large particles in the sample are slowly drifting through the light scattering volume (the coherence area) • a dirty cuvette Whenever possible, we suggest that these effects be remedied so that a large Last channel number can be used. 4 4--4 4 P P rr e ec c ii ss ii o on nD De ec co on n vv o o ll vv e e 33 22 –– C Ch ha ap p tt e e rr 4 4 4.2.1.4 The Run Time The Run time is the frequency at which the operator is updated on the current analysis (i.e. the duration of an individual correlator run). If, for example, the Sample Time is 10 µsec and the Run Time is 1 sec, one measurement will take the Sample time multiplied by the number of channels (1024), or 10.24 ms. Since the run time is 1 sec, the instrument will perform 97 measurements to generate the results. At the end of each run, the data is transferred from the correlator board to the personal computer for further analysis and display. If the sample is clean (i.e. no particulate matter), a longer run time could be used because it will provide a better signal to noise ratio. When a long run time is selected, the effect of particulate matter (e.g. a dust filter) is minimized. Longer Run times minimize overhead on communications between the correlator board and the computer. However, if the sample contains particulate matter, a short run time is important so that the intensity can be observed more often (the intensity is averaged over each run time). This will allow the operator to then set the threshold and reject runs when a large particle was in the scattering volume. A short Run time is also convenient for preliminary assessment of the quality of measurements and for the validation of the settings used. 4.2.1.5 Accumulate The Accumulate parameter is the number of runs the system will accumulate to obtain a single measurement, and the total time of a single measurement is the product of the Accumulate and Run time parameters. After the completion of data acquisition, the results will be saved using the indicated file name and extension (e.g. Jul20.001). You can change this parameter during measurements. If it is set to the value less then the current accumulation, current measurement will end and next measurement will be started. 4.2.1.6 Repeat The Repeat parameter is the number of accumulation processes that should be performed before the system stops. If one measurement is desired, set the repeat value to 1. At the conclusion of the accumulation process, the data will be stored (e.g. Jul20.001) using the name and sequence number per the Sample Record tab (Section 4.2.4) and the system will wait for another Start command. If the value is greater than 1, the data will be stored, the file name extension will be incremented, (e.g. Jul20.001, Jul20.002, etc.), the Repeat parameter will be reduced by one and another measurement will be initiated. This process will be repeated for the indicated number of data accumulation processes. Note: If Repeat is set to zero, the measurement will be performed, but the results will not be saved. If the user decides to save the results, that can be done via the Save command on the File menu. Note: When the program is opened, the Run time, Accumulate, and Repeat parameters are set to their default values (shown in Figure 4-1). 32 – PrecisionDeconvolve PrecisionDeconvolve32 – Chapter Chapter 4 4 4 4 -- 5 5 4 4.2.1.7 Smoothness Parameter The Smoothness parameter is used to eliminate false spikes or transients in the distribution. We recommend that a small value (e.g. 10) should be used at first. If you see bimodality, spikes or transients, raise the value until the bimodality disappears and then back off slightly. If the smoothness factor is too large, the resulting distribution will be broad and stable (reproducible); but will lack detail, which may contain important information. On the other hand, if the smoothness factor is too small, the deconvolution procedure will be less stable and in polydisperse system may produce set of narrow spikes instead of one wide distribution. We recommend that the value be kept below 20. Table 4-2 presents suggested starting smoothness values for different situations. Table 4-2: Suggested Starting Points for Smoothness Values Sample Type Proteins MW < 20 kD Proteins MW > 20 kD Polymers Samples with particulate matter Smoothness Value 8 10 20 20 The optimal choice of smoothness parameter is to a great degree a matter of experience. The following recommendations may be useful: • If repetitive measurements on the same sample are not very reproducible (even though the correlation function looks identical and the deviations between the experimental data and the fit do not have systematic errors), the smoothing parameter is probably too small. For this reason, we recommended that the user make several measurement of every sample, when possible. • Narrow distributions generally require less smoothing than wide distributions. If the correlation function is measured with about 1% accuracy, the appropriate smoothness parameter for a narrow distribution (e. g. well-purified protein solution) could be as small as 6-8. At the same accuracy with a wide distribution, a smoothness parameter of about 15-20 might be needed. • More accurate data allows better resolution and allows the use of a smaller smoothness parameter, but the effect is small. The accuracy needs to be approximately doubled (time of measurements quadrupled) to allow reduction of the smoothness parameter by 1. • The test mode provides a simulated bimodal distribution with two peaks of the same scattering intensity, but with a three-fold difference in correlation times. It is worthwhile to see how the smoothness parameter affects reconstruction of such distribution. • If the intensity window shows little noise, a smaller smoothing parameter can be used without loss of stability; this will provide a distribution with finer detail. • Narrow distributions generally require less smoothing than wider distributions. Note: The Smoothness parameter is applied to data as it is being collected. It can be changed for completed runs and on data that has been stored to recalculate the distribution. To change the smoothness value on stored data, change the value and press the Apply button. 4 4--6 6 P P rr e ec c ii ss ii o on nD De ec co on n vv o o ll vv e e 33 22 –– C Ch ha ap p tt e e rr 4 4 4.2.2 The Intensity Tab The Intensity tab (Figure 4-3) is used to set a number of parameters on the Intensity plot (Figure 4-4). 4 Figure 4-3: The Intensity Tab The Cutoff intensity level fields are used to select the maximum level of the data that will be presented in the Intensity dialog box. The level can be set at some absolute value by selecting the absolute button and entering the appropriate value or by indicating that the present intensity is some percentage of full scale (i.e. the present signal is 34.56 % of full scale). • Absolute - runs with intensity above specified cutoff intensity level are dropped. The Cutoff level can also be set by right button of the mouse if you click in the Intensity window. • Off - no intensity management is performed. • Relative - runs with intensity that is a specified percentage above the averaged intensity are dropped. In this mode, a right button mouse click in the Intensity window sets the cutoff level relative to the current averaged intensity. Average xxxx points - specifies the number of runs over which an exponential averaging of intensity is performed. Dropped runs (with intensity above the cutoff level) are also included into averaging process, but with 10 times reduced weight. Trace average is selected if the analyst wants to use to display the average over the number of points indicated in the field. The tracing will be presented as a green line on the plot. Tracking the average - the intensity curves in Intensity window are periodically offset so as the current averaged intensity would be at ¼ of window height (level shown by the black horizontal line.) 32 – PrecisionDeconvolve PrecisionDeconvolve32 – Chapter Chapter 4 4 4 4 -- 7 7 Reset on start - used if a fresh intensity plot should be presented when a run is started (previous data is erased) you want to get an intensity at the start. Auto scale - when this box is checked, the intensity curves in the Intensity window are periodically automatically re-scaled to fit the window. 4.2.3 The Sample Data Tab The Sample Data tab (Figure 4-4) is used to enter information about the sample, which is stored with data file. The three parameters presented on the right side of the dialog box must be included. Information about these parameters is presented in Section 4.3. Figure 4-4: The Sample Data Tab 4.2.4 The Sample Record Tab The sample record tab is used to indicate the name of the file, etc. The default name will be today’s date and the number will increment from one for each run. These can be readily changed as desired. 4 4--8 8 P P rr e ec c ii ss ii o on nD De ec co on n vv o o ll vv e e 33 22 –– C Ch ha ap p tt e e rr 4 4 4 Figure 4-5: The Sample Record Tab 4.2.4.1 Path The Path field is used to indicate the directory into which the data should be stored. The absolute path, which starts with the drive letter (e. g. C:\data\sample1) should be provided. If the path does not exist, the error message “Provide absolute path” will appear. If only the last directory in the path does not exist, this directory is automatically created. 4.2.4.2 Next File The Next File field shows the file name that will be used to save the results of the next measurement. The extension, which must include three digits (.001) is used to consecutively label files with a common file name. The date (e.g. Jul20) is the default file name and can be changed as desired. 4.3 THE SAMPLE PARAMETERS 4.3.1 Viscosity The viscosity of the sample should be obtained from the literature or measured in your laboratory. The units for viscosity should be entered in Poise (P). For aqueous solutions, the value is 0.0089 cP at 25o C. A table presenting the viscosity of water as a function of temperature is presented in Appendix 4 and in the on-line help file. A table of viscosity as a function of temperature can also be obtained by pointing the cursor to the field and pressing F1. 4.3.2 Temperature Temperature should be set to the ambient temperature in degrees Celsius (o C). If the CoolBatch system is used, set the temperature to the sample temperature. If the Expert system is used, see Section 2.2. 32 – PrecisionDeconvolve PrecisionDeconvolve32 – Chapter Chapter 4 4 4 4 -- 9 9 4.3.3 Refraction The refractive index of the sample should be obtained from the literature or measured in your laboratory. For aqueous solutions, the value 1.332 should be used at 25 o C. A table presenting the refractive index of water as a function of temperature is presented in Appendix 2. This table can also be obtained by pointing the cursor to the field and pressing F1. 4.3.4 Annotative Information The Concentration, pH, Molarity, Other, operator and info fields should be completed if these parameters should be stored with the data. While they are not relevant for the collection of data, they are used for various calculations and data presentation (see Chapter 6). These parameters can be entered before the data is collected or after the data is collected. 4.4 POSITIONING THE STIRRER The position of the stirrer in the cuvette can be selected via the Positioning dialog box (Figure 4-6). Figure 4-6: The Positioning Dialog Box The present position of the stirrer is indicated in the Current field and by the red indicator in the vertical bar on the right side of the dialog box (e.g. 0.694). The position value that is indicated is related to the full scale movement of the stirrer table. To define a position for the stirrer, enter the desired value (e.g. 0.222) and press the Set button. When the value is accepted, the value will be listed in the Positions field and a horizontal bar will be placed in the vertical bar on the right side of the dialog box. The Spread button is used to re-set the positions so that there is an equal distance between each intermediate position that is checked, using the highest checked position and the lowest checked position as reference points. As an example, if there are three positions with check marks (0.1, 0.5, and 0.7) and the Spread button is pressed, the middle position will be set to 0.4. Positions that are not checked have a white bar inside the vertical bar (e.g. 0.100). 4 4--10 10 P P rr e ec c ii ss ii o on nD De ec co on n vv o o ll vv e e 33 22 –– C Ch ha ap p tt e e rr 4 4 To manually move the stirrer to a given position; highlight that position by clicking on it, then press the Move to button (when you highlight a position, the horizontal bar is colored green [e.g. 0.994]). The Stop button will halt the movement of the stirrer at the present position and the Home button is used to move the stirrer to the bottom-most position. If desired, you can cycle the position of the stirrer. The stirrer will move from one position to the next at the end of the measurement. 4 .5 SELECTING THE APPROPRIATE CONCENTRATION The concentration of the sample required for successful measurement is dependent on the size of the scattering particles. Since a large partic le will scatter more light than a smaller particle, a lower concentration will be required. If the concentration is too high, multiple scattering can be a problem. In addition, inter-particle interactions makes analysis of the results obtained at high concentration difficult. A few important guidelines to determine an acceptable concentration are: • Compare the count rate (reported in top right corner of the Intensity window) for your sample and for the cuvette filled with pure buffer. Scattering from your sample should be at least 50% more than from the blank. • Use the count rate reported in top right corner of Intensity window to determine how many photon counts you get from your sample during the correlation time. The correlation time is the time at which the correlation function (minus baseline) decreases by a factor of approximately 3 times. If there are more then 2 counts per sample time, the scattering intensity will be sufficient; any further increase in concentration will not improve the accuracy. If there are less then 0.2 counts per correlation time, the scattering intensity will be too low, the correlation function will be very noisy and it will be very difficult to obtain good result. In this case increase the concentration. • If the count rate exceeds 1,000,000, it is possible that there will be a significant contribution from multiple scattering. Furthermore, above this count rate photons often strike the photo detector in a too quick a sequence to be detected as separate events, which can lead to undesirable distortions. 32 – PrecisionDeconvolve PrecisionDeconvolve32 – Chapter Chapter 4 4 4 4 -- 1 11 1 4 Chapter 5 Collecting Data 5.1 OVERVIEW This chapter describes the collection of data using PrecisionDeconvolve32 ; it is assumed that the user has selected appropriate parameters (see Chapter 4 for details) and the sample has been placed in the cuvette that has been inserted into the system or the flow has been initiated. 5.2 STARTING THE MEASUREMENT 5 A measurement is started by clicking the Start command on the Measure menu of PrecisionDeconvolve32 . Each measurement consists of several short runs, and the number of runs is specified by the Accumulate parameter and the duration of each run is specified by the Run Time parameter. When the data collection is initiated run is completed, the correlation function will be displayed in the Correlation Function window, the distribution of the scattering particles will be displayed in the Distribution window and the average intensity will be shown in the Intensity window (Figure 5-1). When the measurement is initiated, the Start command on the menu bar will be changed to Stop. Figure 5-1: The Main Screen 32 – PrecisionDeconvolve PrecisionDeconvolve32 – Chapter Chapter 5 5 5 5 -- 1 1 The sample name (which is based on the file name and extension on the Measurement Settings dialog box) will be assigned when the run is initiated and indicated on the title bar of the Distribution window. The data in the Correlation Function window is updated after every run (Section 4.2.2.1). The correlation function is constantly re-analyzed by the deconvolution procedure and the distribution is updated as soon as the computations are completed. At first, the correlation function will be quite noisy and the distribution will change fairly dramatically between each update; after a while, the results will be more stable. The Intensity window displays the average intensity of the scattered light for the previous runs (each point represents one run, up to 2000 points can be displayed) and the average intensity of the last run is indicated in the right top corner of the window. If desired, you can change the vertical scale in the intensity window using up and down arrow keys and re-center the line by pressing the space bar. A typical Intensity window is shown in Figure 5-2 (a detailed discussion of this window is presented in Section 3.3.2). Figure 5-2: Intensity Window The cutoff level (red line) indicates the maximum intensity that is permitted for a run. It is selected by pointing the mouse to the desired level and clicking. If the intensity during a run exceeds this value (e.g. due to a dust particle entering the scattering volume), the run is ignored. The black line is a reference line, pressing the space bar shifts the intensity curve so that the next run intensity will be on a reference line. During a measurement, you can change all parameters described in the previous chapter, except the Sample Time, Last, Run Time and Path parameters in Measurement Settings dialog box. These parameters can be changed only when the correlator is stopped. If the Repeat field on the Measurements setting dialog box is non-zero at the end of the measurement, the data will be saved using the file name indicated in the Measurements setting dialog box. After saving the data, the data file name extension will be incremented by one, the Repeat value will be reduced by one and data collection will resume. When the Repeat parameter becomes zero, the correlator stops and the Stop entry on the menu bar will revert to Start. The last (unsaved) measurement will remain on display. It can be saved manually via Save on the File menu. 5 5--2 2 P P rr e ec c ii ss ii o on nD De ec co on n vv o o ll vv e e 33 22 –– C Ch ha ap p tt e e rr 5 5 5.3 MONITORING DATA COLLECTION Note: To monitor the accumulation process (i.e. to determine the appropriate value for the various parameters, set Run Time to 1 second (minimum) and set the Repeat parameter to 0 to avoid collecting/saving preliminary data. a) This section describes a number of items that the operator should visually monitor during the collection of data to ensure that useful data is being collected. A detailed troubleshooting discussion is presented in Section 8.3. The Correlation Function with subtracted baseline should fall to 1/3 of its initial value at approximately 1/5-1/10 of the delay time indicated on the plot (an acceptable plot is shown in Figure 5-3a, while an unacceptable plot is shown in Figure 5-3b). 5 (a) (b) Figure 5-3: Correlation Function (a) Acceptable (b) Unacceptable b) Consecutive measurements on a sample should be reproducible. c) The Correlation Function should not fall below the X-axis. In addition, the baseline should not have any drift, periodicity or extraneous spikes. The Accumulate parameter should be large to provide sufficiently accurate correlation function and stable reconstruction of distribution. d) The intensity should not exceed 1,000,000 counts. e) The intensity on the Intensity window should not contain numerous spikes and it should not drift. If a few spikes in intensity are present, set the cutoff level below these spikes so as to exclude such runs from the measurement. f) Set the Deviation to be displayed (Section 4.4.2) and make sure that it does not contain systematic features. The deviation should decreases as the accumulation proceeds. 32 – PrecisionDeconvolve PrecisionDeconvolve32 – Chapter Chapter 5 5 5 5 -- 3 3 [This page intentionally left blank] 5 5--4 4 P P rr e ec c ii ss ii o on nD De ec co on n vv o o ll vv e e 33 22 –– C Ch ha ap p tt e e rr 5 5 Chapter 6 Viewing and Processing Stored Data 6.1 OVERVIEW PrecisionDeconvolve32 allows the analyst to view and process stored data files. A typical multi-file display is presented in Figure 6-1. The format of the main window can be selected via the standard Windows tools (e.g. dragging the boundary of the windows) or via the Data Presentation dialog box as described in Section 6.2. In addition, the commands on the Windows menu can be used to select the windows that are presented. Note: If the display is in the Measurement format and more than one file is selected, only the last file will be presented (although all files will be opened). To view all files, select Panels window on the Window menu. Figure 6-1: A Multifile Display Window 32 -- Chapter PrecisionDeconvolve PrecisionDeconvolve32 Chapter 6 6 6 6 -- 1 1 6 The upper left portion of the display window presents a series of panels that show the distribution for each file that has been opened. The panels are shown in the order in which they were loaded and can be rearranged as described in Section 6.4. In addition, the general format of the window can be altered by standard Windows techniques and the Data Presentation dialog box (Section 6.2). One of the panels is outlined in red and is the active file. The Correlation Function window (upper right corner) and the Distribution window (lower right corner) refer to the active file. To select a file as the active file, point the mouse to it and click. If you want to remove a file from the window, point the mouse to it and press the Delete key. As an alternative, select the file as the active file and select the Delete Active command on the Data menu (this action will not remove the file from the disk). A file can be added to the display by selecting Open on the File menu and selecting it from the Open dialog box. To select more than one file in a contiguous set, depress the Shift key and click the first and last file to be selected. To select more than one file in a non-contiguous order, depress the Ctrl key and click on the files of interest. Panels can be moved by creating a blank panel (Section 6.4) ands then dragging a panel via the right mouse button. 6.2 SELECTING THE DESIRED DATA PRESENTATION FORMAT 6.2.1 Data Presentation Dialog Box The Data Presentation command on the Format menu accesses the Data Presentation dialog box (Figure 6-2), which is used to indicate the general design of the data presentation. Each of the six tabs addresses a specific aspect of data presentation. The Apply button at the bottom of the dialog box can be used to see the effect of changing a field without having to close the dialog box. As an example, if you just want to see the effect of MW normalization on the distribution, you can check the appropriate check box and press Apply. If the result is not acceptable, simply remove the checkmark and press Apply again. After you make your selection(s), press OK. 6 6--2 2 P P rr e ec c ii ss ii o on nD De ec co on n vv o o ll vv e e 33 22 -- C Ch ha ap p tt e e rr 6 6 6 Figure 6-2: Data Presentation Dialog Box - Distribution Tab 6.2.2 Distribution Tab The Distribution tab (Figure 6-2) is used to select the general format of the Distribution window. The Distribution field is used to select the type of distribution to be presented. The drop down menu presents the Diameter, Hydrodynamic Radius, Diffusion Coefficient, Molecular Weight and Relaxation Time options. • Diffusion: presents the distribution with respect to the diffusion coefficient (cm2 /sec) • Diameter: presents the distribution with respect to the diameter (nm) • Radius: presents the distribution with respect to the hydrodynamic radius (nm) • Molecular weight: presents the distribution with respect to the MW (kDa) • Relaxation time: presents the distribution with respect to the relaxation time (µsec) Note: The directly measured quantity is the diffusion coefficient. All other parameters are calculated from the diffusion coefficient and are model dependent. When the distribution over molecular weight is chosen, the user supplied parameters k and α in Eq. 6-1 are employed (see next page). The reader should note that the software provides a rough estimate of the molecular weight of the particle with given diffusion coefficient. The relationship between these parameters is discussed in Appendix A. 32 -- Chapter PrecisionDeconvolve PrecisionDeconvolve32 Chapter 6 6 6 6 -- 3 3 The check boxes provide the following roles: a) Show Y axis - places a scaling on the Y axis on the distribution window (see Figure 6-1). b) Show average - indicates the average for the parameter in the upper right corner of the plot (see Figure 6-1). c) Load with Main Peak - the peak with maximum area is automatically selected when data is loaded. When the distribution is stored in the data file (see the description of the Input/Output dialog box (Section 2.2), the selection with which the data was saved will be restored unless this box is checked). When the MW Normalization box is checked, a mass normalization function is employed to display the data (the default is an intensity distribution function). The objective of MW normalization is to obtain a concentration normalized plot. Since the intensity of scattering is proportional to the mass of the particle squared, large particles scatter much more than small particles even when they are present in very small concentration. In most cases, the intensity distribution is satisfactory; but if a small quantity of a high molecular weight aggregate is present, the peaks on the distribution plot for the high molecular weight species could be very large. An example of the use of the intensity distribution function and the MW normalized concentration distribution function is presented in Figure 6-3. (a) (b) Figure 6-3: (a) Intensity Normalization (b) MW Normalization To perform MW normalization, the program assumes the power law for the dependency of the MW on the size of the particle as defined by equation 6-1. MW = k Rh αα 6-1 Appropriate values for α for several typical cases are listed in Table 6-1. This parameter cannot be less then 1 (for a linear system) or more then 3 (for a spheroid). 6 6--4 4 P P rr e ec c ii ss ii o on nD De ec co on n vv o o ll vv e e 33 22 -- C Ch ha ap p tt e e rr 6 6 Table 6-1: Scaling Law Exponent Selection Molecular Type Rigid (Rod) Polymer Random Coil or Disc Proteins (Globular) Exponent 1 2 3 When you start an experiment, begin without the use of this function (i.e. the MW normalization box is not checked and α is set to 0 by default) so that you can see if there are small quantities of high molecular weight species. Once you have identified that these species are present, select the appropriate exponent. When you select the exponent, a red line on the X axis will indicate the range over which mass normalization is applied. When mass normalization is used, only contributions from particles above a certain size are shown and used for normalization. This domain is marked by a red segment on the abscissa and can be reset by right clicking the mouse. The contributions outside the marked domain are indicated by small black triangles. 6.2.3 Correlation Tab 6 The Correlation tab (Figure 6-4) is used to indicate the features desired for the correlation window: Figure 6-4: The Correlation Tab 32 -- Chapter PrecisionDeconvolve PrecisionDeconvolve32 Chapter 6 6 6 6 -- 5 5 a) Subtract Base - When the Subtract Base check box is selected, the baseline is subtracted from the correlation curve. To see the baseline of the correlation function, deselect this box. Only the part of the correlation function above the baseline is of interest. Note: In an ideal measurements, the baseline is approximately one third to one half of the initial value of the correlation function. Too large a baseline may result from dust in the sample, a dirty or scratched cuvette, instability of the laser or misalignment of the optics. b) Show Y axes - When the Show Y axes box is checked, the Y axis in the Correlation window and the Distribution window will be labeled. Both the correlation function and the distribution are normalized, so the Y axis in both plots varies from 0 to 1. c) Log time - When the Log Time box is checked, the Time (x-axis) is indicated in Log format. d) Log CF - When the Log CF box is checked, the Correlation Function (y-axis) is indicated in Log format. e) Show deviation - When the Show Deviation check box is selected, the deviation of the experimentally determined correlation function from the theoretical correlation function that corresponds to the distribution shown in the Distribution window is plotted. The deviation is indicated in red and has a scale that is three times larger than the correlation function (see Figure 6-5). The deviation decreases as you accumulate the correlation function and the Show Deviation feature is used to determine the quality of the fit obtained by the deconvolution procedure. Systematic, nonrandom deviations that do not decrease when you increase the Accumulate or Run Time parameters may indicate that the smoothness parameter is too large. If systematic deviations persist even when smoothness parameter is less then 8, dust in the sample, a dirty or scratched cuvette, instability of the laser or misalignment of the optics may be the cause of the deviations. Figure 6-5: Correlation Function with Fitting Function (Red) and Residuals (Green) Note: If the intensity of scattered light is high, it is possible that more than one photon is counted per Sample Time. This deviation will look as if it is systematic, but it will not be reproducible from one measurement to another and it will decrease in magnitude if you increase the measurement time. f) Scale Factor - The Scale Factor command is used to select the magnitude of the residuals (green line on plot) presented on the display. 6 6--6 6 P P rr e ec c ii ss ii o on nD De ec co on n vv o o ll vv e e 33 22 –– C Ch ha ap p tt e e rr 6 6 g) Show Fit - When the Show fit command is selected, a red line is placed on the plot that indicates the fit of the correlation function. h) Overlay selected data - When the Overlay selected data command is selected, the data for each run is presented in the correlation plot. 6.2.4 Panels Tab The Panels tab (Figure 6-6) is used to indicate the desired format of the panel(s) for data presentation. The field in the left indic ates the parameters that can be displayed in the panel (the selection of the allowable parameters is made via the Configure Parameter Lists dialog box (Section 6.3). To display a given parameter, check the corresponding box (and verify that the Show Parameters box is checked. 6 Figure 6-6: The Panels Dialog Box Show Parameters - if this box is checked, the items in the field below will be presented in each panel if they are checked. The parameters listed in the block are selected on the Configure Parameter Lists dialog box (Section 6.4). Tab - number of spaces between the title of the parameter and the value in each panel. Parameter Names no than xxx characters - number of spaces for the parameter value in the panel. Do not show units - if this box is checked, the parameter(s) will be presented in the panel but the appropriate units will not be indicated. Adjust height automatic - manages the layout of the pane depending on the pane size and the number of parameters to show. When you check this box, the program will adjust the height of the pane to optimize the layout. 32 -- Chapter PrecisionDeconvolve PrecisionDeconvolve32 Chapter 6 6 6 6 -- 7 7 Number of columns - indicates the number of columns that the panels should be arranged in. Height of column in pixels- indicates the height of each panel. Show Last - if this box is checked, the Panels window automatically scrolls to the bottom when a new data pane is added (this is to ensure that the last data is always visible). The last data will have a thicker black frame in this case, Allow duplicates of the same measurements - indicates if two or more panels of the same data files are permitted. 6.2.5 Intensity Record The Intensity record tab (Figure 6-7) is used to manage the display of previously stored active data in the Intensity window (use the Intensity tab on the Measurement Setup dialog box to setup Intensity parameters during new data accumulation. Figure 6-7: The Intensity Record Parameters Show active data intensity: Select the desired format: 6 6--8 8 • Never - if you always want to see the intensity history of the current measurement. This is the only option that allows you to see this history when no measurements is underway. • If not measuring - if you always want to see the intensity history of the current measurement when the correlator is running. • Always - you will see the intensity record of active data. You will see the intensity history of the current measurement only if new data is active. Use the Make Active command to make new data active. P P rr e ec c ii ss ii o on nD De ec co on n vv o o ll vv e e 33 22 –– C Ch ha ap p tt e e rr 6 6 Show description - click to show number of accepted and rejected runs, run duration and average intensity of active data. Show cutoff trace - click to show, in red color, the cutoff level that had been in effect during measurements. Central alignment - when clicked, the intensity plot is shifted to the center of the Intensity window. Time scale - choose the horizontal scale of the intensity plot, in pixels of the computer display per one run, or per one second. (each run can be several seconds, see Measurement setup dialog box). Intensity range - choose the vertical scale of the intensity plot, in percents above and below the average level. If you check the Show axis box, the vertical axis with these percents and the average value will be shown in green. 6.2.6 Data Printout The Data Printout tab (Figure 6-7) is used to describe how the data should be printed out when the Print command is given. Note: You can control the content, but not the layout of the printout, which is designed to fit on a single page. If too mach information is requested or printer resolution is low, the printout may become crowded. The Print preview command (File menu) can be used to develop a satisfactory printout format. Figure 6-8: The Data Printout Parameters The upper portion of the dialog box is similar to Panels tab (Section 6.2.4). The lower portion includes the following selections. 32 -- Chapter PrecisionDeconvolve PrecisionDeconvolve32 Chapter 6 6 6 6 -- 9 9 6 Print in columns - Click one of the radio buttons to indicate parameters to be printed in the header or in one of three columns of the printout. Parameters listed here can be selected in Configure parameter lists dialog accessible through Parameter Lists command on the Setup menu. Print distribution plot - Click this button to print the distribution plot as it shown in the Distribution window. Print corfunction plot - Check this box to print the plot of the correlation function as it is shown in the Correlation function window. Print intensity plot - Check this box to print the plot of the intensity record if it is available. Note that new data does not have intensity record until it is saved (and therefore not new anymore!) Print distribution values - Check this box to print the numerical values for the distribution shown in the Distribution window. 6.2.7 Text File Content Tab The Text File Content tab (Figure 6-9) is used to select the information which is stored as a text file. Figure 6-9: The Text File Content Tab This tab is similar to that for Panels (Section 6.2.4). Parameters are selected via the Parameter lists dialog box (Section 6.3) and then by checking the desired parameters in the panel on the left side of the tab. The correlation function, distribution and intensity record can be saved via the check boxes. 6 6--10 10 P P rr e ec c ii ss ii o on nD De ec co on n vv o o ll vv e e 33 22 –– C Ch ha ap p tt e e rr 6 6 Parameters are saved first, one after another; then the correlation function, then the distribution, over the same parameter and normalized in the same way as in the Distribution window, with highlighted columns marked, and finally the intensity record with the cutoff level and accepted runs marked. 6.3 PARAMETER LISTS The Configure parameter lists dialog box (Figure 6-10) is used to indicate the parameters that should be indicated in the various areas where the user can select the parameters that are to be used (displayed, printed, sorted, etc.). 6 Figure 6-10: Configure Parameter Lists Dialog Box The field on the left side indicates all of the parameters which are available via the program and the radio buttons on the right are used to indicate the area for which you want to select parameters. If for example, you want to select various parameters for the Panel Display, click that radio button, then check the various boxes and finally click apply. After you have programmed all of the items for a given item (e.g. Panel display) press Apply, then select the parameters for some other item. When all items have been programmed, press OK. Note: Selecting items for Panel display and Data Printout does not directly lead to the parameters being included in the indicated activity. It is necessary to select them on the appropriate tab. If desired, a set of parameter settings can be saved by selecting Load Settings on the Setup menu and assigning a file name in the Save dialog box. The stored set can be recalled using the Load settings command. Note: You can select any parameter for any list in this dialog. However, not all parameters are valid for all operations. For example, you cannot plot operator name or date, and you can reset only modifiable parameters. In most cases illegal parameters simply will not be included into the list, even if you check them here. Still, you are advised to exercise common sense. 32 -- Chapter PrecisionDeconvolve PrecisionDeconvolve32 Chapter 6 6 6 6 -- 1 11 1 6.4 THE ROLE OF THE DATA MENU WITH STORED DATA DISPLAY The Data menu (Figure 6-11) includes a number of commands that are very useful in viewing stored data. Figure 6-11: The Data Menu a) Active Data presents a dialog box that contains data about the active file. A detailed discussion is presented in Section 3.5. b) Remove Active deletes the active file from the panel. c) Delete Active deletes the active file from the diskette d) Insert Blank inserts a blank panel (space). Once you have generated a blank, you can move a panel to it by right clicking on the panel and dragging the panel to the blank position. e) Select All indicates that all files should be used in the task to be performed (e.g. generating a plot). When a file is selected, the distribution has a gray background. f) Inverse Selection changes the selection option for all files (e.g. selected files are unselected and vice versa). g) Remove duplicates deletes files that are present more than once from the screen (one copy is left). h) Reset presents the Reset Parameters dialog box (Figure 6-11). The parameters that are included in this box are indicated via the Configure parameter lists dialog box (Section 6.3). 6 6--12 12 P P rr e ec c ii ss ii o on nD De ec co on n vv o o ll vv e e 33 22 –– C Ch ha ap p tt e e rr 6 6 Figure 6-12: Reset Parameters Dialog Box The Reset Parameters dialog box allows you to select a set of parameters for a data file based on the selected parameter for the active file (i.e. you can change the concentration parameter from that which is stored). The changes are not saved to hard drive. If you want to make then permanent use the Update all files command on the File menu. The command is active only if some data are selected. a) Sort presents the Sort by dialog box, (Figure 6-12), which is used to select the parameter on which the files are to be sorted. The parameters that can be used are selected via the Configure parameters list dialog box (Section 6.3). Figure 6-12: Sort by Dialog Box b) Find presents the Find data dialog box, which is used to find files which meet certain user specified information. The parameters that can be used are selected via the Configure parameters list dialog box (Section 6.3). 32 -- Chapter PrecisionDeconvolve PrecisionDeconvolve32 Chapter 6 6 6 6 -- 1 13 3 6 Figure 6-13: Find Data Dialog Box For some parameters (e.g. 1st cumula), you can select the value range to be used as the criteria. The radio buttons are used to select the set of files to be used for the search. c) Plot presents the Plot dialog box (Figure 6-14), which is used to create plots for the data. Creation of plots is presented in Section 6.4.1. Figure 6-14: Plot Dialog Box 6.4.1 Plots The Plot dialog box (Figure 6-14) is used to indicate the format of the plot to be generated using the selected data. Note: Plot is shown only if it contains at least two points and if both X and Y parameters are not identical for all data. Each data point corresponds to a selected file and is represented by a square. The square representing the active file is highlighted by red border. The equation used for the plot is shown in the upper left corner in green and X and Y parameters of the active file are shown in the top right corner of the Plot window in red. 6 6--14 14 P P rr e ec c ii ss ii o on nD De ec co on n vv o o ll vv e e 33 22 –– C Ch ha ap p tt e e rr 6 6 6 Figure 6-15: User Generated Plot The Plot window operates in the following manner: • Clicking on a data point will designate the corresponding file as the active file. The Correlation Function and the Distribution windows as well as any open dialogs will be updated. • Pressing the Delete key will remove the active file from the Plot window, but not from the Main window. Note: If a data file does not contain the selected parameter(s), the plot will not contain a data point for that file. If a linear or quadratic fit is selected, a blue line or parabola, respectively, will be drawn through the data points. The mathematical formula for the curve and the values of the parameters will be shown in blue font above the plot. If you remove a point from the plot (by clicking it to make it Active Data and then pressing the Delete key) the fitting is updated. Note: If X or Y parameters of Active Data are changed as a result of editing in the Record dialog box, changing the Smoothness parameter or changing a selection in the distribution diagram, the plot is not updated automatically and the user should re-plot the data. 32 -- Chapter PrecisionDeconvolve PrecisionDeconvolve32 Chapter 6 6 6 6 -- 1 15 5 Note: The Plot utility is designed for data evaluation. For publication quality graphics, we suggest that you export data in text format, using Save: Summary and plot it using specialized software. The plot shows selected data only and it is interactive: You may click the point in the plot to make the corresponding data active. You can then review the data, or remove it from the plot by de-selecting it in Panels window, or using Remove Active command. Active data point has a red border around it. It is only present in the plot if it is selected. Note: When the Plot window is active, the Remove Active command and the Del key will deselect active data and thus remove it from the plot. Active data will remain active and will not be removed from computer memory or Panels window. Use the Plot dialog box to choose what parameters to plot on X and Y axes and to indicate whether to plot them in linear or logarithmic scale. There is no way to change the scale or set the range for the axes. You can choose to fit the data with a linear or quadratic polynomial. A mean square fit is used and no errors in parameter values are taken into account. The results of the fit are shown at the top of the window. Parameters of the quadratic fit are shown in a little unusual way to facilitate estimation of the second virial coefficient from the intensity/concentration plot. 6 6--16 16 P P rr e ec c ii ss ii o on nD De ec co on n vv o o ll vv e e 33 22 –– C Ch ha ap p tt e e rr 6 6 Chapter 7 Storing and Printing Data 7 7.1 OVERVIEW PrecisionDeconvolve32 allow the user to save and print data in a variety of formats: • Saving collected and/or processed data is described in Section 7.2. • Printing reports is described in Section 7.3. 7.2 SAVING DATA 7.2.1 Saving Data as a Binary File When a measurement is completed, data is automatically saved in a binary file named xxxxxx_yyy.pdi, where xxxxxx is the name indicated on the Sample record tab of the Setup dialog box (Section 4.2.4) and yyy is the number assigned (the numbers are assigned in consecutive order). A file is typically approximately 2.5 kb in length. If desired, you can save the data using a different file name using the Save data command on the File menu. This command presents a standard Windows Save Data As dialog box. For consecutive runs, the name will be same and the number after the underscore will be updated automatically. A binary file contains: • the parameters used to collect the data. • the date. • the sample description (including information entered via the Record dialog box). • the correlation curve. Note: The parameters listed in the Distribution View dialog box (Sections 4.4 and 6.2.2) are not part of the data and are not saved in the data file as they define the mode in which data are presented. These settings are, however, saved in the configuration file when you exit the program. When you restart the program, the mode of presentation that was last used is restored. When you reopen the file, you may change the Smoothness parameter in the Record dialog box. If you change the smoothness parameter, the correlation function will be re-analyzed and the new distribution will be displayed. In addition, you also can select (highlight) another fraction in the distribution. If you change the smoothness and/or the fraction in the distribution and then save the data, the new information will overwrite the information in the existing file. As an alternative, you can change the file name and/or path to create another file in different location. 32 – PrecisionDeconvolve PrecisionDeconvolve32 – Chapter Chapter 7 7 7 7 -- 1 1 7.2.2 The Save Command The Save command on the File menu presents a variety of options: • Save as a Text file - Saves the data in a format that can be imported directly into a word processor. • Update all Files - Saves all open files • Selected Data - Used to save the selected files (with gray). A file can be selected by depressing the Shift button and right clicking with the mouse, or as described in Section 6.4. • Intensity - The Save Intensity command on the File menu is used to save the data in the Intensity window as a text file (Intensity.txt). The time basis for the intensity data is the time when the first run was initiated. Each line in this file describes one run. When the Save Intensity command is selected, a dialog box is presented that asks if you want to Save with history. If you answer Yes, each line in the file will contain three fields: 1. Time elapsed between the moment when the program was started and the moment when the run was completed. 2. Average intensity during the run in counts per second. 3. Asterisk (*) if the run was rejected because the average intensity exceeded the cutoff level (Section 5.2); The letter ‘s’ is used if the run was stopped and the file was not saved; if data was saved, the three digits extension of the data file name is indicated. If you answer No, only the time and intensity are saved. A portion of a typical intensity file saved without history is shown in Figure 7-1. Thu Aug 03 09:11:42 2000 time (sec) counts/sec 1198 1198 1198 1197 1197 1197 1197 1197 1197 1197 4.174e+004 4.182e+004 4.172e+004 4.171e+004 4.177e+004 4.183e+004 4.180e+004 4.170e+004 4.175e+004 4.177e+004 Figure 7-1: A Typical Intensity File The top line of the file shows the date and the time when the program was started. Note: The data is always saved to the Intensity.txt file; if you want to start a new file and save the existing data, rename the existing file. 7 7--2 2 P P rr e ec c ii ss ii o on nD De ec co on n vv o o ll vv e e 33 22 –– C Ch ha ap p tt e e rr 7 7 • Summary - The Save Summary command presents the Summary dialog box (Figure 7-2), which is used to select the parameters to be placed in a summary table. The items that are indicated in the Summary dialog box are selected in the Parameters list dialog box (Section 6.3) and the desired items should be checked on this dialog box. 7 Figure 7-2: Summary Dialog Box. The operator should highlight the parameters that should be included in the table. Once a table has been generated, it can be imported into a data processing and plotting program. A typical report is presented in Figure 7-3. Table of parameters File name Aug01.001 Aug01.002 Aug03.001 Aug03.002 Aug03.003 Aug03.004 Radius 36.15 25.96 25.96 25.96 19.16 30.34 Intensity Date Operator 1.00e+004 Aug 01 14:35:27 T Havard 8.35e+004 Aug 01 18:57:25 T Havard 8.35e+004 Aug 03 16:40:11 T Havard 8.35e+004 Aug 03 08:29:21 T Havard 8.35e+004 Aug 03 08:29:21 T Havard 4.18e+004 Aug 03 08:45:05 T Havard Figure 7-3: Summary Table 32 – PrecisionDeconvolve PrecisionDeconvolve32 – Chapter Chapter 7 7 7 7 -- 3 3 7.3 PRINTING A REPORT The Print command presents the Printer Output Properties dialog box (Figure 7-4), which is used to select the items to be sent to the printer. Figure 7-4: Printer Output Properties Dialog Box - Print Tab The options for the Choose what to are: • Active Data Window –includes the correlation function, distribution window and the selected parameters Figure 7-5: Active Data Record Report 7 7--4 4 P P rr e ec c ii ss ii o on nD De ec co on n vv o o ll vv e e 33 22 –– C Ch ha ap p tt e e rr 7 7 • Panels Window - includes the contents of the panel window 7 Figure 7-6: Panels Window • Plot Window - the present plot • Summary for Selected data – Summary report defined by Figure 7-4 but limited to the files that were selected. • Selected records - Data records that were selected. Print presents a hard copy of the formatted report. Preview provides a display of the printer image on the monitor. Printer setup provides to the Printer Setup dialog box for your printer. The Data Printout tab (Figure 7-7) is used to format the printer output. Figure 7-7: Printer Output Properties Dialog Box - Data Output Tab 32 – PrecisionDeconvolve PrecisionDeconvolve32 – Chapter Chapter 7 7 7 7 -- 5 5 The items to be included on the report are selected in the square in the upper left corner. Items to be included in this box are selected on the Configuring Parameters List dialog box (Section 6.3), using the Printout radio button. The Parameters in columns radio buttons is used to indicate how many columns you want to use for the report. The Print check boxes are used to indicate what should be included. The Tab field is used to indicate the number of spaces between a parameter name and the value. The Parameter Names field is used to indicate the length of the Parameter name. The Margins tab (Figure 7-8) is used to indicate the size of the report. Figure 7-8: Printer Output Properties Dialog Box - Margins Tab A typical printout is shown in Figure 7-9. 7 7--6 6 P P rr e ec c ii ss ii o on nD De ec co on n vv o o ll vv e e 33 22 –– C Ch ha ap p tt e e rr 7 7 7 Figure 7-9: A Typical Report from PrecisionDeconvolve32 The plot shows the content of the Correlation Function and Distribution window and the five blocks of information. The top of the report presents a description of the sample; including data file name and location, date of measurement, name of operator and comments entered in the Sample dialog box (see Section 3.2.1.5). The information on the bottom of the report includes a detailed description of the data acquisition and processing grouped into three columns. The left column describes the measurement process, the middle column describes the sample and the right column describes results. Additional information about the various parameters is indicated below. • Sample Time (Section 4.2.1.1) • Total Channels (Section 4.2.1.2) • Last Channel (Section 4.2.1.3) 32 – PrecisionDeconvolve PrecisionDeconvolve32 – Chapter Chapter 7 7 7 7 -- 7 7 • Duration is the overall time used to record the data. This is the product of Run Time and Accumulate (Sections 4.2.1.5-6) • Smoothness (Section 4.2.1.7) • Fluctuations is the baseline after the statistical baseline has been subtracted. This baseline is due to small fluctuations in laser intensity, non-stationary particulate matter in the sample and dust particles drifting trough the scattering volume. The size of the fluctuation is related to the “goodness” of the data; data with a large fluctuation (more then 20%) should not be trusted (a discussion of the statistical baseline is presented in Appendix A). • Accuracy is the average of the deviation between the experimental correlation function and the fit. This value is affected by the Smoothness parameter. It is minimal with lowest smoothness (1) and should not increase by more then several percent for the appropriately chosen smoothness parameter. If Smoothness parameter is too large, the accuracy parameter will start to increase noticeably. If the accuracy parameter is below 0.03, the data will be very precise. • Temperature, Viscosity, and Refractive Index are required parameters that are entered via the Sample dialog box (Section 4.3). Optional parameters from this dialog box will also appear if defined. Note: Optional parameters are considered undefined if they are set to zero. If you want to specify zero concentration for the blank sample, set the concentration to a very small, but positive value. Parameters can only be positive. • Radius is the average hydrodynamic radius of the selected fraction of the distribution. If a different data output is used in the presentation (e.g. molecular weight) it will be reported instead. • Fraction is the percentage of the selected fraction in histogram that is used for the calculation. • Width is a mean square width of the selected fraction in the distribution. • Intensity is the average intensity for the whole measurement. • Background is the percentage of the statistical baseline in the correlation function. It is at least 50% and a value up to 80-90% is acceptable. If the background is too high, either the cuvette is dirty or it is misaligned. • 1 st and 2nd cumulants are the average decay time of the correlation function and the second momentum of the distribution of the decay times, respectively (a detailed discussion of these values is presented in Appendix A). The numerical data for the distribution is listed at the bottom of the page. The hydrodynamic radius, diameter molecular weight, or diffusion coefficient will be reported for each segment of the distribution (depending on the mode of presentation). 7 7--8 8 P P rr e ec c ii ss ii o on nD De ec co on n vv o o ll vv e e 33 22 –– C Ch ha ap p tt e e rr 7 7 Appendix A General Principles A.1 WHAT IS LIGHT SCATTERING? A The propagation of light may be considered as a continuous rescattering of the incident electromagnetic wave from every point of the illuminated medium. The amplitude of each secondary wave is proportional to the polarizability at the point from which this wave originates; if the medium is uniform, rescattered waves will have the same amplitude and interfere destructively in all directions except in the direction of the incident beam. If, however, at some location the index of refraction differs from the average value, the wave that is rescattered at this location is not compensated for and some light will be observed in directions other than the direction of incidence and light scattering occurs. Scattering of light can be viewed as a result of microscopic heterogeneities within the illuminated volume; and macromolecules and supramolecular assemblies are examples of such heterogeneities. A.2 LIGHT SCATTERING TECHNIQUES Static light scattering probes concentration, molecular weight, size, shape, orientation, and interactions among scattering particles by measuring the average intensity and polarization of the scattered light. Static light scattering measurements which are performed at different scattering angles provide information on the molecular weight, size, and shape of the scattering particles. Measurements of the intensity of light scattering as a function of concentration yield the second virial coefficient, which is the key characteristic of the strength of attractive or repulsive interactions between solute particles. Quasielastic (dynamic) light scattering1,2 probes the relatively slow fluctuations in concentration, shape, orientation and other particle characteristics by measuring the correlation function of the scattered light intensity. Fast vibrations of small chemical groups which lead to significant changes in the frequency of the scattered light is the domain of Raman spectroscopy. These latter two methods, which probe the dynamics of the particles which cause light scattering, are intrinsically more complicated than static light scattering, since they involve measurements of spectral characteristics or related correlation properties of the scattered light. A.3 LIGHT SCATTERING FROM MACROMOLECULES IN SOLUTION One may consider the solution as a homogeneous medium and ascribe light scattering to the spatial fluctuations in the concentration of a solute. An alternative way is to consider each individual solute particle as a heterogeneity and therefore as a source of light scattering. The first approach is more appropriate for solutions of small molecules in which the average distance between the center of the scatterers is small compared to the wavelength of light. The second approach is more appropriate for solutions of large macromolecules and colloids, when the average distance between particle centers is comparable to the wavelength of light. When the size of the solute particles becomes comparable to the wavelength of light, the description of the effects of orientational motion and deformation of the solute particles is much more straightforward when these particles are treated as individual scatterers. 32 – PrecisionDeconvolve PrecisionDeconvolve32 – Appendix Appendix A A A A -- 1 1 Intensity of the light scattered by a single particle is dependent on the mass and the shape of the particle. In this discussion, we will consider an aggregate composed of m monomers and the amplitude of the electromagnetic wave scattered by an individual monomer is E0 (at the point of observation). If the size of the aggregate is small compared to the wavelength of light ( λ ), all waves scattered by individual monomers interfere constructively and the resulting wave has an amplitude E = mE 0 . Since the intensity of a light wave is proportional to its amplitude squared, the intensity of the light scattered by the 2 aggregate is proportional to the aggregation number squared, I = m I0 , where I0 is the intensity of scattering by a monomer. The quadratic dependency of scattering intensity on the mass of the scatterer is the basis for optical determination of the molecular weight of macromolecules. It is this dependency which is accounted for by the Mass Normalization function of PrecisionDeconvolve32 . If the size of an aggregate particle is not small compared to λ , the interference of the electromagnetic waves scattered by the constituent monomers is not all constructive and the phases of these waves must be taken into account. If the phase of a wave scattered at the origin is used as a reference, the phase of a wave scattered at a point with radius vector r is q • r as shown in Figure A-1). The vector q is called the “scattering vector“, which is a fundamental characteristic of any scattering process. The length of the vector is indicated in equation A-1. q≡ q = 4 πn λ sin θ 2 A-1 where: n is the refractive index of the medium λ is the wavelength of light θ is the scattering angle Partial cancellation of waves scattered by different parts of the large aggregate reduces the intensity of 2 light scattering by a factor of α , where α is an averaged value of the phase factors exp(i q • r ) for all monomers. The factor α should be averaged over all possible orientations of the particle. The result of this averaging yields the structure factor, S ( q ) . Expressions for the structure factors for particle s of various shapes can be found elsewhere.3 Figure A-1: The Scattering Vector q The path traveled by a wave scattered at the point with radius vector r differs from the path passing through the reference point O by two segments, 1 and 2, with lengths l1 and l2 , respectively. The phase difference is ∆φ= k (l1 + l2 ) where k ≡ k = k 0 = 2πn λ is the absolute value of the wave vector k (or k 0 ). The segment l1 is a projection of r on the wave vector of the incident beam k 0 , i.e. l1 = r • k 0 k . Similarly, l2 = −r • k k , and thus ∆φ= r • ( k 0 − k ) = rq . Vector q = k 0 − k is called the scattering vector. A A--2 2 P P rr e ec c ii ss ii o on nD De ec co on n vv o o ll vv e e 33 22 –– A Ap pp pe en nd d ii x x A A A.4 M E T H O D O F Q U A S I E LASTIC LIGHT SCATTER ING SPECTROSCOPY (QL S) A.4.1 The Motion of Particles in Solution When light is scattered from a collection of N solute molecules, at the observation point we also have a sum of waves scattered by individual particles (Figure A-1). Each particle could be at any random location within the scattering volume (the intersection of the illuminated volume and the volume from which the scattered light is collected). Since the size of the scattering volume is much bigger than q -1 (with the exception of nearly forward scattering, where q ~ θ ≈ 0 ), the phases of the waves scattered by different particles will vary dramatically. As a result, the average amplitude of the scattered wave is proportional to N and the average intensity of the scattered light is simply N times the intensity scattered by an individual particle, as expected. The local intensity, however, fluctuates from one point to another around its average value. The spatial pattern of these fluctuations in light intensity, called an interference pattern or “speckles”, is determined by the positions of the scattering particles. As the scattering particles move, the interference pattern changes in time resulting in temporal fluctuations in the intensity of light detected at the observation point. The essence of the QLS technique is to measure the temporal correlations in the fluctuations in the scattered light intensity and to reconstruct from these data the physical characteristics of the scatterers. A.4.2 Coherence Area There is a characteristic size for speckles in the interference pattern. If the intensity of the scattered light is above average at a certain point it will also be above the average within an area around this point where phases of the scattered waves do not change significantly; this area is called the coherence area. Within different coherence areas, the fluctuations in intensity of light collected are statistically independent. Increasing the size of the light-collecting aperture beyond the size of a coherence area does not lead to improvement of the signal-to-noise ratio because the temporal fluctuations in the intensity are averaged out. For a monochromatic source, the scattered light is coherent within a solid angle of the order of λ2 /A , where A is the cross-sectional area of the scattered volume perpendicular to the direction of the scattering. Because the coherence angle is fairly small, powerful (100 mW) and well-focused laser illumination, and photon counting techniques, are used in the PDI/BATCH instrument. A.4.3 The Correlation Function While the photodetector signal in QLS is random noise, information is contained in the correlation function of this random signal. The correlation function of the signal i (t) , which in the particular case of QLS is the photocurrent, is defined in equation A-2. G (2) (τ) = < i (t ) ⋅ i(t + τ ) > A-2 The notation G (τ) is introduced to distinguish the correlation function of the photocurrent from the (1 ) correlation function of the electromagnetic field G (τ) (which is the Fourier transform of the light spectrum): (2 ) G (1) (τ) = < E( t) ⋅ E (t +τ ) > * A-3 In the above formulae, the angular brackets denote an average over time t . This time averaging, an inherent feature of the QLS method, is necessary to extract information from the random fluctuations in the intensity of the scattered light. 32 – PrecisionDeconvolve PrecisionDeconvolve32 – Appendix Appendix A A A A -- 3 3 A For very large delay times τ , the photocurrents at moment t and t + τ are completely uncorrelated and (2) (2) 2 G (∞) is simply the square of the mean current i . At τ = 0 , G (0) is obviously the mean of the 2 2 current squared i . Since for any i(t), i ≥ i , the initial value of the correlation function is always larger than the value at a sufficiently long delay time. The characteristic time within which the correlation function approaches its final value is called correlation time. For example, in the most practically important case of a correlation function that decays according to an exponential law exp (−τ τc ) , the correlation time is the parameter τc . 2 In the majority of practical applications of QLS, the scattered light is a sum of waves scattered by many independent particles and therefore displays Gaussian statistics. This being the case, there is a relation (2) (1) between the intensity correlation function G (τ) and the field correlation function G (τ) : G (1) (2) 2 (τ) = I0 (1 +γ g (1) ( 1) 2 (τ ) ) A-4 (1) Here g (τ) ≡ G (τ)/G (0) is the normalized field correlation function, I0 is the average intensity of the detected light, and γ is the efficiency factor. For perfectly coherent incident light and for scattered light collected within one coherence area, the efficiency factor is 1. If light is collected from an area J times larger than the coherence area, fluctuations in light intensity are averaged out and the efficiency factor is of the order of 1 J << 1 . Low efficiency makes the quality of measurements vulnerable to fluctuations in the average intensity caused by the presence of large dust particles in the sample or instability of the laser intensity. A.4.4 Determination of the Correlation Function In PDI instruments the correlation function is determined digitally. The number of photons registered by the photodetector within each of a number of short consecutive intervals is stored in the correlator memory. Each count in a given interval (termed the "sample time" and denoted ∆t ) represents the instantaneous value of the photocurrent i(t) . The series of K counts held in the correlator memory is termed the "digitized copy" of the signal. According to Equation (1), to obtain the correlation function (2) G (τ) at τ = n ∆t ( n = 1.. . K ) , the average product of counts separated by n sample times should be determined. The number n is referred to as a channel number. Up to K channels, in principle, can be measured simultaneously, but usually a smaller subset of M equidistant or logarithmically-spaced channels is used. Clearly, the shortest delay time at which the correlation function is measured by the procedure described above is ∆t (channel 1). The longest delay time cannot exceed the duration of the digitized copy, K ∆t . Thus, it is important that the correlation time τc fit into the interval ∆t << τc << K ∆t . This condition determines the choice of the sample time for the particular measurement. To increase the statistical accuracy with which the correlation function is determined, it is essential to maximize the number of count pairs whose products are averaged within the measurement time. If the correlation function is being measured in M channels simultaneously, ideally M products should be processed for each new count, i.e. during sample time ∆t . The instrument capable of doing this is said to be working in the “real time regime”. The real time regime means that the information contained in the signal is processed without loss. The PDI correlator works in real time with a minimal sample time ∆t of 1 microsecond and the length of the digital copy K =1024. The number of channels M processed in real time is determined by formula M = 19.5 * ∆t − 4.5 and cannot exceed 256. A A--4 4 P P rr e ec c ii ss ii o on nD De ec co on n vv o o ll vv e e 33 22 –– A Ap pp pe en nd d ii x x A A A.4.5 Brownian Motion Temporal fluctuations in the intensity of the scattered light are caused by the Brownian motion of the scattering particles. The speed of the particles is related to the size, small particles move faster than large particles. Though each particle moves randomly; in a unit time more particles leave regions of high concentration than leave regions of low concentration. This results in a net flux of particles along the concentration gradient. Brownian motion is thus responsible for the diffusion of the solute and is quantitatively characterized by the diffusion coefficient, D . The laws of diffusive motion stipulate that over time δt the displacement ∆x of a Brownian particle in a given direction is characterized by the 2 relationship ∆x = 2 D δt . A.4.6 Determination of the Diffusion Coefficient D As explained earlier, temporal fluctuations in scattered light intensity are caused by the relative motions of particles in solution. Two spherical waves scattered by a pair of individual particles have, at the observation point, a phase difference of q • r , where r is the (vector) distance between particles. As the -1 scattering particles move over distance ∆x ≈ q along the vector q , the phases for all pairs of particles change significantly and the intensity of the scattered light becomes completely independent of its initial -1 value. The correlation time, τc , is thus the time required for a Brownian particle to move a distance q -1 along the vector q . As stated above, ∆x = 2 D δt , thus for ∆x ≈ q , τc ~ 1 Dq . Rigorous mathematical analysis of the process of light scattering by Brownian particles leads to the following expression for the correlation function of the scattered light: 2 g (1) ( τ) = e xp ( −Dq 2 τ) 2 A-5 A.4.7 Determination of the Sizes of Particles in Solution According to Equations A-4 and A-5, measurement of the intensity correlation function allows evaluation of the diffusion coefficients of the scattering particles. The diffusion coefficient in an infinitely dilute solution is determined by particle geometry. For spherical particles, the relation between the radius R and its diffusion coefficient D is given by the Stokes-Einstein equation: D= kB T 6 πηR A-6 where: k B is the Boltzmann constant T is the absolute temperature η is the viscosity of the solution app For non-spherical particles it is customary to introduce the apparent hydrodynamic radius Rh , defined as: Rh app = where: kBT 6 πηD D app app A-7 is the diffusion coefficient measured in the QLS experiment. 32 – PrecisionDeconvolve PrecisionDeconvolve32 – Appendix Appendix A A A A -- 5 5 A For non-spherical particles, it is important to note that the diffusion coefficient is actually a tensor—the rate of particle diffusion in a certain direction depends on the particle orientation relative to this direction. -1 As small particles, diffuse over a distance q , their orientation may be changed many times. QLS measures the average diffusion coefficient for these particles. Particles of a size comparable to, or larger -1 than, q essentially preserve their orientation as they travel a distance smaller than their size. For these particles, the single exponential expression of equation A-5 for the field correlation function is not strictly applicable. -1 For particles that are small compared to q , the hydrodynamic radius is calculated numerically, and in some cases analytically, for a variety of particles shapes. The important analytical formula for the prolate ellipsoid, with the long axis a and the ratio of lengths of the short axis to the long axis p is: Rh = a 2 1- p 2 ln 1 + 1- p p 2 A-8 The above formulae connecting the diffusion coefficient or hydrodynamic radius to particle geometry are strictly applicable only for infinitely dilute solutions. At finite concentrations, two additional factors significantly affect the diffusion of particles: viscosity and interparticle interactions. Viscosity generally increases with the concentration of macromolecular solute. According to equation A-6, this leads to a lower diffusion coefficient and therefore to an increase in the apparent hydrodynamic radius. Interactions between particles can act in either direction. If the effective interaction is repulsive, which is usually the case for soluble molecules (otherwise they would not be soluble), local fluctuations in concentration tend to dissipate faster, meaning higher apparent diffusion coefficients and lower apparent hydrodynamic radii. If the interaction is attractive, fluctuations in concentration dissipate slower and the apparent diffusion coefficients are lower. Thus, depending on whether the effect of repulsion between particles is strong enough to overcome the effect of increased viscosity, both increasing and decreasing types of concentration dependence of the hydrodynamic radius are observed. 4 In this context, it should be noted -1 that the interaction between large particles (as compared to q ) generally leads to a non-exponential correlation function that does not take the form of equation A-4 and therefore cannot be completely app described by a single parameter D . A A--6 6 P P rr e ec c ii ss ii o on nD De ec co on n vv o o ll vv e e 33 22 –– A Ap pp pe en nd d ii x x A A A.5 DATA ANALYSIS A.5.1 Polydispersity and the Mathematical Analysis of QLS Data Polydispersity can be an inherent property of the sample, for instance when polymer solutions or protein aggregation are studied, or it can be a consequence of impurities or deterioration of the sample. In the first case, the polydispersity itself is often an object of interest, while in the second case it is an obstacle. In both instances, polydispersity significantly complicates data analysis. A For polydisperse solutions, equation A-5 for the normalized field correlation function must be replaced with: g (1) ( τ) = 1 I0 ∑I i i exp( 2 −D i q τ) A-9 In this expression, Di is the diffusion coefficient of particles of the i-th kind and Ii is the intensity of light scattered by all of these particles. Ii = N i I 0 , i , where N i is the number of particles of i-th kind in the scattering volume and I0, i is the intensity of the light scattered by each such particle. For a continuous distribution of scattering particle size, equation A-10 is generalized as follows: g (1) ( τ) = 1 I0 ∫ I (D) exp( −Dq 2 τ) dD A-10 where: I(D)dD ≡ N(D)I 0 (D)dD is the intensity of light scattered by particles having their diffusion coefficient in the interval [D, D+dD] [N(D)dD] is the number of these particles in the scattering volume I0 (D) is the intensity of light scattered by each of them. The goal of the mathematical analysis of QLS data is to reconstruct as precisely as possible the (2) distribution function I(D) (or N(D) ) from the experimentally measured function G exp ( τ) . It should be noted that polydispersity is not the only source of non-single exponential correlation functions of scattered light. Even in perfectly monodisperse solutions, interparticle interactions, orientation dynamics of asymmetric particles, and conformational dynamics or deformations of flexible particles will lead to a much more complicated correlation function than described by equation A-6. These effects are usually insignificant for scattering by particles small compared to the length of the −1 inverse scattering vector q , but become important, and often overwhelming, for larger particles. In those cases, QLS probes not the pure diffusive Brownian motion of the scatterers, but also other types of dynamic fluctuation in the solution. 32 – PrecisionDeconvolve PrecisionDeconvolve32 – Appendix Appendix A A A A -- 7 7 A . 5 . 2 Deconvolution of the Correlation Function, a n “Ill“Ill-Posed” P r o b l e m The values of G exp ( τ) contain statistical errors. We have described previously the features of the QLS instrument that are essential for minimizing these errors. It is equally important to minimize the (2) distorting effect that experimental errors in G exp ( τ) have on the reconstructed distribution function I(D) . The distribution I(D) is a non-negative function. A priori then, a non-negative function I(D) should be (2) sought that produces, via equations (A-3) and (A-10), the function G theor (τ ) which is the best fit to the experimental data. Unfortunately, this simplistic approach does not work. The underlying reason is that the corresponding mathematical minimization problem is “ill-posed,“ 5 meaning that dramatically different distributions I(D) lead to nearly identical correlation functions of the scattered light and therefore are equally acceptable fits to the experimental data. For example, addition of a fast oscillating component to (2) the distribution function I(D) does not change G theor (τ ) considerably since the contributions from closely spaced positive and negative spikes in the particle distribution cancel each other. We discuss below three approaches for dealing with this ill-posed problem. (2) A.5.3 The Dir ect Fit Method The simplest approach is the direct fit method. In this method, the functional form of I(D) is assumed a priori (single modal, bimodal, Gaussian, etc. and the parameters of the assumed function that lead the best (2) (2) fit of G theor (τ ) to G exp ( τ) then are determined. This method is only as good as the original guess of the functional form of I(D) . Moreover, using the method can be misleading because it may confirm nearly any a priori assumption made. It is also important to note that the more parameters there are in the assumed functional form of I(D) , the better the experimental data can be fit but the less meaningful the values of the fitting parameters become. In practice, typical QLS data allow reliable determination of about three independent parameters of the size distribution of the scattering particles. A.5.4 The Method of Cumulants The second approach is not to attempt to reconstruct the shape of the scattering particle distribution but instead to focus on so-called “stable“ characteristics of the distribution, i.e. characteristics which are insensitive to possible fast oscillations. In particular, these stable characteristics are moments of the distribution, or closely related quantities called cumulants.12 The first cumulant (moment) of the distribution I(D) , that gives the average diffusion coefficient D , can be determined from the initial slope of the field correlation function. Indeed, using equation A-12, it is straightforward to show that: − d dτ ln g (1) (τ ) τ → 0 = 1 I0 ∫ I (D) Dq 2 dD ≡Dq2 A-12 The second cumulant (moment) of the distribution can be obtained from the curvature (second derivative) of the initial part of the correlation function. As in the direct fit method, the accuracy of the real QLS experiment allows determination of at most three moments of the distribution I(D) . The first moment, D , can be determined with better than ±1% accuracy. The second moment, the width of the distribution, can be determined with an accuracy of ±5-10%. The third moment, which characterizes the asymmetry of the distribution, usually can be estimated with an accuracy of only about ±100%. A A--8 8 P P rr e ec c ii ss ii o on nD De ec co on n vv o o ll vv e e 33 22 –– A Ap pp pe en nd d ii x x A A A.5.5 Regularization The regularization approach combines the best features of both of the previous methods. The advantage of the cumulant method is that it is completely free from bias introduced by a priori assumptions about the shape of I(D) , assumptions that are at the heart of the direct fit method. On the other hand, reliable a priori information on the shape of the distribution function, in addition to the experimental data, improves significantly the quality of results obtained by the QLS method. The regularization method assumes that the distribution I(D) is a smooth function and seeks a non-negative distribution producing the best fit to the experimental data. As discussed above, the ill-posed nature of the deconvolution problem means that distributions differing by the presence or absence of a fast oscillating function produce very similar correlation functions. The regularization requirement that the distribution should be sufficiently smooth eliminates this ambiguity, allowing unique solutions to the minimization problem. There are several methods that utilize this approach for reconstructing the scattering particle distribution function from QLS data. All of these methods impose the condition of smoothness on the distribution I(D) but differ in the specific mathematical approaches used for this purpose. One popular program, originally developed by Provencher, is called CONTIN.6 Precision Detectors use a proprietary algorithm of superior quality. All regularization algorithms produce similar results and incorporate the use of a parameter that determines how smooth the distribution has to be. The choice of this parameter is one of the most difficult and important parts of the regularization method. If the smoothing is too strong, the distribution will be very stable but will lack details. If the smoothing is too weak, false spikes can appear in the distribution. The “rule of thumb” is that the smoothing parameter should be just sufficient to provide stable, reproducible results in repetitive measurements of the same correlation function. Two facts are helpful for choosing the appropriate smoothing parameter. First, the lower are the statistical errors of the measurements, the smaller the smoothing parameter can be without loss of stability. This will yield finer resolution in the reconstructed distribution I(D) . Second, narrow distributions generally require much less smoothing and can be reconstructed much better than can wide distributions. This is because oscillations in narrow distributions are effectively suppressed by non-negativity conditions. The moments of the distribution reconstructed by the regularization procedure coincide closely with those obtained by other methods. However, the regularization procedure, in addition, gives unbiased (apart from smoothing) information on the shape of the distribution. This shape cannot be extracted through use of the direct fit method, nor from cumulant analysis. In a typical QLS experiment, regularization analysis can resolve a bimodal distribution with two narrow peaks of equal intensity if the diffusion coefficients corresponding to these peaks differ by more than a factor of ~2.5. 32 – PrecisionDeconvolve PrecisionDeconvolve32 – Appendix Appendix A A A A -- 9 9 A FOOTNOTES 1 R. Pecora, “Dynamic Light Scattering: Applications of Photon Correlation Spectroscopy.” Plenum Press, New York, 1985. 2 K. S. Schmitz, “An Introduction to Dynamic Light Scattering by Macromolecules.” Academic Press, Boston, 1990. 3 H. C. van de Hulst, “Light Scattering by Small Particles.” Dover, New York, 1981. 4 A. N. Tikhonov and V. Y. Arsenin, “Solution of Ill-Posed Problems.” Halsted Press, Washington, 1977. 5 D. E. Koppel, J. Chem. Phys. 57, 4814 (1972). 6 S. W. Provencher, Comput. Phys. Commun. 27, 213 (1982). A A--10 10 P P rr e ec c ii ss ii o on nD De ec co on n vv o o ll vv e e 33 22 –– A Ap pp pe en nd d ii x x A A Appendix B R e f r a c t i v e I n d e x a n d V i s c o s i t y ( W a t e r) 5 6 7 8 9 10 11 12 13 14 15 16 17 18 19 20 21 22 23 24 25 26 Temperature Refractive Index Viscosity [deg. C] [RIU] [P] 1.3339 1.3338 1.3338 1.3338 1.3337 1.3337 1.3336 1.3336 1.3335 1.3335 1.3334 1.3333 1.3332 1.3332 1.3331 1.3330 1.3329 1.3328 1.3327 1.3326 1.3325 1.3324 32 – PrecisionDeconvolve PrecisionDeconvolve32 – Appendix Appendix B B 0.01511 0.01469 0.01428 0.01387 0.01345 0.01304 0.01271 0.01237 0.01204 0.01171 0.01137 0.01110 0.01083 0.01056 0.01029 0.01002 0.00976 0.00953 0.00931 0.00910 0.00890 0.00870 B B B -- 1 1 Temperature Refractive Index Viscosity [deg. C] [RIU] [P] 27 28 29 30 31 32 33 34 35 36 37 38 39 40 B B--2 2 1.3323 1.3322 1.3321 1.3319 1.3318 1.3317 1.3316 1.3314 1.3313 1.3312 1.3310 1.3309 1.3308 1.3306 0.00851 0.00833 0.00815 0.00797 0.00782 0.00766 0.00750 0.00735 0.00719 0.00706 0.00692 0.00679 0.00666 0.00653 P P rr e ec c ii ss ii o on nD De ec co on n vv o o ll vv e e 33 22 –– A Ap pp pe en nd d ii x x B B Index A About PrecisionDeconvolve32 Command 3-9 Accumulate 4-5 Active Data Command 3-5, 6-12 Active Data Dialog Box 3-16 Conditions Tab 3-19 Fit Tab 3-17 Normalization Tab 3-20 Results Tab 3-19 Sample Tab 3-16 Additional Information 1-3 Angle 2-3 Average Error 3-18 Average Points 4-7 B Background 3-17 Binary File 7-1 Brownian Motion A-5 C Calibration Tab 2-5 Cascade Command 3-8 Channels 4-3 Coherence Area A-3 Collecting Data 5-1 Communication Diagnostic Tab 2-6 Configure Parameter Lists Dialog Box 6-11 Conditions Tab 3-19 Concentration, Selecting 4-11 Correlation Function A-3 Correlation Tab 6-5 Correlation Window 3-13 Cumulants 3-17, A-8 Cutoff Intensity Level 4-7 D Data Acquisition Windows 3-13 Data Analysis A-7 Data Display Window 3-11 Data Input Field 2-2 Data Menu 3-4, 6-12 Data Presentation Dialog Box 6-2 Correlation Tab 6-5 Data Tab 6-9 Distribution Tab 6-3 32 – PrecisionDeconvolve PrecisionDeconvolve32 – Index Index Intensity Record 6-8 Panels Tab 6-7 Text File Content Tab 6-10 Data Tab 6-9 Data View Command 3-6 Decay Constant 3-18 Deconvolution A-8 Delete Active Command 3-5, 6-12 Diffusion Coefficient A-5 Direct Fit Method A-7 Distribution Tab 6-3 Distribution Window 3-15 Index F File Menu 3-2 Find Command 3-5 Find Data Dialog Box 6-14 Fit Tab 3-16 Fluctuations 3-17 G General Conventions 1-3 General Principles A-1 H Hardware Settings Tab 2-3 Hardware Command 3-7 Help Menu 3-9 Help Topics Command 3-9 I Intensity Record 6-8 Intensity Tab 4-7 Intensity Window 3-13 Introduction to Light Scattering 1-1 Insert Blank Command 3-5, 6-12 Inverse Selection Command 3-5, 6-12 L Laser Switch 2-3 Last (field) 4-4 Layouts Command 3-8 License Agreement iii Loading Software 2-1 Load Settings Command 3-6 Load with Main Peak 6-3 Log CF 6-5 II -- 1 1 M Results Tab 3-17 Run Time 4-5 Main Window 3-1 Make Active Command 3-4 Measurement Settings Dialog Box 4-2 Measurement Tab 4-2 Measure Menu 3-3 Menu Bar 3-2 Method of Cumulants A-8 Motor 4-10 Mw /Mz 3-18 MW Normalization 6-3 S N Next File 4-9 Normalization Tab 3-19 O Operating Parameters 3-1 Overlay Selected Data 6-6 Overview 1-1 P Panels Tab 6-7 Panels window Command 3-8 Parameter Lists 6-11 Parameters List Command 3-7 Path 4-9 PD Expert Tab 2-7 Plot Dialog Box 6-14 Plot window Command 3-8, 6-14 Polydispersity 3-18, A-7 Positioning the Stirrer 4-10 Processing Raw Data 6-1 Print 3-3 Printer Output Properties Dialog Box 7-4 Printing Data 7-4 Q Quasielastic Light Scattering A-3 R Regularization A-9 Relaxation Time Distribution 6-3 Remove Active Command 3-5, 6-12 Remove Duplicates Command 3-5, 6-12 Remove Selected Command 3-5 Repeat Parameter 4-5 Reset Command 3-5, 6-12 Reset Parameters Dialog Box 6-13 II--2 2 Sample Data Tab 4-8 Sample Parameters 4-9 Sample Record Tab 4-9 Sample Tab 3-15 Sample Time 4-2 Save Command 3-3, 7-2 Save Data Command 3-2 Save Settings Command 3-7 Scale Factor 6-6 Scaling Law 6-4 Select All Command 3-5, 6-12 Selecting Concentrations 4-11 Setup Command 3-3 Setup Menu 3-6 Show Average 6-3 Show Deviation 6-5 Show Fit 6-6 Show Y-Axis 6-3, 6-5 Smoothness Command 3-5, 3-17 Smoothness Parameter 4-6 Smoothness Dialog Box 3-20 Sort Command 3-6 Start Command 3-4, 5-1 Status Bar Command 3-7 Stop Command 3-4 Storing Data 7-1 Subtract Base 6-5 Summary Dialog Box 7-3 System Type 2-2 T Test Mode 2-2 Test Run 2-8 Text File Content Tab 6-10 Time Command 3-8 Tool Bar 3-9 Toolbar Command 3-7 Trace Average 4-7 Tracking the Average 4-7 V Viewing/Processing Stored Data 6-1 W Wavelength 2-3 Window Menu 3-8 P P rr e ec c ii ss ii o on nD De ec co on n vv o o ll vv e e 33 22 –– II n nd de ex x