1
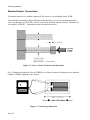
User Manual Appendix #9 Sensor Interfacing Guide For connecting Standard & Non-Standard Sensors To the signatureACE® System Latest revision: 8/20/99 SAMview™, MPMview™, SPCview™, FeatureView™, SA2000™, SAM500™, SAMnet™, InSitu™, FlexStrip™ and SmartSAM™ are registered trademarks of Signature Technologies, Inc. signatureACE® and Signature Technologies® are registered trademarks of Signature Technologies, Inc. Dallas, TX USA. All other trademarks are the property of their respective companies. Copyright 1995, 1996, 1997, 1998, 1999,2000 Signature Technologies, Inc. All Rights Reserved. No part of this publication may be reproduced (via any means — print, electronic, or other) without the written permission of the publisher. Printed in the USA Signature Technologies, Inc. • 13375 Stemmons Fwy. #320 • Dallas, Texas 75234 USA Telephone: (972) 488-9777 • Fax: (972) 488-2924 Website: www.signaturetechnologies.com Interfacing Manual Page #2 Interfacing Manual Table Of Contents: INTRODUCTION: .........................................................................................................................5 Technical Information about the SA2000™ / TEC™ module combination: .................................6 signatureACE® System common / grounding considerations: .....................................................6 TEC™ Board Analog input: ..........................................................................................................7 Standard Sensor Connections: ........................................................................................................8 If the Strain Gage output is too high for the ST system: ................................................................11 Jumper Locations on the SA2000:.................................................................................................11 Dealing with excessive balance offsets:..........................................................................................13 Acceptable offset values: ...............................................................................................................13 How to diagnose / remedy the situation:........................................................................................14 Interfacing Data Instruments Strain Links:.....................................................................................16 Interfacing Piezo to the signatureACE® system ............................................................................16 Interfacing Digital signals to the signatureACE® ..........................................................................18 A simple way to interface digital (On/Off) signals to the ST system:...........................................19 Interfacing D.C. Proximity Switches to the signatureACE®: .......................................................20 Interfacing Self amplified Analog sensors to the signatureACE®: ................................................21 Interfacing 4-20 ma. current loop to the signatureACE® system...................................................22 Calibrating Analog sensors for measurement .................................................................................22 Calculated: ...................................................................................................................................22 Experimentally developed: ..........................................................................................................23 Interfacing to existing Load Monitors ............................................................................................24 Sensor Calibration:..........................................................................................................................25 Calibration of Home-Made Sensors: .............................................................................................26 Topical Index ..................................................................................................................................30 Contact us with any questions at:....................................................................................................32 Page #3 Interfacing Manual Table of Illustrations: Figure # 1 - TEC™ Input connections............................................................................................7 Figure # 2 - Stress / Strain / Poisson's ratio illustration ..................................................................8 Figure # 3 - Strain Gage illustration ...............................................................................................8 Figure # 4 - Whetstone Bridge connection .....................................................................................9 Figure # 5 - "Standard" Strain Link Hookup - Compression..........................................................10 Figure # 6 - "Standard" Strain Link Hookup - Tension ..................................................................10 Figure # 7- A08 Jumpers.................................................................................................................11 Figure # 8 - A+D Input board jumpers ...........................................................................................12 Figure # 9 - Shunt resistor value calculation ..................................................................................12 Figure # 10 - Gage out of balance...................................................................................................14 Figure # 11 - Resistor hooked the wrong way (error larger)...........................................................14 Figure # 12 - Resistor hooked the right way (error less, but resistor too small).............................15 Figure # 13 - Balance within acceptable limits...............................................................................15 Figure # 14 - Data Instruments Strain Link Hookups.....................................................................16 Figure # 15 - Piezo Twinaxial sensor interfacing (Preferred).........................................................17 Figure # 16 - Piezo Coaxial sensor interfacing ...............................................................................17 Figure # 17 - Relay Digital Input....................................................................................................19 Figure # 18 - NPN type 3-wire D.C. Proximity switch ..................................................................20 Figure # 19 - P.N.P. Type 3-wire D.C. Proximity Switch ..............................................................20 Figure # 20 - Hookup for 2-wire universal Proximity Switch. .......................................................20 Figure # 21 - Analog Proximity hookup .........................................................................................21 Figure # 22 - 4-20 Ma. Current Loop Hookup................................................................................22 Figure # 23 - Toledo Model 260 Interface Hookup to signatureACE® .........................................25 Figure # 24 - Extrude station load cell - calibratable......................................................................27 Figure # 25 - Combination Blank & Draw load cell - Uncalibratable...........................................28 Figure # 26 - Combination Blank & Draw load cell - Calibratable...............................................29 Page #4 Interfacing Manual INTRODUCTION: The signatureACE® system hardware is specifically designed to operate with resistive strain gages in full Whetstone bridge configuration. To this end we supply precision regulated D.C. excitation voltage, and full floating differential signal input. We also provide sufficient amplification of the strain gage signals so that dimensional changes as low as 30 µStrain yield usable signatures. Sensor inputs are brought into the "TEC™" unit, and hooked to the terminals on the Green printed circuit board in the TEC™ enclosure. This board is a passive connection device with a few indicators and a fuse tester. NO signal processing is preformed. The TEC™ can be mounted up to 100 feet from the SAM module. Our standard preferred bridge resistance is 350 Ohms, but we can excite and use gages of virtually any resistance. Our standard excitation levels are 10 V.D.C., and 5 V.D.C. They are jumper selectable. Each individual channel can be configured to the desired excitation level. Each input channel can be individually selected to either HIGH, or LOW range. HIGH range provides an amplification of 1000X that is used for Strain gage inputs. LOW range is a 2X amplification that is used for interfacing high level signals. Often the user wishes to interface various other types of devices into the system. This publication is submitted for the purpose of instructing the user on the proper methods and additional components that may be required for successful operation of other types of input devices. In some cases, modifications to the TEC™ or SA2000™ hardware may be needed, which work can only be done by Signature Technologies personnel if the hardware warranty is to be preserved. Page #5 Interfacing Manual Technical Information about the SA2000™ / TEC™ module combination: The SA2000™ Module is the engine that actually performs the data acquisition, limiting, I/O control, and network communications. The TEC™ unit is an enclosed Printed circuit board assembly that provides connectivity for the external system elements. signatureACE® System common / grounding considerations: NOTE: Signature Technologies "Common" points (both "Analog" and "Digital") AND the -Excitation points (if 5V excitation is selected) are connected to EARTH GROUND. The signatureACE® system commons CANNOT be floated. This means you've got to be careful when connecting the signatureACE® to a system that has a floating common (like the Square D Press control systems). In these cases the signatureACE® common should be connected to Earth ground (like the sheet metal of the control enclosure). In most cases the wide Common mode range of the SA2000™ will provide clean signals. When you connect Analog inputs, or Resolver inputs to the ST system - even when you use the HiRes™ resolver converter, connecting to the -Excitation (See note above) or AGND signals to a system with a floating common will tie that floating common in the other system to earth ground, and may cause the existing system to malfunction. In the case of the HiRes™ converter: If you're not sure whether the resolver system you're connecting to has a floating common, tie the AGND to EARTH GROUND (probably the nearest handy screw in the chassis). The common mode inputs of the HiRes™ converter will sort the signals out properly in spite of not having a good common reference. Page #6 Interfacing Manual TEC™ Board Analog input: Figure # 1 - TEC™ Input connections Differential Mode - LO range = +/- 2.5 volts. 1 A/D count = 1.22 Millivolts Differential Mode - HI range = +/- 0.005 volts. 1 A/D count = 2.4414 Micro volts Auto Zero will take out D.C. offsets of up to +/- 0.01 V.D.C. at the input terminals. Auto Zero occurs either: When the clutch input to the SAM module is energized When the position input passes the software-corrected ZERO position For Large step changes in the value of the offset while the machine is running, more than one auto-zero cycle may be required to null out the offset completely. If the machine is stopped, an analog clamp will deploy after 4 seconds, and tie all inputs to Zero (internally - there is no change in the input impedance or loading when the analog clamp deploys). Page #7 Interfacing Manual Standard Sensor Connections: The normal sensor for use with the signatureACE® system is a pre-packaged Strain "LINK". The strain link is normally a simple Whetstone bridge having two of its four elements mounted in such a way that they are "IN-LINE" with the stress in the measured machine element. The other two are mounted "ACROSS" - Perpendicular to the direction of the stress. Figure # 2 - Stress / Strain / Poisson's ratio illustration Fig. #2 illustrates the physical effect of STRESS on a column of material. Starting with two identical columns, STRESS is applied to one of them. Figure # 3 - Strain Gage illustration Page #8 Interfacing Manual The STRESS produces a dimensional change in the column that is called STRAIN. It also causes the stressed column to "Bulge" or increase its cross section. This growth in cross section is referred to as the "Poisson effect”. As shown in Fig. #4 the strain gage element is a series of columns connected in series electrically. As the machine to which the strain gage is attached changes its length, the strain gage changes along with it. Under compression the gage columns grow shorter, but thicker. This growth in cross section with reduced length reduces the electrical resistance of the element. The strain link bar that is being gauged is also experiencing this "Poisson effect" - under compression the bar become shorter, but increases cross section (normally 0.285 times Strain dimensional change for Steel). The gage element mounted perpendicular to the stress will respond to this dimensional change by going into tension - i.e. getting longer, but reducing its cross section. This "Across" gage will increase its resistance with conversely the gage element mounted perpendicular to the stress. When these gage elements are connected together as shown below: Figure # 4 - Whetstone Bridge connection A full Whetstone bridge is created. Under compression, the gage elements IN-LINE with the stress application will REDUCE their resistance, while the elements perpendicular to the Stress application will INCREASE their resistance. Since the gage elements are reversed on each side of the bridged, under compression the +Signal terminal will move in a positive direction, while the -Signal terminal will move more negative. There will then be a differential between the + and - Signal terminals which is then fed to the signatureACE® system as an input of the force in the machine structure. The connections for these links are fairly standardized. Page #9 Interfacing Manual For the Toledo T400, LINK or HELM HT400 links the hookup for Compression sensing as would be found in the connections (Pitmans) of a punch press is as illustrated below in Fig. #5. Figure # 5 - "Standard" Strain Link Hookup - Compression Figure # 6 - "Standard" Strain Link Hookup - Tension Page #10 Interfacing Manual For Tensive sensing, the signal wires are simply flipped as illustrated in Fig. #6 above. Data Instruments Strain links are amplified units that require a totally different hookup as illustrated in Fig. #10 later in this publication. If you don't have colors as illustrated above, or just don't remember the code, you can generally perform checks on strain links with an Ohmmeter to find out what the internal connections are: There will be two pairs of wires that have higher resistance than any other pair. Generally you can hook the excitation to one of the high resistance pairs, and take the signal from the other pair. Strain links typically don't have compensation components, so they don't care how they're connected. In the case of high-precision load cells, there are normally compensation components that make it necessary to connect to the proper sets of wires to get accurate results. If you don't have the information, call the cell manufacturer. If the Strain Gage output is too high for the ST system: Since the signatureACE® doesn't have any provision for input gain adjustment outside of the 1000X / 2X gain switch, sometimes the output of a strain gage bridge in highly strained applications can exceed the input range of the SA2000™ in HI range. One way of cutting the output of the Strain gage is to reduce the excitation voltage from 10 volt to 5 volts with the switch provided for that purpose. This is a valid way of cutting the input level down to 0.5 times its 10-volt value. This is good if you have a lot of signal; the noise level will be significantly increased on the lower level signals. Jumper Locations on the SA2000: Figure # 7- A08 Jumpers Page #11 Interfacing Manual Figure # 8 - A+D Input board jumpers Shunting the gage can reduce the signal from the High output gage. For example: The strain gage pressure sensors from Sensotec have the following spec: "3mv/v" This terse statement translates to: " At full rated input pressure, the output of the strain gauge bridge will be 3 Millivolts for every volt of D.C. excitation applied." With a 10-volt excitation, then, the output of the Sensotec unit would be 30 Millivolts. The ST system at high range only can stand only 5 Millivolts. Obviously we'll overload the input if we try to put this much into the SA2000™ input. Reducing the excitation to 5 volts still gives us 15 Millivolts at full pressure, so some other way of reducing the input voltage must be found. The Bridge resistance is given as "350 Ohms". Connecting a parallel resistance across the bridge is a good way of limiting the output of the bridge. The way to calculate the shunting resistor is: Where: R = the strain gage bridge resistance in Ohms Att = the reduction factor desired Sh = the value of the shunt resistor in Ohms Figure # 9 - Shunt resistor value calculation Page #12 Interfacing Manual In the case above I'd like to run at 10 volts excitation, but I'd have 0.030 volts of output, and I need to get down to 0.005 volts for a proper input. I need, then, to cut the signal from the sensor to 1/6 of what it normally is. This is a reduction factor of 0.16666. The gage resistance is 350 Ohms. Example: A shunt resistor of 69.97 Ohms (use the 0.1% resistor value of: 69.8 Ohms) connected in parallel with the strain gage bridge across the + & - Signal inputs will achieve the proper reduction of the gage output. Dealing with excessive balance offsets: When dealing with strain gages that have static offset voltages (a voltage present between +Signal, and -Signal when under no load) which is due either to basic gage imbalance, or due to a significant mechanical pre-load on the gauged component in its resting state. There must be some care taken to avoid “Railing” the input amplifier on the SA2000™. The Auto Zero circuit will always successfully bring the input level down to zero, BUT if the input amplifier which is outside the Auto Zero loop is saturated, there will be NO signature. Excessive imbalance in a strain gage is not a serious problem with the gage, and is quite common when gages are bent around a circular load cell structure, or applied to an uneven surface. Acceptable offset values: In HIGH range, the static offset voltage should be LESS THAN +0.004 volts (+4 Millivolts), AND more than -0.003 volts (-3 Millivolts) for FULL RANGE capability. Page #13 Interfacing Manual In LOW range, the static offset voltage should be LESS THAN +1.75 volts, AND more than -1.0 volts for FULL RANGE capability. How to diagnose / remedy the situation: The best way to see whether the gage is throwing too much offset at the SA2000™ is by applying a millivoltmeter (Like a Fluke Digital multimeter which has a 300 Millivolts scale) across the +Signal (plus probe) to -Signal (Negative probe) leads and measuring the static voltage. Figure # 10 - Gage out of balance AS stated above, in HIGH range, if the static offset is larger than +4 millivolts, or less than -3 millivolts, then it’s too far out and must be brought in with balancing resistors. The best way to bring the offset down is: a) Connect the meter as above to the +Signal, and -Signal terminals. b) Hook a resistor of 100K ohms, between ANY Excitation connection (Either + or -) and ANY Signal (Either + or -) connection. Figure # 11 - Resistor hooked the wrong way (error larger) Page #14 Interfacing Manual c) When the resistor is connected, the offset will either get better or worse. d) If it gets worse, try the hook the resistor to the OTHER Excitation connection. Verify that the offset gets better when the resistor is applied (If the voltage goes from a POSITIVE value to a NEGATIVE value or vice versa, the resistor connection is right, but the resistor value is too low). Figure # 12 - Resistor hooked the right way (error less, but resistor too small) e) Then adjust the resistor value by applying LARGER resistor values for LESS effect, or lower resistor values for more effect. The aim is to get the offset close to zero volts within the values given above. Fine adjustments can be made by using parallel or series combinations of resistors. Figure # 13 - Balance within acceptable limits. f) Finally, permanently install a fixed resistor or resistor combination of the proper value permanently across the same points. The most practical way to do this is to clamp the resistor leads in the terminals and solder the Strain gage wires to the resistor. If series or parallel resistor combinations are used, be sure to SOLDER all the joints. Inexpensive resistor assortments can be obtained from your local Radio Shack electronics shop. Page #15 Interfacing Manual NOTE: If you apply balancing resistors to a commercial load cell to correct an out of balance situation, you will alter the calibration values for the cell, requiring an experimental calibration to be performed if calibrated values are needed. Interfacing Data Instruments Strain Links: Figure # 14 - Data Instruments Strain Link Hookups Data Instruments links are fundamentally different that other links since they have a built in amplifier. Since DI links operate on +5 V.D.C. excitation, the Excitation of the SA2000™ MUST be reduced to 5 Volts BEFORE the DI units are connected - Failure to do this will permanently damage the DI strain links: This hookup is for compressive application as would be experienced on the Connections (Pitmans) of a press. For Tensive application, swap the Green and White wires. NOTE: Since the DI link is self-amplified, the gain switch on the SA2000™ Unit must be set to LO position on DI link inputs. Interfacing Piezo to the signatureACE® system Piezoelectric transducers like IMCO, HELM Load Plugs, or load probes, or Kistler Piezo load sensors or Accelerometers require a different technique than Strain gages. The Piezo device is a self-generating sensor that produces energy that is proportional to deformation of the Piezo element. Note that I used the word ENERGY - not current or voltage. The Piezo device will produce a certain amount of energy when it is squeezed, but will also extract the same amount of energy when it is released. What is required to properly see the output of a Piezo device is a "Charge Amplifier" which can be formed by connecting a capacitor across the + and - Signal inputs of the TEC™ module. There is some belief that a Piezo device is "Rate Sensitive" - i.e. they produce a greater output when squeezed quickly than they do if squeezed slowly. In fact they don't. It is the leakage of the Charge amplifier that creates the "Rate Sensitivity" not the sensor. A High quality Charge amplifier shows little difference related to "Rate of change". Page #16 Interfacing Manual The signatureACE® input is not "Instrumentation grade" but is superior to most front ends due to its low leakage, and high amplification, enabling the use of large capacitive loads to store the charge from the sensor. When a Piezo device is connected to the TEC™ Unit, some external components are required as illustrated below. First the Piezo signal must be centralized in the common mode range of the input amplifier. The connection shown from -Excitation to -Signal accomplishes this. MAKE SURE the SA2000™ inputs used for Piezo devices are set to 5-volt excitation BEFORE hooking the sensors up. Failure to do this can result in system damage. Figure # 15 - Piezo Twinaxial sensor interfacing (Preferred) The 1 Meg resistor “R” acts as a “Drain” to maintain the sensor at zero potential statically. The Piezo sensor is then connected to the +/- Signal inputs as shown, and the gain of the channel is adjusted by shunting the input with the capacitor "C". What we're looking for is to limit the signal level to either +/- 2.5 volts in LO Range, or +/- 0.005 volts in HI range (selected by the jumper at the channel input). In general it's better to run HI range, as this minimizes the "sag" in the signature at lower speeds. “C” Capacitor values in the 1 - 10 mfd. range are normally required. Figure # 16 - Piezo Coaxial sensor interfacing Page #17 Interfacing Manual The illustration above at Fig #16 features a “Twinax” or two-conductor shielded configuration such as would be used with InSitu Strip™ type sensors. If you purchase from other sources, a coaxial hookup will probably be supplied. It’s connected as shown in Fig #17. If your machine always runs fast then you could use the LO range (fine for 200 S.P.M. and up), use capacitors in the 0.02 - 0.047 range to start, and trim to suit. If you flattop, use a bigger capacitor. If "sag" is a problem, try increasing the value of the 1 Meg resistor. Some channels of the SA2000™ will have less leakage current, and can be used with values as high as 10 Megs, other channels can't. You'll have to find this out for yourself. The 1 Meg value works for every channel. Use a good quality capacitor - Polyester type to limit leakage. Don't use electrolytic or Tantalum capacitors. Interfacing Digital signals to the signatureACE® Digital signals can be brought into the signatureACE® and displayed / limited just like analog signals. You must take a couple of things into consideration though: The AUTO-ZERO function will make whatever state the digital signal is in at Top Dead Center (zero degrees) to be ZERO. If the signal is "HIGH" at Top Dead Center, it will be displayed as a rectangular wave dropping to -2048 from Zero when it goes LOW (when the calibration factor is set to 1). If the signal is LOW at zero degrees, it will be displayed as a rectangular wave jumping to +2048 when it goes high. The AUTO-ZERO function can be disabled selectively through the use if the “.INI” files. Contact ST for more information about this if needed. If the AUTO-ZERO function on a channel is disabled, the result will be a rectangular wave jumping between -2048 to +2048 on the screen (with the calibration factor set to 1). Page #18 Interfacing Manual A simple way to interface digital (On/Off) signals to the ST system: Figure # 17 - Relay Digital Input This is a simple method that would effectively interface with an existing event signal. The relay coil is wired so that when the event occurs, the relay is actuated. The contacts of the relay are wired into one of the Channel inputs on the "TEC" module according to the labels as shown above. Be sure to set the channel switch to LO position. The channel should be set up with a calibration factor of 0.01, and a maximum of 25. I'd set the limits originally at three for the yellow and 5 for the red. Starting out with yellow and red both set at 2 degrees seems O.K. Set your window wide to begin with, until you find where the digital signature occurs. The signature will look like a rectangular wave going from 0 tons to 20 tons when the digital signal changes. Page #19 Interfacing Manual Interfacing D.C. Proximity Switches to the signatureACE®: Proximity switches can be interfaced to the system to permit the signaturing of digital events (pilot hole detection, feed length confirmation etc. Some external components are required as follows: Figure # 18 - NPN type 3-wire D.C. Proximity switch Figure # 19 - P.N.P. Type 3-wire D.C. Proximity Switch Figure # 20 - Hookup for 2-wire universal Proximity Switch. Page #20 Interfacing Manual Interfacing Self amplified Analog sensors to the signatureACE®: Analog proximity switches (like the Turck type LU illustrated), or other self-amplified sensors (Pressure sensors, temperature sensors etc.) can be interfaced to the SA2000™ Module. Two things must be considered. First is the input voltage requirement of the sensor. In the case of the Turck unit illustrated, +15 volts D.C. is required. Since the available excitation voltage is only 5 or 10 V.D.C. you must provide an external power supply for the sensor. Second, the output voltage range of the sensor must be considered. The Turck according to its specifications swings from about +0.5 volt to +10 volts. Figure # 21 - Analog Proximity hookup Since the input of the SA2000™ can only tolerate -2.5 to +2.5 volts, some attenuation of the Turck signal is necessary. The resistive divider shown reduces the 10-volt swing of the Turck down to 2.48 volts into the SA2000™. R1 + R2 = 13300 Ohms E=10 volts I=E/R = 10/13300 = 0.000752 ER2 = IR2 * R2 = 0.000752 * 3300 = 2.4816 Page #21 Interfacing Manual Interfacing 4-20 ma. current loop to the signatureACE® system This is done by converting the 4-20 ma. current loop to a voltage mode signal using a precision resistor to maintain calibration. The 4-20 ma. current loop will normally allow a certain amount of voltage to be generated without affecting to accuracy of the analog data. Using the SA2000™ input in LO range permits a peak signal of +/- 2.5 volts. 20 ma. applied across a 100 Ohm precision resistor produces 2 volts of signal. The circuit is: Figure # 22 - 4-20 ma. Current Loop Hookup The connection between -Signal, and -Excitation is necessary if the 4-20 Ma. current loop is floating to keep the signal inside the common mode range. If the loop isn't floating, and has one side grounded, then you should break the connection between -Signal, and -Excitation. Calibrating Analog sensors for measurement Calculated: In cases where the target for the Analog device is according to the test conditions in the manual, and the target approaches perpendicular to the sensor, and is parallel to it, the figures in the sensor manual can be used to generate a theoretical calibration for the sensor. Referring to the TURCK manual for the “LIU” series analog proxes: Specifically the “Ni8-M18-LIU” - the output of the sensor is 0.25 volts until the gap between the sensor and the target grows to 1 millimeter. As the gap increases, the voltage output grown to 10 volts at 5 millimeters of gap. With the resistive divider as described above installed the 10-volt signal becomes 2.48 volts, and the .25-volt signal becomes 0.062 volts. Let’s say we want to calibrate this sensor to read out in relative thousandths of an inch. 1mm = 0.03937” 5mm = 0.19685” so the difference is 0.15748” The voltage output goes from 0.062 to 2.48 over this range so the voltage difference = 2.418 The ST system has a sensitivity of 1 A/D count for each 0.0012213 Volts in LOW range. Page #22 Interfacing Manual 2.418 / 0.0012213 = 1979 counts = equals a displacement change of 0.15749” or 159.5 thousandths. 157.5 / 1979 = 0.079586, which is the “thousandths” calibration factor for the ST system. 4 / 1979 = 0.002021 is the “Millimeters” calibration factor. Experimentally developed: If the target is not per the test criteria, but the approach is perpendicular and parallel, then the calibration must be arrived at experimentally. Follow the detailed procedure: Step 1 Go to Samtest Step 2 Select “gauge” (selection 2) Step 3 Turn OFF the auto zero for the analog prox channel. Make sure the display for the channel is in “counts” Step 4 Put a sheet of heavy paper over the sensor Step 5 Apply the target to the sensor thru the paper. Step 6 Note the reading on the screen Step 7 Add another piece of paper - Note the reading on the screen. Step 8 Repeat for 7-8 additional pieces of paper. Step 9 Measure, and note the paper thickness. Step 10 Plot the points that you developed. Vertical scale is the output of the sensor as displayed on our system in counts. Horizontal scale is the thickness of the paper stack that resulted in the readings. If the plot is a straight line, you’re home free. If it’s not straight, make the best estimation of a straight line that averages the differences (by eye). Step 11 Then take the difference between the thinnest, and thickest stack in counts. Take the dimensional difference between the thinnest and thickest stacks in thousandths of an inch. Divide the dimensional difference by counts. - That will be your “thousandths” calibration factor. Worked Example: The paper is 0.01” thick Page #23 Interfacing Manual With one piece of paper you got 1023 counts With 9 pieces of paper you got 593 counts. There’s 80 thousandths difference between 1 sheet and 9 sheets. There are 430 counts of difference between 1 sheet and 9 sheets 80 / 430 = 0.18605 the “thousandths” cal factor for that sensor. Note: The channel will read out relative units not actual dimensions. Interfacing to existing Load Monitors Sometimes you may want to connect the signatureACE® unit "downstream" of an existing load monitor. In general the load monitors have "Recorder" or "Track" outputs available. Also in general one side of the output will be GROUND. On the Toledo units, there is a double row 0.1" pattern male header that carries the signals. The bottom row of pins is all grounded, and can be connected directly back to the -Excitation point on the signatureACE®. The Toledo "Analog Track Outputs" are numbered as follows: Channel "0" - Outer Slide Total (Total for S/A Machines) Channel "1" - Outer Slide Left Rear (Left Rear for S/A Machines) Channel "2" - Outer Slide Right Rear (Right Rear for S/A Machines) Channel "3" - Outer Slide Left Front (Left Front for S/A Machines) Channel "4" - Outer Slide Right Front (Right Front for S/A Machines) For 8 channel units additionally: Channel "5" - Inner Slide Total Channel "6" - Inner Slide Left Rear Channel "7" - Inner Slide Right Rear Channel "8" - Inner Slide Left Front Channel "9" - Inner Slide Right Front In general, the recorder outputs are available on any of the commonly available load monitor units, and the hookup is identical to the one shown above - except that the method of connection is probably going to be different. HELM uses double circuit 1/4" Phone jacks. Data Instruments uses Phoenix plug in terminal strips. One side of the signal is usually grounded. Refer to the manual for the Load Monitor you have for the connections. Page #24 Interfacing Manual Figure # 23 - Toledo Model 260 Interface Hookup to signatureACE® If the specific Load monitor you are using doesn't have grounded recorder return, then the connection shown above to the -Excitation on channel #1 should be removed. The connecting cable from the Load monitor should be shielded, and the shield should only be connected at the TEC™ end. It's also generally a good idea to run a heavy bonding conductor between the computer chassis where the signatureACE® is located, and the Load Monitor Chassis. Sometimes the Recorder Outputs will act as antennae for electrical noise, and cause nuisance trips in the Load Monitor. In this case, if you trust the indications on the existing load monitor, system calibration is a breeze, since you can simply make the ST unit readout the same as the Load Monitor using the calibration utility described in the system user's manual. Optionally you can install load cells, and check/calibrate both units. Sensor Calibration: If the sensor that you are attempting to calibrate comes with a statement of what the output of the device is in volts per unit of pressure, or volts per ton etc. then you can use that factor to generate calibration factors for the signatureACE® / SAMview™ system. Page #25 Interfacing Manual Using the SENSOTEC pressure gage that we discussed back on page 11, we had at 10 volts excitation 30 Millivolts of signal at 5000 P.S.I. We then shunted the gage to get its signal down to a usable level of 5 Millivolts at 5000 P.S.I. The calibration factor will be calculated as follows: The SAM gives one A/D count for each 0.002441406 volts of input. With a 5000 P.S.I. input to the gage, the signal to the SA2000™ will be 0.005 volts. The SA2000™ multiplies the signal X 1000, and passes = 5 volts to the SAM module. The 5 volts will create 2048 A/D counts (5 volts divided by 0.002441406 volts per count = 2048 counts). 2048 A/D counts = 5000 P.S.I. The Calibration factor = 2.441406 (5000 P.S.I. divided by 2048 counts). When this factor is programmed into the channel used by the Pressure sensor, the signature will display the value in calibrated P.S.I.G. On the other hand, the Analog prox couldn't be calibrated by the signatureACE® system since it's characteristic is non-linear, and the SAMview™ display package is not set up to provide programmable offsets or sunken zero points: 0-1 mm distance is 0.3 volts 1-5 mm increases linearly from 0.3 to 10 volts With a characteristic like this there's no way to get the system to read out in mm directly. The best that could be done is to read out in voltage, and develop the distance with a chart. If direct readout in mm was required, software could be written to perform that conversion. Contact ST for details. Calibration of Home-Made Sensors: In cases where you are attempting the Calibration of homemade sensors you must make sure of the following: You must make sure the sensor is calibratable. There are cases where a sensor may not be calibratable due to the way force flows to it. In general, if ALL the force involved in a die part can be made to flow directly through a load cell, and then calibration is possible. Page #26 Interfacing Manual Figure # 24 - Extrude station load cell - calibratable The example above is for a station that extrudes a hole in the bottom of a cup. The Extrude punch is mounted in line with, and directly below the punch itself. The force in the punch flows exclusively through the load cell. In order to calibrate this cell, a calibrated force (possibly from a hydraulic press) should be applied to the cell just as it would be when the cell is mounted in the die. Differences in surface finish of the tool elements that contact the cell can change the concentrations of force through the cell. We would recommend that the actual components are used - i.e. place the load cell on the backing surface it will have in the die, and apply pressure with the extrude punch. Following the instructions for calibration in the user's manual, apply the force, calibrate, and then apply the force several more times as a check. On the other hand, sometimes the force flows both through the cell and through the matrix of the die as well. In this case the calibration is only valid for force applied in a SPECIFIC WAY Page #27 Interfacing Manual Figure # 25 - Combination Blank & Draw load cell - Uncalibratable The illustration above is for a combination blank and draw station. In this case the Blanking takes place on the outer circumference of the draw ring while the draw takes place down the middle. The cell is located such that the inner diameter of the draw punch is in line with the gauging location, while the blanking portion is more in line with the outside diameter of the load cell. Force tends to flow straight from its source to the place where the support occurs. The force required to draw and the force required to blank will reach the gages in the load cell differently, and will not produce the same effect. If the load cell is calibrated for the drawing force, the blanking force will indicate MUCH lower than it actually is since it flows through the outer diameter of the load cell, and the support block. Alternatively if the load cell is calibrated for the blanking force, the Draw force will show MUCH higher that it actually is since it flows directly through the gauging location. This cell design, in short, can’t be calibrated accurately for both operations, but can function comparatively so that you can tell that something has changed in the process. Page #28 Interfacing Manual Figure # 26 - Combination Blank & Draw load cell - Calibratable In Fig #22 the design of the cell and the station have been altered to give a calibratable result. There are strain gages both on the outer and inner diameters of the load cell, and they are connected in parallel to cancel out the effect of force being thrown to the inside or outside of the cell body. Also, the complete force of the station flows through the cell, without any assistance from other supports. This cell requires much more wiring than the structure in Fig. #21, but will more accurately indicate the forces form both operations. Page #29 Interfacing Manual Topical Index 3 3-wire D.C. Proximity Switches - Interfacing ............. 21 4 4-20 ma. current loop - Interfacing ............................. 23 A A+D Input board jumpers ........................................... 13 Acceptable offset values ............................................. 14 Adjustment - Strain Gage output................................. 12 Analog inputs - TEC™ Board ...................................... 7 Analog sensors - Calibrating....................................... 23 C Calculation - Shunt resistor value ............................... 13 Calibrating Analog sensors ......................................... 23 Calibration of Home-Made Sensors............................ 27 Connection - Strain Link............................................. 11 Connections - Sensor .................................................... 8 Correcting Excessive balance offsets.......................... 14 D Data Instruments Strain Links - interfacing ................ 17 Digital signals - Interfacing......................................... 19 E Excessive balance offsets............................................ 14 G Grounding considerations ............................................. 6 H Home-Made Sensors - Calibration.............................. 27 I Interfacing 3-wire D.C. Proximity Switches .............. 21 Interfacing Universal Proximity Switches.................. 21 Interfacing 4-20 ma. current loop ............................... 23 Interfacing D.C. Proximity Switches .......................... 21 Interfacing Data Instruments Strain Links .................. 17 Interfacing Digital signals ........................................... 19 Interfacing Piezo devices ............................................ 17 Page #30 Interfacing Self amplified Analog sensors...................22 Interfacing to existing Load Monitors .........................25 Interfacing to Load Monitors ......................................25 INTRODUCTION: .......................................................5 J Jumper Locations - SA2000 .......................................12 Jumpers - A+D Input board.........................................13 L Load Monitors - Interfacing to ....................................25 O Offset values - Acceptable range.................................14 P Piezo devices - Interfacing ..........................................17 S SA2000 Jumper Locations ..........................................12 SA2000™ - Technical Info. ........................................6 Self amplified Analog sensors - Interfacing ................22 Sensor Calibration - strain gage type...........................26 Sensor Connections .......................................................8 Shunt resistor value calculation...................................13 Standard Sensor Connections ........................................8 Strain Gage output adjustment ....................................12 strain gage sensor Calibration .....................................26 Strain Link Hookup .....................................................11 T Table Of Contents:......................................................3 Table of Illustrations: ....................................................4 Technical Info. SA2000™ / TEC™ .............................6 TEC™ - Technical Info...............................................6 TEC™ Board Analog input...........................................7 U Universal Proximity Switches - Interfacing.................21 W Whetstone Bridge connection .....................................10 Interfacing Manual Page #31 Interfacing Manual Contact us with any questions at: Signature Technologies, Inc. 13375 Stemmons Fwy. Ste. 320 Dallas, TX 75234 Phone: (972) 488-9777 FAX: (972) 488-2924 Website: www.signaturetechnologies.com Page #32