1
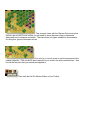
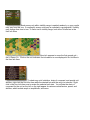
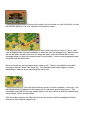
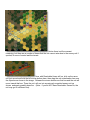
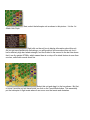
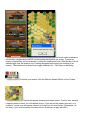
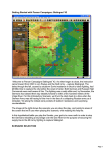
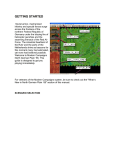
Getting Started with Modern Campaigns: Danube Front ‘85
The Warsaw Pact forces have surged across the West German border. This game, the third
in Germany and fifth of the Modern Campaigns series, represents the fighting in southern
Germany, as the Warsaw Pact attacks from Czechoslovakia and southern East Germany.
The massive forces, made up of Soviet and Czech armies, are pushing hard to cross the
Danube River and reach the Rhine, clearing all of southern West Germany. Welcome to
Modern Campaigns: Danube Front ‘85.
The image above shows the map with parts of the screen indentified so you will know where
to look when this document refers to the Terrain Info for example.
For those who have played other games in the series, there are training scenarios for bridges
due to the full hex river bridges across the Danube. Be sure to give them a look if you are
unfamiliar with them.
SCENARIO SELECTION
Insert the Danube Front CD,
if you haven’t already, and after the introductory cinematic you will be taken to the File
Selection Dialog. Click the scenario #00_Started and then OK.
This takes you to the AI Selection Dialog where
you choose the side you wish to play. For the purposes of this tutorial select Warsaw Pact AI
"Manual" for yourself and "Automatic With FOW" (Fog of War) for NATO. Click OK to get the
game underway, you are now the Warsaw Pact commander. The Rules… button can be
used to choose optional rules or reset the optional rule selections to the default state, but for
now leave the rules set to the default set.
Your first Command Report will
appear with information relevant to the first turn. Note its contents and click OK to close it. The
command report will vary with each start depending on the results of the various checks.
However, the report should indicate air units being available. You can view the report again
by choosing Info from the Menu Bar, then Last Command Report…
OBJECTIVE OF THE GAME
Click Info Menu item and then select the Victory
item from this menu. This shows how many points the first side must earn for each level of
victory. To obtain a major victory in this battle the Warsaw Pact must earn 175 Victory Points
by the scenario’s end. Click OK to close the Victory Dialog.
If you look at the map, you’ll see some oval
shapes with numbers inside them. These are your objectives. The side and nationality
currently holding the objectives are shown by the color of the ovals. To win a major victory,
you will need to hold objectives and inflict enemy casualties equal to 175 points less your
losses. As you incur losses, points are taken away from your total.
Click Info and then Objectives on the Menu
Bar to see a list of the objectives in the scenario. As you can see, there are 2 objectives
worth a total of 150 points to side one, both currently controlled by the NATO side. Click OK
to close the Objectives Dialog.
TURN 1
This scenario starts with the Warsaw Pact moving first.
As there are no NATO units visible, you will need to recon the enemy lines to determine
where and how to advance and attack. There are three unit types available in this scenario
for doing this: ground, helicopter and air.
First, let’s try to use air recon to spot the area around the
nearest objective. Click on the 50-point objective hex to make it the active selected hex – that
hex will be the point that your actions are applied to.
Then click the Call Air Mission Button on the Toolbar.
The Air
Mission dialog will open, showing air units available. There should be a recon unit available,
as shown here by the air unit with RECON after the 0/0/12, with other air units grayed out as
they cannot attack the selected hex without having spotted units in it.
Click the
recon unit’s line and then the OK button. An air recon mission will be conducted against the
selected hex.
(Tip: Enemy unit information with fog of war active will be hidden from you and summarized
as X = less than 10 men/vehicles, XX= 10 to 99 men/vehicles and XXX = 100 to 999
men/vehicles).
Each enemy unit within visibility range is spotted randomly, so your results
may vary from this one. If successful, enemy units may be revealed in varying detail. Visibility
may change from turn to turn. To find a turn’s visibility range, look at the Terrain box in the
Hex Info Area.
Now let’s prepare to move the first ground unit –
the Lt Recon Co. Click on the unit indicated. Its information is now displayed in its Unit Box in
the Hex Info Area.
To check any units’ statistics, chain of command, and special unit
abilities, right click the Hex Info Area while the desired hex with the unit(s) is selected. Right
click in the Hex Info Area now to review the selected unit stats. You will see the chain of
command for the unit on the left; on the right appear its various combat factors, speed, and
abilities, which include amph or amphibious, and recon.
Double click to select unit on the map, or click its Unit Box, so that
the Unit Box lights up. It is now "selected" and ready for orders.
Let’s move it one hex at a time. To do so, right
click an adjacent hex, the one southwest, or down-left, from the selected unit. If able to move,
the unit will obey. Should a unit ever not follow the order, look to the Status Bar to see a
message telling you why the movement can’t be performed. Continue moving generally west
along the road, as shown here.
Move one more hex into the adjacent hex to the up-left. There is a minefield, not spotted
previously, that will "attack" the recon unit. The minefield could cause fatigue or losses,
depending on chance, and it may disrupt the recon unit.
If the unit did not disrupt, move it one hex southwest – down-left – into
the objective hex and adjacent to the enemy unit if it has been spotted by air recon. This
movement may draw fire from any enemy unit(s) in the area, which as with the minefield may
cause fatigue, losses and disruption.
This action also captured the Objective and you can see the oval has changed from West
German to the occupying nations color.
With the recon unit selected and the reachable hexes ON, click the
Change Travel Mode button on the Toolbar. This will deploy the recon unit, removing the
white bar it has, which shows units that are in travel mode. Most units that still show yellow
movement points have enough points to deploy out of travel mode. The unit should have 0
movement points left at this point, so it cannot move any further. This deployment may not be
possible if the unit disrupted from either the minefield attack or enemy fire.
(Tip: Some units such as Artillery and Anti-tank Guns cannot move unless they are in T mode
– if you try and move such a unit while deployed the status bar will give you the reason – in
this case it will likely say "Unit must be in Travel Mode to move")
Now select another unit – the recon unit just below
of the starting position of the unit that just moved. This unit has the white bar across the
bottom indicating that it is already in Travel Mode. Let’s move it several hexes at once toward
the front lines. To do so, left click and hold the left mouse button down and drag it to the
destination 5 hexes west, as indicated by the arrow, then release the button. The system will
determine the path it follows, so it’s wise to drag smallish distances to keep control, since
when fog of war (FOW) is selected, movement cannot be undone.
Clicking the Reachable Hexes Button on the Toolbar will highlight where
a unit may still potentially move in a turn.
Notice there is still movement
remaining, but there are a number of hexes that the unit cannot enter due to the enemy unit if
spotted, its zone of control and the terrain.
Now, with Reachable Hexes still on, click on the recon
unit just moved and hold the left mouse button down, then drag the unit a destination hex near
the objective as shown in the image. Release the mouse button over that hex and the unit will
move toward that hex. There the unit will run into a previously unspotted enemy unit as
shown and again possibly draw fire. (Note - if you do NOT have Reachable Hexes On, the
unit may go to a different hex).
Next, select the helicopter unit as shown in this picture. It is the 1st
Attack Helo Sqdn.
Right click on the unit box to display information about this unit.
As you get more familiar with unit ratings, you will be able to tell more about this unit, but it
has a relatively high hard attack strength, and the Guided in the second to the last line shows
that it can fire guided ATGMs, which means there is no drop off in attack factors at more than
one hex, unlike with normal direct fire.
Select this unit and drag it to the hex shown. But first,
to move it must be put into travel mode, so click on the Travel Mode button. This essentially
put the helicopter in flight mode where it can move over the terrain and obstacles.
Now it is time to fire upon the NATO force. With the helicopter unit still
selected, it should still show green for movement, meaning it has more than two thirds of its
movement left. In general, units can fire three times if they don’t move, so this unit can fire
twice, or fire once and then move further.
To fire this unit, hold the Control Button, place the mouse over the enemy unit
two hexes to the south, and a crosshairs will appear. Right click to Fire. The results of your
fire will be shown on screen – either there will be no effect, or you’ll cause a loss, or possibly
disrupt the enemy (the results will be yellow), or cause it to be broken (the results will be red).
Fire this unit twice at the NATO unit.
With both direct and indirect fire, if more than one enemy unit exists in a hex, you are given
the option to select a target should your weapons be appropriate.
Now let’s fire your artillery. Artillery can fire at any unit within its range, as
long as an eligible spotter can see it. Click on the Indirect Fire button. Doing so brings up a
list of all indirect fire capable units in the scenario that are capable of firing in this turn.
Grayed out units don’t have a spotted target in range. By moving to each unit in the list, it will
highlight in red all eligible enemy targets that the unit can target.
In this case there is one unit for the
Warsaw Pact, and it can target one NATO unit, as shown. To fire on the spotted target in
range, move the mouse cursor, which shows a crosshairs, over the enemy unit and right click
on it. Fire this unit twice at the enemy.
(Tip: Units normally have enough MPs to fire two or three times per turn. This artillery unit can
fire twice at the Hungarians in the hex adjacent to the Russian infantry unit.)
Next, move the 2 infantry units
stacked together, using reachable hexes on, to the locations shown here, avoiding the
minefield.
Now select the Engineer unit shown here.
Right click on the engineer unit box to see its abilities, and you
will see that this unit shows mine/bridge in the second to last line. This indicates the unit can
remove mines, so it can be put to use on the minefield that has been found on the main road
through the nearby objective.
Click and drag this unit into the minefield, which unlike other units
it can enter without being attacked. As it moves into the minefield it will show "Clearing
Mines", but it won’t do that in travel mode. Click on the Travel Mode button to deploy the
engineers and start clearing the minefield. If the engineer does not get disrupted during the
enemy turn, the minefield will be reduced by one level at the start of the next Warsaw Pact
turn, in this case removing the level 1 minefield.
There are two more ground units,
plus a divisional HQ and an HQ for the helo unit, that have not yet moved. Move them to
match the positions shown here. The Divisional HQ will need to go into travel mode and then
deploy back to reach the position indicated.
While you cannot predict what
the enemy will do in their phase of the turn, your forces have the initiative and must continue
to advance if you are going to win. To achieve a victory, the Warsaw Pact forces will have to
drive west on the second objective hex, plus hold the objective that should have been
captured this turn. This requires pushing back the defenders through fire and assault,
following the arrows on the map. Fire is used to weaken and disrupt the defenders, while
assaults are used to push them out of a hex. This attack will require a push across the river
and into the objective.
When you’ve finished moving all your units, click the Next Turn Button on the
Toolbar and click OK if prompted. The enemy will move and fire its forces. Your units may fire
automatically in reply using Opportunity Fire. Some enemy movement may be spotted. Your
next turn will be announced once the Russian Command Report appears.
TURN 2
The Command Report contains
information, such as the availability of air units, HQs out of command, artillery unavailable,
and a host of other details. Your command report will vary from this one, depending on the
specifics of your game. In this case, the report shows an enemy HQ picked up through SigInt.
Clicking on it will show the location of the HQ spotted. Also, as expected, the minefield was
removed by the engineer unit. Click OK to remove the dialog.
At the start of this turn, the situation
should be similar to this. There will probably be more enemy units that appeared during the
other side’s turn.
Your artillery may be unavailable this turn, as shown in the command report above. If it is
available, you may fire it at the enemy unit within its range. Otherwise, move the artillery unit
up to be able to fire at the enemy units near the river on the following turn, if it becomes
available again.
At this point, the most important thing to do is prepare to push across the
river and into the objective there. Select the helo unit and move it as shown, to fire upon the
defenders near the river, assuming a NATO unit occupied the objective during their turn. Go
ahead and fire the helo unit on the adjacent defender.
Also, move the infantry units nearby into the town, adjacent to the
objective hex. Deploy from travel mode and fire them at the defender in the objective. This
may disrupt the enemy unit, as shown here, or at the least cause heavy losses to this target.
(bmr T2_Tank_Move.bmp}Select the tank unit just to the east of the objective and move it into
the stack of units across from the objective. It will try an assault across the river, which
requires staying in travel move to cross the bridge. Otherwise, the unit can’t move or assault
across the river.
Let’s now order an advance
into the hex occupied by the NATO unit occupying the objective, as shown. To enter an
enemy occupied hex, you must assault it, using only undisrupted units. With the tank unit still
selected right click the enemy’s hex. A dialog will appear announcing the initiating of an
assault. The initiation of an assault can trigger defensive fire. Click okay on the dialog.
To resolve your assault, click the Resolve Assault Button on the Toolbar.
Results will appear showing both sides’ losses. If you’ve won, and any
remaining enemy retreat, you will capture its hex. If you win and the enemy does not, or is
unable to, retreat, you will capture some of its forces, but not enter its hex. (Remember, do
not worry if your outcome does not match the one illustrated, as play will differ.)
(Tip: when vehicles assault into non-Clear hexes as in the situation, they may suffer a penalty
for lacking infantry support, so for best results use a combined arms approach when
assaulting. There is also a penalty for assaulting in travel mode. However, in this case the
penalties are worth the risk for the chance to capture the objective quickly, since the defender
is disrupted.)
FINISH THE GAME
You now know how to move your units, fire, and assault with your forces. With the victory
conditions in mind, keep maneuvering your forces in the manner you see fit. The end of the
game will be announced at the conclusion of the enemy’s final turn, at which time, final Victory
Points will be shown. Be sure to create a plan and follow it, either the one outlined at the end
of turn 1 or one that you develop yourself.
(Tip: If you capture an objective hex you will earn its Victory Points, but objectives can be
recaptured an endless number of times in a game. Only the side owning it at a scenario’s end
receives its points. To take an objective hex simply enter it. You do not need to remain there.)
Once both objectives are taken, concentrate on trying to eliminate the rest of the NATO units
for more points toward victory. The objectives themselves only provide enough points for a
draw/minor win, so another 25 points from net losses must be achieved to reach a major
victory.
To restart the scenario, click File and Selection in the Menu Bar. A list of scenarios will appear
and you may select any by double clicking on its entry.
At this point, it is recommended for new players or those that have not dealt much with rivers
and bridges that you read through the user manual section on bridging rivers, then play
through two more tutorial scenarios, #01_Blowing_Bridges.scn and
#02_Building_Bridges.scn, to get a feel for these types of actions.