1
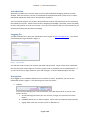
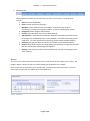
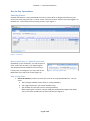
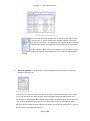
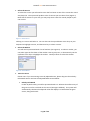
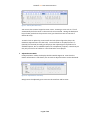
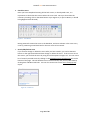
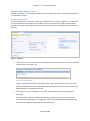
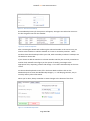
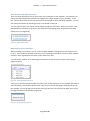
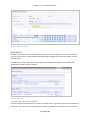
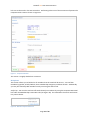
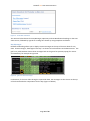
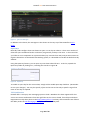
DotGolf Live User Documentation DotGolf Live User Documentation Version 1.20100512 Recently Updated: 12 May 2010 – Tee booking system documentation added; except for the Start Sheet section. 15 April 2010 – Course details screen explained, membership details expanded. 15 April 2010 – Bulk Email add-on documented. 18 March 2010 - Membership details screen explained. Terms of Use This document contains proprietary information of the New Zealand Golf Network Ltd (DotGolf) and/or its affiliates. You may use this document only as a guide to assist you in normal, legal usage of the DotGolf Live and associated DotGolf systems. This document remains the property of the New Zealand Golf Network Ltd and may not be used, circulated, disseminated, copied or quoted to any third party outside of the above condition. Although we endeavour to keep the information in this document accurate and up-to-date, we offer no guarantee (express or implied) that the information is accurate, timely, complete or reliable. We may update this document from time to time at our discretion without any prior notice. Page 1 of 33 DotGolf Live User Documentation Table of Contents Terms of Use ........................................................................................................................................... 1 Table of Contents .................................................................................................................................... 2 Introduction ............................................................................................................................................ 4 Logging On .............................................................................................................................................. 4 Navigation ............................................................................................................................................... 4 Home ....................................................................................................................................................... 5 Day-to-day Operations............................................................................................................................ 6 Entering Scores ................................................................................................................................... 6 Hole-by-Hole entry vs. Adjusted Gross entry................................................................................. 6 Step-by-step Guide ......................................................................................................................... 6 Membership Administration ............................................................................................................. 11 Adding New Members .................................................................................................................. 11 Bulk Membership Administration ................................................................................................. 13 Maintaining Lists of Members ...................................................................................................... 13 Editing Membership Details .......................................................................................................... 14 Membership Reporting ................................................................................................................. 16 Interfacing to other systems ......................................................................................................... 16 Courses.................................................................................................................................................. 16 Course Changes................................................................................................................................. 16 Marker Information .......................................................................................................................... 17 Course Handicap Calculator .......................................................................................................... 17 Bulk Email.............................................................................................................................................. 18 Composing a new Bulk Email ............................................................................................................ 18 Recipients ...................................................................................................................................... 19 Club Website Publishing ............................................................................................................... 20 Email Content................................................................................................................................ 20 Testing a Bulk Email Prior to Sending ............................................................................................... 20 Sending the Email ............................................................................................................................. 20 Bounce Tracking and Email Status .................................................................................................... 20 Tee Booking........................................................................................................................................... 22 System Overview .............................................................................................................................. 22 Getting Started – for new tee booking clubs .................................................................................... 22 Dashboard ......................................................................................................................................... 22 Page 2 of 33 DotGolf Live User Documentation Elements on the Dashboard.......................................................................................................... 23 Creating and Maintaining Day Templates......................................................................................... 24 Template Options ......................................................................................................................... 24 Creating and Maintaining Time Sheets ............................................................................................. 26 Day Messages................................................................................................................................ 27 Open Days ..................................................................................................................................... 28 TXT Notifications ........................................................................................................................... 28 Using Templates and Blocks to Create Your Timesheet ............................................................... 29 Multi-Slot Selections in the Time Sheet interface ........................................................................ 30 Deleting Time Sheets .................................................................................................................... 30 Bookings using the Start Sheet (Under Construction) ...................................................................... 31 Settings.............................................................................................................................................. 31 Override Opening Day/Time for DIY Terminal .............................................................................. 31 Opening Day .................................................................................................................................. 32 Opening Time ................................................................................................................................ 32 Allow Members to Book Visitors on DIY ....................................................................................... 32 Send Daily Booking First-Timers Email .......................................................................................... 32 Enforce Strict Multi-Payment Rules .............................................................................................. 32 Guest Discounts only to Full Playing Members............................................................................. 32 Max Guests per member per booking .......................................................................................... 32 Max bookings per member ........................................................................................................... 32 Junior Age...................................................................................................................................... 33 Page 3 of 33 DotGolf Live User Documentation Introduction Welcome to DotGolf Live, the next major version of the DotGolf handicapping software for New Zealand. With this release, we have re-architected the club administration system to be an online, web-based application which can be accessed from anywhere. This user manual will give you the basic skills needed to perform daily operations at your club using the DotGolf Live system. Please note that basic computing knowledge is assumed, such as the ability to use a web browser to access the Internet. If you do not have these skills, we recommend that you take a basic training course before proceeding. Logging On To login to DotGolf Live, open your web browser and navigate to http://live.golf.co.nz/. You will be presented by the Login window in Figure 1. Figure 1 - Login Window You will now need to enter your Club ID, username and password. These are the same credentials that you may have used to login to our other systems such as the Admin site or DotGolf Express. If you do not have your login, please ask your club manager, or contact DotGolf Support for help. Navigation Once logged in, the standard DotGolf Live user interface is shown. By default, you will see the Dashboard shown in Figure 2. The following main areas are shown: 1. Title Bar In this area you will see your current username, your club name and ID, as well as a few options such as: a. Account Settings (maintain your user account, change your password and a few others) b. Feedback (allows you to request support, report issues and request enhancements) c. Logout which ends your current session on DotGolf Live Page 4 of 33 DotGolf Live User Documentation 2. Navigation Bar The navigation bar allows you to reach the core areas of the system. Currently these include: a. Home (view the Dashboard) b. Scores (shows the Score Input page) c. Members (allows administration of members, in particular searching for, transferring, creating and resigning members, as well as updating their details) d. Categories (allows category maintenance) e. Courses (view details for any course in New Zealand) f. Subscriptions (a paid service included with DotGolf Live Ultimate which allows you to manage your membership subs, invoice members, and offers accounting system integration. For more information and pricing, please contact DotGolf Support.) g. Calendar (manage your News and Events that appear on the NZ Golf website). h. Reports (view various reports for handicapping, membership, card printing (for clubs with this add-on) and membership subscriptions) i. Settings (control various aspects of how DotGolf Live operates and integrates with other systems) Home This area of the screen shows the content for the current section of the system you are using. The image in Figure 2 shows the full view of the DotGolf Live Dashboard, for example. Here you will see an overview of your membership, any emails that have been sent to you from other clubs and also you can Update Your Club Details here. Figure 2 - Dashboard Page 5 of 33 DotGolf Live User Documentation Day-to-day Operations Entering Scores DotGolf Live features a newly developed score entry system which is designed for efficiency and ease of use, from the ground up. To enter scores, click on the Scores tab once you have logged in to DotGolf Live. This will start the score entry screen, as per Figure 3. Figure 3 - Score Entry Hole-by-Hole entry vs. Adjusted Gross entry Depending on your club policy, you may choose to enter scores hole-by-hole, or by adjusted gross. The default mode for DotGolf Live score entry is hole-by-hole; to change this you may click on the Mode links at the top of the screen (Figure 4). Figure 4 - Score Entry Mode Links Step-by-step Guide 1. Select the member you want to enter the score for by using the Member box. You can enter: a. The full 7 digit member ID (for home or visiting members) b. The 4 digit number (for your home members only) c. The member surname (for home or visiting members) When entering the surname, a search dialog will automatically appear that allows you to search for members by surname and club (see Figure 5) Page 6 of 33 DotGolf Live User Documentation Figure 5 - Search for member by name Once you have found the member you are searching for, click on them to select them. If you are entering the member number, just hit the Enter key to select them. You will notice the member details are shown in the leftmost column, including the current handicap for the member. The box will take a blue shade if the member is male, or pink if they are female. The handicap will appear with an N next to it if it is a 9 hole handicapped member. 2. Select the play date. You will notice a calendar appear as soon as focus is on the Play Date box (see Figure 6). Figure 6 - Select Play Date You can click the day you want (note that future dates cannot be selected for score entry), or you can also enter the date using the numeric keypad. Note that abbreviations are accepted; so in the example above where today’s date is 20 January 2010, we can also enter “19” to mean 19 January 2010, or even “26” which will translate to 26 December 2009. Once you have finished the date selection (by clicking on the date or hitting Enter), you will be shown the Course/Marker selection. Page 7 of 33 DotGolf Live User Documentation 3. Select the Course To select the course you will need to enter the first letter or two of the course the round was played at. The system will produce a list of courses you can select from (Figure 7). Note that for visitors to your club, you may only enter scores for rounds played at your own course. Figure 7 - Select Course Clicking on a course will select it. You can also use the up and down cursor keys on your keyboard to highlight courses, and the Enter key to select a course. 4. Select the Marker You will now be presented with a list of markers (see Figure 8). To select a marker, you can either type the first letter of the marker name to jump to it, or alternatively use the up/down cursor keys to highlight the marker. Finally hit Enter to select the marker. Figure 8 - Select Marker 5. Enter the Score Please note: If you are entering scores by Adjusted Gross, please skip past the Hole-byHole Mode section and see the Adjusted Mode section below. a. Hole-by-Hole Mode In Hole-by-Hole mode, you will be presented with 9 or 18 boxes that allow entry of the gross score for each hole on the course (see Figure 9 below). The system will automatically calculate the adjusted value and display it in bold below the gross scores, along with totals. Page 8 of 33 DotGolf Live User Documentation Figure 9 - Hole-by-Hole Score Entry You can use the numeric keypad to enter scores. Entering a score such as “4” will automatically shift the cursor to the next hole to be entered. Hitting the backspace key will take you back to the previous score (you should not have to use Tab or Shift+Tab at all). To mark a hole as picked up, enter a 0 for the hole (this will give the player the maximum adjusted score for that hole). To mark a hole as not played, enter a * (asterisk) for the hole (this will give the player the adjusted gross equivalent of 2 stableford points, but no stableford points for competition purposes). Note that you may only mark 2 out of 9 holes or 5 out of 18 holes as not played. b. Adjusted Gross Mode In Adjusted Gross mode, the display should resemble Figure 10. Note that the marker information is still shown, but no totals or adjusted values can be calculated. Figure 10 - Adjusted Gross Score Entry Simply enter the adjusted gross score into the Total box and hit Enter. Page 9 of 33 DotGolf Live User Documentation 6. Check the score Once you have completed entering all the hole scores, or the adjusted score, it is imperative to check that the score matches the score card. Once you have done the necessary checking, click on the SAVE button as per Figure 11 (or just hit Return; it should be highlighted while focused) Figure 11 - Save Button Hitting SAVE will commit the score to the database, and move it down in the score entry control, presenting a new blank line for the next score to be entered. 7. Search/Edit/Delete score If you need to change or delete the score after you have saved it, you can hit the EDIT button on the right-hand side and then change or delete the score. If the score is not on the screen, you can find the score by using one of the options in Figure 12. You can view a list of recently entered scores by clicking on the Show Recently Entered Scores link at the bottom of the page. This will load the last 10 scores entered, and you may edit them by clicking their individual edit links. You can also view scores via the Score Listing by Day report. Figure 12 – Find Score Page 10 of 33 DotGolf Live User Documentation Membership Administration DotGolf Live features a user friendly membership entry system that allows you to add and maintain your member’s records. Adding New Members To add a new member, click on the yellow new member button as shown in Figure 13. You will need to ascertain whether the member you’re adding was ever a member of any club in New Zealand. This will ensure that their handicap record and any scores they may have played will be carried over properly. Figure 13 – Members 1. If this is the first time a person has held a NZ golf handicap then click on ‘create a brand new membership’, as per Figure 14. Figure 14 - New membership Assign a membership number to the new member, then click Continue to enter the other details of membership. See the Editing Membership Details section for more details on the fields available on a membership record. 2. If the person is or was a member of any club in New Zealand, or currently has NZ golf handicap: Enter the person’s previous membership number (if you have it) or fill in the name and surname fields, selecting the correct gender. Select the membership status (whether they are current or resigned) appropriately; then click Search. Page 11 of 33 DotGolf Live User Documentation Figure 15 – Find Previous Handicap The membership history for that person will appear, see Figure 16. Select the current or the last resigned record for the member. Figure 16 - Check for Duplicates After reviewing the details and confirming the selected member is the correct one, you need to select whether to add the member as a home or secondary member. Home members have their handicap held at your club, while secondary members’ handicaps are left with their home club. If you choose to add the member as a home member and they are currently a member at another club, DotGolf Live will give you the option of sending a message to the appropriate club, requesting a home club change. This is done automatically on the next screen. On the membership details screen, fill in the basic details and then click on the Membership tab to enter the Membership Category - i.e. Full Playing, Summer, Pay as You Play and any other information. When you’re done, always remember to Save Changes at the bottom of the form. Figure 17 - Edit Membership Details Page 12 of 33 DotGolf Live User Documentation Bulk Membership Administration There are some operations you can do in bulk, over a selection of your members. An example is to change the New Zealand Golf membership category for a large number of your members. To do this, use the select boxes on the left of the search results grid to select individual members. You can also select all members by checking the box in the header of the grid. You can page around in the search results without losing your selections. When you’re done, click Bulk Admin at the bottom of the form. This will present a new page with the bulk administration options on it (see Figure 18). Figure 18 - Bulk Member Admin Maintaining Lists of Members While searching for members, you can select multiple members and operate on this selection oneby-one. This is useful for operations where you are updating a few fields at a time for each member and don’t want to go back to the search screen after every save. You can build a member list by selecting the checkboxes at the left of your search results as per Figure 19 below. Figure 19 - Selecting Multiple Members Once you’ve selected all the members you want, click on the Select link for the member you want to start off editing. The member details screen (see the next section) will appear allowing you to edit the member. At the top right of the details screen you will see a set of links that allow you to scroll through the selection of members (Figure 20). Figure 20 - Scrolling the Member List Page 13 of 33 DotGolf Live User Documentation In addition to this, you’ll also see a Save and Next button at the bottom of the screen alongside the standard Save Changes button. Clicking Save and Next will save your changes to the current member and display the next member in the list, ready for editing. Editing Membership Details Once you’ve searched for the member you want to edit (or selected a list of members as per the previous section), click on the Select link at the very right of the results (Tip: If you search for a member by membership number, you will be taken straight to the membership details screen). All the details on each member record are divided into different areas, and these areas are shown at the top of the membership details screen as tabs (Figure 21). Figure 21 - Membership Detail Tabs The table below offers a short explanation of each field in a membership record. Basic Tab Membership Number Handicap First Name, Surname, Initials Adult/Junior Date of Birth Gender Handicap Type Password for www.golf.co.nz Shows the member’s number at your club. Shows the member’s current official handicap index (or Pending if this is the case). On rollover day, the handicap effective on the next day will also be shown. Whether the member is an adult or junior, for NZ Golf levy purposes. For juniors, you must also enter a date of birth. Whether the member is male or female. You can request changing a member’s gender by clicking the Change link – this will notify us automatically, and after we review the scores and membership record, the change will be applied. Whether the member holds a 9 hole or 18 hole handicap. You can request to change this. Note that when changing a member from 9 to 18 holes (or vice versa) their scoring record is wiped. You may reset a member’s password for accessing the www.golf.co.nz handicapping website. To do this, click Reset Password. A new randomly generated password will be shown (you can change this if the member requests a specific password); for example: Page 14 of 33 DotGolf Live User Documentation The system also shows the phonetic pronunciation for easy reading over the phone. Remember to click Save Changes at the bottom of the form to activate the new password. Address, Postal Code, Country Email Address Allow Bulk Mail The email address the member uses to communicate with your club. Note that if this address is incorrect, they will not receive any club newsletters (if applicable) or tee booking notifications. We may also send the member’s password to this address if they request it. If your club uses the DotGolf Bulk Emailing system, you may mark specific members to stop them receiving any bulk mail that you send. This setting controls this. (If you are interested in using the DotGolf Bulk Emailing system at your club, please contact us) Phone - Home, Work, Mobile, Fax Membership Tab Home Club Membership Category New Zealand Golf Category Membership Status Shows the member’s home club. If the member is a secondary member at your club, the system will give you the option of changing the home club – this will automatically send a request to the member’s home club asking them to accept or reject the change; after which the system will process it as necessary. Controls the member’s category at your club. Controls the member’s New Zealand Golf category, mainly for levy purposes. Shows whether the member is current, inactive or resigned at your club. You can click the Resign link to resign a member – you will also be given the opportunity to mark them as Unfinancial at this point. Remember to Save Changes when you’re done. Page 15 of 33 DotGolf Live User Documentation Membership Reporting The two main reports for membership are the Club Member Listing and Member Handicap Listing reports. These can be found on right hand side of Members screen. All reports may also be found under the Reports tab on the navigation bar. Interfacing to other systems If your club uses one of the software systems that needs to upload the NZGA.TXT file, you’ll find this option at the top right of the members screen (Figure 22). Figure 22 – Interface Courses The courses section in DotGolf Live allows you to review pending or completed course changes, and also the history for any course and marker in New Zealand. If there are any pending course changes, you will be notified by email as well as a small alert bubble on the Courses tab. Figure 23 - Courses You may also download the NZCourse.csv file for interfacing with third party software packages. This may be done by clicking the Download NZCourse.csv button. Course Changes Courses are administered and rated by New Zealand Golf. If you need to change your course parameters (such as distances, strokes, course names etc), you need to contact New Zealand Golf. Page 16 of 33 DotGolf Live User Documentation Once a course change is loaded into the system by them, it will appear under your Courses tab, from where you can verify the change. To process your course changes, select either Accept or Reject from the right hand box (Figure 24). You may also click Show Details to expand a full view of exactly which changes would be applied to your course(s). Note that if you do reject a course change, you need to enter a rejection reason which will be sent to New Zealand Golf for review. For each course change, you can override the start date (which defaults to tomorrow). When you’re ready to apply the changes, click Save Changes. Figure 24 - Course Changes Marker Information The lower half of the Courses screen provides an interface where you can view current or historical course information for any course in New Zealand. As shown in Figure 25 below, to view the details for a course, you’ll need to select: 1. The Club or Course 2. The Marker 3. An effective date (because markers change over time) After selecting these criteria, the course details will automatically appear. Any course changes will be shaded in blue, and if you hover your mouse over the changes, the previous and current values will be displayed in a tool tip. Course Handicap Calculator From this screen you may also calculate a course handicap for any member playing the course. You can do this by either entering the member’s 7-digit membership number, OR entering the member’s handicap index. Click Calculate, and a box will appear containing the course handicap. Page 17 of 33 DotGolf Live User Documentation Figure 25 - Marker Information Bulk Email DotGolf Live provides a fully featured bulk email system which is available to all clubs as an add-on. If you are interested in using DotGolf Live Bulk Emailing to engage your membership base, contact DotGolf today! The following section is applicable only to clubs with the Bulk Emailing add-on. The Bulk Emails dashboard is shown in Figure 26 below. Figure 26 - Bulk Emails Composing a new Bulk Email Click the Compose New Email link to create a new blank email. If you have previously sent emails via the system, you can also use a previously sent email as a template by clicking the Use As Template Page 18 of 33 DotGolf Live User Documentation link next to the email in the Sent Items box. Performing either one of these actions will present the Compose Email screen as shown in Figure 27. Figure 27 - Compose Bulk Email The screen is roughly divided into 3 sections: Recipients This section allows you to build a list of members that the email will be sent to. You can filter members by gender, 9-hole/18-hole, their membership categories, and date of birth. Additionally you may also manually add members one by one using the Search link. Useful Tip: You can also send one-off emails directly to members by using the Compose New Email link under the Membership screen Basic tab (see Figure 28). This eliminates the search and Create List process above. Figure 28 - Member Compose New Email Page 19 of 33 DotGolf Live User Documentation Club Website Publishing If your club has a DotGolf Club Website, the bulk email system can automatically publish bulk emails on your website as news articles. If you want this to happen when the email is sent, select the Publish box, and select a topic and keywords for searching (these options are initially hidden, but are displayed when the Publish box is checked). Email Content This section defines the content that will go in the email to be sent. You can pick the From address (which will be a selection of email addresses that you can define in your Club Settings – see the Settings tab), enter a subject (required), and enter a message body. Using the editor, you may do some advanced formatting, including tables, forms and limited styling. You can also upload images and insert them into emails to be sent. The DotGolf Bulk Email system will automatically embed images into emails so they will display properly in most email clients (including Microsoft Outlook). You may also attach files to bulk emails. Please be wary of sending any executable or compressed files, as these may deter your users or cause spam and antivirus software to quarantine your emails. Also keep in mind that some home users don’t have Microsoft Word installed, so they may not necessarily be able to view .DOC or .DOCX files. PDF (Adobe Acrobat) documents are recommended as the portable alternative. After you’ve finished editing your email, you can click Save Changes to save it. We recommend saving your email at least every 10 minutes to guard against loss of work in case of power failure, loss of connection, session timeouts and the like. Saving your email will NOT send it; this is a separate step. Testing a Bulk Email Prior to Sending Before you send your newly created bulk email, we recommend that you test your content first by sending it to your own email address. To do this, you can click the Test link next to the email in the Drafts box. This will send the email to your email address as defined in your User Profile. If you don’t have an email address set in your profile, you can do this by visiting the profile page – click Account Settings at the very top right of your screen. Sending the Email To send your bulk email to all its recipients, click the Send link in the Drafts folder. This will move the email into the Sent Items folder and display a progress indicator as emails are being sent out. You do not have to stay on the page; the email system will continue sending even if the browser is closed. Bounce Tracking and Email Status To view an email and see its sent status, click on the subject line of an email in your Sent Items box. This will present the screen in Figure 29. After the bulk email system has sent an email, it tracks the bounce messages that are returned because of invalid email addresses and similar situations. In the case of a bounce message being received, it automatically links the message to the member, and builds a list of failed emails. You Page 20 of 33 DotGolf Live User Documentation can see which members did not receive your bulk email by reviewing the Failed or Bounced emails report – just click the “emails known to have failed or bounced” link. Remember that not all mail server on the Internet report bounces; many are configured to reject emails “silently”, which means the sender has no way of knowing that the email was not delivered. Therefore, a message being successfully sent is not a guarantee that the recipient has received it. Figure 29 - View Email and Status In addition to the bounced emails report, you may also scroll through the recipient list – any emails that failed will be highlighted in red along with a status message. Page 21 of 33 DotGolf Live User Documentation Tee Booking DotGolf has a fully integrated tee booking system which is available to all DotGolf Enterprise clubs. The tee booking system is also available to non-Enterprise clubs for a small fee; to find out more please contact us. System Overview DotGolf Tee Booking consists of a few main elements: Public Website – http://www.golf.co.nz/ Members can log on to the national website to view, make and cancel their bookings. DotGolf also offers a pre-pay system to all clubs to allow credit card to be accepted online (contact us for more information on this add-on). Your Club Website (if enabled for your club) If your club has a DotGolf powered club website, tee booking is integrated with your website. Members logging in to your club website can book tee times directly at your club. DIY Terminal at club The DotGolf DIY terminal is an easy-to-use touch screen interface to the tee booking system, aimed at your club members, especially those without readily available internet access. The DIY terminal can be configured to allow preferential tee times, so that members booking at the DIY may reserve times before the online system allows. This can drive more foot traffic to your facilities, in turn producing higher revenue for your bar, cafe and pro shop. DotGolf Live Tee Booking Administration We provide a powerful online administration tool to allow club staff to create, edit and cancel bookings. The sections below focus on the administration system available in DotGolf Live, as the client systems listed above are primarily for member/visitor use. Getting Started – for new tee booking clubs As a new club using DotGolf Tee Booking for the first time, you will need to: 1. Configure tee booking settings as per the requirements for your clubs. 2. Configure a set of Day Templates so that all days of the week are covered. 3. Create time sheets for a number of days in advance. Generally DotGolf staff will assist you in the above set up process, so the details will not be elaborated on in this document. Dashboard To access the Tee Booking administration system within DotGolf Live, click on the Tee Booking tab on the navigation bar (Figure 30). Page 22 of 33 DotGolf Live User Documentation Figure 30 - Tee Booking tab Note: If you cannot see the Tee Booking tab, you may be missing user permissions. Please ensure you are using the correct username and password provided by DotGolf or your club administrator. If you still cannot see the tab, we may need to configure your user account with the proper access permissions. Please contact DotGolf if you require any assistance. After clicking on the Tee Booking tab, if you have administrative privileges for tee booking, you will be presented with the Dashboard in Figure 31 below. Figure 31 - Tee Booking Dashboard Note that the dashboard will only show empty timesheets if you are using tee booking for the first time; the example screen shot in Figure 31 is for a club who is actively using the system. Elements on the Dashboard The following is a list of elements shown on the Tee Booking Dashboard: Element Date Status Description Shows the date for each time sheet. Weekends are highlighted in a brown shade. Shows whether a time sheet is open, opening soon, closed (in the past), or empty. If a timesheet is currently open for booking, capacity information will be shown to give you an idea of how full the day is. For empty time sheets, the Message of the Day is shown for quick reference (eg. when a day is closed for coring). Page 23 of 33 DotGolf Live User Documentation Template Places Booked Shows the number of places available on a timesheet. This is the number of players (not tee times) – i.e. a single tee time is usually counted as 4 places, as 4 people may potentially book there. Shows the number of people booked on a timesheet. The following options are available, depending on the timesheet in question: Start Sheet This link takes you to the Start Sheet for the day. See the Bookings using the Start Sheet section below for information on how to use the DotGolf Live Start Sheet. Edit Timesheet (only shown if your account has appropriate permissions) Clicking this link will take you to the timesheet maintenance screen. See the Creating and Maintaining Time Sheets section below for more information. Create Timesheet (only shown if your account has appropriate permissions) Clicking this link will allow you to create a timesheet for an empty day. See the Creating and Maintaining Time Sheets section below for more information. Creating and Maintaining Day Templates DotGolf Tee Booking uses predefined templates to generate timesheets on a daily basis. The club is ultimately in control of these templates, and may create any number of templates for various uses. To get to the Template administration screen, click on the Templates tab on the sub-navigation bar (see Figure 32 - Tee Booking Templates Tab) Figure 32 - Tee Booking Templates Tab Once you click on the Templates tab, a screen will be shown to allow you to pick an existing template. A New Template button will be shown in the top left corner of the screen, allowing you to create a template from scratch. Template Options Clicking on the New Template or selecting an existing template will take you to a screen similar to the screen shot in Figure 33 below – the only difference between the two being the fact that for a new template you can specify a name for the template. Page 24 of 33 DotGolf Live User Documentation Figure 33 - Creating a new Day Template The following elements and options are available on the Edit Template screen: Element Template Name Applies To Block Name Description Specifies the name for a new template, eg. Saturday Shotgun; Monday Standard; etc. Note that once a template has been created, the name cannot be changed. Select the days of the week that you would like this template to be used. When creating timesheets, you will only be able to choose templates that are available for the date of the timesheet. The days of the week may be changed at any time. The block name controls who may book in the particular slot. Blocks are standard across the system; the following blocks are currently available: Open to ALL Open to ALL Home and Affiliated Visitors Open to ALL Home Members 18 Hole Men/Women ALL 18 Hole Men/Women Home Members Only 18 Hole Men/Women Home Members and Affiliated Visitors Only Men Home Members Only Men Home and Affiliated Visitors Only Men ALL 9 Hole Men ALL 9 Hole Men Home Members and Affiliated Visitors Only 9 Hole Men Home Members Only Women ALL Women Home Members and Affiliated Visitors Only Women Home Members Only 18 Hole Women Home Members and Affiliated Visitors Only 18 Hole Women ALL 18 Hole Women Home Members Only 9 Hole Women Home Members and Affiliated Visitors Only 9 Hole Women ALL 9 Hole Women Home Members Only Alias Key Note that 18/9 hole depicts the number of holes being played, which has no correlation to the membership type (18/9) of the member/visitor who is booking. You can change the block name as displayed to the public and your members on the DIY terminal and public website. If you want to change the Alias, you will need to update the Key as well. The key is an abbreviated form of the Alias, and is generally shown on the left of the timesheet online and on the DIY terminal. Page 25 of 33 DotGolf Live User Documentation Course / Tee From/To Time Interval Starters Slots Visibility Controls the start tees. For example, a shotgun start will generally have all tees selected (i.e. 1 to 18), where a normal start will only have tee 1 (and possibly 10 for 9 hole play) selected. Specifies the start and end time of the block. Note that DotGolf Live will recalculate your End time if the time between start and end does not divide into the interval specified. If this happens, the system will alert you to the fact. Specifies the number of minutes between tee times. Controls the number of “starters” times; eg. gaps in the timesheet used to catch up with a slow field. Controls the number of players allowed to tee off at a particular tee time. At present the DotGolf system supports between 1 and 4 players per tee time. Allows you to specify who can “see” and book into a specified tee time. Note that the administrator can, at any time, book anyone into any slot at their own discretion. These limits only apply to the public website and DIY terminal. Options Add New Block Show to All / Adults / Juniors – controls whether adults, juniors or both can see the slots in question. Book on Internet – controls whether the slot is allowed to be booked into on the website. Book on DIY – controls whether members of your club may book into the slot on the DIY terminal (if installed at your club). Remove – removes the block from your template. Duplicate – makes an identical copy of the block and inserts it below the current row on your template. When clicked, a new blank block is added to the end of your template. Creating and Maintaining Time Sheets The Time Sheet screen, like the Templates editor, is dual purpose in that it allows you to both create and edit timesheets. To access time sheets, click on the Create Timesheet or Edit Timesheet links on the Tee Booking Dashboard; shown in Figure 34. Figure 34 - Create/Edit Timesheet Links The time sheet screen will appear as in the screen shot in Figure 35 below. Note that the interface is roughly divided in two areas; the top half of the screen shows settings and options relating to the timesheet, while the bottom half shows the timeslots and blocks that currently form part of the timesheet. Page 26 of 33 DotGolf Live User Documentation Figure 35 - Create New Timesheet The sections below discuss the Day Messages, Open Day and TXT Notification headings on the time sheet screen, followed by a guide to creating time sheets by using templates and blocks. Day Messages DotGolf Tee Booking allows you to display custom messages at the top of the time sheet for any date. These messages, “Messages of the Day” are shown to both members and administrators. The golf.co.nz public website shows these messages both in the green fee preview popup (for visitors and members); for example in Figure 36. Figure 36 - golf.co.nz Green Fee Popup Furthermore, if the user clicks through to a particular date, the messages are also shown at the top of the sheet beside the competitions for the day (Figure 37 below). Page 27 of 33 DotGolf Live User Documentation Figure 37 - golf.co.nz Messages In addition to the above, the messages are also shown at the very top of the DotGolf Live Start Sheet. Open Days Normally clubs configure their time sheets to open 7 or 14 days in advance. There are a number of clubs that open timesheets further in advance, but generally 14 days is the norm. In the event that you’d like to run a competition on a particular date (say a month from now) and you want visitors to register themselves via the DotGolf Tee Booking system, it is desirable to override the default 14-day window. Using the Open Day feature, you can open any time sheet ahead of time. To do this, expand the Open Day header by clicking on it, revealing the controls in Figure 38. Figure 38 - Open Days To enable an open day for the current date, simply tick the Enable Open Day checkbox. (Remember to save your changes). You may also specify a from and to time so that only a specific range of tee times on the day are opened. TXT Notifications DotGolf offers a user-pays TXT messaging system to clubs. Members who have registered for this service can receive notifications from their golf clubs such as course closed, frost delays and others. Registration usually takes place via the http://www.golf.co.nz/ website, where members are offered the ability under the TXT Messaging menu option on the left of My Golf. Page 28 of 33 DotGolf Live User Documentation It is important that the member incurs a cost on their mobile account whenever the club uses this service, so care should be taken not to abuse this feature. Members are offered the ability to unsubscribe (“STOP”) along with every message sent. To send a TXT message to all members booked on a particular timesheet, expand the TXT Notifications header to reveal the controls in Figure 39. Figure 39 - TXT Notifications You need to select the notification type – currently supported are Course Closed, Frost Delay and Other. Optionally a message from the club may also be entered. The system will produce a preview window to the very right showing you what the message will look like when received on a mobile phone. When you are ready to send the messages, click the Send Messages button. Within a few minutes the specified message will appear on all members’ mobile phones who have a) booked on the day and b) registered for the TXT messaging service using the online forms at http://www.golf.co.nz/. Using Templates and Blocks to Create Your Timesheet To create a timesheet, you will need at least one template to exist for the given day of the week. If you have not created your templates yet, see Creating and Maintaining Day Templates. A link is provided (Create New Template) from the time sheet screen. Once a template is selected, several options will be shown, as per Figure 40 below. Figure 40 - Add Blocks to Timesheet Page 29 of 33 DotGolf Live User Documentation The block display shown is exactly the same as the one used in the Creating and Maintaining Day Templates section and will not be discussed here; please see the templates section in the user manual for these details. Clicking the Preview button will generate the timesheet in-memory and show you what it will look like when saved. Every tee time will occupy 1 row in the resulting page, as shown in Figure 41. Note that experienced users may simply skip the preview step and click Create Timesheet to have the system immediately create and save the timesheet. Prior to clicking Preview or Create, you may add blocks to the template. Adding blocks this way does not change the template, and only affects the current timesheet being generated. This is useful for one-time only blocks used on specific days. Again, the interface works exactly the same way as the one on the Creating and Maintaining Day Templates screen. Figure 41 - Timesheet Preview You may also add new slots one at a time by clicking the “Add New Slot” link at the very bottom of the page. This allows you to control time sheet slots in the highest granularity possible. Multi-Slot Selections in the Time Sheet interface The time sheet screen supports multi-select. This allows the user to quickly make changes to multiple rows at the same time. To use this feature, use the Select links at the right to select the rows you want to modify. You can also use Shift+Click to quickly select a range of rows – to do this, click on the first row in the range, hold down the Shift key, then click on the last row in the range. All rows in between will be selected automatically and highlighted in blue. While multiple rows are selected, any changes made to any of the controls on each row will be applied to all rows in the range. Deleting Time Sheets While editing a time sheet, you will be given the option to delete entire time sheets. This will be presented in the form of a “Delete All Timeslots” link near the top of the time sheet. If any bookings exist on the day, the system will not allow the sheet to be deleted. Page 30 of 33 DotGolf Live User Documentation Bookings using the Start Sheet (Under Construction) This section is currently still being authored. We apologise for the inconvenience – please contact DotGolf directly if you need assistance in using the DotGolf Live Start Sheet. Settings Figure 42 below shows the Tee Booking Settings screen. Note that some of these settings are imperative to correct system operation, so if you are not completely aware of the repercussions of changing them, we recommend that you contact DotGolf for assistance. Figure 42 - Tee Booking Settings The following settings are available: Override Opening Day/Time for DIY Terminal This setting allows you to specify a different opening day or different opening times for your DotGolf DIY Terminal than those specified for members booking online via golf.co.nz. If left unchecked, the DIY terminal will use the same opening day and time as the online tee booking system. Clubs generally use this setting to configure the DIY terminal to open at an earlier time than the website does – in order to give members booking at the DIY terminal preference for popular tee times. This in turn can drive more foot traffic to the club and its facilities, resulting in higher cafe, bar and pro-shop turnover. When the check box is ticked, separate Opening Day and Opening Time options are shown for the DIY terminal and internet. Page 31 of 33 DotGolf Live User Documentation Opening Day This setting controls the number of days that members can book ahead of time. If the Override option above is ticked, you will be allowed to specify two different values, one for the Internet and one for the DIY Terminal. Typically clubs set this to 14 days. Opening Time The opening time of a timesheet may be specified in one of two ways; relative to the first tee time on the day, or at a specified time. You may select either option and the internet and DIY options are independent from each other; allowing you to open the timesheet 30 minutes before the tee time on the Internet, while opening the DIY terminal at 6pm the day before (allowing preferential bookings). Allow Members to Book Visitors on DIY This checkbox controls whether members are allowed to book visitors on the DIY terminal. Generally this option is turned off where a club is using the online payments system and strict payment rules, as the DIY terminal does not accept payments and hence allows members to bypass the payment rules. For more information on how this works, please contact DotGolf. Send Daily Booking First-Timers Email When ticked, the club is sent a daily email containing members/visitors who have been booked to play at your course for the first time – to allow you to make the customer feel welcome at your course and introduce them to the facilities. Enforce Strict Multi-Payment Rules When enabled, the system requires all bookings online to be paid for, either by the person making the booking, or by the people they are playing with. The DotGolf Tee Booking system automatically sends emails and asks the relevant people to go online and pay for their bookings; if they don’t pay, the booking gets cancelled (with prior warning). Generally clubs prefer this option turned OFF. If you’d like more information on our payment rule options, please contact us. Guest Discounts only to Full Playing Members When enabled, the “affiliate guest with member” rates are only shown to full playing members of your clubs. This setting is generally used when juniors and mid-week members start abusing the system by booking and paying for other affiliate members at discount rates, when they should not be. Max Guests per member per booking Controls the number of discounted guests a member may add to a booking. Any guests above this limit will be charged the full affiliated rate. Max bookings per member Controls the maximum number of bookings a member of your club may hold at your course. If a member attempts to make any more bookings than this limit, they are shown an error message and the booking is not created. Page 32 of 33 DotGolf Live User Documentation Junior Age Specifies the maximum age a member can be to qualify as a junior. This is in turn used when determining whether a member may book in a given slot when the slot is configured to allow Adults Only or Juniors Only (see the Creating and Maintaining Day Templates section for more details). Page 33 of 33