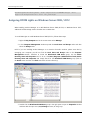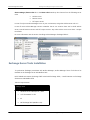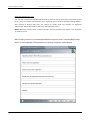
1
Archive Manager Exchange Ed - Advanced Install
Version 7.2
MS Exchange Server 2010
Publication Date: November, 2015
© Copyright Metalogix International GmbH and Idera, Inc., 2008-2015 All Rights Reserved.
This software is protected by copyright law and international treaties. Unauthorized reproduction or distribution of this software,
or any portion of it, may result in severe civil and/or criminal penalties and will be prosecuted to the maximum extent possible
under the law.
Copyright
© Copyright Metalogix International GmbH and Idera, Inc., 2008-2015
All rights reserved. No part or section of the contents of this material may be reproduced or
transmitted in any form or by any means without the written permission of Metalogix International
GmbH.
Archive Manager is a trademark of Metalogix International GmbH and Idera, Inc
Windows SharePoint Services is either a registered trademark or a trademark of Microsoft
Corporation in the United States and/or other countries. Other product and company names
mentioned herein may be the trademarks of their respective owners.
Technical Support
For information about Metalogix Technical support visit http://metalogix.com/support.
Technical support specialists can be reached by phone at 1.202.609.9100.
The level of technical support provided depends upon the support package that you have
purchased. Contact us to discuss your support requirements.
MS Exchange Server 2010
Metalogix Archive Manager Exchange Ed - Advanced Install
Version 7.2
Contents
Introduction
5
Getting started
6
6
What is Archive...................................................................................................................................
Manager Exchange Edition
...................................................................................................................................
7
Process of archiving
with Archive Manager
7
The HSM Server...................................................................................................................................
(Hierarchical Storage Management Server)
................................................................................................................................... 8
Database
................................................................................................................................... 9
Hardware requirements
................................................................................................................................... 9
Software requirements
10
Exchange 2010...................................................................................................................................
requirements
10
Pre-installation...................................................................................................................................
tasks
Pre-installation tasks
Super-user
13
................................................................................................................................... 13
................................................................................................................................................................................................
14
Creating
a super-user account
................................................................................................................................................................................................
15
Creating
a mailbox for the super-user
...................................................................................................................................
17
The Archive Manager
Server
................................................................................................................................................................................................ 18
Outlook
................................................................................................................................................................................................
18
Installation
of IIS on MS Windows Server 2012
................................................................................................................................................................................................
23
Installation
of IIS on MS Windows Server 2008 (R2 SP1)
................................................................................................................................................................................................
28
Installation
of the .NET Framework
Assigning administrator rights to the super-user over the
...................................................................................................................................
28
Archive Manager
Server
Assigning rights to the super-user over the Configuration
................................................................................................................................... 30
Container
...................................................................................................................................
38
Granting the super-user
permissions in MS Exchange Server
Granting super-user impersonation permissions in MS
................................................................................................................................... 40
Exchange Server
...................................................................................................................................
41
Assigning DCOM
rights on Windows Server 2008 / 2012
...................................................................................................................................
47
Creating and mounting
a Public Folder database
...................................................................................................................................
50
Creating an Organizational
Forms Library
Assigning owner rights to the super-user over the
51
Organizational...................................................................................................................................
Forms library
...................................................................................................................................
52
Setting up language
for the forms folder
Installing Archive Manager Exchange Edition
57
1st part of the Archive Manager installation – HSM and
...................................................................................................................................
58
Archive Manager
Search
Page 3
© Copyright Metalogix International GmbH and Idera, Inc., 2008-2015
MS Exchange Server 2010
Metalogix Archive Manager Exchange Ed - Advanced Install
Version 7.2
2nd part of the Archive Manager installation: Components
................................................................................................................................... 59
Selection
................................................................................................................................................................................................
62
Description
of the features
64
How................................................................................................................................................................................................
to select features for various types of LAN
................................................................................................................................... 68
Finishing the installation
Post-installation tasks
74
...................................................................................................................................
75
Configuring the
database
...................................................................................................................................
85
Publishing Archive
Manager Forms
................................................................................................................................................................................................
91
Activating
mailboxes
...................................................................................................................................
93
Start Archive Manager
services
...................................................................................................................................
93
Enterprise Manager
– Initial Configuration
...................................................................................................................................
105
Exchange Server
Tools Installation
107
Testing after ...................................................................................................................................
installation
Addendum
109
...................................................................................................................................
109
Installation check
list
...................................................................................................................................
110
Office 365 Configuration
Details
...................................................................................................................................
119
Creating an MS
SQL database with a database user
Page 4
© Copyright Metalogix International GmbH and Idera, Inc., 2008-2015
MS Exchange Server 2010
Metalogix Archive Manager Exchange Ed - Advanced Install
Version 7.2
Introduction
About this book
This manual gives an introduction to Archive Manager Exchange Edition the email archiving tool. In this
manual we will explain how to manually install and configure Archive Manager Exchange Edition for
Microsoft Exchange Server 2010 using the light setup.
Besides the light setup, Archive Manager can be installed by the Install package which performs
all pre-requisite tasks and necessary configuration itself (see the short “Archive Manager Quick
Start Guide”).
In this manual we use Windows Server 2008 R2 SP1 as OS.
Prerequisites knowledge
You should have a working knowledge of Microsoft Exchange Server 2010 and of the administrative
tasks in Windows Server 2012/2008.
You should also have an understanding of Microsoft SQL Server or ORACLE Database Server,
depending on which you will be using.
Knowledge of Microsoft Outlook and IIS would be of help, too.
Page 5
© Copyright Metalogix International GmbH and Idera, Inc., 2008-2015
MS Exchange Server 2010
Metalogix Archive Manager Exchange Ed - Advanced Install
Version 7.2
Getting started
This chapter describes the most important basic requirements for successful manual installation of
Archive Manager Exchange Edition. Here we will also describe pre-installation tasks the administrator
has to perform before installing Archive Manager by the light setup, so please read it carefully.
Besides the light setup, Archive Manager can be installed by the Install package which performs
all pre-requisite tasks and necessary configuration itself (see the short “Archive Manager Quick
Start Guide”).
What is Archive Manager Exchange Edition
Archive Manager is a software solution for email archiving. It enables archive mail into a pre-defined
store even with a different retention times. Any email can be restored any time along with its
attachments. It provides full version management with a possibility to retrieve any of the versions.
Moreover, our full-text search engine provides searching through the archives by applying various
search criteria.
At archiving, Archive Manager replaces archived emails on the MS Exchange server with a shortcut,
which takes up much less space. Messages remain available, however, and end-users can work with
them as usual. This helps you to increase capacity on your MS Exchange server. Furthermore, our OWA
support lets you access archived e-mails easily without any reconfiguration via Web Access. Thanks to
the “shortcut delay” feature even Blackberry users can read their archived emails. Archive Manager also
offers an Offline Folder Service for those who wish to access their mails while on the road. Emails can
be copied into the Offline Folder using a standard synchronization process. Archive Manager comes
with a plug-in for MS Outlook that gives users authorized by the administrator the ability to control
certain archive functions themselves.
The system is fully automated and the administrator needs to specify the attributes of its behavior only.
Page 6
© Copyright Metalogix International GmbH and Idera, Inc., 2008-2015
MS Exchange Server 2010
Metalogix Archive Manager Exchange Ed - Advanced Install
Version 7.2
Process of archiving with Archive Manager
Archive Manager Exchange Edition transfers the desired email with its attachments to the HSM system.
It is the HSM system that takes care of storing and retrieving emails and their attachments. The HSM
system works with a database because the information contained in the shortcut is stored either in an
ORACLE or an MS SQL database. The HSM system passes down this email and its attachments to a
store specified by the administrator, whereas the email can be compressed “on the fly”. A shortcut of a
few kilobytes only remains at its original location. This shortcut includes information about the new
location of the archived email. The only difference a user notices is that the shortcut is displayed with a
slightly modified icon.
Users may work with archived emails and their attachments as usual. This means that when an archived
email is reopened, Archive Manager passes the information contained in the shortcut to the HSM
system. Then the HSM system restores the respective email and its attachments from the store. Yet, for
users it is as if they were working in their normal environment.
The HSM Server (Hierarchical Storage Management Server)
The HSM Server (i.e. the computer where the HSM system is installed), as a part of Archive Manager,
takes care of saving and securing archived documents. It works with a database, either an ORACLE
Database or an MS SQL Database.
NOTE: If you are using an ORACLE database, Oracle Data Provider for .NET has to be installed.
When installing Archive Manager Exchange Edition you will be asked to specify a database as well as a
database user and password, while configuring the database (see the section “Configuring the
database” in the chapter “Post-Installation tasks”). Therefore, a database with a database user must be
available before installing Archive Manager. (NOTE: The Archive Manager light setup does not create a
database automatically.)
Page 7
© Copyright Metalogix International GmbH and Idera, Inc., 2008-2015
MS Exchange Server 2010
Metalogix Archive Manager Exchange Ed - Advanced Install
Version 7.2
Database
The database used by Archive Manager has basically four parts: Archive Manager part, HSM part,
Users part and Auditing part (optional).
Archive Manager light setup does NOT create databases automatically.
Archive Manager part
HSM part
One database can include all these parts. However, if you
plan to archive 1.000.000 and more emails, we recommend
creating a separate databases for all three parts. These
databases are then easier to back up and are not growing
quickly.
Users
Auditing part
If auditing feature will be used, a separate database for
auditing part must be created.
NOTE: The owner can be the same for all databases or you can create different owner for each
database.
Databases with the database user(s) (who, in addition, should be the owner(s) of these databases) have
to be available before installing Archive Manager, because you will be asked for this data during the
installation of Archive Manager. In this manual we use one database for Archive Manager
(exchangeDB), one for HSM (hsmDB), one for Users (mtRolesDB) and one for Auditing (auditingDB). The
same user for all is “srv_exchange”.
Supported databases:
· MS SQL 2008 and higher
· ORACLE 11g and 12c
Page 8
© Copyright Metalogix International GmbH and Idera, Inc., 2008-2015
MS Exchange Server 2010
Metalogix Archive Manager Exchange Ed - Advanced Install
Version 7.2
Creation of a database with a database user in MS SQL 2012 is described in “Addendum – Creating an
MS SQL database with a database user”.
NOTE: If you prefer working with an ORACLE Database, make sure to have similar data (database,
database user, password, owner of the schema) available during the installation of Archive Manager
Exchange Edition.
Hardware requirements
The minimal configuration:
· Intel P4 2 GHz processor
· 2 GB RAM
Recommended configuration:
· Dual Xeon
· 4 GB RAM
The application, log files and cache folders require 10 GB of HDD space. The space for the database
and the file store must be calculated from the amount of the messages.
Software requirements
Archive Manager Exchange Edition can be installed on:
· Windows 2008 R2 SP1 / 2012
NOTE: In case of Windows Server 2008, check the “Static Content” check box under Server Manager ->
Server Roles-> Web Server (IIS) -> Role Services.
Page 9
© Copyright Metalogix International GmbH and Idera, Inc., 2008-2015
MS Exchange Server 2010
Metalogix Archive Manager Exchange Ed - Advanced Install
Version 7.2
Exchange 2010 requirements
Archive Manager Exchange Edition supports archiving from Exchange 2010 Server. However the
following prerequisites must be met:
· Exchange Server 2010
· Public Folder database – it is necessary to have a Public Folder database in the organization
because the Organization Forms Library resides in the System Folders (which is part of public
folders) and the Organizational Forms Library is necessary to ensure the transparent access to
archived emails from Outlook (see the “Creating and mounting a Public Folder database” and
“Creating an Organizational forms library database” section.)
Pre-installation tasks
In this part we will describe which pre-installation steps should be taken in order to prepare all that is
needed for installing Archive Manager Exchange Edition correctly.
Before installing Archive Manager you need to:
· Create database(s) with a database user (owner of the table) so that they are available when
installing Archive Manager (Creation of a database with a database user in MS SQL 2012 is
described in “Addendum – Creating an MS SQL database with a database user”);
· Create a super-user account (see the section “Super-user” as well as the section “Creating a superuser account” and “Creating a mailbox for the super-user”);
· In case that you will be using ORACLE database, you need to install on the Archive Manager Server
computer the ORACLE Data Provide for .NET (see the section “The Archive Manager Server”)
· Install Outlook 2007 or higher on your Archive Manager server (see the section “The Archive
Manager Server”);
· Make sure to install IIS. In the case that Archive Manager will be running on an:
a) MS Windows Server 2012 then follow the steps as described in the section “Installation of IIS
on a MS Windows Server 2012”
b) MS Windows Server 2008 (R2 SP1) then follow the steps as described in the section
“Installation of IIS on a MS Windows Server 2008 (R2 SP1)”
IMPORTANT NOTE: If you plan to install Archive Manager Exchange Edition on a server with Microsoft
Page 10
© Copyright Metalogix International GmbH and Idera, Inc., 2008-2015
MS Exchange Server 2010
Metalogix Archive Manager Exchange Ed - Advanced Install
Version 7.2
CRM or SharePoint, you have to manually configure Archive Manager web applications. It is necessary,
because these applications are overtaking port 80 in IIS. Archive Manager needs port 80 free, otherwise
it will not be able to retrieve archived data to the users. For more information on how to configure
Archive Manager web applications in such cases see the “Archive Manager Exchange Edition
Configuration on the secondary Website” manual.
· Install .NET Framework 3.5 and 4.5 (see the section “Installation of the .NET Framework”);
· Assign administrator rights on the Archive Manager Server to the super-user (see the section
“Assigning administrator rights to the super-user over the Archive Manager Server”);
· Manage super-user rights with ADSI Edit tool (see the section “Assigning rights to the super-user
over the Configuration Container”);
· Grant the super-user permissions in MS Exchange Server (see the section “Granting the super-user
permissions in MS Exchange Server”);
· Grant the super-user impersonation permissions in Exchange Server (see the section “Granting
super-user impersonation permission in the Exchange Server”);
NOTE: These permissions are necessary only if you plan to access archived emails via OWA.
· Assign DCOM rights (see the section “Assigning DCOM rights on Windows Server 2008 / 2012”);
· Create a Public folder database on the MS Exchange Server (see the section “Creating and
mounting a Public folder database”);
· Create the Organizational forms library (folder) on the MS Exchange Server (see the section
“Creating an Organizational forms library” as well as the section “Setting up language for the
forms folder”);
· Assign owner rights to the super-user over the Organizational forms library on the MS Exchange
Server (see the section “Assigning owner rights to the super-user over the Organizational Forms
library”);
· When you are done with installation, please don’t forget to synchronize the super-user as well (see
the section “Enterprise Manager – Initial Configuration”)
Also, attached is a check-list (see the section “Addendum”) specifying which data you should collect
before installing Archive Manager. For successful installation, we recommend going through that list
first.
IMPORTANT NOTE: Automated archiving is designed for groups. It is therefore crucial to have Active
Directory groups synchronized with Archive Manager, or at least to create new Archive Manager
groups using the Addressbook Manager or the Initial Configuration wizard (see the section “Enterprise
Page 11
© Copyright Metalogix International GmbH and Idera, Inc., 2008-2015
MS Exchange Server 2010
Metalogix Archive Manager Exchange Ed - Advanced Install
Version 7.2
Manager – Initial Configuration”). In Archive Manager, jobs (automated archiving) apply to groups.
Mailboxes not included in any group can be archived manually only.
Page 12
© Copyright Metalogix International GmbH and Idera, Inc., 2008-2015
MS Exchange Server 2010
Metalogix Archive Manager Exchange Ed - Advanced Install
Version 7.2
Pre-installation tasks
· Super-user
13
· The Archive Manager Server
17
· Assigning administrator rights to the super-user over the Archive Manager Server
· Assigning rights to the super-user over the Configuration Container
· Granting the super-user permissions in MS Exchange Server
30
38
· Granting the super-user impersonation permissions in MS Exchange Server
· Assigning DCOM rights on Windows Server 2008 / 2012
· Creating and mounting a Public Folder database
· Creating an Organizational Forms Library
40
41
47
50
· Assigning owner rights to the super-user over the Organizational Forms library
· Setting up language for the forms folder
28
51
52
Super-user
Another important thing for the administrator to do before installing Archive Manager is to create an
account with a mailbox under which Archive Manager will be running. This can be done simply by
adding a new user in Active Directory Users and Computers. Give that account a relevant name –
throughout this manual we will call this account a super-user account, and will be referred to as the
srv_exchange user (see the next section “Creating a super-user account”).
Why is this super-user necessary? Because at archiving, emails and their attachments are taken from
your MS Exchange server and they are placed in the HSM storage, which is another, cheaper, location.
Only a shortcut is left behind on the MS Exchange server. This means that the original email and its
attachments are replaced with a shortcut. The services that do this replacing process run under this
super-user account. That is why this account must be given certain additional rights on your MS
Exchange Server.
This super-user must be added to the local administrators of your Archive Manager Server. As
mentioned above, this super-user account must be given permissions to mailboxes on your Exchange
Server. Those permissions as well as owner rights must be given, in order to enable the archiving
Page 13
© Copyright Metalogix International GmbH and Idera, Inc., 2008-2015
MS Exchange Server 2010
Metalogix Archive Manager Exchange Ed - Advanced Install
Version 7.2
process. Later we will describe how to assign permissions over the mailboxes to the super-user.
IMPORTANT NOTE: You need to create a super-user account with a mailbox and with all additional
rights, which will be described later, before running the installation of Archive Manager, since you will
be asked for its name and password when running the Archive Manager Setup. Please keep in mind
that the password of this super-user must not be blank!
Creating a super-user account
Note that it may take some time for the super-user account to be registered in Active Directory Users
and Computers. The account cannot be used until the registration is complete. The length of the delay
depends on how Exchange Server is set up to replicate recipient information.
To create the super-user account:
1. Click Start /Programs /Administrative Tools /Active Directory Users and Computers.
2. In the left pane of the Active Directory Users and Computers window, double-click the
container where you want to create the srv_exchange account.
3. Click the Action menu, click New, and then User. The New Object –User window is displayed.
4. Complete the New Object – User window (enter srv_exchange) and click Next.
5. In the next window select the Password never expires check box. Enter a password in the
Password text-box and confirm it in the Confirm password text-box.
NOTE: The password cannot be blank!
Leave the remaining checkboxes clear:
User must change password at logon
User cannot change password
Account is disabled
Click Next to move to the next screen.
6. Click Finish to create the new user.
Page 14
© Copyright Metalogix International GmbH and Idera, Inc., 2008-2015
MS Exchange Server 2010
Metalogix Archive Manager Exchange Ed - Advanced Install
Version 7.2
Creating a mailbox for the super-user
As mentioned before the super-user account has to be an account with a mailbox. In the following lines
we describe the process of creating a mailbox for this super-user.
1. On your MS Exchange server open the Exchange Management Console from Start /
Programs / Microsoft Exchange Server 2010 / Exchange Management Console.
2. In the left pane of the Exchange Management Console window select the Recipient
Configuration node.
3. In the right pane click on the New Mailbox.
Page 15
© Copyright Metalogix International GmbH and Idera, Inc., 2008-2015
MS Exchange Server 2010
Metalogix Archive Manager Exchange Ed - Advanced Install
Version 7.2
4. New mailbox window pops up. Select the User mailbox radio button and click Next.
5. In the next window switch to the Existing user radio button. Click Add and locate your super-
Page 16
© Copyright Metalogix International GmbH and Idera, Inc., 2008-2015
MS Exchange Server 2010
Metalogix Archive Manager Exchange Ed - Advanced Install
Version 7.2
user. Then click OK.
6. Click Next.
7. In the Mailbox Settings window enter the alias for the mailbox user and click Next.
8. Click New to create the mailbox for the super-user. Then click Finish.
The Archive Manager Server
Further, if you are using an ORACLE database, you need to install the ORACLE Data Provider for .NET
(available on ORACLE install CD).
· Outlook
Page 17
18
© Copyright Metalogix International GmbH and Idera, Inc., 2008-2015
MS Exchange Server 2010
Metalogix Archive Manager Exchange Ed - Advanced Install
· Installation of IIS on MS Windows Server 2012
18
· Installation of IIS on MS Windows Server 2008 (R2 SP1)
· Installation of the .NET Framework
Version 7.2
23
28
Outlook
Your Archive Manager Server will communicate with your MS Exchange Server via MAPI. To provide
your Archive Manager server with MAPI, install Outlook 2016 (32bit) / 2013 (32bit) / 2010 (32bit) / 2007
on the Archive Manager server (32bit and 64bit OS) – full UNICODE compatibility.
NOTE: Archive Manager and Exchange server must be separate machines.
Installation of IIS on MS Windows Server 2012
Let's say your archiving software is running on a MS Windows Server 2012. Then you need to install
Internet Information Services (IIS). Upon installation of Internet Information Services (IIS) you need to
enable Active Server Pages as well as ASP.NET 2.0 and 4.0.
To install Internet Information Services (IIS):
1. Click Start /Administrative Tools and select Server Manager.
2. Click Manage / Add Roles and Features.
Page 18
© Copyright Metalogix International GmbH and Idera, Inc., 2008-2015
MS Exchange Server 2010
Metalogix Archive Manager Exchange Ed - Advanced Install
Version 7.2
3. Click Next and Next again. In the Select destination server make sure the Archive Manager
server is selected and click Next.
4. Select Web Server (IIS) role. In the pop-up leave the Include management tools check box
selected and click Add Features. Then keep clicking Next until the Features dialog.
5. Leave the default features selected plus select the following:
Page 19
© Copyright Metalogix International GmbH and Idera, Inc., 2008-2015
MS Exchange Server 2010
Metalogix Archive Manager Exchange Ed - Advanced Install
Version 7.2
· .NET Framework 3.5 Features
· .NET Framework 4.5 Features / .NET Framework 4.5
· .NET Framework 4.5 Features / ASP.NET 4.5
· .NET Framework 4.5 Features / WCF Services (all checkboxes under this item)
6. Click Next twice. On the Roles Services leave the default role services selected, plus select following:
· Web Server / Performance / Dynamic Content Compression
· Web Server / Security / Windows Authentication
· Web Server / Web Server / Application Development / .NET Extensibility 3.5
/ .NET Extensibility 4.5
/ ASP.NET 3.5
/ ASP.NET 4.5
· Web Server / Management Tools / IIS 6 Management Compatibility / IIS 6 Metabase
Page 20
© Copyright Metalogix International GmbH and Idera, Inc., 2008-2015
MS Exchange Server 2010
Metalogix Archive Manager Exchange Ed - Advanced Install
Version 7.2
· Web Server / Management Tools / Management Service
Click Next, then Install.
Upon installation of Internet Information Services (IIS) you need to enable Web Service Extensions
ASP.NET v2.0 and 4.0. Follow these steps:
1. Click Start /Administrative Tools /Internet Information Services (IIS) Manager. Select server
node and open the ISAPI and CGI Restrictions feature.
Page 21
© Copyright Metalogix International GmbH and Idera, Inc., 2008-2015
MS Exchange Server 2010
Metalogix Archive Manager Exchange Ed - Advanced Install
Version 7.2
2. Check if ASP.NET v2.0 and 4.0 ISAPI extensions are installed and allowed.
Page 22
© Copyright Metalogix International GmbH and Idera, Inc., 2008-2015
MS Exchange Server 2010
Metalogix Archive Manager Exchange Ed - Advanced Install
Version 7.2
Installation of IIS on MS Windows Server 2008 (R2 SP1)
Let's say your archiving software is running on a MS Windows Server 2008 (R2 SP1). Then you need to
install Internet Information Services (IIS) and add .NET Framework 3.5 feature. Upon installation of
Internet Information Services (IIS) and adding the .NET Framework you need to enable Active Server
Pages as well as ASP.NET 2.0 and 4.0.
To install Internet Information Services (IIS):
1. Click Start /Settings /Control Panel /Administrative Tools and select Server Manager.
2. Click on the Roles node. Click on Add Roles link on the right pane.
3. Select the Web Server (IIS) role. Click Next.
Page 23
© Copyright Metalogix International GmbH and Idera, Inc., 2008-2015
MS Exchange Server 2010
Metalogix Archive Manager Exchange Ed - Advanced Install
Version 7.2
4. Leave the default role services selected, plus select following: ASP.NET, Static Content and
Windows Authentication. Click Next.
Page 24
© Copyright Metalogix International GmbH and Idera, Inc., 2008-2015
MS Exchange Server 2010
Metalogix Archive Manager Exchange Ed - Advanced Install
Version 7.2
5. Click Install to begin installation of IIS. Finally click on Close to exit.
6. Now in Server manager click Features node -> Add Feature and select .Net Framework 3.5.1
Features / .Net Framework 3.5.1 and click Install.
Page 25
© Copyright Metalogix International GmbH and Idera, Inc., 2008-2015
MS Exchange Server 2010
Metalogix Archive Manager Exchange Ed - Advanced Install
Version 7.2
Upon installation of Internet Information Services (IIS) you need to enable Web Service Extensions
ASP.NET v2.0 and 4.0. Follow these steps:
1. Click Start /Settings /Control Panel /Administrative Tools /Internet Information Services
(IIS) Manager. Select server node and open the ISAPI and CGI Restrictions feature.
Page 26
© Copyright Metalogix International GmbH and Idera, Inc., 2008-2015
MS Exchange Server 2010
Metalogix Archive Manager Exchange Ed - Advanced Install
Version 7.2
2. Check if ASP.NET v2.0 and 4.0 ISAPI extensions are installed and allowed.
Page 27
© Copyright Metalogix International GmbH and Idera, Inc., 2008-2015
MS Exchange Server 2010
Metalogix Archive Manager Exchange Ed - Advanced Install
Version 7.2
Installation of the .NET Framework
Since Archive Manager is built on .NET technology, both .NET Framework 3.5 and 4.5 is required.
You can download .NET Framework 3.5 from the following link:
http://www.microsoft.com/en-us/download/details.aspx?id=21
You can download .NET Framework 4.5 from the following link:
http://www.microsoft.com/en-us/download/details.aspx?id=30653
In case of Windows Server 2008 R2 SP1 it is necessary to download and install only .NET Framework
4.5. The other - .NET Framework 3.5 – has already been added as a feature (see the section above
“Installation of IIS on Windows Server 2003”).
In case of Windows Server 2012 both of them are added via Server Manager (see the section above
“Installation of IIS on Windows Server 2012”).
NOTE: In case of Windows Server 2008 R2 SP1 run the following command:
C:\Windows\Microsoft.NET\Framework64\v4.0.30319 aspnet_regiis.exe -i
Assigning administrator rights to the super-user over the
Archive Manager Server
We have already created a super-user domain account (see “Creating a super-user account”). Now you
need to assign to it local administrator rights on your Archive Manager server computer. In case that
the Archive Manager Server will NOT be running on the Domain Controller, follow the steps described
in a). In case that Archive Manager Server will be running on the Domain Controller, follow the steps
described in b).
a) Assigning local administrator rights to the super-user (not on the Domain Controller)
Assume that Archive Manager will not be running on the Domain Controller. Then you need to assign
Page 28
© Copyright Metalogix International GmbH and Idera, Inc., 2008-2015
MS Exchange Server 2010
Metalogix Archive Manager Exchange Ed - Advanced Install
Version 7.2
local administrator rights to the super-user on the Archive Manager Server computer.
To assign local administrator rights to the super-user (srv_exchange) on the Archive Manager server
computer:
1. On the intended Archive Manager Server computer right-click My Computer and, in the context
menu, select Manage (or in Windows Server 2012 open Computer Management by running
compmgmt.msc).
2. Double-click the Local Users and Groups folder to expand it.
3. Double-click the Groups folder.
4. In the right pane right-click Administrators and, in the context menu, select Properties. The
Administrators Properties window opens.
5. Click the Add button.
6. Enter srv_exchange in the text box and click OK.
7. Confirm by clicking Apply and OK.
NOTE: This super-user account must not be a domain administrator.
b) Assigning local administrator rights to the super-user (on the Domain Controller)
Assume that the Archive Manager will be running on the Domain Controller. Then to assign it the local
administrator rights:
1. On the Archive Manager Server open the Active Directory Users and Computers (click Start
\Administrative tools \Active Directory Users and Computers).
2. Locate the super-user account (srv_exchange) in your Active Directory. You can simply right-click
the domain node and search for it using the Find icon in the toolbar.
3. Right-click svr_exchange and in its context menu select Properties.
4. In the svr_exchange Properties window click the Member of tab.
5. Click the Add button to open the Select groups window.
6. In the Select groups window make sure to insert your domain name in the From this Location
box.
7. In the Enter the object name to select text box write Administrators and click the Check
Names button.
Page 29
© Copyright Metalogix International GmbH and Idera, Inc., 2008-2015
MS Exchange Server 2010
Metalogix Archive Manager Exchange Ed - Advanced Install
Version 7.2
8. Click OK. Click Apply and then OK.
Assigning rights to the super-user over the Configuration
Container
We have to grant the super-user Read permission over the organization’s Configuration container
recursively. There are more ways to grant this permission, one way is to use ADSI Editor (which is part
of the Windows Support Tools). We will demonstrate how to grant the necessary permissions using
ADSI Editor.
NOTE: These permissions are required to read the list of Exchange servers and Information Stores of
the organization.
If you run MMC on a domain controller you will find the ADSI Edit tool. On other machines (like MS
Exchange or others) this tool may not be present in the MMC snap in console. In that case the
ADSIEDIT.MSC tool can be freely downloaded from the following link where you can find a good
knowledgebase about this tool as well:
http://www.computerperformance.co.uk/w2k3/utilities/adsi_edit.htm#Download_ADSI_Edit
After downloading and saving it e.g. on your Exchange Server, it is necessary to register the
adsiedit.dll via the regsv32 (%systemroot%\System32\regsv32 adsiedit.dll), otherwise it
will not be possible to run this tool, even if it is copied under windows\system32.
To configure super-user rights over Configuration Container:
Page 30
1.
Open the “MMC” by clicking Start / Run.
2.
Console dialog opens. To add ADSI (Active Directory Services Interface) Edit, click File /
AddRemove Snap-in.
© Copyright Metalogix International GmbH and Idera, Inc., 2008-2015
MS Exchange Server 2010
3.
Page 31
Metalogix Archive Manager Exchange Ed - Advanced Install
Version 7.2
In the pop-up window click Add. Select ADSI Edit in the pop-up Snap-in list and click Add
again. Then click OK.
© Copyright Metalogix International GmbH and Idera, Inc., 2008-2015
MS Exchange Server 2010
Page 32
Metalogix Archive Manager Exchange Ed - Advanced Install
Version 7.2
4.
The ASDI Edit will be added to the Console root. Right-click it and select Connect to to
define the connection settings.
5.
New dialog pops-up. In the Select a well known Naming Context dropdown box select
Configuration and click OK.
© Copyright Metalogix International GmbH and Idera, Inc., 2008-2015
MS Exchange Server 2010
6.
Page 33
Metalogix Archive Manager Exchange Ed - Advanced Install
Version 7.2
Now you will set the super-user permissions over Configuration container. Back in the
Console window, unfold the ADSI Edit down to the CN=Configuration container. Right-click
the CN=Configuration node and select Properties.
© Copyright Metalogix International GmbH and Idera, Inc., 2008-2015
MS Exchange Server 2010
7.
Page 34
Metalogix Archive Manager Exchange Ed - Advanced Install
Version 7.2
On the Security tab of the Properties window, click Add to add the super-user.
© Copyright Metalogix International GmbH and Idera, Inc., 2008-2015
MS Exchange Server 2010
8.
Page 35
Metalogix Archive Manager Exchange Ed - Advanced Install
Version 7.2
When the super-user is added, locate it in the list view and click Advanced.
© Copyright Metalogix International GmbH and Idera, Inc., 2008-2015
MS Exchange Server 2010
9.
Page 36
Metalogix Archive Manager Exchange Ed - Advanced Install
Version 7.2
Locate the super-user. You can see that the permissions do not apply to child objects. To
apply the permissions to child objects as well, click Edit.
© Copyright Metalogix International GmbH and Idera, Inc., 2008-2015
MS Exchange Server 2010
Metalogix Archive Manager Exchange Ed - Advanced Install
Version 7.2
10. In the Apply onto drop-down box select “This object and all descendant objects”.
Page 37
© Copyright Metalogix International GmbH and Idera, Inc., 2008-2015
MS Exchange Server 2010
Metalogix Archive Manager Exchange Ed - Advanced Install
Version 7.2
11. Click OK, then Apply.
Granting the super-user permissions in MS Exchange Server
Archive Manager Exchange Edition requires that the super-user be granted some administrative
permissions and access to the mailboxes which will be archived. In Exchange 2010, the super-user must
be assigned the “View-Only Organization Management” role. This ensures that the mailboxes and
public folders can be accessed using the required administrative privileges. Further, the access to the
mailboxes is granted by setting the “Receive As” permission to the super-user. This can be achieved on
mailbox level or on database level (Exchange Information Store). In this document we demonstrate the
right assignment on the database level.
Exchange Server 2010 uses client throttling policies to track the bandwidth that each user consumes
and enforce bandwidth limits as necessary. Archive Manager needs more resources than the allowed
limit, therefore the throttling policy must be changed for the super-user.
Summary of tasks:
I.
Page 38
Assign super-user (srv_exchange) the “View-Only Organization Management” role
© Copyright Metalogix International GmbH and Idera, Inc., 2008-2015
MS Exchange Server 2010
Metalogix Archive Manager Exchange Ed - Advanced Install
Version 7.2
II. Assign super-user (srv_exchange) the “Public Folder Management” role
III. Grant super-user (srv_exchange) permissions to all mailboxes
IV. Change client throttling for super-user (srv_exchange)
Summary of cmdlets which carry out the above mentioned tasks:
Add-RoleGroupMember -Identity "View-Only Organization Management" -Member
"srv_exchange"
Add-RoleGroupMember -Identity "Public Folder Management" -Member
"srv_exchange"
Get-MailboxDatabase | Add-ADPermission -User "srv_exchange" -AccessRights
ExtendedRight -ExtendedRights Receive-As, ms-Exch-Store-Admin InheritanceType 'All'
New-ThrottlingPolicy MAM4Exchange
Set-ThrottlingPolicy MAM4Exchange -RCAMaxConcurrency $null RCAPercentTimeInAD $null -RCAPercentTimeInCAS $null RCAPercentTimeInMailboxRPC $null
Set-Mailbox "srv_exchange" -ThrottlingPolicy MAM4Exchange
Find the detailed description of the process in the following lines.
Add super-user (srv_exchange) the “View-Only Organization Management” role:
1.
Run the Exchange Management Shell from Start / Programs / Microsoft Exchange Server
2010 / Exchange Management Shell.
Run the following cmdlet in PowerShell to assign super-user (srv_exchange) to the View-Only
Organization Management role:
Add-RoleGroupMember -Identity "View-Only Organization Management" -Member
"srv_exchange"
2.
Run the cmdlet to assign super-user (srv_exchange) to the Public Folder Management role:
Add-RoleGroupMember -Identity "Public Folder Management" -Member
"srv_exchange"
Page 39
© Copyright Metalogix International GmbH and Idera, Inc., 2008-2015
MS Exchange Server 2010
3.
Metalogix Archive Manager Exchange Ed - Advanced Install
Version 7.2
Then run the cmdlet to grant srv_exchange permissions to all mailboxes:
Get-MailboxDatabase | Add-ADPermission -User "srv_exchange" -AccessRights
ExtendedRight -ExtendedRights Receive-As, ms-Exch-Store-Admin InheritanceType 'All'
NOTE: It may take some time until the super-user rights are assigned.
4.
Lastly, run the 3 following cmdlets to set the throttling policy for srv_exchange:
New-ThrottlingPolicy MAM4Exchange
Set-ThrottlingPolicy MAM4Exchange -RCAMaxConcurrency $null RCAPercentTimeInAD $null -RCAPercentTimeInCAS $null RCAPercentTimeInMailboxRPC $null
Set-Mailbox "srv_exchange" -ThrottlingPolicy MAM4Exchange
Granting super-user impersonation permissions in MS
Exchange Server
Super-user must be granted impersonation permissions in Exchange Server just in case that you plan to
access archived emails via OWA. Otherwise these permissions are not necessary.
NOTE: Archive Manager OWA support requires Exchange 2010 Server running the Windows Server
2008 (64-bit version). To install and configure the OWA extension of Archive Manager, the Archive
Manager Exchange Edition_64bit_Extensions setup has to be downloaded and installed on Exchange
Server (see the “Installation of optional features” manual).
Use the PowerShell to grand the super-user Impersonation permissions over all Exchange 2010 Servers
in your environment:
Page 40
1.
Run the Exchange Management Shell from Start / Programs / Microsoft Exchange
Server 2010 / Exchange Management Shell.
2.
To grant the super-user Impersonation permissions, run the following command:
© Copyright Metalogix International GmbH and Idera, Inc., 2008-2015
MS Exchange Server 2010
Metalogix Archive Manager Exchange Ed - Advanced Install
Version 7.2
New-ManagementRoleAssignment -Name "Impersonation-MAM4Exchange" -Role
"ApplicationImpersonation" -User "srv_exchange"
Assigning DCOM rights on Windows Server 2008 / 2012
When installing Archive Manager on a MS Windows Server 2008 (R2 SP1) or Windows Server 2012,
additional DCOM settings need to be taken into consideration.
To set DCOM rights on a MS Windows Server 2008 (R2 SP1), follow these steps:
1. Right-click My Computer and in the context menu select Manage.
2. In the Computer Management window expand the Local Users and Groups node and then
select the Groups node.
NOTE: If you are installing Archive Manager on a Domain Controller machine, please note that by
managing your computer you will not find the Local Users and Groups node in the Computer
Management window. Therefore to locate the Distributed COM Users group, use the Active
Directory Users and Computers tool. To do so, click Start /Programs /Administrative Tools /Active
Directory Users and Computers and simply search for the Distributed COM Users group (click on
the Action menu and then click Find and search in Entire directory).
3. Double-click the Distributed COM Users group in the right pane to open its Properties window
and then add the super-user (srv_exchange account) to this group:
Page 41
© Copyright Metalogix International GmbH and Idera, Inc., 2008-2015
MS Exchange Server 2010
Metalogix Archive Manager Exchange Ed - Advanced Install
Version 7.2
4. After adding the required account to the Distributed COM Users group you need to give this
group both access and launch permissions on Component Services.
To do so, run Component Services (click Start /Settings /Control Panel /Administrative
Tools /Component Services).
In the Component Services window expand the Component Services tree down to Component
Services \Computers \My Computer and then right-click My Computer to open its Properties
window.
Page 42
© Copyright Metalogix International GmbH and Idera, Inc., 2008-2015
MS Exchange Server 2010
Metalogix Archive Manager Exchange Ed - Advanced Install
Version 7.2
5. In the Properties window switch over to the COM Security tab.
In order to assign the Distributed COM Users group and NETWORK SERVICE the Access
Permissions you need to click on the Edit Default button in the Access Permissions section.
Page 43
© Copyright Metalogix International GmbH and Idera, Inc., 2008-2015
MS Exchange Server 2010
Metalogix Archive Manager Exchange Ed - Advanced Install
Version 7.2
6. In the Access Permission dialog add the Distributed COM Users group and the NETWORK
SERVICE using the Add button. The Distributed COM Users group needs both local and
remote Access permissions. The NETWORK SERVICE needs only local Access permissions. Then
click OK.
IMPORTANT NOTE: When trying to Find Distributed COM Users and the computer is not a
domain controller, change the location to local computer.
Page 44
© Copyright Metalogix International GmbH and Idera, Inc., 2008-2015
MS Exchange Server 2010
Metalogix Archive Manager Exchange Ed - Advanced Install
Version 7.2
7. Back in the Properties window on the COM Security tab you need to grant launch
permissions. In order to grant the Distributed COM Users group and NETWORK SERVICE the
Launch Permissions you need to click on the Edit Default button in the Launch and
Activation Permissions section.
Page 45
© Copyright Metalogix International GmbH and Idera, Inc., 2008-2015
MS Exchange Server 2010
Metalogix Archive Manager Exchange Ed - Advanced Install
Version 7.2
8. In the Launch and Activation Permissions dialog add the Distributed COM Users group and
the NETWORK SERVICE using the Add button. The Distributed COM Users group needs both
local and remote Launch and Activation Permissions. The NETWORK SERVICE needs only the
local Launch and Activation Permissions:
Page 46
© Copyright Metalogix International GmbH and Idera, Inc., 2008-2015
MS Exchange Server 2010
Metalogix Archive Manager Exchange Ed - Advanced Install
Version 7.2
Creating and mounting a Public Folder database
Before creating an Organizational Forms library, which is a system folder stored in public folders, you
must create and mount a Public Folder database.
NOTE: You can skip this step if you already have the Public Folder database created. Check it in
Exchange Management Console / Organization Configuration / Mailbox / Database Management. In
case the Public Folder database exists, proceed with the chapter “Creating an Organizational Forms
Library”.
To create and mount a Public Folder database:
Page 47
1.
Run the Exchange Management Console from Start / Programs / Microsoft Exchange Server
2010 / Exchange Management Console.
2.
In the console tree, navigate to Organization Configuration > Mailbox. In the action pane,
click New Public Folder Database.
© Copyright Metalogix International GmbH and Idera, Inc., 2008-2015
MS Exchange Server 2010
3.
Metalogix Archive Manager Exchange Ed - Advanced Install
Version 7.2
On the Introduction page, complete the following fields:
o
Public folder database name
Use this box to type the name of the new public
folder database.
o
Server name This box lets you specify where to create the public folder database.
To specify a location click Browse to open the Select Mailbox Server dialog box.
Use this dialog box to select the server where you want to create the public folder
database, and then click OK.
4.
On the Set Paths page, complete the following fields:
o
Database file path This box is automatically populated with the default path to the
database file. To specify a different location or file name, type the location in the box.
o
Page 48
Log folder path This box is automatically populated with the default path to the
© Copyright Metalogix International GmbH and Idera, Inc., 2008-2015
MS Exchange Server 2010
Metalogix Archive Manager Exchange Ed - Advanced Install
Version 7.2
database log files. To specify a different location, type the location in the box.
o
Mount this database Select this check box to mount the database immediately after it
is created.
5.
On the New Public Folder Database page, review your configuration settings. Click New to
create the public folder database. Click Back to make changes.
6.
On the Completion page, review the following, and then click Finish to close the wizard:
o
A status of Completed indicates that the wizard completed the task successfully.
o
A status of Failed indicates that the task wasn't completed. If the task fails, review the
summary for an explanation, and then click Back to make any configuration changes.
7.
Click Finish to close the wizard.
NOTE: Provided that you have more Exchange 2010 servers, replicate the Public Folder
Database to all of them.
Page 49
© Copyright Metalogix International GmbH and Idera, Inc., 2008-2015
MS Exchange Server 2010
Metalogix Archive Manager Exchange Ed - Advanced Install
Version 7.2
Creating an Organizational Forms Library
You need to have an Organizational forms library (which is actually a system folder stored in public
folders) on your MS Exchange Server, i.e. you need to have a folder under the EFORMS REGISTRY
where you will publish all Archive Manager forms. If such a folder doesn’t exist yet, you have to create
one.
NOTE: There can be several libraries created, one for each language.
Organizational forms library – if such exists – is located under the EFORMS REGISTRY. If the library
exists under the EFORMS REGISTRY, you don’t need to create another one. In that case proceed with
the chapter “Assigning owner rights to the super-user over the Organizational Forms library”.
To check whether an Organizational forms library exists:
1.
Open Outlook.
2.
On the menu bar select Tools / Forms / Choose Form. Choose Form window opens.
NOTE: In Outlook 2010/2013 click Home tab / New Items / More Items / Choose Form.
3.
In the Look in down-drop box look for Organizational Forms Library, if it exists.
To create an Organizational forms library, follow these instructions:
1.
Run the Exchange Management Shell from Start / Programs / Microsoft Exchange Server
2010 / Exchange Management Shell.
2.
Create an Organizational forms library in Exchange Management Shell using the following
command:
New-PublicFolder -Path "\NON_IPM_SUBTREE\EFORMS REGISTRY" -Name
"Organizational Forms" -vb
Parameter “-vb” is optional; it gives the verbose output.
Check in Outlook (2007) that the public folder is shown in Tools / Forms / Choose Form / Look in
down-drop box. In case of Outlook 2010/2013 check it under Home tab / New Items / More Items /
Page 50
© Copyright Metalogix International GmbH and Idera, Inc., 2008-2015
MS Exchange Server 2010
Metalogix Archive Manager Exchange Ed - Advanced Install
Version 7.2
Choose Form. Restart the Microsoft Exchange Information Store service if not (Start / Programs /
Administrative Tools / Services).
Other way how to bring the Organizational Forms on Outlook 2010 (if it didn’t load up after creation), is
just adding another PowerShell line Set-PublicFolder "\NON_IPM_SUBTREE\EFORMS REGISTRY
\Organizational Forms" -EFormslocaleID EN-US.
Assigning owner rights to the super-user over the
Organizational Forms library
The super-user will be publishing all Archive Manager forms in the Organizational Forms library.
Therefore, that account must be given owner rights to this folder. To assign the rights to the superuser, follow these steps:
1.
Run the Exchange Management Shell from Start / Programs / Microsoft Exchange Server
2010 / Exchange Management Shell.
2.
Now enter the following command to set access rights for super-user (srv_exchange):
Add-PublicFolderClientPermission -Identity "\NON_IPM_SUBTREE\EFORMS
REGISTRY\Organizational Forms" -User "srv_exchange" -AccessRights "owner"
First parameter is a path to the Organizational Forms library. Second parameter is a name of the
super-user, which will be granted the rights and third parameter is the AccessRights type which is
usually supposed to be “Owner”.
NOTES:
·
If you are not sure what the name of the Organizational forms library is, the following
command can be used. It will grant permissions for the child objects under EFORMS
REGISTRY:
Get-PublicFolder -Identity "\NON_IPM_SUBTREE\EFORMS REGISTRY" -GetChildren
Page 51
© Copyright Metalogix International GmbH and Idera, Inc., 2008-2015
MS Exchange Server 2010
Metalogix Archive Manager Exchange Ed - Advanced Install
Version 7.2
| Add-publicfolderclientpermission -User srv_exchange -AccessRights Owner
·
It may take some time until the super-user is assigned owner rights over the Organizational
Forms library.
Tips & Tricks: If there are any issues with assigning rights over Organizational Forms Library, you can
download Microsoft ExFolders from:
http://msexchangeteam.com/archive/2009/12/04/453399.aspx
This tool can facilitate the process of assigning rights over different Exchange Server folders. It can be
used for MS Exchange Server 2010.
Setting up language for the forms folder
After we have successfully created Organizational forms library, its language needs to be set up. To do
so, download the Microsoft’s MAPI Editor tool from the Microsoft download center to the machine with
Outlook installed. The current location for download is:
http://mfcmapi.codeplex.com/
(go to download and select the latest release)
Page 52
1.
Start the Microsoft’s MAPI Editor tool on any client computer, where Outlook is installed
and profile(s) are present.
NOTE: Should you have Outlook installed also on your Archive Manager server, you can
launch the MAPI Editor on that machine as well.
2.
To display the store tables unfold the Session menu and select Logon command.
3.
The store tables are displayed then. Right-click the Public Folder store. From the context
menu select Open store or double-click the store to open it.
© Copyright Metalogix International GmbH and Idera, Inc., 2008-2015
MS Exchange Server 2010
Page 53
Metalogix Archive Manager Exchange Ed - Advanced Install
Version 7.2
4.
A new window with public folders appears. Unfold the tree in the left pane down to
Public Root \ NON_IPM_SUBTREE \ EFORMS REGISTRY \ Organizational Forms.
5.
Click on the Property tab on the menu bar and from the down-drop menu select Edit
given property option.
6.
In the new window click enter the number 0x3FE90003 in the Property tag text box. It
defines the PR_EFORMS_LOCALE_ID property. Check it in the Property name box. Then
click OK.
© Copyright Metalogix International GmbH and Idera, Inc., 2008-2015
MS Exchange Server 2010
7.
Page 54
Metalogix Archive Manager Exchange Ed - Advanced Install
Version 7.2
In the pop-up Property Editor window type the required locale ID (1033 for English) in
the Unsigned Decimal box and click OK:
© Copyright Metalogix International GmbH and Idera, Inc., 2008-2015
MS Exchange Server 2010
8.
Metalogix Archive Manager Exchange Ed - Advanced Install
Version 7.2
Back in the Folder Tree window locate the PR_PUBLISH_IN_ADDRESS_BOOK property in
the right pane. Right-click it and select Edit property.
NOTE: If this property does not exist, you have to create it. Click Property / Additional
properties. Click Add and enter the number 0x3FE6000b in the Property tag text box. It
defines the PR_PUBLISH_IN_ADDRESS_BOOK property. Check it in the Property name
box. Click OK and OK again.
Page 55
© Copyright Metalogix International GmbH and Idera, Inc., 2008-2015
MS Exchange Server 2010
9.
Metalogix Archive Manager Exchange Ed - Advanced Install
Version 7.2
Uncheck the Boolean check box and click OK.
10. Finally close the Folder Tree window and exit MAPI Editor by selecting Session/Logoff
menu command.
Page 56
© Copyright Metalogix International GmbH and Idera, Inc., 2008-2015
MS Exchange Server 2010
Metalogix Archive Manager Exchange Ed - Advanced Install
Version 7.2
Installing Archive Manager Exchange
Edition
LAN Architecture
Before installing Archive Manager Exchange Edition, we need to mention something about the type of
LAN you may have, which basically consists of:
·
MS Exchange Server, (must be a SEPARATE MACHINE)
·
·
·
·
Database Server,
Archive Manager Server,
HSM Server and
Archive Manager Search Server (optional).
In the most basic configuration all servers EXCEPT MS EXCHANGE can be installed on one machine.
However, more advanced configurations are recommended.
Archive Manager is a product of high scalability and administrators can decide for various LAN
solutions. For instance, maximum 3000 mailboxes can be archived with one Archive Manager Archive
server. If more than 1000 mailboxes are being archived, we recommend dedicating an additional server
where only the Archive Manager retrieve part will reside. In this manual we describe two LAN
configurations in detail:
Common config (containing ONE Archive Manager server)
·
·
MS Exchange Server (one machine)
Database Server, Archive Manager Server, HSM Server, Archive Manager Search Server,
PST Import Server (second machine)
LoadBalancing config (containing MORE Archive Manager servers)
·
·
·
·
·
MS Exchange Server (one machine)
Database Server (second machine)
one Archive Manager Archive Server (third machine) (with optional PST Import)
one Archive Manager Retrieve Server (fourth machine)
HSM and Archive Manager Search Server (fifth machine)
st
HSM server setup and optional Archive Manager Search server setup must be installed first - 1 part
of the installation section.
Page 57
© Copyright Metalogix International GmbH and Idera, Inc., 2008-2015
MS Exchange Server 2010
Metalogix Archive Manager Exchange Ed - Advanced Install
Version 7.2
Then run the Archive Manager setup on all other servers (except the Exchange and Database Server) –
nd
2 part of the installation section.
NOTE: To achieve load balancing and enable multiple archiving for large organizations scattered
around the globe, Archive Manager provides you with the possibility to configure several Archive
Manager Archive servers distinguished by a unique identifier – the LocationID. More servers can be
assigned to ONE location:
ONE Archive server
several Retrieve servers and/or
PST Import servers.
·
·
·
For example: one Archive Manager archive service for daily business, one PST Import archive service
and several retrieve services operating in parallel.
(For more info see the note at the end of the “Installing Archive Manager Exchange Edition” chapter.)
1st part of the Archive Manager installation – HSM and Archive
Manager Search
After you have decided on your Archive Manager configuration solution, you can start installing Archive
Manager. As was mentioned before, the first step is to install:
·
the HSM Server which takes care of storing and retrieving emails and
·
optionally the Archive Manager Search Server if you wish to use the fulltext search
NOTE: When running the Archive Manager Search setup, you can choose from different fulltext
search engines:
o
Archive Manager Search (recommended)
o
MS Search integration
NOTE: Both HSM and Archive Manager Search can be installed by separate setups or by using the
Archive Manager installation package. For detailed information on how to install and configure the HSM
and Archive Manager Search see the following manuals:
Page 58
o
HSM Installation and Configuration
o
Archive Manager Search
© Copyright Metalogix International GmbH and Idera, Inc., 2008-2015
MS Exchange Server 2010
Metalogix Archive Manager Exchange Ed - Advanced Install
Version 7.2
2nd part of the Archive Manager installation: Components
Selection
When your HSM and Archive Manager Search are installed, you can continue with the Archive Manager
installation. We will use the separate Archive Manager Exchange Edition setup. This setup is also a part
of Archive Manager Installation Package. You can run the installation package and then select just the
Metalogix Archive Manager Exchange Edition component.
NOTE: Make sure that all MMC applications (the System Manager tool, the Services window etc.) are
closed before running the Archive Manager setup. Run the setup while being logged on to the server
with a domain account with local administrative permissions.
On the Welcome page click Next.
On the License Agreement page read the license agreement. If you agree, select the I accept the terms
of the license agreement option and click Next to continue.
Page 59
© Copyright Metalogix International GmbH and Idera, Inc., 2008-2015
MS Exchange Server 2010
Metalogix Archive Manager Exchange Ed - Advanced Install
Version 7.2
Before proceeding with installation, you need to apply the license. There can be two different situations:
·
·
a)
Archive Manager server has an internet connection (a)
Archive Manager server has NO internet connection (b)
If Archive Manager server has an internet connection, follow the next steps:
-
-
Enter your license key and click Next.
NOTE: If the internet access is filtered out by proxy on the Archive Manager server,
click the Set proxy link to enter the respective parameters.
License will be validated and you can continue the installation.
b) If the Archive Manager server has NO internet connection, follow the next steps:
-
Page 60
Insert your license key.
Select the Offline activation radio button and click Next.
Copy the Activation request text from the Activation request text box or save it as a file
(click the Save to file link)
On the machine with internet access open the Metalogix Activation URL:
http://www.metalogix.com/OfflineActivation
Paste the Activation Request text you have copied or Browse for the file you have saved
and click Activate
Activation text is generated. Again copy the text or save it as a file
Back on the Archive Manager server click Next to proceed to the Enter your
Activation Response dialog. Paste the Activation text you have copied from the
Metalogix web page or load the file.
© Copyright Metalogix International GmbH and Idera, Inc., 2008-2015
MS Exchange Server 2010
-
Metalogix Archive Manager Exchange Ed - Advanced Install
Version 7.2
Click Next, then Finish.
In the next window you can check the location where the Archive Manager folder with all the application
necessary files will be installed. The default destination location is C:\Program Files\ Metalogix. You
can use the Change button to change the destination directory, if you wish. Then click Next.
The next step is very important as in the following dialog (Select Features window) you are selecting
which features of Archive Manager will be installed. We will describe how to select the features in a
separate section (see the following sections “Description of the features” as well as the section “How to
select the features”). You must select appropriate features depending on your LAN configuration.
Page 61
© Copyright Metalogix International GmbH and Idera, Inc., 2008-2015
MS Exchange Server 2010
Metalogix Archive Manager Exchange Ed - Advanced Install
Version 7.2
Description of the features
Application Server
Please select this option only for the computer where Archive Manager Server will be running. By
selecting this option you will install the basic components of Archive Manager.
PST Import
As for PST Import, it is an application collecting and archiving users’ PST files. It can be used only
on the machine where MS Outlook is installed.
Supported Outlook versions:
o Outlook 2007
Page 62
o
Outlook 2010 (32bit)
o
Outlook 2013 (32bit)
o
Outlook 2016 (32bit)
© Copyright Metalogix International GmbH and Idera, Inc., 2008-2015
MS Exchange Server 2010
Metalogix Archive Manager Exchange Ed - Advanced Install
Version 7.2
(For more information on how to use and configure the PST Importer, see the “Administrator
manual for PST Importer”.)
IMPORTANT NOTE: The PST Import component can easily be installed on any machine with the
following minimum requirements:
· Windows Server 2008 R2 SP1
· .NET Framework 2.0 SP2
· Outlook 2007
Administrative tools
By selecting this option you will install the Configuration tool and the Enterprise Manager, which
are included among administrative applications of Archive Manager.
These tools can be installed and used on several computers. For instance, you may decide to use
Enterprise Manager not only on the machine where Archive Manager Server is running (i.e. not only
on the machine where Application server is selected during setup). In that case you must select
ONLY Administrative tools when running Archive Manager Exchange Edition setup on the new
machine. Several users can then have access to full management of Archive Manager.
Forms Installer
Forms Installer contains custom forms and FormsInstaller.exe tool which publishes the forms in the
Organizational Forms Library. It can only be used on a computer where Outlook is running. You can
also choose any client machine with Outlook 2016 (32bit) / 2013 (32bit) / 2010 (32bit) / 2007 and
.NET Framework 2.0 SP2 installed to be able to publish the forms.
NOTE: There is always a FormsInstaller setup to be downloaded together with the Archive
Manager setup. This smaller setup installs the FormsInstaller.exe tool on the client machine.
Auditing
Auditing allows administrator to log defined user actions in the email archive, i.e. administrator has
an overview of user actions as archiving, retrieving, restoring and even executed fulltext searches
(in Outlook and ArchiveWeb). This feature can be installed on Archive Manager server or on a
separate machine (for detailed information see the “Auditing manual”).
Monitoring service
This service is implemented since v5.1. It automates monitoring of other Archive Manager (MAM)
services and alerts administrator via notification email if necessary. Notification mail is send only if
Page 63
© Copyright Metalogix International GmbH and Idera, Inc., 2008-2015
MS Exchange Server 2010
Metalogix Archive Manager Exchange Ed - Advanced Install
Version 7.2
some error occurs. For more information see the “MAM services – Basic description” manual.
Documentation
Available documents
All in all, certain restrictions and recommendations regarding LAN architecture need to be taken into
account when installing Archive Manager. Basically the MS Exchange Server and Archive Manager
Server should be on different computers, i.e. two separate machines (for more information see the
section “LAN Architecture”).
IMPORTANT NOTE: There is a special Archive Manager Exchange Edition_64bit_Extensions setup to
be downloaded together with the Archive Manager Exchange Edition setup. This Archive Manager
Exchange Edition_64bit_Extensions setup installs Exchange Server Tools which are necessary for
reading permissions and Archive Manager components for OWA 2010 (optional).
Archive Manager Exchange Edition_64bit_Extensions setup is dedicated to run only on Exchange
2010 Server running Windows Server 2003 (64bit) (see the “Archive Manager Exchange Edition
Installation of Optional Features” manual).
How to select features for various types of LAN
As mentioned in “LAN Architecture” section Archive Manager is a product of high scalability and
administrators can decide for various types of LAN. It is important to select the correct features for
your servers when installing Archive Manager. Further we discuss two most common LAN
configurations in detail:
o
containing ONE Archive Manager Server (“Common config”)
o
containing MORE Archive Manager Servers (“LoadBalancing config”).
I. Common config
Possible LAN configuration:
·
·
MS Exchange Server (one machine)
Archive Manager Server, HSM Server, Archive Manager Search Server, PST Import Server,
Database Server (second machine)
Please select the features on the Select Features page as described below:
Page 64
© Copyright Metalogix International GmbH and Idera, Inc., 2008-2015
MS Exchange Server 2010
Metalogix Archive Manager Exchange Ed - Advanced Install
Version 7.2
When running the Archive Manager setup on the second machine, select Application Server. To enable
ArchiveWeb application, select also ArchiveWeb. If you plan to use administrative applications on the
server as well, select Administrative tools. Select Auditing if you want to deploy auditing feature and
Monitoring service if you want to deploy monitoring as well.
You can select also FormsInstaller and PST Import features.
st
NOTE: HSM and Archive Manager Search have been installed on the machine separately (1 part of the
installation).
NOTE: The only components installed on the Exchange Server are Exchange Server Tools necessary
for synchronizing permissions and/or OWA 2010 extension (optional). They are installed with the
Archive Manager Exchange Edition_64bit_Extensions setup which can be downloaded together with
the Archive Manager Exchange Edition setup (see the “Post Installation tasks” section).
For OWA 2010 extension installation see the “Archive Manager Exchange Edition Installation of Optional
Features” manual.
Page 65
© Copyright Metalogix International GmbH and Idera, Inc., 2008-2015
MS Exchange Server 2010
Metalogix Archive Manager Exchange Ed - Advanced Install
Version 7.2
II. LoadBalancing Config
Possible LAN configuration:
Page 66
·
MS Exchange Server (one machine)
·
Database Server (second machine)
·
one Archive Manager Archive Server (third machine) (with optional PST Import)
·
one Archive Manager Retrieve Server (fourth machine)
© Copyright Metalogix International GmbH and Idera, Inc., 2008-2015
MS Exchange Server 2010
·
Metalogix Archive Manager Exchange Ed - Advanced Install
Version 7.2
HSM and Archive Manager Search Server (fifth machine)
NOTE: Provided that you wish to have two or more Archive Manager servers, the Archive Manager
installation has to run on all of them. When the whole installation process is completed the servers have
to be assigned the “Archive server” role and “Retrieve server” role respectively using Enterprise
Manager application (Enterprise Manager / Tools / Options / Server settings tab) – as will be
described later.
Please select the components as described:
When running Archive Manager setup on the computers where Archive Manager Servers should be
installed, select Application Server for both of them and also Administrative tools if you plan to use
administrative applications on the servers as well. To enable ArchiveWeb, select this feature on one of
the Archive Manager Servers. To enable Auditing, select this feature also on one of the Archive
Manager Servers. Monitoring service feature can be installed on each Archive Manager Server.
Optionally select also PST Import if you plan to use this feature.
HSM and Archive Manager Search are installed on the HSM and Archive Manager Search server by
st
separate setups as described in the 1 part of the installation.
There is no need to run the installation on the Database Server and MS Exchange Server.
NOTE: The only components installed on the Exchange Server are Exchange Server Tools necessary
for synchronizing permissions and/or OWA 2010 extension (optional). They are installed with the
Archive Manager Exchange Edition_64bit_Extensions setup which can be downloaded together with
the Archive Manager setup (see the “Post Installation tasks” section).
For OWA 2010 extension installation see the “Archive Manager Exchange Edition Installation of Optional
Features” manual.
Page 67
© Copyright Metalogix International GmbH and Idera, Inc., 2008-2015
MS Exchange Server 2010
Metalogix Archive Manager Exchange Ed - Advanced Install
Version 7.2
Finishing the installation
As the setup continues you are asked to allow Metalogix Exchange Extension to be added to the
Exception list of the Windows Firewall. In this way the Archive service will be allowed to communicate
through Windows Firewall.
Page 68
© Copyright Metalogix International GmbH and Idera, Inc., 2008-2015
MS Exchange Server 2010
Metalogix Archive Manager Exchange Ed - Advanced Install
Version 7.2
Then you are asked to specify the user account under which Archive Manager services will be running.
Enter your super-user (srv_exchange) in the User Name text box in the DOMAIN\Username format. You
can use the Browse button, to locate the user. Fill in the super-user’s password in the Password and
Confirm Password text boxes. Click Next.
Page 69
© Copyright Metalogix International GmbH and Idera, Inc., 2008-2015
MS Exchange Server 2010
Metalogix Archive Manager Exchange Ed - Advanced Install
Version 7.2
In the next window enter the NETBios name of your HSM Server, i.e. the computer where you have run
the HSM setup (see the 1st part of the installation). You can use the Browse button to locate the server.
Then click Next.
NOTE: Click the Test server button if you want to test the connection to the HSM server.
Page 70
© Copyright Metalogix International GmbH and Idera, Inc., 2008-2015
MS Exchange Server 2010
Metalogix Archive Manager Exchange Ed - Advanced Install
Version 7.2
Then you are asked to enter the NETBios name of your Fulltext Server, i.e. the computer where you have
st
run the Archive Manager Search setup (see the 1 part of the installation). You can use the Browse
button to locate the server. Then click Next.
NOTE: Click the Test server button if you want to test the connection to the Fulltext server.
Archive Manager Search is optional. If you do not have Archive Manager Search Server installed,
uncheck the Enable Fulltext search check box and click Next.
Page 71
© Copyright Metalogix International GmbH and Idera, Inc., 2008-2015
MS Exchange Server 2010
Metalogix Archive Manager Exchange Ed - Advanced Install
Version 7.2
Finally click Install.
When the installation has finished, click the Finish button. As the Archive Manager installation finishes,
the Postinstallation window opens with all necessary post-installation tasks listed. We describe them in
the following chapter.
IMPORTANT NOTE:
If your LAN configuration requires more than one Archive Manager Archiving server in one domain
(especially in case of large organizations demanding multiple archiving), Archive Manager provides you
with the possibility to configure several Locations with their Archive servers.
You must distinguish the intended Archive servers by the Location ID immediately after installation. As
default the Location ID for every installation is 1. To change the Location ID, e.g. set Location ID to 2 for
nd
your 2 Archive Manager Archive server, you have to change the following registry key values to “2”:
·
·
HKEY_LOCAL_MACHINE \ SOFTWARE \ Wow6432Node \ Heilig & Schubert \ exchangePAM \
MultiServerID
HKEY_LOCAL_MACHINE \ SOFTWARE \ Wow6432Node \ Heilig & Schubert \ exchangePAM \
OfflineStorage \ LocationID
Assigning Archive / Retrieve server role to respective Archive Manager servers is accomplished in the
Page 72
© Copyright Metalogix International GmbH and Idera, Inc., 2008-2015
MS Exchange Server 2010
Metalogix Archive Manager Exchange Ed - Advanced Install
Version 7.2
Enterprise Manager on the Tools / Options / Server settings tab – will be described later.
Page 73
© Copyright Metalogix International GmbH and Idera, Inc., 2008-2015
MS Exchange Server 2010
Metalogix Archive Manager Exchange Ed - Advanced Install
Version 7.2
Post-installation tasks
As the Archive Manager Exchange Edition installation finishes you will be prompted the
Postinstallation dialog. The list of post-installation steps varies for different parts of installation
(Archive Manager Server, PST Server etc.).
This dialog lists post-installation tasks which have to be completed after installation:
1.
2.
3.
4.
Configuration - Configuring your already installed databases
Forms Publishing - Publishing the Custom Forms of Archive Manager
Start Services - Start the Archive Manager services
Enterprise Manager - Run the Enterprise Manager to start populating
Archive Manager with users and mailboxes and archive the first emails.
The last task is to be completed on the Exchange Server (not included in the Postinstall dialog):
Page 74
© Copyright Metalogix International GmbH and Idera, Inc., 2008-2015
MS Exchange Server 2010
Metalogix Archive Manager Exchange Ed - Advanced Install
5.
Version 7.2
Exchange Server Tools – installs tools necessary for reading permissions
For information on how to complete the tasks read the following sections. Each of the above mentioned
steps can be done once you click the relevant Start button on the dialog. The Postinstallation tool can
be launched also from <installdir> \ Metalogix \ MAM4Exchange \ Tools \ LaunchTools \
LaunchTools.exe.
Configuring the database
As suggested in the Postinstallation dialog, as a first step you need to configure your previously
created database(s). To do so, just click the first Start button - Launch configuration tool. The database
Configuration tool pops-up. This tool administers the database(s) which your Archive Manager
software will use to keep meta-data in. The database(s) must be available before you run Archive
Manager setup (see the Addendum “Creating an MS SQL database with a database user).
In this manual we use separate database for each component (exchangeDB for Archive Manager part,
hsmDB for HSM part and auditingDB for Auditing part and mtRoleDB for Users part) and the same user
for all (srv_exchange). The following lines describe only configuration of Archive Manager, Auditing and
Users part. For HSM configuration see the “HSM Installation and Configuration” manual.
Page 75
© Copyright Metalogix International GmbH and Idera, Inc., 2008-2015
MS Exchange Server 2010
Metalogix Archive Manager Exchange Ed - Advanced Install
Version 7.2
The Configuration tool has different tabs:
-
Auditing – only in case that Auditing feature was selected during the installation
HSM (which is configured after the HSM installation – see the “HSM Installation and
Configuration manual”)
Exchange Archive (which is used to configure the Archive Manager)
Users – should be configured for correct function of ArchiveWeb
Search – only in case that MAM Search was installed as an optional feature
Fulltext tab – only in case that old fulltext engine is used
You will notice that each tab of the tool (Exchange Archive, HSM, Users and Auditing) has 2
subsections - the Configuration section and the Execute Scripts section. Always start with the
Configuration subsection, since you will first need to set the connection parameters in order to run the
sql scripts.
IMPORTANT NOTE: Once configured, you must NOT change the following values in the
Configuration tool on any of the tabs:
·
Page 76
Initial Catalog: this is the default Database where the system is writing and reading from.
© Copyright Metalogix International GmbH and Idera, Inc., 2008-2015
MS Exchange Server 2010
Metalogix Archive Manager Exchange Ed - Advanced Install
Version 7.2
This name should never be changed, unless you do not specifically restore all the prior
archived data back in Exchange and decide to start all over with a fresh new database for
the product. If by mistake another database is used the old archived data is no longer
reachable.
·
Table Owner: this is the default table owner used by the product. This SQL Table owner
must be always the same, even if you move the SQL databases from one SQL server to
another. If another SQL Table Owner name is created and used for the archiving product
all the tables will be re-created as duplicate and the system will write in the new table set.
As an end-effect the old archived data will not be reachable anymore. For SQL 2008 / 2012
the Table Owner is the SCHEMA NAME of the database.
·
Server Name: this is the name of the SQL server where the databases used by the
Metalogix product are hosted. It is only allowed to change this name if the database(s) the
Metalogix product uses are moved from one SQL server to another
In case of an ORACLE database, do NOT change ORACLE NET name and Schema.
UPDATING: When updating from earlier versions to version 3.4 and higher, running the
parentFolderConv-SQL.sql database script from the Exchange Archive tab can take a longer time. It is not
necessary to run the script immediately after update. It is recommended to unselect the abovementioned script when executing scripts on the Exchange Archive tab, have the system up and running
and execute that script on the Exchange Archive tab only later.
To configure the Archive Manager and Auditing databases:
1.
Page 77
On the database Configuration tool switch to the Exchange Archive section and then click
Configure.
© Copyright Metalogix International GmbH and Idera, Inc., 2008-2015
MS Exchange Server 2010
2.
Page 78
Metalogix Archive Manager Exchange Ed - Advanced Install
Version 7.2
If you have an MS SQL server as a database provider, select the respective radio button and
click Next. If you are using an Oracle database choose the other radio button and click Next.
© Copyright Metalogix International GmbH and Idera, Inc., 2008-2015
MS Exchange Server 2010
3.
Metalogix Archive Manager Exchange Ed - Advanced Install
Version 7.2
In the next window you have to fill in the text fields as follows:
·
If you have Microsoft SQL Server
Server name - name of the SQL server
Initial catalog - name of the Archive Manager database (e.g. exchangeDB).
Table owner - name of the SQL Login that is a Table Owner (or the name of the SQL Schema),
e.g. srv_exchange
Authentication – authentication type used for the database
User name - database login user (the one you are using as a table owner – e.g. srv_exchange)
Password - password of the above database login
Page 79
© Copyright Metalogix International GmbH and Idera, Inc., 2008-2015
MS Exchange Server 2010
Metalogix Archive Manager Exchange Ed - Advanced Install
Version 7.2
IMPORTANT NOTE: When updating Archive Manager from one version to another you must NOT
change the following values in the Configuration tool on any of the tabs:
o Server Name
o Initial Catalog
o Table Owner
In case of an ORACLE database, do NOT change ORACLE NET name and Schema.
·
If you have ORACLE
ORACLE NET Name - ORACLE NET name, TNS name
Schema - the name of the schema where Archive Manager tables will be created
User Name - log-on user for the HSM database (with read and write rights to the tables)
Password - log-on user’s password
Page 80
© Copyright Metalogix International GmbH and Idera, Inc., 2008-2015
MS Exchange Server 2010
4.
Page 81
Metalogix Archive Manager Exchange Ed - Advanced Install
Version 7.2
Back on the Exchange Archive tab run the sql scripts by clicking Execute Scripts. The list of
the scripts will appear. Click Next.
© Copyright Metalogix International GmbH and Idera, Inc., 2008-2015
MS Exchange Server 2010
Metalogix Archive Manager Exchange Ed - Advanced Install
Version 7.2
NOTE: When updating from earlier versions to version 3.4 and higher, running the
parentFolderConv-SQL.sql database script (the last one) can take a longer time. It is not
necessary to run the script immediately. It is recommended to unselect the above-mentioned
script when executing scripts on the Exchange Archive tab, have the system up and running and
execute that script on the Exchange Archive tab only later.
5.
Page 82
In case of SQL Authentication, click Next once more to accept the database login user and its
password.
© Copyright Metalogix International GmbH and Idera, Inc., 2008-2015
MS Exchange Server 2010
6.
Page 83
Metalogix Archive Manager Exchange Ed - Advanced Install
Version 7.2
Click Next to execute the scripts.
© Copyright Metalogix International GmbH and Idera, Inc., 2008-2015
MS Exchange Server 2010
Metalogix Archive Manager Exchange Ed - Advanced Install
Version 7.2
7.
When the process finishes, click Finish.
8.
Then switch to the Exchange Archive/Supporting Services tab. It lists two services running
on the background ensuring smooth Archive Manager functionality. If Archive Manager itself
is installed on the local machine, just click Apply. Otherwise specify machine name (instead of
“localhost”) and port for the computer where Archive Manager is installed.
9.
Now switch to the Users tab. Configure it in the same way as the Exchange Archive part. Use
either the dedicated database mtUserDB or the same database that was used for Exchange
Archive part.
10. If you have installed Auditing feature, switch to the Auditing tab to configure the Auditing
database. The process is similar to Archive Manager database configuration – configure the
auditingDB and run the scripts.
NOTE: Auditing log targets and configuration are described in detail in the “Auditing
manual”.
11. When you finished, close the database Configuration tool. Archive Manager database is
now configured.
Page 84
© Copyright Metalogix International GmbH and Idera, Inc., 2008-2015
MS Exchange Server 2010
Metalogix Archive Manager Exchange Ed - Advanced Install
Version 7.2
Publishing Archive Manager Forms
As suggested back in the Postinstallation window, the second step will be FormPublishing. You need to
publish the custom forms for Archive Manager in the Organizational Forms library of each Exchange
Server you plan to archive.
These custom forms need to be installed with the FormsInstaller.exe tool. This tool is as default
installed on the Archive Manager server under C:\ Program Files (x86) \ Metalogix \ MAM4Exchange
\ Tools \ Forms. It can be used on any machine with Outlook 2016 (32bit) / 2013 (32bit) / 2010 (32bit) /
2007 and .NET Framework 2.0 SP2 or higher installed. You can run it on a client or on your Archive
Manager server.
How to do it:
NOTE: To run the FormsInstaller on a client, use the FormsInstaller setup. It can be downloaded
together with the Archive Manager setup. This smaller setup is used to install the FormsInstaller.exe
tool and other necessary .dll files on the client machine.
1.
Check that the super-user account is a local admin on the machine.
2.
Log-on with the super-user account and open its profile in Outlook. Make sure you are not
using cache mode while attempting to publish the custom forms.
3.
When done, keep the Outlook still opened with the super-user account and run the forms install
application from this location
C:\ProgramFiles (x86)\Metalogix\MAM4Exchange\Tools\Forms\FormsInstaller.exe
4.
Page 85
The Forms Installer window opens. Select Install/repair. Then click Next.
© Copyright Metalogix International GmbH and Idera, Inc., 2008-2015
MS Exchange Server 2010
5.
Metalogix Archive Manager Exchange Ed - Advanced Install
Version 7.2
If you have installed the Forms folder on a location different from the one displayed, click the
Browse button to find it. Otherwise click Next.
NOTE: The Archive Manager form templates are located under the following path: C:\ Program
Files (x86) \ Metalogix \ MAM4Exchange \ Tools \ Forms \ Templates.
Page 86
© Copyright Metalogix International GmbH and Idera, Inc., 2008-2015
MS Exchange Server 2010
6.
Page 87
Metalogix Archive Manager Exchange Ed - Advanced Install
Version 7.2
In the next window select the available forms and then click on the “>>” button to add them to
the Selected forms list. Then click Next.
© Copyright Metalogix International GmbH and Idera, Inc., 2008-2015
MS Exchange Server 2010
7.
Metalogix Archive Manager Exchange Ed - Advanced Install
Version 7.2
For full functionality leave all four options of this window checked and click Next.
Uncheck the individual options only for special purposes:
- When an archived email is opened in Outlook, the “Previous Item” and “Next Item” functionality
is not working. This is because of the nature of archived email, which is just an offline copy of
the original email. If you want to use the “Previous/Next” buttons while not retrieving the
archived email, you can uncheck the “On Open” check box. In this case the archived email is not
downloaded when the user double-clicks on the shortcut. Please note that in order to be able
to access the archived mail, you have to set up another way of accessing its content, e.g. by
setting up attachment links or html shortcuts. In this case there are direct links to the archived
content directly from the shortcut, so the On Open method is replaced.
- Should you want to send in a reply just the shortcut of the given email (when clicking Reply on
the Outlook menu bar), unchecked the On Reply check box.
- Should you want to send in a reply to all just the shortcut of the given email (when clicking
Reply to all on the Outlook menu bar), unchecked the On Reply to All check box.
- Should you want to forward just the shortcut of the given email (when clicking Forward on the
Outlook menu bar), uncheck the On Forward check box.
8.
Page 88
On the next dialog you will have to provide the name of your Archive Manager server that will
© Copyright Metalogix International GmbH and Idera, Inc., 2008-2015
MS Exchange Server 2010
Metalogix Archive Manager Exchange Ed - Advanced Install
Version 7.2
be used for retrieving of archived mails. This name will be written in the custom forms code.
You can provide two values (for example the NETBios name of the Archive Manager server and
its IP Address as well) in case one of them is not reachable, the forms will do an automatic
switch.
In the Location ID you have to write integers. Your first Archive Manager archiving server has
the Location ID 1. If you will have later a second Archive Manager archiving server in the same
domain you can set its Location ID to 2 etc. This will help the Forms to target to all the Archive
Manager servers in the same domain. In other words, you have as many Location IDs as the
number of your Archive Manager databases in use.
The Primary Retrieve Server column must contain the name of your Archive Manager server. If
you use a dedicated server for retrieving, then you should write the name of this Retrieving
Archive Manager server on this column.
The Secondary Retrieve Server column is usually keeping a different value than the one written
on the previous column. That’s because the forms can do a switch and try two values in case
one is not accessible.
EXAMPLE:
Page 89
• If you have only ONE Archive Manager server, always set on the
Primary Retrieve Server column the NETBios name of your Archive
Manager server and on the Secondary Retrieve Server the IP
Address of the very same machine.
© Copyright Metalogix International GmbH and Idera, Inc., 2008-2015
MS Exchange Server 2010
Metalogix Archive Manager Exchange Ed - Advanced Install
Version 7.2
• If you have MORE Archive Manager Servers, i.e. you have a
dedicated retrieve server for your Archive Manager, then on the
Primary Retrieve Server column you have to provide the NETBios
name of the Retrieving Archive Manager Server, while in the
Secondary Retrieve Server column you have to provide the
NETBios name of the Archiving Archive Manager Server.
9.
Now define your retrieval settings. Check the Use SSL (https) in server communication check
box if you use the “https” in your domain communication. The Open message as read-only
check box is selected as default, so that archived emails would open as read-only for your
users. Do not change these settings unless it is necessary. When this option is not checked,
users are allowed to modify archived emails but these changes are not reflected in the archive.
When finished, click Next and then Install to publish the custom forms
NOTE: Users with Archive Manager Outlook Addin installed can modify archived emails by
creating new email versions in archive even if the Open message as read-only check box is
selected.
10. After the attempt of publishing each of the eight forms you will get a result in the Forms
Installer tool. If the result is OK, your installation of the forms is successful. You can check them
Page 90
© Copyright Metalogix International GmbH and Idera, Inc., 2008-2015
MS Exchange Server 2010
Metalogix Archive Manager Exchange Ed - Advanced Install
Version 7.2
if you go in Outlook to Tools / Form / Choose Form and then list from the Organizational
Forms Library.
When done, click Finish and your custom forms are now installed.
Activating mailboxes
After publishing the forms for the super-user (previous chapter), it is necessary to activate all mailboxes
which you plan to archive. To do so:
- open Outlook with super-user account
- go to Tools/Forms/Choose form
NOTE: In Outlook 2013 click Home tab / New Items / More Items / Choose Form.
- in the new dialog list choose the Organizational Forms Library
- keep the SHIFT key pressed on your keyboard and double-click to load the form called PamMessage
th
(there are 4 of them, use the 4 one – it is the one with an icon of archived message
; to display the
icon click Advanced)
- it will open and look like a normal email
Page 91
© Copyright Metalogix International GmbH and Idera, Inc., 2008-2015
MS Exchange Server 2010
Metalogix Archive Manager Exchange Ed - Advanced Install
Version 7.2
- send this email to all mailboxes you plan to archive
Now you have activated all mailboxes and they can be archive.
NOTE: If there are multiple languages (multiple organizational form libraries), then you need to publish
the forms using a language specific Outlook and account – one for each language.
To replicate the Archive Manager forms in the Public Information Store, use the same method to send
an Archive Manager form to your Inbox folder. Then copy it in the Public Folder you wish to archive
from. The Archive Manager forms are replicated now in the Public Information Store too.
NOTE: If during the installation the Choose Profile window is displayed, select the appropriate profile
from the Profile Name combo box. (The profiles are created in MS Outlook under a user with an email account on the MS Exchange Server.)
NOTE: If during installation a Warning window concerning macros appears, then always click on the
Enable Macros button.
Page 92
© Copyright Metalogix International GmbH and Idera, Inc., 2008-2015
MS Exchange Server 2010
Metalogix Archive Manager Exchange Ed - Advanced Install
Version 7.2
Start Archive Manager services
You are now ready to proceed to the next post installation task – starting the Archive Manager services
on your archiving server:
?
Click the relevant Start button in the Postinstallation window or
?
You can also start services when running the batch file from <installdir> \
Metalogix \ MAM4Exchange \ Tools \ Start.bat
NOTE: Maybe in the future you will have to restart the Archive Manager services to load some special
settings for your email archiving. In that case use always the batch tools - Stop.bat and Start.bat located in the same directory <installdir> \ Metalogix \ MAM4Exchange \ Tools.
Enterprise Manager – Initial Configuration
Once the Archive Manager services are all started you can proceed with opening the main archiving
tool of Archive Manager called Enterprise Manager where you will have to populate the Archive
Manager with users - in other words, synchronize your users whose emails you wish to archive.
Additionally, the Initial Configuration wizard will lead you through all settings necessary for archiving.
To open the Enterprise Manager:
? click the last Start button in the Postinstallation window or
? launch it from Start / Programs / Metalogix / Archive Manager Exchange Edition /
Enterprise Manager.
Page 93
© Copyright Metalogix International GmbH and Idera, Inc., 2008-2015
MS Exchange Server 2010
Metalogix Archive Manager Exchange Ed - Advanced Install
Version 7.2
NOTE: As default, only the super-user, which was specified during the Archive Manager installation, has
logon permissions to the Enterprise Manager (EM). Thus when you want to run the EM, you have to be
logged on with the super-user account. However, you can grant other users logon permissions as well.
It can be done on the Tools / Options / User roles tab in EM (for more information see the
“Administrator manual for Archive Manager Exchange Edition Enterprise Manager”).
When the EM is launched for the first time, no users are synchronized with Archive Manager, no
archiving is scheduled. To facilitate the initial configuration tasks, the Initial Configuration wizard is
started. It will lead you through the initial configuration so that you can start archiving with Archive
Manager. The wizard will perform the following tasks:
1. Import mailboxes or group which you want to archive with Archive Manager
2. Set the default retention category
3. Define job, i.e. scheduled task which will perform the archiving
4. Configure group and email filtering
After you finish the initial configuration as described further, you will not need to run the wizard again.
All additional settings can be configured directly in EM. Check the Do not show this wizard when the
application starts check box so that this wizard will not start next time when you run the EM.
Page 94
© Copyright Metalogix International GmbH and Idera, Inc., 2008-2015
MS Exchange Server 2010
Metalogix Archive Manager Exchange Ed - Advanced Install
Version 7.2
On the initial page of the wizard click Next. On the next page you can choose between different ways of
importing users to Archive Manager:
a)
Create group and import users – a user defined group (not an Active Directory group) will
be created in the Archive Manager and you will be able to choose which users from Active
Directory should belong to this group
b) Create group by LDAP query – you will create a group in Archive Manager containing the
users/groups satisfying the defined LDAP query
c)
Select an Active Directory group – you will select an existing group from Active Directory
and all its users will be imported
d) Select a group in Azure Active Directory – you will connect to your Office 365 and import
selected groups/users (for more information see the “Office 365 Configuration Details” part)
NOTE: With the evaluation license you can import only 5 mailboxes.
Page 95
© Copyright Metalogix International GmbH and Idera, Inc., 2008-2015
MS Exchange Server 2010
Metalogix Archive Manager Exchange Ed - Advanced Install
Version 7.2
Depending on the option you have chosen in the previous dialog, now you can:
a)
Set the name of the group which will be created in the Archive Manager and select the
mailboxes which you want to import to this group
NOTE: Right-click inside the list view to unfold the context menu. The context menu can
be used to check / uncheck all mailboxes etc.
Page 96
© Copyright Metalogix International GmbH and Idera, Inc., 2008-2015
MS Exchange Server 2010
Metalogix Archive Manager Exchange Ed - Advanced Install
Version 7.2
Further, should you wish to allow members of this group to use the Outlook addin for
archiving directly from Outlook check the Set the Outlook addin permissions for the
group option.
b) Select the Active Directory group which you want to import to the Archive Manager
Page 97
© Copyright Metalogix International GmbH and Idera, Inc., 2008-2015
MS Exchange Server 2010
Metalogix Archive Manager Exchange Ed - Advanced Install
Version 7.2
Further, should you wish to allow members of this group to use the Outlook addin for
archiving directly from Outlook check the Set the Outlook addin permissions for the
group option.
c)
Set the name of the group which will be created in Archive Manager and specify LDAP
query criteria for users to be imported:
Root of Search – use the Browse button to choose the root level for query search
Query String – here define your LDAP query
Query Scope – select if the query should be executed just on the root level (One level
Search) or also on subtree starting from the root level (Subtree search)
After defining your criteria click Next. The following dialog displays users satisfying the
criteria. Then click Next.
Page 98
© Copyright Metalogix International GmbH and Idera, Inc., 2008-2015
MS Exchange Server 2010
Metalogix Archive Manager Exchange Ed - Advanced Install
Version 7.2
d) Enter your Office 365 credentials to import from Azure AD
NOTE: In case of Advanced Authentication for Azure AD, entering username and
password is required (for more information see the "Office 365 Configuration Details"
section).
Page 99
© Copyright Metalogix International GmbH and Idera, Inc., 2008-2015
MS Exchange Server 2010
Metalogix Archive Manager Exchange Ed - Advanced Install
Version 7.2
In the next dialog select the Azure AD group which you want to import to Archive Manager.
Page 100
© Copyright Metalogix International GmbH and Idera, Inc., 2008-2015
MS Exchange Server 2010
Metalogix Archive Manager Exchange Ed - Advanced Install
Version 7.2
Further dialogs are the same for all scenarios:
In the Archive Settings dialog you can select the retention category which will be used as the
default retention category. Retention category defines the lifecycle of the archived emails, i.e. it
defines for how long the item will be kept in the archive etc. In the case of fresh installation,
there is just one retention category (“Default” retention category) created by the wizard.
If you want to create a new retention category with specific settings click the “create a new
retention category” link. Then in the pop-up dialogues you can create retention category with
specific settings (for detailed information see “Retention tab” section in the “Administrator
Manual for Archive Manager Exchange Edition Enterprise Manager”).
In the Email filtering section define settings for email archiving. In the Archive files older than
… days text box enter the period following which the items will be archived. In the Archive files
bigger than text box enter the size of the messages to be archived. Do not forget to select the
appropriate units (B, KB or MB) in the down-drop box. Click Next.
Example: As the default the settings are the following:
10 days
0.01 MB
It means that messages older than 10 days AND bigger than 0.01 MB will be archived.
Page 101
© Copyright Metalogix International GmbH and Idera, Inc., 2008-2015
MS Exchange Server 2010
Metalogix Archive Manager Exchange Ed - Advanced Install
Version 7.2
In the Job Settings dialog you will define job, i.e. scheduled task that will perform the archiving
of messages for the given group. You can either Select an existing job or Create a new job.
In the case of fresh installation there are no jobs yet. You have to create one by selecting the
Create a new job option. In the Job name text box enter the name for the job. Then define
the Schedule interval, i.e. the interval after which the job is restarted. If the Start the job
automatically is checked, the job starts archiving automatically when the configuration finishes.
If it is not checked, you will have to start the job manually.
Page 102
© Copyright Metalogix International GmbH and Idera, Inc., 2008-2015
MS Exchange Server 2010
Metalogix Archive Manager Exchange Ed - Advanced Install
Version 7.2
Finally click Finish. In the final report dialog you can read the summary. To conclude click
Close.
NOTE: Check the Do not show this wizard the next time check box so that the wizard is not
started every time you open Enterprise Manager. However, you can open it again anytime
from Help / Setup wizard in the Enterprise Manager.
Page 103
© Copyright Metalogix International GmbH and Idera, Inc., 2008-2015
MS Exchange Server 2010
Metalogix Archive Manager Exchange Ed - Advanced Install
Version 7.2
NOTE: For created groups make sure to check Automatically import group members and
Automatically import mailbox members on group Properties/Advanced tab. This will ensure that
new members satisfying your criteria will be automatically imported to Archive Manager at
synchronization.
Conclusion
The following tasks were performed:
imported a group of users to Archive Manager
created retention category for archiving
created job and assigned it to the imported group
From this moment on, Archive Manager job will archive messages of the given users based on the
defined criteria. The group with all its settings will be displayed on the Groups tab of the Enterprise
Manager.
NOTE: The process of importing users, groups or servers to Archive Manager is described in detail in
“Administrator manual for Archive Manager Exchange Edition Enterprise Manager”. Explanation of
retention categories, jobs and other archiving settings can be found in the same document.
As mentioned at the end of the installation section you must assign a server role to your Archive
Manager server depending on your LAN architecture. Go to Enterprise Manager / Tools / Options /
Page 104
© Copyright Metalogix International GmbH and Idera, Inc., 2008-2015
MS Exchange Server 2010
Metalogix Archive Manager Exchange Ed - Advanced Install
Version 7.2
Server settings / Server roles tab. In the Server role down-drop box choose from the following server
roles:
· Archive server
· Retrieve server
· PST Import server
In case of only one Archive Manager server in your environment, assign the Archive server role to it.
In case of more Archive Manager servers remember that in one Location there can be ONE Archive
server, several Retrieve servers and PST Import servers. Any other Archive server must have a unique
LocationID.
For more information see the section “Installing Archive Manager Exchange Edition”.
Exchange Server Tools Installation
To synchronize Exchange permissions with Archive Manager, Archive Manager Server Tools has to be
installed on the Exchange server with Mailbox Role.
NOTE: Mixed environment (Exchange 2007 mixed with Exchange 2010) – install Extension on Exchange
2010 server with Mailbox Role
Technical requirements
Exchange 2010
Page 105
·
Windows Server 2008 (64-bit) / 2012
·
.NET Framework 3.5 SP1
·
IIS
·
MS Exchange 2010 (Mailbox role)
© Copyright Metalogix International GmbH and Idera, Inc., 2008-2015
MS Exchange Server 2010
Metalogix Archive Manager Exchange Ed - Advanced Install
Version 7.2
1.
Download the Archive Manager Exchange Edition_64bit_Extensions setup.
2.
Run it on the Exchange 2010 Server with the Mailbox role.
3.
When asked to specify a user, enter the super-user credentials (DOMAIN\UserName and
password). Super-user is the user under which Archive Manager is running. It was specified
during the installation of Archive Manager.
4.
The install folder is by default set to C:\ Program Files \ Metalogix.
NOTE: It is a 64 bit application, so the 64 bit Program Files folder is selected as default. In case
of custom folder, the full path will always be Metalogix\MAM4Exchange.
Page 106
5.
Select the Exchange Server Tools option. Click Next. Click Install, then Finish.
6.
As a last step, you need to configure the permission synchronization server. To do so on
Archive Manager server launch the Enterprise Manager. Go to Tools / Addressbook
Manager / General tab. Under Automatic permission synchronization parameters click Settings.
In the pop-up dialog enter the name of the Exchange server on which you have just installed
© Copyright Metalogix International GmbH and Idera, Inc., 2008-2015
MS Exchange Server 2010
Metalogix Archive Manager Exchange Ed - Advanced Install
Version 7.2
the Archive Manager Extension.
Testing after installation
When all post-installation tasks are completed, it is important to check if you are able to archive emails.
This will prove that your installation was completed successfully. To do a fast check:
Page 107
1.
Open the Enterprise Manager tool in its Archive view (you can switch to this view by clicking
the View menu on the toolbar).
2.
In the Look for text field type the name of one of your synchronized mailboxes and click
Enter.
3.
After expanding the mailbox structure you will be able to see the list of emails in the rightpane of the tool.
4.
Simply right-click one email and choose Archive File from the context menu.
5.
If the archiving process ends with the following dialog you have successfully managed to
archive your first email.
© Copyright Metalogix International GmbH and Idera, Inc., 2008-2015
MS Exchange Server 2010
Page 108
Metalogix Archive Manager Exchange Ed - Advanced Install
Version 7.2
© Copyright Metalogix International GmbH and Idera, Inc., 2008-2015
MS Exchange Server 2010
Metalogix Archive Manager Exchange Ed - Advanced Install
Version 7.2
Addendum
· Installation check list
109
· Office 365 Configuration Details
· Creating an MS SQL database
110
119
Installation check list
Use the list below to write down all information which you will need during the installation and
configuration of Archive Manager Exchange Edition. It also summarizes all prerequisites for individual
server.
·
·
MS Exchange Server name:
ü
Create and mount Public Folder database
ü
Create Organizational Forms Library
Mailbox for the super-user:
The super-user must be given these permissions:
·
ü
local administrator on your Archive Manager server
ü
rights over LDAP Configuration container – with ADSI edit tool
ü
Owner rights over Organizational Forms Library
ü
View-Only Organization Management role on your Exchange Server
ü
Public Folder Management role on your Exchange Server
ü
Permissions on your Exchange Server to mailboxes which will be archived
ü
Only if OWA will be used: Impersonation permission on your Exchange Server
Database
o
MS SQL Database 2008 and higher
SQL Server name:____________________________________________
Initial Catalogue (DB-Name):________________________________
o
ORACLE Database 11g and 12c
Net8 Connection Name:_____________________________________
Page 109
© Copyright Metalogix International GmbH and Idera, Inc., 2008-2015
MS Exchange Server 2010
Metalogix Archive Manager Exchange Ed - Advanced Install
o
Version 7.2
In both cases:
Schema: ______________________________________________________
Database user: _____________________________________________
Password (do not reveal, do not fill in here!):___________
·
·
HSM Server:
o HSM Server (NETBios) Name: ______________________________________
o
HSM Schema name:__________________________________________________
o
HSM Store name:
________
Archive Manager Server;
ü Operating system – MS Windows Server 2008 R2 SP1 / 2012
ü IIS 6.0 or higher installed
ü .NET Framework 3.5 and 4.5 installed
ü Web Service Extension ASP.NET v2.0 and 4.0 allowed
ü MSXML (IE 7.0)
ü If ORACLE database is used you need to install the ORACLE Data Provider for .NET, in
order to establish a Net8 connection.
ü Outlook 2016 (32bit) / 2013 (32bit) / 2010 (32bit) / 2007 installed (full UNICODE
compatibility ensured)
ü Additional DCOM rights set
IMPORTANT NOTE: Automated archiving is designed for groups. It is therefore crucial to have Active
Directory groups synchronized with Archive Manager, or at least to create new Archive Manager
groups using the Addressbook Manager. In Archive Manager, the jobs (automated archiving) apply to
groups. Mailboxes not included in any group can be archived manually only.
After Installation
When you have completed this check list and installed everything as described in this manual, log on to
the Archive Manager Server as the super-user and open Outlook. Add a few test mailboxes and send a
couple of emails, in order to see if you can read them. This way you can check if the super-user has the
necessary rights for archiving to function properly.
Office 365 Configuration Details
Archive Manager requires specific connection configuration details to import your o365 users. This
section will guide you through the steps to be completed in your o365 in order to collect the necessary
Page 110
© Copyright Metalogix International GmbH and Idera, Inc., 2008-2015
MS Exchange Server 2010
Metalogix Archive Manager Exchange Ed - Advanced Install
Version 7.2
data:
Organization Name in Office 365 – your organization in Office 365
Client ID – get this ID by following the process described below
Client Secret (or Key) – get this key by following the process described below
Autodiscovery Url – to get this URL, go to https://testconnectivity.microsoft.com/, select the Outlook
Autodiscover option; click Next and perform the test with your details; As a result you should get the
URL
Username & Password – the respective user must be Office 365 administrator
VERY IMPORTANT: In case of Office 365, run the EM with the super-user under which Archive Manager
has been installed (i.e. the user under which MAM services run).
NOTE: This sample will not work with a Microsoft account, so if you signed in to the Azure portal with a
Microsoft account and have never created a user account in your directory before, you need to do that
now. If you create an account and want to use it to sign-in to the Azure portal, don't forget to add the
user account as a co-administrator of your Azure subscription.
Page 111
1.
Sign in to the Azure management portal.
2.
Click on Active Directory in the left hand nav.
3.
Click the directory tenant which you plan to archive with Archive Manager.
4.
Click the Applications tab. In the drawer, click Add.
© Copyright Metalogix International GmbH and Idera, Inc., 2008-2015
MS Exchange Server 2010
Metalogix Archive Manager Exchange Ed - Advanced Install
Version 7.2
5.
Click Add an application my organization is developing.
6.
Enter a friendly name for the application, for example "Archive Manager App", select Web
Application and/or Web API, and click next.
7.
For the sign-on URL, enter the base URL for the sample, which is by default https://
localhost:44322/ .
NOTE: It is important, due to the way Azure AD matches URLs, to ensure there is a trailing slash
on the end of this URL. If you don't include the trailing slash, you will receive an error when the
Page 112
© Copyright Metalogix International GmbH and Idera, Inc., 2008-2015
MS Exchange Server 2010
Metalogix Archive Manager Exchange Ed - Advanced Install
Version 7.2
application attempts to redeem an authorization code.
8.
For the App ID URI, enter https://<your_tenant_name>/WebAppGraphAPI , replacing
<your_tenant_name> with the domain name of your Azure AD tenant. For example https://
metalogix.com/WebAppGraphAPI . Click OK to complete the registration.
9.
While still in the Azure portal, click the Configure tab of your application. Find the Client ID
value and copy it aside, you will need this when connecting to o365 in Archive Manager.
10. Under the Keys section, select either a 1 year or 2 year key - the key value will be displayed
after you save the configuration at the end.
In the Reply URL, add the reply URL address used to return the authorization code returned
during Authorization code flow. For example: https://localhost:44322/ .
Configure Permissions - under the Permissions to other applications section, select
application "Windows Azure Active Directory", and under the second permission (Delegated
permissions), select "Access your organization's directory" and "Enable sign-on and read users'
profiles". The 2nd column (Application permission) is not needed.
Page 113
© Copyright Metalogix International GmbH and Idera, Inc., 2008-2015
MS Exchange Server 2010
Metalogix Archive Manager Exchange Ed - Advanced Install
Version 7.2
11. Select the Save button at the bottom of the screen - upon successful configuration, your Key
value (aka ClientSecret in Archive Manager) should now be displayed - please copy and store
this value in a secure location. The key value is only displayed once, and you will not be able to
retrieve it later.
NOTE: The permission "Access your organization's directory" allows the application to access
your organization's directory on behalf of the signed-in user - this is a delegation permission
and must be consented by the Administrator for web apps (such as this demo app). The
permission "Enable sign-on and read users' profiles" allows users to sign in to the application
with their organizational accounts and lets the application read the profiles of signed-in users,
such as their email address and contact information - this is a delegation permission, and can
be consented to by the user. The other permissions, "Read Directory data" and "Read and
write Directory data", are Delegation and Application Permissions, which only the Administrator
can grant consent to.
Advanced Authentication
Archive Manager Exchange Edition supports also access to Azure AD in case when user account name
and password are needed (advanced authentication) for retrieval of user accounts and groups in Azure
AD. This chapter describes the user interface and configuration of this feature in Archive Manager.
Advanced authentication is normally not required and must be configured on both Azure AD and
Page 114
© Copyright Metalogix International GmbH and Idera, Inc., 2008-2015
MS Exchange Server 2010
Metalogix Archive Manager Exchange Ed - Advanced Install
Version 7.2
Archive Manager Exchange Edition.
Configuration in Azure AD
User creates web application as described in https://msdn.microsoft.com/en-us/library/dn985955.aspx
110 .
There is one more important step include and it is setup of reply URL, in example below it is: http://
localhost:41414.
Configuration in Archive Manager
Advanced authentication is implemented in Archive Manager in two components:
Back-end is in MAM Exchange Direct Archive Error Monitoring service which contains a web application
waiting for responses on location specified in registry key: Metalogix\exchangePAM
\OwinAuthWebAppLocation. It needs to match reply URL in Azure AD web application and it needs
to end with character /. The URL from example above is then: http://localhost:41414/
Front-end is located in Enterprise Manager which authenticates user on Azure AD server and waits for
security token which is send from Azure AD server to Archive Manager back-end.
Tips & Tricks: If there is a problem with retrieval of security token it is recommended to restart MAM
Exchange Direct Archive Error Monitoring service and restart Enterprise Manager. Also check the registry
key Metalogix\exchangePAM\OwinAuthWebAppLocation (as described above).
Page 115
© Copyright Metalogix International GmbH and Idera, Inc., 2008-2015
MS Exchange Server 2010
Metalogix Archive Manager Exchange Ed - Advanced Install
Version 7.2
Advanced Authentication is UI
User interface contains intermediate window which will retrieve security token when required during new
server, group or mailbox add operation (see "Importing users to Archive Manager Exchange Edition").
After retrieval of security token user can continue as usually. New user interface for Advanced
authentication will be described on new server add operation below.
NOTE: Retrieval of security token is made only when necessary therefore this feature is not applicable
for majority of user.
When importing Azure AD in Archive Manager Addressbook (see the section "Importing MS Exchange
Servers to Archive Manager Exchange Edition") the following configuration window appears.
Page 116
© Copyright Metalogix International GmbH and Idera, Inc., 2008-2015
MS Exchange Server 2010
Metalogix Archive Manager Exchange Ed - Advanced Install
Version 7.2
After setting the necessary information additional authentication window may appear as in example
below:
User chooses administrator account and fills in password and submits the login form by clicking Sign
in.
Archive Manager communicates with Azure AD server to obtain required security token for
communication between Archive Manager and Azure AD. This communication can take cca 30 seconds
and during this time the login should not be closed. When security token was successfully processed,
"success" message appears.
Page 117
© Copyright Metalogix International GmbH and Idera, Inc., 2008-2015
MS Exchange Server 2010
Metalogix Archive Manager Exchange Ed - Advanced Install
Version 7.2
By clicking Next original window with information about O365 tenant appears.
Page 118
© Copyright Metalogix International GmbH and Idera, Inc., 2008-2015
MS Exchange Server 2010
Metalogix Archive Manager Exchange Ed - Advanced Install
Version 7.2
Security token will be used for retrieval of information from Azure AD.
NOTE: Security token must be provided always when application is communicating with Azure AD, i.e.
during adding of O365 groups or O365 mailboxes procedure. This is also reason why automatic
synchronization of groups and mailboxes from Azure AD will not work. Therefore it is recommended to
use default authentication which does not require usage of security tokens.
Creating an MS SQL database with a database user
When planning to install Archive Manager, an empty database(s) and an appropriate database user
must be created before running the setup. The database providers supported by Archive Manager are
MS SQL Server 2008 and higher and Oracle 11g and 12c.
NOTE: This section guides you through the configuration of SQL Server 2012 and creation of a
Page 119
© Copyright Metalogix International GmbH and Idera, Inc., 2008-2015
MS Exchange Server 2010
Metalogix Archive Manager Exchange Ed - Advanced Install
Version 7.2
database with a database user. In case of SQL 2008 you can use the “SQL Server 2008 Configuration for
Archive Manager” guide.
To configure your SQL Server 2012:
1.
Open the SQL Server Configuration Manager and click the SQL Server Services node.
Both the SQL Server (SERVERNAME) and the SQL Server Browser services have to run.
2.
If the SQL Server Browser service is not started and the Start option available in its
context menu, it means that this service is disabled. To enable the service, right-click it and
from the context menu select Properties.
3.
Page 120
The Properties window opens. Switch over to the Service tab and change the Start Mode
from Disabled to Manual. Conclude by clicking Apply and OK and then try to start the
service again.
© Copyright Metalogix International GmbH and Idera, Inc., 2008-2015
MS Exchange Server 2010
4.
Metalogix Archive Manager Exchange Ed - Advanced Install
Version 7.2
In the SQL Server Configuration Manager expand the SQL Server Network
Configuration node from the navigation tree. On the Protocols for SQL node you need
to enable the Named Pipes, the Shared Memory and the TCP/IP protocols.
Page 121
© Copyright Metalogix International GmbH and Idera, Inc., 2008-2015
MS Exchange Server 2010
Metalogix Archive Manager Exchange Ed - Advanced Install
Version 7.2
5.
Instead of enabling the TCP/IP using the context menu, we recommend opening its
Properties window. This window has two tabs, Protocol and IP Addresses. On the
Protocol tab set the Enabled to Yes.
6.
On the IP Addresses tab you will see several sections - one for each network connection
and a local loopback connection indicated by the standard address of 127.0.0.1 For
remote access to the SQL Server Express 2012 instance the loopback connection is of no
interest.
For the desired network connection the Active option should say Yes as should the
Enabled option. The IP address will probably be filled in for you (by Windows) and will be
different on your machine.
Page 122
© Copyright Metalogix International GmbH and Idera, Inc., 2008-2015
MS Exchange Server 2010
Metalogix Archive Manager Exchange Ed - Advanced Install
Version 7.2
If you wish to enable dynamic ports for your SQL Server Express 2012 instance then the TCP
Dynamic Ports option should be 0. To disable this option and use a fixed port change this
field to a blank value and fill in the port on the TCP Port option. Disabling dynamic ports is non
standard for named instances and should really only be done if you know exactly what you are
doing and why you want to do it.
Conclude by clicking Apply and then OK.
Page 123
© Copyright Metalogix International GmbH and Idera, Inc., 2008-2015
MS Exchange Server 2010
7.
Metalogix Archive Manager Exchange Ed - Advanced Install
Version 7.2
For the changes to take effect you need to restart both the SQL Server (SERVERNAME)
and SQL Server Browser services have to be restarted switching over to the SQL Server
Services node.
8.
Page 124
Check the Shared Memory, the TCP/IP and the Named Pipes client protocols on the SQL
Native Client Configuration node in the SQL Server Configuration Manager too. They
should all be enabled.
© Copyright Metalogix International GmbH and Idera, Inc., 2008-2015
MS Exchange Server 2010
Metalogix Archive Manager Exchange Ed - Advanced Install
Version 7.2
Furthermore you will need to create an empty database and a database user for your Archive
Manager. To do so:
Page 125
1.
Connect to your SQL Server 2012 with the Microsoft SQL Server
Management Studio, then expand its tree and right-click on the Databases
node. From the context menu choose to create a new database.
2.
In the New Database dialog, give the new database a name (e.g.
exchangeDB) and you can leave the owner to be the <default>. This owner
will be changed later on, when you will create a new login with table owner
rights over the database you are creating. You can also choose to change
the default location for the Data file and Log file, if needed. Finish by
clicking OK.
© Copyright Metalogix International GmbH and Idera, Inc., 2008-2015
MS Exchange Server 2010
Metalogix Archive Manager Exchange Ed - Advanced Install
3.
Version 7.2
To create the Table Owner for the exchangeDB database you will need to
create a new login, a new scheme and a new user as well. We will name
each of them “srv_exchange”.
To create a new login, expand the tree of the MS SQL Server Management
Studio tool and right-click on the Security tab and choose New/Login.
4.
The new dialog opens. Before proceeding further on the General tab
decide on the type of authentication to be used:
Windows authentication - the user (e.g. “srv_exchange”) must already exist
in the Active Directory. Use the Search button to find your desired user in
AD. It can be your Archive Manager super-user as is described in the
section “Creating a super-user account”.
SQL authentication – specify the login name (“srv_exchange” in our
example). Make sure to uncheck the Enforce password policy check box.
Page 126
© Copyright Metalogix International GmbH and Idera, Inc., 2008-2015
MS Exchange Server 2010
Metalogix Archive Manager Exchange Ed - Advanced Install
Version 7.2
As for the Default database, select the exchangeDB database and set the
Default language to be English.
Page 127
5.
Once this is done, you can switch over to the User Mapping tab. Here map
to the exchangeDB database a user (it will be automatically created and
named with the same name as the login) and select also the db_owner and
public membership role for the exchangeDB database.
6.
Switching over to the Status tab. Make sure that the Permission to connect to
database engine is granted and also that the Login is enabled. Conclude by
clicking OK.
© Copyright Metalogix International GmbH and Idera, Inc., 2008-2015
MS Exchange Server 2010
Metalogix Archive Manager Exchange Ed - Advanced Install
7.
Version 7.2
Next you will need to create a schema for your new database login. To do
so, expand the tree on the new created database (exchangeDB) in the
Microsoft SQL Server Management Studio tool down to Security/
Schemas. Right-click on Schemas and choose New Schema from the
context menu.
In the New schema dialog just give a name to the schema you want to
create (e.g. srv_exchange) and click the Browse button to select the schema
owner. Select the schema owner to be the previous user you have specified
in step 4 (srv_exchange). Click OK.
Page 128
© Copyright Metalogix International GmbH and Idera, Inc., 2008-2015
MS Exchange Server 2010
Metalogix Archive Manager Exchange Ed - Advanced Install
8.
Version 7.2
Furthermore you will need to assign the new created schema to your new
database user. The new database user (srv_exchange) was automatically
created when creating the new login and mapping a user to the
exchangeDB database.
To locate this new user, expand the tree of the exchangeDB database in
the MS SQL Server Management Studio tool down to Security/Users.
By clicking on the Users node you will see the user called srv_exchange on
the right pane of the tool. Double-click on it to open its Properties window.
A new dialog opens on the General tab. Click the browse button next to
the Default Schema text box and select the previously created user
“srv_exchange”.
Page 129
© Copyright Metalogix International GmbH and Idera, Inc., 2008-2015
MS Exchange Server 2010
Metalogix Archive Manager Exchange Ed - Advanced Install
9.
Version 7.2
Switch to Owned Schemas node where you will see that the one called
srv_exchange is selected. Make sure that the db_owner is selected too.
Now switch to the Membership node and make sure that db_owner is
selected here, too. Save the changes you have made by clicking OK.
Metalogix makes every effort to perform comprehensive testing b ut cannot guarantee, due to environmental
differences, that all functions will work in every environment. It is always recommended that testing b e
conducted within your own environment to confirm functionality and compatib ility.
Page 130
© Copyright Metalogix International GmbH and Idera, Inc., 2008-2015