1
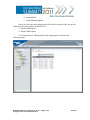
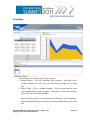
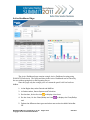
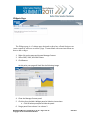
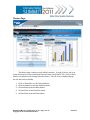
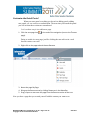
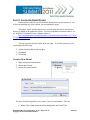
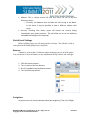
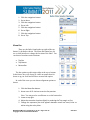
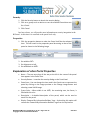
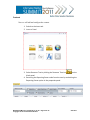
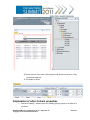
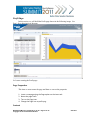
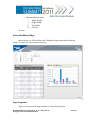
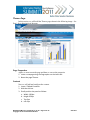
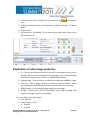
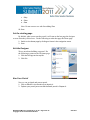
WebFOCUS BI Portal: S.I.M.P.L.E. as can be Author: Matthew Lerner Company: Information Builders Presentation Abstract: This hands-on session will introduce attendees to the new WebFOCUS BI Portal. We will cover the process of building a complete portal from scratch. WebFOCUS BI Portl: S.I.M.P.L.E as can be Copyright © 2011 Information Builders Page 1 of 35 5/27/2011 Table of Contents Introducing the WebFOCUS Business Intelligence Portal ................................................. 3 Part 1: Explore the Retail Portal ......................................................................................... 4 Home Page ...................................................................................................................... 5 Profit Page ....................................................................................................................... 7 Active Dashboard Page ................................................................................................... 9 Widgets Page ................................................................................................................ 10 Themes Page ................................................................................................................. 11 Customize the Retail Portal .......................................................................................... 12 Part 2: Create the Retail Portal.......................................................................................... 14 Create a New Portal ...................................................................................................... 14 Portal Level Settings ..................................................................................................... 15 Banners ..................................................................................................................... 15 Navigation ................................................................................................................. 15 Menu Bar .................................................................................................................. 16 Theme ....................................................................................................................... 17 Security ..................................................................................................................... 18 Properties .................................................................................................................. 18 Top Banner.................................................................................................................... 19 Home Page .................................................................................................................... 20 Page Properties.......................................................................................................... 20 Content ...................................................................................................................... 22 Profit Page ..................................................................................................................... 27 Page Properties.......................................................................................................... 27 Content ...................................................................................................................... 27 Active Dashboard Page ................................................................................................. 29 Page Properties.......................................................................................................... 29 Content ...................................................................................................................... 30 Widgets Page ................................................................................................................ 31 Page Properties.......................................................................................................... 31 Content ...................................................................................................................... 31 Themes Page ................................................................................................................. 33 Page Properties.......................................................................................................... 33 Content ...................................................................................................................... 33 Set the starting page ...................................................................................................... 35 Exit the Designer........................................................................................................... 35 Run Your Portal ............................................................................................................ 35 WebFOCUS BI Portl: S.I.M.P.L.E as can be Copyright © 2011 Information Builders Page 2 of 35 5/27/2011 Introducing the WebFOCUS Business Intelligence Portal: The Business Intelligence Portal (BI Portal), is brand new in WebFOCUS 8. It is the successor to the Business Intelligence Dashboard (BI Dashboard). It does everything that BI Dashboard did and a whole lot more. BI Dashboard is focused solely on building dashboards, which are much smaller than portals. The new BI Portal is about being able to build complete modern websites. That means you are no longer restricted to a single level of navigation; you can have as many levels as you want. No longer is your content static. Instead, the end user experiences the drag and drop behavior they have come to love in popular online portals. This is a key point as they do not have to learn anything new. It is Information Builder’s belief that people should get the same great experiences they use every day for reading news, email, etc., while at work. This results in zero training and a high usage rate. Not only have we made the end user experience much more delightful, we have made it so much easier to build. WebFOCUS BI Portal uses the same familiar ribbon interface found in WebFOCUS InfoAssist. Building a portal is just a matter of a few clicks and drags. Anyone who can build a report using InfoAssist can design a beautiful portal without any knowledge of web design. WebFOCUS BI Portl: S.I.M.P.L.E as can be Copyright © 2011 Information Builders Page 3 of 35 5/27/2011 Part 1: Explore the Retail Portal WebFOCUS comes with a sample portal named Retail. In the first section of this lab we will explore the prebuilt portal. 1. Launch it by clicking on it in the WebFOCUS Portals tree on the Welcome page shown in the following image. WebFOCUS BI Portl: S.I.M.P.L.E as can be Copyright © 2011 Information Builders Page 4 of 35 5/27/2011 The Retail portal has 5 pre-defined pages. 1. Home (pictured in Figure 23) 2. Profit 3. Active Dashboard 4. Widgets 5. Themes Home Page The Home page is the starting page of the Retail portal. It has a 2 column layout. The first page contains the new WebFOCUS 8 Resource tree. This replaces the Repository tree found in WebFOCUS 77x and earlier. The right side has a tabbed container titled Output. The 2007 profit report is displayed by default. Any reports run from the Resource Tree will appear as a new tab in the Output panel. 1. Browse the Repository section of the Resource tree a. Expand Retail WebFOCUS BI Portl: S.I.M.P.L.E as can be Copyright © 2011 Information Builders Page 5 of 35 5/27/2011 b. Expand Profit c. Expand Annual Reports Notice how the repository contains sub-folders and is not restricted to the special folders found in prior releases of WebFOCUS. 2. Run the 2008 report. 3. Run the 2009 report. You will now have 2 additional tabs in the Output panel as shown in the following image. WebFOCUS BI Portl: S.I.M.P.L.E as can be Copyright © 2011 Information Builders Page 6 of 35 5/27/2011 Profit Page The profit page is a free form page with three panels. 1. Annual Reports – This is an accordion style container. Each pane in the container displays the Price, Cost, and Gross Profit by Region for a single year. 2. Charts (2010) – This is a tabbed container. The first tab contains an area chart showing Price vs Cost by Region. The second is a bar chart showing Price, Cost, and Gross Profit by Region. Notice how the chart is not sized properly for the panel. In the production release of WebFOCUS 8 charts will be able to automatically scale to the panel size. WebFOCUS BI Portl: S.I.M.P.L.E as can be Copyright © 2011 Information Builders Page 7 of 35 5/27/2011 3. Advanced Reports – This is another tabbed container. It contains Auto Prompt and InfoMini versions of the Annual Report. The auto prompt version lets you choose one or more years, while the InfoMini version lets you use Slicers to filter on a variety of dimensions. 1. In the Annual Reports panel, click 2008 to display the 2008 report. By default the 2008 report will not run until you access it. 2. In the Charts (2010) panel, click Bar to see the bar chart. 3. In the Advanced Reports panel, choose 2007 and 2008 and click Run. This will show you the annual report for both 2007 and 2008. 4. In the Advanced Reports panel, click the InfoMini tab to see the InfoMini report. a. Click Format b. Change Output Type to Active Report c. Click Slicers Tab d. Set Year to 2009 and 2010 e. Click Run WebFOCUS BI Portl: S.I.M.P.L.E as can be Copyright © 2011 Information Builders Page 8 of 35 5/27/2011 Active Dashboard Page The Active Dashboard page contains a single Active Dashboard creating using WebFOCUS InfoAssist. The report and chart in the Active Dashboard can be filtered by the user without going back to the Reporting Server. Since this page only has a single piece of content the panel’s title bar has been hidden. 1. In the Region box, select Central and MidEast 2. In Product select, Stereo Systems and Television. 3. On the chart, hit the line icon to display a line chart. 4. On the chart, hit the Chart/Rollup tool icon to display the Chart/Rollup tool 5. Explore the different chart types and select one such as the Multi-Series Bar 2D. WebFOCUS BI Portl: S.I.M.P.L.E as can be Copyright © 2011 Information Builders Page 9 of 35 5/27/2011 Widgets Page The Widgets page is a 2 column page designed to show how a Portal designer can create content for end users to add to a page. It starts blank with some instructions on how to add a widget. 1. Right click on the page and choose Manage Content 2. Select 2007, 2010, and 2010 Charts 3. Click Restore At this point your page will look like the following image: 4. Close the Manage Content panel 5. Click the X on the Add a Widget panel to hide the instructions a. Click OK when prompted to hide the panel. 6. Drag a panel from column 1 to column 2. WebFOCUS BI Portl: S.I.M.P.L.E as can be Page 10 of 35 Copyright © 2011 Information Builders 5/27/2011 Themes Page The themes page contains a single tabbed container. In each of the six tabs is an image showing one of the portal themes that will ship with WebFOCUS 8. Each of these themes corresponds to an existing InfoAssist theme. Like the Active Dashboard page, the title bar has been hidden. 1. 2. 3. 4. 5. Click on Emerald to see the Emerald theme. Click on Graphite to see the Graphite theme. Click on Ruby to see the Ruby theme. Click on Silver to see the Silver theme. Click on Slate to see the Slate theme. WebFOCUS BI Portl: S.I.M.P.L.E as can be Page 11 of 35 Copyright © 2011 Information Builders 5/27/2011 Customize the Retail Portal When you run a portal everything you do such as hiding panels, adding new panels, etc. are saved as a customization. The next time you launch the portal you will see that those actions are remembered. Let’s see how easy it is to add a new page. 1. Click the new page icon page). at the end of the navigation (next to the Themes Doing so results in a new page, just like clicking the new tab icon in a web browser creates a new tab. 2. Right click on the page tab and choose Rename. 3. Name the page My Page. 4. Bring up the Resource tree by clicking Resources in the Menu Bar. 5. Drag a report or two onto the page from the Recents section of the tree. Now you have a page that you created yourself with the content you want to see. WebFOCUS BI Portl: S.I.M.P.L.E as can be Page 12 of 35 Copyright © 2011 Information Builders 5/27/2011 WebFOCUS BI Portl: S.I.M.P.L.E as can be Page 13 of 35 Copyright © 2011 Information Builders 5/27/2011 Part 2: Create the Retail Portal In this section of the lab you will build the Retail portal you just explored. You will not be building any of the content, just assembling the pages. All reports, charts, and documents were created using InfoAssist with features that are available in the production release. For more information on these features, see the WebFOCUS InfoAssist User’s Manual online at: http://documentation.informationbuilders.com/masterindex/html/html_wf_7702/w f77infoassist/index.htm. To begin you must be back on the Welcome page. To exit the portal you were exploring do the following. 1. Locate the Menu Bar at the top right. 2. Click More 3. Click Close Create a New Portal 1. Right click on the Portals Node 2. Choose New Portal 3. Name your portal Retail2 The New Portal dialog allows you to enter 3 pieces of information. They are: Name: This is how the portal will be displayed in the Portal Tree. WebFOCUS BI Portl: S.I.M.P.L.E as can be Page 14 of 35 Copyright © 2011 Information Builders 5/27/2011 Address: This is a direct access URL that your users can use to skip the Welcome screen. o Currently, the Address must end with the same string as the Name. In the future it may be possible to have a different address than name. Security: Checking Give others access will launch the security dialog immediately upon portal creation. This will allow you to set the audience and additional designers for the portal. Portal Level Settings Before building a page we will setup portal level items. We will take a look at each option in the Portal group of the Layout tab. Banners A banner is an area that is visible no matter what page you are in in the portal. You can choose to have no banners or any combination of top, bottom, left, and right. 1. 2. 3. 4. Click the banners button. Turn on each of the four banners. Scroll if needed to see the bottom banner. Turn off all but top banner. Navigation As pictured you can choose between None (No navigation), Top, Left, & Right WebFOCUS BI Portl: S.I.M.P.L.E as can be Page 15 of 35 Copyright © 2011 Information Builders 5/27/2011 1. 2. 3. 4. 5. 6. 7. 8. Click the navigation button. Set to None. Click the navigation button. Set to Left. Click the navigation button. Set to Right. Click the navigation button. Set to Top. Menu Bar These are the links, found at the top right of the top banner, by default as shown. The Menu bar button lets you use a visual interface to change the location of the links. You can choose from three main locations: Top Bar Top Banner Bottom Bar The bar options are thin strips either at the top or bottom. In the future, they will always be visible no matter how far down or up you scroll and will have an auto hide option. In each of the areas you can choose alignment options as shown. 1. Click the Menu Bar button. 2. Hover over all 15 choices to see the live preview. Note: You may need to scroll down to see the bottom bar. 3. Leave at top right. 4. Adjust the menu bar location slightly by reducing the Top margin to 5px. 5. Change the separator (bar that appears between menu bar items) color to white using the color picker. WebFOCUS BI Portl: S.I.M.P.L.E as can be Page 16 of 35 Copyright © 2011 Information Builders 5/27/2011 6. Add the following items: a. Userid b. Manage Content c. Portals d. Resources e. Sign In/Sign Out 7. Set the items order using the up down arrows to: a. Userid b. Manage Content c. Resources d. Portals e. Help f. Close g. Sign In/Sign Out 8. Set Max Items to 3 Theme The theme menu is used to pick from one of the 3 predefined themes. Each theme controls the styling of the banner, the page tabs, and the panels. In the future, we will include matching themes for each of the existing themes in WebFOCUS InfoAssist. 1. Click the theme button. 2. Roll over each of the different themes. 3. Click outside of the pop-up to keep the Information Builders theme. We will come back to themes later once we have added some content. WebFOCUS BI Portl: S.I.M.P.L.E as can be Page 17 of 35 Copyright © 2011 Information Builders 5/27/2011 Security 1. Click the Security button to launch the security dialog. 2. Click on a group such as admins to see the available Permission sets for a Portal. 3. Click Cancel In a later release, we will provide more information on security integration in the BI Portal. At this time it is restricted to the portal level only. Properties 1. Click the properties button to make the Portal itself be the selected item. This will result in the properties panel be setting to that of the portal as shown in the following image. 2. Set width to 50%. 3. Set alignment to Left. 4. Set width back to 100%. Explanation of other Portal Properties Name – The text entry box all the way at the left is the name of the portal that appears in the Portal Tree. Security Button – Launches the security dialog on the Portal level. Portal Icon – You can change the icon used in the Portal tree to represent the portal by clicking on the image preview or the Change Image button and selecting a new 16x16 image. Frame Color – When width is not 100%, the remaining area, the frame, is filled with this color. Description – A detailed description of the portal, which can be used to search for the portal. Display ‘Powered By Information Builders’ logo – Unchecking this option will remove the ‘Powered By Information Builders’ logo from the top banner WebFOCUS BI Portl: S.I.M.P.L.E as can be Page 18 of 35 Copyright © 2011 Information Builders 5/27/2011 Top Banner Configuring banners in WebFOCUS BI Portal is really simple. Let’s try resizing the banner. 1. Click inside the top banner. 2. In the banner properties panel set the size to 20px. 3. Set back to 75px. The style tab can be used to change additional properties such as the background image. WebFOCUS BI Portl: S.I.M.P.L.E as can be Page 19 of 35 Copyright © 2011 Information Builders 5/27/2011 Home Page In this section, we will build the Home page shown in the following image. See Part 1 for a description of the page. FIGURE 1 - HOME PAGE Let’s start creating the Home page. Page Properties First we will set the page properties. 1. 2. 3. 4. Click on the page Go to page properties Type Home Check Page Icon Notice: The generic icon appears WebFOCUS BI Portl: S.I.M.P.L.E as can be Page 20 of 35 Copyright © 2011 Information Builders 5/27/2011 5. 6. 7. 8. Click change image. Browse RetailImages Select home.png Uncheck ‘Show in Navigation’ to remove the page from the navigation. You may do this if you are going to create a hyperlink to go to this page, which will be possible in the future. 9. Check ‘Show in Navigation’ to add it back to the navigation menu. Explanation of other Page Properties Published – Uncheck this option if you do not want users to see the page yet. Use this if the page is under development. Margins – Set these to create margins at the edges of the page. Description – A detailed description of the page, which can be used to search for the page. Let’s continue by setting up the page layout and styling the page. 10. On the layout tab, click the Layout button in the Page & Banners group. 11. Choose Two Columns. 12. Switch to the Style tab of the ribbon. 13. Click the background color icon . 14. Set Background color for Normal State to Gray. 15. Set the border as follows: a. Click style. b. Hover over each option to see the live preview. c. Choose your favorite (anything except None). d. Increase the width to 5px. 16. Switch the State to Hover using the State group. 17. Set background color to Navy. WebFOCUS BI Portl: S.I.M.P.L.E as can be Page 21 of 35 Copyright © 2011 Information Builders 5/27/2011 Content Now we will add and configure the content. 1. Switch to the insert tab 2. Insert a Panel 3. Select Resource Tree by clicking the Resource Tree icon on the blank panel. 4. Removing the Reporting Server node from the tree by unchecking the Reporting Server option in the properties panel. WebFOCUS BI Portl: S.I.M.P.L.E as can be Page 22 of 35 Copyright © 2011 Information Builders 5/27/2011 Explanation of other Resource Tree properties ID – The text entry box all the way on the left is the content area id. It has a default value, but can be changed to a friendly name. This is used as a target location for resource trees as well as in a WebFOCUS drilldown. Nodes – In addition to turning off the Reporting Server node, you can turn off any of the top level nodes. Run Location – Choose whether a report appears in a window or a panel Window – Appears only when Run Location is Window. You can choose to use a new window every time or a window name of your choice. Panel – Appears only when Run Location is Panel. Let’s you choose between new panels, existing panels, or even specific content areas in existing panels. The third option matters when the container is an accordion or tabbed container. Let’s continue adding content. 5. Click on the title bar 6. Set title to Resources 7. Click Change Image 8. Select resources.png 9. Click the title bar again to get to the main panel properties. 10. Set height to 600px Explanation of other Resource Tree properties Title – The text entry box all the way on the left is the title. It can be set here in addition to the title bar properties Delete – Deletes the container Behaviors (Default is checked for all) o Close (Hide) – Allows the user to close (X) or hide the panel. Unchecking it removes the X from the title bar. WebFOCUS BI Portl: S.I.M.P.L.E as can be Page 23 of 35 Copyright © 2011 Information Builders 5/27/2011 o Move – Allows the user to reposition the panel. o Resize – When checked the user can resize the container both with the mouse and with the restore and maximize icons on the title bar. Unchecking it removes the restore and maximize icons. o Collapse – Allows you to collapse the panel to just the title bar. Unchecking it removes the minimize icon from the title bar. o Refresh – Allows the user to refresh the content in the panel. Unchecking it removes the refresh icon from the title bar. Appearance (Default is unchecked for all) o Hide Panel – When checked the panel starts hidden. To make it visible at run time use the Manage Content option available as a right click on the page and as an optional item in the Menu Bar. o Hide Title Bar – When checked the title bar is removed from the panel. This option is useful when you are placing a single panel on a page. Let’s continue adding content. 11. Click into the 2nd column 12. Insert a Tabbed container 13. Set title to Output 14. Set height to 600px Note: The properties at the panel level for a Tabbed or Accordion container are the same as the regular Panel with the addition of an area box at the end that lets you add, rename, remove, and reorder areas in the container. 15. Select the title bar 16. Remove the icon by unchecking Panel Icons 17. Click the Resources icon to launch resource tree 18. Explore the Resource Tree to the Repository Retail Profit Annual Reports folder 19. Drag report 2007 into the tabbed container WebFOCUS BI Portl: S.I.M.P.L.E as can be Page 24 of 35 Copyright © 2011 Information Builders 5/27/2011 20. Select column 1 by either clicking above the Resources Panel or using the breadcrumb trail. 21. Set width to 250px Explanation of other Column properties Container Padding – Allows you to set padding (empty space) on all sides of a container. WebFOCUS BI Portl: S.I.M.P.L.E as can be Page 25 of 35 Copyright © 2011 Information Builders 5/27/2011 All of the content on the page is now added. Let’s make a few final tweaks. 22. Select the resources content area by either clicking in the content area of the Resources panel twice or using the breadcrumb. Note: The first click on any panel selects the panel itself. The second click selects the area you are over. 23. Set Run location to Panel 24. Set Panel to Output This will result in a new tab in the Output panel every time a report is run from the tree. 25. Switch the theme to see the full effect. a. Roll over Blue Square b. Roll over Red Square c. Choose the one you like best 26. Save WebFOCUS BI Portl: S.I.M.P.L.E as can be Page 26 of 35 Copyright © 2011 Information Builders 5/27/2011 Profit Page In this section, we will build the Profit page shown in the following image. See Part 1 for a description of the page. Let’s start creating the Profit page. Page Properties This time we must create the page and then we can set the properties. 1. 2. 3. 4. Insert a new page using the Page option on the Insert tab. Name the page Profit. Turn on the Page Icon. Change the Page Icon to profit.png. Content WebFOCUS BI Portl: S.I.M.P.L.E as can be Page 27 of 35 Copyright © 2011 Information Builders 5/27/2011 Now we will add and configure the content. 1. 2. 3. 4. 5. 6. Insert an Accordion container Name the container Annual Reports Click the resources option Drag 2007 from the Annual Reports folder Click New Area at the bottom of the panel (Scroll down if needed). Add reports 2008 – 2010 in new areas. Note: Do not create a new area after adding 2010 7. Insert a Tabbed container 8. Name it Charts (2010) 9. Explore the Resource Tree to the Repository Retail Profit 2010 Charts folder 10. Drag in Area (Price vs Cost) 11. Click New Tab on the tab bar 12. Drag in Bar from the 2010 Charts folder 13. Insert a Tabbed container 14. Name it Advanced Reports 15. Explore the Resource Tree to the Repository Retail Profit Advanced folder 16. Drag in Auto Prompt 17. Hit New Tab 18. Drag in InfoMini from the Advanced Folder 19. Size & position the panels as follows: a. Annual Reports (Top Left) i. Top: 5px ii. Left: 5px iii. Leave Width and Height at 400px b. Charts (2010) (Top Right) i. Width: 600px ii. Height: 400px iii. Top: 5px iv. Left: 415px WebFOCUS BI Portl: S.I.M.P.L.E as can be Page 28 of 35 Copyright © 2011 Information Builders 5/27/2011 c. Advanced (Bottom span) i. Width: 1015px ii. Height: 600px iii. Top: 415px iv. Left: 5px 20. Save Active Dashboard Page In this section, we will build the Active Dashboard page shown in the following image. See Part 1 for a description of the page. Page Properties Again, we must create the page and then we can set the properties. WebFOCUS BI Portl: S.I.M.P.L.E as can be Page 29 of 35 Copyright © 2011 Information Builders 5/27/2011 1. 2. 3. 4. Insert a new page using the Page option on the Insert tab. Name the page Active Dashboard. Turn on the Page Icon. Change the Page Icon to active_technologies.png. Content Now we will add and configure the content. 1. Explore the Resource Tree to the Repository Retail Profit Advanced folder 2. Drag the Active Dashboard onto the page Notice that we did not need to create a panel first. If you just want a single content Panel you can drag the resource directly onto the page. 3. Select the Panel itself. (After adding the Active Dasbhoard the content area became the selected object). Either click the title bar twice or use the breadcrumb trail. 4. In the Appearance section of the Properties panel check the ‘Hide Title Bar’ option. 5. Size & position the panel as follows: a. Width: 1024px b. Height: 650px c. Top: 0px d. Left: 0px 6. Save WebFOCUS BI Portl: S.I.M.P.L.E as can be Page 30 of 35 Copyright © 2011 Information Builders 5/27/2011 Widgets Page In this section, we will build the Widgets page shown in the following image. See Part 1 for a description of the page. FIGURE 2 - WIDGETS PAGE Page Properties Again, we must create the page and then we can set the properties. 1. Insert a new page using the Page option on the Insert tab. 2. Name the page Widgets. 3. Set the page layout to Two Columns Content Now we will add and configure the content. 1. If the Resource tree is not visible bring it up by either hitting F8 or using the WebFOCUS Resources option on the Insert tab. 2. Drag in all four Annual reports (2007, 2008, 2009, & 2010) placing two in each column. As a shortcut you can find them all under the Recents section of the Resource Tree. 3. Insert a Tabbed or Accordion container. 4. Name it Charts. 5. Add both of the 2010 Charts (Area (Price vs Cost) & Bar). 6. Hide all of the newly created panels. This can be done by either clicking on the X on each panel or using the ‘Hide Panel’ option in the panel’s properties. WebFOCUS BI Portl: S.I.M.P.L.E as can be Page 31 of 35 Copyright © 2011 Information Builders 5/27/2011 Note: The first time you try and hide a panel you will get a warning message and instructions on how to bring a panel back. Check the ‘Do not show this message again’ option and then click OK. 7. Insert a panel 8. Name it Add a Widget. 9. Click the text icon in the new panel. 10. Type the following text: To add a widget right click on the page and choose Manage Contents. Then choose a widget to add. 11. Set the panel height to 100px. Notice, that Width, Top, and Left are not options. Width is controlled by the columns width. Top is controlled by the height of any panels above and the column padding settings. Left is controlled by the width of any prior columns and the containing columns padding settings. 12. Save WebFOCUS BI Portl: S.I.M.P.L.E as can be Page 32 of 35 Copyright © 2011 Information Builders 5/27/2011 Themes Page In this section, we will build the Themes page shown in the following image. See Part 1 for a description of the page. Page Properties Again, we must create the page and then we can set the properties. 1. Insert a new page using the Page option on the Insert tab. 2. Name the page Themes. Content Now we will add and configure the content. 1. Insert a Tabbed Container. 2. Hide the title bar. 3. Size & position the panel as follows: a. Width: 1024px b. Height: 650px c. Top: 0px d. Left: 0px WebFOCUS BI Portl: S.I.M.P.L.E as can be Page 33 of 35 Copyright © 2011 Information Builders 5/27/2011 4. If the Resource tree is not open click the resources icon in the content area. 5. Explore the Resource Tree to the Repository Retail Images Themes folder. 6. Drag in Azure 7. Set Location to Top Middle. This is done using a visual menu similar to the Menu Bar location. Explanation of other Image properties ID – The text entry box all the way on the left is the content area id. It has a default value, but can be changed to a friendly name. This is used as a target location for resource trees as well as in a WebFOCUS drilldown. Change Image – Click this button to replace the image with a different image. Lock Icon – Click to toggle on/off the constrain proportions feature. When on, adjusting the width adjusts the height proportionately and vice versa. Width/Height – Sets the width/height in pixels or percentage. Margins – Allows you to fine tune the location you picked by setting a top and/or left margin in pixels or percentage. Let’s now add the rest of the images. 8. Click New Tab 9. Repeat steps 6 – 9 for: a. Emerald b. Graphite WebFOCUS BI Portl: S.I.M.P.L.E as can be Page 34 of 35 Copyright © 2011 Information Builders 5/27/2011 c. Ruby d. Silver e. Slate Note: Do not create a new tab after adding Slate 10. Save Set the starting page By default, when a user runs the portal, it will start on the last page the designer was on when they clicked save. Do the following to make that page the Home page. 1. Switch to the Home page by clicking on Home in the navigation menu. 2. Save. Exit the Designer We are now done building our portal. Do the following to return to the Welcome page. 1. Click the BIP logo at the top left. 2. Click Exit Run Your Portal Now we can go ahead and run our portal. 1. Click on Retail2 in the Portal tree to launch it. 2. Explore your portal just as we did the Retail portal in Chapter 4. WebFOCUS BI Portl: S.I.M.P.L.E as can be Page 35 of 35 Copyright © 2011 Information Builders 5/27/2011