1
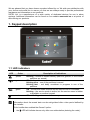
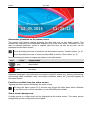
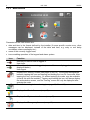
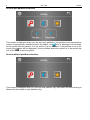
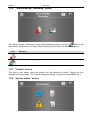
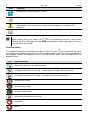
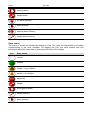
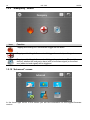
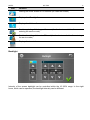
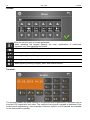
int-tsg_ov_en 05/15 Keypad INT-TSG Firmware version 1.03 VERSA / VERSA Plus Brief System User Manual SATEL sp. z o.o. • ul. Budowlanych 66 • 80-298 Gdańsk • POLAND tel. 58 320 94 00 www.satel.eu WARNINGS Please read this manual carefully before use. Changes, modifications or repairs not authorized by the manufacturer shall void your rights under the warranty. SATEL's goal is to continually upgrade the quality of its products, which may result in alterations of their technical specifications and firmware. The current information on the introduced modifications is available on our website. Please visit us: http://www.satel.eu The declaration of conformity may be consulted at www.satel.eu/ce The following symbol may be used in this manual: - note. We are pleased that you have chosen a product offered by us. We wish you satisfaction with your choice and would like to assure you that we are always ready to provide professional assistance and information on our products. SATEL Ltd. is a manufacturer of a wide variety of dedicated devices for use in alarm systems. Additional information can be found on our website www.satel.eu or at points of sale offering our products. 1. Keypad description 1.1 LED indicators LED Color yellow green green red Description of indications blinking – trouble or trouble memory (the LED goes off, if one or both partitions are armed) ON – both partitions are armed blinking slow – one of the partitions is armed blinking fast – exit delay countdown in progress in one of the partitions ON – the service mode is active and the service menu is available blinking – the service mode is active, but the service menu is hidden or available on another keypad ON or blinking – alarm or alarm memory Information about the armed state can be extinguished after a time period defined by the installer. If the installer has enabled the GRADE 2 option: the LED will indicate alarms only after user authorization (entering the code); 2 INT-TSG SATEL blinking of the LED means that there is a trouble in the system, some zones are bypassed, or that there was an alarm. 1.2 Touch screen The screen enables communication between the user and the alarm system. It displays information about the system status, while allowing you to operate and program the alarm system, as well as control the home automation equipment. Intuitive icon-based menu makes the everyday use easier. On most screens, the keypad offers two operating modes: graphical mode – large icons are displayed without description, verbose mode – small icons are displayed with description. To change the operating mode, use the following icons: – tap to switch over the screen to the verbose mode, – tap to switch over the screen to the graphical mode. This manual describes how to operate the keypad, based on the graphical mode. Tapping an icon or icon description will display the next screen or start the specified function. The icon will bring you back to the previous screen. Tapping the icon will display the main screen. After 10 minutes of keypad inactivity, the screen saver is displayed (slide show or clock) or the screen goes blank (the mode of operation is to be defined by the installer). Tapping the screen when it is blank or the screen saver is displayed will wake up the keypad. The keypad can also be woken up e.g. on opening the door, detecting motion by a detector etc. The installer defines the content which is to be displayed after the keypad wake-up (status screen, main screen or start of the disarming procedure). During the keypad inactivity period, messages about arming/disarming, entry/exit delay countdown, alarm etc. can be displayed on the screen. 1.2.1 Slide show The slide show can be displayed as the status screen background or the screensaver. The pictures to be displayed should be saved to a microSD memory card, which will be put into the keypad by the installer. The installer defines the speed at which the pictures will change during the slide show. 1.2.2 Status screen The status screen is displayed 60 seconds after the last operation performed on the keypad screen, unless the terminal is running (see p. 12). When the terminal is displayed, the status screen may appear later or even not appear at all (e.g. when the service menu is open). If the user is logged in, he/she will be automatically logged out a few seconds after the status screen is displayed. SATEL INT-TSG 3 Information presented on the status screen The keypad with factory settings presents the date and time on the status screen. The installer can customize the information displayed to suit the user needs. Information on the state of selected partitions, zones or outputs, date and time, as well as any text, can be presented on the status screen. Icons illustrating the state of partitions are described in section “Partition status” (p. 8). Icons illustrating the state of zones are described in section “Zone status” (p. 9). Icons illustrating the state of outputs are shown in the table below. Icon Color Output status grey deactivated red activated Additional messages, connected with occurrence of specific events (e.g. arming or disarming, auto-arming delay countdown, entry / exit delay countdown, alarm, etc.), may also appear on the status screen. Functions available from the status screen Tapping the status screen will display the main screen. Pressing the status screen for 3 seconds may trigger the silent panic alarm. Whether or not this function will be available is to be defined by the installer. Status screen background A single picture or a slide show can be displayed as the status screen. The status screen background is to be configured by the installer. 4 INT-TSG SATEL 1.2.3 Main screen Presented on the main screen are: date and time in the format defined by the installer (if some specific events occur, other messages can be displayed, instead of the date and time, e.g. entry or exit delay countdown, alarm messages, etc.); name of the currently logged user; icons enabling operation of the keypad and alarm system. Icon Function Informs you that no user is logged in. User login. Informs you that a user is logged in (name of the currently logged user is displayed below). User logout. Displays the “Arming” screen (see pages 5 and 14). The keypad distinguishes between tapping the icon and tapping and holding the icon for 3 seconds. After tapping the icon, quick arming, i.e. without entering the code, may be available (consult this with the installer). Tapping and holding the icon will always display the authorization screen, and the ”Arming” screen will only be displayed after entering the code. Enables disarming / alarm clearing (see pages 7, 16 and 16). Displays the “Control” screen (see p. 7). Displays the “System status” screen (see p. 7). Displays the “Emergency” screen (see p. 10). SATEL INT-TSG 5 Displays the “Advanced” screen (see p. 10). 1.2.4 Authorization screen Some screens and functions may only be available after user authorization. The authorization is code based. Use the number keys to enter the code and then confirm, tapping the icon. By default, the following codes are preprogrammed in the control panel: service code: 12345 user 30 code: 1111 If you make a mistake when entering the code, tap and re-enter the code (if you fail to enter the valid code within one minute, information on entering a wrong code will be saved to the control panel memory). 1.2.5 “Arming” screen Appearance of the screen changes depending on whether you are allowed to arm one or two partitions. Icon Function Arming in the full mode. Arming in the day mode. Arming in the night mode. 6 INT-TSG SATEL Screen with partition selection This screen is displayed when you can arm both partitions. The partitions are presented by means of appropriately described fields. By default, the icon is displayed in both fields, which means that the partition is to be armed. Tap on the field, if the partition is not to be armed (the icon will be displayed). Having defined where the system is to be armed, tap one of the icons to arm the system. Screen without partition selection This screen is displayed when you can arm one partition only (also when the quick arming is allowed by the installer in one partition only). SATEL 1.2.6 INT-TSG 7 “Alarm clearing / Disarming” screen The “Alarm clearing / Disarming” screen will be displayed after you tap the icon on the main screen, when there is an alarm (alarm memory) and at least one partition is armed. Icon Function Enables alarm clearing. Enables disarming. 1.2.7 “Control” screen The icons on the screen show the outputs you are allowed to control. Tapping an icon changes the output status. The icons illustrating the status of outputs are described on p. 3. 1.2.8 “System status” screen 8 INT-TSG Icon SATEL Function Displays the “Partition status” screen. Displays the “Zone status” screen. Displays the “Troubles” screen, on which the current troubles are presented (the installer can configure the control panel to display the troubles until cleared). Enables viewing the event log. icon is available at the top of the screen. When viewing the log of events, the Tapping the icon will toggle the information presentation mode: light grey / color font (and the other way round). Partition status The status of partitions is illustrated by means of icons. Tap the icon situated at the top of the screen to see description of all icons. The number shown next to the icon corresponds to the partition number. On tapping the icon, the full partition name will be presented at the display bottom. Icon Partition status disarmed – there are no violated zones exit delay countdown is running – remaining time longer than 10 seconds exit delay countdown is running – less than 10 seconds remained armed in full mode armed in day mode armed in night mode entry delay countdown is running fire alarm alarm SATEL INT-TSG 9 warning alarm tamper alarm fire alarm memory alarm memory warning alarm memory tamper alarm memory Zone status The status of zones is illustrated by means of icons. The icons are designated by numbers corresponding to the zone numbers. On tapping the icon, the zone number and text information about the zone state is presented at the top of the display. Icon Zone status normal violated trouble – long violation trouble – no violation bypassed tamper first triggered alarm tamper memory alarm memory 10 INT-TSG SATEL 1.2.9 “Emergency” screen Icon Function Tapping and holding for 3 seconds will trigger the fire alarm. Tapping and holding for 3 seconds will trigger the medical (auxiliary) alarm. Tapping and holding for 3 seconds will trigger the panic alarm. The installer defines, whether the loud panic alarm (with a loud alarm signal) or the silent one (without a loud signal) will be triggered. 1.2.10 “Advanced” screen In the lower right corner of the screen you will find information on the keypad firmware version. SATEL Icon INT-TSG 11 Function Locking the touch screen for 30 seconds (to clean the screen). Displays the “Backlight” screen. Displays the “Volume” screen Enables updating of the keypad firmware (the function is available after entering the service code). Enables formatting of the microSD card (the function is available after entering the service code). Displays the terminal. Backlight Intensity of the screen backlight can be controlled within the 10-100% range. In the night hours, which can be specified, the backlight intensity can be different. 12 INT-TSG SATEL Volume You can define the volume level of sounds generated: when operating the keypad (tapping the keys, confirmation of performed operation, etc.) and signaling the trouble. after zone violation (CHIME signal). when signaling the entry delay. when signaling the exit delay. when signaling fire alarms. when signaling warning, burglary, panic and medical alarms. Terminal The terminal enables the alarm system to be operated and programmed in the same way as from the LCD keypad with text menu. The method of using such a keypad is described in the control panel programming / user manuals (electronic versions of the manuals are available on the www.satel.eu website). SATEL INT-TSG 13 1.3 Sound signaling The installer can disable the sound signaling. 1.3.1 Beeps generated when using the icon-based menu 1 short beep – tapping a key on the authorization screen or selecting/deselecting a field when choosing the partitions and event type. 2 short beeps – confirmation of executing a function, command, etc. 2 long beeps – incorrect code, function unavailable or return from the main screen back to the status screen. 1.3.2 Beeps generated when using the terminal 1 short beep – tapping a number key. 2 short beeps – entering the user menu, submenu or a function, or going to a next programming step. 3 short beeps – confirmation of: – starting the arming procedure (there is exit delay in the partition) or arming (there is no exit delay in the partition); – disarming and/or alarm clearing; – turning output off; – disabling chime signal in the keypad, using the key; – exiting the function and returning to the menu after confirmation of the data entered. 4 short beeps and 1 long beep – signaling of: – turning output on; – enabling chime signal in the keypad, using the key; – ending the function and exiting the user menu after confirmation of the data entered. 1 long beep – some zones are bypassed (when arming) or denial of arming (some zones in the partition are violated or there is a trouble). 2 long beeps – incorrect code, function not available or exiting the function without confirmation of the data entered (e.g. by using the key). 3 long beeps – refusal to carry out a command (the user does not have the required authority level or the function is not available). 1.3.3 Events signaled by sounds Only installer selected events are signaled. Alarms are being signaled throughout the time programmed by the installer. 5 short beeps – zone violation (CHIME). Long beep every 3 seconds, followed by a series of short beeps for 10 seconds and 1 long beep – countdown of exit delay (if the time is shorter than 10 seconds, only the final sequence of short beeps will be generated). A sequence of 7 beeps of diminishing duration, repeated every few seconds – countdown of auto-arming delay. 2 short beeps every seconds – countdown of entry delay. 14 INT-TSG SATEL 2 short beeps every 3 seconds – signaling a new trouble. Short beep every 0.5 seconds – warning alarm. Continuous beep – alarm. Long beep every second – fire alarm. 2. Operating the alarm system This section describes selected operations which can be executed using the icon-based menu. The description does not include the user authorization, which will be required when using the keypad. The alarm system is operated from the terminal in the same way as when using the LCD keypad with text menu. For description of the alarm system operation by means of LCD keypad with text menu, please refer to the control panel user manual. 2.1 Arming Completion of the steps below will start the arming procedure. The procedure ends when the exit delay time elapses (if the countdown is completed successfully, the system becomes armed – see also “Failure of arming procedure” p. 16). If the exit delay time is 0, the system becomes armed instantly. You can change the arming mode, which means you do not have to disarm the system to set the partition to another arming mode. In the case of alarm, changing the arming mode or reactivating the same arming mode will result in clearing the alarm (it does not apply to the quick arming mode). The day/night arming modes are available if the installer has defined which zones are to be active in this armed mode. If exit delay is programmed for a partition, you can leave the partition through the exit route without triggering alarm after the partition arming procedure has started. The exception is when the partition is armed without exit delay. 1. Tap on the main screen. The “Arming” screen will be displayed. Appearance of the screen depends on whether you can arm the system in one or two partitions. If the installer has allowed the quick arming (without entering the code) of one partition only, arming the other partition is only possible after tapping and holding 3 seconds. for 2. If a screen is displayed presenting the partitions by means of appropriately described fields, you can tap these fields to select whether the partition is to be armed ( ( ). 3. Tap one of the following icons: - to arm in full mode, - to arm in day mode, - to arm in night mode. ), or not SATEL INT-TSG 15 If you want to arm the system immediately (without any exit/entry delay), tap and hold the icon for 3 seconds. 4. The arming procedure will be initiated in the partition(s). 2.1.1 Information about bypassed zones The installer can configure the control panel in such a manner that, if there are any bypassed zones in the partition, the arming procedure will not start, but the terminal and the following message will be displayed: “Bypassed zones 1=Arm 4=Bypasses” – you can: – tap to cancel the arming, – tap to proceed with the arming, – tap to start the INHIBIT function (see: alarm control panel user manual). “Bypassed zones 1=Arm” – you can: – tap to cancel the arming, – tap to proceed with the arming. 2.1.2 Denial of arming The installer can configure the control panel in such a manner that, if there is any violated zone in the partition or any trouble (including tamper) in the system, the arming procedure will not start, but the terminal and the following message will be displayed: “Zone [zone number] violat.” – you can: – tap to cancel the arming, – tap to start the INHIBIT function (see: alarm control panel user manual). The system can be armed after eliminating the cause of the zone violation, or after bypassing the zone. “Violated zones 1=Ok 2=Check” – you can: – tap to cancel the arming, – tap to force the arming, – tap to view the list of violated zones. When viewing the violated zones, provided you have the ZONE INHIBITION right, you can bypass the violated zone after tapping (when a prompt is displayed asking you to confirm the operation, tap bypass the zone, or to cancel bypassing the zone). “Troubles 1=Ok 2=Check” – you can: – tap to cancel the arming, – tap to force the arming, – tap to view the trouble log. Information on the forced arming is written into the event log. to 16 INT-TSG SATEL 2.1.3 Failure of arming procedure The installer can program the control panel so that the arming procedure will fail if, when the exit delay countdown ends: – there is a violated zone in the partition which was not violated when the arming procedure was started; – there is a trouble which did not exist when the arming procedure was started. 2.2 Disarming If there is an alarm (alarm memory), disarming will result in simultaneously clearing the alarm. Tap on the main screen. Depending on the system state: I. There is no alarm (alarm memory) and 1 partition is armed / you have access to 1 partition The partition will be disarmed. II. There is an alarm (alarm memory) and 1 partition is armed / you have access to 1 partition The “Alarm clearing / Disarming” screen will be displayed. Tap . The partition will be disarmed. III. There is no alarm (alarm memory) and both partitions are armed A screen will be displayed presenting partitions by means of appropriately described fields. Tap these fields to select whether the partition is to be disarmed ( ), or not ( ). Having finished selecting the partitions, tap . IV. There is an alarm (alarm memory) and both partitions are armed The “Alarm clearing / Disarming” screen will be displayed. Tap instructions given in it. III above. and then follow the 2.3 Alarm clearing (without disarming) Tap on the main screen. Depending on the system state: I. There is an alarm (alarm memory) and none of the partitions is armed The alarm will be cleared. II. There is an alarm (alarm memory) and at least 1 partition is armed The "Alarm clearing / Disarming" screen will be displayed. Tap cleared. . The alarm will be