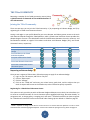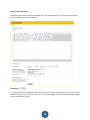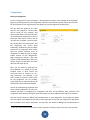
1
User’s Manual A how-to guide for the TakingITGlobal for Educators platform TIGed User’s Manual: A how-to guide for the TakingITGlobal for Educators platform Version 1.0 (September 2010) Lead Writing and Editorial Team Katherine Walraven, TakingITGlobal Katie O’Connor, TakingITGlobal Natalie Cheng, TakingITGlobal Sara Hassan, TakingITGlobal Design and Technology Team Francisco Pereira, TakingITGlobal This toolkit is licensed under a Creative Commons Attribution-Share Alike 3.0 Unported license. For more information about Creative Commons licensing, please see http://creativecommons.org/licenses/by-sa/3.0/. Table of Contents INTRODUCTION ............................................................................................................................................. 1 THE TIGed COMMUNITY ............................................................................................................................... 2 Joining the TIGed Community ................................................................................................................... 2 Participating in the TIGed Community ...................................................................................................... 3 Sharing Collaboration Details................................................................................................................ 3 Using the Community Search ................................................................................................................ 4 Connecting in the TIGed Lounge ........................................................................................................... 4 Reading and Sharing Educator Stories .................................................................................................. 4 Staying up to Date on TIGed News ....................................................................................................... 5 TIGed RESOURCES ......................................................................................................................................... 5 The Activities Database ............................................................................................................................. 5 Searching the Database ........................................................................................................................ 5 Importing Activities to Your Virtual Classroom..................................................................................... 5 Adding Your Own Activity ..................................................................................................................... 5 Best Practices in Global Education and Collaborative Technologies ........................................................ 6 Thematic Classrooms ................................................................................................................................ 7 Setting up a Thematic Classroom ......................................................................................................... 8 TIGed VIRTUAL CLASSROOMS ..................................................................................................................... 10 Setting up your School on TIGed............................................................................................................. 10 Creating a class ....................................................................................................................................... 14 Virtual Classroom Features ..................................................................................................................... 17 Adding Participants ............................................................................................................................. 17 Announcements .................................................................................................................................. 19 Assignments ........................................................................................................................................ 22 Blogs .................................................................................................................................................... 25 Bookmarks .......................................................................................................................................... 26 Discussions .......................................................................................................................................... 28 Gallery ................................................................................................................................................. 29 Writing ................................................................................................................................................ 30 Maps ................................................................................................................................................... 31 Videos.................................................................................................................................................. 33 Premium Features ................................................................................................................................... 34 Class Files ............................................................................................................................................ 34 Video Chat ........................................................................................................................................... 35 Settings.................................................................................................................................................... 36 Collaborations ......................................................................................................................................... 37 Creating a collaboration ...................................................................................................................... 37 Inviting others to your collaboration .................................................................................................. 38 SUPPORT ..................................................................................................................................................... 39 Virtual Office Hours................................................................................................................................. 39 Video Tutorials ........................................................................................................................................ 39 TIGed Lounge .......................................................................................................................................... 39 APPENDICES ................................................................................................................................................ 40 Appendix 1: McREL Compendium............................................................................................................... 40 Appendix 2: Framework for 21st Century Learning .................................................................................... 41 Appendix 3: Creative Commons.............................................................................................................. 42 Appendix 4: Collaboration Ideas ............................................................................................................. 43 INTRODUCTION Launched in 2006, the TakingITGlobal for Educators (TIGed) program provides rich, interactive global learning experiences by allowing educators to leverage the resources of the world's most popular online community for young global leaders in ways that meet the needs of their learning environments. We bring a global education perspective to the most innovative applications of online social networking and digital media to create relevant, engaging, and student-centered learning opportunities. TIGed offers: A community of close to 4,000 global educators and 20,000 students in over 100 countries around the world who are interested in collaborating, sharing, and learning together. A resource centre with lesson plans, activities, games, and thematic classrooms linked to Midcontinent Research for Education and Learning (MCREL) curriculum benchmarks and 21st century skills.1 Virtual classroom communities that teachers create, moderate, and control to fit the needs of their students and objectives of their curriculum. Classroom tools include blogs, podcasts, maps, image galleries, live video chat, discussion boards, and online file storage, allowing students to demonstrate their learning, express themselves, engage in constructive dialogue around important topics, and develop a portfolio of their work – all within a private, secure, and advertising-free online environment, anytime, anywhere! A support page where educators can access all the information they need in order to make best of what the TIGed program has to offer! 1 For an overview of the MCREL Compendium and 21st Century Skills, please see appendices 1 and 2. 1 THE TIGed COMMUNITY Becoming a member of the TIGed community means joining a global network of thousands of like-minded educators in over 100 countries. Joining the TIGed Community There are two ways you can join the TIGed community: 1) by requesting an Educator Badge; and 2) by registering for a TIGed virtual classroom license. Having a red apple on your profile identifies you as an educator and allows greater access to the tools and resources offered through the TIGed platform, while a TIGed virtual classroom license provides the deepest degree of access. The table below outlines the differences between the tools, resources, and functionalities available to regular TIG members and those with Educator Badges (only) and virtual classroom licenses, respectively. TIG Member Educator Badge Virtual Classroom License Can participate in the TIGed Lounge Can contribute to the TIGed Activities Database Can post collaboration details Can create thematic classrooms Can create customizable virtual classroom spaces Requesting an Educator Badge Once you are a registered TIG member, follow these steps to apply for an educator badge: 1) Log in to your TIG account, and click on “My TIG” 2) Click on “My Account” 3) Click on “Settings” 4) Click on the “TIGed tab” and enter your school name, grade level, and the subject that you teach. A request will be sent to the TIGed team, to be reviewed as quickly as possible. Registering for a TIGed Virtual Classroom License This option not only provides you with an Educator Badge and deeper access levels, but also allows you to create an unlimited number of virtual classroom spaces equipped with blogs, discussion boards, an assignment tool, an image gallery, a mapping tool, and more! 2 Detailed instructions on how to register for a TIGed virtual classroom license can be found under ‘Setting Up Your School on TIGed’ on page 10. 2 TIGed is required to charge a small fee for the annual use of its virtual classroom platform in order to cover associated costs and fund ongoing development. To learn more about the pricing structure, please see page 12. 2 Participating in the TIGed Community One of the greatest benefits of becoming a member of the TIGed network is having access to a huge community of like-minded educators with whom to connect, share, and collaborate. This section outlines the many features and tools available to members of the TIGed Community, also referred to as “TIGeducators.” Sharing Collaboration Details The TIGed Community provides an avenue for your students to interact with other classrooms around the world. Collaboration details associated with individual teachers and classrooms can help you to identify potential collaborators. As the ability to add collaboration details is a relatively new feature on TIGed, many educators have not added their personal or classroom-based collaboration details to date. Don’t forget to add yours in order to facilitate connections with other members of the TIGed community! To add your personal collaboration details, log in, and under the TIGed page, click on 'Community'. On the right hand side of the community page, you will see a section that reads 'My Collaboration Details'. Here you may post specific ideas for how you would like to collaborate with other educators. The more specific you are the better! In doing this, they will be displayed alongside your name in search results.3 If you have an idea, but do not want to be contacted right now, you can include a note in your description asking people to check back later. After entering they will be saved for future reference. If you would like to edit your details, you may do so by visiting the Community page and re-saving your details. For more information about on how to create a collaboration, please see ‘Creating a Collaboration’ on page 34. For tips and suggestions on how to build and maintain a collaboration, please see Appendix 4: Collaboration Ideas. 3 See the following section, “Using the Community Search”, for more information. 3 Using the Community Search The TIGed Community Search was designed to facilitate connections between TIGeducators and their students. When you use the TIGed Community Search, you have the option to search for teachers, classes or schools. You can then narrow your search by subject, year, country/region and thematic classroom.4 For optimal search results, queries should not be made too specific as this will decrease the number of search results. If you are searching by teacher, you have the option to limit your search to educators who have posted collaboration details. Once you have found an educator you’d like to collaborate with, you can connect without sharing personal information through TIG Messenger. To contact someone through TIG Messenger, click on their name to visit their profile, scroll down to TIG Messenger and click to send them a message. Connecting in the TIGed Lounge The TIGed Lounge is a space for members of the TIGed community to network, discuss teaching experiences and strategies, share resources related to collaborative learning and global education, and get a feel for the TIGed Virtual Classroom platform. The lounge is open to all TIGeducators and accessible from the TIGed Community Page (http://www.tigweb.org/tiged/community.html). Use the lounge to connect with TIGed’s growing community of teachers around the world who are committed to facilitating learning for a better common future. Reading and Sharing Educator Stories Educator stories are accounts of educators who are helping their students to build a better world with the help of TIGed. Have you been inspired by TIGed, and want to inspire others? Submit your educator story! Simply click on ‘Submit Your Story’ under the red ‘Educator Stories’ tab on the TIGed community page5 and follow the guidelines and instructions provided. Once approved, your educator story will randomly be featured on the TIGed Community page! 4 Searching by thematic classroom is useful if you are using one and wish to collaborate with other educators who are using the same thematic classroom. More information on thematic classrooms can be found on page 7. 5 Or enter http://www.tigweb.org/connections/stories/submit.html?type=educator into your address bar 4 Staying up to Date on TIGed News News from TIGed is a quarterly newsletter which contains information about special events, conferences and more in addition to general information about TIGed. Past newsletters can be viewed online at http://www.tigweb.org/tiged/community.html (bottom right hand side of the community page). TIGed RESOURCES From the activities database to thematic classrooms, TIGed provides a wide variety of resources and methods for you to bring global perspectives into your classroom. The Activities Database The TIGed Activities Database is a resource by teachers, for teachers. Using the database, you can find new methods to infuse TakingITGlobal into your teaching in ways that meet your local curriculum standards. TIG staff, partners, and educators from around the world have developed our activities and lesson plans and you can contribute too! Searching the Database To search the database, simply input the year, subject and/or keyword(s) or leave all fields blank to view all activities. Importing Activities to Your Virtual Classroom Once you select an activity, you can add it to any of your TIGed virtual classrooms by selecting a classroom from the dropdown menu at the bottom left hand side of the page. The new activity will automatically be added under the ‘Assignments’ section in the classroom you selected, and all activity information including relevant links and bookmarks will be imported for you. For information about modifying the activity, see ‘Assignments’ on page 22. Adding Your Own Activity Adding an activity to the TIGed Activities Database is a functionality reserved for TIGeducators. To add an activity, click on ‘add activity’ from the Activities Database page or visit http://www.tigweb.org/tiged/activity/addlesson.html, and then fill out the online submission form. More information on the fields that make up the form are provided in the table below. Year Subjects Categories The appropriate school year for which the activity may be used. Select up to three options by holding down the CTRL key while clicking relevant options. The appropriate subject for which the activity may be used. Select up to three options by holding down the CTRL key while clicking relevant subjects. Select up to three options by holding down the CTRL key while clicking relevant 5 Site Sections Web Pages Used Description Outcomes Tools and Materials Time Required Process Evaluation rubric Student Prompt Teacher Notes Attachments Creative Commons options. If you select certain categories, the activity may be linked to on TIG’s Global Issues pages (http://www.tigweb.org/understand/issues/). Use this category to related select sections of the TakingITGlobal website. Allows you to associate relevant webpage(s). Space for a short description of the activity or lesson. Include outcomes/objectives of the activity. What will the students learn? List of all tools and materials required for the activity or lesson. Approximate time required for completion. Short description of the process that must be performed. If you have a specific evaluation rubric that you can be used, you may include it here. Any relevant information about the activity that the students should know. Any notes you may have about this activity that are not covered in other sections. A space to attach any pertaining documents. Creative Commons allows you to modify the copyright restrictions on your work, allowing others greater access for legal sharing, use, repurposing and remixing. They work alongside copyright licenses so that you can modify your copyright terms to best suit your needs. To learn more about Creative Commons, and the various levels of licensing, visit their website (http://www.creativecommons.org) or see appendix 3. Best Practices in Global Education and Collaborative Technologies Making the Connection - Best practices in Global Education and Collaborative Technologies is a TakingITGlobal publication developed to showcase the ways in which TIGed has been successfully used by other educators. It highlights the best practices and lessons learned by teachers, schools, districts and other organizations creating new projects at the intersection of global education and educational technology. In addition, it outlines common threads that were found in the case studies. The Guide to Best Practices can be downloaded as a PDF and printed, however the online version contains podcasts contributed by educators who are active members of TIGed and thus is the best format with which to engage with the publication. The guide is a fantastic way to demonstrate to parents/other educators who have questions about what TIGed does, and experiences that educators have had while using TIGed. If you are interested in contributing ([email protected]). to TIGed's 6 Best Practices, please contact us Thematic Classrooms Thematic classrooms and teacher toolkits are a great way to utilize TIGed resources and incorporate them into your existing lesson plans. Thematic classrooms come preloaded with activities, lesson plans, websites and more relating to the particular theme of the classroom and, best of all, they are completely free to use and accessible to educators who have not paid for a TIGed virtual classroom license. Teacher toolkits are downloadable lesson plan aides. These can be used to accompany and supplement the thematic classrooms. To download a teacher toolkit, visit the Resources page by clicking on ‘Resources’ at the top of the TIGed home page. Scroll down to Thematic Classrooms at the bottom of the page, and select the theme you would like to use. You will be taken to the theme’s webpage, where you will click ‘Download the Teacher Toolkit.’ All teacher toolkits are in PDF format. Tread Lightly – A secondary school resource for a more sustainable future Exploring climate change through the lens of ecological footprints, this thematic classroom helps secondary school students to understand basic climate change science, develop a sense of personal and collective responsibility for the earth, and adopt more environmentally friendly habits and behaviours. Tread Lightly contains a carbon footprint calculator, individual lesson plans, a teacher toolkit and a fully loaded virtual classroom! Get started with the Tread Lightly by visiting: http://www.tigweb.org/tiged/projects/treadlightly/ GRUB – Youth perspectives on food choices and food systems Utilizing the Photovoice technique, this thematic classroom encourages intermediate and secondary school students to ask important questions about the food we eat, where it comes from, how we make food-related decisions, and the local and global impacts of these choices on human and community health. GRUB contains a teacher toolkit, a match game, a photo collection and a fully loaded virtual classroom all designed to encourage your students to ask important questions about the food we eat! Get started with GRUB by visiting: http://www.tigweb.org/tiged/projects/grub/ Orange Revolution This thematic classroom helps secondary school students explore issues related to human rights, good governance and political stability by examining the Ukrainian Orange Revolution in 2004 and 2005. Particular focus is placed on the role of Canadians and Canadian organizations during this period. Orange Revolution contains a game, individual lesson plans and a virtual classroom pre-loaded with activities and bookmarks. 7 Get started with Orange Revolution by visiting: http://www.tigweb.org/tiged/projects/orange/ Ayiti – The cost of life Developed to support learning through the Ayiti role playing game, this thematic classroom helps intermediate and secondary school students explore how rural poverty affects individuals, families and communities in developing countries such as Haiti. Get started with Ayiti by visiting: http://www.tigweb.org/tiged/projects/ayiti/ TIG Xpress – HIV/AIDS Young people are amongst those most affected by HIV/AIDS. Drawing on photography and digital media, this thematic classroom provides secondary school students with a participatory educational resource based on social justice, transnational communication, and global solidarity. It focuses on five main areas of HIV vulnerability: gender, migration, stigma, poverty, and access to treatment. TIG Xpress – HIV/AIDS contains a TIG Xpress photo gallery, a guide to action, a teacher toolkit and a virtual classroom loaded with activities and bookmarks. Get started with TIG Xpress – HIV/AIDS by visiting: http://www.tigweb.org/tiged/projects/tigxpress/ The Virtual Classroom on Tobacco Control Smokers almost exclusively take up the habit during their youth. Designed to help reduce the incidence of tobacco use among secondary school students, this thematic classroom supports learning about the health impacts of first- and second-hand smoke, the exploitative nature of the global tobacco industry, and how to effectively encourage peers to lead smoke-free lives. The Virtual Classroom on Tobacco Control contains a tobacco match game, a teacher toolkit, and a fully loaded virtual classroom. Get started with the Virtual Classroom on Tobacco Control by visiting: http://www.tigweb.org/tiged/projects/tobacco/ Setting up a Thematic Classroom To set up a thematic classroom, visit the Resources page by clicking on ‘Resources’ at the top of the TIGed home page. On the resources page, scroll down to see all of the thematic classrooms available and select the theme you would like to use. Once you have selected the theme, click on ‘Set up your virtual classroom’ and follow the steps below: Step 1 : Sign up or Login to TakingITGlobal If you have a TakingITGlobal account, you will be prompted to sign in, and you will move on to Step 2. If you are not an existing TakingITGlobal member, you will be asked to create an account. 8 Step 2 : Search for your school If you have already registered your school under TIGed, you will skip to step 3. If you are a teacher in multiple schools, you will be prompted to select your school. Type your school’s name into our school database. If your school is not registered in our database, you will have the opportunity to create a new school. For large cities, please be sure to enter a keyword to limit the results returned. If you find your school in the list of search results, you must either join or claim the school. If you are asked to join your school, it means that other teachers from your school are already using TIGed. If you are asked to claim your school, it means that you are the first! Step 3 : Join or Claim your school Joining your school : o If you find your school, join it by entering the registration code for your school. o Don’t have the registration code? TIGed can automatically request the registration code for you by emailing the administrator of your school. To do this, after searching for your school click ‘Join school’. Scroll down under ‘Request registration code’ and click send. TIGed will send an email to your school administrator requesting the code. Can’t find your school? Add it to the database! o You will be asked to enter your school’s name, create your school’s TIG web address, school acronym, teacher registration code (other teachers will need this to join your school) and create student privacy settings along with your school’s address and telephone number. Step 4 : Payment Thematic classrooms are provided to you free of charge through the gracious help of TIGed partners. You have access to all virtual classroom resources (with the exception of TIGed premium features). However if you would like to use the virtual classroom platform to teach about other subjects, you do have the option of purchasing a TIGed virtual classroom license. For information about payment options, please see ‘Payment’ on page 13. Step 5 : You’re finished! Congratulations! You have successfully created a TIGed thematic classroom. For information about formatting your classroom, adding students and more, please see page 17. 9 TIGed VIRTUAL CLASSROOMS TIGed offers teachers the ability to create and manage private, advertising-free virtual classrooms, through which students can take advantage of the benefits of web 2.0 tools without sacrificing security. Teachers choose which tools to integrate into their online classrooms based on what is most appropriate for their students and projects. Available tools include: blogs, podcasts, maps, digital image galleries, discussion boards, live video chat, online file space, and more. Virtual classrooms were designed with the understanding that time is a scarce resource for many teachers. To save time, TIGeducators can import activities from the database as well as content external to TIGed (such as bookmarks and videos) directly into their virtual classrooms. They can also duplicate existing classrooms, creating several copies of the same classroom, which is handy for educators who teach the same or similar classes to different students at different times of the day. Setting up your School on TIGed The first step to getting started with TIGed Virtual Classrooms is to add or join your school on TIGed. To do this, visit TIGed’s main page (http://www.tiged.org) and click on ‘Get Started’ at the top right hand corner. You will be taken to the TIGed get started page. There are five steps in the signup process, and you can keep track of your progress using the online registration process outline at the top of the page. Step 1 : Sign up or Login to TakingITGlobal If you have a TakingITGlobal account, you will be prompted to sign in, and you will move on to Step 2. If you are not an existing TakingITGlobal member, you will be asked to create an account. 10 Step 2 : Search for your school Type your school’s name into our school database. If your school is not registered in our database, you will have the opportunity to create a new school. For large cities, please be sure to enter a keyword to limit the results returned. If you find your school in the list of search results, you must either join or claim the school. If you are asked to join your school, it means that other teachers from your school are already using TIGed. If you are asked to claim your school, it means that you are the first! Step 3 : Join or Claim your school Joining Your School o If you find your school, join it by entering the registration code for your school. Don’t have the registration code? TIGed can automatically request the registration code for you by emailing the administrator of your school. To do this, after searching for your school click ‘Join school’. Scroll down under ‘Request registration 11 o code’ and click send. TIGed will send an email to your school administrator requesting the code. Can’t find your school? Add it to the database! You will be asked to enter your school’s name, create your school’s TIG web address, school acronym, teacher registration code (other teachers will need this to join your school) and create student privacy settings along with your school’s address and telephone number. Step 4 : Payment You will be asked to complete the payment process. Details on the various payment options are available below. If you have received a promotional code at a conference or presentation, you will be asked to enter it here. Regular vs. Premium virtual Classrooms: o TIGed offers a premium membership option, providing two additional valuable features we've had to separate due to the costs for us to deliver them. The first, Class Chat, allows up to 100 students to participate in a 4-way video chat. The second, Class Files, provides a secure space for you and your students to exchange and store files. Pricing Individual teacher: $29 (standard) / $49 (premium) Small school (15 transferable licenses): 12 o $195 (standard) – Works out to be $13 per teacher! o $325 (premium) – Works out to under $22 per teacher! Large school (75 transferable teacher licenses): o $495 (standard) – Works out to under $7 per teacher! o $795 (premium) – Works out to under $11 per teacher! For board or district-wide, regional, or non-OECD discounts, please contact [email protected]. Payment can be made online using a major credit card or Paypal account. You can also choose to pay by cheque or receive an invoice, which will be presented at the final step of the signup process. Those paying by cheque or invoice will have access to their classroom for a 15 day grace period until payment has been received. For more information, please contact [email protected] NOTE: If you request an invoice or require a copy for documentation purposes, please print a copy of the invoice or take a screen shot. Step 5 : You’re Finished! Congratulations! You have successfully signed up for TIGed. You will be issued a receipt/invoice from TakingITGlobal at this point, depending on the method of payment chosen. Once you have completed all the steps above, you will receive a confirmation email and have full access to your TIGed school. 13 Creating a class Once you have created and/or joined your school, you will be prompted to create a class. After creating your first class, you can create subsequent ones by clicking ‘Create Class’ on your school’s home page. When creating your class, you will be asked to fill out four main sections, which are listed below. Basics This table below provides more details about the ‘basic’ fields required in the online classroom creation form: Class name: Class web address: This name will appear on your school's TIGed school page Your TIGed.org web address *NOTE: This CANNOT be changed after it is submitted 14 Subject: The subject of the class Year: The year or level of the class who will be using the classroom Language: Language of the class environment Security: Public: The classroom and its content will be viewable by any TIG member. Only student profile information will be hidden. Description: A description of the classroom; can include the theme or topic of the class. A space to post collaboration details if you are interested in collaborating with another class. For more information on collaboration details, see page 3. Collaboration Details: Private: The classroom will only be accessible to teachers, students, and guests of the classroom. Registration You have two options which allow your students to register for your virtual classroom: Teacher Managed: You will add students directly through your class page. Students are not required to have email addresses. For more information on adding students, see page 17. You will have the option to create one password for all students or create individual passwords for each student. You will have to distribute the class URL (located in the address bar on the homepage of your classroom) to each student, along with their username and password (individual or group) Student Managed: You will create a student registration code and students will sign up and create profiles on their own. Students are required to have email addresses. 15 Features A list of features accessible to your students. Once you activate a feature, it can only be deactivated if empty (ie. If students have not submitted any content) Students can use the following features to submit items directly for an assignment: Blogs, gallery, discussions, files, gallery and writing Please see below for a description of regular and premium virtual classroom features. Regular Features Bookmarks: A place to list useful websites Assignments: Assignment submission and marking tools. Blogs: Online journals supporting photo and audio uploads. Gallery: A space to store and organize images. Language: Language of the class environment Videos: A space to showcase relevant video content. Discussions: Threaded discussions with moderation options. Maps: A tool for creating individual or group maps. Writing: A space to share more formal writing Videos: A space to showcase relevant video content Premium Features : Video Chat: A space for real-time video and text sharing. Files: A space to store and organize files Learning groups: Learning groups let you create custom groupings of students that can then be easily added to any class. Only Educators from your school can see learning groups, and you can easily move students between groups, or delete students from a learning group. Import class content: Importing class content allows you to import content from another class in your school. This is a great option if you would like to use the same class content multiple times. 16 Virtual Classroom Features All TIGed classroom features can be accessed by clicking on the links provided on the left hand side of your classroom’s web page. Adding Participants To add students to your classroom, simply follow the steps below: If you selected the 'Teacher Managed' option under settings: Step 1: From the ‘Participants’ page, click on the green ‘+Add’ button on the lower right hand side of the page. Step 2: You can use this tool to create accounts for all your students for your TIGed classroom. Each student requires a unique username. With respect to passwords, you can choose to create a single password6 for all students to use or assign individual student passwords. 6 As some students may realize that there is only one password for the entire class and attempt to use the class password to access each other’s accounts, you may want to consider creating individual passwords instead. 17 Step 3: We suggest using your school alias or acronym as a common prefix in order to avoid creating usernames which have already been taken and to help in readily identifying your students. An example of a username that employs this system is MCI-SteveB. Please note that no spaces are allowed in TakingITGlobal usernames. Step 4: You're finished! As a reminder, students will not be allowed to change their passwords. If you selected the 'Student Managed' option under settings – which requires all students to have an email address: Step 1: Click on the green '+ Invite' on the lower right hand side of the 'Participants' page Step 2: Input the email addresses of students you would like to invite. Step 3: Include a message you would like to send with the invitation to join your classroom. (Optional) Each invitee will receive an e-mail explaining how to become a TIG member (if they are not already) and how to register for your class. Importing Students Another way to add students to your class is to import them from another class in your school. To do this, the students you would like to import must already be members of your school. To select multiple students to import, simply hold down the CTRL key. 18 Adding Teachers Teachers have the ability to post/edit/remove assignments. They can assign due dates, modify settings, edit writing, and moderate the classroom. There are two options to add other teachers to your classroom: If they are not part of your school: 1) Click on 'Settings' on the left hand side of your classrooms homepage 2) Scroll down to 'Teacher Registration' 3) Copy the Teacher Registration Link and Teacher Registration Code into an email, and email them to the teacher(s) you would like to invite to your classroom If they are already part of your school: 1) 2) 3) Click on 'Settings' on the left hand side of your classrooms homepage Scroll down to 'Teacher Registration' Select the Teacher's name from the drop down box and click 'Add Teacher' Adding Guests/Assistants Guests have the ability to view the classroom, however they cannot edit or post content. Assistants have the ability to edit content, however they cannot post assignments. To add a Guest and/or Assistant, follow these steps: 1) From your classroom homepage, click on 'Settings' on the left hand side of the page 2) Scroll down to 'Guests' or 'Assistants' 3) Copy the Guest or Assistant Registration Link and Registration Code into an email, and email them to the guest(s) or assistant(s) you would like to invite to your classroom 4) If you do not have a Guest or Assistant registration code, simply input a code into the registration code box, and scroll down to the bottom of the page and click 'Save All'. This creates a code which you can use when you invite guests and assistants to your classroom. Changing or deleting the registration code will prevent those previously granted access from entering your classroom. Exporting Participant Data Exporting participant data generates a spreadsheet containing each student’s username, name, display name, email and password. Exporting participant data is an excellent way to obtain students’ usernames and passwords for your records. Announcements Announcements allow you to post information, videos and links directly on the home page of your classroom. For information about how to post an announcement, see below. 19 Posting an Announcement TIGed offers many ways to create and modify your class announcements. For more information about how to use these tools, please see below. Using HTML If you are familiar with HTML code, and prefer to use this method, simply select 'Source' at the top left hand of the document. This will enable you to use HTML coding. To revert back from HTML coding, simply click on ‘Source’ again. 20 Pasting from Word If you have text that has already been entered into a Microsoft Word document, you may paste it directly from Word its self and maintain the formatting of the text that you used in the Word document. Simply copy the text from Word, and click on the 'Paste From Word' button towards the middle of the 'Post an Announcement' page. A 'Paste From Word' box will pop up. Select 'Ctrl+V' and paste the text into the box or right click and select ‘Paste.’ Embedding video in an announcement When posting an announcement, you have the option to embed video from YouTube. To do this, find that video you would like to embed on YouTube. Below the video, you will see a button that says <embed>. If you click on this, Youtube will generate a code. Highlight the code and copy it. Then return back to the 'Post an Announcement' box in your virtual classroom. Click on 'Source' at the top left corner of the box. This will enable you to paste source code into your announcement. Paste the code you copied from YouTube. Once you have saved and posted your announcement, simply refresh the page once or twice to view the changes. 21 Assignments Posting an Assignment From the ‘Assignments’ click on the green ‘+ Post Assignment’ button at the top right of the webpage.7 Begin by providing a name for your assignment. Next you will be asked to specify a start date and time for the assignment. The assignment will not appear on the class page until this date/time. You also have the option to set a due date for the assignment. The due date will be visible to your students, and when the due date is past and they have not submitted the assignment it will tell them how many days it is late. If you do not want this to appear, you may select the ‘No due date’ box underneath, and the assignment will remain open indefinitely. Students are able to submit content for an assignment once its due date has passed, however once an assignment is closed they may no longer submit content. On the ‘Assignments’ page assignments without a due date will be sorted alphabetically. When the teacher assigns the due date, the most due ones will come up first. Next, you can submit a description of the assignment. It is helpful to let your students know in what format you would like them to respond. (ie. as a blog, discussion). For example, if you have created a discussion board topic for the assignment you are creating, using HTML you can hyperlink directly to that particular discussion board thread. You can also add learning objectives and tasks. Learning objectives are what the students will learn by completing the assignment, and tasks are the different tasks involved in the assignment. While optional, filling out these fields helps to provide additional information to students. You also have the option of adding links and documents to your assignment. If you select this option, once you submit your assignment you will be taken right away to the ‘Edit your assignment’ page where you can add the links and/or documents. You also have the option of adding links and documents to 7 Please note, only teachers are able to post and edit assignments. Student profiles do not have this functionality. 22 your assignment afterwards by editing your assignment. For more information on adding links and documents and editing your assignment, please see ‘Editing an Assignment’ on page 22. You also have the option to make your assignment visible to educators only. This is a good option if you assignment is not ready to be posted for students. Once you are ready to make it viewable to students you can edit your assignment and remove this selection. Finally, you have the option of receiving an email each time a student marks the assignment complete. Once you have filled out all the required fields, click on the ‘Submit’ button. You will be taken to a new page where you can view your assignment. Import Assignment from class: If you have an assignment from another class in your school that you would like to use in your current class, you may select an assignment from the dropdown menu. All of the assignment information will be imported into your class, however you will have to go into the assignment and modify the due dates. Editing an Assignment To edit an assignment, begin in the ‘Assignments’ page in your classroom. Scroll to the assignment you would like to edit. Next to the assignment, you will see a pencil symbol. Click on the pencil symbol to edit the assignment. In this section, you may add links, documents, and more as well as modify assignment information. Closing an assignment: To close an assignment, go into the edit section of the assignment you would like to close, click on the tab next to 'Close Assignment' and then click 'Edit assignment information.' Once an assignment has been closed, it will no longer appear in the assignment dropdown for students. 23 Adding links: To add a link to your assignment, begin by giving your link a title and then inputting the link address and clicking add. Once you have submitted a link you can remove it by going into the assignment and clicking on the red ‘X’ next to the link. Adding documents: To add a document, begin by giving your document a title. Then click ‘Browse’ and search for the document you would like to upload. Once you have uploaded a document, you can remove it by going into the assignment and clicking the red ‘X’ next to the document. The following document types are allowed: doc, pdf, ppt, xls, txt, gsp, gif and jpg. The maximum file size allowed is 2000 kb (2 MB). Copying an assignment: Copying an assignment allows you to post your assignment to multiple classes at once. To do this, select the class or classes you would like to post your assignment to. To select multiple classes at once, hold down the CTRL button while selecting. Deleting an assignment To delete an assignment, click on the red X next to the assignment you would like to delete. If this assignment has been posted to multiple classrooms and you want to delete it from every class you will have to go into each class separately to delete it. Creating teams: Teams are a great feature to use if your students are working together to complete an assignment. To create a team, select the assignment you would like to create a team for. Begin by inputting a team name, and select the students you would like to be on that team. You can select more than one student by holding the CTRL key and then clicking on their name. To view the team you just created, or to create 24 another team, simply click on the assignment page again and select the assignment you created the team for, and you should see it below under ‘Teams.’ Submissions Under the submissions section, you will see all the students who have submitted an assignment. To view submissions, click on the student’s name or click ‘View All Submissions’ and you will see all the documents they have submitted. To read and mark a submission, click on the submission name, and a marking box will appear below. In this box you may input a mark for the student’s submission, as well as comments. You may also check the box next to ‘Email results to student on save?’ If this box is ticked the marks and comments will be emailed to that student. You can then continue submitting marks and comments for the rest of the submissions. When you are finished, click ‘Save Marks and Comments.’ Once you have saved your marks and submissions, a green checkmark will appear next to all the submissions your have marked on the submissions page. Once all students have completed the assignment, you can visit the ‘Edit Assignment’ page to close it. Blogs Posting a Blog To post a blog, begin on the ‘blog’ page in your classroom and click on ‘+ post a blog.’ Begin by providing a subject and/or title for your blog. Next, select the entry type of your blog (text, photo or audio post.) Text posts consist of text, photo posts allow you to upload photos (JPG, PNG, GIF) and audio posts allow you to upload podcasts (Mp3). You can also add text by entering it into the text box. You have the option of making text bold, italicizing it, creating a link, inserting an image, and inserting a quote. When adding an image to a text post, the maximum image size is 250x250 pixels or 150 kb. For a photo post the maximum image size is 500x500 maximum or 300 kb. You then have the option of choosing the language of your blog post. 25 Finally, you can make your blog posts more specific. You can choose from a list of topics, a list of countries, a book you have linked to your TIG profile, or something in the news. You also have the option to make your blog post visible to only teachers, teachers and the class, or the class and TIGblogs, where it will be visible on the public TIGblogs section (http://www.tigblogs.org). If students are writing a blog post for an assignment, they have the option of clicking on a drop down menu and seeing all the assignments that are due, and their due dates. They may select the appropriate assignment from the drop down menu. Please remind your students that if they do not select the appropriate assignment then the blog will not be submitted for that assignment. When the students have filled out all the required fields, they may then click ‘Post’. Editing/deleting a blog post Teachers have the ability to edit or delete all blog posts, while students may edit/delete their own blog posts but not those of other students. To edit a blog post, from the ‘Blogs’ page click on the title of the blog you would like to edit, then click on ‘Edit Post.’ In this section you may modify the blog post. To delete a blog post, click on the name of the blog post you would like to delete, then click on ‘Delete post.’ Posting Comments Students and teachers may comment on blog posts. To comment on a blog post, click on the name of the blog post you would like to comment on and click ‘Post Comment.’ Teachers may delete their own comments, as well as those of students. Students may only delete their own comments and not those of other students. Bookmarks Bookmarks are links to websites/resources you feel are relevant to your class, which you can post on your virtual classroom for your students to see. 26 Posting a bookmark To post a bookmark, from the ‘Bookmarks’ page, click on ‘+ Post a bookmark’.8 Fill in the name and the URL of the bookmark, and provide a brief description. This description will be available for your students to see. If you have created folders, you also have the option of moving the bookmark into a folder. For more information about folders, see below. Creating a folder Folders are a great way to organize bookmarks in your online classroom. To create a folder, from the bookmarks page click on ‘+ add folder’ and input a title for your folder. You have the option of making 8 Please note, default settings enable only teachers to add/edit files and bookmarks, however if you would like your students to be able to add and edit these as well, under ‘Settings’ tick ‘Allow students to create and edit bookmarks in the class.’ 27 the folder viewable only by teachers and assistants. To edit or delete a folder, click on edit or delete beside the folder. Discussions The discussion boards are a great place for students to engage in meaningful asynchronous dialogue with their peers. Starting a new thread9 Begin by clicking on ‘Discussions’ and then clicking on 'New Thread'. You can insert links, images, quotes as well as bolding and italicizing text. Adding a poll You have the option of adding a poll to your post. To do this, you must select ‘Add a poll to this post.’ You will have the option to create up to ten choices for the poll, however there you are allowed only one answer for each poll. Replying to a thread To reply to a thread, click on the thread you would like to reply to, and then click on 'Reply' at the top right corner of the post. This will bring you to a page where you can include a response to the thread. You also have the option of previewing the thread before you post it, and then post when satisfied. Editing/deleting content Teachers and assistants have the ability to edit/delete discussion threads. To do this, click on the thread you would like to edit and/or delete. At the bottom right, just below the thread, you will see edit and delete in red. Editing will allow you to edit the content of the post, and deleting will delete the post and all associated replies. 9 By default both teachers and students can start new discussion threads, however if you would like to enable it so that only teachers may start discussion threads, under ‘Settings’ tick the box next to ‘Only allow teachers to create new threads.’ This will limit students to only replying to existing threads. 28 Gallery The gallery is a space for your students to post artwork and images Posting to the Gallery To post electronic images to the gallery, begin in the ‘Gallery’ section of your classroom. Start by choosing a title for your image and select its medium (collage, animation, mixed media, etc). You may then select a maximum of three categories that the artwork relates to. To select more than one category, hold down the CTRL key while making your selections. Then select a language for the artwork or image. To upload the image or artwork, click ‘Browse’ and choose the artwork you would like to upload. Include a short description of the artwork and choose a country to which the artwork is related. Then select a visibility option for the artwork. Students may select to have it viewable to their class only, their teacher only, or their class and TIG. By making it viewable to their class and TIG, students are choosing to allow TIG to feature their artwork on the TIG Global Issues page. (http://www.tigweb.org/understand/issues/). 29 Writing Writing is a place for students to submit various writing pieces such as poems, short stories, essays and articles. It is a space for more formal writing. Their writing pieces may be submitted for an assignment. Posting Writing Submissions In the ‘Writing’ section of your classroom click ‘+ post writing.’ To begin, input a title for your writing, followed by the actual body of the piece of the writing and the language in which the writing is to be posted. You may also make your writing entry more specific by indicating the type of entry, countries the writing may relate to and specific topics that dealt with in the piece. When students post a piece of writing they can choose the visibility of the piece. They can choose from Class Only, Teacher Only or Class and Panorama. If they select ‘Class and Panorama’ their writing will be considered for publication in TIG’s Panorama Zine (www.tigweb.org/express/panorama). When students are finished, they may click on ‘Submit Article Now’ or if they would like to save it and submit it later, they may click on ‘Save and complete later.’ Editing/Deleting Writing Teachers and assistants have the option of editing/deleting student writing submissions, while students may edit and delete their own submissions, but not those of other students. To do this, click on the pencil symbol next to the writing you would like to edit. To delete the submission, click on the red X next to the writing you would like to delete. 30 Maps The mapping feature allows your students to create points on a map, allowing them to explore various points of interest around the globe. Creating a map To create a map, under ‘Maps’ click on '+ Create map.’ Begin by inputting a title for your map. When you create a map, you have the option to allow the entire class to see and/or add to the map, or make it viewable only to other teachers. Students also have the same option. When you are finished, click on ‘Create map.’ The map you have just created will be added to the list of class maps. 31 Adding a point to a map Step 1) Select the map you would like to add the point too and input an address, city/country, zipcode10 or longitude/latitude. Step 2) If you are adding a specific location, it is helpful to add a description of that location. Once you are finished, click add to map! Map Features Choose a map type: Choose Road (standard map), Aerial (satellite photo), or Bird's eye11 (detailed photo) view View the map in 3D: By default, maps appear in 2D. Click the 3D button to view the map in 3D. When you are in 3D mode, to navigate the map you can do the following: 10 11 This is for Australia, Canada, New Zealand and the United States only. Please note that Bird’s eye is currently only available to view certain major cities. 32 Pan: Click one of the four directional arrows in the compass, click and drag the map, or use the arrow keys. You can also move the cursor to the edge of the map, and then click and hold the left mouse button and move your mouse when the cursor changes to a horizontal double-arrow . Pivot: Click the ring of the compass, and then drag the ring in any direction, or hold down CTRL and drag the map, or press the left or right arrow keys. Rotate: Click the rotate clockwise button or the rotate counter-clockwise button down SHIFT and drag the map, or press the left or right arrow keys. Tilt: Click the tilt up button or the tilt down button or press the up or down arrow keys. , or hold , or hold down CTRL and drag the map, Change pitch: Hold down SHIFT and drag the map, or press the up or down arrow keys. Change altitude: Click the Increase altitude button or the Decrease altitude button PAGE UP or PAGE DOWN, or rotate the mouse wheel. Zoom: Click the zoom in button or the zoom out button the PLUS SIGN (+) or the MINUS SIGN (-). , press , rotate the mouse wheel, or press Labels: To remove labels from your map, click on the ‘Labels’ button. By default, labels automatically appear on the map. Videos If you have a Youtube account (http://www.youtube.com), you can import all of the videos from your Youtube account into your TIGed classroom. To do this, click on ‘Videos’ and click ‘Edit Settings.’ Input the username of your Youtube account and click ‘Submit.’ All of the videos in your Youtube account will be imported. To remove a video, click on ‘Remove’ located below the video.12 12 Only teachers are able to remove and post videos. 33 Premium Features Class Files Class files provide a secure space for teachers and students to exchange and store files. Creating a folder Folders are a great way to organize files that have been uploaded. To create a folder, in the ‘Files’ section of your classroom click on ‘+add folder’ and input a title for your folder. You have the option of making your folder viewable only by teachers and assistants. When you are finished, click on ‘Create folder.’ Whenever you or your students upload or edit a file, you will both have the option of moving it into this folder. To create multiple folders, simply return to the ‘Files’ page.13 13 Only teachers are able to create folders. Students may add files to the folders. 34 Adding a file To add a file, click on the Add File’ button. Begin by adding a name for the file. Upload the file by clicking on ‘Browse’ and selecting the file you wish to upload. The file size must be no bigger than 2 MB. You also have the option of submitting a brief description of the file (max 25 words). You must then select the visibility of the assignment. You may choose ‘All class members’ or ‘Teacher only.’ Also, if a folder(s) have been previously created, you may choose to place your file into a particular folder by selecting the folder you would like to use from the dropdown menu next to ‘Put in Folder.’ If you have not created any folders this option will not appear. Editing/deleting a file Teachers and assistants have the option of editing/deleting files and folders. To edit a file, click on the pencil symbol next to the file/folder you would like to edit. To delete a file/folder, click on the red x. Video Chat Video chat supports up to 4 webcams and 100 text chat participants at one time, and is a great way for your students to connect online with each other or with other students across the globe. To begin, a teacher or assistant must log in and open the chat. To open a chat room, click on ‘Class chat’ under ‘Your Classroom,’ then click on ‘+ Open room.’ Students may then log into the video chat. Only teachers or assistants may open the chat room, however once it is open students may start chats on their own until the room has been closed by a teacher. 35 In the video chat room, under ‘Text chat’ you will see everything that is being written in the chat room. On the right side of the page under ‘Users in room’ you will see everyone who is currently logged into the chat room. To view their TIG profile, click on ‘View profile.’ To report a user who is using the chat room, click on ‘Report user.’ If you would like to send a direct message to one person viewable only by them, click on that person’s name under ‘Users in room.’ Under the text box ‘Chatting to everyone’ will change to ‘Chatting to (name here).’ Once you type your message in the text box, you will see your message appear in the ‘text chat’ box as a whisper. To start sending messages to everyone again, click ‘Stop whisper.’ Settings In the settings section of your classroom, you may modify all settings in your classroom, with the exception of your classroom's website address. Basics In this section, you may modify all of the basic settings of your classroom, including the description of the class. You may also add collaboration details should you wish to create a collaboration with another classroom. If you add collaboration details, they will appear in class search results in the TIGed Community Search. Registration In this section, you may modify how students, teachers, guests and assistants can register for your class. For more information on student managed and teacher managed registration, see page 15. Features Here you may modify the various sections which will appear in your classroom. If you choose to remove a section, existing content in that section will not be deleted, only hidden, and can still be accessed by re-enabling the feature. 36 Collaborations Collaborations are a fantastic way to allow your students to connect and partner with other students.14 To create a collaboration, follow the steps below: Creating a collaboration 1) Find a collaborator: To find a collaborator, you may post your own collaboration details so that anyone who searches you will see your collaboration details and may potentially contact you. For more information about posting collaboration details, see page 3. It is also recommended that you reach out to others on TIGed who you would be interested in collaborating with. Using the TIGed community search, discover potential collaborations. It is better to have broader search criteria, however if you would like to narrow your search to classrooms who have posted collaboration details, tick the box that says ‘Show only Educators with collaboration details’; when you search, your results will be limited to those with collaboration details To contact a potential collaborator, click on their profile and contact them through TIG Messenger The best way to find a collaborator is to post your own collaboration details, in addition to searching out a potential collaborator! You do not have to limit your collaboration potential to those currently using TIGed. TIGed also welcomes and encourages collaborations with those outside of TIGed. 14 If you are not interested in being involved in a collaboration at the moment, you may disable this feature by clicking on ‘Settings’ under your classroom and ticking the box next to ‘Remove the Collaborating In left menu.’ To enable it, simply remove the tick from the box. 37 2) Once you have found a collaborator, you can create a collaboration: To do this, simply follow these steps: 1) Select an initial class for collaboration: Select the class in your school that you will using as the starting point for the collaboration By doing this, your class list will be copied, and you will have the option to import content from your classroom into the collaboration classroom. 2) Input the name of the collaboration and the description 3) Create a collaboration web address. This will consist of http://collab.tiged.org/yourcollaborationnamehere. Please note that this web address CANNOT be changed later. 4) Privacy settings: Create privacy settings for this collaboration o Public: The classroom and its content will be viewable by anyone. Only student profile information will be hidden o Private: The classroom will only be accessible to teachers, teaching assistants, students, and guests of the classroom. Create a registration code: This is the registration code for other teachers to register their class with this collaboration. In order for other classes to join this collaboration with must provide them with this code. 5) Configure the appearance settings 6) Import class content: This option allows you to import bookmarks and assignments from your classroom. Inviting others to your collaboration To invite others to your collaboration you will need the registration link and the code you created when you first created the collaboration classroom. To find these, in your collaboration classroom, under 38 settings, scroll down and under ‘Registration’ you will see the link and the code. When a classroom registers they will have the option of importing all of their students at once, as well as their assignments and bookmarks. SUPPORT TIGed offers a support page where you can access information you need to make the best of what TIG has to offer. If you cannot find what you are looking for, simply email us at [email protected] Virtual Office Hours Virtual office hours are live chats with a TIGed representative, where you can pose any questions/queries you may have about the program. Virtual office hours vary from week to week, however they are always posted under the Support page. They are conducted using Elluminate Live (http://www.elluminate.com) Live web conferencing. Please visit (http://www.elluminate.com/Support/?id=62) to configure your setup. To learn how to use Elluminate Live, check out these helpful participant tutorials and reference guides (http://www.elluminate.com/Services/Training/?id=70). Video Tutorials Video tutorials are online videos on various subjects. If there is a topic that you would like information on that you do not see here, feel free to us at [email protected]. TIGed Lounge The TIGed Lounge (http://pd.tiged.org/tigedlounge) is an online space for members of the TIGed community to network, discuss teaching experiences and strategies, share resources related to collaborative learning and global education, and get a feel for the TIGed Virtual Classroom platform. 39 APPENDICES Appendix 1: McREL Compendium15 A Compendium of Standards and Benchmarks for K-12 Education, the “Compendium” is an online database of standards from 174 state, national, and international documents that address K–12 standards-based education. The database comprises the following subject areas: Arts (Art Connections, Dance, Music, Theatre, Visual Arts) Behavioral Studies Career Education (Agricultural, Arts and Communication, Business, Engineering Education, Family/Consumer Sciences, Health Education) Civics Economics Foreign Language Geography Health History (Grades K-4 History, Historical Understanding, United States History, World History) Language Arts Life Skills (Life Work, Self-Regulation, Thinking and Reasoning, Working with Others) Mathematics Physical Education Science Technology Across these subject areas, the Compendium contains a total of 373 subject matter standards.16 The standards organize over 5,100 benchmarks17 that describe the information and skills that K–12 students are expected to master at grade level intervals, as reflected in the documents that were synthesized for the database. The database is also organized by topics18 – some 1,300 of them – which provide teachers and other users a way to access the benchmarks easily, using familiar subject-area terms. Each benchmark is “unpacked”; that is, the constituent knowledge and skills that students should master in order to meet the benchmark are also provided. There are over 23,000 of these knowledge/skill statements in the database. Because academic vocabulary knowledge is critical, especially for nonEnglish speakers, the benchmarks are associated with vocabulary terms and phrases to ensure students are building appropriate academic background knowledge as they acquire new words. Over 12,500 vocabulary terms and phrases are associated with Compendium benchmarks. Finally, high-quality assessment items from the Trends in Mathematics and Science Study (TIMSS) as well as the National Assessment of Educational Progress (NAEP), complete with data on student performance, have been aligned to more than 150 specific knowledge/skill statements in K–8 mathematics and language arts. 15 The information below has been adapted from information provided by McREL. To learn more and to access the compendium, please visit www.mcrel.org/standards-benchmarks/. 16 A standard is an organizing idea, for example, “The student understands the structure and function of cells and organisms.” A benchmark is a grade-band appropriate description of content. For example, at grades 6–8, an appropriate benchmark for the standard on cells is: “The student knows the levels of organization in living systems, including cells, tissues, organs, organ systems, whole organisms, ecosystems, and the complementary nature of structure and function at each level.” 18 A topic is a means of providing content organization below the level of a standard. For the standard on cells, topics include “life cycles,” “regulation and behavior,” and “structure and function of cells.” 17 40 Appendix 2: Framework for 21st Century Learning19 Developed by the Partnership for 21st Century Skills, the Framework for 21st Century Learning presents a holistic view of 21st century teaching and learning that combines a discrete focus on 21st century student outcomes (a blending of specific skills, content knowledge, expertise and literacies) with innovative support systems to help students master the multi-dimensional abilities required of them in the 21st century. The key elements of 21st century learning are displayed in the graphic below, which represents both 21st century skills student outcomes (the arches of the rainbow) and 21st century skills support systems (the pools at the bottom). While the graphic represents each element distinctly for descriptive purposes, all components are fully interconnected in the process of 21st century teaching and learning and are critical to ensuring 21st century readiness for every student. Twenty-first century standards, assessments, curriculum, instruction, professional development and learning environments must be aligned to produce a support system that produces 21st century outcomes for today’s students. 19 The information contained in this appendix was compiled from content from The Partnership for 21st Century Skills website (www.p21.org). To download a brief overview of the Framework, please visit http://www.p21.org/documents/P21_Framework.pdf; to download the full P21 Framework definitions, please visit http://www.p21.org/documents/P21_Framework_Definitions.pdf. 41 Appendix 3: Creative Commons Check out the labels below from OER Commons (http://www.oercommons.org) for information about the different levels of licensing. Remix and Share Your remixing, redistributing, or making derivatives works comes with some restrictions, including how it is shared. Includes Creative Commons Attribution Share Alike (CC BY-SA), Creative Commons Attribution NonCommercial Share Alike (CC BYNC-SA), Creative Commons Attribution NonCommercial (CC BY-NC), GNU Free Documentation License (GFDL), WGBH Teachers' Domain remix. Share Only Your redistributing comes with some restrictions. Do not remix or make derivative works. Includes Creative Commons No Derivatives (CC ND), WGBH Teachers' Domain share. No Strings Attached No restrictions on your remixing, redistributing, or making derivative works. Give credit to the author, as required. Includes Public Domain, Creative Commons Attribution (CC BY), Creative Commons Public Domain, and any item that explicitly says no restrictions. Read the Fine Print Everything else. All Rights Reserved. US-based educators have certain permissions under Fair Use and the TEACH Act. Includes educational and personal uses of copyrighted materials, custom licenses and terms, permission to print only, unknown restrictions, and any other redistribution restrictions of the DMCA and of your own country. 42 Appendix 4: Collaboration Ideas Collaborations are opportunities for students to connect with peers with different perspectives and realities. They make global issues ‘real’ through a personal connection and allow the students to have an authentic audience for their work. Here are some collaboration ideas: Web publishing (podcasts, creative writing, video, art) Interpersonal/information exchange: o Debate o Dialogue on global issues o Sharing cultures/traditions o Sharing local history Performances Joint problem solving Joint data collection and analysis Examination/analysis of public policy Sharing of research Joint service projects Older students teaching younger Foreign language practice Webquests/treasure hunts Get inspired: Check out TIGed’s Best Practices Guide (http://www.tigweb.org/tiged/bp/) to read about successful collaborations Read testimonials by other educators on how they have used TIGed to forge collaborations (http://www.tigweb.org/connections/stories/index.html) Below are fifteen tips for creating a collaboration on TIGed: 1) 2) 3) 4) 5) 6) 7) 8) 9) Align your project with your curriculum As a first experience, considering joining an established project Look at examples of other projects and related reflections Start planning early (3 – 4 months is recommended) Identify specific goals, tasks and outcomes Evaluate available resources Keep the scope small, manageable and focused Plan to involve three or more other classrooms Have clear timeframe (project calendar) and expectations 43 10) Understand legal limitations (ie. Student information online) 11) Have acceptable use forms signed by parent or legal guardian 12) Sort out with your partner(s) a. Number of students in respective classes b. School holiday schedules c. Timezones and length of availability 13) Establish more than one way to contact partner(s) 14) Don’t give up! It’s worth it!! 15) Allow time to reflect at the end of the project 44