1
Toltec™ Connector - User Manual (v2.0)
Toltec™ Connector
User Manual
Document Version 2.0
-1-
Toltec™ Connector - User Manual (v2.0)
LICENSE AGREEMENT
Please read this entire agreement. If you do not agree to the terms of this agreement or intend to
use the software in a country, territory, state or province where the law conflicts with or weakens
any part of the agreement, promptly return your distribution materials to the place you obtained
them for a full refund or delete your trial package.
RADLEY NETWORK TECHNOLOGIES CC END-USER LICENSE AGREEMENT:
This End-User License Agreement ("EULA") is a legal agreement between you ("Customer" or
"Sub Licensee") and Radley Network Technologies CC ("Licensee") for the Toltec Connector
product(s) you are installing which include(s) computer software, "on line" or electronic
documentation, and may include associated media and printed materials ("SOFTWARE
PRODUCT" or "SOFTWARE").
By installing, copying, or otherwise using the SOFTWARE PRODUCT, you agree to be bound by
the terms of this EULA. If you do not agree to the terms of this EULA, promptly return the entire
unused SOFTWARE PRODUCT, including all subscription UPDATES that you may have received
as part of the SOFTWARE PRODUCT, to the place from which you obtained it for a full refund
and/or delete all files related to your trial demonstration version of the SOFTWARE PRODUCT.
This agreement is governed by the laws of the Republic of South Africa.
RADLEY NETWORK TECHNOLOGIES CC SOFTWARE LICENSE:
This SOFTWARE PRODUCT is protected by copyright laws and international copyright treaties,
as well as other intellectual property laws and treaties. The SOFTWARE PRODUCT is licensed,
not sold. The SOFTWARE PRODUCT consists of product documentation, a Toltec Connector
application and one or more license keys collectively referred to herein as "SOFTWARE". All
rights not expressly granted are reserved by Radley Network Technologies CC.
You may not reverse-engineer, de-compile, or disassemble the SOFTWARE PRODUCT, except
and only to the extent that such activity is expressly permitted by applicable law, notwithstanding
this limitation.
GRANT OF LICENSE:
Radley Network Technologies CC grants to you as an individual, a personal, nonexclusive,nontransferable license to install and execute a single instance of the SOFTWARE on a single
computer or on multiple computers provided that there is no chance of concurrently running two or
more distinct instances of the SOFTWARE simultaneously for the purposes of evaluating the
performance of the SOFTWARE PRODUCT for a period of no more than 30 days. If after that
time continued use of the SOFTWARE PRODUCT is desired then the SOFTWARE PRODUCT
must be purchased from Radley Network Technologies CC. If you are an entity Radley Network
Technologies CC grants you the right to appoint an individual within your organization to use and
administer the SOFTWARE subject to the same restrictions enforced on individual users.
-2-
Toltec™ Connector - User Manual (v2.0)
SUPPORT:
Radley Network Technologies CC or its authorized agent will provide e-mail support for the
SOFTWARE during the first 60 days after the purchase of the SOFTWARE. Support includes
configuration assistance, how-to, problem determinations, reasonable problem resolutions and
automatic provisioning of software program temporary fixes.
Additional support and maintenance packages can be purchased from Radley Network
Technologies CC.
DISCLAIMER OF WARRANTY:
NO WARRANTIES. THIS SOFTWARE IS PROVIDED BY RADLEY NETWORK
TECHNOLOGIES CC, ITS AGENTS OR SUPPLIERS ``AS IS'' AND ANY EXPRESSED OR
IMPLIED WARRANTIES, INCLUDING, BUT NOT LIMITED TO, THE IMPLIED WARRANTIES
OF MERCHANTABILITY AND FITNESS FOR A PARTICULAR PURPOSE ARE DISCLAIMED.
IN NO EVENT SHALL THE RADLEY NETWORK TECHNOLOGIES CC, ITS AGENTS OR
SUPPLIERS BE LIABLE FOR ANY DIRECT, INDIRECT, INCIDENTAL, SPECIAL, EXEMPLARY,
OR CONSEQUENTIAL DAMAGES (INCLUDING, BUT NOT LIMITED TO, PROCUREMENT OF
SUBSTITUTE GOODS OR SERVICES; LOSS OF USE, DATA, OR PROFITS; OR BUSINESS
INTERRUPTION) HOWEVER CAUSED AND ON ANY THEORY OF LIABILITY, WHETHER IN
CONTRACT, STRICT LIABILITY, OR TORT (INCLUDING NEGLIGENCE OR OTHERWISE)
ARISING IN ANY WAY OUT OF THE USE OF THIS SOFTWARE, EVEN IF ADVISED OF THE
POSSIBILITY OF SUCH DAMAGE.
No oral or written information given by Radley Network Technologies CC, it agents or suppliers
shall, in any way, create a warranty.
CUSTOMER REMEDIES.
RADLEY NETWORK TECHNOLOGIES CC ENTIRE LIABILITY AND YOUR EXCLUSIVE
REMEDY SHALL NOT EXCEED THE PRICE PAID FOR THE SOFTWARE. NO LIABILITY FOR
CONSEQUENTIAL DAMAGES. TO THE MAXIMUM EXTENT PERMITTED BY APPLICABLE
LAW, IN NO EVENT SHALL RADLEY NETWORK TECHNOLOGIES CC BE LIABLE FOR ANY
DAMAGES WHATSOEVER (INCLUDING, WITHOUT LIMITATION,DAMAGES FOR LOSS OF
BUSINESS PROFITS, BUSINESS INTERRUPTION, LOSS OF BUSINESS INFORMATION, OR
ANY OTHER PECUNIARY LOSS) ARISING OUT OF THE USE OF OR INABILITY TO USE THIS
SOFTWARE PRODUCT, EVEN IF RADLEY NETWORK TECHNOLOGIES CC HAS BEEN
ADVISED OF THE POSSIBILITY OF SUCH DAMAGES.
This product includes software developed by the OpenSSL Project for use in the OpenSSL Toolkit
(http://www.openssl.org/)
This product includes cryptographic software written by Eric Young ([email protected]).
This product includes software written by Tim Hudson ([email protected]).
Portions of this software are Copyright (c) 1993 - 2003, Chad Z. Hower (Kudzu) and the Indy Pit
Crew - http://www.nevrona.com/Indy/
-3-
Toltec™ Connector - User Manual (v2.0)
Table of Contents
1.Welcome............................................................................................................ 5
2.Manual Conventions (2003)............................................................................... 5
3.Requirements..................................................................................................... 6
3.1 System Requirements................................................................................. 6
3.2 IMAP4 Server Requirements....................................................................... 6
4.Setting up the Toltec™ Connector..................................................................... 7
4.1 Activate the Licensing of the Toltec™ Connector....................................... 7
4.2 Mapping a Message Store to an IMAP4 Mail Account................................ 9
Step 1 : Selecting a message store............................................................ 11
Step 2 : Select a Data Format..................................................................... 12
Step 3 : Server and User Information......................................................... 13
Step 4 : Test Connection............................................................................ 14
4.3 Detach a Message Store........................................................................... 15
5.Configuration of Folders................................................................................... 16
5.1 Setting Synchronization Options............................................................... 16
5.2 Sharing Folders......................................................................................... 17
6.Synchronization of Folders Manually................................................................ 20
7.Notes on configuring MS Outlook..................................................................... 21
7.1 Internet E-mail Account............................................................................. 21
7.2 iCalendar Setup........................................................................................ 24
8.Toltec™ Message Store Options..................................................................... 26
9.Notes on Configuring Toltec™ Connector with the Kolab Server ....................27
9.1 Mapping a Message Store and Sharing Folders....................................... 27
9.2 Internet E-mail Account............................................................................. 27
Copyright © 2004, 2005 by Radley Network Technologies CC. All rights reserved. Microsoft,
Windows and Microsoft Outlook are registered trademarks of Microsoft Corporation. Other
products and company names mentioned herein may be the trademarks of their respective
owners.
-4-
Toltec™ Connector - User Manual (v2.0)
1.Welcome
Welcome to the world of the Toltec™ Connector. We trust that you will enjoy the
simplicity of the product while achieving great results. The manual will assist to
configure the Toltec™ Connector.
2.Manual Conventions (2003)
To utilize this manual for Microsoft Outlook 2003 Message Store and Folder Options,
you need to switch to the Folder List View, in the bottom left corner of the navigation
pane in Microsoft Outlook 2003, as shown below:
The manual conventions explained below will assist you while working trough the
Toltec™ Connector manual.
i)
Notes:This icon will indicate valuable notes which should be taken into
account.
ii)
Tips:Tips will guide you through the easy to remember pointers.
iii)
Troubleshooting:This icon will indicate areas where difficulty could arise and where
you should refer to the Troubleshooting Section at the end of the
Toltec™ Connector Manual.
iv)
Warning:Attend to these points with great care, otherwise vast amounts of
time will be spent in the Troubleshooting Section.
v)
Kolab:This refers to Kolab Server specific sections.
-5-
Toltec™ Connector - User Manual (v2.0)
3.Requirements
3.1 System Requirements
The system requirements for the Toltec™ Connector are as follows:Microsoft Windows 98SE/NT4SP6/ME/2000/XP
Microsoft Outlook 2000/XP/2003
•
•
3.2 IMAP4 Server Requirements
The IMAP4 server must support the following commands and extensions:NAMESPACE (different names for the inbox mailboxes and shared mailboxes),
ACL,
UIDPLUS,
STARTTSL,
AUTH=PLAIN,
AUTH=CRAM-MD5,
ANNOTATEMORE.
No quotas should be set on IMAP4 accounts used by the Toltec Connector.
For a groupware solution we used the KOLAB server project for testing. This
server incorporates the Cyrus-IMAP server. For more details goto
www.kolab.org.
To use Cyrus-IMAP4 on it own you need to do the following:
•
User versions 2.2.x or newer. Older versions (2.1.x) will not work.
•
Apply ANNOTATEMORE patch to the Cyrus-IMAP4 source that allows for
support of custom vendor annotation. The patch can be obtained from our
web site www.toltec.co.za.
•
Compile Cyrus-IMAP with Cyrus SASL with support for PLAIN and/or CRAMMD5 authentication.
•
Disable altnamespace in the imapd.conf.
-6-
Toltec™ Connector - User Manual (v2.0)
4.Setting up the Toltec™ Connector
4.1 Activate the Licensing of the Toltec™ Connector
After installing the software package you need to
active the license key.
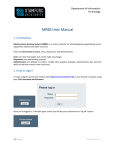
Path: Outlook | Help | About Toltec Connector ...
To activate the licensing of the Toltec™
Connector, start up Microsoft Outlook click on the
“Help” button on the toolbar. Scroll down and
select the “About Toltec Connector” option
(Illustration 1).
Illustration 1
You will now see that the
Registration Information is blank.
The product has not been
registered as yet (Illustration 2).
Click on the “Load a License
Key” button to load.
Illustration 2
The “key” that is required for the loading of the
licensing will be e-mailed to the registered user.
The key must be save to disk.
Browse to where the key is saved and click on
the “Open” button to continue (Illustration 3).
Illustration 3
-7-
Toltec™ Connector - User Manual (v2.0)
In the Toltec Connector License Key
Window you will be able to view your
unique License Key details (Illustration
4).
Click on the “Yes” button to install this
license key.
Illustration 4
You will now be able to
view the Registered
information and choose
your preferred language.
Click on the “OK” to finish
(Illustration 5).
TIPS:
When installing the
Toltec™ Connector on
a number of client
machines, it would be
advisable to use a
removable disk, as this
would be easier.
Illustration 5
-8-
Toltec™ Connector - User Manual (v2.0)
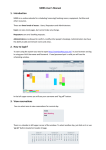
4.2 Mapping a Message Store to an IMAP4 Mail Account
Path: Outlook | Tools | Options
In order to map a
Message Store to an
IMAP4 mail account, you
need to open Microsoft
Outlook, and click on the
Tools button on the
Outlook Menu bar. Scroll
down to the Options
menu item and select
(Illustration 6).
Illustration 6
Next, click on the Toltec™
Connector Tab.
Click on the “New” button to
activate the Mapping Wizard,
which enables you to map a
message store to an IMAP4 mail
box (Illustration 7).
Illustration 7
-9-
Toltec™ Connector - User Manual (v2.0)
This Wizard will help you step by step to set up the mapping of a message store
to an IMAP4 mail account. Upon entering the Wizard, press the “Next” button to
continue (Illustration 8).
WARNING:
It is advisable that before mapping an existing private message store,
make a BACKUP of the message store!
Illustration 8
- 10 -
Toltec™ Connector - User Manual (v2.0)
Step 1 : Selecting a message store
Illustration 9
This step will enable you to select a personal message store to be mapped to an
IMAP4 server.
The message stores available to be mapped will be listed and a choice can be
made. Should the message stores listed be insufficient, a new message store
can be created. To create a new message store, click on the button “Create a
new personal message store” (Illustration 9).
TIPS:
The list of personal folders which are available to be mapped. It is not
necessary to create a new message store if one in the list can be
selected.
- 11 -
Toltec™ Connector - User Manual (v2.0)
Step 2 : Select a Data Format
Illustration 10
a)
Open Format (Kolab-XML 2.x)
This is the new format used that allows interoperability with other KolabXML clients, for example, KDE Kotact and the Horde Web Client.
b)
Open Format (Kolab-XML 2.x) – Share-Only Server
This is used when mapping to a non-home Kolab Server where you have
more than one Kolab Server setup.
c)
Classic Format (Toltec Connector 1)
This format can be used when sharing of information is done between
Toltec Connectors only.
NOTES:Only use the Kolab-XML format or the Classic Format. Mixing the
two formats on the same account can have unpredictable results.
- 12 -
Toltec™ Connector - User Manual (v2.0)
Step 3 : Server and User Information
Illustration 11
This step will enable you to enter the IMAP4 connection information.
Enter the host name / IP Addresses of the server or a fully qualified domain
name. For our example, we will be using “mail.toltec.tld” as our host name.
You can also use the IP Address of the server, “[email protected]” as our
user name. Click on the “Next” button to continue (Illustration 11).
The following points should be taken into consideration (Illustration 14):i)
Server Information: The IP Address used should be a fully qualified
domain name.
On Kolab this is usually the full e-mail address.
ii)
User name and Password: This must is the user name and password that
will authenticate the user on the IMAP4 server.
For use with Kolab Servers this must be checked.
- 13 -
Toltec™ Connector - User Manual (v2.0)
iii)
By activating this, all communication between the connector and the
server will be encrypted. Some IMAP servers need this before it will
expose some authentication mechanisms.
Step 4 : Test Connection
Illustration 12
This step will test the connection to the IMAP4 server and confirm the user
credentials provided. To continue, click on the “Next” button. The Wizard will
confirm that the mapping had been successful (Illustration 12). Click on the
“Finish” button to complete.
- 14 -
Toltec™ Connector - User Manual (v2.0)
4.3 Detach a Message Store
In order to detach a message
store, follow the path as indicated
below:Path: Outlook | Tools | Options |
Toltec Connector
Click on the “Detach” button to
detach a message store.
Illustration 13
NOTES:
Note that the message store will only be detached and not deleted. The
message store can be reselected, therefore remapped at any time.
WARNING:
If you remove this mapping you will need to either remove the PST file or
delete/recreate the account on the IMAP4 server before mapping again,
else all the entries will be duplicated.
NOTES:
When detaching a message store, all shared folders will be removed from
the PST file.
- 15 -
Toltec™ Connector - User Manual (v2.0)
5.Configuration of Folders
5.1 Setting Synchronization Options
Select Microsoft Outlook. Click on the Calendar
folder (the example that we will be using, as any
of the Outlook folders can be synchronized).
Right click on the Calendar Folder and a menu
will appear. Select the “Properties” menu item
(Illustration 14).
Click on the “Toltec” tab. Tick the “Synchronize
this Folder box”, (no.1 as per the following screen
shot) as no synchronization will take place if this
option is not selected.
Illustration 14
The “Synchronize when” gives you the
following options:2.1) “The folder is selected”
The synchronization will take place
when the chosen folder has been
selected.
2.2) “Outlook is started'
The synchronization will
automatically take place when
Outlook is started.
Illustration 15
2.3) “Manually only”
The synchronization will only take
place when applied manually, as
follows:(continues on the next page)
- 16 -
Toltec™ Connector - User Manual (v2.0)
2.4) “Every ... minutes” :The synchronization will automatically take place every chosen amount of
minutes. This option needs to be specified by the user.
3)
“Synchronize Now” :Refer to 2.3 (“Manually Only” no. 2.3.1).
4)
“Folder Sharing Options” :Please refer to the next section of the Toltec™ Connector Manual, “6.2
Sharing Folders”.
After the required choice has been made, click on the “Apply” button and then on
the “OK” button.
NOTES:
Note that should the “Synchronize this folder” box be unselected
(switched off), no synchronization will take place.
5.2 Sharing Folders
Path: Outlook | Folder (erg.
Calendar) | Properties
Select Microsoft Outlook. Click
on the Calendar folder (the
example that we will be using, as
any of the Outlook folders can be
synchronized) (Illustration 16).
Right click on the Calendar
Folder and a menu will appear.
Select the “Properties” menu
item.
A new window will open up.
Click on the “Toltec” tab.
Illustration 16
- 17 -
Toltec™ Connector - User Manual (v2.0)
Click on the “Folder Sharing
Options” button (no.4).
A new window will be
displayed on your screen
(Illustration 17).
Illustration 17
In order to share folders with another user, a
user must be added. Click on the “Add”
button to continue (Illustration 18).
Illustration 19
The example will be named
“[email protected]”.
Illustration 18
After entering the user name, click on the
“OK” button (Illustration 19).
With Kolab Servers you usually need to use the full e-mail address.
- 18 -
Toltec™ Connector - User Manual (v2.0)
Select (tick) all the permissions that is allowed for the
specified user and click the “Apply” button (Illustration
20).
Upon selecting a user, all the permissions dedicated
to the user can be viewed and modified.
Illustration 20
High Level Permissions:None:The selected user has no access to the folder
and will be removed when you click on the
apply button.
Read Only:The selected user has Read Only access to
the folder and cannot modify any of the items
in that folder.
Read / Write:The selected user has both Read and Write
access to the folder and can see all the items,
modify and delete them.
Custom:-
Illustration 21
The administrator can set selected IMAP ACL
options for the folder. This should only be
done by advanced users.
- 19 -
Toltec™ Connector - User Manual (v2.0)
Should you wish to delete a shared
access of a user, follow this path and click
on the “Delete” button:Path: Outlook | Folder (e.g. Calendar) |
Properties | Toltec | Folder Sharing
Options
The user will now be removed from the
shared list. (Illustration 22).
Illustration 22
6.Synchronization of Folders Manually
Path: Outlook | Folder (e.g. Calendar) | Properties
The manual synchronization of folders can be achieved as follows:1. Select the “Synchronize Now” button in the Folder's Properties OR
2. Click the synchronization button on the Outlook Toolbar, as indicated below
(Illustration 23):-
Illustration 23
- 20 -
Toltec™ Connector - User Manual (v2.0)
7.Notes on configuring MS Outlook
7.1 Internet E-mail Account
NOTES:When creating an Internet E-mail account to send and receive mail, only
use the POP3 and POP3S protocols to retrieve mail. DO NOT use
IMAP4 or IMAP4S.
To add an internet e-mail account, you need to use the Wizard provided by
Microsoft Outlook. To start the Wizard, select the menu “Tools” and select “Email Accounts”.
Step 1: Select “Add a new e-mail account”
Click on the “Add a new
e-mail account” button.
Click on next to continue.
Illustration 24
- 21 -
Toltec™ Connector - User Manual (v2.0)
Step 2: Select “POP3” Server Type
Click on the “POP3” button.
Click on the “Next” button to
continue.
Illustration 25
Step 3: Entering User and Server Information
Illustration 26
- 22 -
Toltec™ Connector - User Manual (v2.0)
1 & 2)
Your display name and e-mail address.
3 & 4)
Incoming and outgoing mail server host names of IP
addresses.
5 & 6)
User name and password of the POP3 account.
Note: You can obtain the information for 3,4,5 and 6 from your system
administrator or your Internet Service Provider.
Click on the “Next” button to continue.
Click on the “Finish” button
to complete the setup of the
Internet E-mail Account.
Illustration 27
- 23 -
Toltec™ Connector - User Manual (v2.0)
7.2 iCalendar Setup
After setting up at least one Internet E-mail Account you need to configure
Microsoft Outlook to send invitations in iCalendar format.
To access the Calendar Options you need to select the menu “Tools”, and then
select “Options”. In the “Preference” tab, select “Calendar Options...”
Illustration 28
- 24 -
Toltec™ Connector - User Manual (v2.0)
Illustration 29
Ensure that the “When sending meeting requests over the Internet, use
iCalendar format” is selected. Click on the OK button when done.
- 25 -
Toltec™ Connector - User Manual (v2.0)
8.Toltec™ Message Store Options
Click on the top folder of the
message store.
Right click on the folder and a menu
will appear. Select the “Properties”
menu item (Illustration 30).
Click on the “Toltec Message Store
Options” tab.
Illustration 30
1) Select this to enable synchronization of
the message store.
2) The server, user information and option
of the IMAP4 account.
3) This button will test the settings of 2.
Use this to diagnose connection
problems to the IMAP4 server.
4) Clicking on the “Synchronize All the
Folders” button will force the
synchronization of all the folders to the
IMAP4 server.
5) If this option is selected all the folders
will be synchronized every time Outlook
is started.
6) This field will indicated the format the
connector is using to store the Outlook
information on the IMAP4 server.
Illustration 31
- 26 -
Toltec™ Connector - User Manual (v2.0)
9.Notes on Configuring Toltec™ Connector with the
Kolab Server
9.1 Mapping a Message Store and Sharing Folders
When mapping a message store or sharing folders on a Kolab server you
need to use the correct UID as the user name. The default UID used by
the Kolab server is the e-mail address of the user.
In some cases the administrator can elect to use and alternative UID. If so
you need to obtain the UID from the Administrator.
9.2 Internet E-mail Account
The default configuration of the Kolab server requires the use of POP3S and SMTPS
for the Internet E-mail Account. This configuration can be changed in the “Services”
page of the Kolab web administration interface.
Should you elect to stay with the default configuration you need to configure
the Internet E-mail Account as follows. To start the Wizard, select the menu
“Tools” and select “E-mail Accounts”
Step 1: Select “Add a new e-mail account”
Click on the “Add a new
e-mail account” button.
Click on next to continue.
Illustration 32
- 27 -
Toltec™ Connector - User Manual (v2.0)
Step 2: Select “POP3” Server Type
Click on the “POP3” button.
Click on the “Next” button to
continue.
Illustration 33
Step 3: Entering User and Server Information
Illustration 34
- 28 -
Toltec™ Connector - User Manual (v2.0)
1 & 2)
Your display name and e-mail address.
3 & 4)
Incoming and outgoing mail server host names of IP
addresses.
5 & 6)
User name and password of the POP3 account.
Note: You can obtain the information for 3,4,5 and 6 from your system
administrator or your Internet Service Provider.
Step 4: Configure security and authentication settings
Click on the “More Settings ...” button.
On the “Outgoing Server” tab
you need to enable to “My
outgoing server (SMTP)
requires authentication”.
Once this is done select “Use
same settings as my incoming
mail server”
Illustration 35
- 29 -
Toltec™ Connector - User Manual (v2.0)
On the “Advanced” tab select
“This server requires an
encrypted connection(SSL)” for
both servers.
Set the POP3 server port to 995
and the SMTP port to 465.
Click on the OK Button.
Click on the “Next” button to continue.
Click on the “Finish” button
to complete the setup of the
Internet E-mail Account.
Illustration 36
- 30 -