1
MON User's Manual
page 1
MON User's Manual
for MON Version 2.0
September, 1995
© 1995 by Robert J. Borrmann
Preliminary Ideas. The main prompt. The current
address. Memory address display modes . page 2.
Some Conventions in MON. Numerical values.
Cursor shape. Entering values. The <Esc>,
<Home>, and <spacebar> keys. Autopause.
Keyboard interrupt. . . . . . . . . . . . . . . . . . . . . . . page 3
MON's Memory Map. . . . . . . . . . . . . . . . . . . . . . . page 4
Letter Commands
A . . . . . . . . . . Assemble (Source File) . . . . . . . . . page 5
A . . . . . . . . . . Assemble (Patch Assemble) . . . . . page 6
. . . . . . . . . . . . Assembler Directives (Pseudo-Ops)
. . . . . . . . . . . . .......ORG, ERROR, LIST . . . . . . . page 7
. . . . . . . . . . . . .......SOURCE, ALIGN . . . . . . . . . page 8
C . . . . . . . . . . Copy . . . . . . . . . . . . . . . . . . . . . . . . . . . page 9
D . . . . . . . . . . Dump or Display . . . . . . . . . . . . . . page 10
E . . . . . . . . . . Edit . . . . . . . . . . . . . . . . . . . . . . . . . . . page 11
F . . . . . . . . . . Fill . . . . . . . . . . . . . . . . . . . . . . . . . . . . page 14
G . . . . . . . . . . GoTo . . . . . . . . . . . . . . . . . . . . . . . . . . page 15
H . . . . . . . . . . Help . . . . . . . . . . . . . . . . . . . . . . . . . . . page 16
J . . . . . . . . . . . Jump High . . . . . . . . . . . . . . . . . . . . page 18
L . . . . . . . . . . Load . . . . . . . . . . . . . . . . . . . . . . . . . . page 19
M . . . . . . . . . Modify . . . . . . . . . . . . . . . . . . . . . . . . page 20
N . . . . . . . . . . Named Regions . . . . . . . . . . . . . . . . page 21
R . . . . . . . . . . Recorder . . . . . . . . . . . . . . . . . . . . . . page 23
S . . . . . . . . . . Search . . . . . . . . . . . . . . . . . . . . . . . . . page 25
T . . . . . . . . . . Trace . . . . . . . . . . . . . . . . . . . . . . . . . . page 26
U . . . . . . . . . . Unassemble . . . . . . . . . . . . . . . . . . . page 27
V . . . . . . . . . . Verify . . . . . . . . . . . . . . . . . . . . . . . . . page 28
W . . . . . . . . . Write . . . . . . . . . . . . . . . . . . . . . . . . . . page 29
Shift-K . . . . Clear the Screen . . . . . . . . . . . . . . . page 35
Shift-L . . . . Set Load Parameter . . . . . . . . . . . . page 35
Shift-M . . . . Set Memory Display Mode . . . . . page 36
Shift-N . . . . Set Autopause . . . . . . . . . . . . . . . . . page 37
Shift-P . . . . . Set "Previous" Bytes . . . . . . . . . . . page 37
Shift-R . . . . Set RANGE . . . . . . . . . . . . . . . . . . . page 38
Shift-T . . . . Set Trace Mode . . . . . . . . . . . . . . . . page 39
Shift-U . . . . Define U-Format . . . . . . . . . . . . . . . page40
Shift-W . . . . Set Wildcard Byte . . . . . . . . . . . . . page 40
Shift-X . . . . Set Exclusion Byte . . . . . . . . . . . . . page 41
Other Commands
= . . . . . . . . . . Set Offset Address . . . . . . . . . . . . .
+ . . . . . . . . . . Set Current Segment . . . . . . . . . . .
n . . . . . . . . . . Set Autopause Value . . . . . . . . . . .
. (period) . . Save Offset . . . . . . . . . . . . . . . . . . . .
<Home> . . . Move to Beginning . . . . . . . . . . . .
<Ins> . . . . . . Define New Region . . . . . . . . . . . .
<End> . . . . . Move to End . . . . . . . . . . . . . . . . . . .
<CrsrDn> . One-Line Dump . . . . . . . . . . . . . . .
<CrsrUp> . Decrease Offset . . . . . . . . . . . . . . . .
<CrsrLeft> Repetitive One-Line Dump . . . . .
<PgUp> . . . Decrease Segment . . . . . . . . . . . . .
<PgDn> . . . Increase Segment . . . . . . . . . . . . . .
<spacebar> Resume After Pause . . . . . . . . . . .
<Fn> . . . . . . User-Defined Macro . . . . . . . . . . .
Shift-<Fn> Define a Macro . . . . . . . . . . . . . . . .
page 41
page 42
page 42
page 42
page 43
page 43
page 43
page 44
page 44
page 44
page 45
page 45
page 45
page 46
page 46
Keycodes Syntax . . . . . . . . . . . . . . . . . . . . . . . page 47
Custom Macros Files . . . . . . . . . . . . . . . . . . page 48
Shifted Letter Commands
U-Format Syntax . . . . . . . . . . . . . . . . . . . . . . . page 49
Shift-A . . . . Set Assembler Options . . . . . . . . .
Shift-B . . . . Set Breakpoints . . . . . . . . . . . . . . . .
Shift-D . . . . Set Dump Options . . . . . . . . . . . . .
Shift-G . . . . Set GoTo Parameters . . . . . . . . . .
Shift-I . . . . . I/O - Memory Toggle . . . . . . . . . .
Shift-J . . . . . Change the Segment Adder . . . .
page 30
page 31
page 32
page 33
page 34
page 34
Communication with Other Programs
. . . . . . . . . . . . . . . . . . . . . . . . . . . . . . . . . . . . . . . . . . . . . page 50
Appendix - Assembler Syntax . . . . . . page A-1
MON User's Manual
page 2
Preliminary Ideas
1. MON is a real-mode keyboard-command-driven program.
2. At the completion of any command, MON signals that it is awaiting your next command by
writing its main prompt on a new line at the left side of the screen.
3. The main prompt always includes the prompt symbol # or @
( # when the Recorder is off, @ when the Recorder is on).
4. The main prompt usually includes MON's current address; the exceptions are when the
message "Autopause" or "Interrupt" appears instead of the address if the command has not
yet terminated. Six examples of main prompts are:
1E51:0200 #
Autopause @
I/O :0250 #
1E710 #
REL0:0200 @
Interrupt #
If the current address does not appear, but you want to know its value, press <Enter>. The
current address will then appear in a new prompt on the next line.
5. The four possible formats for MON's current address, or any system address, are:
Absolute
Segmented
Memory Address
Example:
Absolute
Non-Segmented
Memory Address
1E51:0200
1E710
Segment = 1E51
Offset = 0200
MON-Relative
Address in the I/O
Segmented
Space (Input &
Memory Address Output Ports)
REL0:0200
I/O :0250
Segment = REL0 Port Number =
Offset = 0200
0250
6. You can switch among the three memory address display modes with the Shift-M command.
You can switch between memory and I/O spaces with the Shift-I or the + (plus) command.
7. The principal ways of changing the value of the current address are the following commands:
Command
Command
=
Change Offset
+
Change Segment
N
Change to a Known Region
J
Change to a Higher Location
<Home>
Change Offset to Beginning
<End>
<PgUp>
Change Segment
<PgDn>
Change Offset to End
Change Segment
<
Decrease Offset by 1
>
Increase Offset by 1
↑
Decrease Offset by 10H
↓
Increase Offset by 10H
MON's Current Address is important because many commands depend on the
current address to determine what memory area they will work on or work from.
This is especially true for the edit command (E) and the various memory display
commands (D and U).
Therefore, you may have to change the current address before you initiate the
command you want.
MON User's Manual
page 3
Some Conventions in MON
1) Numerical Values. Generally, you should enter numerical values (and MON will display
them) in hexadecimal. The exceptions are (see also #3 below):
(a) In the editor - bytes are entered and displayed as characters.
(b) In the assembler - numbers you enter are decimal by default.
(c) In disk I/O and region names - you enter names as characters.
2) Cursor Shape. The shape of the blinking cursor denotes the expected input form:
Single-Underline Cursor
Hexadecimal input is expected.
Large Block Cursor
Character input is expected (insert mode).
Small Overblock Cursor
Character input is expected (overstrike mode).
(In the editor, pressing the <Ins> keys toggles between the last two modes.)
3) Hex or Character Input? You can usually enter byte values in either form:
Press Alt-A to get the Large Block Cursor Press Alt-H to get the Single-Underline
and then enter bytes as characters (e.g.,
Cursor, and then enter bytes as hex values
press A to enter 41 hex).
(e.g., press 4 then 1 to enter 41 hex).
4) The <Esc> key in general allows you to abort any command in progress, or to back out of any
command that you got into by mistake. Pressing <Esc> once or twice should always get you
back to MON's main prompt.
5) Entering 16-Bit Values. When MON expects you to enter a 4-digit hexadecimal address, it
shows its single underline cursor at the beginning of a field of 4 dots. Simply key in the 4 digits
(e.g., 02AC) - do not press <Enter>. [However, if you omit the initial zero and type 2AC, then you must
press <Enter> to complete the field.]
Often the <Home> key selects a default or standard value, if one exists. Whenever you
are not sure of what value to type in, try the <Home> key!
Other ways of inputting a 16-bit value are the <spacebar> (see #6 below), Vn (see
Communication With Other Programs - page 50), or (for a segment) Rn (see page 42).
6) The <spacebar> sometimes acts as an "OK, go ahead" key:
a) From a main prompt, pressing the <spacebar> will resume a previously interrupted
command or operation.
b) When MON is waiting for you to input a 2-digit or 4-digit hex value, it sometimes
"suggests" an expected or last-used value to you. (The suggested value appears at
the cursor position.). Press the <spacebar> to accept the suggested value shown.
7) Autopause. Before beginning any MON operation that will produce a lot of screen output,
you can set an AUTOPAUSE parameter (this is a number, n, from 1 to 99). Thereafter, until you
change this number, MON will pause after every "n" lines of screen output. When MON pauses,
the message "Autopause" will appear in place of the current address in the main prompt.
To resume an autopaused operation, simply press the <spacebar>.
To disable AUTOPAUSE, set the AUTOPAUSE parameter to zero.
There are two ways to set the AUTOPAUSE parameter from a main prompt:
MON User's Manual
page 4
The Quick Way
The Regular Way
Press a digit key 0 to 9.
Press Shift-N, and then a 2-digit decimal number.
8) Keyboard Interrupt. Another way of pausing screen output is by pressing any regular
keyboard key. To resume an interrupted operation, simply press the <spacebar>.
__________________________________________
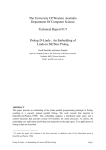
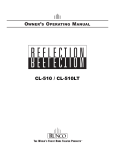
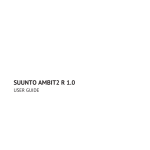
MON's Memory Map
The example shown here assumes that REL0 = 1EA5, and that an assembly source file in User
Segment 1 has just been assembled into REL0:0100 using the default AMACRO.
---System Area-- ------------------ User Areas ------------------------ --System AreaNon-Segmented
00000
1EA50
2EA50
3EA50
Segmented
0000:0000
1EA5:0000
2EA5:0000
3EA5:0000
REL0:0000
REL1:0000
REL2:0000
MON-Relative
Notes
BIOS DOS MON
•
Size
??? K
Notes:
•
¶
‡
ø
$
9FFFF
FFFFF
9000:FFFF
F000:FFFF
User Segm 0 User Segm 1 User Segm 2
¶
‡ø $
64 K
64 K
64 K
Video ROM
??? K
384 K
Interprogram Communication Area begins at 0EA5:0130 (see page 50)
User's COM program begins at REL0:0100.
Assembler's symbol table grows down from REL0:FF00.
User program's stack grows down from REL0:FFFF.
User's source program (assembly language) begins at REL1:0000.
Additional regions (not shown above) typically include the MON.HLP file and the Custom
Macros File (loaded from disk), and the Recorder memory region. These are somewhere in the
User Area.
__________________________________________
The remainder of this manual is a summary of
MON's commands. Commands are single keystrokes
pressed when the program is waiting for user input
and is displaying MON's main prompt.
MON User's Manual
COMMAND
page 5
A
Assemble
(Assemble a Source File)
PURPOSE: To assemble an assembly language source program into an executable machine
language object program (a .COM file).
HOW TO INITIATE:
1. Make sure your source program is in memory, beginning at REL1:0000.
[Use the L command to load in the file from disk to memory, OR
the E command to create the file in memory.]
2. The source program should end with an " END" statement, followed by a blank line.
3. Turn off AUTOPAUSE [press zero, from a main prompt].
4. Press A, then <Home>.
HOW TO INTERPRET RESULTS:
1) If the computer beeps, an error has been found. You will be returned to the editor, with the
cursor positioned at the line where the error was found. The error message will appear at the
bottom of the screen. Make the required change(s), escape from the editor, and re-initiate the A
command as described above in step 4.
2) If no error is found, a listing will scroll by on the screen during pass 2 of the assembly. At the
end, you will see a message that you are "Now Accessing" the newly created object program in
memory. Unless you changed the default (see below), the object program will begin at 0:0100.
HOW TO USE THE OBJECT PROGRAM:
1. If you want to save the object program to disk as a ".COM" program, press W (write command),
then type in the filename you want to give the program. Suggested filename extension:
COM.
2. If you want to execute your object program, press G (goto command), then <Home>, then
<Home> again.
3. If you want to trace-execute your object program, use the T (trace) command.
AVAILABLE ASSEMBLER OPTIONS:
1. Most assembler options are determined by pseudo-ops in a macro file called AMACRO. You
can examine or change MON's built-in AMACRO file by means of the Shift-A command.
Initially, the default file contains the lines:
SYMBOLS
; inz symbol table, LWA=0:FF00
"FWA" means
ORG 0:0100H ; FWA object program
beginning address.
ERROR EDIT
"LWA" means end
LIST
address.
SOURCE 1:0 ; FWA source file
END
The first line reinitializes the symbol table (makes MON forget any symbolic names used in
a previous assembly), and establishes the memory address where the symbol table will
begin. The "ORG" line establishes the memory address where the object program will
begin. The "ERROR" line tells MON what to do if it encounters an assembly error. The
"LIST" line causes the assembly listing to be scrolled by on the screen during pass 2 of the
assembly. The "SOURCE" pseudo-op tells MON where in memory to find the source file.
MON User's Manual
page 6
Details on these and other psuedo-ops are given in the section below on Assembler
Directives.
2. If you load into memory a Custom Macros file which contains an "ASM" section, then MON will
use the information it finds there instead of in its built-in default AMACRO.
How to get an ASSEMBLY LIST of your program:
1. Make sure that the psuedo-op LIST appears in the source file or in the assembler MACRO
2. Start the RECORDER by pressing R then 1 .
3. Press A <Home> to initiate the assembly process.
4. When assembly is finished, stop the RECORDER and edit the assembly list (press R then 5),
save it to disk (press R then 4), or print it (press R then 4 then PRN as the filename).
See Appendix A for required Assembler Syntax.
COMMAND
A
Assemble
(Patch-Assemble)
PURPOSE: To assemble one or more assembly language source statments, typed at the
keyboard, into machine language (object) code. This is useful for "patching" an existing machine
language program.
HOW TO INITIATE (from a main prompt):
1. Change the current address to the address you want to put the object code.
[Use the = command to change the current offset, OR
the + command to change the current segment, OR
the <PgDn> or <PgUp> command to change the current segment, OR
the N command to access the memory region you want to assemble into.]
2. Press A. You see the assembler prompt ">" on the screen.
3. Type in an assembly language statement, for example,
<space>MOV AL,6<ENTER>
4. Additional assembly language statements if desired can be typed in; remember to leave a
leading space or TAB before the mnemonic, and end each line by pressing the <ENTER>
key.
HOW TO INTERPRET RESULTS:
1. After each <ENTER>, you will see the object byte(s) for the instruction appear at the left of the
screen. This means that they now reside in memory. The current address is advanced to
the location beyond the instruction.
2. If the machine beeps, an error was found. The current address is not advanced, and so you can
immediately re-type the correct instruction.
HOW TO TERMINATE ASSEMBLY:
Use the pseudo-op " END", or press the <Esc> key.
MON User's Manual
page 7
Assembler Directives (Psuedo-Ops)
Each assembler directive must be indented at least one space or TAB from the left column, and
can appear in source files or in assembler macro files. Brackets [ ] enclose optional items.
Directives apply to the A-command both in the source file and patch modes, except those marked
SOURCE MODE ONLY. Single-digit segment addresses are interpreted as MON-relative segment
numbers (e.g., 0 means REL0, 1 means REL1, etc.)
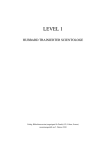
SYMBOLS [ [ [ segment:] offset1 ], offset2 ]
This psuedo-op clears the assembler's symbol table. If no addresses are specified, the new table
will begin at REL0:FF00 and grow downward from there. If one address offset2 is specified,
the new symbol table will begin at that address and grow downward from there. If two addresses
are specified, the symbol table will limited to the range from the offset1 to offset2. The default
memory organization in segment REL0 for assembling source files is as depicted here:
Symbol Table
Object Program grows →→
←←grows
REL0:0100
REL0:FF00
Only one SYMBOLS directive should appear in any set of files to be assembled together.
ORG [ [ segment: ] offset ]
Examples:
ORG
ORG 0:0100H
ORG 1100H
ORG 2:0
This psuedo-op sets MON's current address, so that subsequent assembly language instructions
will be assembled into memory beginning at the specified location. If no address is specified,
REL0:0100 is assumed. If no segment is specified, REL0 is assumed. Multiple ORG directives
can appear in a file.
SOURCE MODE ONLY
ERROR option
where option is one of the words EDIT, HALT, or RUN.
This psuedo-op determines what action the assembler will take in the event it detects an error in
your source file. EDIT means it will automatically switch you to the editor so that you can
correct the error immediately. HALT means the assembler will pause; you can press the spacebar
if you want to continue assembly in spite of the error. RUN means to continue assembling
without pause after an error.
A source file can have more than one ERROR statement. Each ERROR statement prevails
until the next ERROR statement is encountered.
LIST [ label, nlines ]
or
NOLIST
SOURCE MODE ONLY
This psuedo-op determines whether the assembler will write an assembly list to the screen during
the second pass of assembly. If MON's RECORDER is running during assembly, the assembly list
can be saved to disk or printed. If you include label and nlines , then a partial assembly list
will be produced, starting from the program address of label , and going thereafter for nlines
program lines. For example, LIST LOOP,10 will cause a 10-line listing beginning with the line
having the label "LOOP".
MON User's Manual
SOURCE [ segment: ] offset
Examples:
SOURCE 1:0
or
page 8
SOURCE RegionName
SOURCE 1:0800H
SOURCE MODE ONLY
SOURCE TEST.SRC
This psuedo-op directs the assembler to look for a source file at the indicated location in memory.
In the first form, if no segment is specified, then REL0 is assumed. In the second form,
RegionName must be in MON's list of known regions.
More than one SOURCE psuedo-op can be included in the defaults file AMACRO. Like
"INCLUDE" statements in other languages, SOURCE statements allow multiple source files to be
effectively chained together to form larger files.
Source psuedo-ops can be nested (one source file can contain another SOURCE statement) to
a maximum of 4 levels deep. In this way you can invoke a Library source file in your program.
ALIGN value
This psuedo-op causes MON's current address (where the following program instruction will be
assembled to) to increase if necessary to make the address an integral multiple of "value".
For example, if a developing program occupies memory locations REL0:0100 to REL0:0173
so far, and the assembler then encounters the instruction ALIGN 100H then the assembler will
assemble the next instruction into location REL0:0200.
This psuedo-op can be useful when, for reasons of execution speed, you want to be sure that
tables or variables are stored in memory on word, page, or paragraph boundaries.
MON User's Manual
COMMAND
C
page 9
Copy
PURPOSE: Copies a block of memory or input ports into another memory area.
HOW TO INITIATE (from a main prompt):
1. Change the current address to the address you want to begin from.
[Use the = command to change the current offset, OR
the + command to change the current segment, OR
the Shift-I command to change to the I/O segment, OR
the <PgDn> or <PgUp> command to change the current segment, OR
the N command to access the memory region you want to copy from.]
2. Type in the hexadecimal offset address of the end of the block you are copying from (4
keystrokes needed). Alternatives: E or V.
3. Type in the hexadecimal segment address of the beginning of the memory area you are copying
to (4 keystrokes needed). Alternatives: V, S or R.
4. Type in the hexadecimal offset address of the beginning of the memory area you are copying to
(4 keystrokes needed). Alternative: V.
HOW TO INTERPRET RESULTS: MON says "DONE!" when finished.
ALTERNATIVES:
E. The <End> key can be pressed to indicate the end of the current region.
V. The key V followed by a digit key 0 to 9 to enter a "saved" value.
S. The <spacebar> can be pressed to accept the default segment value shown at the cursor
position.
R. The key R followed by a digit 0 to 9 to enter a MON-relative segment value.
MON User's Manual
COMMAND
page 10
D
Dump or Display
PURPOSE: Display (Dump) contents of memory or input ports.
HOW TO INITIATE (from a main prompt):
1. Change the current address to the address you want to begin from.
[Use the = command to change the current offset, OR
the + command to change the current segment, OR
the <PgDn> or <PgUp> command to change the current segment, OR
the Shift-I command to change to the I/O segment, OR
the N command to access the memory region you want to display.]
2. Determine how/when you want the display to stop.
[Use the Shift-N command to set the autopause value, OR
the Shift-R command to set the RANGE, OR
be ready to press <Esc> or other key to interrupt the output.]
3. Press D.
HOW TO INTERPRET RESULTS:
1. A typical dump line consists of an address at the left of the screen, 16 bytes showing memory or
input port contents, and 16 ASCII characters at the right of the screen.
2. The leftmost byte (if 16 are shown) always has a hex address ending in 0. (Intel calls this a
"paragraph boundary".) The final address digits of the 16 bytes are always:
0123 4567 89AB CDEF
Bytes are clustered into groups of 4 as suggested here; this is designed to help you identify
byte addresses easily (clusters always begin at addresses ending with 0, 4, 8, or C).
3. The first line of a dump may contain fewer than 16 bytes. This happens if you begin dumping
from a current address which does not end with 0. 4-byte clusters will still begin at 0, 4, 8,
and C.
4. The ASCII field shows the ASCII characters corresponding to the 16 bytes on the display line. If
a byte is not a standard printing character (i.e., if its value is outside the range 20 hex to 7E
hex), then a dot is shown.
5. Constant Fields. If one or more consecutive display lines will all show the same content value,
they will be shown on the screen as a single line, as:
1805:0000 to 016F Constant Field of All 00's
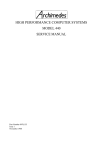
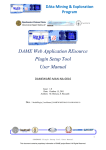
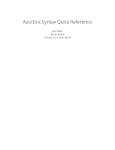
EXAMPLE OUTPUT:
The following 5 lines show a sample dump output. The current address was set to REL0:0400
initially, AUTOPAUSE was set to 3, and the default dump options were used:
REL0:0400
REL0:0400
REL0:0410
REL0:0420
Autopause
D U M
46 6F
76 65
75 72
#
P :
75 72
6E 20
20 66
73 63 6F 72
79 65 61 72
61 74 68 65
65 20 61 6E
73 20 61 67
72 73 20 62
64 20 73 65 Fourscore and se
6F 0D 0A 6F ven years ago..o
72 6F 75 67 ur fathers broug
--------------------- Hexadecimal byte field ---------------------- ----ASCII field-----(16 bytes per line)
(16 characters/line)
Address:
-0 -1 -2 -3
-4 -5 -6 -7
-8 -9 -A -B
-C -D -E -F
From the above sample output, we can glean information such as:
MON User's Manual
page 11
46 hex (ASCII "F") is stored at memory location REL0:0400
6F hex (ASCII "o") is stored at memory location REL0:0401, 0406, 041C, 041F, and 042D
75 hex (ASCII "u") is stored at memory location REL0:0402, 0420, and 042E
65 hex (ASCII "e") is stored at REL0:0408, 040F, 0411, 0415, 0427
Note that nonprintable characters (e.g., the 0D and 0A bytes at addresses 041D and 041E) are shown as dots in the
ASCII field.
AVAILABLE OPTIONS:
1. If you want to display only a few bytes, use the Single-Line Dump command ( <CrsrDn> )
instead of the D command. This always results in a single dump line of 16 bytes. If the
current address does not end with 0, the address sequence of the bytes will not begin with
zero, but 4-byte clusters will still begin at 0, 4, 8, or C.
2. After the dumping stops due to autopause, end of range, or keyboard interrupt, you can resume it
by pressing the <spacebar> once.
3. The Shift-D Command allows you to see and change the following parameters which affect the
screen output from the dump command:
LineLength, Printable Range, No.Reqd, Compact Runs.
4. See the U (unassemble) command if you want a dump function with greatly increased
customization cabability.
COMMAND
E
Edit
PURPOSE: To edit (create or modify) an ASCII file in memory.
HOW TO INITIATE (from a main prompt):
1. Change the current address to any address within the file to be edited.
(a) [For a new file to be created]: Change the current address to the memory location
where you want the file to begin. Suggested location: REL1:0000, or use the J command.
(b) [For a file already in memory]: Use the N command to access the file you want.
(c) [For a file on disk, but not yet in memory]: Change the current address to the memory
location where you want the file to begin (suggested: REL1:0000), and use the L command
to load the file from disk. If there are other files in memory, use the J command to position
the current address away from them before using the L command.
2. Press E.
SIDE EFFECTS:
1. Each editor action which alters the file increments the memory region's modification count. If the
memory region is not initially in MON's list of known regions, it is added to the list with the
Region Name "(NoName Edit File)".
HOW TO EXIT FROM THE EDITOR:
Press <Esc> twice to exit from the editor, and return to a MON main prompt.
MON User's Manual
page 12
EDITOR OPERATIONS:
1) Cursor and Screen Positioning.
a)
b)
c)
d)
e)
Cursor keys move the cursor one position (left, right, up, down).
<Home> and <End> move the cursor to the beginning or end of the line.
Control Left and Control Right move the cursor 16 positions horizontally.
<PgUp> and <PgDn> move the cursor up or down 24 lines.
Control <PgUp> or <PgDn> move cursor to the beginning or end of the file.
2) Inserting, Deleting, and Overwriting Characters.
a) <Ins> changes from INSERT to OVERSTRIKE mode, or vice-versa. The cursor appearance changes to
indicate the mode.
b) <Del> key deletes a single character at the current cursor position.
c) <Backspace> key deletes the character before the cursor position.
d) <Tab> key inserts or overwrites a TAB character (hex 09). The editor displays a TAB by expanding it into
1 or more spaces; tab stops initially are 8 columns apart.
e) Pressing a character key causes that character to be added to the file at the original cursor position, and the
cursor to be advanced by one position.
3) User-definable macros.
a) Function keys <F1> to <F9> can be used for whatever custom sequences of keystrokes you want to program.
These macros can be used either inside or outside of the editor. See the Shift-<Fn> command for
information on how to define a function key macro.
4) Editor Command Level. In the editor, pressing <Esc> once brings you to the editor command
level. The file's name, modification count, and memory range, and the cursor's line and column
numbers are displayed, along with the editor prompt "Editor Command ?". At this point you
can do any of the following:
a)
b)
c)
d)
Press <Esc> again. This brings you out of the editor entirely, and to a main MON prompt.
Press E. This returns you the editor, and the file you were working on.
Press C, D, P, R, W, S, <Tab> or <spacebar>, which initiates one of the "escape" commands.
Press H or any other key, to show an editor Help screen.
5) "Escape" Commands are initiated from the Editor Command Level (see #4 above).
a) DELETE BLOCK. After <Esc>, press D. This brings you back into the editor. Now move the cursor to
the end of the block you want to delete, and press D again. The block will be deleted from the file.
However, it is copied into a "paste buffer" so that it can be put somewhere else in your file (see the PASTE
command below).
b) COPY BLOCK. After <Esc>, press C. This brings you back into the editor. Now move the cursor to the
end of the block you want to copy, and press C again. The block will remain unchanged in the file you are
editing, but a copy will be put in the paste buffer.
c) PASTE FROM BUFFER. After <Esc> press P. This copies the contents of the paste buffer into your file at
the current cursor position, and returns you to the editor (and your modified file).
NOTE: The paste buffer can hold only one block at a time. Each new DELETE or COPY block
operation erases the previous contents of the paste buffer. PASTE operations leave the paste buffer
contents unchanged.
d) WRITE to disk or printer. After <Esc> press W. This brings you back into the editor. Now move the
cursor to the end of the block you want to write, and press W again. The selected block is highlighted,
and you are prompted for a destination. Type the pathname, and press <Enter>. The highlighted block is
written to disk (or to the printer if the name PRN is used).
OPTIONS: (i) If you do not move the cursor between the first and second "W", then the entire file is
written. (ii) If you press <Home> when prompted for the destination, the region name is used.
MON User's Manual
page 13
e) SEARCH. After <Esc>, press S. Then type in the character or the string of characters you want to search
for, then press <ENTER>. This returns you to the editor, with the cursor positioned at the next
occurrence of the character or string you typed in. (If the character or string is not found, the computer
beeps, and the cursor is not moved.)
AVAILABLE SEARCH OPTIONS: Hex mode, exclusion byte, and wildcard byte, as described under
MON's Search (S) command.
f) REPEAT SEARCH. After <Esc>, press the <spacebar>. This repeats the SEARCH command, with the
same search character or string you typed in before.
g) REPLACE. After <Esc>, press R. Then type in the character or the string of characters you want to
replace the search string with, and then press <ENTER>. This returns you to the editor. Press the
<spacebar> to replace the SEARCH STRING with the REPLACE STRING.
AVAILABLE REPLACE OPTION: Hex mode (press ALT-H) or normal ASCII mode (press
ALT-A).
h) REPEAT REPLACE. Once you have typed in the replace string once, you can use it whenever you wish by
pressing the <spacebar> again (immediately following a REPEAT SEARCH operation).
i) TAB STOPS. After <Esc>, press <Tab>. This lets you see the editor's current TAB settings. To change
any TAB, use the cursor left or right key to move to the desired position and press the <spacebar>. (The
<spacebar> toggles the position's TAB status, making it a TAB stop if it was not before, or removing the
TAB from that position if one was there before.) At this point, you can also press L or W to load or write
the TAB settings to or from disk. To return to the Editor Command Level, press <Esc> once.
MON's editor is a simple non-wrapping line editor, suitable for preparing assembly langage source
files, or for editing ASCII text files such as AUTOEXEC.BAT, CONFIG.SYS, WIN.INI, etc.
The maximum file size is 64K bytes. (But you can have multiple files in memory at the same time,
and easily switch between them by exiting to MON's main prompt, and using the N command.)
The maximum offset address for any character in the edit file is FFFF hex. Therefore, to realize
the maximum possible file size (64 Kbytes), you should start the file at offset address 0000H.
The maximum line length is 254 characters. Only 80 characters are visible on the screen at any
time.
Special Characters
You can include any character (hex 00 to FF) in the file, though only the standard "printable"
characters (hex 20 to 7E) may be immediately recognizable. Codes outside the printable range
are usually regarded as "control codes" or special characters, and should not be used in generalpurpose ASCII text files. The common exceptions (and the exceptions in MON's editor) are:
0D hex (carriage return)
0A hex (line feed) 09 hex (TAB)
Use the ALT key, plus the numeric keypad decimal digits 0-9, to enter special characters (e.g.,
ALT-206 gives +). For a complete definition of all codes in the range 00-FF, run the BIOSCHAR
program. Some useful numeric codes to use with Alt, and the resulting characters, are:
16
20 ¶
172 ¼
171 ½
Box-Drawing Characters:
179
196
218 194 191 + - + 201 203 187 + - +
195 197 180 + + ¦ 204 206 185 ¦ + ¦
192 193 217 + - + 200 202 188 + - +
186 ¦
213 209 184 +
198 216 181 ¦
212 207 190 +
205 - + 214 210 183 + - +
+ ¦ 199 215 182 ¦ + ¦
- + 211 208 189 + - +
COMMAND
MON User's Manual
page 14
F
Fill
PURPOSE: To fill a region of memory with a constant byte, character, or string of bytes or
characters.
HOW TO INITIATE (from a main prompt):
1. Change the current address to the beginning of the memory block you want to fill.
[Use the = command to change the current offset, OR
the + command to change the current segment, OR
the <PgDn> or <PgUp> command to change the current segment, OR
the N command to access the memory region you want to fill.]
2. Press F.
3. Type in the hexadecimal address of the end of the memory block you want to fill. This requires 4
keystrokes.
4. Type in one or more bytes you want to use as the "filler". Each byte requires two keystrokes.
5. Press the <ENTER> key. When the filling is done, MON will signal "DONE!".
AVAILABLE OPTIONS:
1. If you prefer to enter one or more of the filler bytes in terms of their printable ASCII
representations, instead of in hexadecimal notation, you can switch to ASCII mode by
pressing "ALT-A". After entering zero or more ASCII characters, you can switch back again
to hex mode if desired by pressing "ALT-H".
2. If you declare a byte value to be a wildcard byte (using the Shift-W command), then any
occurrences of that byte value in the filler string will NOT overwrite the corresponding bytes
in memory. In other words, the memory bytes at locations that wildcard filler bytes are
being sent to will remain unchanged. The filler string must be at least 2 bytes long.
3. In step 3, you can enter the end address as follows instead of the usual 4 keystrokes:
(a) You can press V then a digit key 0 to 9 to enter a "saved" value.
(b) You can press the <End> key if you want to enter the end address of the current region.
MON User's Manual
COMMAND
G
page 15
GoTo
PURPOSE: To execute a machine language program in memory.
HOW TO INITIATE (from a main prompt):
1. Make sure the program you want to execute resides in memory, and that its logical end is a RET
(return) instruction.
2. If you want to emulate command line parameters, use the Shift-G command. Then press G.
3. If your program begins at 0:0100, then you can press <Home>, then <Home>. Otherwise, type
in the hexadecimal segment address (4 keystrokes required), and then the hexadecimal
offset address (4 keystrokes required) of the beginning address of the program.
4. MON remembers these typed in values, and the next time you want to execute this program you
can type G, then <spacebar>, then <spacebar> to repeat the address given in step 3.
HOW TO INTERPRET RESULTS:
1. If your program returns normally, a message (Normal)(Return) appears on the screen, along with
a report of the final register values.
2. If your program produces any output to the screen, it will appear on the screen line below the
"GOTO" prompt.
3. If your program contains one or more INT 3 instructions (also called "software interrupts"), then
MON will report each time an INT 3 is encountered in the execution, and will show a register
dump.
4. Execution can be paused after "n" INT 3 executions by means of MON's autopause, or by a
keyboard interrupt (press any character key). Pressing the <spacebar> will then resume the
execution of your program from the INT 3 location.
5. If your program hangs up in an infinite loop, you can interrupt it and allow MON to regain control
by pressing <Esc>. MON will show a register dump, and give you a main prompt. You can
then resume execution, if you wish, by pressing the <spacebar>.
AVAILABLE OPTIONS:
1. After executing part of your program, and interrupting it with an INT 3 instruction or by an <Esc>
keypress, you can switch over to tracing the rest of the program by pressing T, then
<ENTER>.
THE FINE PRINT:
1. The Goto command turns over control of the computer to your program, except that MON
watches for an <Esc> keypress (keyboard interrupt). If your program is ill-behaved (e.g.,
disabling interrupts, writing to memory being used by another program, etc.), MON may
never be able to regain control.
2. The Goto command sets the CS and IP registers to the "goto" address values you type in, and
sets the other segment registers (DS,ES,SS) to the same value as CS. It also sets
SP=0000, and then puts a return address and an INT 3 instruction on the stack to return
control to MON when a RET is executed.
MON User's Manual
COMMAND
H
page 16
Help
PURPOSE: To summarize some important operating instructions for MON.
HOW TO INITIATE (from a main prompt):
1. Press H . A menu of available help topics appears.
2. Press a letter key, or a 2-digit number code, identifying the topic you want help on. Information
on that topic instantly appears on the screen.
3. Many help screens have cross references to other help screens. Repeat step 2 as often as you
like.
4. Screen H reproduced below summarizes other keys you can use.
5. Exit from HELP by pressing the <Esc> key.
»H.
How To Use HELP
MON's Help System consists of a number of screens of information.
Each screen has an identifying letter or 2-digit number at the top left,
preceded by the » symbol. For example, the screen you are looking at now
is the H screen. When you are viewing any screen in HELP,
+-------------+
+-------------------+
¦you can press¦
¦in order to do this¦
+-------------+
+-------------------+
Home or 00
See the Help Index Screen (i.e., screen 00)
Any Letter "X"
See Help Screen "X" (if screen "X" exists)
Two Digits "ab"
See Help Screen "ab" (if screen "ab" exists)
See the logically next Help Screen
*
↓ or PgDn or space
See the logically previous Help Screen
*
↑ or PgUp
See the Help Screen you viewed before in time
§
←
See the Help Screen you viewed next in time
§
→
Esc
Exit from HELP
---------------------------------------------------------------------------* These keys allow you to browse through the entire HELP file, or to go
back and forth through pages of a multi-screen topic.
§ The ← and → keys allow you to retrace your sequence of steps through
the Help system during this visit (except it skips over screen 00).
POSSIBLE DIFFICULTIES:
MON's Help function uses a separate file MON.HLP. If the file has not already been loaded into
memory, or if it has an access key other than "H", MON asks your permission to load MON.HLP
at this time. Press "Y" to allow this action. If it cannot find the file, or if there is no more room in
memory for the file, MON writes a message to this effect on the screen.
Suggestion: Use the DOS command APPEND to let DOS know where to find the file.
MODIFYING MON.HLP
You can annotate or otherwise modify the help file if you wish.
1. Make a backup copy of the original MON.HLP file, using another name such as MONORIG.HLP.
MON User's Manual
page 17
2. The file should be organized as "pages", each of which begins with the Control-P character and a
unique two-digit number or a single non-digit character which will be the identifier by which
the help user can access that page.
3. No line should exceed 79 characters in length, and each page should contain exactly 24 lines.
(MON supplies the 25th line automatically at the bottom of each HELP page.)
4. The last "page" should have the identifier "XX", and need not have any additional lines. MON
uses this as the end-of-file indicator, and wraps around again to the top of the file without
displaying this page "XX".
MON User's Manual
COMMAND
J
page 18
Jump High
PURPOSE: This command changes MON's current address to a location higher in memory than
the highest location used so far. This is a usually a good step for you to take before you create a
new named region (e.g., an edit file), or before you load in a new file from disk, so that the new
region does not collide with any existing one.
HOW TO INITIATE (from a main prompt):
1. (OPTIONAL) Press plus (+) then <Home>. (This sets the current address to REL0:0000, and
guarantees Effect #1 below.)
2. Press J .
EFFECTS:
The effect of this command depends on three values: the current address (CA) when the
command is initiated, the highest used memory location (HUML) as defined by MON's list of
known memory regions, and MON's current segment adder value (SA). When you execute the J
command, MON examines its list of known memory regions to determine HUML. Then:
1. If CA < HUML, then the current address is changed to HUML + 10H×SA, rounded down if
necessary to a whole multiple of SA.
2. If CA > HUML, then the current address is changed to CA + 10H×SA, rounded down if necessary
to a whole multiple of SA.
3. If the result of the above operation (1 or 2) is less than REL1:0000, MON increases the current
address to REL1:0000.
The net effect is that the current address becomes at least REL1:0000, and least 8×SA bytes
higher than the highest byte in any of the known memory regions. If you press J more than once,
the current address is placed even higher in memory. This is useful if you anticipate that the
highest existing memory region will grow.
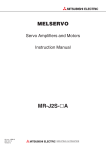
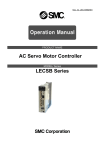
EXAMPLE: (assuming the current address is REL0:A396 when J is pressed four times):
REL0:A396
2994:0000
2D94:0000
3194:0000
REL2:0000
Setting Segment above highest named region.
Adding 0400 to Current Segment.
Adding 0400 to Current Segment.
Adding 0400 to Current Segment.
#
AVAILABLE OPTIONS:
1. The Shift-J command allows you to change the current segment adder value (SA).
MON User's Manual
COMMAND
L
page 19
Load
PURPOSE: To read a file from disk into memory.
HOW TO INITIATE (from a main prompt):
1. Change the current address to the location you want the file to begin at.
[Use the = command to change the current offset, OR
the + command to change the current segment, OR
the <PgDn> or <PgUp> command to change the current segment, OR
the N command to access the memory region you want to overwrite.]
2. Press L.
3. Type in the desired filename, then press <ENTER>. DOS pathnames can be used. Wildcards
are not allowed..
HOW TO INTERPRET RESULTS:
1. If the file loads successfully, you will see the end address of the file written near the left side of
the screen.
2. If the file cannot be found, or cannot be read into memory, the computer will beep, and an error
message will be written on the screen.
SIDE EFFECTS:
1. The memory area into which the file is loaded will be added to MON's list of "known" memory
regions (if it is not already there), the pathname (up to 30 characters) will be used as the
RegionName, the RANGE parameter will be set to the end address of the region, and the
region's modification count will be set to zero.
AVAILABLE OPTIONS:
1. Low-level (BIOS level) access to the disk, instead of the high-level (DOS level) access described
above, is available by pressing the cursor down (down arrow) key instead of the filename.
You then must key in 5 hexadecimal byte values (10 keystrokes needed) specifying to BIOS
the disk drive number, the head number, the cylinder (track) number, the first sector
number, and the number of sectors to read.
2. The Shift-L command allows you to change the minimum spacing between successive parts of a
multisegment file.
MON User's Manual
COMMAND
M
page 20
Modify
PURPOSE: To modify the contents of memory or write into output ports.
HOW TO INITIATE (from a main prompt):
1. 1) Change the current address to the first location you want to modify.
[Use the = command to change the current offset, OR
the + command to change the current segment, OR
the <PgDn> or <PgUp> command to change the current segment, OR
the Shift-I command to change to the I/O segment, OR
the N command to access the memory region you want to overwrite.]
2. Press M.
3. Type in the new hexadecimal byte value you want at that location. This requires two keystrokes
for each byte value.
4. After you type each byte, the cursor advances to the next memory location; so you can enter a
series of values into consecutive memory locations by simply repeating step 3 for as many
bytes as you want.
HOW TO INTERPRET RESULTS:
1. When modifying memory (but not when writing to output ports), MON does a read check after
each write. If the value(s) you type in remain(s) on the screen, then they have been
successfully stored into memory. If storage is unsuccessful (e.g., the memory location is
ROM or unimplemented), the computer will beep, and the screen will show the actual
contents of memory.
SIDE EFFECTS:
1. Each byte modified with this command increments the memory region's modification count. If
the memory region is not initially in MON's list of known regions, it is added to the list with
the RegionName of "(NoName Modify Region)", with an initial mod count of 80 hex.
HOW TO TERMINATE THE M COMMAND:
Press <Esc>, or <ENTER>, or any illegal hex or ASCII key.
AVAILABLE OPTIONS:
1. In step #3 above, if you prefer to enter new values in terms of their printable ASCII
representations, instead of in hexadecimal notation, you can switch to ASCII mode by
pressing "ALT-A". After entering zero or more ASCII characters, you can switch back again
to hex mode if desired by pressing "ALT-H".
2. Within the MODIFY command, you can use the cursor up, down, left and right keys to move
around in memory.
3. Ordinarily, the MODIFY function operates in the overwrite mode. If you want to use the insert
mode, press the <Ins> key. For this to work, you must have a RANGE value greater than
the current address. RANGE defines how far into memory the file extends, and will
increase automatically for every byte you insert (type in), and will decrease automatically for
every byte you delete (by means of the <Del> key). The "insert" mode cannot be used
when accessing output ports. Pressing <Ins> again returns you to overwrite mode.
MON User's Manual
COMMAND
N
page 21
Named Regions
PURPOSE: To display or change the memory region currently being accessed by MON.
HOW TO INITIATE (from a main prompt):
1. Press N. This shows the memory region currently being accessed, if any.
2. (OPTIONAL) Press N again. This results in a list on the screen of all memory regions currently
known to MON.
3. Press any region's "Access Key". This changes MON's current address to the access address
shown for that region, and returns you to MON's main prompt.
SIDE EFFECTS:
1. Each time a new memory region is accessed, MON changes its current address to the last
accessed address in that region. This makes it possible, for example, to return to the same
point in a text file when re-entering the editor.
2. Each time a new memory region is accessed, MON changes the value of RANGE to the region's
end address.
CHANGING REGION PARAMETERS MANUALLY:
If, after pressing N is step 1 above, MON is currently accessing a named region, then you can
press one of the five keys
=
<Home>
<End>
<Ins>
<Del>
This allows you to change the region's access key, beginning address, end address, name, or to
delete the region, respectively.
HOW ARE NAMED REGIONS CREATED?
MON automatically creates new named regions during disk I/O, and as a result of executing the
M (modify) command, the E (editor) command, and the A (assemble source file) command. You
can manually create a new named region by pressing <Ins> (when at a main prompt). Type in a
name, then press <ENTER>. This creates a new region, with address range beginning and ending
at the current address. You can then widen the address limits if you wish as described in the
previous paragraph. Named regions can be in the I/O space (I/O segment), or in the memory
space. Note: Before creating a new memory region, see caution #4 below.
THE MOD COUNT.
After a disk I/O operation, the loaded or written file is made a region with mod count = 00.
When a region is created in a non-disk operation, the mod count is initialized to 80 hex. Any
edit/modify operations then increase the region's mod count until the maximum value of FF is
reached. The bottom line is this:
If the MOD count is nonzero, the region is not yet saved to disk.
Thus, before exiting MON, you may want to execute the N N command to see whether there are
any unsaved files or regions that you want to write to disk before exiting.
LIMITS AND CAUTIONS:
1. The maximum number of known regions is 15. If any MON operation attempts to add a 16th
region, the last entry on the list will be overwritten with the new one.
MON User's Manual
page 22
2. The region name is limited to 30 characters maximum.
3. The modification count can go as high as FF hex. If additional modifications are made, the
count remains at FF.
4. It is recommended that you empty the recorder memory (Press R then 3 from a main prompt)
before you create a new memory region. This precaution is necessary because you do not
know what part of memory MON has decided to use for the recorder memory.
MON User's Manual
COMMAND
page 23
R
Recorder
PURPOSE: To control MON's recorder facility.
What is MON's Recorder ?
It is a facility which lets you make a log in memory of most main screen output from
MON. It is really useful because it provides you with an "audit trail" of what you did
and saw with MON. When MON assembles a file, the record file constitutes an
ASSEMBLY LIST. When MON dumps memory, the record file is the memory dump.
When MON traces execution of a program you are trying to debug, the record file
captures every action of the program so that you can study its history in detail to find
the bug, or document its operation in a report.
To use the recorder, you must first turn it on, then perform some action in MON
that results in screen output you want to record, and finally write the log file to disk or
edit it (action 4 or 5, which also turn the recorder off).
HOW TO INITIATE (from a main prompt):
1. Press R , then a number (1 to 5) depending on which action you want to take.
EXPLANATION OF THE SCREEN DISPLAY
REL0:0100 RECORDER is OFF. Memory in Use: ................................
1=On 2=Off 3=Clear 4=Disk/Print 5=Edit
PRESS 1, 2, 3, 4, 5, or Esc.
The recorder memory is 64K bytes long. Each dot in the "Memory in Use" display represents 2K
of unused memory. Each "X" represents a fully or partially used 2K block. You should not let
the recorder memory overflow! Execute the R 1 command periodically as you are recording to
see the progress of memory use, and execute R 3, R 4, or R 5 to purge the memory before it
reaches its 64K byte limit.
RECORDER OPERATIONS
OFF? RWD?
Key
Action Name
Description / Comments
1
Record
Turns the recorder on. MON's prompt character
becomes @ instead of #.
no
no
2
Stop
Pauses or stops the recorder.
yes
no
3
Discard
Rewinds the recorder without saving anything.
yes
yes
yes
yes
yes
yes
4
5
Write to Disk Writes the recorder memory to disk (or to the
printer if you use the destination name PRN).
Edit
Creates a memory region of the recorder
memory, and puts you into the editor so that you
can examine, annotate, and save the log file.
The column OFF? indicates whether the action turns the recorder off.
action causes a rewind of the recorder.
ADDITIONAL RECORDER DETAILS:
RWD?
indicates whether the
MON User's Manual
page 24
1. MON chooses a section of memory to use for the 64K recorder memory segment, but does not
register this section in the list of known regions. Therefore, you do not know its location.
For this reason, it is recommended that you purge the recorder memory by executing
recorder action R 3, R 4, or R 5 before you create any new memory regions with the
<Ins>, L, M, or E commands.
2. For the same reason, the J command may not put you into a "clear" memory area. It is
recommended that you purge the recorder memory by executing recorder action R 3, R 4,
or R 5 before you use the J command.
3. You can record most screen output from MON, including memory dumps, unassembles,
assembly listings, and trace executions.
4. You cannot record screen output that is produced by your program when it is executing from
MON's GoTo (G) command or Trace (T) command.
5. You cannot record editor screens with the Recorder, but you can achieve the same effects with
the edit and save capabilities built into the editor.
6. You cannot record Help screens with the Recorder, but you can access the file MON.HLP using
the editor, and then save or print it using the capababilities built into the editor.
7. When you initiate recording, MON preclears the 64K segment it will use for the recorder memory
with blanks (20 hex).
MON User's Manual
COMMAND
S
page 25
Search
PURPOSE: To search memory for a specified byte, character, or string.
HOW TO INITIATE (from a main prompt):
1. Change the current address to the address you want to begin searching from.
[Use the = command to change the current offset, OR
the + command to change the current segment, OR
the <PgDn> or <PgUp> command to change the current segment, OR
the N command to access the memory region you want to search.]
2. Determine how/when you want the display to stop.
[Use the Shift-N command to set the autopause value, OR
the Shift-R command to set the RANGE if you are not in a known region, OR
Be ready to press <Esc> or other key to interrupt the output.]
3. Press S.
4. Type in the byte or byte string you want to search for. Each byte must be in hexadecimal, and
therefore requires two keystrokes.
5. When you have finished entering your search byte or string (maximum 32 bytes long), press
<ENTER>.
HOW TO INTERPRET RESULTS:
1. Each instance of a "match" found results in an output of a 16-byte "dump" line, with the
address(es) of the found occurrence(s) shown at the left side of the screen.
2. At the end of the search, MON reports the number of "finds".
AVAILABLE OPTIONS:
1. After screen output stops due to autopause, end of range, or keyboard interrupt, you can resume
it by pressing the <spacebar> once.
2. If you prefer to specify one or more bytes of the search string in terms of their printable ASCII
representations, instead of in hexadecimal notation, you can switch to ASCII input mode by
pressing "ALT-A". After entering zero or more ASCII characters, you can switch back again
to hex mode if desired by pressing "ALT-H".
3. If you want to see some of the bytes PRECEEDING each match, you can use the Shift-P
command to specify the number of "previous" bytes (1-15) you want displayed with each
match.
4. You can make one or more of the search string bytes a "wildcard" by means of the Shift-W
command. A wildcard byte in the string is considered to match ANY byte value in memory .
5. You can make one or more of the search string bytes an "exclusion" byte by means of the
Shift-X command. An exclusion byte is considered to match any byte value in memory
EXCEPT the value of the exclusion byte.
MON User's Manual
COMMAND
T
page 26
Trace
PURPOSE: To trace-execute a machine-language object program in memory, for study or
debugging purposes.
HOW TO INITIATE (from a main prompt):
1. Press T.
2. Hold down the <Home> key (or press <Home> 13 times) until the cursor goes all the way across
the screen, and reappars at the left side. This initializes all the registers to zero, except
CS=DS=ES=SS = MON's home segment (REL0:), and IP=0100. Skip this step if you want
to resume tracing without restarting the program from the beginning.
3. Press <ENTER>. This "arms" the <spacebar> for tracing, splits the screen into three "windows",
and returns you to a main MON prompt.
4. You now also see on the screen a summary of 3 important options for tracing: the autopause
value, the trace mode, and the breakpoints. You can change any or all of these (the
commands are respectively Shift-N, Shift-T, and Shift-B), or proceed directly to step 5.
5. Press the <spacebar>. This initiates trace-execution of the program.
HOW TO INTERPRET RESULTS:
The upper screen window is for any screen output that the traced program
may produce.
The center window is the main window for MON output as usual. During
tracing, this window also shows:
1. (if enabled) the log of register and flag values
2. (if enabled) the log of instructions executed
3. An "End of Trace" message when the terminating RET instruction is
encountered.
The lower screen window (if enabled) shows the current register values
and stack contents of the traced program. The IP register shows the
address of the next instruction that is about to be executed. During a
pause, the next instruction is previewed in this window.
Items marked "if enabled" can be enabled or disabled with the Shift-T command.
AVAILABLE OPTIONS:
1. The trace mode (trace options) can be set with the Shift-T command.
2. After screen output stops due to autopause, breakpoint, or keyboard interrupt, you can resume it
by pressing the <spacebar> once.
3. Before resuming the trace, you can do other MON commands (e.g., examine memory). If any of
these other commands redirects the spacebar so that pressing the <spacebar> no longer
causes tracing, you can press T, then <ENTER>, to re-arm the spacebar for tracing.
OPERATING NOTES:
1. To trace a only subroutine within a larger program, simply type in the subroutine's starting
address for the IP register value in initiation step 2 above, instead of setting IP equal to
0100 with the <Home> key.
MON User's Manual
page 27
2. If the subroutine needs certain register inputs, these values can similarly be keyed in in initiation
step 2 above, instead of accepting the default <Home> key value of zero.
3. To undo the split screen caused by the T command, you can (from a main prompt) press Shift-T,
then <Esc>. Alternatively, invoking HELP, or doing any editor operation, also restores the
screen to a single window.
THE FINE PRINT:
The trace command works by setting the processor's TF bit (trace flag) to 1. This causes the processor to be
interrupted after every instruction. Tracing is suspended during hardware or software interrupts. Trace-execution
of a program is slower (by several orders of magnitude) than "GOTO" execution of the same program.
COMMAND
U
Unassemble
PURPOSE: To unassemble (disassemble) a machine language object program into an assembly
language source program. This command also allows dumping of memory or I/O ports with
greater custom formatting capability than the D (dump) command.
HOW TO INITIATE (from a main prompt):
1. Change the current address to the object program address you want to begin unassembling from.
[Use the = command to change the current offset, OR
the + command to change the current segment, OR
the <PgDn> or <PgUp> command to change the current segment, OR
the N command to access the memory region you want to unassemble.]
2. Determine how/when you want the display to stop.
[Use the Shift-N command to set the autopause value, OR
the Shift-R command to set the RANGE, OR
Be ready to press <Esc> or other key to interrupt the output.]
3. Press U. You will see on the screen the header "U N A S S E M B L E
using format U_"
4. Press the ID character key for the format you want. If there is no Custom Macros file in
memory, the only legal choices are 0 (which results in source code in the screen output)
and 1 or U (which results in object and source code in the screen output).
5. If you have a Custom Macros file in memory, you can use in step 4 any ID key for which you
have a U-format definition in that file. If you define format U0 or U1 or UU in the
Custom Macros file, then that definition will override the default meaning described above.
AVAILABLE OPTIONS:
1. The Shift-U command allows you to define custom U-formats which gives you tremendous
flexibility in displaying contents of memory or I/O ports.
MON User's Manual
COMMAND
V
page 28
Verify
PURPOSE: Verifies (compares) a block of memory with another memory area.
HOW TO INITIATE (from a main prompt):
1. Determine how/when you want the display to stop.
[Use the Shift-N command to set the autopause value, OR
Be ready to press <Esc> or other key to interrupt the output.]
2. Change the current address to the beginning address of the first block you want to compare.
[Use the = command to change the current offset, OR
the + command to change the current segment, OR
the Shift-I command to change to the I/O segment, OR
the N command to access the memory region you want to compare].
3. Type in the hexadecimal offset address of the end of the first block you are comparing (4
keystrokes needed). Alternatives: E or V.
4. Type in the hexadecimal segment address of the beginning of the second memory block (4
keystrokes needed). Alternatives: V, S, or R.
5. Type in the hexadecimal offset address of the beginning of the second memory block (4
keystrokes needed). Alternative: V
HOW TO INTERPRET RESULTS:
1. Any discrepancies between the two blocks are reported on the screen as a double line dump.
The first of the 2 lines is complete; i.e., it shows 16 bytes. The second of the 2 lines shows
only those bytes that differ from the corresponding bytes in the first line.
2. When screen output stops, and a main prompt reappears, the number of differences found is
reported on the screen.
AVAILABLE OPTIONS:
1. If you want to see some of the bytes preceeding each reported discrepancy, you can use the
Shift-P command to specify the number of "previous" bytes (1-15) you want displayed with
each 2-line discrepancy report.
2. After the screen output stops due to autopause, or keyboard interrupt, you can resume it by
pressing the <spacebar> once. When the end of the specified range is reached, pressing
the spacebar will result in no change in the current address.
ALTERNATIVES:
E. The <End> key can be pressed to indicate the end of the current region.
V. The key V followed by a digit key 0 to 9 to enter a "saved" value.
S. The <spacebar> can be pressed to accept the default segment value shown at the cursor
position.
R. The key R followed by a digit 0 to 9 to enter a MON-relative segment value.
MON User's Manual
COMMAND
W
page 29
Write
PURPOSE: To write a block of memory to disk (or to the printer).
HOW TO INITIATE (from a main prompt):
1. Change the current address to the beginning of the block you want to write.
[Use the = command to change the current offset, OR
the + command to change the current segment, OR
the <PgDn> or <PgUp> command to change the current segment, OR
the N command to access the memory region you want to write.]
2. Use the Shift-R command, if necessary, to set RANGE to the end address of the block you want
to write. (Not necessary if you used the N command in step 1).
3. If you did use the N command in step 1, you may have to press the <Home> key to bring the
current address to the beginning of the region.
4. Press W.
5. Type in the desired filename, then press <ENTER>. DOS pathnames can be used. The
reserved name "PRN" means the printer, instead of a disk file.
HOW TO INTERPRET RESULTS:
1. If the file transfers successfully, MON writes "DONE!" on the screen after the filename.
2. If the specified disk or pathname cannot be found, or if the file cannot be written (e.g., a file of
the same name already exists on disk, and it is write-protected), the computer will beep, and
an error message will appear on the screen.
3. If the memory span you attempt to write is within a "known" memory region, but it is smaller than
the "known" region, the computer will beep and a warning message will appear reminding
you that you are about to write only PART of the file. If this is what you want, you can
proceed with step 5 above; the original file on disk will be overwritten with the shorter "part"
file. If this is not what you want, you can abort the operation by pressing the <Esc> key.
SIDE EFFECTS:
1. Once written, the pathname (up to 30 characters) will be added to MON's list of "known" memory
regions, and the modification count will be set to zero.
AVAILABLE OPTIONS:
1. Low-level (BIOS level) access to the disk, instead of the high-level (DOS level) access described
above, is available by pressing the cursor down (down arrow) key instead of the filename.
You then must key in 5 hexadecimal byte values (10 keystrokes needed) specifying to BIOS
the disk drive number, the head number, the cylinder (track) number, the first sector
number, and the number of sectors to read.
WARNING: Because it is easy to trash a DOS disk with this BIOS-level
write command, MON asks you "Are you sure ?" Press "Y" to confirm.
Unless you are absolutely sure of what you are doing, do not use this
BIOS-level write option!
MON User's Manual
page 30
Shift-Commands
Many Shift commands allow you to set parameters for the corresponding unshifted command.
(For example, the Shift-A command sets options for the Assembler - the A command.) Other
Shift commands allow you to set parameters which can affect several different MON commands.
COMMAND
Shift-A
Set Assembler Options
PURPOSE: To examine or modify options for MON's assembler.
HOW TO INITIATE (from a main prompt):
1. Press Shift-A.
2. Use standard editor keys to move around in the file, delete or add characters, etc.
HOW TO EXIT FROM THE SHIFT-A COMMAND:
1. Press the <Esc> key twice to return to MON's main prompt.
See the A (assemble) command for explanations of the various options that can be used in this
AMACRO file.
WHERE IS THE ASSEMBLER OPTIONS FILE?
1. MON has a built-in edit file which has the initial defaults described under the A command.
Executing the Shift-A command accesses this built-in file, and allows you to edit it using
editor commands, just as you would edit any other ASCII file.
2. To allow you to customize the assembler defaults to your own preferences, MON will always
search the Custom Macros file, if one exists in its list of known regions. If the file is found,
and if the file contains an "ASM" section, MON will use that section as the assembler
options file instead of the built-in file.
The same command, Shift-A, accesses both files; the ASM section of the Custom Macros file if
found, otherwise, the built-in file.
MON User's Manual
COMMAND
Shift-B
page 31
Set Breakpoints
PURPOSE: To examine or modify the BREAKPOINTS to be used when trace-executing a
program (T command).
HOW TO INITIATE (from a main prompt):
1. Press Shift-B.
2. If you do not wish to change any breakpoint values, press <ENTER>.
FOR EACH OF THE FOUR BREAKPOINTS:
1. If you want to set a new breakpoint (or change an existing one), you can overtype the old with a
new hexadecimal value (4 keystrokes needed).
2. If you want to zero a breakpoint (this "turns it off"), press <Home>.
3. If you want to specify a breakpoint symbolically, press the quote key ("), and then type in a line
label (maximum 10 characters), and then press <ENTER>. The numerical equivalent of the
label, and the symbolic name, will be shown on the screen.
NOTE: Symbolic specification of breakpoints is possible only if the symbol table is resident in
memory; e.g., if you have used MON's assembler in this working session with MON to assemble
the program.
MON User's Manual
COMMAND
page 32
Shift-D
Set Dump Options
PURPOSE: To set certain options to be used when dumping memory (D command).
HOW TO INITIATE (from a main prompt):
1. Press Shift-D. Then you see on the screen:
DUMP OPTIONS:
LineLength
Printable
No.Reqd
CompactRuns
16
20-7F Hex
00
Y
The cursor initially is under the "16". To accept a value shown, press the <spacebar>; to
change a value, type in the new value. The cursor then advances to the next field. After all
values have been accepted and/or changed, you are returned to a main prompt. To return
prematurely, press <Esc>.
SIGNIFICANCE OF THE PARAMETERS:
These parameters affect principally the dump (D) command, but Printable also affects what is
regarded as a "printable" byte value in the formatted unassemble command and in the editor.
LineLength: Initially 16, can range from 01 to 20. If LineLength is greater than 16, the
ASCII field presentation at the right side of the screen will not be shown. If LineLength is a
multiple of 4, then an extra space is inserted before any byte that has an address that is a multiple
of 4 (making 4-byte clusters on the screen).
Printable: Initially 20-7E, these two values define for MON what you consider to be the
range of "printable" byte values. If you make the range include 0DH and 0AH, then screen
printouts of those values may become irregular, because these codes are used by MON to denote
a carriage-return and linefeed (CRLF).
No.Reqd: Initially 00, this denotes the number of printable bytes on a dump line that there
must be in order for MON to show the dump line on the screen. Maximum value: 20 (which will
result in no dump lines - only runs [see below] being reported).
CompactRuns: Initially Y (meaning Yes). This means that if one or more dump lines
would consist of the same repeated byte value, then a single line report of this fact will be made
instead of the multiple repeated dump lines. Can be Y (Yes) or N (No).
MON User's Manual
COMMAND
Shift-G
page 33
Set GOTO Parameters
PURPOSE: This command allows you to set up some "command line parameters" before you
use the G (GOTO) command to test-run a .COM program.
What are Command Line Parameters ?
Suppose you have a program XYZ.COM. To run it from a DOS prompt, you could type:
XYZ/1 /P2
where /1 and /P2 are command line parameters, or switches, that XYZ has been
programmed to act on in some way. DOS places anything on the command line that follows the
program name (here, the string "/1 /P2") into memory starting at offset address 0081 hex. It
then loads the program XYZ.COM into memory starting at offset address 0100 hex, and turns
over control to ("goes to") program XYZ at offset location 0100 hex.
To emulate this DOS behavior in MON, the Shift-G command provides an easy way for you to
put command line parameters into the same memory area below the COM program that DOS
would use.
HOW TO USE:
1. Press Shift-G.
2. Type the command string you want the COM program to see.
3. Press <Enter>.
4. GoTo (G command) your COM program at REL0:0100.
EFFECTS:
The string you type is placed into memory begining at REL0:0081, and its byte count is placed in
REL0:0080. Step 4 then executes the COM program, and your COM program sees the command
line parameters in memory at the same location it would see them if the program had been run
from DOS.
MON User's Manual
COMMAND
Shift-I
page 34
I/O - Memory Toggle
PURPOSE: To access I/O ports instead of memory addresses in certain MON commands (i.e.,
the COPY, DUMP, and MODIFY commands).
HOW TO INITIATE (from a main prompt):
1. Press Shift-I.
HOW TO INTERPRET RESULTS:
1. When the segment part of the current address in MON's main prompt is "I/O", you are accessing
I/O ports instead of memory addresses.
HOW TO TERMINATE I/O ACCESS:
1. Press Shift-I again. In other words, The Shift-I command toggles the segment part of the current
address between memory and I/O spaces.
COMMAND
Shift-J
Change the Segment Adder
PURPOSE: The Shift-J command allows you to change the parameter which MON uses in
executing the J command.
HOW TO EXECUTE:
1. Press Shift-J.
2. Type in the new 4-hex-digit value you want for the Segment Adder.
SIGNIFICANCE OF THE SEGMENT ADDER:
The segment adder is used by MON is calculating a new currrent address when the J command is
used. See the J command for details.
MON User's Manual
COMMAND
Shift-K
page 35
Clear the Screen
PURPOSE: To clear the screen, or set screen colors.
HOW TO INITIATE (from a main prompt):
1. Press Shift-K. The screen is cleared, and a new main prompt appears at the upper left corner.
2. If you press Shift-K a second time, you will see on the screen 128 numbered attribute settings,
and a report of the current screen attribute settings for normal and inverse screens. You
can type in new hex values if you wish to change screen colors. Inverse screen colors are
used for the top and bottom screen windows when tracing a program, and for highlighting in
the editor.
NOTE: The initial Shift-K clears only the main screen window; it does not affect the top or
bottom windows used in the trace function. To undo the 3-window split screen, press Shift-T,
then <Esc>.
COMMAND
Shift-L
Set Load Parameter
PURPOSE: To set the value of the Load Parameter used in MON's Load (L) command.
HOW TO EXECUTE:
1. Press Shift-L.
2. Type in the new 4-hex-digit value you want for the Load Parameter.
SIGNIFICANCE OF THE LOAD PARAMETER:
This parameter controls the maximum size of the parts a large file is broken into when it is loaded
from disk into memory. Its default value is 0000 hex, which means 64K bytes. With this value,
any file less than 64K bytes in length will be loaded as-is into memory. Any file longer than 64K
bytes will be broken into 64k-byte parts, and loaded into memory part by part. The names of
these memory regions will include the designations Part 1, Part 2, etc. However, these regions
cannot be added to by editor operations, because the editor buffer is limited to 64K bytes. The
solution to this is to set the Load Parameter to, say, E000 hex before loading the file into
memory. Then the large file will be loaded in 56K-byte (=E000 hex) chunks, each of which can
be edited as usual (a maximum of 2000=10000-E000 hex additional bytes can be added to it). In
this way, large text files can be handled by MON's editor.
MON User's Manual
COMMAND
Shift-M
page 36
Set Memory Display Mode
PURPOSE: To change the memory address display mode used in MON's main prompt.
HOW TO INITIATE (from a main prompt):
1. Press Shift-M one or more times. Each time Shift-M is pressed, another mode is selected of the
three available modes: Segmented, Absolute, and MON-Relative.
MEMORY DISPLAY MODES
1. In the segmented mode, the address is of the form XXXX:YYYY, where XXXX denotes the
current segment, and YYYY denotes the current offset.
2. In the absolute mode, the address is of the form ZZZZZ. In the 8086 family of microprocessors,
the absolute address ZZZZZ is determined from the segment XXXX and offset YYYY by the
equation ZZZZZ = XXXX0 + 0YYYY. Example: Segment 1234 hex and offset 5678 hex
denotes absolute address 12340 + 5678 = 179B8 hex.
3. In the MON-Relative mode, the address is of the form RELn:YYYY, where n denotes the
current MON-relative segment (0 to 9).
MEMORY in MON
1. The available "user" memory in MON means that memory which you can use for editing,
assembling, echoing, or other operations which require storage. The lowest address of this
user memory area is displayed when you first invoke MON, and is called MON's "home"
address. In segmented form, it is XXXX:0000, where XXXX is MON's " home" segment. In
MON-relative form, it is REL0:0000.
2. Example: (See MON's Memory Map on page 4) If 1EA5 is MON's home segment, then the
home address is 1EA5:0000 or 1EA50 or 0:0000 (all equivalent). Every segment is 64
Kbytes long. The maximum address in the home segment is 1EA5:FFFF or 2EA4F or
0:FFFF.
3. Each additional 1000 hex increase in segment XXXX corresponds to an increase by one in
MON-relative segment n , and an increase of 10000 hex (64 Kbytes) in absolute memory.
Continuing with the above example, the first address beyond the home segment has
address 2EA5:0000 or 2EA50 or 1:0000.
MON User's Manual
COMMAND
Shift-N
page 37
Set Autopause
PURPOSE: To establish the Autopause parameter, i.e., the maximum number of screen lines
MON will output before pausing in some of its commands.
HOW TO INITIATE (from a main prompt):
1. Press Shift-N. You will see the current value of the autopause parameter.
2. To change the value, type in a new value (can be 0 to 99). A double digit number is expected; if
you type a single digit number without a leading zero, you must press <ENTER> to signal
MON that you are done. To leave the value unchanged, press <Esc>.
INTERPRETATION:
1. An autopause value of zero means that autopause is off; i.e., MON will output an unlimited
number of lines. In other words, something other than autopause will have to stop the
screen output.
AVAILABLE OPTIONS:
1. A "quick equivalent" to the Shift-N command is obtained simply by pressing any number key (0
to 9) at a main prompt. This sets the autopause value with a single keystroke, but of course
can set values only in the range 0 to 9.
COMMAND
Shift-P
Set "Previous" Bytes
PURPOSE: To establish the number of "previous" bytes to be shown on the screen in the
SEARCH or VERIFY commands.
HOW TO INITIATE (from a main prompt):
1. Press Shift-P. You will see on the screen the current value of "previous" bytes.
2. To change the value, type in a new value (can be 0 to 15). A double digit number is expected; if
you type a single digit number without a leading zero, you must press <ENTER> to signal to
MON that you are done. To leave the value unchanged, press <Esc>.
SIGNIFICANCE OF "PREVIOUS" BYTES:
A value greater than 0 means that many byte values before the matching byte (SEARCH) or the
differing byte (VERIFY) will be displayed on the screen.
MON User's Manual
COMMAND
Shift-R
page 38
Set RANGE
PURPOSE: To display or change the value of RANGE.
HOW TO INITIATE (from a main prompt):
1. Press Shift-R.
HOW TO OPERATE:
1. To change the value, type in a new hexadecimal value (can be 0000 to FFFF).
SIGNIFICANCE OF RANGE:
1. RANGE is used to identify the end (offset) address of a section of memory to be acted upon in
some way by a subsequent MON operation.
2. Initially, the value of RANGE is zero, and this effectively disables the range limit in the DUMP,
SEARCH, and UNASSEMBLE commands. However, making RANGE nonzero limits the
memory extent of these operations to the specified address value.
3. The value of RANGE is optional in the MODIFY command (overwrite mode).
4. A nonzero value of RANGE is required in the MODIFY (insert mode), EDIT, and WRITE
commands.
IMPLICIT SETTINGS OF RANGE:
1. RANGE is automatically set after a file is loaded from disk (L command).
2. RANGE is automatically set by the N command, when a new memory region is accessed.
MON User's Manual
COMMAND
page 39
Shift-T
Set Trace Mode
PURPOSE: To examine or change the value of the trace mode for use with the TRACE (T)
command.
HOW TO INITIATE (from a main prompt):
1. Press Shift-T. You see:
REL0:0000 Trace Outputs: Registers NO
Instructions NO
Bottom Window NO
with the blinking cursor at the first "NO".
HOW TO OPERATE:
1. You can type "Y" (yes) or "N" to each of the three items displayed, and the cursor moves to the
next one. After the third item, you are returned to a main prompt.
2. Alternatively, you can choose any combination of the three Yes/No options by selecting a
numeric value called the trace mode. (Each of the three Yes/No items corresponds to one
bit in trace mode.) To change the value of trace mode, type in a new number (0 to 7).
SIGNIFICANCE OF TRACE MODE:
1. The trace mode determines how much detail you see on the screen when you trace-execute a
program. 0 gives no trace output; 7 gives maximum trace output:
Trace Mode value
0
1
2
3
4
5
6
7
Use Bottom Window ?
No
Yes
No
Yes
No
Yes
No
Yes
Unassemble Instructions ?
No
No
Yes
Yes
No
No
Yes
Yes
Show Register Values ?
No
No
No
No
Yes
Yes
Yes
Yes
SIDE EFFECTS:
1. Choosing any trace mode value (0 to 7) causes the screen to split up into 3 screen windows.
2. Pressing <Esc>, instead of a number 0 to 7, unsplits the screen back into a single window.
MON User's Manual
COMMAND
page 40
Shift-U
Edit a U-Format
PURPOSE: To display or change the definition of a U-Format, which affects the operation of
the unassemble (U) command.
HOW TO INITIATE (from a main prompt):
1. Press Shift-U. If there is a Custom Macros file in memory, you will see
"Edit U-Format, ID = U_" on the screen. If there is no Custom Macros file in memory,
you will see an error message to that effect.
2. Press the ID character of the U-Format you wish to define or edit.
EFFECTS:
1. If the U-Format you want to edit already exists in the Custom Macros file, you will be put into the
editor, accessing that format.
2. If the U-Format you want to define does not already exist in the Custom Macros file, you will be
put into the editor, at the bottom of the file.
U-FORMAT SYNTAX:
Please see "Custom Macro Files" later in this document.
COMMAND
Shift-W
Set Wildcard Byte
PURPOSE: To examine or change the value of the WILDCARD byte.
HOW TO INITIATE (from a main prompt):
1. Press Shift-W.
HOW TO OPERATE:
1. To change the value, type in a new hexadecimal value (can be from 00 to FF hex). Two
keystrokes are required.
2. To disable the wildcard, press <Esc> instead of typing in a value.
SIGNIFICANCE OF THE WILDCARD BYTE:
1. The wildcard byte is significant only in the FILL and SEARCH commands.
AVAILABLE OPTIONS:
1. You can enter the wildcard byte as an ASCII printable character, if you prefer, by pressing
"ALT-A", and then the character (instead of the hexadecimal value).
MON User's Manual
COMMAND
Shift-X
page 41
Set Exclusion Byte
PURPOSE: To examine or change the value of the EXCLUSION byte.
HOW TO INITIATE (from a main prompt):
1. Press Shift-X.
HOW TO OPERATE:
1. To change the value, type in a new hexadecimal value (can be from 00 to FF hex). Note 2
keystrokes are required.
2. To disable the exclusion byte, press <Esc> instead of typing in a value.
SIGNIFICANCE OF THE EXCLUSION BYTE:
1. The exclusion byte is significant only in the SEARCH command.
AVAILABLE OPTIONS:
1. You can enter the exclusion byte as an ASCII printable character, if you prefer, by pressing
"ALT-A", and then the character (instead of the hexadecimal value).
OTHER COMMANDS
All of the following commands must be initiated from a MON main prompt.
COMMAND
=
Set Offset Address
PURPOSE: To change the OFFSET part of MON's current address.
HOW TO USE (from a main prompt):
1. Press = (the "equals" key).
2. Type in the new hexadecimal address (4 keystrokes needed).
AVAILABLE OPTIONS:
1. If you press <Home>, instead of a hexadecimal number, the value 0000 will be entered.
2. If you press V then a digit 0 to 9 instead of a hexadecimal number, the saved value V0 to V9
will be entered.
MON User's Manual
COMMAND
+
page 42
Set Current Segment
PURPOSE: To change the SEGMENT part of MON's current address.
HOW TO USE (from a main prompt):
1. Press + (the "plus" key).
2. Type in the new hexadecimal address (4 keystrokes needed).
AVAILABLE OPTIONS:
1. If you press <Home>, instead of a hexadecimal number, MON's home segment will be entered.
2. If you press V then a digit 0 to 9 instead of a hexadecimal number, the saved value V0 to V9
will be entered.
3. If you press R then a digit 0 to 9 instead of a hexadecimal number, the MON-Relative
Segment REL0 to REL9 will be entered.
4. If you press the letter "I" instead of a hexadecimal number, the segment changes to "I/O"; i.e.,
the I/O ports are accessed instead of memory locations.
COMMAND
n
Set Autopause Value
[where n is any digit 0 to 9]
PURPOSE: To establish the Autopause parameter; i.e., the maximum number of screen lines
MON will output before pausing in some of its commands.
HOW TO INITIATE (from a main prompt):
1. Press a digit key 0 to 9.
INTERPRETATION:
1. An autopause value of zero means that autopause is off; i.e., MON will output an unlimited
number of lines. In other words, something other than autopause will have to stop the
screen output.
AVAILABLE OPTIONS:
1. The Shift-N command is available to allow you to set AUTOPAUSE to a value greater than 9.
COMMAND
. (period)
Save Offset
PURPOSE: To save the current offset address into a location accessible to other programs.
HOW TO USE: Set the current offset to the value you want to save. Press the dot (period), and
then press V then n (where n is a digit 0 to 9). This saves the offset value into the indicated
save variable (see page 50).
MON User's Manual
COMMAND
<Home>
page 43
Move to Beginning
PURPOSE: To change the current address to the beginning of the currently accessed known
region.
HOW TO EXECUTE (from a main prompt):
1. Press the <Home> key.
COMMAND
<Ins>
Define New Region
PURPOSE: To define a new known region to MON.
HOW TO EXECUTE (from a main prompt):
1. If the recorder memory (see R command) is not empty, purge it by pressing R 3, R 4, or R 5.
2. Change the current address to the address you want the region to begin at.
[Use the = command to change the current offset, OR
the + command to change the current segment, OR
the <PgDn> or <PgUp> command to change the current segment.]
3. Press the <Ins> key.
4. Type in the RegionName you want to give to this new region (30 characters max). Suggestion:
You can name it with the pathname it will finally occupy later when you save it to disk.
5. Press the <ENTER> key.
EFFECTS OF THIS COMMAND:
1. A new region is added to MON's list of "known" regions. The maximum capacity of the list is 15
regions. If you try to add a 16th region, the last one will be deleted, and the new one will
take its place in the list.
2. The beginning and end addresses of the new region will be set to the value of the current
address. You can change these as described under the N command.
3. The modification count of the region will be set to zero.
COMMAND
<End>
Move To End
PURPOSE: To change the current address to the end address of the currently accessed memory
region.
HOW TO INITIATE (from a main prompt):
1. Press the <End> key.
MON User's Manual
COMMAND
<CrsrDn>
page 44
One-Line Dump
PURPOSE: To display a single line of memory bytes or input port bytes.
HOW TO INITIATE (from a main prompt):
1. Change the current address to the memory location whose contents you want to display.
[Use the = command to change the current offset, OR
the + command to change the current segment, OR
the <PgDn> or <PgUp> command to change the current segment, OR
the Shift-I command to access input ports instead of memory locations, OR
the N command to access the memory region you want to display.]
2. Press the <CrsrDn> (cursor down) key.
COMMENTS:
1. This is a quick DUMP (D) command, which always results in only a single line of output on the
screen (16 bytes). 4-byte clusters of bytes begin with addresses ending with 0, 4, 8, and C.
2. The current offset address is incremented by 0010 hex.
COMMAND
<CrsrUp>
Decrease Offset
PURPOSE: To decrease the current offset address by 0010 hex. This undoes the address
change caused by the <CrsrDn> command.
HOW TO INITIATE (from a main prompt):
1. Press the <CrsrUp> (cursor up) key.
COMMAND
<CrsrLeft>
Repetitive One-Line Dump
PURPOSE: To repetitively display a one-line dump.
HOW TO INITIATE (from a main prompt):
1. Change the current address to the memory location whose contents you want to display.
[Use the = command to change the current offset, OR
the + command to change the current segment, OR
the <PgDn> or <PgUp> command to change the current segment, OR
the Shift-I command to access input ports (not memory locations), OR
the N command to access the memory region you want to display.]
2. Press the <CrsrLft> (cursor left arrow) key.
COMMENTS:
1. This command allows you to examine a memory location or input port in "real time", so that you
can watch how it changes in response to external stimuli. Press the <Esc> key to exit.
2. The command is also useful for monitoring the values of timer bytes which are maintained by
interrupts and BIOS or DOS routines.
MON User's Manual
COMMAND
<PgUp>
page 45
Decrease Segment
PURPOSE: To decrease the current segment address by 1000 hex; i.e., to decrease the current
MON-relative segment by 1.
HOW TO INITIATE (from a main prompt):
1. Press the <PgUp> key.
OTHER EFFECTS:
1. This command also de-selects I/O mode addressing, if it is initially on.
COMMAND
<PgDn>
Increase Segment
PURPOSE: To increase the current segment address by 1000 hex; i.e., to increase the current
MON-relative segment by 1.
HOW TO INITIATE (from a main prompt):
1. Press the <PgDn> key.
OTHER EFFECTS:
1. This command also de-selects I/O mode addressing, if it is initially on.
COMMAND
<spacebar>
Resume After Pause
PURPOSE: To resume a paused ASSEMBLE, DUMP, GOTO, SEARCH, TRACE,
UNASSEMBLE, VERIFY, or <CrsrLft> (repetitive one-line dump) command.
HOW TO INITIATE (from a main prompt):
1. Press the <spacebar>.
COMMENT:
1. Each of the commands named above in PURPOSE causes the <spacebar> to be "armed" to
resume the command after a keyboard interrupt or autopause.
2. If pressing the <spacebar> has no effect, then the previous command has run to completion, and
cannot be resumed.
MON User's Manual
COMMAND
<Fn>
page 46
User-Defined Macro
(function key F1 to F9)
PURPOSE: To execute a user-defined macro (sequence of commands).
HOW TO INITIATE (from a main prompt):
1. Press the <Fn> key (n = 1 to 9).
COMMENTS:
1. The meaning of the function key <Fn> must be defined in a section of the Custom Macros file.
The section begins with the two characters Fn (where n is a digit 1 to 9). See the Shift-Fn
command below for syntax details of this definition.
2. Execution of a lengthy function key macro can be interrupted by pressing the <Esc> key, the
<spacebar>, or any letter key. Once it is interrupted, however, the function key macro
cannot be resumed; it must be restarted from the beginning by pressing <Fn> again.
ERROR CONDITION:
1. If there is no Custom Macros file, or no definition in it for the function key you press, an error
message to that effect will appear on the screen. Create the file or definition using the E
(edit) command.
COMMAND
Shift-<Fn>
Define a Macro
<Fn> is function key <F1> to <F9>
PURPOSE: To define a function-key macro.
HOW TO EXECUTE (from a main prompt):
1. Make sure that a Custom Macros file exists in the list of known memory regions. If there is
none, you can (a) create a new file with the E (edit) command, (b) load an existing macro
file from disk with the L (load) command, or (c) redefine one of the existing regions as the
custom macro region by redefining its Access Key as the asterisk (*) .
2. Press Shift-<Fn> (where <Fn> is a function key, <F1> to <F9>). If a definition for the
selected function key already exists in the Custom Macros file, it will appear on the screen
now. If no definition for the selected function key currently exists, you will be put into the
editor at the bottom of the Custom Macros file.
3. Use editor commands to create or change the definition as desired. The required Keycodes
Syntax is detailed below.
4. Exit from the editor, and the Custom Macros file, by pressing the <Esc> key twice.
MON User's Manual
page 47
KEYCODES SYNTAX
Here is a sample <Fn>-definition for <F2>. It is part of the Custom Macros file.
F2
optional comments
+ <Home> =0100
L PGM.COM
<Enter>
Note that the function key name (here F2) must appear
at the left margin. MON ignores the rest of this line;
you can use it for a title or for comments.
The body of the definition begins on the next line, and continues until the next line in
the file that is not indented. In other words, body lines must be indented!
This file section specifies:
the two keystrokes plus (+) and <Home>
followed by the 5 keystrokes =0100
followed by the 8 keystrokes LPGM.COM followed by <Enter>.
Spaces, endlines, blank lines, and tabs in an <Fn> definiton are ignored, so that you can format the
file into lines and groups of keystrokes that make sense to you.
Besides the printable letter, number, and puncuation characters, you can specify certain other keys
in an <Fn> definition by using the angle bracket notations shown here:
<TAB> <ESC> <ENTER> <BKSP> <INS> <HOME> <DEL> <END>
<PGUP> <PGDN> <SPACE>
Key combinations using the Shift or Control keys can be specified; e.g.,
<SHIFT> A
<CONTROL> D
specify Shift-A and Control-D respectively. Alt-key combinations are limited to <ALTA> and
<ALTH>, signifying Alt-A and Alt-H respectively.
<Fn> definitions are not case-sensitive (you can write <TAB> or <tab>).
LIMITATIONS:
1. A function key macro cannot invoke another macro.
2. Do not press any <Fn> when editing the Custom Macros file! This could confuse MON if the
characters in the definition of <Fn> moved around in memory as it was trying to interpret
those characters.
3. If a MON error is encountered when an <Fn>-macro is being run, the macro is turned off and the
computer beeps. To see which keystroke in the macro produced the error, press E (editor).
MON will have set its current address to the position in the Custom Macro file where the
error occurred, so that you can see where it is and take appropriate remedial action.
MON User's Manual
page 48
Custom Macros File
You can customize MON's operations in a number of ways through a Custom Macros File. This
is an ASCII text file, organized as follows:
← the first section in the file
Initiation Section
Assembler MACRO,
Function Key Definitions, and
Unassemble Format Definitions
← Definitions in these sections
← can appear in any order,
← and sections can be split.
The Initiation Section defines the MON commands to be executed when MON is first invoked from
DOS. (This macro filename is specified as a slash option on the DOS command line.) The initiation
section begins on the very first nonblank line in the file, and consists of indented lines of keycodes . It
ends just before the first line in the file that is nonblank in column one (NBC1).
The Assembler Macro begins with the upper-case letters ASM starting in column one. The rest of
this line is ignored by MON and can be used for a title and/or identifying comments. The body begins on
the next line, and consists of valid assembler directives (see the Shift-A command), all indented at least one
column. The macro ends with the assembler directive END.
Each Function Key Definition begins with the two characters Fn starting in column one (where n is
a digit from 1 to 9); the rest of this line is ignored by MON and can be used for a title and/or identifying
comments. The body consists of indented lines of keycodes . The definition ends just before the next line
in the file which is nonblank in column one (NBC1).
Each Unassemble Format Definition begins with the two characters Ux starting in column one
(where x is any printable character); the rest of this line is ignored by MON and can be used for a title
and/or identifying comments. The body consists of indented lines of U-Format codes. The definition ends
just before the next line in the file which is nonblank in column one (NBC1), or with a right bracket
character ( ] ), whichever comes first.
To summarize:
The Item
Begins
The Body
Consists Of
The Item
Ends
Can There Be More Than
One of These in the File?*
Initiation
Section
at the top of the file Indented
Keycodes†
before the first
NBC1 line
No
Assembler
MACRO
with ASM in
column one
Assembler
directives
with the END
directive
Not usually; MON uses only the
first one.
before the next
NBC1 line
Yes, each with a different value
of n
Before the next
NBC1 line, or at
the ] character
Yes, each with a different ID
character x
Function Key with Fn in column Indented
Keycodes†
one (n = 0 to 9)
Definition
Unassemble
Format
Definition
with Ux in column Indented
U-Format
one (x = any
printable character) Codes ‡
* If the file contains more than one ASM section, or more than one definition for the same function key, or more
than one definition for the same Ux (i.e., having the same ID character x), MON uses the first one in the file.
† Keycodes Syntax is described under the Shift-<Fn> command.
‡ U-Format Codes are described immediately following.
MON User's Manual
page 49
U-FORMAT CODES
U-Format Codes are the building blocks of U-Format definitions. The code forms, and their
meanings, are:
Code
Significance or Effect when using the U command
B
output a hex byte, followed by a space
W
output a hex word, followed by a space
D
output a hex doubleword, followed by a space
Tnn
TAB to screen column nn (nn = 1 to 79)
Ann
output exactly nn (nn = 1 to 60) ASCII characters, then a space
A
output ASCII characters (max 60) up to the first non-printable character.
/
begin a new line in the screen output
"text"
copy the TEXT onto the screen output
]
begin a new screen line, and return to the most recent "[". End of definition.
[
marks the point in a U-Format definition to return to when a "]" is reached
P
forces a pause in the screen output (MON's main prompt)
=abcd
changes the current offset address to abcd (must be 4 hexadecimal digits)
=Vn
changes the current offset address to saved value Vn (n = 0 to 9)
SVn
stores the current offset address into save variable Vn (n = 0 to 9)
SBVn
stores the current byte into save variable Vn (n = 0 to 9)
SWVn
stores the current word into save variable Vn (n = 0 to 9)
SDVn
stores the current doubleword into save variable Vn (n = 0 to 9)
Rnn ( )
repeat the U-codes within parentheses nn times (nn = 2 to 99)
RVn ( ) repeat the U-codes within parentheses Vn times (n = 0 to 9)
Note: The variables Vn used above are the same as described in the section "Communication With Other
Programs".
Sample U-Format:
UK
Disk Directory
[A8 A3 B T35 "Attributes" /
W W W W W T35 "Reserved" /
W W W T35 "Time, Date, 1st cluster #" /
D T35 "File Size" ]
MON User's Manual
page 50
Communication With Other Programs
A special memory area is defined beginning at hex location 0130 in MON's segment (i.e., in
REL-1). The area is 40 bytes long, and stores the values of 10 save variables denoted by V0,
V1, ..., V9. (This area is the same area used for variables V0 ... V9 in U-Formats.) Each variable
is allotted 4 bytes:
0130-0133
V0
0134-0137
V1
0138-013B
013C-013F
V2
V3
0140-0143
V4
0144-0147
0148-014B
V5
V6
014C-014F
V7
0150-0153
V8
0154-0157
V9
The purpose of this area is to allow MON to interact with other programs that may execute while
MON is still loaded in memory. For example, user programs that are assembled by MON and
then executed with the G (GoTo) command or the T (Trace) command can deposit values into
any or all of these locations, and MON can then use them as address values in its commands.
To implement this design goal, a special variable-input capability has been added to MON. A
special MON command has also been added to permit communication in the reverse direction;
i.e., from MON to the other program.
Variable-Input Capability
Whenever MON is awaiting your input of a hexadecimal word value (4 hex digits), you can type
instead one of the variable names V0, V1, ..., V9. MON will retrieve the value from its memory
space, and use it as if you had entered 4 digits manually. This allows you to set, among other
things, the following quantities from values deposited by another program:
MON's Current Address
Beginning or End addresses of a named region
GoTo Address
Address range specification in Copy or Verify commands.
Set range, J, L, and breakpoints parameters.
Set screen attributes
Variable-Output Capability
The main-prompt dot command (page 42) allows MON to write to the variables V0 ... V9.
With it, the offset part of MON's current address is written to the designated location.
MON User's Manual -- Appendix
page A-51
Appendix A --- Assembler Syntax
The assembler (the "A" command) allows you to translate assembly language source statements
into executable machine language object code. Whether assembling a source file, or "patch"
assembling, the required syntax for source statements is the same.
LINE FORMAT
Each source statement is a line of ASCII text, arranged as follows:
LABEL: MNEMONIC OPERAND(S) ;COMMENTS
example:
SHOW:
MOV
AL, [SI]
; get limit value
The LABEL, if present, must begin in the very first column of the line (not preceeded by a space or TAB). It must
begin with a letter, consist of no more than 10 characters, and include only letters and/or digits. The colon (:)
is optional.
The MNEMONIC, if present, must not begin in column 1. That is, it must be preceeded by at least one space or
TAB character. Legal mnemonics are either 8088/8086 instructions (listed on page A-3), or assembler
directives (also called psuedo-ops) listed on page A-2.
The number and types of OPERANDS required depends on the mnemonic. Two or more operands must be
separated by at least one space or TAB or other operand separator, but no space or TAB should appear within
an operand. The permissible forms of operands are:
Operand Form
Examples
Notes Comments
i Numerical constant
5, 17H, 29635
see Numerical Values on the next page
ii Register Name
AX, AL, SI, DH
iii Absolute memory offset
[5], [17H], [1234H] P S M must be in square brackets [ ].
iv Register indirect memory offset [SI], [BX]
P S M Register name must be in square brackets [ ].
v Symbolic Address or Value
SM
vi A literal ASCII constant
SUM, SHOW,
OFFSET TOTAL
The symbolic name must be defined
elsewhere in the program as a label or in a
DW, DB, or EQU statement. The keyword
OFFSET if present means "the address of"
instead of "the contents of".
'A', 'today is '
Use single quotes to bracket ASCII constant.
Note P: The letter "B" (for byte) or "W" (for word) may precede these forms; in fact, it may be required if the
operand size (8 or 16 bits) would otherwise be ambiguous. Thus: MOV AL,[SI] is OK but INC [SI] is illegal
because it is ambiguous. You must use INC B[SI] or INC W[SI]. This use of B or W is a shorthand for
the longer BYTE PTR or WORD PTR required by other assemblers.
Note M: Mixed memory expressions of the form VARIABLE[xx+yy±cc] are allowed, where VARIABLE is a
symbolic name, xx is either SI or DI, yy is either BX or BP, and cc is a constant (max 16 bits).
Note S: A segment override prefix CS:, DS:, ES:, or SS: can prefix the mnemonic or memory operand in most
instructions. Thus: ES MOV AL,[SI] and MOV AL,ES:[SI] have the same meaning.
COMMENTS, if present, follow a semicolon (;) which follows the last operand on the line.
Every line must be terminated; in a source file, by a carriage return and linefeed (0D 0A hex); when patch
assembling from the keyboard, by pressing the <Enter> key.
MON User's Manual -- Appendix
page A-52
Blank lines, or all-comment lines (beginning with a semicolon), are allowed and advisable to improve the
readability of your program.
Remember: TABS, spaces, or commas are separators. The semicolon begins comments.
If there is no label, put a space or TAB before the mnemonic to indent it from column 1.
Upper/Lower case are not distinguished in the assembler except in literal ASCII constants. Thus the lines
SHOW1: MOV AH,'a'
and
Show1: mov ah,'a'
are equivalent.
Numerical Values
must begin with a digit 0 to 9 (cannot begin with a letter). Thus use 0FF, not FF for hex FF.
Suffix H denotes hexadecimal, D denotes decimal, Q or letter O denotes octal, B denotes binary.
Numbers with no suffix are assumed to be decimal, unless they begin with digit 0 in which case they are
assumed to be hexadecimal
An X can precede the suffix letter to avoid ambiguity. Example: 011XB is binary 11. Without the X,
would 011B mean binary 11 or hex 11B ?
ASSEMBLER DIRECTIVES (PSUEDO-OPS)
The following Assembler Directives are described following the assemble (A) command.
SYMBOLS
ORG
ERROR
LIST
SOURCE
ALIGN
Additional assembler directives are:
Directive & Operand(s) Examples
Comments
DB value(s)
DB 5, 6, 2, 7, 23H, 0, 1
DB ?
STRING: DB 'Hello$'
reserves memory for, and initializes, byte variables.
? denotes the value is unknown at assembly time.*
A DB string can be any number of characters long
DW value(s)
DW 3400H, 7, 23H
DW ?
CODE: DW 'AB'
reserves memory for, and initializes, word variables.
? denotes the value is unknown at assembly time.*
A DW string must be exactly two characters long.
In either of these assembler directives, value may be replaced by n DUP (value), where n is a numeric constant:
Examples
Meaning
DB 5 DUP (7)
same as DB 7, 7, 7, 7, 7. Reserves & initializes 5 bytes.
DB 1000 DUP ('a')
same as 1000 lines of DB 'a'. Reserves and initializes 1000 bytes.
DW 16H DUP (5)
same as 22 lines of DW 5. Reserves & initializes 44 bytes.
*MON initializes these locations to zeroes, but other assemblers may initialize them differently.
Additional assembler directives are:
Directive & Operand(s) Examples
LABEL: EQU value
END
FIVE: EQU 5
MOV AL,FIVE
END
Comments
Useful for defining symbolic constants.
Equivalent to MOV AL,5
Takes no label or operands. END must be followed
by a carriage return and linefeed!
MON User's Manual -- Appendix
page A-53
THE "IF" CONSTRUCT
MON's assembler allows a conditional construct of the form
IF condition instruction
where the keyword IF occupies the position in the line of the usual mnemonic. The condition is one of:
A
AE
B
BE
C
E
G
GE
L
LE
P
PE
S
Z
O
NA
NO
NAE
NB
NBE
NC
NE
NG
NGE
NL
NLE
NP
PO
NS
NZ
which are the conditional jump mnemonics without the leading "J". The instruction is any legal instruction. The
assembler converts this source line into two instructions (the first a conditional jump around the second) such that
instruction is executed if and only if
Example: these source lines... .. are assembled as if they were ..
condition is true. Thus during
CMP AL,5
CMP AL,5
execution of the example shown, BL
IF E INC BL
JNE NEXT
will be incremented if and only if AL
INC BL
equals 5.
NEXT: ...
LEGAL PROCESSOR MNEMONICS
AAA
AAD
AAM
AAS
ADC
ADD
AND
CALL
CBW
CLC
CLD
CLI
CMC
CMP
CMPSB
HLT
IDIV
IMUL
IN
INC
INT
INTO
IRET
JA
JAE
JB
JCXZ
JBE
JC
JE
JLE
JMP
JNA
JNAE
JNB
JNBE
JNL
JNLE
JNO
JNP
JNS
JS
JZ
LAHF
LDS
LEA
LES
LODSB
LOOPNZ MOV
MOVSB
PUSH
POP
SAHF
STI
CMPSW
CWD
JG
JGE
JL
JNC
JNE
JNG
JNGE
JNZ
JO
JP
JPE
JPO
LODSW
LOOP
LOOPE
LOOPZ
LOOPNE
MOVSW MUL
NEG
NOP
NOT
OR
OUT
POPF
PUSHF
RCL
RCR
RET
RETF
ROL
ROR
SAL
SAR
SBB
SCASB
SCASW
SHL
SHR
STC
STD
STOSB
STOSW
SUB
TEST
WAIT
XCHG
XLAT
XOR
REPE
REPNE
REPNZ
REPZ
CS:
DS:
ES:
Legal prefixes are:
LOCK
REP
SS:
SAMPLE SYNTAX FILE
See the sample syntax file SYNTAX.SRC for examples of allowable assembler syntax. Although this program
does nothing useful, you can assemble it and execute it if you wish.
MON User's Manual -- Appendix
page A-54