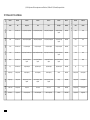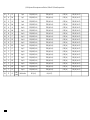
1
© 2014 Spicetone OÜ www.spicetone.com Võistluse 9, Tallinn 10132, Estonia, European Union SPICETONE® 6APPEAL™ Hexaphonic analogue overdrive/distortion with digital controls © 2014 Spicetone OÜ www.spicetone.com Võistluse 9, Tallinn 10132, Estonia, European Union 1 Quick Start.................................................................................................................................................................. 4 2 Overview of Features............................................................................................................................................. 5 2.1 QUALITY............................................................................................................................................................... 5 2.2 PRODUCT HIGHLIGHTS..........................................................................................................................................5 2.3 OTHER REMARKABLE FEATURES........................................................................................................................5 2.4 POLYPHONIC DISTORTION....................................................................................................................................6 2.5 ANALOGUE SUPERIORITY......................................................................................................................................6 3 Pots, Knobs and Interface.................................................................................................................................... 7 3.1 ENCODER................................................................................................................................................................. 7 3.2 CLOCK....................................................................................................................................................................... 7 3.3 POTENTIOMETER POSITION INDICATION..........................................................................................................7 3.4 FOOTSWITCHES................................................................................................................................................... 8 4 Presets......................................................................................................................................................................... 9 4.1 OVERVIEW OF PRESETS........................................................................................................................................ 9 4.2 AUTOMATIC STORE................................................................................................................................................9 4.3 SAVING A PRESET................................................................................................................................................10 4.4 SAVING A PRESET TO ANOTHER PRESET BANK............................................................................................10 4.5 RECALL SAVED PRESETS....................................................................................................................................11 4.6 RECALL DEFAULTS (INITIAL PRESET)............................................................................................................11 4.7 WORKFLOW OF PRESETS...................................................................................................................................11 4.8 6APPEAL FACTORY PRESETS......................................................................................................................... 12 5 Preset Banks........................................................................................................................................................... 14 6 Menus........................................................................................................................................................................ 15 6.1 PLAYER MODE..................................................................................................................................................... 15 6.2 MENU 1. SOUND..................................................................................................................................................16 6.3 MENU 2. PAN.......................................................................................................................................................17 6.4 MENU 3. SEQUENCER (SEQ)............................................................................................................................18 6.5 MENU 4 AND MENU 5. LFO 1 AND LFO 2...................................................................................................20 6.6 MENU 6. ENVELOPE (ENV)............................................................................................................................. 22 6.7 MENU 7. MIDI CONTROLLER SETUP............................................................................................................ 23 6.8 MENU 8.................................................................................................................................................................24 6.9 MENU 9. MIDI SETTINGS..................................................................................................................................24 6.10 MENU 10. GLOBAL PARAMETERS....................................................................................................................25 7 Features Explained.............................................................................................................................................. 27 7.1 SCULPTING THE SOUND......................................................................................................................................27 7.2 CLEAN TONE........................................................................................................................................................ 27 7.3 OVERDRIVE, CRUNCH AND FUZZ......................................................................................................................27 7.4 TONE STACK.........................................................................................................................................................28 7.5 SPREAD FUNCTION........................................................................................................................................... 28 7.6 FILTER SECTION..................................................................................................................................................29 7.7 ROOT BOOST CIRCUIT........................................................................................................................................ 29 7.8 MODULATIONS (LFO)........................................................................................................................................30 7.9 SEQUENCER.......................................................................................................................................................... 30 7.10 TAP TEMPO AND MIDI CLOCK.........................................................................................................................30 7.11 PER STRING SETTINGS.......................................................................................................................................30 7.12 BREAKOUT BOX...................................................................................................................................................31 8 Connectivity............................................................................................................................................................ 32 8.1 13PIN INPUT................................................................................................................................................... 32 8.2 MONO INPUT........................................................................................................................................................ 32 8.3 13PIN OUTPUT...................................................................................................................................................32 8.4 JACK OUTPUTS..................................................................................................................................................... 32 8.5 OUTPUT BOOST................................................................................................................................................... 33 2 © 2014 Spicetone OÜ www.spicetone.com Võistluse 9, Tallinn 10132, Estonia, European Union 8.6 9 MIDI IN, OUT AND THRU............................................................................................................................... 33 Guitars and other pedals................................................................................................................................... 34 9.1 HEXAPHONIC GUITARS.......................................................................................................................................34 9.2 MONO GUITARS...................................................................................................................................................34 9.3 BASS GUITAR........................................................................................................................................................34 9.4 OTHER PEDALS.................................................................................................................................................... 35 10 Computer Connection.................................................................................................................................... 36 11 MIDI....................................................................................................................................................................... 37 11.1 OVERVIEW OF MIDI IN 6APPEAL....................................................................................................................37 11.2 MIDI CONTROL MIDIIN, MIDIOUT AND MIDITHRU..................................................................................37 11.3 PROGRAM CHANGE AND BANK SELECT..........................................................................................................37 11.4 TEMPO SYNC........................................................................................................................................................ 38 11.5 SETTING UP EXTERNAL MIDI CONTROLLER.................................................................................................38 11.6 USING 6APPEAL AS A MIDI CONTROLLER.....................................................................................................39 11.7 MIDI MONOMODE............................................................................................................................................. 40 11.8 CONTROLLING 6APPEAL WITH EXPRESSION PEDALS...................................................................................41 12 Software Update............................................................................................................................................... 42 12.1 HOW TO CHECK SOFTWARE VERSION.............................................................................................................42 12.2 HOW TO UPDATE............................................................................................................................................. 43 13 Factory Reset..................................................................................................................................................... 45 14 Technical Specifications and Compatibility.......................................................................................... 46 14.1 TECHNICAL PARAMETERS..................................................................................................................................46 14.2 POWER ADAPTER................................................................................................................................................46 14.3 COMPATIBILITY AND CERTIFICATION..............................................................................................................46 14.4 TARIC................................................................................................................................................................... 47 14.5 ENVIRONMENTAL CONSCIOUSNESS..................................................................................................................47 15 Problems and questions................................................................................................................................ 48 15.1 FAQ AND TROUBLESHOOTING....................................................................................................................... 48 15.2 PROBLEM REPORTING........................................................................................................................................49 15.3 SUPPORT............................................................................................................................................................... 50 15.4 ANALOGUE EXPERIENCE AND NOISE...............................................................................................................50 15.5 PHASE ISSUES.......................................................................................................................................................50 16 Warnings............................................................................................................................................................. 51 17 Appendix............................................................................................................................................................. 52 17.1 TABLE 1. CLOCK POSITION VALUES IN MENUS.............................................................................................52 17.2 TABLE 2. POTS IN MENUS.................................................................................................................................53 17.3 TABLE 3. BUTTON VALUES AND COMBINATIONS......................................................................................... 54 17.4 TABLE 4. MIDI CC MESSAGES.........................................................................................................................55 17.5 TABLE 5. MIDI NOTEON MESSAGES..............................................................................................................58 17.6 FLOWCHARTS ON HOW TO USE 6APPEAL......................................................................................................62 3 © 2014 Spicetone OÜ www.spicetone.com Võistluse 9, Tallinn 10132, Estonia, European Union 1 QUICK START First of all, this device is meant to open up a whole new perspective for your hexaphonic guitar with 13pin output. If you don't have a hexaphonic axe at your hands yet, you can use our effect pedal with normal monophonic guitar and take advantage of customizable 24 presets (actually 144, thanks to 6 preset banks) and instant modifications. For mono guitar, use mono input with TS (not TRS) cable. All right, let us enter the world of hexaphony. Connect your guitar's 13pin output to 6Appeal 13pin input. Connect 6Appeal to one, two or even three guitar amps, or a recording device, using standard jack plug cables. Connect the mains. Almost any 9-12VDC centre negative polarity guitar effect adapter will do (at least 300mA). The most prominent thing on the interface is the CLOCK with LED lights. In the centre of the CLOCK there is the ENCODER that can be turned and pushed as a button. Turn the encoder or press the PREV or NEXT footswitch to browse 12 green and 12 red PRESET memory slots. The last PRESET (Preset 24, red at 12 o’clock) is reserved for your unaffected sound (FX off). Toggle between DRIVE effect (DRIVE is lit green, yellow or red) and CLEAN sound using the FX/ESC footswitch. (Drive LED in the middle of the Clock goes dark and PRESET 24 lights up). Adjust DRIVE, GAIN, TONE, LEVEL as usual. For more attack and transparency, add some clean signal using DRY knob. Mix the hexaphonic signal with monophonic sound using MONO knob. With mono pickups, MONO is your volume potentiometer (pot). LEVEL sets the sound level from your hexaphonic pickup. If you like your new settings, save the preset. To start saving, long press the encoder. To save, long press once more. To exit, short press FX/ESC footswitch. In default mode, the four POTS in the middle (07, 08, 09, 10) adjust SPREAD/TILT, meaning you can apply more or less of the effect of DRIVE, GAIN, TONE, LEVEL on higher or lower strings. For example you can apply more drive on higher strings or make low string louder. Short click ENCODER to enter menus where you can access further settings like distortion mode, string stereo balance, filter settings, root boosts, LFO modulations and much more. For example in MENU 1, toggle Clock Position 11 for no effect (Dark), overdrive (Green), crunch (Yellow), fuzz (Red). POTS have different duties in different menus, but as a rule Pots 1...6 and Clock Positions 1...6 positions affect corresponding strings (12 goes for the mono channel). See dedicated tables, block diagrams or read further on for details. If you find the learning curve rather steep, first focus on the main knobs and explore the factory presets. You can get into menus and advanced settings when you feel comfortable with the basics. This pedal has heaps of functions and some are still to come with software updates. 4 © 2014 Spicetone OÜ www.spicetone.com Võistluse 9, Tallinn 10132, Estonia, European Union 2 OVERVIEW OF FEATURES 2.1 QUALITY Spicetone' guitar effect pedals are designed, assembled and tested in Estonia in the North-East of European Union. Highly skilled personnel, who use precise automated PCB assembly equipment with automated optical inspection, make our pedals. We test the effect pedals with special testing equipment. Before shipping, we check each piece of gear with a guitar and an amplifier. And we keep in mind the environmental impact of our products. 2.2 PRODUCT HIGHLIGHTS Polyphonic (Hexaphonic) Overdrive/Distortion Full Analogue Signal Path Overdrive, Crunch and Fuzz 6x24 Preset Memory Slots 6 Banks for Presets 3 Footswitches and 10 Illuminated Potentiometers Tone Stack On/Off Parameter Spread: tilt (more effect on higher or lower strings) or smile (more effect on centre strings) Per String Settings (Effect On / Clean / Mute) Filter Section (two low pass cut-off points, adjustable resonance up to self-oscillation) Root Boost Circuit (Pre and Post to add glorious amounts low end punch) Dry Signal Blend (for tonal transparency and attack) Mono Signal Blend (mix hex with mono pickups) 13PIN IN and OUT; chain 6Appeal with 13pin effects like Roland/Boss GR/GP series MIDI IN, OUT/THRU 3 Mono/Stereo Jack Outputs (1/4" plug) High quality JFET operational amplifiers and Alpha potentiometers Sturdy Enclosure of maritime grade anodized aluminium Made in Estonia, Europe 2.3 OTHER REMARKABLE FEATURES Breakout Box (6Appeal can output 6+1 channels from hex pickup to ¼” jacks) MIDI Control In (control 6Appeal with MIDI) MIDI Control Out (use 6Appeal as a MIDI controller for your DAW or MIDI devices) 2 LFOs (sine, triangle, pulse, saw up, saw down, random; can be synced to each other) Parameter Modulation (modulate any pot with LFO) Panning Modulation (per string stereo panning modulation) Filter Modulation (auto wah-wah and rhythmic resonance) Phase spread for Modulations Syncing (synchronize the tempo with DAW or external device) Sequencer (sequenced modulations, can be tempo synced) Envelope (with external devices) Tap Tempo Suitable for Bass (no low end cutoff, can mute unused channels for 4string) Software updates (mini USB) 5 © 2014 Spicetone OÜ www.spicetone.com Võistluse 9, Tallinn 10132, Estonia, European Union 2.4 POLYPHONIC DISTORTION With normal mono pickups, overdrive sounds nasty with complex chords. This is because of intermodulation distortion. With hexaphonic pickups, you have a separate overdrive for each string, so that each overdrive has room to flourish. Intermodulation distortion introduces spurious signal components with frequencies that were not present in the original signal, based on the sum and difference products of the original frequencies. The introduced frequencies are often not related harmonically to the original frequencies, so the resultant newly generated frequencies are perceived as being non-musical. In human language: overdriven normal pickups can sound nasty in a bad way. Polyphonic (hexaphonic in most cases) distortion means there is a separate distortion circuit per string. Thus the nasty intermodulation distortion is eliminated. Internally, 6Appeal has 6+1 distortion pedal circuits, one for each string and one for monophonic signal. You can play complex harmonies just as you would do with clean or acoustic guitar. As each string has its own turf in the hexaphonic mode, you get huge orchestral harmonics from you guitar. Try playing you electric guitar like an acoustic. The complex harmonies you would have normally avoid, sound great. You can really fill the stage, if you hook up two amps and use a bit of stereo panning. Yes, 6Appeal has outputs for stereo and even stereo panning effect. 2.5 ANALOGUE SUPERIORITY Our guitarist friends have noticed that 6Appeal feels like a tube amp, especially like a certain classic British amp. Play "God Save the Queen" by the Queen and you get the point. An example of analogue superiority, the pedal is sensitive to picking technique. You can go from practically clean to heavily overdriven in the same setting. 6 © 2014 Spicetone OÜ www.spicetone.com Võistluse 9, Tallinn 10132, Estonia, European Union 3 POTS, KNOBS AND INTERFACE Besides the more obvious functions, we use combinations of buttons in more specific cases. Also, pressing shortly and pressing longer than 2 second are different functions. For all combinations of button presses, please see the Table 3 in appendix (Chapter 17.3). 3.1 ENCODER ENCODER (ENC) is a shiny knob in the middle of the Clock. The Clock has 12 LED lights in circle plus two on the sides and one below ENC. Encoder is a clickable rotary knob. In Player Mode, i.e at your starting point, turning the encoder does the same as tapping the footswitches PREV and NEXT – it takes you from preset to preset. Encoder also lets you save and recall presets, enter and operate menus. Read further on to find out how. 3.2 CLOCK CLOCK is the most prominent component of the interface. In normal Player Mode the 12 multicolor LED lights (CLOCK POSITIONS) show presets. There are 12 green and 12 red PRESET MEMORY SLOTS. You can save your own settings to any of these slots. There are four possible indication states that a Clock Position LED lights can have: green, yellow, red and dark. If you have selected a position with dark indication, dark is marked with green-red blinking sequence, so you can see in which position you are. If a position is not selected and the value is dark, that position is dark. In MENUS, CLOCK and its 12 POSITIONS let you access sound sculpting settings, extra effects and utility features. The POSITIONS can be Dark (no light), Green, Yellow or Red. There are also three LED light close to the encoder. TEMPO LED shows you modulation frequency rate (speed) that is dialled, tapped in, or obtained via external MIDI. DRIVE LED in the middle shows if you’re in no drive (dark), overdrive (green), crunch (yellow) or fuzz (red) mode. SAVE LED on the right from ENC lights up red when a preset is changed but not saved. It also blinks green shortly when the preset change is automatically stored (until the next time power 6Appeal off and on), and flashes when you are saving a preset. It also flashes when recalling settings. 3.3 POTENTIOMETER POSITION INDICATION You probably have noticed the illuminated POTS. This is not a gimmick but useful feature for indication for knob position. When changing a PRESET, the POT knob position does not change automatically. We steered clear of rather unreliable motorized potentiometers and opted for illuminated ones. If the knob position does not reflect the actual setting, the knob is dark and passive. Turn it until the physical pot knob indicator reaches the autostored or preset setting. The knob lights up green and is now active. Moving past that position the active pot knob is red. 7 © 2014 Spicetone OÜ www.spicetone.com Võistluse 9, Tallinn 10132, Estonia, European Union When you save the current preset, all active knobs turn green, as their position now matches the saved position. It sounds complicated but is dead simple to learn. In some cases where centre (or zero) position is important, it is marked with yellow light, such as spread and pan pots. Another way to put it, is that if a potentiometer is turned the way that does not reflect the preset state, the LED light is off and pot is passive until turned to the preset value. From then on, the pot is active. Dark = Pot is passive and is not regulating the sound Red = Pot is active but not turned to preset (saved) value Green = Pot is active and turned to preset value Yellow = Pot is active and in middle position – only when it is used for functions where middle (zero) point is important (spread, LFO amplitude etc). Pots are disabled if the corresponding function is turned off. Tone (Menu1, Clock 10) – if off, Pot 3 in Player Mode, Menu1, Menu9, Menu 10 and Pot 8 in Menu2, Menu 9, Menu 10 is disabled, Filter (Menu1, Clock 9)- if off, Pot 7…10 in Menu 1 are disabled SEQ Mode (Menu 3, Pot 11) ) – if off, Pot 1…10 in Menu3 are disabled LFO1 Mode (Menu 4, Pot 11) – if off, Pot 1…10 in Menu4 are disabled LFO2 Mode (Menu 5, Pot 11)) – if off, Pot 1…10 in Menu5 are disabled ENV Mode (Menu 6, Pot 11) – if off, Pot 1…10 in Menu6 are disabled There is also position indication in the CLOCK, a feature called POT DISPLAY. Basically, if you turn any POT which is not currently disabled, the LEDs flash in CLOCK to show you where the stored potentiometer position is. It also shows you the pot movement limits between 7 and 5 o’clock. You can turn the Pot Display feature globally off, if it annoys you. POT DISPLAY Menu 10 Clock 6: On (G) / Off (R) 3.4 FOOTSWITCHES In Player Mode, footswitches have pretty obvious functions. FX/ESC turns the drive effect on and off (FX on/off). PREV goes to previous preset (as does turning the encoder counter clockwise). NEXT goes to next preset (as does turning ENC clockwise). The footswitches also help you navigate the menus, recall presets, tap tempo etc. In any menu , saving or other non Player Mode situation, the FX/ESC is your way out, acting just as an escape button on your computer’s keyboard. It either takes you to Player Mode or back to menu from a submenu. Read on to find out more. 8 © 2014 Spicetone OÜ www.spicetone.com Võistluse 9, Tallinn 10132, Estonia, European Union 4 PRESETS 4.1 OVERVIEW OF PRESETS By default, 24 PRESET MEMORY SLOTS (12 green, 12 red) are at your disposal. Choose the presets either by rotary encoder (ENC) or the footswitches PREV and NEXT. Each PRESET MEMORY SLOT (Preset 1…23) holds information of the corresponding FX ON settings. Presumably these are you overdriven and/or modulated sounds. Preset 24 is special. This is the memory slot dedicated to your bypassed, clean tone. In Player Mode you can use FX/ESC footswitch to toggle between selected preset (Preset 1…23) and Preset 24. You can also browse to Preset 24 with PREV or NEXT footswitch or by turning the encoder. In the context of your selected Preset Bank, Preset 24 is your global clean preset. Saving it means you alter the clean tone that you get when you press FX footswitch OFF. Normally you wouldn’t want to make it dirty, so turn on DRY and keep DRIVE and GAIN pots low. There are two exceptions in displaying Preset in the Clock. When you are in Preset 12 (green at 12 o’clock) and switch FX off (activate Preset 24), the LED will go yellow, not red. And if you browse to Preset 24 and press FX/ESC, then nothing happens, as you are already in Preset 24. MIDI users, please keep in mind that for no drive effect situation (FX off), your MIDI controller actually sends a message to activate Preset 24 (i.e preset change). Note that by default the device starts up in first preset (Clock Position Green 1). You can make to start up in the last preset used. START WITH FIRST PRESET Menu 10 Clock 4: On (G) / Off (R) 4.2 AUTOMATIC STORE If you tune the POTS in a PRESET, the new settings are stored automatically, so that the next time you return to this preset slot, you have the last used settings. NB! Autostore is just for temporary setup. You have to save your favourites, because settings are autostored only until the device is powered on. You lose all unsaved content if you switch it off without saving. There's a SAVE LED in the middle of the CLOCK, on the right. If you turn any pots or change settings in menus, the LED light up red. This means the active Preset Memory Slot contains new information that has not been saved yet. Please note that because of a technical limitation the SAVE LED can be a bit too active in lighting up. This can happen when a pot is close to the saved value and thus becomes active. To put it short, if you are very sure that you have saved your preset, just ignore this LED if it shows the opposite. 9 © 2014 Spicetone OÜ www.spicetone.com Võistluse 9, Tallinn 10132, Estonia, European Union 4.3 SAVING A PRESET You can save a Preset to any Preset Memory Slot (24 per Banks) and any Bank (6). Please note that you can enter Save Mode only from Player Mode. You cannot start saving while still in a menu. The autostore, though, works constantly, even if you're in a menu. To enter Save Mode, hold down the Encoder more than 2 seconds. Save LED and you currently selected Preset Memory LED in the CLOCK start to blink. If you want to save in another memory slot, use rotary ENC to choose it. To save, hold down the ENC again for more than 2 seconds. Blinking stops. You are now in the newly saved preset – if you choose another preset memory slot, you are now in that slot. To exit Save Mode without saving, shortly press FX/ESC footswitch. Easy? Just in case we repeat it in a more compact way: SAVING PRESETS ENC Long Push In Player Mode = Enter Save Mode (ENC turn = choose where to Save) One more ENC Long Push = Save or FX footswitch = Exit The same process applies to Bypass/Clean Preset (red LED12 o’clock). Please keep in mind that in each Preset Bank, Preset 24 is global. In Player Mode you can use FX/ESC footswitch to toggle between selected preset (Preset 1…23) and Preset 24. Saving in Bypass/Clean mode means saving to your Preset 24. You can also browse to Preset 24 with PREV or NEXT footswitch or by turning the encoder. How to save to another Bank? See next chapter. 4.4 SAVING A PRESET TO ANOTHER PRESET BANK You can save a preset to any of the six preset banks. Use this only if using preset banks. ENC Long Push In Player Mode = Enter Save Mode ENC Short Push in Save Mode = Enter Save to Bank Mode ENC turn and Short Push in Save to Bank Mode = Choose a Bank to save to (Clock Positions 1…6); default is the Bank you are working with FX footswitch = Exit Save to Bank Mode ENC Long Push = Save or FX footswitch = Exit Note that this procedure does not change your selected bank. This means you can save to another bank, but you can use that banks only by selecting it in Menu 10 “Global”. PRESET BANK SELECTION Menu 10 Clock 11: Toggle to enter submenu SUBMENU 10.11 SELECT PRESET BANK NUMBER Clock 1…6 Bank1…6 Toggle On (G) / Off (R) 10 © 2014 Spicetone OÜ www.spicetone.com Võistluse 9, Tallinn 10132, Estonia, European Union 4.5 RECALL SAVED PRESETS We’re all familiar with undo process in computers. The obvious way to revert to saved preset and erase temporary autostore, is to unplug 6Appeal for a couple of seconds. Good news is that there is even easier way. If you want to recall a saved preset, shortly push ENC and FX simultaneously; press ENC slightly earlier and overall for less than a second, otherwise you get the initial preset. If you feel that it's all too messed up but thankfully not saved yet, turning the device off and then on again (by removing the power cord) effectively restores all saved presets. Note that recalling only applies to Player Mode, Menus1...8; it does not work in SubMenus and in Global Menus 9..10, Tap Tempo and Save Mode The SAVE LED, on the right in the CLOCK, flashes when recalling the saved preset. 4.6 RECALL DEFAULTS (INITIAL PRESET) If you feel the current preset is utterly messed up and you want to start on a blank page, you can recall a somewhat neutral default preset. It’s a basic preset, but some features are turned on, like Root Boost Pre; Filter is on, but there’s almost no cutoff. RECALLING. To recall the default preset, long push ENC and FX simultaneously (ENC slightly earlier and hold both longer than 2 seconds). The lights will flash, indicating the default (initial) preset is loaded. In Player Mode and Menus 1…8 you can recall initial preset (preset based recall). In Menu 9…10 you can recall a default global state (global recall), leaving current preset settings as they are. By the way, in Menu 10.11 (Banks), the Recalling Process recalls default (factory) Preset Bank. The SAVE LED, on the right in the CLOCK, flashes when recalling. 4.7 WORKFLOW OF PRESETS People like different workflows. In most cases you’d want to keep PRESET SLOT 24 (red at 12 o’clock) as your clean sound, as you can access it with FX/ESC footswitch at any time. For other PRESETS, you could start with cleaner sounds and move on to more distorted sounds and then to modulated/sequenced sounds and experimental stuff. Or you could use series of presets, starting with almost clean followed by distorted followed by cleanish etc. Or, for live concert situation, you could arrange the presets in the order of your tracklist. We suggest you to keep the overall volume near unity, meaning the distorted presets should not be much louder than the clean ones. Adjust LEVEL POT accordingly. Note that you can mute PRESET SLOT Red 12 by turning down LEVEL and DRY. This way your FX/ESC will work as mute/unmute footswitch. You can apply this solution, if you don’t need clean sound and if you don’t route the sound to other effect pedals. 11 © 2014 Spicetone OÜ www.spicetone.com Võistluse 9, Tallinn 10132, Estonia, European Union 4.8 6APPEAL FACTORY PRESETS Here’s the list of factory presets in 6Appeal. Note that Preset 24 is global clean preset that is accessible with FX footswitch from Presets 1…23. Presets 1…12 are shown in Clock with green LEDs. Presets 13…24 are shown in Clock with red LEDs. 6APPEAL FACTORY PRESETS PRESET Preset 1 Preset 2 NAME Hex Overdrive Hex Crunch, 30% Dry MODULATION - Preset 3 OD No Tone, 30% Dry - Preset 4 Resofilter Max Dry - Preset 5 Preset 6 Preset 7 Preset 8 Preset 9 Preset 10 Preset 11 Preset 12 Preset 13 Preset 14 Preset 15 Preset 16 Preset 17 Preset 18 Preset 19 Preset 20 Preset 21 Preset 22 Preset 23 Preset 24 High Gain Bluesy Overdrive Hazy Fuzz Inner Whistler Crunch Deep Drive Slow Tremolo Fast Tremolo Faster Tremolo Resonant Vibe, Crunch Random OD Filter Modulation Double LFO A Double LFO B Sample'N'Hold Pan Drive OD SEQ Hex Crunch SEQ ? High String Solo SEQ Mono Overdrive Clean Slow LFO1 Slow Filter LFO1 Slow LFO1 Fast LFO1 Faster LFO1 LFO1 Pulse LFO1 Random LFO 1,2 Sync LFO 1,2 Sync LFO Phase Spread LFO1 Pan SEQ Synced To LFO1 Fast, Only On Strings 5,6 SEQ Str 4,5,6 - OTHER Less Drive, More Dry On Lows More Drive, Less Dry On lows, Clean MonoCh Less Drive, More Dry On Lows Less Highs, On The Breakup Resonant Filter Root Boost Pre And Post Resonant Filter Random Filter LFO2 30% Dry Low Strings Faster High Strings Faster -Synced To LFO1 Clean 30% Mono 30% Gain, 100% Dry If you want to overwrite presets in the currently selected bank with factory default, please follow RECALL process, as described in Chapter 4.6. 12 © 2014 Spicetone OÜ www.spicetone.com Võistluse 9, Tallinn 10132, Estonia, European Union NB! Besides the official factory set, Preset Bank 6 holds a set of modulation presets. Second half of those are for working with external devices (MIDI Expression Pedal, Roland GR-55 etc). PRESET Preset 1 Preset 2 Preset 3 Preset 4 Preset 5 Preset 6 Preset 7 Preset 8 Preset 9 Preset 10 NAME Phase-wave Phase-wah Bass-Mod Piano-Mod Freq-wave Seq-Ballad Seq-Rock Seq-Env Envelope-sync Pan-Modu Preset 11 Swing-Wah Preset 12 Preset 13 Auto-Wah Wah-Mod Clean/ODSwell Clean/OD Cello Staccato Wah-Mod Preset 14 Preset 15 Preset 16 Preset 17 Preset 18 Preset 19 Preset 20 Preset 21 Preset 22 Preset 23 Preset 24 Clean-Mod Factory Preset 10 (Sine MOD) with Phase Spread Preset 1 + LFO2 Slow Filter Factory Preset 12 (Pulse MOD) on String 1…3, Crunch Preset 3 with Falling Sawtooth (piano MOD) Preset 1 (Phase-wave) with Frequency Spread and Pan MOD Sequencer String 4…5, slow Sequencer String 5…6, slow Sequencer and Envelope String 3…5 Envelope 2/3/4/5 keel süngitud LFO1st Panning Modulation LFO1 --> Filter, LFO2 --> Drive/Level Opposite Phase and Phase Spread Preset 11, deeper LFO1, no spread on LFO2 External Pedal Level/Drive opposite phasevastasfaasis + Filter External Pedal from Clean to Overdrive (ModWheel) 1-3 string OD and soft LFO, 4-6 string clean (ModWheel) 2-5 string with envelopes, GR-55 2-5 string with envelopes, GR-55 Preset 8 with GR-55 (slow envelope) LFO 1 with clean 13 © 2014 Spicetone OÜ www.spicetone.com Võistluse 9, Tallinn 10132, Estonia, European Union 5 PRESET BANKS When getting started with 6Appeal, you would probably want to stick with 24 PRESETS that you can browse using PREV and NEXT footswitch or by turning the encoder. For advanced setups you have the firepower of 6 PRESET BANKS at your command. This takes the number of your customizable preset to a whopping 6x24=144, which most probably is more than you’ll ever need. But it’s there. If you plan to use the pedal in different setups, it is advisable to set up different sets of presets. For example you can set Bank 1 for studio work, Bank 2 for stage and Bank 3 for solely monophonic applications. Or set the banks up for different guitars. You can use up to six banks. That takes your maximum number of presets to 144. Sure there’s no need to use all the firepower, but it is there if you need it. PRESET BANK SELECTION Menu 10 Clock 11: Toggle to enter submenu SUBMENU 10.11 SELECT PRESET BANK NUMBER Clock 1…6 Bank1…6 Toggle On (G) / Off (R) You can save a preset to another preset bank. Please see Chapter 4.4 for details. SAVING A BANK. You can save all modified presets, i.e you can save the whole active bank. Or you can save your active bank to another bank. Enter Submenu 10.11 (Menu 10, Clock 11). DRIVE LED is blinking to indicate you’re in submenu. Clock 1…6 represent banks. Green marks active. Turn ENC to any clock position you want to save to and long press ENC to save. If you save to a new bank, the new bank is automatically activated after bank save. Please note that in that case your settings is the previously active bank are not saved. If you want to have two identical banks, first save the active bank to active, and then proceed saving it to a new bank. If you find your currently selected preset bank is utterly messed up, you can recall the factory settings. This will erase all your presets in the currently selected bank. RECALLING BANKS. Enter Submenu 10.11 (Banks). To recall the factory default bank to the bank you are using (active bank marked with green LED). Long push ENC and FX simultaneously (ENC slightly earlier and hold both longer than 2 seconds). The lights will flash, indicating the default (initial) Preset Bank is loaded. You can only recall to active bank, not any other bank. NB! Similarly to Preset Recall, loading of a bank to another bank only temporarily overrides it, unless you follow the Save Bank process (long ENC on the bank’s position in Submenu 10.11). 14 © 2014 Spicetone OÜ www.spicetone.com Võistluse 9, Tallinn 10132, Estonia, European Union 6 MENUS NB! To save space, we use abbreviations for menu items. For example 0 is mono channel, 16 means strings 1...6. The default startup is in Player Mode, giving you control over essential features (DRIVE, GAIN, TONE, LEVEL, MONO, DRY and the corresponding SPREAD knobs). To access extended settings, shortly press the encoder in the middle of the clock (ENC SHORT). Now you have entered the menu that was opened the last time. On first use it’s the Menu 1 “Sound” that you enter. Menu 1 is the most important menu for sculpting your sound. Hence its contents are written on the pedal enclosure. If you don’t feel like experimenting much, you can come by with just that menu. In any case, pushing ENC shortly is pretty similar to pressing Shift knob on your computer’s keyboard, only with ENC you push and release it. A blinking knob (01...10) shows, in which menu you are. To go to another menu, use PREV and NEXT FOOTSWITCH. To exit Menus, press FX/ESC footswitch. Menu 1…7 settings are saved within a preset. Menu 9 “Midi” and 10 “Global” are global menus and their settings are applied to all presets in all preset banks. Please remember to save a preset if you like your settings. You can save a preset to any Preset Memory Slot (23 normal slots and Slot 24 for clean/bypass) in the selected Bank. If you work with more than 24 presets, there are 6 Preset Banks available. If you tune the pots in a preset, the new settings are stored automatically, so that the next time you return to this preset slot, you have the last used settings. Settings are stored only until the device is powered on. You lose all unsaved content if you switch off without saving. Red SAVE LED (right next to ENC) indicates that the preset has been altered and has to be saved, if you want to keep the changes after power disconnected. For saving process, please see Chapter 4.3 for details. You can save a preset to another preset bank. Please see Chapter 4.4 for details. 6.1 PLAYER MODE This is the essential state, where POTS 1…10 do what is written next to them without *(asterisk). There are advanced menus, where POTS do other stuff, too. The contents of MENU 1 are written with an *, but skip this info for now. DRIVE controls clipping. GAIN controls the signal strength that is fed to latter stages. TONE is classic Tone Circuit that rolls off highs. It can be switched off in MENU 1. LEVEL is basic output level (volume) pot for hexaphonic drive channels. MONO pot determines how much monophonic signal is mixed in. NB! If you are using a normal monophonic guitar without hex pickups then this is your volume/level knob. Meaning you have to turn it up with normal pickups, otherwise you hear no sound. 15 © 2014 Spicetone OÜ www.spicetone.com Võistluse 9, Tallinn 10132, Estonia, European Union DRY controls how much dry, unaffected clean signal, both mono and hex, is mixed in. Very useful for adding transparency and attack. SPREAD pots (7…10) in the middle do the SPREAD thing that is explained further on. SPREAD only has effect on hexaphonic signal. DRIVE SPREAD lets you add more or less drive on higher or lower strings. TONE SPREAD mean shifting Tone Circuit toward high or low strings. For example for fuller tap harmonics you can cut highs on higher strings but keep all the available higher harmonics on low strings. LEVEL SPREAD is volume control for higher to lower strings. Actually you can make mid strings louder or quieter, too. Read on to find out, how. DRY SPREAD let you control how much dry (clean) signal is added to overdriven high or low string signal. To put in a more formal way: DRIVE Player Mode Pot1 GAIN Player Mode Pot2 TONE Player Mode Pot3 LEVEL Player Mode Pot4 MONO Player Mode Pot5 DRY Player Mode Pot6 DRIVE SPREAD Player Mode Pot7 TONE SPREAD Player Mode Pot8 LEVEL SPREAD Player Mode Pot9 DRY SPREAD Player Mode Pot10 6.2 MENU 1. SOUND MENU 1 (POT01 blinking) sets the main sound options that affect the fully analogue signal path. These are the most important sound sculpting settings. You can also bypass/mute and adjust FILTER if it’s switched on. The Clock Positions 1…6 apply for strings (Menu 1 to Menu 6) and Clock Position 12 applies to monophonic channel. This means you can apply or not apply the effect per string / per channel. In Menu 1 you can also mute strings that can be useful full bass guitar or for soloing. In Menu 1 in strings settings, Clean (yellow LED) means that particular string is passed through without applying any effects in the menu. For example you can use lower strings without overdrive. Occasionally you might also want to completely mute some strings (red LED). STRING 1 ON/ CLEAN/MUTE Menu 1 Clock 1: On (G) / Clean (Y) / Mute (R) STRING 2 ON/ CLEAN/MUTE Menu 1 Clock 2: On (G) / Clean (Y) / Mute (R) STRING 3 ON/ CLEAN/MUTE Menu 1 Clock 3: On (G) / Clean (Y) / Mute (R) STRING 4 ON/ CLEAN/MUTE Menu 1 Clock 4: On (G) / Clean (Y) / Mute (R) STRING 5 ON/ CLEAN/MUTE Menu 1 Clock 5: On (G) / Clean (Y) / Mute (R) STRING 6 ON/ CLEAN/MUTE Menu 1 Clock 6: On (G) / Clean (Y) / Mute (R) 16 © 2014 Spicetone OÜ www.spicetone.com Võistluse 9, Tallinn 10132, Estonia, European Union The Clock Positions on the left apply to sound sculpting settings that in the old times used to demand soldering. See Chapter 6 for in depth explanations. If you feel the sound is lacking low end, turn on Root Boost Circuit either pre effect, post effect or both. Watch out not to blow your speakers – too much bass can rip the speaker cones off. ROOT BOOST POST Menu 1 Clock 7: 0Off_16Off (D) 0Off_16On (G) 0On_16Off (Y) 0On_16On (R) ROOT BOOST PRE Menu 1 Clock 8: 0Off_16Off (D) 0Off_16On (G) 0On_16Off (Y) 0On_16On (R) In most of the factory setting, the Filter Section is turned on. Use Pots 7…10 to tune it. Filter is useful for rolling off some highs. With extreme resonance you’re in the territory of creative effects. Filter Circuit comes after Drive Circuit. Note that Filter is a stereo effect and is not passed on through 13pin Out. FILTER SECTION ON/OFF Menu 1 Clock 9: Filter On (G), Off (R) Getting rid of the Tone Stack enhances lower end and opens up higher frequencies. Tone Circuit sits in the Drive Circuit. You can compensate increased higher content by rolling off some highs with Filter Circuit. TONE STACK Menu 1 Clock 10: On (G) / Off (R) DRIVE TYPE Menu 1 Clock 11: Overdrive (G) / Crunch (Y) / Fuzz (R) / FX Off (D) Just like with strings, you can mute or keep the mono channel clean, too. MONOCH Menu 1 Clock 12: On (Green) / Clean (Yellow) / Mute (Red) In Menu 1 Pots 1...6 do the same as in Player Mode: DRIVE Player Mode & Menu 1 Pot1 GAIN Player Mode & Menu 1 Pot2 TONE Player Mode & Menu 1 Pot3 LEVEL Player Mode & Menu 1 Pot4 MONO Player Mode & Menu 1 Pot5 DRY Player Mode & Menu 1 Pot6 In Menu 1 the four Pots in the middle (POT 7…10) are FILTER settings that work only with the filter engaged (Menu 1 Clock 9). FILTER affects 1/4” jack outputs only. These are highly beneficial Pots for sculpting your sound and rolling off highs. You can get some nice twang, chime and whistle with those. FREQUENCY A Menu 1 Pot7 FREQUENCY B Menu 1 Pot8 FILTER LEVEL (VOLUME) Menu 1 Pot9 FILTER RESONANCE Menu 1 Pot10 Watch out, if you set the resonance high, the filter can squeal and screech. On the other hand you can get nice jangle or instant feedback paradise with high resonance. 6.3 MENU 2. PAN In MENU 2 (POT 2 blinking) the POTS 1…6 let you pan the strings in stereo. If you don't bother to set up panning manually, there are several autopan setups in MENU 2. 17 © 2014 Spicetone OÜ www.spicetone.com Võistluse 9, Tallinn 10132, Estonia, European Union AUTOPAN 1 Menu 2 Clock 1: LRLRLR (G) / Reverse (Y) / Off (R) AUTOPAN 2 Menu 2 Clock 2: RRRLLL (G) / Reverse (Y) / Off (R) AUTOPAN 3 Menu 2 Clock 3: L2R2L5R5L10R10 (G) / Reverse (Y) / Off (R) AUTOPAN 4 Menu 2 Clock 4: L10L5L2R2R5R10 (G) / Reverse (Y) / Off (R) AUTOPAN 5 Menu 2 Clock 5: L10R5L2R2L5R10 (G) / Reverse (Y) / Off (R) AUTOPAN 6 Menu 2 Clock 6: MONO (G) / Reverse (Y) / Off (R) Last but not least, you can choose the way the SPREAD KNOBS act. By default these give more effect on higher or lower strings. Set SPREADS to Smile option and you can cut or boost the effect more on middle strings. For example, Level Spread in Smile settings gives you something similar to midrange frequency boost. Experiment. SPREAD function works on MODULATIONS, too (Pot 8, Pot 10 in Menu 3, 4, 5). SPREADTYPE 1 Menu 2 Clock 12: Tilt (G) / Smile (R) In SEQ and LFO1,2 you can apply different frequency rate (speed) to low and high strings with Pot 8 (Menu 3…5). But that is not all – in these menus, you can make Pot 8 to apply different phasing to high and low strings. SPREADTYPE 2 Menu 2 Clock 11: Freq (G) / Phase (R) As said, in Menu 2 the POTS 1…6 set the stereo panning of separate strings. This works only with a polyphonic pickup and applies to left and right output jack. STRING 1 PAN Menu 2 Pot1 STRING 2 PAN Menu 2 Pot2 STRING 3 PAN Menu 2 Pot3 STRING 4 PAN Menu 2 Pot4 STRING 5 PAN Menu 2 Pot5 STRING 6 PAN Menu 2 Pot6 The four knobs in the middle are SPREAD settings, the same as in Player Mode. DRIVE SPREAD Player Mode & Menu 2 Pot7 TONE SPREAD Player Mode & Menu 2 Pot8 LEVEL SPREAD Player Mode & Menu 2 Pot9 DRY SPREAD Player Mode & Menu 2 Pot10 6.4 MENU 3. SEQUENCER (SEQ) Menu 3 (POT03 blinking) controls a 24 step sequencer. The sequence is described in Menu 3 submenus (Clock Position 7 and 8). Both have a submenu of 12 steps. Describe the Step On with green LED, Step Off with dark LED and mark a restart point with red. Sequence starts from Menu 3 Clock 7 submenu and continues to Clock 8 submenu. Whenever a red step is reached, the sequencer restarts. If there is no red step, the sequence runs all 24 steps. Modulation Depth determines the strength of parameter change. In that sense the sequencer is like pulse modulation, but you may apply more complex rhythmic figures. Sequence can be started and stopped by external MIDI controller sending Midi CC #30. A sequence also starts when preset is selected, if Menu 3 Clock 9 is set to On. If you do not want to use external MIDI control, you may create two nearby presets, in one of these Clock 9 switched 18 © 2014 Spicetone OÜ www.spicetone.com Võistluse 9, Tallinn 10132, Estonia, European Union On and in other switched Off – in this case changing between presets feels like switching sequencer On/Off. Now for the detailed overview of Menu Items (Clock Positions). You can turn modulation off on certain strings, setting it from Clock Positions 1…6. STRING 1 MODULATION Menu 3 Clock 1: On (G) / Off (R) STRING 2 MODULATION Menu 3 Clock 2: On (G) / Off (R) STRING 3 MODULATION Menu 3 Clock 3: On (G) / Off (R) STRING 4 MODULATION Menu 3 Clock 4: On (G) / Off (R) STRING 5 MODULATION Menu 3 Clock 5: On (G) / Off (R) STRING 6 MODULATION Menu 3 Clock 6: On (G) / Off (R) There are two submenus, each with 12 sequencer patterns. To pick any of these, enter submenu and toggle a clock position with encoder (On (G) / Off (D) / Reset (R)): SUBMENU 3.7: STEP1 Menu 3 Clock 7: Toggle to enter SUBMENU 3.8: STEP2 Menu 3 Clock 7: Toggle to enter To get Sequencer going when you select a preset, set it to start when preset starts: START SEQ WITH PRESET: Menu 3 Clock 9: On (G) / Off (R) You can synchronize SEQ with LFO 1 at the rate of 1, 2 or 4 times. If you want the sequencer in sync with external MIDI or TAP TEMPO, you must first sync LFO1. SYNC SEQ TO LFO1 Menu 3 Clock 10: Off (D) / 1X (G) / 2X (Y) / 4X (R) SYNC LFO1 Menu 4 Clock 10: Off (D) / Tempo (G) / Midi (Y) / Midi.OR.Tempo (R) If you have synced tempo to LFO1, turning Pot 7 changes the SEQ tempo in relation to LFO1 (from -16 times to +16 times the speed of LFO1). Setting LFO1 to slow rate and slowing down even more gives you slower setting than Pot 7 without synching; and vice versa for faster. To turn SEQ on, set it to control either parameters, panning or filter parameters. Please note that you cannot bypass filter modulation per string, as the Filter works on 1/4" outputs. SEQ MODULATION MODE Menu 3 Clock 11: Off (D) / Parameter (G) / Pan (Y) / Filter (R) You can turn on sequenced modulation on mono channel: MONO CHANNEL SEQ (0) Menu 3 Clock 12: On (G) / Off (R) In sequencer menu the main POTS change the corresponding sequenced modulation depth. Depending on your settings, the main functions, panning or filter can be modulated. Note that turning the depth past the mid-point (yellow light) counter clockwise reverses the shapes. DRIVE / PAN1 / FILTER FREQ A MOD DEPTH Menu 3 Pot 1 GAIN / PAN2 / FILTER FREQ A MOD DEPTH Menu 3 Pot 2 TONE / PAN3 DEPTH Menu 3 Pot 3 LEVEL / PAN4 / FILTER VOLUME MOD DEPTH Menu 3 Pot 4 MONO / PAN5 / FILTER RESONANCE DEPTH Menu 3 Pot 5 DRY / PAN6 DEPTH Menu 3 Pot 6 The four knobs in the middle set SEQ Frequency and SEQ Level. You can also apply more or less modulation on lower or higher strings, using familiar spread function. 19 © 2014 Spicetone OÜ www.spicetone.com Võistluse 9, Tallinn 10132, Estonia, European Union SEQ FREQUENCY / RELATION TO LFO 1 Menu 3 Pot 7 SEQ FREQUENCY SPREAD Menu 3 Pot 8 SEQ LEVEL (MOD AMPLITUDE) Menu 3 Pot 9 SEQ LEVEL SPREAD Menu 3 Pot 10 Troubleshooting to get SEQUENCER going! Checklist: o Is SEQ on? (Menu 3, Clock Position 11) o You must define a sequence type in Menu 3 Submenus, available in Clock positions 7 and 8 o SEQ does not start with preset; set it to start with preset (Menu 3 Clock Position 9 Green) o You must turn at least one of the Pots 1…6, thus defining sequenced modulation depth for at least one parameter. o In Menu 3, Pot 9 that controls modulation amplitude, must not be in zero position. 6.5 MENU 4 AND MENU 5. LFO 1 AND LFO 2 Menu 4 (POT04 blinking), Menu 5 (POT05 blinking). There are two LFOs, which may have different shapes: sine, triangle, pulse, rising or falling saw and random level (Menu 4&5, Clock 7 and/or 8). Experiment. LFOs may run at independent tempo, but can be controlled externally by MIDI (CC #1, CC #2 or Pitch Bend) (Menu 4&5 Clock 9). LFO 1 can be synced with TAP TEMPO or MIDI and LFO 2 can be synced with LFO 1. You could say that LFO 1 and LFO 2 have a sort of master-slave relationship. The controls in these menus are the same, just that they influence a separate LFO. You can use both LFOs at the same time or only one (LFO1) of these. Two LFOs give you a possibility to control diverse groups of parameters at the same time (like main parameters and Pan or Filter parameters), which can give you rather experimental sounds. First of all you can turn modulation off on certain strings, setting it from Clock Positions 1…6. STRING 1 MODULATION Menu 4&5 Clock 1: On (G) / Off (R) STRING 2 MODULATION Menu 4&5 Clock 2: On (G) / Off (R) STRING 3 MODULATION Menu 4&5 Clock 3: On (G) / Off (R) STRING 4 MODULATION Menu 4&5 Clock 4: On (G) / Off (R) STRING 5 MODULATION Menu 4&5 Clock 5: On (G) / Off (R) STRING 6 MODULATION Menu 4&5 Clock 6: On (G) / Off (R) 20 © 2014 Spicetone OÜ www.spicetone.com Võistluse 9, Tallinn 10132, Estonia, European Union You have several modulation types to choose (sine, triangle, pulse, rising and falling sawtooth). The possible Shapes are available through two clock positions, but with one LFO you can use only one Shape. Check out the Random Shape setting for experimental sounds. If both Shapes are off, the LFO is off. SHAPE 1 Menu 4&5 Clock 7: Off (D) / Sine (G) / Triangle (Y) / Pulse (R) SHAPE 2 Menu 4&5 Clock 8: Off (D) / Rising (G) / Falling (Y) / Random (R) If you have connected a dedicated MIDI controller to 6Appeal’s MidiIn, or have connected other MIDI device and set correct MIDI channels, you can control LFO rate with modulation wheel, breath control or pitch bend. NB! If you make the MIDI Control active, your LFO will stop autorunning and starts to follow either one of these three MIDI control messages. LFO MIDI CTRL Menu 4&5 Clock 9: Off (D) / ModWheel (G) / BreathCtrl (Y) / PitchBend(R) You can synchronize LFO1 with TAP TEMPO or MIDI IN. SYNC LFO1 Menu 4 Clock 10: Off (D) / Tempo (G) / Midi (Y) / Midi.OR.Tempo (R) You can synchronize LFO2 with LFO1 at the rate of 1, 2 or 4 times. SYNC LFO 2 TO LFO 1 Menu 5 Clock 10: Off (D) / 1X (G) / 2X (Y) / 4X (R) If you have synced LFO2 tempo to LFO1, turning Pot 7 changes the SEQ tempo in relation to LFO1 (from -16 times to +16 times the speed of LFO1). Setting LFO1 to slow rate and slowing down even more gives you slower setting than Pot 7 without synching; and vice versa for faster. Besides modulating the parameters of the main knobs (DRIVE, GAIN, TONE, LEVEL, MONO, LEVEL), you can apply modulated panning (sound moves between 1/4” output left and right). You can also modulate filter parameters if the FILTER is switched on. You cannot bypass filter modulation per string, as the Filter works on 1/4" outputs. MODULATION MODE Menu 4&5 Clock 11: Off (D) / Parameter (G) / Pan (Y) / Filter (R) And you can choose if the Mono Channel is modulated or not. MONO CHANNEL (0) LFO Menu 4&5 Clock 12: On (G) / Off (R) In modulation menu the main POTS change the corresponding modulation depth. Depending on your settings, the main functions, panning or filter can be modulated. Note that turning the depth past the mid-point (yellow light) counter clockwise reverses the shapes DRIVE / PAN1 / FILTER FREQ A MOD DEPTH Menu 4&5 Pot 1 GAIN / PAN2 / FILTER FREQ A MOD DEPTH Menu 4&5 Pot 2 TONE / PAN3 DEPTH Menu 4&5 Pot 3 LEVEL / PAN4 / FILTER VOLUME MOD DEPTH Menu 4&5 Pot 4 MONO / PAN5 / FILTER RESONANCE DEPTH Menu 4&5 Pot 5 DRY / PAN6 DEPTH Menu 4&5 Pot 6 The four knobs in the middle set LFO Frequency and LFO Level. You can also apply more or less modulation on lower or higher strings, using familiar spread function. LFO FREQUENCY Menu 4&5 Pot 7 LFO FREQUENCY SPREAD Menu 4&5 Pot 8 LFO LEVEL (MOD AMPLITUDE) Menu 4&5 Pot 9 LFO LEVEL SPREAD Menu 4&5 Pot 10 21 © 2014 Spicetone OÜ www.spicetone.com Võistluse 9, Tallinn 10132, Estonia, European Union So, to get modulation going, enter Menu 4 or Menu 5, pick the Modulation Shape (Clock7 or Clock8), then pick the Modulation Mode (Clock 11). The POTS are active now. Turn any POT to set its modulation depth and use POT7 and POT9 to set the tempo (rate) and LFO level. You can use TAP TEMPO function to set the modulation rate. For that, in Player Mode, hold the FX FOOTSWITCH longer than 2 seconds, then use it for tapping the tempo. The TAP TEMPO function ends automatically in 5 seconds when you stop tapping. There is TEMPO LED in the CLOCK, left from the rotary encoder. The TEMPO LED blinks with modulation speed you have set or obtaining from an external MIDI device. For MODULATION, the SPREAD function is special (POT 8 and POT 10 in Menu 3,4,5). By default, SPREAD POTS control the frequency rate of modulation, applying different speed on high or low strings. But you can use POT 8 to make the high and low string modulate in different phases, giving you a phasing kind of effect. SPREADTYPE 2 Menu 2 Clock 11: Freq (G) / Phase (R) Troubleshooting to get LFO going. Checklist: o Is LFO on? (Menu 4 or 5, Clock Position 11) o Is LFO controlled by MIDI? You must have an external MIDI device working, otherwise switch this feature off (Menu 4 or 5, Clock Position 9 to Dark). o You must have at least one modulation type set (Menu 4 or 5, Clock Position 7 or 8). o You must turn at least one of the Pots 1…6, thus defining modulation depth for at least one parameter. o In Menu 4 or 5, Pot 9 that controls modulation amplitude, must not be in zero position. o Have you turned on LFO MIDI CTRL? If yes, then LFO runs only if you input one of the three control types. 6.6 MENU 6. ENVELOPE (ENV) Menu 6 “Envelope” (POT06 blinking) let you control 6Appeal parameters with an externally created envelope. We are planning to build a pedal that creates envelopes, but for the time being you probably have to opt for a Roland device. The Envelope control is to form individual string shapes over time. For example, slow attack sounds (imitating cello/violin type of sounds), or staccato (banjo) type of sounds. This needs some kind of string pluck detector, which we plan to realize in some of next hexaphonic processors. So far the use of envelopes is quite limited, but you may use some external pluck detector. The Envelope is ADSR type; you can also control it from external MIDI controller by sending Midi CC #31 messages. You can change Envelope time fronts: Linear/Exponential/Logarithmic (Menu 6 Clock 9). You can turn the Envelope from ADSR type to ADR type (Menu 6 Clock 8). Syncing Envelope to LFO1 makes it run continuously. As with modulations, you can apply ENC to only some of the strings. STRING 1 ENVELOPE Menu 6 Clock 1: On (G) / Off (R) STRING 2 ENVELOPE Menu 6 Clock 2: On (G) / Off (R) STRING 3 ENVELOPE Menu 6 Clock 3: On (G) / Off (R) STRING 4 ENVELOPE Menu 6 Clock 4: On (G) / Off (R) 22 © 2014 Spicetone OÜ www.spicetone.com Võistluse 9, Tallinn 10132, Estonia, European Union STRING 5 ENVELOPE Menu 6 Clock 5: On (G) / Off (R) STRING 6 ENVELOPE Menu 6 Clock 6: On (G) / Off (R) You can change the envelope curve and choose staccato mode. Experiment. STACCATO Menu 6 Clock 8: On (G) / Off (R) FRONT Menu 6 Clock 8: Linear (G) / Exponential (Y) / Logarithmic (R) You can synchronize ENV with LFO1 at the rate of 1, 2 or 4 times. SYNC ENV TO LFO 1 Menu 6 Clock 10: Off (D) / 1X (G) / 2X (Y) / 4X (R) Even though you’d normally stick to controlling parameters with envelope, you can even apply envelope to panning and filter settings. You are welcome to create multi parameter wah-wah effects, yet unheard in this solar system. ENVELOPE MODE Menu 6 Clock 11: Off (D) / Parameter (G) / Pan (Y) / Filter (R) And finally, you can decide if mono channel is affected by the envelope effect. MONO CHANNEL (0) ENV Menu 6 Clock 12: On (G) / Off (R) In envelope menu the main POTS change envelope modulation depth for the corresponding parameters. Depending on your settings, the main functions, panning or filter can be modulated. In panning envelope mode, POTS 1…6 refer to STRING 1…6. DRIVE / PAN1 / FILTER FREQ A MOD DEPTH Menu 6 Pot 1 GAIN / PAN2 / FILTER FREQ A MOD DEPTH Menu 6 Pot 2 TONE / PAN3 DEPTH Menu 6 Pot 3 LEVEL / PAN4 / FILTER VOLUME MOD DEPTH Menu 6 Pot 4 MONO / PAN5 / FILTER RESONANCE DEPTH Menu 6 Pot 5 DRY / PAN6 DEPTH Menu 6 Pot 6 The four knobs in the middle (POT 7…10) set ADSR values, familiar to synthesizer people. ENC ATTACK Menu 4&5 Pot 7 ENV DECAY Menu 4&5 Pot 8 ENC SUSTAIN Menu 4&5 Pot 9 ENC RELEASE Menu 4&5 Pot 10 6.7 MENU 7. MIDI CONTROLLER SETUP Menu 7 is reserved for setting up MIDI controller operation, to control external MIDI devices with 6Appeal – see Chapter 11 “MIDI” for more info. Please note that Menu 7 is preset-based, not global. For example you can set up different MIDI applications for different songs. SUBMENU CMD1 Menu 7 Clock 1: Toggle to enter SUBMENU CMD2 Menu 7 Clock 2: Toggle to enter SUBMENU CMD3 Menu 7 Clock 3: Toggle to enter SUBMENU CMD4 Menu 7 Clock 4: Toggle to enter SUBMENU CMD5 Menu 7 Clock 5: Toggle to enter SUBMENU CMD6 Menu 7 Clock 6: Toggle to enter 23 © 2014 Spicetone OÜ www.spicetone.com Võistluse 9, Tallinn 10132, Estonia, European Union SUBMENU CMD7 Menu 7 Clock 7: Toggle to enter SUBMENU CMD8 Menu 7 Clock 8: Toggle to enter SUBMENU CMD9 Menu 7 Clock 9: Toggle to enter SUBMENU CMD10 Menu 7 Clock 10: Toggle to enter SUBMENU CMD11 Menu 7 Clock 11: Toggle to enter MIDI CONTROL Menu 7 Clock 12: On (G) / Off (R) MidiCtrl1 Menu 7 Pot 1 MidiCtrl2Menu 7 Pot 2 MidiCtrl3 Menu 7 Pot 3 MidiCtrl4 Menu 7 Pot 4 MidiCtrl5 Menu 7 Pot 5 MidiCtrl6 Menu 7 Pot 6 MidiCtrl7 Menu 7 Pot 7 MidiCtrl8 Menu 7 Pot 8 MidiCtrl9 Menu 7 Pot 9 MidiCtrl10 Menu 7 Pot 10 6.8 MENU 8 Menus 8 is reserved for future development. 6.9 MENU 9. MIDI SETTINGS MENU 9 “MIDI” (POT09 blinking) controls everything related to MIDI. This is a global menu, having effect on all presets. First of all, you can turn MIDI input on and off. MIDIIn Menu 9 Clock 1 : On (G) / Off (R) If you are only planning to use MIDI for synching modulation and sequencer tempo, keep MIDI OUT (and MIDI THRU) turned off. MIDIOut Menu 9 Clock 2 : On (G) / Off (R) You can choose if a MIDI signal coming to MidiIn on 6Appeal, is transferred on to MidiOut on 6Appeal. This is useful in advanced MIDI routing, as we do not have a dedicated MidiThru connector on 6Appeal. Unless you’re an advanced user, keep MIDI THRU off. MIDI THRU Menu 9 Clock 3: On (G) / Off (R) To set up correct MIDI control you have to set Midi In and Midi Out channels according to your MIDI setup (Menu 9 items 10 and 11). By default both of these are set to channel 6. Please note that 6Appeal can only be set to MIDI channels 1 to 12, even though MIDI standard channel range is 1 to 16 – this is a limitation of our user interface, sorry for that. We also recommend you to avoid MIDI channels 11 and 12 if you want to use 6Appeal in MIDI MonoMode. MIDI IN CHANNEL SUBMENU Menu 9 Clock 10 MIDI OUT CHANNEL SUBMENU Menu 9 Clock 11 You may turn on MidiAll (Menu item 12), but be very careful with and use it just for very simple setups. In this case 6Appeal reads and executes all MIDI commands and in complex MIDI setup this may cause havoc. 24 © 2014 Spicetone OÜ www.spicetone.com Võistluse 9, Tallinn 10132, Estonia, European Union MIDIALL (OMNI): Menu 9 Clock 12: On (G) / Off (R) To set up correct MIDI control you have to set Midi In and Midi Out channels according to your MIDI setup (Menu 9 items 10 and 11). By default both of these are set to channel 6. Please refer to 6Appeal’s extended MIDI CC and Note On control table in the annexes. MIDI MonoMode is a special mode to control Envelopes for each string separately. Please refer to Chapter 11.7 “MIDI MonoMode” for details. MIDI MONOMODE Menu 9 Clock 4 On (G) / Off (R) In Menu 9, POTs do the same as in Player Mode (i.e what is written next to them). 6.10MENU 10. GLOBAL PARAMETERS Menu 10 (POT10 blinking) is for global parameters. First of all you can set the device to be used only with monophonic guitars (1/4” Mono In). If the MONOGUITAR setting is on, then plugging in a mono guitar with a TS cable automatically shuts off hexaphonic channels 1...6. If you want to use a Mono In and 13pin input at the same time, you have to turn MONOGUITAR off. MONOGUITAR Menu 10 Clock 1 : On (G) / Off (R) You can use the three 1/4” outputs as breakout box. These are stereo (two channel) outputs, so two strings run through one output. If you want to separate the signals, use Y cables (TRS to 2xTS) or stereo plug to two mono plug adapters. Also, when BREAKOUT BOX is engaged, Mono In turns into Mono signal output, so you can even get the monophonic signal out from your hex guitar. BREAKOUT BOX Menu 10 Clock 2: On (G) / Off (R) If you send the output to a mixing desk or other device that is happier with hotter signal, there is the OUTPUT BOOST to help you. OUTPUT BOOST Menu 10 Clock 3: 0Off_16Off (D) / 0Off_16On (G) / 0On_16Off (Y) / 0On_16On (R) By default the device starts up in Preset Slot G1. You can turn this off, so that it starts in the last preset used. It's just a matter of taste. START WITH FIRST PRESET Menu 10 Clock 4: On (G) / Off (R) If you are using a Roland GK equipped guitar, you can choose the function of your GK volume knob. G_VOL GK VOLUME KNOB Menu 10 Clock 5: On (G) / Off (R) By default, when you turn a POT, the CLOCK LEDs show you the POT position with light trails. Some people might find it confusing. You can switch this function off if it’s not to your taste. POT DISPLAY Menu 10 Clock 6: On (G) / Off (R) If you plan to use the pedal in different setups, it is advisable to set up different sets of presets. For example you can set Bank 1 for studio work, Bank 2 for stage and Bank 3 for solely monophonic applications etc. 25 © 2014 Spicetone OÜ www.spicetone.com Võistluse 9, Tallinn 10132, Estonia, European Union PRESET BANK SELECTION Menu 10 Clock 11: Toggle to enter preset bank selection submenu SUBMENU 10.11 PRESET BANK NUMBER Clock 1…6 Bank1…Bank6 On (G) / Off (R) Next, in position 12 you can enter the software version submenu. This is to find out, which software version you are using. If you need to report a problem, just let us know which Clock LEDs light up when you enter this submenu. See Chapter 12 “Sortware Update” for more info. SWVERSION Menu 10 Clock 12: Submenu 10.12 of software version SUBMENU 10.12 Global.SWVer (X.Y.Z.) X=Clock 1...3, Y=Clock 4...8, Z=Clock 9...12 On (R/Y/G) / Off (D) In Menu 10, POTs do the same as in Player Mode (i.e what is written next to them). 26 © 2014 Spicetone OÜ www.spicetone.com Võistluse 9, Tallinn 10132, Estonia, European Union 7 FEATURES EXPLAINED 7.1 SCULPTING THE SOUND DRIVE pot affects all channels, including the mono channel. Keep in mind that a pinch less driven guitar can sound a lot better in recording. Adjust GAIN pot to feed the Drive Circuit with a signal powerful enough for you taste. Use DRY pot to mix in some unaffected signal, giving you more attack, punch and transparency just like a certain expensive guitar pedal named after a horse-legged creature in Greek mythology. Note that DRY acts as your clean level and is independent of LEVEL pot. Use MONO pot if you feel like adding mono signal to your sound. Your monophonic pickups might not be in unity gain with your hexaphonic ones and are also affected by your guitar’s volume pots. Adjust LEVEL KNOB to feed your guitar amp or other device with matching signal level. Keep in mind that too hot signal can overfeed your amp's preamp tubes or mixer's op-amps, resulting in unpleasant distortion. We suggest to turn up the amp first and then turn up 6Appeal's output level. If you really need hotter signal for your mixer or soundcard, add the OUTPUT BOOST from a menu. OUTPUT BOOST Menu 10 Clock 3: 0Off_16Off (D) / 0Off_16On (G) / 0On_16Off (Y) / 0On_16On (R) Shortly push the ENCODER to enter Menu 1 "Sound" (check if Pot 1 is blinking). Use Pot7..10 to tune FILTER that affects 1/4" outputs. See more about FILTER in Chapter 7.6. 7.2 CLEAN TONE Each Preset Memory Slot 1…23 holds data of one preset, which in most cases is an overdrive and/or modulated sound. Your clean/bypassed/effect off (FX off) setting is stored in Preset Memory Slot 24. You can turn effects on/off by activating/deactivating Preset 24 (clean) with FX FOOTSWITCH. Note that your selected Preset 1..23 still remains selected. While in clean mode, you can browse to any other preset, and then deactivate clean (turn FX on again). The main purpose of the clean preset is to provide healthy unaffected signal for the next hexaphonic effect pedal in line. The only thing you should do with it, is to bring it to unity or near unity gain with your overdriven setting or vice versa, otherwise you blast the ears on audience. If you really need to, you can turn your clean preset dirty, or, alternatively, mute it by turning LEVEL all the way down. In an overdriven preset setting the clean sound that you mix in using DRY POT is not affected by the clean channel settings, stored in Preset 24. 7.3 OVERDRIVE, CRUNCH AND FUZZ You have three types of distortion at your disposal. These are different modifications to a classicinspired Drive Circuit. People had to make permanent soldering mods to access these. With 6Appeal, you just have to click ENC, choose the first menu and pick a clipping option you like the best. DRIVE TYPE Menu 1 Clock 11: Overdrive (Green) / Crunch (Yellow) / Fuzz (Red) / Off (Dark) 27 © 2014 Spicetone OÜ www.spicetone.com Võistluse 9, Tallinn 10132, Estonia, European Union Please note that you have to adjust the level after changing the drive type. The more distorted, the less loud it is. Drive setting “Overdrive” is the loudest and also the least noisy. “Fuzz” setting is the most clipped and just as a certain classic distortion pedal, it is rather noisy. You may want to apply TONE or FILTER to roll off higher frequencies. 7.4 TONE STACK TONE POT controls a Tone Stack familiar from classic big stuff like a certain fuzz box. As you might know, some people like to defeat the Tone Stack, to get more mids, lows and power. Please keep in mind that the TONE POT and TONE SPREAD POT stop working if the TONE STACK is Off. TONE STACK Menu 1 Clock 10: On (G) / Off (R) The TONE STACK sits in the Drive Circuit. The FILTER on the other hands comes after all the clipping has happened. 7.5 SPREAD FUNCTION DRIVE, LEVEL, TONE and DRY POTS are paired with a SPREAD POT (the four pots in the middle, marked 07, 08, 09, 10). The idea is that thanks to hexaphonic pickup, you can apply the effect in different proportion to lower or higher strings. SPREAD POTS Player Mode, Menu 2,9,10 Apply more effect on higher (turn counter clockwise) or lower strings (turn clockwise) Yellow light = central position Drive Spread Less drive on lower strings means less mud and more punch Level Spread Louder higher or lower strings Tone Spread Works if the Tone Circuit is in Menu 1 Clock 10: On (G) / Off (R) Dry Spread More dry (clean hex or mono signal) on higher or lower strings The SPREAD KNOBS for Player Mode can be set to two different options. TILT means you can apply more effect on lower (turn CCW) or higher strings (CW). SMILE mean that you can adjust the effect by smiley face (CW) or sad face (CCW) curve, applying more or less effect on the mids. SPREADTYPE 1 Menu 2 Clock 12: Tilt (G) / Smile (R) For MODULATION, the SPREAD function is special. You can use the SPREAD POTS to control the frequency rate of modulation, applying different tempo on high or low strings. Or, with spread type 2, you can make the high and low string modulate in different phases with Pot 8 (Menu 3...5), giving you a phasing kind of effect. SPREADTYPE 2 Menu 2 Clock 11: Freq (G) / Phase (R) 28 © 2014 Spicetone OÜ www.spicetone.com Võistluse 9, Tallinn 10132, Estonia, European Union 7.6 FILTER SECTION There is a stereo FILTER SECTION on the 1/4” outputs that gives you further sounds sculpting. Using hexaphonic pickups you are often stuck with just one pickup; use the filter to extend the tonal characteristics. Please note the FILTER does not affect the sound that is sent out through 13pin output. FILTER SECTION ON/OFF Menu 1 Clock 9: Filter On (Green), Off (Red) You can tweak the filter in MENU 1 or 2. For this, short tap on ENC, then using footswitches to go to MENU 1 or 2. Note that the FILTER has to be switched on from Menu 1, otherwise the pots are disabled. FILTER SECTION Menu 1: Frequency A Pot 7 Frequency B Pot 8 Filter Volume Pot 9 Resonance Pot 10 You can use FILTER to roll of hiss and harsh high frequencies. It also has nice chimy quality, if you set the frequency bands in separate slots. Please not that in extreme settings the filter can oscillate or make harsh squealing sounds. This is the essence of a filter. Watch out and be prepared. You can achieve loads of feedback, setting filter frequencies apart and using high resonance. If you learn to control the feedback, it opens you whole new horizons, similar to sustainer pickups or highly expensive guitars by a certain analogue synthesizer producer. You can modulate the Filter parameters with Sequencer, LFO1 and LFO2, giving you wah kind of effects. 7.7 ROOT BOOST CIRCUIT There are a lot of useful modifications to classic effect pedals that our Drive Circuits resemble. One of these is ROOT BOOST that enhances the basic harmonics content of the sound. In our device, each string’s channel has one ROOT BOOST built in before distortion effect (Pre), and one after it (Post). Switch on one or both to get more juice and bottom end. Besides hexaphonic channels (1…6) we have Root Boost function for mono guitar channel (0) that you can switch on separately. In most cases, you would want to keep Root Boost off for monophonic channel. ROOT BOOST PRE Menu 1 Clock 8: 0Off_16Off (D) 0Off_16On (G) 0On_16Off (Y) 0On_16On (R) ROOT BOOST POST Menu 1 Clock 7: 0Off_16Off (D) 0Off_16On (G) 0On_16Off (Y) 0On_16On (R) ROOT BOOST is especially useful, if your guitar has a hexaphonic pickup (like Roland GK) mounted on or near the bridge. Pickup near bridge mean thin sound. The Root Boost function recovers the lack of bottom end, amplifying the fundamental frequency range of each string. When ROOT BOOST pre, post or both are engaged, you may want to roll back lower frequencies on your amplifier. 29 © 2014 Spicetone OÜ www.spicetone.com Võistluse 9, Tallinn 10132, Estonia, European Union 7.8 MODULATIONS (LFO) Tremolo and vibe effects are probably the most familiar MODULATIONS. You can get the, making LEVEL oscillate. Adding other parameters and several oscillators can give you very complex and innovative modulations. Modulating FILTER gives you autowah. There are two Low Frequency Oscillators (LFOs) in the device and one SEQUENCER. If you have a device that is able to generate envelopes, there is also a dedicated ENVELOPE modulation. Modulations can be independent or synced. You can control LFOs with MIDI, set tempo with Tap Tempo or obtain it from an external MIDI device. The LFO1 (Menu 4) has special importance – all other Modulations can be synced to LFO1, and LFO1 can be synced to Tap Tempo or external MIDI device. If a Modulator is synced to LFO1 (Menu 3, 5, 6, item 10), changing the frequency of LFO1 proportionally changes frequency rate of synced Modulations. You can modulate all parameters (DRIVE, GAIN, TONE, LEVEL, MONO, DRY), and even FILTER and PANNING. You can even use several Modulations simultaneously. Enter Menu 3 (SEQ), Menu 4 (LFO 1) or Menu 5 (LFO 2) to use the modulations. Please refer to Chapter 6.5 “LFO1 and LFO2” for details. 7.9 SEQUENCER Spicetone's 6Appeal features a simple but powerful 24 step MODULATION SEQUENCER. You can use it similarly to LFO 1&2. Sequencer is set up in Menu 3 (POT03 blinking). Please refer to Chapter 6.4 “Menu 3. Sequencer (SEQ)” for details. 7.10TAP TEMPO AND MIDI CLOCK For Modulations it is important to set the speed to match other instruments and backing track. For this, we have TAP TEMPO that sets the speed of LFO1. SEQUENCER, LFO2 and ENVELOPE can be synced to LFO1. You can use TAP TEMPO function to set the modulation rate of LFO1. For that, in Player Mode, hold the FX FOOTSWITCH longer than 2 seconds, and then use it for tapping the tempo. The TAP TEMPO function ends automatically in 5 seconds when you stop tapping. There is TEMPO LED in the CLOCK, left from the rotary encoder. The TEMPO LED blinks with speed you have set, or are obtaining from external source. Please note that with very fast frequency rates, the LED may seem as being constantly on; this is due to a technical limitation of LED switching. You can also set 6Appeal to receive tempo from an external MIDI device. And yes, you can sync 6Appeal’s modulation to you DAW. For details, please refer to Chapter 11 "MIDI". 7.11PER STRING SETTINGS A great ability of hexaphonic pickups is that you can apply effects per string. First of all, you can use SPREAD POTS (see Chapter 7.5) to apply different amount of GAIN, TONE, LEVEL and DRY to higher or lower strings (Tilt), or to middle strings (Smile). Secondly, you can bypass effect on some strings. This works separately in each special effect menu, too. For example you can get LFO going and then turn it off on some strings, keeping a modulated drone on others. 30 © 2014 Spicetone OÜ www.spicetone.com Võistluse 9, Tallinn 10132, Estonia, European Union The Clock Positions 1…6 apply to strings (Menu 1 to Menu 6) and Clock Position 12 applies to monophonic channel. In Menu 1 you can also mute strings that can be useful for bass guitar or for soloing. Bypassing effect in Menu 1 bypasses modulation effects, too. Please note that there is no separate Filter on each channel and thus you cannot tune Filter per string - it can only be on or off for everything that goes out through 1/4" outputs. 7.12BREAKOUT BOX If you want to process the six strings in DAW or any other processor, you can use 6Appeal as a breakout box. Outputs (Ring/Tip) labelled Mono Out 6/5, Right 4/3, Left 2/1 output Strings 1..6 and MonoIn output summed (monophonic) signal from you 13pin guitar. Just connect to you analogue/digital converter, sound card or other device that accepts six or seven channels. Use Y cables or stereo to double mono adapter plugs, if the recording device has mono inputs. Use TRS cables for stereo inputs. BREAKOUT BOX Menu 10 Clock 2 On (G) / Off (R) 31 © 2014 Spicetone OÜ www.spicetone.com Võistluse 9, Tallinn 10132, Estonia, European Union 8 CONNECTIVITY NB! Never connect the 13pin inputs of two devices. This can result in damage or destruction of both devices. We can assume no responsibility in that case. It is as grave misuse as powering on a tube amp head without connecting a cabinet. Please remember, out>in, in->out only! Having said that, our effect pedals welcome daisy chaining. Connect any effect devices from Spicetone or any other maker. Experiment with available 13pin devices that accept or produce audio signal. Experiment with adding conventional effect devices using jack outputs. Route the jack outputs to two or ever three guitar amplifiers. 8.1 13PIN INPUT The device has one standard 13pin DIN input that provides +7V/-7V power needed by hexaphonic guitars with preamps. We have tested it with several types of custom-made passive pickups, too - works perfectly. You can also hook up any sound device that has 13pin DIN output. There are not many around but we are hoping to see them appearing. You should never connect two inputs, as both have +7V/-7V coming from them, which can mean damage or destruction. No threat of nuclear mayhem, just watch where you plug the cable. We suggest you use high quality 13pin cables that lock in place and provide good grounding. 8.2 MONO INPUT The 1/4” jack input, labelled Mono In, is meant for connecting a conventional guitar or other monophonic sound source. Use TS guitar cable for that (not a stereo cable). If the MONOGUITAR function is turned on, inserting a TS cable automatically turns off hexaphonic channels. MONOGUITAR Menu 10 Clock 1 On (G) / Off (R) If your guitar's hex pickup and conventional ones are not commuted, you can connect your guitar with two cables, one for 13pin and one for mono signal. For this you must MONOGUITAR function off. If using 6Appeal as a BREAKOUT BOX, MonoIn becomes the output for summed audio signal. 8.3 13PIN OUTPUT 6Appeal has one standard 13pin DIN output. Use this to hook up another 13pin effect pedal or guitar synth. Note that the signal is affected by your sound settings, so it may not be good as a 13pin control signal – it’s really a sound now. 8.4 JACK OUTPUTS 6 Appeal has three 1/4” jack outputs, labelled Mono Out 6/5, Right 4/3 and Left 2/1. The outputs are not balanced. All outputs are TRS, meaning you can get one or two channels from any of the outputs. You may use the output to connect to guitar amp, recording interface, mixing desk or any other device that accepts 1/4” jack outputs. Adjust output level accordingly. 32 © 2014 Spicetone OÜ www.spicetone.com Võistluse 9, Tallinn 10132, Estonia, European Union With one guitar amplifier, use Mono Out. With two amps, use Left and Right. You can connect three amps, using Mono Out for the amp in the middle. If you want to process the six strings in DAW or any other processor, use you can use 6Appeal as a breakout box. Just connect to you analogue/digital converter, sound card or other device that accepts six channels. Use three Y cables, if the recording device has mono inputs. Use three TRS cables for stereo inputs. BREAKOUT BOX Menu 10 Clock 2 On (G) / Off (R) Use good quality cables to get maximal fidelity. 8.5 OUTPUT BOOST Besides adjusting LEVEL knob, you can choose whether our pedal outputs stronger or weaker signal. Recording desks are happier with +4dB but guitar amplifiers probably sound better with -10dB level. OUTPUT BOOST Menu 10 Clock 3: 0Off_16Off (D) / 0Off_16On (G) / 0On_16Off (Y) / 0On_16On (R) 8.6 MIDI IN, OUT AND THRU Please refer to Chapter 11 "MIDI". 33 © 2014 Spicetone OÜ www.spicetone.com Võistluse 9, Tallinn 10132, Estonia, European Union 9 GUITARS AND OTHER PEDALS 9.1 HEXAPHONIC GUITARS You get the best overdriven guitar sound with magnetic pickups. At the moment there are only a few full size magnetic hex pickups available, made by luthiers and enthusiasts. Notable projects as of mid 2014: Ubertar and Cycfi. Probably the most widely used magnetic hex pickup is Roland GK series, either externally mounting or as a kit. Roland GK sounds very good with Spicetone’s hex pedals. Please mind that the GK is normally mounted close to bridge, meaning rather thin sound. To overcome this, turn on our root boost circuit on the hexaphonic channels. Experiment with pre and post boost. ROOT BOOST PRE Menu 1 Clock 8: 0Off_16Off (D) 0Off_16On (G) 0On_16Off (Y) 0On_16On (R) ROOT BOOST POST Menu 1 Clock 7: 0Off_16Off (D) 0Off_16On (G) 0On_16Off (Y) 0On_16On (R) Hexaphonic piezo pickups are widely available, too. Most notable are RMC pickups, used in many Godin guitars. The piezos sound very clear. For best results you might want to engage filter section to roll off unpleasant high frequencies. FILTER SECTION ON/OFF Menu 1 Clock 9 Filter On (G), Off (R) FILTER SECTION Menu 1: Pot 7 Frequency 1 Pot 8 Frequency 2 Pot 9 Filter Output Pot 10 Resonance 9.2 MONO GUITARS 6Appeal works just fine with ordinary monophonic guitars. If you use MONOGUITAR setting, then plugging a guitar to Mono In with a conventional TS guitar cable automatically turns off hexaphonic channels. NB! Disconnect 13pin first. MONOGUITAR Menu 10 Clock 1 : On (G) / Off (R) You have to turn up MONO POT to hear your monophonic guitar. MONO is a volume knob for monophonic signals, affecting both dry and driven sound. Warning! As a rule of thumb, to plug in to Mono In, you have to unplug 13pin cable from 6Appeal. You also have to switch off G-VOL feature in Menu 10 (“Global”), otherwise neither hex nor mono sound comes through. G_VOL GK VOLUME KNOB Menu 10 Clock 6: On (G) / Off (R) That being said, with some types of hex-equipped guitars you can use Mono In and 13 pin In inputs simultaneously, but with many guitar it does not work that way because of guitar’s inner switching. If your guitar happens to accept 6Appeal’s Mono In and 13pin In simultaneously, you have to turn MONOGUITAR function off to use that. 9.3 BASS GUITAR Unlike common distortion pedals, 6Appeal works nicely with bass guitars, especially the ones with hexaphonic pickups. First of all there's no low end cutoff in the signal path. Secondly, you can blend in dry signal, thus maintaining clarity and punch. The DRY pot goes far past 50/50 mix, meaning you can have just a little of distorted sound along with your main bass tone. 34 © 2014 Spicetone OÜ www.spicetone.com Võistluse 9, Tallinn 10132, Estonia, European Union For 4 or 5 strings bass guitars with hexaphonic pickups it is advisable to mute the channels that are not in use. Go to Menu 1 and use ENC to toggle on/off/mute in Clock Positions 1...6. With a hexaphonic bass, you can also use clean signal on some strings and distorted or modulated signal on others, for example you can keep E and A string clean and get some crazy solo stuff going on D and G strings. 9.4 OTHER PEDALS It is possible to connect our hexaphonic pedals to Roland guitar synths and their hexaphonic pedals. Or any other pedals with 13pin input. Just avoid plugging input to input. We also encourage you to try any conventional effect pedals with 6Appeal's 1/4" jack outputs. It does not have to be a stereo pedal. For example you can try routing higher strings to one output and feeding the sound through delay or reverb pedal. You can apply compressor to lower strings or use two different delays with strings autopanned LRLRLR. Feel free to experiment. 35 © 2014 Spicetone OÜ www.spicetone.com Võistluse 9, Tallinn 10132, Estonia, European Union 10 COMPUTER CONNECTION 6Appeal has a standard mini USB connector (female). This is needed for software updates. In future, we might build a dedicated software interface to give you control over 6Appeal, using USB cable or even a radio dongle and a laptop, desktop or portable device like a smartphone. However this might take long to release the software. Meanwhile you can always hook up through MIDI. We have successfully tested Apple iPad to USB MIDI interface to 6Appeal MIDI In solution with some third party software. MIDI is a good old standard and all devices that follow it, should work with 6Appeal. To know more, read the next chapter. 36 © 2014 Spicetone OÜ www.spicetone.com Võistluse 9, Tallinn 10132, Estonia, European Union 11 MIDI 11.1OVERVIEW OF MIDI IN 6APPEAL An external MIDI controller that sends MIDI CC commands can control practically all 6Appeal parameters that you can control with POTS. Not only can 6Appeal receive MIDI messages – it can send MIDI messages out, too, if MidiOut is turned on. MIDI items are controlled from Menu 9 and Menu 7. The 6Appeal MIDI CC messages are listed in Table 4, Appendix 17.4. Most of 6Appeal’s switchable parameters (menu items that you toggle with ENC) can be changed with MIDI Note On messages. Be especially careful with that; if your MIDI setup includes synthesizers, too, then playing synth notes may cause 6Appeal to act in peculiar ways. Set up MIDI channels correctly. The 6Appeal MIDI Note ON messages are listed in Table 5, Appendix 17.5. 11.2MIDI CONTROL MIDIIN, MIDIOUT AND MIDITHRU 6Appeal has both MidiIn and MidiOut connectors, which means that it can be controlled by external MIDI sources and can also control external MIDI equipment. MidiOut can be used for Midi Thru - 6Appeal mirrors the MIDI commands from MidiIn to MidiOut if MidiThru is turned on. Please note that MIDI System Exclusive (Sysex) commands are not mirrored. To set up correct MIDI control, you have to set Midi In and Midi Out channels according to your MIDI setup (Menu 9 items 10 and 11). By default both of these are set to channel 6. Please note that 6Appeal can only be set to MIDI channels 1 to 12, even though MIDI standard channel range is 1 to 16 – this is a limitation of our user interface, sorry for that. We also recommend you to avoid MIDI channels 11 and 12 if you want to use 6Appeal in MIDI MonoMode. If you want your 6Appeal to be controlled by external MIDI equipment, you have to turn on MidiIn from Menu 9.1; be aware of your Midi In channel, the default MidiIn channel is 6. If you would like to control external MIDI equipment with 6Appeal, you have to turn on MidiOut from Menu 9.2; again, be aware of your MIDI Out channel, the default Midi Out channel is 6. And finally, if you would like to pass your MIDI messages from MidiIn to other equipment connected to 6Appeal MidiOut, switch on MidiThru. MIDIIN Menu 9 Clock 1: On (G) / Off (R) MIDIOUT Menu 9 Clock 2: On (G) / Off (R) MIDITHRU Menu 9 Clock 3: On (G) / Off (R) You may turn on MidiAll, in which case 6Appeal is going to execute MIDI commands from all MIDI channels. MIDIALL (OMNI): Menu 9 Clock 12: On (G) / Off (R) Be very careful with using MIDIALL and use it just for very simple setups. In this setting 6Appeal reads and executes all MIDI commands; in complex MIDI setup this may cause havoc. 11.3PROGRAM CHANGE AND BANK SELECT 6Appeal reacts to Program Change messages as any other Midi equipment – it selects a new preset. The number of presets in 6Appeal is limited to 24 (in each Bank), so if you send any larger preset number, 6Appeal sets to preset 24, which presumably is your clean sound. Also, we count presets from 1 to 24, even though in MIDI commands the presets are counted from zero. So, in Program Change command you actually have to send preset minus one number! 37 © 2014 Spicetone OÜ www.spicetone.com Võistluse 9, Tallinn 10132, Estonia, European Union The reaction of Appeal to Bank Select is slightly different from MIDI standard, According to standard, you have to send the following sequence of commands before actual preset change: Bank Select MSB (CC#0), Bank Select (CC#32) and Program Change. If you send this sequence to 6Appeal, it actually executes every command separately. In fact, it ignores Bank Select MSB (CC#0) command and you may leave it out. The Bank Select LSB (CC #32) command causes immediate Bank change and recall of the same preset number as was used in the previous bank. Now you may recall another preset by Program Change command. If that is not exactly what you would like to have and you need a kind of “silent” Bank Select, the workaround is following: make a “silent” preset in every bank by the same preset number. Before Bank select command, recall the “silent” preset. Then send Bank Select LSB message with the bank number followed by Program Change message. If you leave out the Bank Select MSB message, the length of the MIDI sequence actually will be the same a standard. 6Appeal has six customizable Preset Banks available. These are numbered from 1 to 6; the same numbering is used Bank Select LSB command, too, meaning you should not use number minus one there. To be honest to the bone, there is Bank 0, but it's reserved for storing default presets. 11.4TEMPO SYNC You can use simple tempo synching for modulations. For this you have to connect 6Appeal’s MidiIn and external device’s MidiOut, and sync LFO1 to MIDI. Then you can sync other modulation tempos to LFO1, meaning that LFO1 is the tempo master. SYNC LFO1 Menu 4 Clock 10: Off (D) / Tempo (G) / Midi (Y) / Midi.OR.Tempo (R) SYNC LFO 2 TO LFO 1 Menu 5 Clock 10: Off (D) / 1X (G) / 2X (Y) / 4X (R) SYNC SEQ TO LFO1 Menu 3 Clock 10: Off (D) / 1X (G) / 2X (Y) / 4X (R) SYNC ENV TO LFO 1 Menu 6 Clock 10: Off (D) / 1X (G) / 2X (Y) / 4X (R) Be aware that Midi Clock messages are so called Real Time Midi Messages and do not have channel number. In fact, you even do not need to turn on MidiIn to get the MIDI tempo – just sync the LFO1 to MIDI. If LFO1 is not synced to MIDI, the MIDI real time messages do not affect 6Appeal in any way. 11.5SETTING UP EXTERNAL MIDI CONTROLLER If you want to control 6Appeal from an external MIDI controller, you have to do, at least, the following: 1. Connect a MIDI cable from your MIDI controller's MidiOut to 6Appeal's MidiIn 2. Set 6Appeal MidiIn channel number (Menu 9, Clock 10), by default it is channel 6 3. Program your controller knobs, sliders, switches etc to send Midi CC and NoteOn messages according to tables 4 and 5 in the Appendix (17.4; 17.5), using the corresponding MIDI channel number (if not using MidiAll). Now you should be able to control 6Appeal from your MIDI controller. You may also use a synthesizer to control 6Appeal. It may just be complicated to use a synth and 6Appeal at the same for other purposes than MIDI sync. This is because synth knobs and keyboard commands most probably will conflict with 6Appeal MIDI commands. But, if you want to get just MIDI sync, be aware, that MidiOut channel of the synth and MidiIn channel of 6Appeal have to be different and MidiAll in 6Appeal has to be turned off. If you do not use any other MIDI control than MIDI sync, you may simply turn off MidiIn in 6Appeal. 38 © 2014 Spicetone OÜ www.spicetone.com Võistluse 9, Tallinn 10132, Estonia, European Union In some cases you may want to have MIDI sync from your synth (or from your DAW) and use an external MIDI controller the same time. In this case you may use a MIDI Merger, like MIDI Solutions Quadra Merge (www.midisolutions.com). This small box allows merging MIDI commands from up to four MIDI devices and works without any external power supply (draws all the power needed from MIDI input). In some cases you may want to control several MIDI devices (one of them being 6Appeal) from a single MIDI controller. In this case you may daisy chain your MIDI devices starting from external controller. But, even better way for minimum latency and more accurate sync is to use some MidiThru device, like Midi Solutions Quadra Thru, that works also without any external power supply. Set up your MIDI system and enjoy the functionality. We just hope you know some basics of MIDI control. Otherwise, take some time to browse Internet; there is a lot of info available. MIDI is not rocket science, you'll get along with it soon. 11.6USING 6APPEAL AS A MIDI CONTROLLER Receiving MIDI is obvious – you can use a MIDI controller or computer to control the pedal. But a great news is that 6Appeal works as a MIDI controller itself. If you turn on MidiOut, all the pots in 6Appeal start to send out Midi messages according to the MIDI CC table (Table 4, Appendix 17.4). Most of the Menu Items start to send out respective NoteOn messages if changed (Table 5, Appendix 17.5). MIDIOUT Menu 10 Clock 2: On (G) / Off (R) You may use these messages to control your external devices together with 6Appeal. Just be organized, as complicated MIDI systems may easily turn from disorder to pandemonium, if you mix up channel numbers and/or controller numbers. 6Appeal also has a dedicated MIDI Control menu, Menu 7. If MidiControl and Midiout are turned on, all the pots in Menu 7 generate Midi CC information, which you may use to control your MIDI equipment – a computer DAW program, for instance. This means you can trigger loops, startstop recording, add effects, run beat tracks, control soft synths and devices etc. With computer software you typically may use MIDI Learn functionality to assign these pots to control your software. MIDI CONTROL Menu 7 Clock 12: On (G) / Off (R) If MidiControl is on, 6Appeal remembers the state of the pots within the preset. If a preset is recalled, and both MidiOut and MidiControl are turned on, 6Appeal sends the saved values of these pots out by MidiOut. This allows you to initialize your external MIDI devices according to the preset, i.e you can set up dedicated MIDI output preset for different setups. Even more, by preset recall, you may send out up to 11 bytes of MIDI information to external MIDI equipment. These bytes are programmed by submenus from each clock position in Menu 7 (see Chapter 6.7 "MIDI Controller Setup"). To use this feature you need rather deep knowledge of MIDI commands. Hopefully an example of this feature gives an idea to start with. If you are not familiar with MIDI command system, it is better postpone using these features at this point. An example. Let us suppose that with selecting a preset, we want to send out a Program Change message on channel 12 to set the preset number to 11 (counting from one). In hex format this command includes two bytes: 0xAB and 0x0A. In binary form these are in Clock 1 and Clock 2 positions in the table below, respectively. 39 © 2014 Spicetone OÜ www.spicetone.com Võistluse 9, Tallinn 10132, Estonia, European Union Clock SubMenu Menu 7 Clock1: Menu 7 Clock2: Menu 7 Clock3: Menu 7 Clock4: Menu 7 Clock5: Menu 7 Clock6: Menu 7 Clock7: Menu 7 Clock8: Menu 7 Clock9: Menu 7 Clock10: 8 1 0 1 1 1 1 1 1 1 1 7 0 0 1 1 1 1 1 1 1 1 6 1 0 1 1 1 1 1 1 1 1 5 0 0 1 1 1 1 1 1 1 1 4 1 1 1 1 1 1 1 1 1 1 3 0 0 1 1 1 1 1 1 1 1 2 1 1 1 1 1 1 1 1 1 1 1 1 0 1 1 1 1 1 1 1 1 Menu 7 Clock11: 1 1 1 1 1 1 1 1 Comments Code 0xAB Code 0x0A To dial in the binary codes, you have to enter the corresponding SubMenu and turn the Encoder clockwise or counter clockwise, until you reach the particular binary code. Green position means 1 and Dark position means 0. You may enter up to 11 bytes of MIDI commands. If there are less than 11 bytes of information, the unused bytes have to be set to all ones (0xFF). At the preset recall, all the MIDI information, if byte not equal to 0xFF, will be sent out by MidiOut, byte by byte. Of course, only if both MidiControl and MidiOut are turned on. This way you may set up your external MIDI equipment for every 6Appeal preset. If you are not familiar with MIDI command system, this feature may be rather complicated to use; this indicates you probably don't need it. Just be aware that it is there and, if you ever need it, ask friendly synth enthusiasts and MIDI gurus to get you on the track. 11.7MIDI MONOMODE In this mode 6Appeal reads MIDI information from MIDI channels 11 to 16 in a specific way. From channel 11 every Note On message causes Envelope to start for string 1 and every Note Off message causes to stop Envelope (start the Release phase of Envelope). The same is true for string 2 from Midi channel 12 and so on, up to channel 16 for string 6. All other MIDI commands from these channels are ignored. This mode is meant to work with some effect devices we are planning to introduce later. Currently it can be used with some Roland equipment, for instance with GR-55. To set it up: 1. Use 13pin cable splitter (like Roland US-20) to connect your hexaphonic guitar both to 6Appeal and GR-55 2. Connect a Midi cable from GR-55 Midi Out to 6Appeal’s Midi In 3. In 6Appeal set the following settings: a. MidiIn channel (Menu 9, item10) to anything between 1 and 10 b. MonoMode (Menu 9, item 4) to On 4. In GK-55 set MIDI/USB section GTR-MIDI parameters (User Manual, p.79): a. SWITCH to ON b. MODE to MONO c. STRING CH to 11 d. DATA THIN to ON e. Other parameters as you like We also recommend you to avoid MIDI channels from 11 to 16 in you setup if you want to use 6Appeal in MIDI MonoMode. 40 © 2014 Spicetone OÜ www.spicetone.com Võistluse 9, Tallinn 10132, Estonia, European Union If the setup does not work as expected, check with some Midi Monitor software that GR-55 is generating Note On and Off messages by Midi channels 11 to 16 if you play your guitar. Most probably this approach can be used with Boss GP-10, if you manage to get MIDI commands in and out from it. 11.8CONTROLLING 6APPEAL WITH EXPRESSION PEDALS External MIDI controllers often allow you to connect Expression Pedals and/or Switches. If you set your Expression Pedal to a CC number from Table 4, Appendix 17.4, you may control the particular 6Appeal parameter with the Expression Pedal. Similarly, if your controller lets you do that, you may use Expression Switches to send out Midi On notes according to Table 5, Appendix 17.5 and thus switch corresponding 6Appeal parameters. Just keep in mind that many parameters in 6Appeal have more than two states. Most probably, with a single switch, you can just toggle between two states with the controller. Although, some controllers may allow you to use parameter incremental/decremental stepping, meaning you could step thru all the parameter values. The obvious limitation of this method is that you may control just a single 6Appeal parameter with a single controller. To overcome this limitation we have introduced MIDI control of LFOs: LFO1 MIDI CTRL Menu 4 Clock 9: Off (D) / ModWheel (G) / BreathCtrl (Y) / PitchBend(R) LFO2 MIDI CTRL Menu 5 Clock 9: Off (D) / ModWheel (G) / BreathCtrl (Y) / PitchBend(R) Setting one of those parameters to anything else than Off, causes respective LFO to stop autorunning. The LFO starts to follow incoming MIDI messages instead. The MIDI message value 0 is equal to LFO minimum value and the MIDI value 127 is LFO maximum. This way you may address your Expression Pedal to send out Modulation Wheel (CC #1), Breath Control (CC #2) or Pitch Bend (a separate MIDI command) and control a group of parameters with a single controller. By the way, with Pitch Bend control you will get twice higher (smoother) control resolution. In fact, you are not limited to Expression Pedals for controlling 6Appeal. Use any MIDI controller, your DAW software or any software based MIDI controller. Just for a hint, with Lemur iPad software by Liine you may create whatever crazy MIDI controls for 6Appeal, periodic or not. Control depth or a parameter is defined the same way as you do with autorunning LFOs. You have to choose one of the parameter groups to control (main parameters, pan or filter) and you can define control depth for every parameter within the group separately, in phase or out of phase. LFO LEVEL defines overall modulation depth and LFO LEVEL SPREAD defines modulation depth for separate strings. LFO FREQUENCY and LFO FREQUENCY SPREAD do not affect parameters in this mode. There are MIDI controllers that let you set more than one controllable parameter for a single knob. These are mostly guitar pedal MIDI controllers like Softstep from Keith McMillen. This way you may control main and pan or filter parameters the same time, using a single control pedal. Please note that if LFO MIDI CTRL is set to other than Off, the LFO stops autorunning. The other way around, if your LFO is not autorunning, check if it is not set to MIDI Control! 41 © 2014 Spicetone OÜ www.spicetone.com Võistluse 9, Tallinn 10132, Estonia, European Union 12 SOFTWARE UPDATE 12.1HOW TO CHECK SOFTWARE VERSION To checking the software version of your 6Appeal, you have to read colour codes in Menu 10 Clock Position 12. SWVERSION Menu 10 Clock 12: Submenu 10.12 of software version SUBMENU 10.12 Global.SWVer (X.Y.Z.) X=Clock 1...3, Y=Clock 4...8, Z=Clock 9...12 On (R/Y/G) / Off (D) Clock1 Clock2 Clock3 Clock4 Clock5 Clock6 Clock7 Clock8 Clock9 Clock1 0 Clock1 1 Clock12 X2 X1 X0 Y4 Y3 Y2 Y1 Y0 Z3 Z2 Z1 Z0 1.0.0 0 0 1 0 0 0 0 0 0 0 0 0 1.2.3 0 0 1 0 0 0 1 0 0 0 1 1 4.5.6 1 0 0 0 0 1 0 1 0 1 1 0 7.31.15 - Max 1 1 1 1 1 1 1 1 1 1 1 1 0 - LED is OFF 1 - LED is On Another way to explain it: Clock1 Clock2 Clock3 Clock4 Clock5 Clock6 Clock7 Clock8 Clock9 Clock1 0 Clock1 1 Clock12 X2 X1 X0 Y4 Y3 Y2 Y1 Y0 Z3 Z2 Z1 Z0 1.0.0 1.2.3 4.5.6 7.31.15 - Max There’s a binary code reference table on the next page. 42 © 2014 Spicetone OÜ www.spicetone.com Võistluse 9, Tallinn 10132, Estonia, European Union 5-bit binary code table DEC BIN4...BIN0 0 00000 1 00001 2 00010 3 00011 4 00100 5 00101 6 00110 7 00111 8 01000 9 01001 10 01010 11 01011 12 01100 13 01101 14 01110 15 01111 16 10000 17 10001 18 10010 19 10011 20 10100 21 10101 22 10110 23 10111 24 11000 25 11001 26 11010 27 11011 28 11100 29 11101 30 11110 31 11111 X Y Z 12.2HOW TO UPDATE Occasionally Spicetone offers software updates that boost your pedal’s capabilities or smooth the experience. Please note that software updates are not mandatory. As the updater software is provided by third party (Texas Instruments) and performed by you, Spicetone cannot guarantee that everything goes well. If something goes bad, drop an email to [email protected], and we will try to find a solution. First of all, never plug your 6 Appeal effect device off during software update. Ensure a good electrical connection. Loss of power can brick your pedal. 43 © 2014 Spicetone OÜ www.spicetone.com Võistluse 9, Tallinn 10132, Estonia, European Union This being said, actual process should not be too hard to follow, if you have done similar with other devices. You even do not lose your presets, unless the update is stated to change to user interface in great scale. For software update you need a USB cable (mini USB to USB2 or USB3 or anything similar you have on your computer). Steps: 1) Go to www.spicetone.com and find the update package for your device. Download it and unpack. The unpacked catalogue should contain 6appeal.bin, dfuprog.exe and prog.bat 2) Disconnect dc supply cable from 6Appeal 3) Connect 6Appeal to you computer with USB cable. 4) While pressing PREV, ENC, NEXT simultaneously, connect dc supply cable to 6Appeal. Do not confuse with PREV, FX, NEXT! Correct is left and right footswitch + encoder. 5) LEDs flash and become dark. 6) If correct driver installed, your computer should automatically detect "TivaWare Device Firmware Upgrade" shown in Device Manager of Windows Control Panel. If your computer does not find 6Appeal (device driver installation failed), please follow Driver Installation Guide below. 7) If OK, double-click prog.bat 8) Security Warning dialog box may appear, click Run to continue 9) Terminal window opens, showing the progress. 10) If programmed successfully, 6Appeal restarts. 11) You can close terminal window by pressing any key. You are done! After the update, we suggest to enter Menu 10 (short click ENC, browse to Pot 10 blinking) and reload defaults by holding ENC + FX/ESC longer than 2 seconds. Also, some updates might add or change menus, like how many slots are used and what are the values – in that case you either have to toggle corresponding slots with ENC once or load initial preset. We will notify if it’s needed. We will notify it in the release notes if it is needed. Driver Installation Guide (needed when Windows Control Panel Device Manager shows unrecognised device “Stellaris Device Firmware Update” under section “Other devices” after running step #4 above): 1) Download the device driver package from www.spicetone.com 2) In Device Manager right mouse click on device “Stellaris Device Firmware Update” and select “Update Driver Software”. 3) Browse for downloaded and extracted directory “windows_driver” and check “Include subfolders”. 4) Click “Install” when prompted to install device software. 5) “TivaWare Device Firmware Upgrade” should appear in Device Manager. If driver installation fails or prog.bat fails to program the device please email us [email protected]. 44 © 2014 Spicetone OÜ www.spicetone.com Võistluse 9, Tallinn 10132, Estonia, European Union 13 FACTORY RESET You can recall global settings. Enter Menu 9 MIDI or Menu 10 "Global" and long press ENC+FX/ESC footswitch until SAVE LED flickers. You can recall Factory Presets to any Bank. Enter Submenu 10.11 (Banks). To recall the factory default, long push ENC and FX simultaneously (ENC slightly earlier and hold both longer than 2 seconds). The lights will flash, indicating the default (initial) bank is loaded. You still need to save individual preset or entire bank to make the changes permanent. 45 © 2014 Spicetone OÜ www.spicetone.com Võistluse 9, Tallinn 10132, Estonia, European Union 14 TECHNICAL SPECIFICATIONS AND COMPATIBILITY 14.1TECHNICAL PARAMETERS Dimensions: Depth 142 mm / 5.5 inches Width 215 mm / 8.5 inches Height 53.4 mm / 2.1 inches Weight 0.870 kg / 1.92 lbs Input impedance 270 kΩ on each audio channel Maximal output signal, approximately -10dBV (OUTPUT BOOST Off), +4dBu (OUTPUT BOOST On) Output impedance 220Ω on each audio channel Power supply 9-12V DC, center negative polarity (>=300mA) Current consumption less than 300mA Operating temperature +5 degrees Celsius to +45 degrees Celsius 14.2POWER ADAPTER You can use any 9vDC centre negative polarity guitar effect adapter (2.1mm/5.5mm power jack), suitable for your local mains current. Minimal requirement for the power adapter is 300mA. NB! Do not connect 6Appeal to any AC output adapters, as this will result in permanent damage. 14.3COMPATIBILITY AND CERTIFICATION SPICETONE OÜ, Võistluse 9, Tallinn 10132, Estonia, Europe, declare under sole responsibility, that the following product: hexaphonic analogue guitar effect pedal with digital control, conforms to requirements of the EC Council Directives: * 2006/95/EEC Low Voltage Directive, * 2004/108/EEC Electromagnetic Compatibility, and holds CE mark. Above named product conforms with the following standards: * EN 60065:2004 /EN 60065:2002/ Audio, video and similar apparatus Safety requirements. * EN 55032:2012/AC:2013 / EN 55103-1:2000 /EN 55103-1:1996/ Electromagnetic compatibility - Product family standard for audio, video, audio-visual and entertainment lighting control apparatus for professional use - Part 1: Emission * EN 55103-2:2009/IS1:2012 / EN 55103-2:2009 / EN 55103-2:2001 / EN 55103-2:1996/ Electromagnetic compatibility - Product family standard for audio, video, audio-visual and entertainment lighting control apparatus for professional use - Part 2: Immunity This Class B Digital device complies with Part 15 of the Federal Communications Commission's (FCC) Code of Federal Regulations, Title 47, Part 15 (47 CFR 15). Operation is subject to the 46 © 2014 Spicetone OÜ www.spicetone.com Võistluse 9, Tallinn 10132, Estonia, European Union following two conditions: (1) This device may not cause harmful interference, and (2) this device must accept any interference received, including interference that may cause undesired operation. This Class B digital apparatus complies with Canadian ICES-003. NB! Please use a certified power supply that complies with the standards mandatory in your region. 6 Appeal itself has been tested to cause practically no electromagnetic disturbances but it can amplify the disturbances caused by a power supply. Just a good power supply with CE, FCC or other certification accepted in your region. 14.4TARIC For import/export and duties, the TARIC code is 9209 94 - Parts and accessories for the musical instruments of heading 9207. 14.5ENVIRONMENTAL CONSCIOUSNESS All the components used in the manufacturing and assembly of the Spicetone's guitar effects comply with the Restriction of Hazardous Substances Directive 2002/95/EC (RoHS), meaning that in our guitar effects there are no hazardous materials. Except for the soul of Rock'N'Roll. We also watch out for environmental impact of our products and operations. We keep as many operations as possible in Estonia, thus minimizing the CO2 emissions on transportation. We pick our suppliers carefully. The places we use for assembly and metal works, are small and can be easily monitored for environmental impact and for working conditions of the good folks that help us deliver those nice devices. 47 © 2014 Spicetone OÜ www.spicetone.com Võistluse 9, Tallinn 10132, Estonia, European Union 15 PROBLEMS AND QUESTIONS 15.1FAQ AND TROUBLESHOOTING You connect a guitar but cannot hear sound. Is it a monophonic guitar with 1/4" output? Turn up MONO pot, otherwise the monophonic channel is off. LEDs are lit but strings are muted or only one string can be heard. Check if 6Appeal is set to Breakout Box. If yes, switch it off. BREAKOUT BOX Menu 10 Clock 2: On (G) / Off (R) LEDs are lit but some strings are quiet. Breakout Box is off. This indicates a mistake in software. Disconnect power (shortly remove DC plug) for 5 seconds. 6Appeal should be up and going again. Please report to [email protected] describing the case, so we can catch and kill the software bug. 6Appeal freezes or some pots freeze. Disconnect power (shortly remove DC plug) for 5 seconds. 6Appeal should be up and going again. Please report to [email protected]. 6Appeal misbehaves (channels become silent, pot parameters change by themselves) when an external MIDI device (a synthesizer) is connected for tempo synching. If you are only synching tempo, turn off MidiThru and MidiOut, and set MidiIn channel to to something else than the MIDI out channel of the other devices. If MidiIn is set to MidiAll, all MIDI CC info from your device affects 6Appeal, which is undesirable if you are using MIDI just for tempo synching. Pots seem to be stuck. Lightly moving pots up and down, and turning quickly should release them. Reason: the pots are sealed and greased inside; this is to avoid corrosion and make the pots last forever. The downside is the pots may get stuck for a while, if not used frequently. Sorry for the inconvenience! Some users have reported that the encoder (ENC) knob is slippery and hard to control. We have tested other knob materials but for now this still seems the best option. If you really feel the encoder is hard to handle, remove the knob by pulling it up. A knurled pot shaft might be easier for your fingers to grab. ENC may be hard or inconsistent to push if it's screwed to tightly to the case. Please try to loosen the nut under ENCODER. 6Appeal is much louder than usual. Check if Output Boost is on. If yes, switch it off. OUTPUT BOOST Menu 10 Clock 3: 0Off_16Off (D) / 0Off_16On (G) / 0On_16Off (Y) / 0On_16On (R) Guitar, 6Appeal and amp are plugged in, but there’s no sound. Are you using a Roland GK system? If you have turned on G-VOL (GK volume knob), check your GK switch position. If it’s switched to Guitar, the sound is off – move GK switch to GK, to have sound again. Guitar, 6Appeal and amp are plugged in, but there’s no sound. Have you switched on G_VOL in Menu 10, Clock Position 6? If you’re not using a Roland GK equipped guitar, you should switch G_VOL off in 6Appeal, as this feature might not work with other equipment. SAVE LED shows my preset is not saved, even though I did save it? We are sorry! Because of a technical limitation the SAVE LED can be a bit too active in lighting up. This can happen when a pot is close to the saved value and thus becomes active. To put it short, if you are very sure that you have saved your preset, just ignore this LED if it shows the opposite. 48 © 2014 Spicetone OÜ www.spicetone.com Võistluse 9, Tallinn 10132, Estonia, European Union You have connected guitar’s monophonic output to 6Appeal, using 1/4” TS cable, but you hear no sound. Turn up MONO POT to hear your monophonic channel. Normally it is turned down, to avoid intermodulation distortion. You have connected guitar’s monophonic output to 6Appeal, using 1/4” TS cable, but you hear no sound. Disconnect 13pin cable and check if MONOGUITAR feature is turned on. Turn it on. MONOGUITAR Menu 10 Clock 1 : On (G) / Off (R) You also have to switch off G-VOL feature in Menu 10 (“Global”), otherwise it may happen that neither hex nor mono sound comes through. G_VOL GK VOLUME KNOB Menu 10 Clock 6: On (G) / Off (R) I cannot get the modulations (LFO1, LFO2) going! Checklist: o Is LFO on? (Menu 4 or 5, Clock Position 11) o Is LFO controlled by MIDI? You must have an external MIDI device working, otherwise switch this feature off (Menu 4 or 5, Clock Position 9 to Dark). o You must have at least one modulation type set (Menu 4 or 5, Clock Position 7 or 8). o You must turn at least one of the Pots 1…6, thus defining modulation depth for at least one parameter. o In Menu 4 or 5, Pot 9 that controls modulation amplitude, must not be in zero position. I cannot get SEQUENCER going! Checklist: o Is SEQ on? (Menu 3, Clock Position 11) o You must define a sequence type in Menu 3 Submenus, available in Clock positions 7 and 8 o SEQ does not start with preset; set it to start with preset (Menu 3 Clock Position 9 Green) o You must turn at least one of the Pots 1…6, thus defining sequenced modulation depth for at least one parameter. o In Menu 3, Pot 9 that controls modulation amplitude, must not be in zero position. 15.2PROBLEM REPORTING In case of problems with your device please contact the retailer. If the retailer is not available and the sales guarantee does not apply any more, please send an email to [email protected], containing: * Your name, contact address, country/state * Name and product code of the device * Software version (or tell, which LEDs in which colour appear in submenu Menu 10, Clock 12) * Buying date * Description of the problem 49 © 2014 Spicetone OÜ www.spicetone.com Võistluse 9, Tallinn 10132, Estonia, European Union 15.3SUPPORT If you have question on using the device, drop us a line at [email protected]. It’s only three people here but we will do our best to answer quickly. 15.4ANALOGUE EXPERIENCE AND NOISE Spicetone's 6Appeal™ uses fully analogue signal path. There are no analogue to digital converters in the device. As you might have experienced before, noise is part of analogue heritage. Please be easy on our pedal, and us, as we made no compromise to real analogue guitar sound. We use a microprocessor and digital potentiometers to control the analogue circuit. As there is loads of gain available, you may hear slight clicking or other artefacts, especially with modulation effects like LFO and SEQUENCER. Please keep in mind that modulation effects come as a bonus and might sound not so smooth to expert ear. Internally there are six separate channels (one for each string) plus one channel for monophonic signal, thus the noise that you normally would not notice could be heard when you stop playing. We used low noise components to avoid excessive noise, so in most settings you should be just fine. In the end it all comes down to your sound source. Some hexaphonic pickups might be noisier than normal magnetic pickups. Some, on the other hand, are much cleaner. To fight the noise, try to roll off some highs using TONE KNOB or FILTER SECTION. For the DISTORTION TYPE, the OVERDRIVE setting is the loudest and also the least noisy. Of course turning down the DRIVE and GAIN helps a lot, too. Rather than turning the pedal up, turn up you amplifier first. That way you avoid preamp distortion and get more crunch in power section, too. When using a common monophonic guitar, see that the MONOIN ONLY setting is active and empty hexaphonic channels are thus muted. By their nature, piezoelectric pickups have harsh ice-pick qualities to them that might not sound pleasant when overdriven. Again, rolling off some highs can save the day. In some cases our ROOT BOOST circuit can cause oscillation in the amplifiers. If you get this, you probably have sufficient amount of lower harmonics already, so there is no need to use the ROOT BOOST circuit. 15.5PHASE ISSUES In certain guitars, the magnetic mono pickups and hexaphonic under saddle piezos are wired in opposite phases. This means, that turning up the MONO knob on 6 Appeal can cause loss of highs. To avoid this, experiment with different pickups and lower MONO settings. 50 © 2014 Spicetone OÜ www.spicetone.com Võistluse 9, Tallinn 10132, Estonia, European Union 16 WARNINGS NEVER use the device in moist or humid or very hot (over +45C) conditions. This could be dangerous to your own health and can damage the device permanently. NEVER connect input to input. NEVER connect 6Appeal to inappropriate power supply. Connecting AC output to 6Appeal will result in permanent damage. Use 9-12V DC, centre negative polarity (>=300mA) power supply only. DO NOT open the enclosure and DO NOT remove any parts, as this voids the warranty. There are no user serviceable parts inside. Spicetone makes tweaking and modifications available through software updates. DO NOT attempt to install any software that is not provided by Spicetone, as this can void the warranty and kill the device. Please be EXTRA CAREFUL during software updates, as a voltage drop during update can brick the device, meaning permanent damage and loss of warranty. DO NOT PLACE THIS PRODUCT INTO THE WASTE CONTAINER. This device is marked with a cross-lined waste container symbol according to 2002/96/EU Directive on Waste Electric and Electronic Equipment. You are obliged to return wasted equipment to a party collecting wasted electric and electronic equipment. This device is made of materials, which can be recycled or utilized after becoming out of use. Proper handling of wasted electric and electronic equipment reduce demand for raw materials and contribute in avoiding harmful consequences for environment and health of people caused by dangerous components and not proper storing and utilizing of such equipment. 51 © 2014 Spicetone OÜ www.spicetone.com Võistluse 9, Tallinn 10132, Estonia, European Union Menu 1 Menu 2 Menu 3 Menu 4 Menu 5 Menu 6 Menu 7 Menu 8 Reserved 17 APPENDIX 17.1TABLE 1. CLOCK POSITION VALUES IN MENUS Menu 9 Menu 10 Sound Pan Sequencer LFO1 LFO2 Envelope MidiCtrl Ch1: On (G) / Clean (Y) / Mute (R) Ch2: On (G) / Clean (Y) / Mute (R) Ch3: On (G) / Clean (Y) / Mute (R) Autopan1: LRLRLR (G) / Reverse (Y) / Off (R) Autopan2: RRRLLL (G) / Reverse (Y) / Off (R) Autopan3: L2R2L5R5L10R10 (G) / Reverse (Y) / Off (R) Ch1Mod: On (G) / Off (R) Ch1Mod: On (G) / Off (R) Ch1Mod: On (G) / Off (R) Ch2Mod: On (G) / Off (R) Ch2Mod: On (G) / Off (R) Ch2Mod: On (G) / Off (R) Ch3Mod: On (G) / Off (R) Ch3Mod: On (G) / Off (R) Ch3Mod: On (G) / Off (R) Ch1Mod: On (G) / Off (R) Ch2Mod: On (G) / Off (R) Ch3Mod: On (G) / Off (R) SubMenu: MidiCmd1 SubMenu: MidiCmd2 SubMenu: MidiCmd3 Clock 4 Ch4: On (G) / Clean (Y) / Mute (R) Ch4Mod: On (G) / Off (R) Ch4Mod: On (G) / Off (R) Ch4Mod: On (G) / Off (R) Ch4Mod: On (G) / Off (R) SubMenu: MidiCmd4 Clock 5 Ch5: On (G) / Clean (Y) / Mute (R) Ch5Mod: On (G) / Off (R) Ch5Mod: On (G) / Off (R) Ch5Mod: On (G) / Off (R) Ch5Mod: On (G) / Off (R) SubMenu: MidiCmd5 G_VOL: On (G) / Off (R) Clock 6 Ch6: On (G) / Clean (Y) / Mute (R) PostRB: 0Off_16Off (D) / 0Off_16On (G) / 0On_16Off (Y) / 0On_16On (R) PreRB: 0Off_16Off (D) / 0Off_16On (G) / 0On_16Off (Y) / 0On_16On (R) Filter: On (G) / Off (R) Autopan4: L10L5L2R2R5R10 (G) / Reverse (Y) / Off (R) Autopan5: L10R5L2R2L5R10 (G) / Reverse (Y) / Off (R) Autopan6: MONO (G) / Reverse (Y) / Off (R) Ch6Mod: On (G) / Off (R) Ch6Mod: On (G) / Off (R) Ch6Mod: On (G) / Off (R) Ch6Mod: On (G) / Off (R) PotDisplay: On (G) / Off (R) SubMenu: Step1 Shape1: Off (D) / Sine (G) / Triangle (Y) / Pulse (R) Shape0: Off (D) / Sine (G) / Triangle (Y) / Pulse (R) SubMenu: MidiCmd6 SubMenu: MidiCmd7 SubMenu: Step2 Shape2: Off (D) / Rising (G) / Falling (Y) / Random (R) Shape1: Off (D) / Rising (G) / Falling (Y) / Random (R) Staccato: On (G) / Off (R) SubMenu: MidiCmd8 Start SEQ with Preset: On (G) / Off (R) MidiCtrl: Off(D) / ModWheel(G) / BreathCtrl(Y) / PitchBend(R) Sync: Off (D) / Tempo (G) / Midi (Y) / Midi.OR.Tempo (R) MidiCtrl: Off(D) / ModWheel(G) / BreathCtrl(Y) / PitchBend(R) Sync with LFO1: Off (D) / 1X (G) / 2X (Y) / 4X (R) Front: Lin (G) / Exp (Y) / Log (R) SubMenu: MidiCmd9 SubMenu: MidiCmd10 SubMenu: MidiInCH Mode: Off (D) / Parameter (G) / Pan (Y) / Filter (R) Mode: Off (D) / Parameter (G) / Pan (Y) / Filter (R) Mode: Off (D) / Parameter (G) / Pan (Y) / Filter (R) SubMenu: MidiCmd11 SubMenu: MidiOutCH SubMenu: Bank ChMono: On (G) / Off (R) ChMono: On (G) / Off (R) ChMono: On (G) / Off (R) Sync with LFO1: Off (D) / 1X (G) / 2X (Y) / 4X (R) Mode: Off (D) / Parameter (G) / Pan (Y) / Filter (R) ChMono: On (G) / Off (R) MidiCtrl: On (G) / Off (R) MidiAll: On (G) / Off (R) SubMenu: SWVersion Clock 1 Clock 2 Clock 3 Clock 7 Clock 8 Clock 9 Clock 10 Tone: On (G) / Off (R) Clock 11 Distortion: FX Off (D) / Overdrive (G) / Crunch (Y) / Fuzz (R) Clock 12 ChMono: On (G) / Mute (Y) / Clean (R) Sync with LFO1: Off (D) / 1X (G) / 2X (Y) / 4X (R) SpreadType2: Freq (G) / Phase (R) SpreadType1: Tilt (G) / Smile (R) Midi Global MidiIn: On (G) / Off (R) MidiOut: On (G) / Off (R) MidiThru: On (G) / Off (R) Mono Guitar: On (G) / Off (R) Box: On (G) / Off (R) MonoMode: On (G) / Off (R) Output Boost: 0Off_16Off (D) / 0Off_16On (G) / 0On_16Off (Y) / 0On_16On (R) Start1stPreset: On (G) / Off (R) © 2014 Spicetone OÜ www.spicetone.com Võistluse 9, Tallinn 10132, Estonia, European Union Midi Global Pot1 Drive Drive Drive Pot2 Gain MidiPot2 Gain Gain Pot3 Tone Tone/Pan3 Depth MidiPot3 Tone Tone Pot4 Level Level/Pan4/FilterVol Depth Level/Pan4/FilterVol Depth MidiPot4 Level Level Pot5 Mono Mono/Pan5/FilterReso Depth Mono/Pan5/FilterReso Depth Mono/Pan5/FilterReso Depth MidiPot5 Mono Mono Pot6 Dry Dry/Pan6 Depth Dry/Pan6 Depth Dry/Pan6 Depth Dry/Pan6 Depth MidiPot6 Dry Dry Pot7 Frequency A Drive Spread SEQ Frequency LFO1 Frequency LFO2 Frequency Attack MidiPot7 Drive Spread Drive Spread Pot8 Frequency B Tone Spread SEQ Frequency / Phase Spread LFO1 Frequency / Phase Spread LFO2 Frequency / Phase Spread Decay MidiPot8 Tone Spread Tone Spread Pot9 Menu 1 Menu 2 Menu 3 Menu 4 Menu 5 Menu 6 Menu 7 Sound Pan Sequencer LFO1 LFO2 Envelope MidiCtrl Channel 1 Pan Drive/Pan1/FreqA Depth Drive/Pan1/FreqA Depth Drive/Pan1/FreqA Depth Drive/Pan1/FreqA Depth MidiPot1 Channel 2 Pan Gain/Pan2/FreqB Depth Gain/Pan2/FreqB Depth Gain/Pan2/FreqB Depth Gain/Pan2/FreqB Depth Channel 3 Pan Tone/Pan3 Depth Tone/Pan3 Depth Tone/Pan3 Depth Channel 4 Pan Level/Pan4/FilterVol Depth Level/Pan4/FilterVol Depth Channel 5 Pan Mono/Pan5/FilterReso Depth Channel 6 Pan Filter Level Level Spread SEQ Level LFO1 Level LFO2 Level Sustain MidiPot9 Level Spread Level Spread Resonance Dry Spread SEQ Level Spread LFO1 Level Spread LFO2 Level Spread Release MidiPot10 Dry Spread Dry Spread Menu 8 Reserved Menu 10 Pot Menu 9 Pot10 17.2TABLE 2. POTS IN MENUS © 2014 Spicetone OÜ www.spicetone.com Võistluse 9, Tallinn 10132, Estonia, European Union 17.3TABLE 3. BUTTON VALUES AND COMBINATIONS FX_SHORT FX_LONG PREV_SHORT PREV_LONG NEXT_SHORT NEXT_LONG ENC_SHORT ENC_LONG ENC_CCW ENC_ CW ENC_FX_SHORT ENC_FX_LONG G_SW1_SHORT G_SW2_SHORT Player Mode Toggle FX Enter Tap Preset - Tap Set Tempo Save Mode Exit Save W/O Save Save2Bank Exit Save2Bank Menu (1-8) Exit Menu Global Menu (9-10) Exit Global Menu Sub Menu Exit Sub Menu Preset - Bank - Menu - Menu - Preset + Preset + Bank + Menu + Menu + Enter (Global) Menu Enter Save Preset Preset + Recall Preset Recall Default Preset Preset Preset + Enter Save2Bank Exit Save W/ Save Preset Preset + Set Bank Toggle Menuitem Toggle Menuitem Toggle Menuitem Bank Bank + Menuitem Menuitem + Recall Preset Recall Default Preset Menuitem Menuitem + Recall Global Recall Default Global Menuitem Menuitem + Recall Bank* Recall Default Bank* *) Only in Bank Submenu 10.11 © 2014 Spicetone OÜ www.spicetone.com Võistluse 9, Tallinn 10132, Estonia, European Union 17.4TABLE 4. MIDI CC MESSAGES Controller Change (0xB0 - 0xBF) CC No (dec) 0 1 2 3 4 5 7 8 9 10 11 12 13 16 17 18 19 20 21 22 23 24 25 26 27 28 CC No (hex) 00 01 02 03 04 05 07 08 09 0A 0B 0C 0D 10 11 12 13 14 15 16 17 18 19 1A 1B 1C Group Parameter Bank Select LFO Control Bank Select (MSB) Modulation Wheel Breath Controller MidiPot1 MidiPot2 MidiPot3 MidiPot4 MidiPot5 MidiPot6 MidiPot7 MidiPot8 MidiPot9 MidiPot10 Drive Gain Tone Level Mono Dry Drive Spread Tone Spread Level Spread Dry Spread FXOFF Gain FXOFF Mono FXOFF Dry Midi Control Main Parameters Comments Ignored © 2014 Spicetone OÜ www.spicetone.com Võistluse 9, Tallinn 10132, Estonia, European Union 29 30 31 32 40 41 42 43 44 45 46 47 48 49 54 55 56 57 58 59 60 61 62 63 64 72 73 74 75 76 77 1D 1E 1F 20 28 29 2A 2B 2C 2D 2E 2F 30 31 36 37 38 39 3A 3B 3C 3D 3E 3F 40 48 49 4A 4B 4C 4D SEQ/ENV Control Bank Select Pan/Filter LFO1 SEQ/ENV Control Envelope FXOFF Dry Spread SEQ Start/Stop ENV Start/Stop Bank Select (LSB) Pan 1 Pan 2 Pan 3 Pan 4 Pan 5 Pan 6 Filter Frequency A Filter Frequency B Filter Level Filter Resonance LFO1 Frequency LFO1 Frequency Spread LFO1 Level LFO1 Level Spread LFO1 Drive/Pan1/FreqA Depth LFO1 Gain/Pan2/FreqB Depth LFO1 Tone/Pan3 Depth LFO1 Level/Pan4/FilterVol Depth LFO1 Mono/Pan5/FilterReso Depth LFO1 Dry/Pan6 Depth SEQ/ENV Start/Stop Release Attack Decay Sustain ENV Drive/Pan1/FreqA Depth ENV Gain/Pan2/FreqB Depth Value: STOP <= 63 < START Value: STOP <= 63 < START Value from 1 to 6 Value: STOP <= 63 < START © 2014 Spicetone OÜ www.spicetone.com Võistluse 9, Tallinn 10132, Estonia, European Union 78 79 80 81 85 86 87 88 89 90 91 92 93 94 102 103 104 105 106 107 108 109 110 111 4E 4F 50 51 55 56 57 58 59 5A 5B 5C 5D 5E 66 67 68 69 6A 6B 6C 6D 6E 6F LFO2 Sequencer ENV Tone/Pan3 Depth ENV Level/Pan4/FilterVol Depth ENV Mono/Pan5/FilterReso Depth ENV Dry/Pan6 Depth LFO2 Frequency LFO2 Frequency Spread LFO2 Level LFO2 Level Spread LFO2 Drive/Pan1/FreqA Depth LFO2 Gain/Pan2/FreqB Depth LFO2 Tone/Pan3 Depth LFO2 Level/Pan4/FilterVol Depth LFO2 Mono/Pan5/FilterReso Depth LFO2 Dry/Pan6 Depth SEQ Frequency SEQ Frequency Spread SEQ Level SEQ Level Spread SEQ Drive/Pan1/FreqA Depth SEQ Gain/Pan2/FreqB Depth SEQ Tone/Pan3 Depth SEQ Level/Pan4/FilterVol Depth SEQ Mono/Pan5/FilterReso Depth SEQ Dry/Pan6 Depth © 2014 Spicetone OÜ www.spicetone.com Võistluse 9, Tallinn 10132, Estonia, European Union 17.5TABLE 5. MIDI NOTEON MESSAGES Note On (0x90 - 0x9F) Note No (dec) Note No (hex) Note Group Parameter 0 (R = Red) 1 (G = Green) 12 0C C-1 Global FX OFF (0..63) ON (64..127) 13 0D C#-1 Mono Guitar OFF (0..63) ON (64..127) 14 0E D-1 Box OFF (0..63) ON (64..127) 15 0F D#-1 Output Boost BOOST_0ON_16ON (0..31) BOOST_0OFF_16ON (32..63) 16 10 E-1 Start First Preset OFF (0..63) ON (64..127) 17 11 F-1 Guitar Volume OFF (0..63) ON (64..127) 18 12 F#-1 Pot Display OFF (0..63) ON (64..127) 24 18 C0 Ch0 State CHST_CLEAN (0..42) CHST_ON (43..85) CHST_MUTE (86..127) 25 19 C#0 Ch1 State CHST_CLEAN (0..42) CHST_ON (43..85) CHST_MUTE (86..127) 26 1A D0 Ch2 State CHST_CLEAN (0..42) CHST_ON (43..85) CHST_MUTE (86..127) 27 1B D#0 Ch3 State CHST_CLEAN (0..42) CHST_ON (43..85) CHST_MUTE (86..127) 28 1C E0 Ch4 State CHST_CLEAN (0..42) CHST_ON (43..85) CHST_MUTE (86..127) 29 1D F0 Ch5 State CHST_CLEAN (0..42) CHST_ON (43..85) CHST_MUTE (86..127) 30 1E F#0 Ch6 State CHST_CLEAN (0..42) CHST_ON (43..85) 31 1F G0 Root Boost Post BOOST_0ON_16ON (0..31) BOOST_0OFF_16ON (32..63) 32 20 G#0 Root Boost Pre BOOST_0ON_16ON (0..31) BOOST_0OFF_16ON (32..63) CHST_MUTE (86..127) BOOST_0ON_16OFF (64..95) BOOST_0ON_16OFF (64..95) BOOST_0OFF_16OFF (96..127) BOOST_0OFF_16OFF (96..127) 33 21 A0 Filter OFF (0..63) ON (64..127) 34 22 A#0 Tone OFF (0..63) ON (64..127) 35 23 B0 Drive DRIVE_FUZZ (0..31) DRIVE_OVERDRIVE (32..63) DRIVE_CRUNCH (64..95) DRIVE_OFF (96..127) 36 24 C1 Autopan1 AUTOPAN_OFF (0..42) AUTOPAN_ON: LRLRLR (43..85) AUTOPAN_REV (86..127) 37 25 C#1 Autopan2 AUTOPAN_OFF (0..42) AUTOPAN_ON: RRRLLL (43..85) AUTOPAN_REV (86..127) 38 26 D1 Autopan3 AUTOPAN_OFF (0..42) Sound Pan 2 (Y = Yellow) 3 (D = Dark) Comments Note Velocity range in brackets AUTOPAN_ON: L2R2L5R5L10R10 (43..85) BOOST_0ON_16OFF (64..95) AUTOPAN_REV (86..127) BOOST_0OFF_16OFF (96..127) © 2014 Spicetone OÜ www.spicetone.com Võistluse 9, Tallinn 10132, Estonia, European Union 39 27 D#1 Autopan4 AUTOPAN_OFF (0..42) AUTOPAN_ON: L10L5L2R2R5R10 (43..85) AUTOPAN_REV (86..127) 40 28 E1 Autopan5 AUTOPAN_OFF (0..42) AUTOPAN_ON: L10R5L2R2L5R10 (43..85) AUTOPAN_REV (86..127) 41 29 F1 Autopan6 AUTOPAN_OFF (0..42) 46 2E A#1 Spread Type2 PHASE (0..63) FREQ (64..127) 47 2F B1 Spread Type1 SMILE (0..63) TILT (64..127) 48 30 C2 Ch0 Mod LFO1 OFF (0..63) ON (64..127) 49 31 C#2 Ch1 Mod LFO1 OFF (0..63) ON (64..127) 50 32 D2 Ch2 Mod LFO1 OFF (0..63) ON (64..127) 51 33 D#2 Ch3 Mod LFO1 OFF (0..63) ON (64..127) 52 34 E2 Ch4 Mod LFO1 OFF (0..63) ON (64..127) 53 35 F2 Ch5 Mod LFO1 OFF (0..63) ON (64..127) 54 36 F#2 Ch6 Mod LFO1 OFF (0..63) ON (64..127) 55 37 G2 LFO1 Shape1 LFOSHAPE1_PULSE (0..31) LFOSHAPE1_SINE (32..63) 56 38 G#2 LFO1 Shape2 57 39 A2 LFO1 Midi Ctrl 58 3A A#2 LFO1 Sync 59 3B B2 LFO1 Mode LFOSHAPE2_RANDOM (0..31) MIDICTRL_PITCHBEND (0..31) LFO1SYNC_MIDI_OR_TEMP O (0..31) MODE_FILTER (0..31) 60 3C C3 Ch0 Mod LFO2 OFF (0..63) ON (64..127) 61 3D C#3 Ch1 Mod LFO2 OFF (0..63) ON (64..127) 62 3E D3 Ch2 Mod LFO2 OFF (0..63) ON (64..127) 63 3F D#3 Ch3 Mod LFO2 OFF (0..63) ON (64..127) 64 40 E3 Ch4 Mod LFO2 OFF (0..63) ON (64..127) 65 41 F3 Ch5 Mod LFO2 OFF (0..63) ON (64..127) 66 42 F#3 Ch6 Mod LFO2 OFF (0..63) ON (64..127) 67 43 G3 LFO2 Shape1 LFOSHAPE1_PULSE (0..31) LFOSHAPE1_SINE (32..63) 68 44 G#3 LFO2 Shape2 69 45 A3 LFO2 Midi Ctrl Spread LFO1 LFO2 LFOSHAPE2_RANDOM (0..31) MIDICTRL_PITCHBEND AUTOPAN_ON: MONO (43..85) AUTOPAN_REV (86..127) LFO1SYNC_TEMPO (32..63) LFO1SYNC_MIDI (64..95) MODE_PARAM (32..63) MODE_PAN (64..95) LFOSHAPE1_OFF (96..127) LFOSHAPE2_OFF (96..127) MIDICTRL_OFF (96..127) LFO1SYNC_OFF (96..127) MODE_OFF (96..127) LFOSHAPE1_TRIANGLE (64..95) LFOSHAPE2_FALLING (64..95) MIDICTRL_BREATHCTRL LFOSHAPE1_OFF (96..127) LFOSHAPE2_OFF (96..127) MIDICTRL_OFF LFOSHAPE2_RISING (32..63) MIDICTRL_MODWHEEL (32..63) LFOSHAPE2_RISING (32..63) MIDICTRL_MODWHEEL (32..63) LFOSHAPE1_TRIANGLE (64..95) LFOSHAPE2_FALLING (64..95) MIDICTRL_BREATHCTRL (64..95) © 2014 Spicetone OÜ www.spicetone.com Võistluse 9, Tallinn 10132, Estonia, European Union (0..31) 70 46 A#3 71 47 B3 Envelope (64..95) (96..127) LFO2 Sync w/ LFO1 LFO2 Mode SYNC_4X (0..31) SYNC_1X (32..63) SYNC_2X (64..95) SYNC_OFF (96..127) MODE_FILTER (0..31) MODE_PARAM (32..63) MODE_PAN (64..95) MODE_OFF (96..127) Ch0 Mod Env OFF (0..63) ON (64..127) 72 48 C4 73 49 C#4 Ch1 Mod Env OFF (0..63) ON (64..127) 74 4A D4 Ch2 Mod Env OFF (0..63) ON (64..127) 75 4B D#4 Ch3 Mod Env OFF (0..63) ON (64..127) 76 4C E4 Ch4 Mod Env OFF (0..63) ON (64..127) 77 4D F4 Ch5 Mod Env OFF (0..63) ON (64..127) 78 4E F#4 Ch6 Mod Env OFF (0..63) ON (64..127) 80 50 G#4 Env Staccato OFF (0..63) ON (64..127) 81 51 A4 Env Front ENVFRONT_LOG (0..42) ENVFRONT_LIN (43..85) ENVFRONT_EXP (86..127) 82 52 A#4 83 53 B4 84 54 C5 85 55 86 56 87 88 Env Sync w/ LFO1 Env Mode SYNC_4X (0..31) SYNC_1X (32..63) SYNC_2X (64..95) SYNC_OFF (96..127) MODE_FILTER (0..31) MODE_PARAM (32..63) MODE_PAN (64..95) MODE_OFF (96..127) Ch0 Mod Seq OFF (0..63) ON (64..127) C#5 Ch1 Mod Seq OFF (0..63) ON (64..127) D5 Ch2 Mod Seq OFF (0..63) ON (64..127) 57 D#5 Ch3 Mod Seq OFF (0..63) ON (64..127) 58 E5 Ch4 Mod Seq OFF (0..63) ON (64..127) Sequencer 89 59 F5 Ch5 Mod Seq OFF (0..63) ON (64..127) 90 5A F#5 Ch6 Mod Seq OFF (0..63) ON (64..127) 93 5D A5 Seq Start OFF (0..63) ON (64..127) 94 5E A#5 Seq Sync SYNC_4X (0..31) SYNC_1X (32..63) SYNC_2X (64..95) SYNC_OFF (96..127) 95 5F B5 Seq Mode MODE_FILTER (0..31) MODE_PARAM (32..63) MODE_PAN (64..95) MODE_OFF (96..127) 96 60 C6 Step 1 STEP_RESET (0..31) STEP_ON (32..63) (STEP_NA) STEP_OFF (96..127) 97 61 C#6 Step 2 STEP_RESET (0..31) STEP_ON (32..63) (STEP_NA) STEP_OFF (96..127) 98 62 D6 Step 3 STEP_RESET (0..31) STEP_ON (32..63) (STEP_NA) STEP_OFF (96..127) 99 63 D#6 Step 4 STEP_RESET (0..31) STEP_ON (32..63) (STEP_NA) STEP_OFF (96..127) 100 64 E6 Step 5 STEP_RESET (0..31) STEP_ON (32..63) (STEP_NA) STEP_OFF (96..127) © 2014 Spicetone OÜ www.spicetone.com Võistluse 9, Tallinn 10132, Estonia, European Union 101 65 F6 Step 6 STEP_RESET (0..31) STEP_ON (32..63) (STEP_NA) STEP_OFF (96..127) 102 66 F#6 Step 7 STEP_RESET (0..31) STEP_ON (32..63) (STEP_NA) STEP_OFF (96..127) 103 67 G6 Step 8 STEP_RESET (0..31) STEP_ON (32..63) (STEP_NA) STEP_OFF (96..127) 104 68 G#6 Step 9 STEP_RESET (0..31) STEP_ON (32..63) (STEP_NA) STEP_OFF (96..127) 105 69 A6 Step 10 STEP_RESET (0..31) STEP_ON (32..63) (STEP_NA) STEP_OFF (96..127) 106 6A A#6 Step 11 STEP_RESET (0..31) STEP_ON (32..63) (STEP_NA) STEP_OFF (96..127) 107 6B B6 Step 12 STEP_RESET (0..31) STEP_ON (32..63) (STEP_NA) STEP_OFF (96..127) 108 6C C7 Step 13 STEP_RESET (0..31) STEP_ON (32..63) (STEP_NA) STEP_OFF (96..127) 109 6D C#7 Step 14 STEP_RESET (0..31) STEP_ON (32..63) (STEP_NA) STEP_OFF (96..127) 110 6E D7 Step 15 STEP_RESET (0..31) STEP_ON (32..63) (STEP_NA) STEP_OFF (96..127) 111 6F D#7 Step 16 STEP_RESET (0..31) STEP_ON (32..63) (STEP_NA) STEP_OFF (96..127) 112 70 E7 Step 17 STEP_RESET (0..31) STEP_ON (32..63) (STEP_NA) STEP_OFF (96..127) 113 71 F7 Step 18 STEP_RESET (0..31) STEP_ON (32..63) (STEP_NA) STEP_OFF (96..127) 114 72 F#7 Step 19 STEP_RESET (0..31) STEP_ON (32..63) (STEP_NA) STEP_OFF (96..127) 115 73 G7 Step 20 STEP_RESET (0..31) STEP_ON (32..63) (STEP_NA) STEP_OFF (96..127) 116 74 G#7 Step 21 STEP_RESET (0..31) STEP_ON (32..63) (STEP_NA) STEP_OFF (96..127) 117 75 A7 Step 22 STEP_RESET (0..31) STEP_ON (32..63) (STEP_NA) STEP_OFF (96..127) 118 76 A#7 Step 23 STEP_RESET (0..31) STEP_ON (32..63) (STEP_NA) STEP_OFF (96..127) 119 77 B7 Step 24 STEP_RESET (0..31) STEP_ON (32..63) (STEP_NA) STEP_OFF (96..127) Midi Controller OFF (0..63) ON (64..127) 120 78 C8 Midi Control © 2014 Spicetone OÜ www.spicetone.com Võistluse 9, Tallinn 10132, Estonia, European Union 17.6FLOWCHARTS ON HOW TO USE 6APPEAL Depend on a person, flowcharts might be a quick and easy introduction to using 6Appeal. You can download a series of flowcharts in one PDF file from www.spicetone.com 6Appeal page (check below the specs).