1
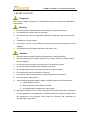
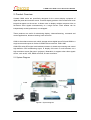
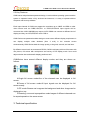
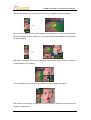
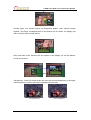
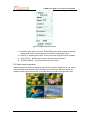
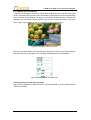
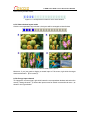
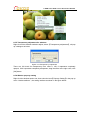
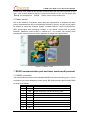
CK8H series
Multi-viewer
Instruction Manual
V1.2
Shenzhen Createk Electronics Co., Ltd.
http://www.ckdz.com/
Note: Please read the User’s Manual carefully before using the products, and kept the
manual properly for future reference
CK8H series Multi-viewer Instruction Manual
TABLE OF CONTENTS
TABLE OF CONTENTS........................................................................................................................ I
1. SAFETY NOTICE .............................................................................................................................. 2
2. PRODUCT OVERVIEW.................................................................................................................... 3
2.1 SYSTEM DIAGRAM.......................................................................................................................... 3
2.2 KEY FEATURES............................................................................................................................... 4
3. TECHNICAL SPECIFICATION ....................................................................................................... 4
4. FUNCTION INTRODUCTION.......................................................................................................... 5
5. HARDWARE STRUCTURE ............................................................................................................. 8
5.1 PRODUCT ELEVATION ..................................................................................................................... 8
5.2 THE STRUCTURE OF THE FRONT PANEL ......................................................................................... 8
5.3 THE STRUCTURE OF THE REAR PANEL ........................................................................................... 9
6. INTRODUCTION OF CONTROL SOFTWARE ............................................................................ 9
6.1 HOW TO INSTALL THE CONTROL SOFTWARE .................................................................................. 9
6.2 STARTUP THE SYSTEM ................................................................................................................. 10
6.4 STATIC ADJUSTMENT .................................................................................................................... 11
6.5 VIDEO WINDOW OPERATION ......................................................................................................... 12
6.5.1 Window size and position ............................................................................................. 13
6.5.2 Open and close the video windows ............................................................................ 13
6.5.3 Video window layout mode ........................................................................................... 15
6.5.4 Change input channel .................................................................................................... 15
6.5.6 Window property setting ............................................................................................... 16
6.6 SETTING ....................................................................................................................................... 17
6.7 MATRIX CONTROL......................................................................................................................... 19
7. RS232 COMMUNICATION PORT AND INNER MODE RECALL PROTOCOL ................... 19
7.1 RS232 CONNECTION ................................................................................................................... 19
7.2 THE PROTOCOL OF THE INNER MODE RECALL ............................................................................. 20
8. FAQ(FREQUENTLY ASKED QUESTIONS): .............................................................................. 21
-i-
CK8H series Multi-viewer Instruction Manual
1. SAFETY NOTICE
Dangerous
There’s high voltage in processor. To avoid danger, please do not open rear cap without
authorization.
Warning
1
Do not allow liquid, small particles or other objects to get into the device;
2
Do not place the system near fire and water;
3
Do not block any vents. To keep good ventilation, please place the system at least
20
4
cm away from a wall surface;
5
If any noise、smoke、smell, please cut off the power at once and contact your local
suppliers;
6
Do not disconnect DVI signal cable when the power is on.
Attention
1.
Read the manual carefully before using the system, and keep it safely;
2.
Check the packing list to confirm if there is any missing .If there is, please contact
the local supplier.
3.
Cut off the power if thunder or the machine is not used for long term ;
4.
You should be well trained before operating the system;
5.
Do not slip anything from vent to prevent broken or electric shock;
6.
Do not place the device near liquid or moisture;
7.
Do not put the device near heat sink or high temperature environment;
8.
Keep the power cable properly;
9.
If the following situations happen, please cut off the power and for maintenance
1)
Liquid splash to device;
2)
Device fall down or the cabinet is broken;
3)
Any abnormality or malfunction in the system
10. Shenzhen Createk Co., LTD. has the copyright of the manual and reserves the right
of final explanation. Any enterprises or individuals shall not infringe the right without
the agreement of the company. Once found, the company will investigate for
relevant legal responsibility.
-2-
CK8H series Multi-viewer Instruction Manual
2. Product Overview
Createk CK8H series are specifically designed for the current display equipment of
digital flat panel and oversize screen. It tackles display problem of the mosaic and crude
image that appear on the screen. It allows users to display multiple computer-video or
full-motion video signals simultaneously on a single screen. Each window can be
independently scaled, positioned, or overlapped.
These products are useful for advertising display, videoconferencing, command and
control applications, distance learning, bank and more.
CK8H is the enhancement mode, which accepts various digital inputs DVI and HDMI in a
single screen and outputs in format of HDMI/VGA at resolution 1920×1080.
CK8H-SDI series SDI signal multi-window processor is aimed at processing and control
high-definition SDI broadcasting signal, to display full–screen or multi-windows on a
high-resolution screen (flat panel / projector). Meanwhile, it supports other video signals
source, such as AV, VGA, HDMI at full-HD, or lower resolution.
2.1 System Diagram
CVBS
VGA
HDMI
Figure2.1 System diagram
-3-
CK8H series Multi-viewer Instruction Manual
2.2 Key Features
CK8H series adopt hardware patented design, it works without operating system and the
system is operated under a fully enclosed environment, it is easy to operate without
computer and boot-up software.
Each input channel of CK8H can support the resolution up to 1080P via HDMI or other
video format such as CVBS,VGA,DVI-I or YPbPr,HD-SDI.All input signals will be
converted into 1920*1080/60Hz as output via DVI.CK8H can connect to different kind of
display and they are LCD,PDP,DLP and LCOS et.
CK8H Series use patented modular design to meet users different display requirement. It
can
display multiple video
windows
(from 2
to16) in
the
oversize
screen
simultaneously.CK8H Series deal the image quality, to be good, smooth, and real time.
By different control such as remote and RS232, CK8H could easy achieve full-screen with
one picture, full screen with multi-picture and variety of PIP display mode. User could
adjust window size and transfer display position at will.
CK8HSeries have several different display modes and they are shown as
follows:
A.Single full screen mode-One of the channels can be displayed in full
screen:
B.Pieces of full screen mode-All input signals can be displayed for full
screen evenly:
C.PIP mode-Choose one image as the background and other image can be
displayed on top.
D.Roaming, zoom and superposition mode-Images of different channels can
be superimposed on the same screen.
3. Technical specification
-4-
Input
CVBS
VGA/RGBHV
HDMI/DVI
YPbPr/YCbCr
(Customizable)
SDI(Customizab
le)
Output
Control
CK8H series Multi-viewer Instruction Manual
Support PAL/NTSC format, multiple BNC ports (some
models do not support the port input)
Multi-channel VGA DB-15 port, support VGA full-format
input
Support HDMI 1.3
The same connector of VGA/RGBHV signal, which
support PAL/NTSC format and 720p/1080i HDTV.
BNC Port(Only for the model of CK8HS)
VGA/RGBHV
Signal channel XGA(1024×768@60Hz)/DB-15 port
HDMI/DVI
Support HDMI 1.3
SDI(Customizab
le)
BNC port loop out(Only for the model of CK8HS)
Standard RS232 port(CKDZ patented control software)
IR remote control(Customizable)
Working
temperature
-20℃~60℃
Working humidity
5%~95%
AC supply voltage
AC100V-240V 50Hz/60Hz
Power consumption
The maximum consumption for each channel is 15W
Case Dimension
2U:483×410×90(mm)
4U:483×490×178(mm)
Product Weight
2U:About7KG
4U:About 10.5KG
Figure3.1 Technical specifications
4. Function introduction
CK8 series multi-window processor is a platform for multiple images processing , which
has the following functions:
1.Compatible with various signal inputs, including C-video, YPbPr, VGA, HDMI,
DVI, SDI, etc. Processing& control 1024*768 high-definition inputs and display
full–screen or multi-windows on a high-resolution screen (flat panel / projector)
2. Support VGA full format input signal processing;
3. Support HD 720 p and 1080 I input and output (Only for some special model);
4.CK8B series support to adjust the display window’s position and size arbitrarily;
5.The image brightness, contrast, saturation and chroma can be adjusted.
6.Flexibility multi-window control, support PIP/POP/PBP, overlap, roam, zoom,
transparent settingetc..
CK8B series multi-window processor has a variety of display modes. And the mode
depends on the number of input channels. All the display modes as below:
-5-
CK8H series Multi-viewer Instruction Manual
Main window display; choose any one of the channel signals to full-screen display.
Multi view Tile mode: put all the input signals to average size on a screen for display, the
general amplitude for the 2,4,6,8,9,12. For the odd number input channels, it can't realize
full screen display.
PBP mode: All signals can be any rectangular sharp display format at any size, without
overlap between any windows.
Tiled 1+Nmode: set one as the main window, the rest average size display
PIP mode: set one picture as background, other signals of channel use sub-window at
customer configuration
-6-
CK8H series Multi-viewer Instruction Manual
A.
Overlap mode: one channel picture as background display, other channel overlap
together. (The being overlapped parts of the window will not shown, the display part
refers to priority class of input source)
Zoom and roam mode: Window size and location of the display unit can be arbitrary
moved and zoomed.
Transparency: In the PIP overlay mode, the users can set the transparency of the upper
window and see the upper and bottom windows simultaneously.
No transparency
60% transparency
-7-
CK8H series Multi-viewer Instruction Manual
5. Hardware structure
5.1 Product elevation
Figure5.1 Product elevation
The Number of segmentation images, card number and case size depend on the user’s
requirement. There are two kinds of case: 2U and 4U.
5.2 The structure of the front panel
① ②
③
Figure5.2 Front panel of the 2u case
(1)The power switch: Power on/off
(2)IR:Infrared receiver
(3)Equipment status indicator: The power indicator in red keeps light on after power on,
the status indicator in green keeps flashing when it is in normal working.
①
③
①
②
Figure5.3 Front panel of the 4Ucase
(1)Buttons area: Recall the memory preset
(2)Power switcher: Start or close the processor
(3)Light and infrared receiving: red power indicator light, green light for work, black for the infrared
-8-
CK8H series Multi-viewer Instruction Manual
receiver
5.3 The structure of the rear panel
①
③
⑤
②
④
Figure 5.4 Rear panel of the CK8 Multi-window processor,2U cases
④
②
①
③
⑤
Figure 5.5 Rear panel of the CK8 Multi-window processor,4U cases
(1)Power socket:AC100-240V 50/60HZ
(2)Power switch: Owe on/off
(3)Control port:RS232 input and RS232 output
(4)Input connector :AV、VGA、HDMI etc..
(5)Output connector :DVI/VGA to connect with the display screen.
ATTENTIONS: In different application situation, input/output signal’s number and type are
varied, so the board type and quantity may have differences. In case of conflict between the
above description and practice, it’s subject to the practical supplied board. In case of any
difficult problem, please contact your supplier for technical assistance.
6. Introduction of control software
6.1 How to install the control software
CK8 series multi-window processor adopts user-friendly design. Its control software
-9-
CK8H series Multi-viewer Instruction Manual
requires no installation and the volume is small. The root folder includes following files,
you can copy it to any place of the control computer and then double-click it to execute file
program. It saves tedious software installation steps and time. Even computer entry-level
users can operate it quickly and easily.
Figure 6.1 the folder of control software system
Program operating environment:
CPU: more than P4;
Memory: more than 512M;
Hard disk: more than 40G;
Attention: the above four files are all necessary to guarantee the control software operation,
and they all need to be in the same file .please do not alter the file, Otherwise it will cause
software abnormal use.
6.2 Startup the system
Double click application program “Video divider.exe”, it will be followed with the following
operation interface:
Figure 6.2 Serial port communication connections
Select the COM and Baud rate in the interface as shown in figure above. The initial mode
has two options “Memory mode” and “Standard mode”. When you choose the memory
mode, the interface of the last run will be recalled. Then click the button “OK” to startup
the system software. If the serial port has been occupied by other program or is in
abnormal, it will pop up a warning dialog box as shown below.
-10-
CK8H series Multi-viewer Instruction Manual
Figure 6.3 Prompt of abnormal connection
After finishing the parameter setting in figure 6.2 and click the item ”ok” ,it will
enter into the software interface as shown below.
Figure 6.4 Software interface
6.3 Com port connection and disconnection
Clicking the item【D】(disconnect) in the menu
(connect and disconnect),and
the connection between the software and processor will be disconnected. Clicking the
item【C】(connect) in the menu
(connect and disconnect),and it appears a Com
port connection interface.
6.4 Static adjustment
-11-
CK8H series Multi-viewer Instruction Manual
Figure 6.5 Static adjustment areas
(1)Select the item “Select all” in the 【WHOLE】,all the video windows in the right
display area will be switched when you switch the input/output signal.
(2)【INPUT】:Switching the inputs. There are 5 kinds of signal sources available.
(3)【OUTPUT】:Switching the output’s frequency and resolution.
(4)【USER MODE】:Save and recall of the user mode.
6.5 Video window operation
Window operation is mainly to adjust the window size, position, signal source, etc, and to
realize different segmentation mode. Windows area as shown in the figure below, the
upside bar lists with shortcut button, the middle area layouts the main operation area.
Figure 6.6 Windows display area
-12-
CK8H series Multi-viewer Instruction Manual
6.5.1 Window size and position
It appears at the bottom a two-way arrow when putting the mouse in the lower right
corner of window, while you can move the window by directing the mouse in the windows;
Put the mouse on the window and drag can change the window position. Through this
operation you can realize window layouts such as video across the screen, full screen
video, single video window and so on, as shown on the diagram below:
Figure 6.7 Change the size of windows
Moreover, as shown below, you can also find a input field to enter the accurate value for
both start and end coordinates. Click 【Send】to adjusted the size and position.
Figure 6.8 Input fields for accurate value
6.5.2 Open and close the video windows
Right click the window, and select the menu 【Close window】,then the windows will be
closed immediately.
-13-
CK8H series Multi-viewer Instruction Manual
Figure 6.9 Close window
If you want to reopen a window, just right click at a blank area, select 【window display】,
and choose a window to reopen in the second-level menu.
Figure 6.10 Open window
Moreover, clicking the correspondent number for each window can also reopen the
-14-
CK8H series Multi-viewer Instruction Manual
window that just was closed.
Figure 6.11 correspondent number for each video window
6.5.3 Video window layout mode
Click the correspondent layout button ,the layout will be arranged as listed below.
Figure 6.12 Different multi viewer layouts
Moreover, if you just need to display a certain input in Full screen, right click the target
window and select 【Full screen】.
6.5.4 Change input channel
To change the current signal, right click button the correspondent window and select the
menu【 change channel 】, choose the input source for switch in second-level menu , as
shown in the figure below:
-15-
CK8H series Multi-viewer Instruction Manual
Figure 6.13 Switch input signal
6.5.5 Transparency adjustment for windows
Right click on the window needed to adjust, select 【Transparency adjustment】, will pop
up a dialogue as below:
Figure 6.14 Transparency adjustment
There are 100 levels for transparency from value 0, 100; 0 represents completely
opaque, 100% represents completely transparent, drag the slider to the right value, click
[OK] button.
6.5.6 Window property setting
Right click the window need to set, then select the item【Property Setting】in the pop up
menu “window attribute” , the setting interface as shown in the figure below:
-16-
CK8H series Multi-viewer Instruction Manual
Figure 6.15 Window property setting
6.5.6.1 Property setting
In this interface, brightness, chroma and contrast of displayed images may be adjusted.
Firstly, select the input signal for adjustment, and then click on the corresponding area of
the "+" or "-" button, then you can adjust the three parameters; If you are not satisfied to
the adjusted parameters , you can click 【Reset】 button on the upper right area of the
image, All parameters will be restored to factory default values.
6.5.6.2 Preset modes
In the interface, you can recall the presets as shown below:
Figure 6.16 Preset modes
6.6 Setting
-17-
CK8H series Multi-viewer Instruction Manual
Figure 6.17 Setting interface
Click the bar 【 Setting 】next to 【Adjust 】, it then shows the interface of setting, which
includes the screen brightness, chroma and contrast parameters adjustment. At the
same time, if the parameters setting is not in conformity with the requirements, you can
restore to factory default.
【ADC】and【Auto】 is ADC correction and automatic adjustment to screen.
【ModeCyc】:it represents mode cycle. Clicking 【Start】button, it will pop up the following
dialogue:
Figure 6.18 Mode cycle setting
-18-
CK8H series Multi-viewer Instruction Manual
Double-click cycle mode on the left side of the window, and add it the cycle list on the
right , click on [OK] button to start the cycle once cycle time is set; You will notice that
【Start】has changed into 【Stop】 button, click it to stop mode cycle.
6.7 Matrix control
Due to the limitation of hardware, when doing the superposition of windows, the lower
priority window/channel will be automatically blocked by priority, and the priority option
for window of cannot be changed. System considers channel 1 as the lowest priority,
while going higher with increasing numbers. If you should request with no priority
limitation, additional control matrix is needed for it. The system has already come
provided the control function for matrix switcher, as shown in the figure below:
Figure 6.19 Matrix control
7. RS232 communication port and inner mode recall protocol
7.1 RS232 connection
The multi-window processor offers standard DB9 RS-232 serial controlling port. It can be
controlled by any other third party control device. RS-232connecroris 9pin female RS232
pin chart is as follows:
Pin#
name
Description
1
NC
--
2
TXD
Single transmitter, connect to device RXD
3
RXD
Signal receiver, connect to device TXD
4
NC
--
5
GND
Connect to device GND
6
NC
--
7
NC
--
8
NC
--
9
NC
--19-
CK8H series Multi-viewer Instruction Manual
Figure7.1 RS232 every pin’s explain
Please pay attention to the TXD and RXD line sequence when connect the processor RS
- 232 port with the computer.
拼接控制器
Multi-window processor
Computer
Figure 7.1 Communication cable diagram
7.2 The protocol of the inner mode recall
Users can the use RS232 serial command to simple recall the saved inner memory of
preset, or program it into the controlling device to realize a third party controlling easily.
The protocols are as follows:
Control:RS232
Baud rate:115200
Format: Hex
The following protocol is corresponding to the relative memory of preset on the control
interface. The standard configuration has16 memory of presets.
Preset mode 1
F0 0f 04 05 00 00 00 00 00 00 00 00 ff ff
Preset mode 2
F0 0f 04 05 01 00 00 00 00 00 00 00 ff ff
Preset mode 3
F0 0f 04 05 02 00 00 00 00 00 00 00 ff ff
Preset mode 4
F0 0f 04 05 03 00 00 00 00 00 00 00 ff ff
Preset mode 5
F0 0f 04 05 04 00 00 00 00 00 00 00 ff ff
Preset mode 6
F0 0f 04 05 05 00 00 00 00 00 00 00 ff ff
Preset mode 7
F0 0f 04 05 06 00 00 00 00 00 00 00 ff ff
Preset mode 8
F0 0f 04 05 07 00 00 00 00 00 00 00 ff ff
Preset mode 9
F0 0f 04 05 08 00 00 00 00 00 00 00 ff ff
Preset mode 10
F0 0f 04 05 09 00 00 00 00 00 00 00 ff ff
Preset mode 11
F0 0f 04 05 0a 00 00 00 00 00 00 00 ff ff
Preset mode 12
F0 0f 04 05 0b 00 00 00 00 00 00 00 ff ff
Preset mode 13
F0 0f 04 05 0c 00 00 00 00 00 00 00 ff ff
-20-
CK8H series Multi-viewer Instruction Manual
Preset mode 14
F0 0f 04 05 0d 00 00 00 00 00 00 00 ff ff
Preset mode 15
F0 0f 04 05 0e 00 00 00 00 00 00 00 ff ff
Preset mode 16
F0 0f 04 05 0f 00 00 00 00 00 00 00 ff ff
8. FAQ(Frequently asked questions):
1. Can not startup the machine after pressing the power button
Possible reason: 1.The power switch has been closed.
2. The power cord is not plugged properly.
Solutions: 1.To cheek the input power and open the power switch on the rear panel.
2. To confirm whether the power cord is in normal work and has been
connected to AC.
2. No image
Possible reason: A. No video source input;
B. Signal switching is not correct, such an example: input video
source is VGA, but the input channel is switched to AV input;
C. VGA input port and VGA output port reversed.
D. Display device don’t adjust to the relative input source, such as
adjust the input video source of the LCD display to VGA;
E. Output is black background image;
F. Output VGA or DVI cable is damaged
Solutions:
A. Please check the input signals states (Test by connecting the input
signal source to the display device directly)
B. Confirm the input channel, with control software or remote
controller to switch the channel;
C. Confirm the input and output signals are connected correctly,
D. Adjust the display state of display device. Please refer to the user
manual of the display devices for specific operation.
E. Adjust the content of output signal, suggest using the dynamic
picture, do not use the monochrome image output.
F. Use good quality VGA cable to ensure the stability and high quality
images
3. Serial operation failure, can’t control the video wall processor
Possible reasons: A. The serial port is not opened
B. The serial port already destroyed;
C. The USB-RS232 adapters are not installed correctly;
Solutions:
A. Check the status of serial port
-21-
CK8H series Multi-viewer Instruction Manual
B. Change serial port or controlling PC;
C. Correctly install USB-RS232 device;
4. The picture partial color phenomenon
Possible reasons: A.VGA interface not connected, loose connection leads to bad
contacts
B.VGA cable is damaged
C. Color of display device is not correct
D. Use the software color toning excessively
Solutions:
A. After VGA or DVI interface connection, please tighten the retaining
bolt, to prevent loosing because of pulling;
B. Please change higher quality VGA or DVI cable;
C. Adjust color balance of display device, referring to the user manual
of display device;
D. Re-adjust color and white balance through controlling software;
5. Image of some display unit flash, shake, or appear noise
Possible reasons: A. Too long VGA or DVI cable leads to signal loss seriously
B. Unstable video source device or damaged cable
C. Failure of display unit
D. Video wall processor’s output is not compatible with display unit
Solutions:
A. Please use other stand-alone display unit to connect to the output
of video wall processor. If image shows normally, please check the display unit.
B. Change the normal output cable with the abnormal cable, if the
problems still exist, it shows problems result from display unit.
C. Connect the input signal to display device directly to check whether
the output image is normal;
D. If above solutions validate that the processor and display
equipment are normal, it may be problem the processor not compatible with display
equipment .Please contact the supplier's engineer to solve it.
6. Image does not display completely and appears black frame
Possible reasons: A. Video wall display unit has cropped for the video output
B. Over adjust the image through controlling software
C. The resolution varies according to different display unit
D. Incorrect graphic card settings
E. Not standard input resolution
-22-
CK8H series Multi-viewer Instruction Manual
Solutions:
A. Please make an auto adjusting for display unit, referring to user
manual of display device.
B. Re-adjust image position for a better effect through software.
C. Click “Output Resolution Set” to choose suitable resolution.
D. Choose correct input resolution
Attentions:
1 The above listed is the common failure in after-sales maintenance. If you find the device
failure phenomena are not in above range. Please notify the suppliers to solve as soon as
possible. Please do not open the case without authorization, so as not to expand the fault or
cause unnecessary safety accidents.
2 Our company reiterates: without the permission, you who take device apart will bear all the
responsibilities that it may bring.
-23-