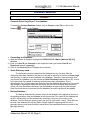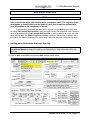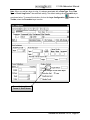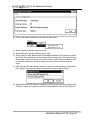
1
Version 3.25 Addendum Manual
Suite 314, 602 – 11th Avenue S.W.
Calgary, Alberta T2R-1J8
Phone: (403) 777-9454 Fax: (403) 777-9455
Website: www.powerlogger.com Email: [email protected]
V3.25 Addendum Manual
OverView
TVD / SSL Module
We have created a new TVD/SSL module to add to the Power*Log application. - TVD and SSL
views can be activated from the View menu and from a drop box on toolbar. If the well contains
directional surveys, the TVD and SSL view of the log can be shown. A Master survey set is build
from the default survey group or is user defined to include multiple survey sets. We have also
changed the interface for calculating directional survey group, calculating the master survey
group, updating the well path and correcting the other TVD fields in the reporting application.
The TVD/SSL views are now based on the Master Survey group. A definition of the Master
Survey Group is a compilation of multiple survey groups to define the well from spud to total
depth. Power*Suite has enabled the user to enter multiple set of surveys from different
measuring devises. The user can then take points from all the sets to build a Master Set of
survey points that best defines the well path. This group is then compiled and then used to
represent Power*Log in the TVD/SSL depth views. This survey set is also used to calculate or
interpolate TVD values for all measured depth fields. If the user only has one survey set and
has kept the group name as 1 then the Master Survey group does not have to be assembled.
There is no ability for the user to edit any data on the striplog in TVD/SSL view modes. We have
given the user the ability to transfer Sample descriptions to the striplog in the TVD/SSL views.
We have added a second depth to the mousebox fields to represent both the Measured Depth
and the depth of the current view. Either TVD/SSL view.
License Selector Module
We have added another utility to replace the old batch file method to select which License you
would like to use. The License selector application enables the user to switch from Crypkey
(Software License) authorization and the Hasp (Hardware License) authorization. Also allows
the user to set up a remote license where the software license is residing on another box on a
network.
Automated Backup Module
We have added the Auto Backup module allows the user to have their database backuped while
the database is connected to. This will prove useful when the database is being used and
updated on a continual basis and the normal backup procedure when the database is being
connected to is not being used on a continual basis.
Upgraded Crypkey Software
We have upgraded our Software protection utility to CrypKey5.5 which will allow us to use the
new Windows ME and 2000 opertaing systems.
Print Log Window
We have added the Log width to the print log window to allow the user to better identify which
size paper they should be printing the log to. We have also modified this window to be able to
print the log in 3 different view modes. The title bar on the Print Log window now identifies to the
user which view mode they are in (MD - Measured Depth, TVD - True Vertical Depth, SSL Subsea Level). Depending on which view the user is in when they activate the print log window
the corresponding depth in the print log window will be modified to the view they are presently
in.
Slide Rotate Layer / Track
Addendum Manual V3.25, Page 2
V 3.25 Addendum Manual
We have added the "S" symbol to the slides in the Slide/Rotate track.
LAS Import Module
We have further enhanced our LAS Import Module to be able to handle more types of LAS files
and variations to the true LAS file headers.
Formation Tops Window
We have added a Formation Thickness calculation button to the Well Formation Report window.
It will now find the next deeper formation and calculate the measured depth thickness between
those two records.
Well Window
We have added a County and Permit # fields to the Well record in the Imperial Version of the
program and also redesigned the window to make the flow of data input easier.
Connect Database Window
We have added a Backup database checkbox to the connect database window to automatically
backup the database when the user connects to the database and makes a copy of the
database file and puts it into the dbbackup directory in the Pgeology directory.
System Options Window
We have added some new functionality’s to the System Options window. The user now has the
ability to turn off or turn on the bedding contact lines and accessories in the interpretive lithology
track/layer.
Addendum Manual V3.25, Page 3
V3.25 Addendum Manual
Table of Contents
File Menu Selection .......................................................................................................5
Connect... ............................................................................................................................... 5
Import Surveys........................................................................................................................ 6
Importing Surveys ................................................................................................................ 6
TVD Calculations ................................................................................................................. 7
Print Log ............................................................................................................................... 11
Edit Menu Selection ....................................................................................................15
Well....................................................................................................................................... 15
View Menu Selection ...................................................................................................17
Depth View Mode.................................................................................................................. 17
Toolbar.................................................................................................................................. 18
Selection Bar......................................................................................................................... 18
Report Menu Selection................................................................................................19
Directional Survey ................................................................................................................. 19
Adding a Directional Survey Group… ................................................................................ 20
Master Survey Group......................................................................................................... 21
How to Compile the Master Survey Group..................................................................... 21
How to Add a Survey Group........................................................................................................................... 22
How to Change a Survey Group top Survey Point.......................................................................................... 23
How to Delete a Survey Group ....................................................................................................................... 24
How to Calculate the Master Survey Group Survey Points ............................................................................ 24
Directional Survey Point:.................................................................................................... 28
Calculating Directional Survey Points… ........................................................................ 30
Formation.............................................................................................................................. 33
Options Menu Selection..............................................................................................38
System Options..................................................................................................................... 38
How to Change the Rock Favorites Selection .................................................................... 38
How to Change the Accessory Favorites Selection ............................................................ 39
How to Change the % Lithology Sort Order ....................................................................... 42
License Selector Program ..........................................................................................44
Hasp (Hardware Key) License Activation .............................................................................. 44
Crypkey (Software) License Activation [Local]....................................................................... 45
Crypkey (Software) License Activation [Remote]................................................................... 45
Automated Backup Module ........................................................................................47
Overview............................................................................................................................... 47
How to Start the Auto Backup Module................................................................................... 47
File Menu .............................................................................................................................. 49
Edit Menu.............................................................................................................................. 50
View Menu ............................................................................................................................ 51
Backup Menu ........................................................................................................................ 52
Options Menu........................................................................................................................ 53
Window Menu ....................................................................................................................... 54
Help ...................................................................................................................................... 55
Addendum Manual V3.25, Page 4
V 3.25 Addendum Manual
File Menu Selection
Connect...
Connects Power*Log/Curve™ to a database.
To access the Connect Database window, click on Connect, under File, or click on the
Connect
•
button on the Toolbar.
Connecting to a Database…
1.) When this window is displayed, highlight the PGEOLOGY V3.2 Metric [Watcom SQL 4.0]
database.
2.) Enter your User ID and Password in their respective fields (your default User ID and
Passwords are both "pgeology").
3.) Click on the Connect button to complete the connection.
•
Quick Dictionary Load…
The dictionaries must be loaded from the database the very first time. After the
dictionaries have been loaded for the first time, they will be stored as a few files in Power*Log's
root directory, in addition to being available in the database. Therefore, each successive time
you connect to a database, you can activate the Quick Dictionary Load check box (!), to refer
to the quick load files instead of retrieving the dictionaries from the database. This is
approximately four (4) times faster than retrieving from the database. Be aware that if you make
any changes to a geological expansion dictionary, they will not be reflected upon connection
unless you have retrieved the dictionary from the database at least once since the changes.
Each time the dictionary is retrieved from the database, the quick load files will be updated.
•
Backup Database…
The backup database utility creates a copy of the database to the pgbackup directory in
the pgeology directory when the database is being connected. Two copies of the database are
saved in this directory and are subsequently overwritten every time you connect to the
database. The file names are pgeology.qm1 and qm2 for quick metric 1 and 2. These files can
be used if the database fails for any reason. Simply replace the pgeology.db files in the
pgeology directory with these files which would have to be renamed before being copies to the
pgeology directory.
Addendum Manual V3.25, Page 5
V3.25 Addendum Manual
Import Surveys
Importing Surveys
To access the Directional Survey Import window, click on Import / Export under File to
activate the pop-out menu and then select Import Surveys or click on the Import Survey
button on the Toolbar. This will activate the Directional Survey Import window.
1. The first thing you must do is click the ‘
provided by the directional drillers.
’ button, and select the data file
Addendum Manual V3.25, Page 6
V 3.25 Addendum Manual
2. The next step is to select which Survey Group you want to Import the surveys into. The
Default is Group 1. If you wish to Import the surveys into a different group click on the
Survey Group button and then select the Survey Group form the List provided.
3. The next step is to select the correct delimiter for your file. Select one from the right hand
drop down box. When you have selected the correct delimiter for your file, the curves should
fill the individual columns.
4. From the top window, choose a start depth by clicking the first line of data you wish to
import.
5. Select the columns that represent the measured depth, Inclination and azimuth values from
the drop down boxes on the right hand side of the columns.
6. Click on
Button
After a successful import, the directional surveys should contain the values of the
measured depth, inclination and azimuth from the directional survey data file.
The next thing will be a System message asking the user
7. Click on the Yes Button only if you have the required fields filled in within the Directional
Survey Report window. Otherwise you will not be able to calculate the surveys.
TVD Calculations
The TVD Calculations window will perform either Minimum Curvature calculations if the survey
data has an azimuth or direction or can do Drift Angle calculations if the survey data only has a
measured depth and an angle for both the Survey group imported into as well as the Master
Survey group. This Master Survey group can consists of survey data from several groups of
survey data that have been used throughout the drilling process. The Master Survey group must
be chosen in the Directional Survey window. Also this window we can update a Well path curve
from the survey points in either TVD or SSL values starting at a desired measured depth. Also if
you would like to change or update any of the TVD fields scattered through the different report
windows can also be done in this window.
If a Master Survey group is built this survey data is utilized to perform all the TVD and SSL
views for a specific well. This would only be applicable if there are multiple survey groups for a
well and they cover different portions of the wells profile.
Addendum Manual V3.25, Page 7
V3.25 Addendum Manual
Directional Survey Portion:
The User has the ability to have the program calculate the Directional Survey group, select
which survey group they wish to calculate, which calculation method either minimum curvature
or drift angle calculations and from either tie-in or kick off co-ordinates.
Procedure…
1) If the user wishes to calculate a Survey Group activate the Check box (!) in this portion of
the window.
2) If the default survey group is not correct Click on the Survey Group button and select the
survey group you wish to calculate from the List.
3) Select the Calculation method from the drop box. (Minimum curvature must have an azimuth
and will fill in all the fields in the Survey Points Window, otherwise use drift angle to get only
the TVD field completed in the Survey Points Window.)
4) Select the From Tie-In or Kick-Off co-ordinantes
The defaults are picked up from the User defined TVD Calculation portion of the ‘Directional
Surveys Report’, found under the menu item “Reports”. Kick Off is selected by default if not
filled in.Remember that the data required for the Kick Off or Tie In reference is entered in the
‘Directional Surveys Report’, found under the menu item “Reports”. Kick Off is selected by
default.
Addendum Manual V3.25, Page 8
V 3.25 Addendum Manual
Calculate Master Survey Portion:
The User has the ability to have the program calculate the Directional Surveys in the Master
Survey group, which calculation method either minimum curvature or drift angle calculations and
from either tie-in or kick off co-ordinates. The Master Survey Group can be compiled from points
from different Survey Groups. The Master Survey group is built in the Directional Survey
window. If there is only one survey group this procedure is not required. The Master Survey
group if built, is then used to perform all TVD / SSL Calculations within the application.
Procedure…
3.) If the user wishes to calculate the Master Survey Group activate the Check box (!) in this
portion of the window.
4.) Select the Calculation method from the drop box. (Minimum curvature must have an azimuth
and will fill in all the fields in the Survey Points Window, otherwise use drift angle to get only
the TVD field completed in the Survey Points Window.)
5.) Select the From Tie-In or Kick-Off co-ordinates.
The defaults are picked up from the User defined TVD Calculation portion of the ‘Directional
Surveys Report’ window from the survey group that has the shallowest survey point, Kick
Off is selected by default if not filled in. Remember that the data required for the Kick Off or Tie
In reference is entered in the ‘Directional Surveys Report’, found under the menu item
“Reports”. Kick Off is selected by default.
Well Path Portion
The Well Path for lack of better terms will update any curve on your log with either TVD or SSL
data and will start at any depth required. It basically plots a curve with respect to measured
depth and the survey data’s TVD calculations which can also be converted to SSL if a KB
elevation has been entered into the Well Record located under the Edit menu.
Procedure…
1) If the user wishes to calculate or update the Well path curve activate the Check box (!) in
this portion of the window.
2) Select which curve you wish to populate with this data by clicking on the Well Path Curve
Button and selecting the curve from the existing curve in the database.
3) Type in the Start depth for which the curve will first appear on the log.
4) Select which units you would like this curve to be plotted or updated with from the Units
selection box. TVD is the direct calculations from the survey points. SSL are converted with
respect to the wells Kelly Bushing Elevation.
TVD Attributes Portion
Procedure…
6.) If the user wishes to calculate or update the specified TVD fields within the various windows
throughout the Reports activate the Check box (!) in this portion of the window.
The program is only able to determine the TVD at any depth covered by the directional surveys.
Power*Log and Power*Curve have several windows in which the measured depth and
corresponding true vertical depth are asked for. If you have directional surveys over that
Addendum Manual V3.25, Page 9
V3.25 Addendum Manual
interval, the program will calculate the exact TVD for you. If it is outside the range of your
surveys, it will be left as a manual entry.
7.) Select or click on which fields (highlight) you wish to calculate for or recalculate if you have
changed the survey data. Remember you have the ability to select all or unselect all.
8.) Click on the
Button
Addendum Manual V3.25, Page 10
V 3.25 Addendum Manual
Print Log
Prints all or part of your log/well.
1.) Under the File menu, click on Print Log or click on the Print
activate the Print Log window shown below:
button on the Toolbar to
Note: The Title bar and all depths associated with the Print Log window are defaulted to the
Depth View that Power*Log or Power*Curve are in at the time of the activation of the Print Log
window.
2.) Select the appropriate paper orientation from the Page Orientation drop box field and the Title
Page, Legend, and Formation Tops will automatically conform to the selected orientation.
There are four (4) types of paper orientation to choose from: letter portrait or letter landscape
and legal portrait or legal landscape settings.
Note: The letter or legal landscape or portrait settings selected from within the Print Log
window will NOT override the paper orientation settings selected in the printer's Properties
window. Therefore, you must also modify the paper orientation settings in your printer's
Properties window to letter or legal landscape.
Addendum Manual V3.25, Page 11
V3.25 Addendum Manual
Moreover, when printing in letter or legal landscape, you may wish to modify the Transmission
Retry value, in the printer's Properties window, from the default of 45 seconds to 200 seconds.
3.)
4.)
Activate the Title Page check box (!), if you wish to printout a Title Page.
Activate the Logo check box (!), if you wish to printout a logo, and then select a logo from
the Logo drop box field.
Note: Any bitmap image may be printed out as a logo. However, the bitmap image must be an
equally sided square image, because Power*Log will shrink or expand the image to fit the logo
space on the Title Page. This bitmap should be placed in the pgeology\logo directory.
5.)
Type any pertinent comments into the Title Page Remarks field and they will be displayed
accordingly on the Title Page.
6.)
Activate the Legend check box (!), if you wish to have a striplog legend printed out.
In the Log portion of the Print Log window
7.)
Select or type in the Scale for the main log to be printed out at, in the Scale drop box field,
and then activate the Header check box (!) to have the track headers printed out with the main
log.
8.)
Activate the Core Accessories check box (!) to have the core accessories printed out on
the main log.
9.)
Highlight the main log printing options in the selection box. The user can select either None,
User-defined Interval (requires that you manually enter the desired print interval depths),
Today Section, Well Section, or Lithology Section.
Note: Today Section interval is derived from the From and To Depth values entered into the
Today’s Section portion of the Power*Log Data Transfer: Export window.
The Well Section interval is derived from the Top and Base Depth values entered into the
Print Sections window. (See Print Sections).
The Lithology Section interval is derived from what has been drawn into the interpretive
lithology track of the well that is being printed.
10.)
If user defined interval is chosen the user can select which depth type, either measured
depth, true vertical depth or subsea level depth from the depth measurement drop box. The
user must also type in the depth interval to be printed.
Note: The log itself must be displayed in whatever depth view you wish to print before you
activate the print log window. To change the log to the desired format refer to depth view under
the view pull down menu.
Addendum Manual V3.25, Page 12
V 3.25 Addendum Manual
In the Cores portion of the Print Log Window.
11.)
If you are printing out a Core log, select the Cores you wish to print by highlighting them.
12.)
Select or type in the Scale for the core log to be printed out at, in the Scale drop box field,
and then activate the Header check box (!) to have the track headers printed out with the core
log.
Note: A separate Header Information Box is automatically printed out with every Core and
includes the Core Scale, Core Date, Core Number, Cored Interval, Amount Cut, Amount
Recovered, and Percentage.
**A value must be entered into the Core Scale field in order to printout anything.**
13.)
If you wish to printout Formation Tops, activate the Formation Tops check box (!) and
the Formation Tops will be included on a separate page at the end of the log printout.
The page margin field is available, primarily, when you are printing to
• Page Margin
Adobe Acrobat writer. When a numerical value in inches is typed into this field it will initiate a top
and left margin for the templates (Title Page, Legend and Formation Tops) as well as a left
margin for the main log.
Activate the Page Overlap check box(!) if you are printing on single
• Page Overlap
sheets. This will force the printer to include an additional 1/4 inch of the log at the top and
bottom of each page, so that you can cut-and-paste pages manually, if you so desire.
•
Print Methods…
Activating the Default radio button (") forces Power*Log/Curve to use a raster
• Default
or bitmap graphic printing method which was used exclusively in Power*Log/Curve from
V1.92 and earlier.
• Pixel Matching Activate the Pixel Matching radio button (") if you are using an HP
PaintJet Continuous printer. The user must install the HP PaintJet Continuous printer
driver(found on Installation Disk 1) on your diskettes.
• Meta File Activating the Meta File radio button (") forces Power*Log/Curve to use the
meta file technology printing method. This printing method was developed for the newer
models of printers on the market today as well as using the Adobe Acrobat Writer or pdf printing
technology.
•
Color Options…
Activating the Auto radio button (") forces Power*Log/Curve to use the settings
• Auto
from the printer driver to printout the log.
Activating the Color radio button (") forces Power*Log/Curve to override the
• Color
printer driver settings and consequently Power*Log/Curve assumes that you are using a color
printer.
Activating the Mono radio button (") forces Power*Log/Curve to override the
• Mono
printer driver settings and consequently Power*Log/Curve assumes that you are using a
monochrome (black and white) printer.
14.)
Click on the Setup button to activate the Print Setup window and confirm that the correct
printer settings are in effect.
Addendum Manual V3.25, Page 13
V3.25 Addendum Manual
Note: If you are printing out logs in color, you must activate the Diffusion or Error Diffusion
option normally found under Graphics in the Properties window for most printers.
15.)
Interval per page field indicates how many meters of log will fit on a page of selected paper
size and orientation selected in the setup as well as what log scale you are printing at. This will
help indicate to the user how many pages will be required by the print job.
16.)
Activate the Blank first page with a check box (!) if the user wishes to have a blank page
before the logs starts. This could be useful if utilizing continuous paper when you want the title
page oriented on the correct side of the prefolded paper.
17.)
When you are ready to print your log, click on the Print button.
Note: When you exit from the Print Log window, you will be asked if you wish to save the print
settings. If you click on Yes, the program will remember every setting that you made to the Print
Log window and then will default to those settings the next time you enter the Print Log
window.
Addendum Manual V3.25, Page 14
V 3.25 Addendum Manual
Edit Menu Selection
Well
Lets you add new wells, edit existing wells, and delete a well. The majority of this
information is usually filled in at the start of a well, but should be updated with
new information at the completion of a well.
The information associated with each well is entered into the Well window, along with
the well's UWI (Unique Well Identifier). Note that each well and the information that it contains
must be associated with a UWI (Unique Well Identifier) in order to distinguish it from the other
wells residing within the Power*Log/Curve database. However, the only way in which a well’s
information can then be displayed is by associating it with a log and then having that log open.
•
Starting a New Well without Starting a New Log…
Note: Starting a new well without starting a new log is only useful, if you are utilizing the
Correlational Module to display the data from multiple wells for offset information within the
same log.
1.) Click on Well, under Edit, to activate the Well window shown below:
Addendum Manual V3.25, Page 15
V3.25 Addendum Manual
Note: This diagram has been filled in to give you an idea of how to complete the different fields.
2.) Click on the New
3.)
4.)
5.)
6.)
7.)
button or press ALT-N to prepare the window for the entry of a new
record and a flashing cursor will be placed in the Well Name field.
Type a well name into the Well Name field.
Click on the UWI button to activate the UWI Format window.
Select either DLS, NTS or Name from the Use drop box field and then enter the UWI
information into the appropriate fields.
Click on the OK button and the UWI field in the Well window will automatically be filled in with
the new UWI.
Insert any other necessary information into the remaining Well window fields.
8.) Click on the Save
button or press ALT-S and the new well will be saved to the
database.
Note: The Well Name field should be highlighted after you have clicked on the Save
button or press ALT-S, as an indication of a properly saved record. Some of the fields in the
Edit Well window have character restrictions or mandatory requirements. Consequently, if any
of these restrictions have been violated or if any requirements have not been met, the offending
field will be highlighted and the problem will be displayed on the Status Bar, at the lower left
hand corner of your screen. Remember to save your work again, after the problem has been
rectified.
9.) If the record has been successfully saved, select Exit, when prompted with the Shortcut
Options system window.
Addendum Manual V3.25, Page 16
V 3.25 Addendum Manual
View Menu Selection
Depth View Mode
Changes the depth view of Power*Log according to your needs. The log
can be viewed and printed in either Measured Depth, Subsea Level or True
Vertical Depth. These views are dependant on whether you have survey data
entered and if you have calculated or entered in the TVD fields in the Survey
points window. There are two ways to change your depth views but these views
are only applicable to Power*Log. They are both outlined below.
Procedure 1
1.) Click on Depth View, located under the View pull down selection on the menu bar, to
activate the pop out menu and then click on the desired depth view MD (Measured
Depth), TVD (True Vertical Depth) or SSL (Sub Sea Level you want for the active Log. This
will change the logs screen presentation. You will notice that the depth layer shows the
depths with either an “m or ft” followed by “(ssl)” in subsea level view or “(tvd)” in true vertical
depth view
Note: The SSL and TVD views are calculated from the directional surveys entered into the wells
data. You must also have the KB elevation if you wish to view the log in the SSL view. The user
has the ability to setup which survey groups / survey sets they wish to utilize for these views.
Procedure 2
Click on the down arrow on the Depth View mode selection on the Selection Bar and select the
desired depth view for your Log.
Note: Once SSL or TVD is activated the mouse pointer now indicates the view mdoe you are in
as well as the measured depth that the mouse pointer is now pointing at.
Addendum Manual V3.25, Page 17
V3.25 Addendum Manual
View Menu
Toolbar
Turns the Toolbar on and off.
•
The New Power*Log/Curve™ Toolbar…
View
Selection Bar
Turns the Selection Bar on and off.
•
The New Power*Log/Curve™ Selection Bar…
Note: Disabled buttons are a gray color, like the Show/Hide Digits button displayed on the
previous page. Likewise, when buttons are in use they are indented, like the Show/Hide
Header button displayed on the previous page.
Addendum Manual V3.25, Page 18
V 3.25 Addendum Manual
Report Menu Selection
Directional Survey
Information regarding Directional Surveys is entered into this window. This
information can then be printed out in the Print Well End Report window. Also
this information is utilized to build a True Vertical Depth and Subsea Level Depth
view log presentations in Power*Log. The tie-in and kick-off information is critical
to these calculations as well as the Target Azimuth and the Dog Leg Severity
characteristics. Also the choosing of which survey group/groups you wish to use
to do these calculations with in the Master Survey Group.
The information entered into this window can be used to produce three (4) separate reports as
well as the TVD and SSL depth view Power*Log presentations. The “Directional Surveys”
report uses both the Groups information and its survey points. The “Directional Survey Points”
report and the "Deviation Survey Points" uses the survey points only with two pieces of
information (Survey Type & Mode) out of the group data entry window. The User can also print
out the Master Survey Groups Survey points.
There is two ways to activate the Directional Survey window. Select Directional Survey located
under the Report pull down menu or click on the Directional Survey
button located on the
toolbar.
Addendum Manual V3.25, Page 19
V3.25 Addendum Manual
The Survey Points can be added through the
through the Directional Survey layer Toolbox.
button or directly
Note: The Survey Group number is used to identify which group of survey points is associated
with a specific Directional Survey layer on a log. Each Directional Survey layer can be
associated with a specific group of survey points. This is done through the Directional Survey
Layer Configuration window and selecting the group through its Directional Survey button.
The
button allows the user to build or compile the survey points from
multiple or specific survey groups other than the default group 1.
The User Defined TVD Calculation portion of the window allows the user to define the default
calculation method when the survey groups survey points are calculated.
The
button activates the TVD calculations window which can calculate the
survey group, calculate the Master Survey group, update the well path, and calculate all the
TVD fields in the various report window.
Adding a Directional Survey Group…
1.) Click once on the New
data.
button or press ALT-N and then fill in the report window with your
2.) When you have finished adding your data, click on the Save
then Exit out of the ensuing Shortcut Options window.
•
button or press ALT-S and
Editing a Directional Survey Group…
1.) Click on the
button to view a list of Directional Survey Groups to date and
then double click on the record, that you wish to edit. Once the selected record is displayed in
the Directional Survey window, make any changes you feel are necessary.
2.) Or, click twice on the Query
button and then click on the Next Record
button to
view all of the records in the database. See the Database Navigational Tools section later in
this User Manual for more information.
3.) Click on the Save
Options window.
•
button or press ALT-S and then Exit out of the ensuing Shortcut
Deleting a Directional Survey Group…
1.) Click on the
button to view a list of Directional Survey Groups to date and
then double click on the record, that you wish to delete. Once the selected record is displayed
in the Directional Survey window, click on the Delete
button.
2.) Or, click twice on the Query
button and then click on the Next Record
button to
view all of the records in the database. Select the record you wish to delete and it will be
Addendum Manual V3.25, Page 20
V 3.25 Addendum Manual
displayed in the Abandonment Plug window. Then, click on the Delete
button. See the
Database Navigational Tools section later in this User Manual for more information.
The Undo
button will restore the window to the settings of the last saved record.
You can Tab between fields or press Shift+Tab to move backwards between fields.
Master Survey Group
Definition: The user can imagine the master survey group as a compilation of multiple survey
groups to define the well from spud to total depth. Power*Suite has enabled the user to enter
multiple set of surveys from different measuring devises. The user can then take points from all
the sets to build a Master Set of survey points that best defines the well path. This group is then
compiled and then used to represent Power*Log in the TVD/SSL depth views. This survey set is
also used to calculate or interpolate TVD values for all measured depth fields. If the user only
has one survey set and has kept the group name as 1 then the Master Survey group does not
have to be assembled.
How to Compile the Master Survey Group.
The user must identify which Survey Groups they want used for the TVD / SSL depth views of
Power*Log. The user must identify which group(s) of surveys and the starting survey point in
that survey group. Once this is done the application then creates a Master Survey group that
contains all the survey points from all the groups and there surveys points and then uses these
to create the TVD and SSL presentations.
The Tie In or Kick of the shallowest survey points Survey group is used as a starting or
reference point.
Addendum Manual V3.25, Page 21
V3.25 Addendum Manual
How to Add a Survey Group
1.) Click on the Master Survey Group button in the Directional Survey Window. This will activate
the Master Survey Group Window.
2.) Click on the Select Survey Group button. This will activate the Choose Directional Survey
Window.
3.) Click on the Directional Survey group you wish to Add and then click on the Select Button.
This will activate the Choose Survey Point Window.
4.) Click on the Survey point you wish to start with and then click on the Select Button.
Addendum Manual V3.25, Page 22
V 3.25 Addendum Manual
5.) This will place survey points depth in the top depth field the Survey Group ID selected into
the Survey Group ID field.
6.) Click on the Add button and the Survey will be place in the list.
Note: This Survey and all subsequent surveys in this groups list will be added to the Master
Survey Groups survey points until another Survey Group and its top depth has been added to
the list.
How to Change a Survey Group top Survey Point
1.) Click on the Master Survey Group button in the Directional Survey Window. This will activate
the Master Survey Group Window.
2.) Highlight or click on the survey point you wish to change.
3.) Click on the Select Survey Group button. This will activate the Choose Directional Survey
Window.
4.) Click on the Directional Survey group you wish to Add and then click on the Select Button.
This will activate the Choose Survey Point Window.
Addendum Manual V3.25, Page 23
V3.25 Addendum Manual
5.) Click on the new Survey point you wish to start with and then click on the Select Button.
6.) This will place survey points depth in the top depth field the Survey Group ID selected into
the Survey Group ID field.
7.) Click on the Change button and the new Survey point will be place in the list.
How to Delete a Survey Group
1.) Click on the Master Survey Group button in the Directional Survey Window. This will activate
the Master Survey Group Window.
2.) Highlight or Click on the Survey points Start depth and Group ID you wish to Delete and
then click on the Delete Button. This will delete the survey point and Groups ID from the list.
How to Calculate the Master Survey Group Survey Points
If the Master Survey group has been altered in any way and the user exits the window they will
be prompted with a calculation window. The user will have to recalculate the master survey
group for your changes to take affect.
1.) Click on the Master Survey Group button in the Directional Survey Window. This will activate
the Master Survey Group Window.
2.) Click on the Calculate TVD Button. This will activate the TVD Calculations window.
Addendum Manual V3.25, Page 24
V 3.25 Addendum Manual
Directional Survey Portion:
The User has the ability to have the program calculate any Directional Survey group, select
which survey group they wish to calculate, which calculation method either minimum curvature
or drift angle calculations and from either tie-in or kick off co-ordinates.
Procedure…
3.) If the user wishes to calculate a Survey Group activate the Check box (!) in this portion of
the window.
4.) If the default survey group is not correct Click on the Survey Group button and select the
survey group you wish to calculate from the List.
5.) Select the Calculation method from the drop box. (Minimum curvature must have an azimuth
and will fill in all the fields in the Survey Points Window, otherwise use drift angle to get only
the TVD field completed in the Survey Points Window.)
6.) Select the From Tie-In or Kick-Off co-ordinantes
The defaults are picked up from the User defined TVD Calculation portion of the ‘Directional
Surveys Report’, found under the menu item “Reports”. Kick Off is selected by default if not
filled in.Remember that the data required for the Kick Off or Tie In reference is entered in the
‘Directional Surveys Report’, found under the menu item “Reports”. Kick Off is selected by
default.
Addendum Manual V3.25, Page 25
V3.25 Addendum Manual
Calculate Master Survey Portion:
The User has the ability to have the program calculate the Directional Surveys in the Master
Survey group, which calculation method either minimum curvature or drift angle calculations and
from either tie-in or kick off co-ordinates. The Master Survey Group can be compiled from points
from different Survey Groups. The Master Survey group is built in the Directional Survey
window. If there is only one survey group this procedure is not required. The Master Survey
group if built, is then used to perform all TVD / SSL Calculations within the application.
Procedure…
7.) If the user wishes to calculate the Master Survey Group activate the Check box (!) in this
portion of the window.
8.) Select the Calculation method from the drop box. (Minimum curvature must have an azimuth
and will fill in all the fields in the Survey Points Window, otherwise use drift angle to get only
the TVD field completed in the Survey Points Window.)
9.) Select the From Tie-In or Kick-Off co-ordinates.
The defaults are picked up from the User defined TVD Calculation portion of the ‘Directional
Surveys Report’ window from the survey group that has the shallowest survey point, Kick
Off is selected by default if not filled in. Remember that the data required for the Kick Off or Tie
In reference is entered in the ‘Directional Surveys Report’, found under the menu item
“Reports”. Kick Off is selected by default.
Well Path Portion
The Well Path for lack of better terms will update any curve on your log with either TVD or SSL
data and will start at any depth required. It basically plots a curve with respect to measured
depth and the survey data’s TVD calculations which can also be converted to SSL if a KB
elevation has been entered into the Well Record located under the Edit menu.
Procedure…
10.)
If the user wishes to calculate or update the Well path curve activate the Check box (!)
in this portion of the window.
11.)
Select which curve you wish to populate with this data by clicking on the Well Path
Curve Button and selecting the curve from the existing curve in the database.
12.)
Type in the Start depth for which the curve will first appear on the log.
13.)
Select which units you would like this curve to be plotted or updated with from the Units
selection box. TVD is the direct calculations from the survey points. SSL are converted with
respect to the wells Kelly Bushing Elevation.
TVD Attributes Portion
Procedure…
14.)
If the user wishes to calculate or update the specified TVD fields within the various
windows throughout the Reports activate the Check box (!) in this portion of the window.
The program is only able to determine the TVD at any depth covered by the directional surveys.
Power*Log and Power*Curve have several windows in which the measured depth and
corresponding true vertical depth are asked for. If you have directional surveys over that
Addendum Manual V3.25, Page 26
V 3.25 Addendum Manual
interval, the program will calculate the exact TVD for you. If it is outside the range of your
surveys, it will be left as a manual entry.
15.)
Select or click on which fields (highlight) you wish to calculate for or recalculate if you
have changed the survey data. Remember you have the ability to select all or unselect all.
16.)
Click on the
Button
Field Restriction Table:
Survey Group
Service Company
Directional Driller
MWD Hands
Survey Type
Survey Mode
Survey Date
Calculation Method
Kick-off MD
Kick-off TVD
Kick-off Inclination
Kick-off Azimuth
Kick-off East meters
Kick-off North meters
Kick-off Section meters
Kick-off Dog Leg
Kick-off Latitude
Kick-off Longitude
Kick-off N/S
Kick-off E/W
Tie-in MD
Tie-in TVD
Tie-in Inclination
Tie-in Azimuth
Tie-in East meters
Tie-in North meters
Tie-in Section meters
Tie-in Dog Leg
Tie-in Latitude
Tie-in Longitude
Tie-in N/S
Tie-in E/W
Dog Leg Characteristic
Target Azimuth
Remarks
30
30
50
50
20
20
DATE FORMAT
20
10.5
10.5
10.5
10.5
10.5
10.5
10.5
10.5
5.7
5.7
100
100
10.5
10.5
10.5
10.5
10.5
10.5
10.5
10.5
5.7
5.7
100
100
4.0
5.2
254
Character
Character
Character
Character
Character
Character
Optional
Character
Numeric
Numeric
Numeric
Numeric
Numeric
Numeric
Numeric
Numeric
Numeric
Numeric
Character
Character
Numeric
Numeric
Numeric
Numeric
Numeric
Numeric
Numeric
Numeric
Numeric
Numeric
Character
Character
Numeric
Numeric
Character
Mandatory
Optional
Optional
Optional
Optional
Optional
Default=Current Date
Optional
Required for calculations
Required for calculations
Required for calculations
Required for calculations
Required for calculations
Required for calculations
Required for calculations
Required for calculations
Optional
Optional
Optional
Optional
Required for calculations
Required for calculations
Required for calculations
Required for calculations
Required for calculations
Required for calculations
Required for calculations
Required for calculations
Optional
Optional
Optional
Optional
Required for calculations
Required for calculations
Optional
Addendum Manual V3.25, Page 27
V3.25 Addendum Manual
Directional Survey Point:
This window is accessed through the Directional Survey Report window, the Well
window, or through the Directional Survey layer Toolbox. These points can be viewed on the
log through a Directional Survey layer or can be printed from the Print Well End Report
window. Directional Surveys can be imported from ASCII files supplied by Directional Drillers.
Use the Database Navigational Tools to scroll through the existing records or click on
the Measured Depth button to view a list of the survey points, that already exist within the
database.
•
Adding a New Record…
1.) Click on the New
button or press ALT-N.
2.) Enter any appropriate information into the empty fields.
Note: If you have information for the Measured Depth, Drift Angle and Azimuth fields, the rest
of the fields can be calculated for you.
See Chapter Five - Options Menu : Directional Survey Import - Overview
3.) Select an Alignment, if you want to view the Directional Survey Point(s) on the track that
contains the survey layer. The default Alignment is always right. However, if you select a blank
Alignment from the Alignment field drop box, your Directional Survey Point(s) will not be
displayed on the survey layer, but they will still be printed out through the Print Well End Report
window.
Note: The information that is shown on the Directional Survey layer is a line that is always
placed on the right side of the track at the Measured Depth, Drift Angle, Azimuth, and TVD.
The rest of the information goes to the Print Well End Report.
4.) Click on the Save
button or press ALT-S and then respond to the ensuing Shortcut
Options window.
5.) After the record has been saved the user can then select the
button to perform
either Drift Angle or Minimum Curvature calculations from either the tie-in or kick-off points.
Note: The drift angle calculations uses minimum curvature but we assume an azimuth for all the
survey points so we can do some TVD calculation’s to produce interpolated TVD’s as well as
produce a TVD / SSL log.
•
Editing a Directional Survey Point…
Addendum Manual V3.25, Page 28
V 3.25 Addendum Manual
1.) Click on the Measured Depth
button to view a list of Directional Survey
Points to date and then double click on the record, that you wish to edit. Once the selected
record is displayed in the Directional Survey Point window, make any changes you feel are
necessary.
2.) Or, click twice on the Query
button and then click on the Next Record
button to
view all of the records in the database. See the Database Navigational Tools section later in
this User Manual for more information.
3.) Click on the Save
Options window.
•
button or press ALT-S and then Exit out of the ensuing Shortcut
Deleting a Directional Survey Point…
1.) Click on the Measured Depth
button to view a list of Directional Survey
Points to date and then double click on the record, that you wish to delete. Once the selected
record is displayed in the Directional Survey Point window, click on the Delete
button.
2.) Or, click twice on the Query
button and then click on the Next Record
button to
view all of the records in the database. Select the record you wish to delete and it will be
displayed in the Directional Survey Point window. Then, click on the Delete
button. See
the Database Navigational Tools section later in this User Manual for more information.
The Undo
button will restore the window to the settings of the last saved record.
You can Tab between fields or press Shift+Tab to move backwards between fields.
•
Indicating a Misrun…
To indicate a Misrun, enter in the measured depth (MD) of the survey and simply check the
MISRUN check box to flag this survey as a misrun. Misruns will be excluded from any
calculations performed on the surveys, and will be labeled in the appropriate End of Well
reports.
Addendum Manual V3.25, Page 29
V3.25 Addendum Manual
Calculating Directional Survey Points…
To perform the minimum curvature calculations on your directional surveys, click on the
Calculate TVD
button in the Directional Survey Points window. This will activate
the TVD Calculations window.
Directional Survey Portion:
The User has the ability to have the program calculate any Directional Survey group, select
which survey group they wish to calculate, which calculation method either minimum curvature
or drift angle calculations and from either tie-in or kick off co-ordinates.
Procedure…
1.) If the user wishes to calculate a Survey Group activate the Check box (!) in this portion of
the window.
2.) If the default survey group is not correct Click on the Survey Group button and select the
survey group you wish to calculate from the List.
3.) Select the Calculation method from the drop box. (Minimum curvature must have an azimuth
and will fill in all the fields in the Survey Points Window, otherwise use drift angle to get only
the TVD field completed in the Survey Points Window.)
4.) Select the From Tie-In or Kick-Off co-ordinantes
The defaults are picked up from the User defined TVD Calculation portion of the ‘Directional
Surveys Report’, found under the menu item “Reports”. Kick Off is selected by default if not
filled in.Remember that the data required for the Kick Off or Tie In reference is entered in the
‘Directional Surveys Report’, found under the menu item “Reports”. Kick Off is selected by
default.
Addendum Manual V3.25, Page 30
V 3.25 Addendum Manual
Calculate Master Survey Portion:
The User has the ability to have the program calculate the Directional Surveys in the Master
Survey group, which calculation method either minimum curvature or drift angle calculations and
from either tie-in or kick off co-ordinates. The Master Survey Group can be compiled from points
from different Survey Groups. The Master Survey group is built in the Directional Survey
window. If there is only one survey group this procedure is not required. The Master Survey
group if built, is then used to perform all TVD / SSL Calculations within the application.
Procedure…
5.) If the user wishes to calculate the Master Survey Group activate the Check box (!) in this
portion of the window.
6.) Select the Calculation method from the drop box. (Minimum curvature must have an azimuth
and will fill in all the fields in the Survey Points Window, otherwise use drift angle to get only
the TVD field completed in the Survey Points Window.)
7.) Select the From Tie-In or Kick-Off co-ordinates.
The defaults are picked up from the User defined TVD Calculation portion of the ‘Directional
Surveys Report’ window from the survey group that has the shallowest survey point, Kick
Off is selected by default if not filled in. Remember that the data required for the Kick Off or Tie
In reference is entered in the ‘Directional Surveys Report’, found under the menu item
“Reports”. Kick Off is selected by default.
Well Path Portion
The Well Path for lack of better terms will update any curve on your log with either TVD or SSL
data and will start at any depth required. It basically plots a curve with respect to measured
depth and the survey data’s TVD calculations which can also be converted to SSL if a KB
elevation has been entered into the Well Record located under the Edit menu.
Procedure…
8.) If the user wishes to calculate or update the Well path curve activate the Check box (!) in
this portion of the window.
9.) Select which curve you wish to populate with this data by clicking on the Well Path Curve
Button and selecting the curve from the existing curve in the database.
10.)
Type in the Start depth for which the curve will first appear on the log.
11.)
Select which units you would like this curve to be plotted or updated with from the Units
selection box. TVD is the direct calculations from the survey points. SSL are converted with
respect to the wells Kelly Bushing Elevation.
TVD Attributes Portion
Procedure…
12.)
If the user wishes to calculate or update the specified TVD fields within the various
windows throughout the Reports activate the Check box (!) in this portion of the window.
The program is only able to determine the TVD at any depth covered by the directional surveys.
Power*Log and Power*Curve have several windows in which the measured depth and
corresponding true vertical depth are asked for. If you have directional surveys over that
Addendum Manual V3.25, Page 31
V3.25 Addendum Manual
interval, the program will calculate the exact TVD for you. If it is outside the range of your
surveys, it will be left as a manual entry.
13.)
Select or click on which fields (highlight) you wish to calculate for or recalculate if you
have changed the survey data. Remember you have the ability to select all or unselect all.
14.)
Button
Click on the
Directional Survey Points Window Field Restriction Table:
Measured Depth
Drift Angle
Azimuth
TVD Depth
N/S Distance
E/W Distance
Vertical Section
Dog Leg Severity
5.2
4.6
4.6
5.2
13.2
13.2
13.2
4.2
Numeric
Numeric
Numeric
Numeric
Numeric
Numeric
Numeric
Numeric
Mandatory
Optional
Optional
Optional
Optional
Optional
Optional
Optional
Note: When you add any layer to a log, it is always associated with a Data Type. Every Data
Type in Power*Log/Curve has a default setting. The default settings for a Directional Survey
layer are shown below. To access this window, click on the Layer Configuration
button
on the Toolbar, when the layer is active. Notice that this Directional Survey is directed at
Reference ID 1 and its associated Survey Points.
Addendum Manual V3.25, Page 32
V 3.25 Addendum Manual
Reports
Formation
Enter the details of any Formation into this window.
The information entered into this window can be used to produce three (3) separate reports: the
well end Formation Evaluation report, the well end Formation Tops report and the Morning
Report Formation report. These reports can be printed using the Print Well End Report and
the Print Morning Report windows.
Note: In order to have the Formation Evaluation report printed, there are two fields that must
be filled in: Boundary Type and Period. If these fields are left blank, the Formation
Evaluation Report for that Formation will not be printed.
The Formation Tops information can also be viewed on the log, using the formation layer in
either Format 1 or 2(depending on your application).
Note: Format 1 displays Period (in short form), Formation (in short form), a Bedding Line,
and a Sample Top, while Format 2 gives Formation in long form TVD and Sub Sea Value.
Formation Tops are automatically generated in the Morning Report from the Formation Tops
that are entered into the Well Formation window. The depths entered into the Morning Report
window are used to generate the Morning Formation Top report list. However, before a list can
be generated, two (2) reports must be filled in to initiate a range. If your Sample Tops are
located between these two (2) depths, the Formation Tops will then come out in the Morning
Report.
•
Adding a Formation Top…
1.) Click once on the New
data.
button or press ALT-N and then fill in the report window with your
2.) When you have finished adding your data, click on the Save
then Exit out of the ensuing Shortcut Options window.
•
button or press ALT-S and
Editing a Formation Top…
1.) Click on the Formation
button to view a list of Formations to date and then
double click on the record, that you wish to edit. Once the selected record is displayed in the
Formation window, make any changes you feel are necessary.
2.) Or, click twice on the Query
button and then click on the Next Record
button to
view all of the records in the database. See the Database Navigational Tools section later in
this User Manual for more information.
3.) Click on the Save
Options window.
button or press ALT-S and then Exit out of the ensuing Shortcut
Addendum Manual V3.25, Page 33
V3.25 Addendum Manual
•
Deleting a Formation Top…
1.) Click on the Formation
button to view a list of Formations to date and then
double click on the record, that you wish to delete. Once the selected record is displayed in the
Formation window, click on the Delete
button.
2.) Or, click twice on the Query
button and then click on the Next Record
button to
view all of the records in the database. Select the record you wish to delete and it will be
displayed in the Formation window. Then, click on the Delete
button. See the Database
Navigational Tools section later in this User Manual for more information.
The Undo
button will restore the window to the settings of the last saved record.
You can Tab between fields or press Shift+Tab to move backwards between fields.
This is the Well Formation window:
Addendum Manual V3.25, Page 34
V 3.25 Addendum Manual
K.B., Ground, and Casing - This information is displayed based on the Well information that
you entered in the Well window. The Well window can be located under the Edit Menu
Selection.
Formation List Button - Click on this button to display the list of Formations and Sample
Tops, that have been entered to date. Double click on the Formation or highlight the
Formation and click on the Select button to edit or view the Formation.
When editing or adding a new Formation, remember to click on the Save
press ALT-S, when you are finished.
Clicking on the
new information.
button or
button or pressing ALT-N will clear the window, allowing you to enter a
Note: A Well Formation can't be saved until you have entered a name in the Long Formation
field, next to the Formation button.
Group, Formation, and Member (short and long) - Type in the short and long name for the
Group, Formation, and Member names. Only the Formation long name is a mandatory field.
The short name will be added to the formation layer display on the log coupled with the short
period name and the measured depth.
Formation Layer Long Name format.
Short Name format.
Sequence Number - The Seq# field can be used to override the order that the formations are
printed out in the well end and morning reports.
Era, Series, Period, and Stage - Use the drop box methods to access the various Eras on the
lists. Note that the Period chosen will affect the list in the Stage drop box.
Age – You may enter the estimated geological age of this formation in this field.
Thickness – You may enter the thickness of this formation into this field (or) the user can Click
on the
button if you wish the program to calculate the Measured Depth
thickness between this formation and the next formation in the list.
Note: When the Thickness field is filled in with the measured depth thickness of the formation
you will be able to generate a sample description report with formation tops that will contain
all your sample descriptions.
Tops Depth section - You may enter the Measured Depths and True Vertical Depths in
these fields. If you have entered survey point data and have filled in or calculated the TVD fields
and you have a survey point above and below the depth of this formation the True Vertical
depths will be calculated for the user.
Note: Formations are normally ordered by their depths starting with Log Tops TVD, then MD
followed by Sample Top TVD, then MD and lastly by Prognosed Tops TVD in all the well end
and morning reports where the tops are generated.
Subsea - This is calculated from the depths entered in the Tops section and the K.B. elevation,
that you entered in the Well window.
Addendum Manual V3.25, Page 35
V3.25 Addendum Manual
Subsea is calculated successively using the following data respectively: Prognosis depth,
Sample Top (MD), Sample Top (TVD), Log Top (MD), and finally Log Top (TVD).
Alignment - This is used to align the Formation Top in a Formation layer, using Format 2 in
the Layer Configuration window. The following choices are available from this drop box: Left,
Middle, Right, and Blank. Leave this box blank, if you don't want the Formation Top to be
shown on the layer, but still want the Formation Top to be printed out via the Well End Report
window. If you are using the Formation layer in more than one track, you should beware of
layer overlapping. You will discover which is the best alignment for all layers. You have one
selection for all layers using this format.
Samples Button - Click on this button to activate the Sample/Core Description Transfer
window from which you may copy Sample/Core Descriptions into either the Evaluation and/or
Conclusion fields. See “Copying a Sample/Core Description” in the Table of Contents for
more information.
Evaluation - Type in the Formation Evaluation pertaining to the lithology, etc…. You may use
the short forms and then click on the Expand button to lengthen the descriptions.
Conclusion - Type in the Formation Conclusion pertaining to hydrocarbon potential. You may
use the short forms and then click on the Expand button to lengthen the descriptions.
Field Restriction Table:
Group (short)
Group
Formation (short)
Formation
Member (short)
Era
Series
Period
Stage
Age
Boundary Type
Fault Type
MD Sample
MD Log
TVD Prognosis
TVD Sample
TVD Log
Evaluation
Conclusion
Thickness
5
30
5
30
5
30
30
30
30
7.3
30
30
5.2
5.2
5.2
5.2
5.2
2000
2000
10.5
Character
Character
Character
Character
Character
Character
Character
Character
Character
Numeric
Character
Character
Numeric
Numeric
Numeric
Numeric
Numeric
Character
Character
Numeric
Optional
Optional
Optional
Mandatory
Optional
Optional
Optional
Optional
Optional
Optional
Optional
Optional
Optional
Optional
Optional
Optional
Optional
Optional
Optional
Optional
Addendum Manual V3.25, Page 36
V 3.25 Addendum Manual
Note: When you add any layer to a log, it is always associated with a Data Type. Every Data
Type in Power*Log/Curve™ has a default setting. The default settings for a Formation layer
are shown below. To access this window, click on the Layer Configuration
Toolbar, when the Formation layer is active.
button on the
Format 1: Long Names
Format 2: Short Names
Addendum Manual V3.25, Page 37
V3.25 Addendum Manual
Options Menu Selection
System Options
The user can manage the Power*Log/Curve system settings with this window.
•
System Options…
Home Directory - This is the directory on your hard drive where Power*Log/Curve is being
executed.
Rock Favorites - Allows the user to determine their ten (10) favorite Rock Types and then
displays them in a pop-up menu or Toolbox generated by the activation of the Rock Type
Builder window in the Interpreted and Detailed Lithology tracks.
button when clicked allows the user to determine their ten (10) favorite
The
Rock Types and then displays them in a pop-up menu or Tool Box generated by the activation
of the Rock Type Builder window in the Interpreted and Detailed Lithology tracks.
How to Change the Rock Favorites Selection
1.) Click once on the
button in the System Options window to activate the Rock
Type Favorites window shown on the next page:
Addendum Manual V3.25, Page 38
V 3.25 Addendum Manual
2.) Then, click once on the Clear All button in the Rock Type Favorites list window to prepare it
for the selection of your Rock Favorites.
3.) Now, select some of your more commonly used Rock Types from the Rock Type Favorites
list window.
4.) Click once on the OK button to return to the System Options window.
5.) Click on the Save button in the System Options window, when you are finished.
Acc Favorites - Allows the user to determine their thirty (30) favorite Accessories and then
displays them in a pop-up menu or Toolbox generated by the activation of the Accessory
Builder window in the Interpreted and Detailed Lithology tracks.
Button when clicked allows the user to determine their thirty (30) favorite
The
Accessories and then displays them in a pop-up menu or Tool Box generated by the activation
of the Accessory Builder window in the Interpreted and Detailed Lithology tracks.
How to Change the Accessory Favorites Selection
1.) Click once on the
button in the System Options window to activate the
Accessory Favorites window shown on the net page:
Addendum Manual V3.25, Page 39
V3.25 Addendum Manual
2.) Then, click once on the Clear All button in the Accessory Favorites list window to prepare it
for the selection of your Accessory Favorites.
3.) Now, select some of your more commonly used Accessories from the Accessory Favorites
list window.
4.) Click once on the OK button to return to the System Options window.
5.) Click on the Save button in the System Options window, when you are finished.
Date Format - From this drop down box, you can select the date format. This selection
determines how every date in Power*Log/Curve will be entered and displayed. If you import a
log with different date formats, Power*Log/Curve will change the dates to comply with the
format you've chosen here.
Version Compatibility - Enables the user to achieve compatibility between Annotations in the
Version 1.81 Lithology Text layer and Annotations in the Version 1.90 and later Versions'
Lithology Text layer.
Data Buffer Lookahead - The number placed in this field determines how far ahead and behind
the current top depth will be stored in the computers buffer. The larger the lookahead number,
the longer it takes for Power*Log/Curve to refresh the screen when you exceed the lookahead
value. However, until you meet or exceed the lookahead value, scrolling will be much faster,
because the database is not yet being accessed.
Addendum Manual V3.25, Page 40
V 3.25 Addendum Manual
Monitor Height - This option allows you to scale your monitor for Power*Log so you may
correlate on-screen wells with hard copy logs that you may have. It is recommended that you
take an opportunity to measure the vertical viewing area of your monitor in inches and then
insert that value in the Monitor Height field. Be aware, however, that if you adjust the screen
height knob on your monitor, this will affect the monitor height setting.
Monitor Width - This option allows you to scale your monitor for Power*Curve so you may
correlate on-screen wells with hard copy logs that you may have. It is recommended that you
take an opportunity to measure the horizontal viewing area of your monitor in inches and then
insert that value in the Monitor Width field. Be aware, however, that if you adjust the screen
width knob on your monitor, this will affect the monitor width setting.
Note: You must restart Power*Log/Curve for the Monitor Width / Height changes to take
effect.
Font Size (Lithology Desc / Annotation) - Allows you to pre-determine the font size on your
log, when you use the Sample Description Transfer window. It is also the default font size
when you enter any Annotation Layer Toolbox. If you change this option, it will only be
reflected upon the Annotation that you transfer or add to the system from that point on. Any
previous transfers are not affected.
Font Size (Depth) - This allows you to select the font size of the depth markers in the
Measured Depth track of the log.
Printer Font Scaler - Used to scale the default printer’s font size up or down, so that the font
size on printouts matches the font size displayed on the screen. Ie. If the font size on the
printout is bigger than the font you see on the screen the user must reduce this number and vice
versa, if the font size on the printout is smaller than the font you see on the screen the user
must increase the value of this number.
Transparent - When activated, this function makes the background of the accessory symbols
transparent, so that the bed in the background shows through. If deactivated, a white
background surrounds the accessory symbols in order to separate them more from the beds.
Frequency @ 1:240 - Determines how often symbols are shown on a Lithology Layer, while at
the scale of 1:240. For example: 1 symbol every 1 meter at 1:240, 2 symbols every 1 meter at
1:120, 1 symbol every 2 meters at 1:480, and so on. These frequencies are only in effect if you
utilize the entire interval in Oil Shows, Rounding, Sorting, Framework, and Diagenesis.
Grain Size Scale List box- You may choose your system default Grain Size Scale from either
the Wentworth, Canstrat or Amstrat scales, when using the Grain Size Builder.
Grain Size Verbal Scale Radio Button- This radio button will display the Grain Size Track
header with the equivalent verbal grain sizes such as such as C SLT, VF, F, M, C.
Grain Size mm Scale Radio Button- This radio button will display the Grain Size Track
header with the equivalent numeric grain sizes (in mm) such as .0625, .125, .25, .5, 1, 2 etc.
Interpretive Lithology Layer - Show Bedding Contacts- This check box (!) when activated
will turn on the bedding contacts (lines) between the drawn lithology types in the Interpretive
Addendum Manual V3.25, Page 41
V3.25 Addendum Manual
Lithology Layer. When the check box is deactivated (unchecked) it will turn off the bedding
contacts (lines) between the drawn lithology types in the Interpretive Lithology Layer.
Interpretive Lithology Layer - Show Accessories- This check box (!) when activated will
turn on the accessories in the Interpretive Lithology Layer. When the check box is deactivated
(unchecked) it will turn off the accessories in the Interpretive Lithology Layer.
Directional Survey Display – This option will display your directional surveys on your log in
either Quadrant format ( N 62 º W) or Azimuth format (AZ 298 º)
This button activates a window that does
Lithology Sort Order Buttonthe ordering of the % Lithology layer. The rock types listed in this window is the sort order from
left to right in Power*Log and top to bottom in Power*Curve when the %Lithology Track / Layer
is utilized. The sort order can be changed by the user at any time but will only take effect after
the application has been reactivated. The % Lithology Sort Order Window is shown below:
How to Change the % Lithology Sort Order
1.) Click on the Options Selection on the Application menu bar and select Systems Options.
This will activate the System Options window.
2.) Click on the % Lithology Sort Order button. This will activate the % Lithology Sort Order
Window shown above.
3.) Select the Rock Type the user wishes to move by clicking on the rock type once. This will
highlight the rock type.
4.) Click on the Move button. The Move button will then transform into a Move Start button.
Addendum Manual V3.25, Page 42
V 3.25 Addendum Manual
5.) Then Select the Rock Type you wish to move the previously selected type above by
clicking on the new rock type. The previously selected rock type will now be placed above
or to the left of the rock type you just clicked on.
6.) If you wish to change the order of more rock types proceed with steps 3-5.
7.) If you are pleased with the newly rearranged % Lithology Rock order click on the Save
Button. This will close the % Lithology Sort Order Window and put the user back into the
Systems Options window.
More
Button
When the More Button is activated the user will look at the lesser used functions of the
Systems Options which are only relevant to the Template Entry method of inputting sample
descriptions.
Template Entry Method - This option allows you to utilize the template features of
Power*Log/Curve to enter Lithology Descriptions, instead of the default method of data
entry.
Wholebed Visibility - Determines how much of a bed to display when a Lithology track
is populated with symbols.
Symbol Size- Does not change the actual size of the symbols. Instead, the figures in
these fields determine how much space surrounds the symbols. When the spaces around the
symbols are larger, fewer symbols can be placed on a track.
Addendum Manual V3.25, Page 43
V3.25 Addendum Manual
License Selector Program
The License Selector program can be accessed through the Power*Geology folder and
facilitates the selection between the two different licensing methods available for the
Power*Suite applications. The two types of authorizations that can be implemented to
run our applications are:
• Hasp Key (hardware license) that sits on either the parallel port or USB port of your
computer. Otherwise known as a dongle or hardware key.
• Crypkey (software license) that can either reside locally on your computers hard
drive or can reside on a network drive.
Hasp (Hardware Key) License Activation
To activate a Hasp (hardware) key the user must first place the Hasp (parallel port) key
on the parallel port before the printer cable. If you have a USB Hasp key this must be
placed on the USB port. If you have not installed the Hasp key driver on your computer
you must insert the Power*Suite CD-ROM and run the executable (HDD16.exe or
HDD32.exe) to enable the program to see the Hasp key. Refer to page ?? in your
manual.
1.) To activate the License Selector click on the Start menu, select programs, select the
selection. This will
Power*Geology folder and click on the
activate the Power*Suite License Selector program shown below.
2.) Click on the Options selection to view the pull down menu.
3.) Select HASP. The Protection type should read HASP Hardware Key as viewed in the
Power*Suite License Selector window shown above.
Addendum Manual V3.25, Page 44
V 3.25 Addendum Manual
Crypkey (Software) License Activation [Local]
The Crypkey Authorization (Local) is the default License Activation when the program is
first installed. The program authorization must be done by TriVision Geosystems Ltd.. To
activate a trial or permanent Local Crypkey license please call our office @ (403) 7779454. The user should refer to the License Configuration section in the manual to
generate a site code.
1.) To activate the License Selector click on the Start menu, select programs, select the
selection. This will
Power*Geology folder and click on the
activate the Power*Suite License Selector program shown below.
2.) Click on the Options selection to view the pull down menu.
3.) Select Crypkey to activate a pop-out menu.
4.) Select Local from the pop-out menu. The Protection type should read Crypkey as
viewed in the Power*Suite License Selector window shown above
Crypkey (Software) License Activation [Remote]
The Crypkey Authorization (Remote) licensing has to be done by TriVision Geosystems
Ltd. on a Network Server. To activate a trial or permanent Remote Crypkey license
please call our office @ (403) 777-9454. The user should refer to the License
Configuration section in the manual to generate a site code.
1.) To activate the License Selector click on the Start menu, select programs, select the
Power*Geology folder and click on the
selection. This will
activate the Power*Suite License Selector program shown below.
Addendum Manual V3.25, Page 45
V3.25 Addendum Manual
2.) Click on the Options selection to view the pull down menu.
3.) Select Crypkey to activate a pop-out menu.
4.) Select Remote to activate another pop-out menu.
5.) Select either the UNC Network Path or the Mapped Network Drive selection to direct
the Power*Suite applications to the location of the licensing files. The Protection type
should read Crypkey as viewed in the Power*Suite License Selector window as well
as the path to the remote directory where the license files are located as shown
above.
a.) UNC Network Path will activate a window in which the user should type in the path to
the Crypkey License files as shown below and then click on the OK button.
b.) Mapped Network Drive will open a window in which the user will select the drive and
directory in which the Crypkey License files reside and then Click on the OK button.
Addendum Manual V3.25, Page 46
V 3.25 Addendum Manual
Automated Backup Module
Overview
The Auto Backup module allows the user to have their database backuped while the
database is connected to. This will prove useful when the database is being used and
updated on a continual basis and the normal backup procedure when the database is
being connected to is not being used on a continual basis.
How to Start the Auto Backup Module
1. Click on the Start button and then select programs, Power*Geology V3.25 and then
select the Auto Backup
selection
The User can also go into the Pgeology Folder and then double click on
the Auto Backup Icon as shown below:
2. This will activate the Database Login Window. Type in the User ID and Password for
the database you wish to back up and then click on the OK Button.
3. This will then activate the Power*Suite Auto Backup Window and Log. Click on the
Setup Icon
activate the Setup window shown on the next page.
Addendum Manual V3.25, Page 47
V3.25 Addendum Manual
The Backup Directory defaults to the Pgbackup directory of the Pgeology directory on
the drive that the Power*Suite programs were loaded. The user can click on the further
button and direct the backup files to any directory they desire.
The Number of backup copies indicates how many copies of the pgeology.db (metric
database file), or the pgeology.dbi (imperial database file) the user would like to save
before these files get overwritten with newer files.
Backup Schedule portion of this window indicates when the first backup is performed
and how often after that the backup occurs. In the example above the first backup
occurs at 12:00 Midnight and happens once a day.
Select database type to backup allows the user to select either the Metric or the
Imperial database.
Min. free disk space allows the user to specify what the minimum hard disk space
requirements are to perform a backup. In this case the hard drive has to have 75
megabytes of free disk space in order for a backup to be performed.
4. Once the user has selected their specifications click on the OK button and those
requirements will be followed.
5. Click on the Start Button on the toolbar or Click on Start selection under the Backup
pull down menu. This will activate a confirmation window indicating what was
specified in the Setup window.
Addendum Manual V3.25, Page 48
V 3.25 Addendum Manual
File Menu
Shrink Log History
This selection allows the user to view a portion of the last page of the Autoimp.log
file so that any new action can be seen.
To activate this select Shrink Log History located under the File selection on the main
Auto Import Window.
This will then truncate the file so that the last action is always in the middle of the log
window.
Print
This selection allows the user to print the Auto Import log history to the default
printer.
To activate this select Print located under the File selection on the main Auto Import
Window.
This will then print the Auto Import Log.
Print Preview
This selection allows the user to print to a preview window the Auto Import log
history. The user can then select print, View Next page, View Previous page, View
One page, View Two pages, Zoom Out, Zoom In and Close from the toolbar on the
top of this window.
To activate this select Print Preview located under the File selection on the main Auto
Import Window.
This will then print to preview the Auto Import Log.
Print Setup
This selection allows the user to print to activate the Printer Setup window to
select the desired printer and define the page setup etc.
To activate this select Print Setup located under the File selection on the main Auto
Import Window.
This will then activate the Print Setup window which handles the Printer and the page /
paper orientation etc.
Exit
This selection allows the user to close down or exit the Auto Import Module.
To activate this select Exit located under the File selection on the main Auto Import
Window.
This will then close down the Auto Import Module.
Addendum Manual V3.25, Page 49
V3.25 Addendum Manual
Edit Menu
Undo
This selection allows the user to undo anything that has been cut or pasted within
the Auto Import Log history.
1. To undo anything that has been cut out or pasted by the user they must select Undo
located under the Edit selection on the main Auto Import Window. This will undo the
last cut or paste that was done in the log history.
Cut
This selection allows the user cut out a portion of the Auto Import Log history.
1. The user must first highlight by clicking and dragging with the mouse a portion or all
of the history. The highlighted portion of the log history will be cut if step two (2) is
done.
2. To cut out or erase the highlighted portion of the log history the user must select Cut
located under the Edit selection on the main Auto Import Window. The highlighted
portion of the log will be cut and saved to the clipboard.
Copy
This selection allows the user copy a portion or all of the Auto Import Log history.
1. The user must first highlight by clicking and dragging with the mouse a portion or all
of the history. The highlighted portion of the log history will be copied if step two (2) is
done.
2. To copy the highlighted portion of the log history the user must select Copy located
under the Edit selection on the main Auto Import Window. The highlighted portion of
the log will be copied and saved to the clipboard.
Paste
This selection allows the user to paste a previously cut or copied portion of the
Auto Import Log history into the existing history log.
1. The user must place the mouse where they wish to paste the copied or cut log
history. The previously copied or cut log history will be pasted if step two (2) is done.
2. The user must select Paste located under the Edit selection on the main Auto Import
Window. The previously cut or copied portion of the Auto Import log history that was
saved to the clipboard will be pasted into the log.
Addendum Manual V3.25, Page 50
V 3.25 Addendum Manual
View Menu
Tool Bar
This selection allows the user to turn on or off the Tool bar on the Auto Import
Window.
1. The user must select Toolbar located under the View selection on the main window.
This will either turn off or on the Toolbar depending on its status at the time of
activation.
Status Bar
This selection allows the user to turn on or off the Status bar on the Auto Import
Window.
1. The user must select Status located under the View selection on the main window.
This will either turn off or on the Status bar depending on its status at the time of
activation.
Addendum Manual V3.25, Page 51
V3.25 Addendum Manual
Backup Menu
Start
This selection allows the user to activate or start the Backup Database Module
and follows the directions last saved in the Setup window.
1. The user must select Start located under the Backup selection on the main window
on the toolbar. This will activate or start the
or they can click on the Start Icon
Backup procedure according to the rules provided in the Setup window. This will also
print a date and time stamp and the comment Start in the Log History.
BACKUP: 2001-01-17 14:16:57 [ Performed ] Last File Saved C:\PGEOLOGY\PGBACKUP\PGBACKUP\pgeology.01
Stop
This selection allows the user to deactivate or stop the Backup Database Module
from backing up the pgeology database into the designated backup directory.
1. The user must select Stop located under the Backup selection on the main window
on the toolbar. This will deactivate or stop the
or they can click on the Stop Icon
Import Module from detecting any new files in the Import files directory. The user will
also notice a date and time stamp and the comment Stop in the Log History.
BACKUP: 2001-01-17 14:20:05 Stop
Manual
This selection allows the user to activate a Manual Backup of the Database file at
the present time.
2. The user must select Manual located under the Backup selection on the main
window or they can click on the Manual Icon
on the toolbar. This will activate or
start a manual backup of the database. The user will also notice a date and time
stamp and the comment Manual Backup in the Log History.
BACKUP: 2001-01-17 13:36:54 Manual Backup
BACKUP: 2001-01-17 13:36:58 [ Performed ] Last File Saved C:\PGEOLOGY\PGBACKUP\pgeology.002
Addendum Manual V3.25, Page 52
V 3.25 Addendum Manual
Options Menu
Setup
The setup window for the DBBackup module is where the user has control over
where the database files are saved, the frequency or how often the backup are
performed, at what time the backup occurs, and even how much hard disk space
is left in order to perform a backup.
There are two ways to activate the setup window. One is to select setup from under the
Options pull down menu or the user can click on the Setup
will activate the Setup window shown below.
Icon on the toolbar. This
The Backup Directory defaults to the Pgbackup directory of the Pgeology directory on
the drive that the Power*Suite programs were loaded. The user can click on the further
button and direct the backup files to any directory they desire.
The Number of backup copies indicates how many copies of the pgeology.db (metric
database file), or the pgeology.dbi (imperial database file) the user would like to save
before these files get overwritten with newer files.
Backup Schedule portion of this window indicates when the first backup is performed
and how often after that the backup occurs. In the example above the first backup
occurs at 12:00 Midnight and happens once a day.
Select database type to backup allows the user to select either the Metric or the
Imperial database.
Min. free disk space allows the user to specify what the minimum hard disk space
requirements are to perform a backup. In this case the hard drive has to have 75
megabytes of free disk space in order for a backup to be performed.
Once the user has selected their specifications click on the OK button and those
requirements will be followed.
Note: The backup file names for the database backups are pgeology.001, pgeology.002
etc.
Addendum Manual V3.25, Page 53
V3.25 Addendum Manual
Window Menu
New Window
Use this command to start a new Auto Backup Log.
The user must select New Window located under the Windows selection on the main
window to arrange multiple log history windows in a cascading manner.
Cascade
Use this command to arrange multiple opened windows in a non-overlapping, top
to bottom fashion.
The user must select Cascade located under the Windows selection on the main window
to arrange multiple log history windows in a cascading manner.
Tile
Use this command to arrange multiple opened windows in a non-overlapping,
side-by-side fashion.
The user must select Tile located under the Windows selection on the main window to
arrange multiple log history windows in a tiled manner.
Arrange Icons
Use this command to arrange icons.
The user must select Arrange Icons located under the Windows selection on the main
window to arrange your icons.
Addendum Manual V3.25, Page 54
V 3.25 Addendum Manual
Help
About Auto Backup
The user must select About Auto Backup located under the Help selection on the main window to
view the About window.
Addendum Manual V3.25, Page 55