1
iSync_Manual
3/18/06
10:19 AM
Page 14
Page 14 of 31
Page 15 of 31
iSync HD and iSync Pro User Manual
Basic Operation of the iSync HD [Pro]
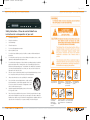
Ensure that the program Mode switch, located at the bottom right of the iSync HD [Pro], is set
to the “Normal” mode, unless performing a firmware upgrade [to perform a Firmware Upgrade,
turn to the Firmware Upgrade Procedure section].
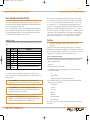
Using the on-board push-button controls you can now familiarize yourself with navigating the
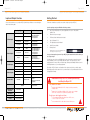
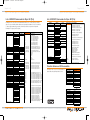
Menu. As illustrated in the following table, the iSync HD [Pro] MENU, and its associated selections and parameter adjustment windows, is easily accessed by using the pushbutton keys
located directly right of the LCD display on the face of the unit.
iSync HD and iSync Pro User Manual
Now that you have become familiar with the basic navigation procedure, you are prepared to
access and change the actual settings of parameters associated with specific headings in the
SUB-MENU. This part of the procedure is accomplished by using the LEFT and RIGHT buttons once the desired SUB-MENU heading and its current setting is displayed on the LCD
screen. The user is again prompted to adjust this setting by the left and right pointing arrows
bracketing the chosen setting currently displayed. Pressing either the LEFT or RIGHT button
will now alter the setting for the chosen parameter. As before, the LEFT and RIGHT buttons will
scroll through the content of an individual sub-menu associated with a particular parameter, in a
continuous loop, until such time that the user either exits the system by pressing the MENU
button or resumes scrolling through the SUB-MENU using the UP and DOWN buttons.
Navigation Procedure
Functions
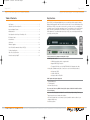
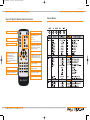
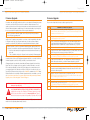
The front panel of the iSync HD [Pro] is equipped with user Navigation Keys listed in the table
below.
1.
No.
Key Name
Description
1
2
3
4
5
6
7
Power
Toggle between two states: Power on, Power off
Scroll Ascending
Scroll Left
Scroll Right
Scroll Descending
Setup or Selection
Toggle between two states: Menu entering, Menu exiting.
8
SELECT
MENU
INPUT
SELECT
Select one input video among all input video in order.
Understand the full capabilities of your iSync HD [Pro] Video Processor and
Switcher unit.
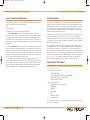
Your iSync HD [Pro] unit is feature-rich, and performs much more than “2 x 1” switching of
HDMI signals A/V and corresponding analog, PCM, and/or Toslink optical Audio. Your iSync HD
[Pro] unit has a built-in, high-quality scaler and video processor. Before we start to operate and
control these functions, let’s look at the gamut of features provided in your unit:
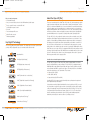
Video Processing Functions Provided
■
Key Digital® DPE™ (digital picture enhancement) and DEE™ (digital edge enhancement)
■
Sharpness, Brightness, Contrast
■
Saturation, Hue
■
Horizontal & Vertical Size, Position, Input Offset
■
Zoom (Output Aspect Ratio processing), including options to prevent monitor burn-in for
Letterbox or Pillarbox images:
Note: Function selected is voided when no key is depressed for more than 30 seconds
➾ Full
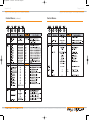
Please refer to the Menu Tree table provided in this Manual when accessing the iSync HD [Pro]
parameter windows.
➾ Letterbox, Pillarbox
Pressing the MENU button once will display, on the on-board LCD screen, the
current status of the Video formats present at the input and output of the iSync HD [Pro].
➾ Horizontal Zoom, Vertical Zoom, Horizontal and Vertical Zoom
■
Built-in Test patterns help you set-up your video system (all patterns available through the
front-panel controls, as well as RS-232)
➾ Horizontal Ramp
Pressing the MENU button a second time will display the last heading accessed
on the MENU tree and prompt the user, by means of left and right pointing arrows
bracketing that heading, to access the sub-menu.
➾ Color Bars
➾ Cross Hatch
➾ Gray Scale
➾ White Screen
Pressing either the LEFT or RIGHT button will now access items listed in the
SUB-MENU. Successively pressing either the UP or DOWN button will access, in a
continuous loop, all the headings tabulated in the SUB-MENU column.
➾ Wide Horizontal Ramp
➾ Wide Vertical Ramp
When instructed, you can reset the setting to Factory Default using the “Select” pushbutton on
the front panel.