1
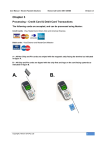
Integration Addendum – Nexion Payment Solutions
Nexion Call Centre 0861 639 466
Payment Solutions for Service Providers
User Manual Addendum for GoodX Users
_____________________________________________________________________________________________________________________
Copyright Nexion SA (Pty) Ltd
-1-
Integration Addendum – Nexion Payment Solutions
Nexion Call Centre 0861 639 466
INDEX
Page
Post Nexion Installation
------------------------
3
----------------------------------------------
4
A.) Refer to the Post Nexion Installation setup on page 3
Transacting with Nexion
A.) Payments originating from GoodX
B.) Payments originating from Nexion Standalone
---------------------------------
8
_____________________________________________________________________________________________________________________
Copyright Nexion SA (Pty) Ltd
-2-
Integration Addendum – Nexion Payment Solutions
Nexion Call Centre 0861 639 466
Integrated Installation ( GoodX )
Post Nexion Install
After successfully installing Nexion the following must be completed, to enable communications
between Nexion and GoodX
1.)
2.)
3.)
4.)
Go to C:\nexion3
Copy the nxAgent.exe and nx_api.dll
Go to C:\WINDOWS\system32
Paste copied files into the directory
LINKING THE MERCHANT ID
1.)
2.)
3.)
4.)
5.)
6.)
7.)
Click to Start, Run
Enter the following link C:\gxmn32\gxopsies4_11.exe/goodx1/supervsr/”date of install”
Login as supervisor
Click on the system options button
Select “Interfacing“from the left hand index
Check the box – “Use Nexion”
Enter the Merchant ID supplied by Nexion SA and then click Exit
_____________________________________________________________________________________________________________________
Copyright Nexion SA (Pty) Ltd
-3-
Integration Addendum – Nexion Payment Solutions
Nexion Call Centre 0861 639 466
Transacting with Nexion
A.
Payments originating from Good X
1. Once logged on to the Good X Practice Management System to Process a Payment proceed by double
clicking the Cash Register Icon (A) on the Good X main Menu.
A
2. Highlight the Cash Register (B) you wish to use by single clicking it and then clicking OK (C).
B
C
3. The Point of Sale Screen is now displayed. Select “Patient payments” (E) from the “Cashbook” option (D) in
the “Point of Sale” Menu as displayed in the illustration below.
_____________________________________________________________________________________________________________________
Copyright Nexion SA (Pty) Ltd
-4-
Integration Addendum – Nexion Payment Solutions
Nexion Call Centre 0861 639 466
D
E
4. The Select entity menu is now displayed. Select the Entity (F) for which the payment is being processed and
click “OK” (G).
F
G
5. Select the Patient concerned (H) from the Account list and click “OK (I)” to begin processing the payment.
_____________________________________________________________________________________________________________________
Copyright Nexion SA (Pty) Ltd
-5-
Integration Addendum – Nexion Payment Solutions
Nexion Call Centre 0861 639 466
H
I
6. Fill in the Amount of the transaction about to be processed in the Amount to allocate field (J) then click
continue (K).
J
K
7. Select the patient from the list and double click in the “Amount” column (L) to allocate the funds concerned
then click “Done” (M).
_____________________________________________________________________________________________________________________
Copyright Nexion SA (Pty) Ltd
-6-
Integration Addendum – Nexion Payment Solutions
Nexion Call Centre 0861 639 466
L
M
8. Select Card Payment (N) then click the Nexion button (O). The Nexion Agent will now be displayed
N
O
Please Note:
Good X will pre populate the amount, Transaction reference and Member reference into their respective
fields. These fields will be grayed out on the Nexion Payment Details Screen as shown in point 9
_____________________________________________________________________________________________________________________
Copyright Nexion SA (Pty) Ltd
-7-
Integration Addendum – Nexion Payment Solutions
Nexion Call Centre 0861 639 466
The Nexion Payment screen
A
Preloaded Information
Preloaded Information
Preloaded Information
B
C
D
E
F
G
Please Note:
The Amount: Transaction Ref#: and Member Ref#: is automatically pre-populated. These
details will appear on the Patients Receipts and Nexion Reports. For Multiple Practitioners at a
single practice please select the correct name from the Merchant: Drop Down list.
The displayed information cannot be edited. The Reference information is as follows:
(A) Merchant: The Doctor who will be credited with the transaction amount.
(B) Amount: The total amount to be collected from the cardholder
(C) Currency: The Currency is defaulted to ZAR and cannot be changed.
(D) Transaction Ref#: This is a sequential transaction number generated by Good X for
that specific patient and will be displayed on the Nexion Report under Transaction Ref#.
(E) Member Ref#: This is the Good X Account Number for that specific patient and will be
displayed on the Nexion Report under Member Ref#.
(F) User Ref#: This field only needs to be used if the user requires extra information to be
added to the transaction details.
(G) Bank Auth#: This field only needs to be completed upon request from the bank. A
Specific Declined reason will determine this
_____________________________________________________________________________________________________________________
Copyright Nexion SA (Pty) Ltd
-8-
Integration Addendum – Nexion Payment Solutions
Nexion Call Centre 0861 639 466
9. Select your transaction type from the list
10. If applicable a screen will be displayed, prompting the user to swipe the card.
11. If you want to do a credit/debit card transaction, swipe the card through the slot on the side of the pay point
terminal, with the magnetic strip at the bottom of the card facing toward the terminal.
_____________________________________________________________________________________________________________________
Copyright Nexion SA (Pty) Ltd
-9-
Integration Addendum – Nexion Payment Solutions
Nexion Call Centre 0861 639 466
A.
B.
12. You will be prompted on the terminal to select an account type:
If the card is a Debit Card* Choose option # 1 for Savings # 2 for Cheque
Confirm with Cardholder if debit card is linked to a savings or current account
Refer to the LOGO on the card; Logo’s with Visa Electron or Maestro are debit cards.
*In the case of a debit card your client will be prompted to enter their PIN on the terminal and to press Enter to confirm.
If the card is a Credit Card, the option to deduct an amount on a straight or budget facility is displayed on the
terminal. If in doubt refer to the LOGO on the card, Logos with Visa, Master Card, American Express or Diners
Club are credit cards. If the client requests a budget option, select the number of months as prompted on the
screen or select option 1 to continue.
13. The terminal will now prompt you to re-confirm the transaction amount by pressing the green enter key on the
pay point terminal.
At this point the transaction will be processed and the result displayed on the terminal by means of an
Approved or Declined message.
Regardless of the outcome of the transaction, receipts will automatically be printed to your default printer.
_____________________________________________________________________________________________________________________
Copyright Nexion SA (Pty) Ltd
- 10 -
Integration Addendum – Nexion Payment Solutions
Nexion Call Centre 0861 639 466
The Nexion Receipt
For any queries regarding Nexion please call our Call Centre on
0861 639 466
_____________________________________________________________________________________________________________________
Copyright Nexion SA (Pty) Ltd
- 11 -