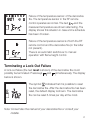
1
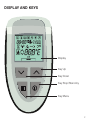
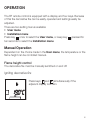
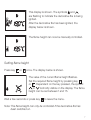
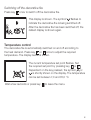
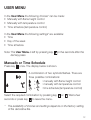
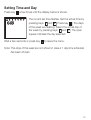
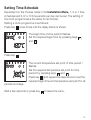
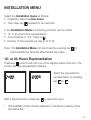
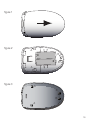
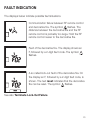
Honeywell
Manual
DF-RC
RF Remote Control Decorative Fire
DISPLAY AND KEYS
Display
Key Up
Key Down
Key Stop/Stand-by
Key Menu
Display
Manual operation.
Time schedule active.
Active time period.
Closed (left) or open fire place type (right).
Decorative fire is on.
Decorative fire can be ignited.
Fault of decorative fire can be reset.
Burner off/setting down (left), burner on/setting up (right).
Busy (for instance while decorative fire is been ignited).
Fault.
Main plug of the decorative fire is plugged in the other way round.
RF-communication.
Batteries are almost empty (symbol flashes).
Time representation (24-hours or 12-hours).
Days of the week. Square indicates actual day.
Temperature representation.
Temperature sensor(s) are defect.
Keys
Enhance setting or change selection.
Lower setting or change selection.
Choose menu and menu selection.
Stop setting menu or go to stand-by.
SET UP FOR OPERATION
The RF remote control makes it possible to operate your decorative fire
both manual as by means of a time schedule.*
The temperature and the flame height can be manually controlled. The
time schedule only controls the temperature.
The possible time schedules are*:
• A time schedule with the same settings for each day.
• A time schedule with separate settings for the week days (monday to
friday) and the weekend.
• A time schedule with separate settings for each day.
For each day, two, four or six different time periods can be set.*
The time schedule can easily be set by setting the begin time and the
temperature set point of each period.
Flame Symbol
A flame symbol indicates that the burner of your decorative fire has been
switched on.
Batteries
Before you can take the RF remote control in operation, the two supplied
batteries (type AA) have to be placed. After the batteries have been
placed, the RF remote control is ready for manual operation with flame
height control. To save batterie life, some time after the last key pressure,
the display goes blanc*, unless the decorative fire is switched on.
* The availability of the option depends on the factory setting of the
decorative fire.
Binding RF Remote Control
The RF remote control can only communicate with a decorative fire after
the RF remote control has been bound with that decorative fire.
If both devices are switched on within 5 minutes after each other, the
binding goes automatically.
This display is shown if the RF remote control has
not been bound. The symbol
flashes. Make
sure the decorative fire has not been switched on
for more than 5 minutes and start the binding as
follows:
Press keys
and
simultaneously.
The display below is shown.
This display is shown during binding. The symbol
flashes. When the binding is finished, the default
display is shown.
Note: In case of replacement of the decorative fire or the RF remote
control, the binding has to be initiated manual, see Binding RF
remote control, on page17.
Time and Day
The time schedule of the RF remote control can only be used if the
time has been set. The time and day can be set in the User Menu, see
Setting Time and Day on page 13. The time representation, 12-hours or
24-hours, can be set in the Installation Menu, see Choice 12- or 24Hours Representation on page 15.
OPERATION
The RF remote control is equipped with a display and four keys. Because
of this the decorative fire can be easily operated and settings easily be
adjusted.
There are two setting menus available:
• User menu
• Installation menu
Press key
once to select the User menu, or keep key
pressed for
ten seconds to select the Installation menu.
Manual Operation
Dependent on the choice made in the User menu, the temperature or the
flame height can be controlled manual.
Flame height control
The decorative fire must be manually switched on and off.
Igniting decorative fire
Press keys
and
simultaneously if the
adjacent display is shown.
This display is shown. The symbols and
are flashing to indicate the decorative fire is being
ignited.
After the decorative fire has been ignited, the
display below is shown.
The flame height can now be manually controlled.
Setting flame height
Press key
or
once. The display below is shown.
The value of the current flame height flashes.
Set the required flame height by pressing key
or
. Dependent on the key pressed, the symbol
or
is shortly visible on the display. The flame
height can be set between1 and 15.
Wait a few seconds or press key
to leave the menu.
Note: The flame height can only be controlled if the decorative fire has
been switched on.
Switching off the decorative fire
Press key
once to switch off the decorative fire.
This display is shown. The symbol
flashes to
indicate the decorative fire is being switched off.
After the decorative fire has been switched off, the
default display is shown again.
Temperature control
The decorative fire is automatically switched on and off according to
the heat demand. Press key
or
once to adjust the required
temperature. The display below is shown.
The current temperature set point flashes. Set
the required set point by pressing key
or
.
Dependent on the key pressed, the symbol
or
is shortly shown on the display. The temperature
can be set between 7,0 and 35,0 °C.
Wait a few seconds or press key
to leave the menu.
Temporarily interrupting temperature control
When temperature control is used, the decorative fire can temporarily be
switched off.
Press key
once to switch off the decorative fire.
This diplay is shown. The symbol
flashes to
indicate the decorative fire is being switched off.
After the decorative fire has been switched off, the
display below is shown.
The symbol
flashes to indicate the
decorative fire has to be ignited manually by
pressing the keys
and
simultaneously.
When the decorative fire is ignited again, the
temperature control becomes active.
Note: The temperature set point can not be changed during the
temporarily temperature control interruption.
Time Schedule
The temperature is controlled according to the time schedule, see Setting
Time Schedule on page 14. The decorative fire is fully automatically
ignited and switched off.
Temporarily changing the temperature set point
The temperature set point of a time schedule period can temporarily be
enhanced or lowered. Press key
or
once to set the temporarily set
point. The display below is shown.
The current temperature set point flashes. Set
the temporarily required temperature set point
by pressing key
or
. Dependent on the key
pressed, the symbol
or
is shortly shown on
the display.
Wait a few seconds or press key
to leave the menu.
This display (example) is shown. The symbol
indicates that the temperature set point has been
adjusted manually.
The temporarily adjustment can be undone by setting the manually
adjusted set point back to the set point of the current time period. In
case of a transition to a new time period, the temporarily adjustment is
cancelled automatically.
10
Temporarily interrupting time schedule
In case of the use of a clock programme, the decorative fire can also be
switched off temporarily.
Press key
once if the decorative fire has been ignited.
This display (example) is shown. The symbol
flashes to indicate the decorative fire is being
switched off.
After the decorative fire has been switched off, the
display below is shown.
This display (example) is shown. Symbol
flashes to indicate the decorative fire has to be
ignited manually by pressing keys
and
simultaneously.
When the decorative fire is ignited, the time
schedule becomes active again.
Note: The temperature set point can not be changed when the time
schedule is temporarily interrupted.
11
USER MENU
In the User Menu the following choices* can be made:
• Manually with flame height control
• Manually with temperature control
• Time schedule (temperature control)
In the User Menu the following settings* are available:
• Time
• Day of the week
• Time schedule
Note: The User Menu is left by pressing key
last key press.
or five seconds after the
Manually or Time Schedule
Press key
once. The display below is shown.
A combination of two symbols flashes. There are
three possilbe combinations:
+ : manually with flame height control
+
: manually with temperature control
+
: time schedule (temperature control)
Select the required combination by pressing key
seconds or press key
to leave the menu.
or
. Wait a few
* The availability of choices and settings depends on the factory setting
of the decorative fire.
12
Setting Time and Day
Press key
a few times until the display below is shown.
The current set time flashes. Set the actual time by
pressing keys
and
. Press key
. The days
of the week are flashing. Select the actual day of
the week by pressing keys
and
. The open
square indicates the day selected.
Wait a few seconds or press key
to leave the menu.
Note: The days of the week are not shown in case a 1 day time schedule
has been chosen.
13
Setting Time Schedule
Dependent on the choices made in the Installation Menu, 1, 2 or 7 time
schedules and II, IV or VI time periods per day can be set. The setting of
the clock programmes is the same for all choices.
Setting a clock programme is as follows:
Press key
a few times until the diplay below is shown.
The begin time of time period I flashes.
Set the required begin time by pressing keys
and
.
Press key
.
The current temperature set point of time period I
flashes.
Set the required temperature set point for time
period I by pressing keys
and
.
Press key
and repeat the steps above to set the
required begin time and temperature set point for all
periods and days.
Wait a few seconds or press key
to leave the menu.
14
INSTALLATION MENU
Select the Installation menu as follows:
• If selected, leave the User menu.
• Then keep key
pressed for ten seconds.
In the Installation Menu the following choices* can be made:
• 12- or 24-hours time representation
• Time schedule (1, 5/2, 7days or )
• Number of time periods per day (II, IV or VI)
Note: The Installation Menu can be closed by pressing key
automatically five seconds after the last key press.
or
12- or 24-Hours Representation
Press key
a few times until one of the displays below is shown. The
current set time representation flashes.
Select the required time
representation by pressing
key
or
.
Wait a few seconds or press key
to leave the menu.
* The availibility of the choices depends on the factory setting of the
decorative fire.
15
Time Schedule (1, 5/2, 7 days or
Press key
)
a few times until one of the displays below is shown.
Select the required time schedule (1, 5/2, 7 or ) by pressing key
. Time schedule 5/2 is represented by the display showing 1..6.
Wait a few seconds or press key
to leave the menu.
or
Note: Choice
means no time schedule is used. Only manually operation
with flame height control is now possible.
Day Time Periods (II, IV or VI)
Press key
a few times until one of the displays below is shown. The
current choice (digits) flashes.
Select the required day time periods (II, IV of VI) by pressing key
Wait a few seconds or press key
to leave the menu.
or
.
16
Binding RF Remote Control
In case of replacement of either the decorative fire or the RF remote
control, the binding must be started manually. Act as follows:
Press key
a few times until the display below is shown.
Make sure the decorative fire has not been
switched on for more than 5 minutes. Press keys
and
simultaneously. The binding is started
and the display below is shown.
This display is shown during the binding. The
symbol
flashes.
When the binding succeeds, the default display is shown.
17
REPLACING BATTERIES
Your RF remote control operates with two alkaline batteries (type AA).
If the symbol
is shown flashing on the display, the batteries have to be
replaced.
If the batteries are completely empty, the display will go blanc. Therefore,
replace the batteries of the RF remote control in time.
Replace the batteries as follows:
1.
Remove the back cover of the RF remote control by moving the
back cover down a few millimeters (see figure 1) and then lift up
the back cover.
.
Remove the old batteries from its holder.
Place a new set of batteries in the holder as shown in figure 2.
.
4.
Replace the back cover of the RF remote control by placing the
tabs A and B of the back cover (figure 3) in the according notches
of the housing (figure 2).
.
Push the back cover up to secure it.
The current time and day of the week must be set again after replacement
of the batteries. However, this is only necessary in case a clock
programme is used.
Note: Don’t throw empty batteries away but dispose of them as chemical
waste.
18
figure 1
figure 2
A
B
+
+
B
A
figure 3
A
B
B
A
19
FAULT INDICATION
The displays below indicate possible fault situations.
Communication failure between RF remote control
and decorative fire. The symbol
flashes. The
distance between the decorative fire and the RF
remote control is probably too large. Hold the RF
remote control nearer to the decorative fire.
Fault of the decorative fire. The display shows an
F, followed by a 2-digit fault code. The symbol
flashes.
A so called lock-out fault of the decorative fire. On
the display an F, followed by a 2-digit fault code, is
shown. The text reset indicates that the decorative
fire can be reset. The symbol
flashes.
See also Terminate Lock-Out Failure.
20
Failure of the temperature sensor of the decorative
fire. The temperature sensor in the RF remote
control operates as normal. The text
and the
measured temperature are shown alternating. The
display shows this situation in case a time schedule
has been choosen.
Failure of the temperature sensors of both the RF
remote control and the decorative fire (or the latter
not present).
There is an automatic switchover to manual
operation with flame height control.
Terminating a Lock-Out Failure
A lock-out failure (the text reset is shown) of the decorative fire could
possibly be terminated. Press keys
and
simultaneously. The display
below is shown.
The symbol
indicates that it is possible to reset
the decorative fire. After the decorative fire has been
reset, the default display is shown. The decorative
fire can be reset 5-times per day at the most.
Note: Consult also the manual of your decorative fire or consult your
installer.
21
WARRANTY
This Honeywell product was produced with the most care and highest
quality demands.
Honeywell warrants this product, excluding batteries, for a period of 24
months from the date of purchase. This date must be included on a valid
proof of purchase.
This warranty covers manufactoring faults with respect to material,
components or finishing. Defects or malfunctions caused by wrong
application or treatment of this product are excluded from this warranty.
Claims to this warranty must always be made at the retailer of this
product.
22
Contents
DISPLAY AND KEYS
SET UP FOR OPERATION
2
4
Flame Symbol Batteries
Binding RF Remote Control
Time and Day
4
4
5
5
OPERATION
6
Manual Operation
Time Schedule
6
10
USER MENU
12
INSTALLATION MENU
15
Manually or Time Schedule
Setting Time and Day
Setting Time Schedule
12- or 24-Hours Representation
Time Schedule (1, 5/2, 7 days or
Day Time Periods (II, IV or VI)
Binding RF Remote Control
12
13
14
)
15
16
16
17
REPLACING BATTERIES
18
FAULT INDICATION20
Terminating a Lock-Out Failure21
WARRANTY22
23
Honeywell
EN2H-0035NL15 R0806