1
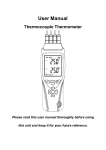
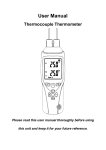
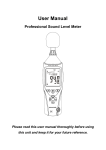
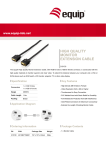
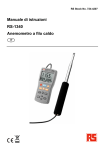
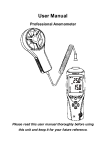
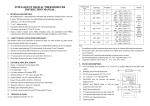
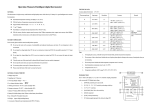
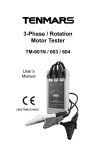
User Manual
Professional Anemometer
Please read this user manual thoroughly before using this
unit and keep it for your future reference.
Contents
1. Safety .......................................................1
2. Introduction ..............................................2
3. Features ...................................................2
4. Specifications ...........................................3
5. Meter Description.....................................5
6. LCD Display Description ..........................6
7. Operating Instructions .............................7
8. Notes...................................................... 11
9. Accessories ............................................12
1.
Safety
Read the following safety information carefully before
attempting to operate the meter.
Use the meter only as specified in this manual; otherwise,
the warranty may be invalidated.
◆ Environment conditions:
RH≤90%(Non-Condensation)
Operating Temperature: -20°C ~ 60°C
◆ Maintenance
Repairs or servicing should only be performed by ATP
Instrumentation Ltd.
Cleaning: Wipe the unit with a dry soft cloth. Do not use
abrasives or solvents on this instrument.
◆ Safety Symbol
Complies with EMC
1
2. Introduction
The Anemometer is designed for measuring air velocity, air
flow and temperature. 35mm high contrast easy-read
backlit LCD display with function indicators for air velocity,
temperature and air velocity level, shown at the same time.
3. Features
Circuit: based on fast and high accurate MCU design
High accuracy NTC resistance for air temperature
measuring
Air velocity bar graph indicator
Low voltage battery indication
MAX/MIN/AVG/HOLD function
2
4. Specifications
-30℃~60℃(-22℉~140℉)
0.4~30 m/s
0.8~58 Knots
1~67 MPH
80~5900 ft/min
Air Velocity Range
1.4~108 Km/h
Air Temp. Accuracy
±1.5℃(±2.7℉)
Air Velocity Accuracy
±3%±0.1
Resolution
0.1
Sampling rate
1 time per second
Operating temperature
-20℃~60℃(-4℉~140℉)
Operating humidity
<90%RH(Non-condensation)
Storage temperature
-30℃~60℃(-22℉~140℉)
Storage humidity
<80%RH
Air velocity level
level 0-16 with analog bar-graph
indication
Measurement average
average reading of the latest 10 records
Maximum / Minimum
MAX/MIN
Reading freezing
HOLD
Area set
0.001 ~9999 m 2 (0.001~ 9999ft2 )
Power Supply
1x 9V battery with type of 006P,NEDA1604
or IEC6F22
3
Auto power off
Automatically power off after approx. 15
minutes of inactivity
Display
4 digit 35mm LCD display
Battery life
at least 30 hours
Dimension(L*W*H)
158*62*32mm
Weight
292g
4
5. Meter Description
①Air Velocity Sensor
②LCD display
③Temperature Units Selection
④MAX/MIN/HOLD
Button
⑤Velocity Units Selection
⑥AVG/Backlight
Button
⑦Power ON/OFF
⑧Battery cover
5
6. LCD Display Description
①Timing shutdown Icon
②AVG Icon
③MAX Icon
④MIN Icon
⑤HOLD Icon
⑥Battery Icon
⑦Temperature unit
⑧Air Velocity Units: m/s,km/h,ft/min,knots (nautical miles
per hour), MPH
⑨Air Velocity readings
⑩×100 (100 times for air volume reading)
2
⑪Area units: m , ft
2
⑫Air flow units: CMM (cubic meters per minute),
CFM (cubic feet per minute)
⑬Air Velocity level indication
⑭Analog bar-graph indication for air velocity level
⑮Measuring temperature readings
6
7. Operating Instructions
Open battery cover and install a 9-volt battery in the battery
compartment.
Power ON:To turn the meter on, press the "
" button for
1 second until the LCD is lit, then release the button.
Power OFF:To turn the meter off, press and hold the
"
" button for approx. 3 seconds until the LCD is
switched off, then release the button.
“
” icon: When the low battery icon "
" appears,
replace the meter's battery.
(5)
Auto power off icon, the meter will automatically turn
off after approx. 15 minutes of inactivity.
(6) LCD Backlight: After turning the meter on, momentarily
press "
" button, the backlight will turn on/off. It will
automatically turn off after approx. 30 seconds of inactivity.
(7) Units selection: After enter measuring mode, press
“
” button to select desired units.
(8) HOLD: Press “
” button one time, “HOLD” icon will
appear on LCD, which indicates the reading is frozen.
7
Press the button again to exit HOLD mode.
(9) MAX/MIN: Press "
" button one time until "MAX"
icon appears on the LCD to view the current MAX reading;
press the button again, "MIN" icon will appear to view the
current MIN reading. To exit the MAX/MIN mode, press the
"
" button again.
(10) AVG Button: Press “
” button one time, ‘AVG’ will
appear on LCD and the meter will enter the average
measuring mode. The average reading of the latest 10
records will be displayed on the LCD.
(11)Temperature Units selection: Press"
"button to
select ℃ or ℉.
(12) Area Set
Press and hold the “
on, release ‘
” button and then power the meter
’ button when LCD displays, at the time
the display will show as following (Note: the area units can
be set by press “
” button for 3 seconds)
8
:
Set the area units as square centimeter (fig. as above)
Press“
”to increase the data,press“
”to decrease
the data
Set the area units as square meter (fig. as above)
Press“
” to increase the data , press“
decrease the data
9
”to
Set the area units as square feet (fig. as above)
” to increase the data , press“
Press “
” to
decrease the data
Press“
” to increase the data,press“
” to decrease
the data
Air volume
Air volume display x 100 the actual volume = displayed
data x 100
10
8. Notes
1)
This meter has already been calibrated before
delivery.
2)
Repairs or servicing should only be performed by ATP
Instrumentation Ltd.
3)
Remove the battery when the meter is to be stored for
long periods of time to avoid battery leakage.
11
9. Accessories
① Sensor
② User manual
③ 9V battery
12
ATP Instrumentation Ltd
Tournament Way
Ashby-de-la-Zouch
Leicestershire
LE65 2UU
Sales: 01530 566 800
[email protected]
Repair and Calibration: 01530 566 804
www.atp-instrumentation.co.uk
[email protected]