1
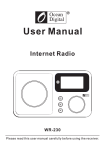
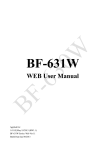
ENVIRONMENTAL PROTECTION
Do not dispose of this product with the normal household waste at the end
of its life cycle. Return it to a collection point for the recycling of electrical
and electronic devices. This is indicated by the symbol on the product,
user manual or packaging.
The materials are reusable according to their markings. By reusing, recycling or
other forms of utilization of old devices you make an important contribution to
the protection of our environment.
Please contact your local authorities for details about collection points.
This symbol indicates the presence of dangerous
voltage inside the enclosure, sufficient enough to
cause electric shock.
WARNING
Risk of electric shock
Do not open!
Caution: To reduce the risk of electric shock, do n ot remove the
cover (or back). There are no user serviceable part s inside. Refer
servicing to qualified service personnel.
This symbol indicates the presence of important
operating and maintenance instructions for the
device.
Safety, Environmental and Setup Instructions
•
Use the device in dry indoor environments only.
•
Protect the device from humidity.
•
Do not open the device. RISK OF ELECTRIC SHOCK! Refer opening and servicing to qualified personnel.
•
Connect this device to a properly installed and earthed wall outlet only. Make sure the mains voltage corresponds with
the specifications on the rating plate.
•
Make sure the mains cable stays dry during operation. Do not pinch or damage the mains cable in any way.
•
A damaged mains cable or plug must immediately be replaced by an authorized service center.
•
In case of lightning, immediately disconnect the device from the mains supply.
•
Children should be supervised by parents when using the device.
•
Clean the device with a dry cloth only.
Do NOT use CLEANING AGENTS or ABRASIVE CLOTHS!
•
Do not expose the device to direct sunlight or other heat sources.
•
Install the device at a location with sufficient ventilation in order to prevent heat accumulation.
•
Do not cover the ventilation openings!
•
Install the device at a safe and vibration-free location.
•
Install the device as far away as possible from computers and microwave units; otherwise radio reception may be
disturbed.
•
Do not open or repair the enclosure. It is not safe to do so and will void your warranty. Repairs only by authorized
service/ customer center.
•
Only use mercury and cadmium-free batteries.
•
Used batteries are hazardous waste and NOT to be disposed of with the household waste!!!
Return the batteries to your dealer or to collection points in your community.
•
Keep batteries away from children. Children might swallow batteries.
Contact a physician immediately if a battery was swallowed.
•
Check your batteries regularly to avoid battery leakage.
•
Batteries shall not be exposed to excessive heat such as sunshine, fire or the like.
•
CAUTION: Danger of explosion if battery is incorrectly replaced
Replace only with the same or equivalent type
EN 1
IR4000DAB / English Instruction Manual
Contents
Ⅰ Features/Technical Specifications……………………………………………3
Ⅱ Ma i n K e y s …… …………… ……………… ……………… ……………… ……3
Ⅲ Overall Menu Diagram……………………………………………………………4-5
IV Swich ON or Switch off………………………………………………………………5
V O p er a t i o ns ……………………………………………………………………5 -9
1.FM……………………………………………………………………………5-6
2.DAB……………………………………………………………………………6
3.AUX……………………………………………………………………………6
4.Internet Radio…………………………………………………………………6-7
5.Media Center……………………………………………………………………7-8
5.1 USB…………………………………………………………………………7
5.2 UPN…………………………………………………………………………7
5.3 My Playlist …………………………………………………………………7
5 .4 Cl ea r My P la yl is t……… ……………… ……………… ……………… …8
6.Local Radio……………………………………………………………………8
7.My Media U……………………………………………………………………………8
8.Informatio n Center…………………………………………………………8-9
8.1 Weather Information……………………………………………………8-9
8.2 Financial Information……………………………………………………9
8.3 System Informatio………………………………………………………9
VI Con fi gu rat i on ………………………………………………………………9 -14
1. Manage My Media…………………………………………………………9
2. Network…………………………………………………………………………9-10
3. date&Time……………………………………………………………………10
4. Alarm……………………………………………………………………………10-11
5. Language………………………………………………………………………11
6.Dimmer…………………………………………………………………………11-12
7.Sleep Timer……………………………………………………………………12
8.Buffer……………………………………………………………………………12
9. Weather…………………………………………………………………………12
10.FM Setup FM……………………………………………………………………12
11.Local Radio Setup …………………………………………………………12-13
12.Playback Setup………………………………………………………………13
13.DLAN Setup……………………………………………………………………13
14.Equaliser………………………………………………………………………13
15. Resume When Power On…………………………………………………14
16. Software Update……………………………………………………………14
17. Reset to Defaut………………………………………………………………14
VII Line out…………………………………………………………………………14
VI I I Bat te r y…………………………………………………………………………14
IX Caution ……………………………………………………………………………………14
X Technical Data……………………………………………………………………………15
XI Glossary ……………………………………………………………………………………15
EN 2
IR4000DAB / English Instruction Manual
I Features/Technical Specifications
◆Available for global stations by internet
◆Compatible with the audio of WMA/MP3/OGG
◆Support the digital Radio of DAB/DAB+ (BAND Ⅲ 5A-13F) and the FM Radio
◆With 240*320 RGB TFT screen
◆With the adapter of DC 5.5V 2000mA and build-in battery of 2000mA/HR
◆Access to available Wi-Fi Internet
II Main Keys
NO.
Button
1
ON/OFF
Function/Usage
Turn on or turn off the unit. (on the back of the unit)
The switch between standby and turn on.
2
3
MENU
Show menu for the current mode.
4
MODE
Cycle through the modes: Internet Radio, Music player,
DAB, FM, Aux in and etc.
5
FAV
6
To save and take out the radio stations.
SELECT/ Confirm, Tune up or down.
VOLUME
7
LEFT
8
RIGHT
Turn left or return the upper menu.
Turn right.
9
Go up.
10
Go down.
EN 3
IR4000DAB / English Instruction Manual
III. Overall Manu Diagram
Manage my media
Network >
Date & Time >
Set Date and Time
Set Time Formart
Set Date Formart
Daylight Saving Time(dst)
GMT(**:**)
Alarm >
Alarm 1 (Turn off) >
Alarm 2 (Turn off) >
NAP Alarm 1
Alarm Volume
Language
Menu
Configuration
>
Show On Standby
Temperature Unit
Set Location
Mode
Local Radio Setup >
Manual Setup
Auto Detect
Playback Setup >
Off
Repeat All
Repeat one
Shuffle
DLAN Setup(DLAN) >
Equalizer
Local Radio
My Media U
Internet Radio
Media Center >
Turn On
Turn Off
Turn On
Turn Off
Power Saving
Turn On
Dimmer >
Sleep Timer
Buffer
Weather >
FM Setup >
Menu
Wireless Network Configuration
Wireless Network(WPS PBC)
Manual Configuration
Check Network when Power on
Resume When Power On >
Software Update
Reset to Default
Rename(AirMusic)
On
Off
USB
UPnP
My Playlist
Clear My Playlist
FM
DAB
Information
Center >
I Radio >
DAB
Mode
FM
Weather Information
Financial Information
System Information
My Favorite
Radio Station/Music
Local Radio
History
Service >
AUX
USB
EN 4
Searsh Radio Station
Add New Radio Station
IR4000DAB / English Instruction Manual
Ⅳ Switch ON or OFF
Plug the adapter into the hole of DC IN(on the back of the product) and press the
‘ON/OFF’ switch to ‘ON’, then the logo ‘Welcome’ will be shown on the screen,
meanwhile, the radio will scan the available Internet automatically. You can use the
or
to choose the Internet, then press SELECT to enter the Internet.
button
Tips:
●When you need input the Internet password, please press
or
to choose the
characters (you can refer to the last page for the details of characters).
●In this condition, Press LEFT can turn left and delete the left characters at the same
time.
Note: Below characters are available for the radio:
●Numbers (from 0 to 9)
●English Letters (from A to Z and from a to z)
●Other characters (DEL, @, Blank,!,”,#,$,%,&,’,(,),*,+, )
Tips:
●Press LEFT button will turn left and delete the left characters at the same time.
●When inputting the characters, press RIGHT, LEFT,
to choose the character.
or
ⅤOperations
1 FM
● Choose stations by hand
Press MENU→press LEFT or RIGHT button to choose
FM→press SELECT to enter the interface of FM→press
or
to choose station (press once, the station
changes 0.05MHZ) →SELECT to enter the station.
● Choose stations automatically
Steps: MENU→press LEFT or RIGHT button to choose
FM→press SELECT to enter the interface of FM→press
LEFT or RIGHT→press SELECT to search stations
forwards or backwards automatically(If searched, it will
stop automatically and play the programs of the
searched stations)
Tips:
●For favorite stations and on the mode of FM, long press
‘FAV’ till the screen shows the remark of saving stations,
or
to choose the saving location
then press
number and press “SELECT” to save it and enter the
station.
●It can save 20 stations at most.
EN 5
IR4000DAB / English Instruction Manual
2 DAB
Press MENU→press LEFT or RIGHT button to choose DAB/DAB+ →press SELECT
to enter the interface of DAB/DAB+(It will search the DAB/DAB+ stations automatically.
After search, it will show the names and numbers of the searched stations)→ press
or
to choose station→press SELECT to enter the station.
Tips:
1) In the mode of DAB/DAB+ and choose the station by SELECT, press LEFT ,it will
show ‘Delete station list?’on the screen.
●Choose ‘YES’ means to delete the existing stations, then search new stations, later
the name and number of new stations will be shown on the screen.
●Choose ‘NO’ means not to delete the existing stations, meanwhile do the search and
add the new-searched stations into the station list without repeat stations.
2) When playing program, press SELECT will stop
playing and go back to the playlist.
3 AUX
Fuctions: To set up the playing mode of program with
audio outlay
Press MENU→press LEFT or RIGHT button to choose
AUX→press SELECT to enter the interface of AUX.
Tips: On the mode of AUX, you can plug the audio line into the hole of AUX IN (on the
back of the product), then you can play the Medium.
4 Internet Radio
Functions: To set up the play mode of Internet radio
Steps: Press MENU→press LEFT or RIGHT button to
choose ‘Internet Radio’→press SELECT to enter the
interface, then below choices will be shown on the
screen:
1) My Favorite
4) History
2) Radio Station/Music
5) Service
3) Local Radio
Tips:
●When playing program, press SELECT will stop playing and go back to the playlist.
●On the mode of Internet Radio, the internet must be available.
●The acquiescent Internet server is http://www.mediayou.net.
●Able to search the Internet stations all over the world and play local radio stations
fast.
EN 6
IR4000DAB / English Instruction Manual
5 Media Center
5.1 USB
Functions: Play the audio medium by USB , which is
compatible with the files of WMA/MP3/AAC/AAC+/
FLAC/WAV.
Steps: Press MENU→press LEFT or RIGHT button to
choose ‘Media Center’→press SELECT to enter the
or
→enter it by
interface →choose ‘USB’ by
SELECT
Tips:
●After plugging the USB, there will be a USB mark showing on top right corner of the
product(which is changed with the battery mark by turns)
●compatible with USB 2.0 and lower versions
● For the setup of play, please refer to the Playback setup in Configuration
5.2 UPNP
Fuctions: Play the media in computer
Steps: Press MENU→press LEFT or RIGHT button to
choose ‘Media Center’→press SELECT to enter the
interface →choose ‘UPNP’ by
or
→enter it by
SELECT
Tips:
●You must install the software of ‘Windows Media Play
11’ (or upgrade versions) or Twonky Media in your
computer, which is necessary for the UPNP operation.
Note: In ‘Windows Media Play’, you should get the media to share in your playlist
(tick the ‘shared media’ and make it shared in setup ),then confirm and exit it.
●Your computer must be available to the Internet.
●The media must be put in your playlist.
●Your computer must be allowed to be linked with others(You can set up it in
‘Windows Media Play’ by hand or automatically)
5.3 My Playlist
Steps: Press MENU→press LEFT or RIGHT button to choose ‘Media Center’→press
or
→enter it by
SELECT to enter the interface →choose ‘my playlist’ by
SELECT.
Tips: In the UPNP model, when Playing you can long press SELECT to put the chosen
file into your ‘my playlist’.
5.4 Clear My Playlist
Steps: Press MENU→press LEFT or RIGHT button to choose ‘Media Center’→press
or
→enter it by
SELECT to enter the interface →choose ‘Clear My Playlist’ by
SELECT
Tips: By cutting off the power, the files of your ‘my playlist’ will be cleared
automatically.
EN 7
IR4000DAB / English Instruction Manual
6. Local Radio
Fuctions: To setup the list or menu of Local Radio
Steps: Press MENU→press LEFT or RIGHT button to
choose ‘Local Radio’→press SELECT to enter the
interface →choose ‘the station of local radio’ by
or
→enter it by SELECT.
Tips: The stations are created by the setup of ‘Local
Radio Setup’ in ‘Configuration’
7. My Media U
Fuctions: Fastly play the program of internet radio per the personal playlist
Steps: MENU→My media U→Select
Tips: For the first time, you need register in
http://www.mediayou.net and set up related data before
you use it, otherwise the display will show info to
reminder you not to connect the internet.
8. Information Center
Fuctions: Check the weather all over the world; browse
the stock status of main stock exchange globally; show
the system info of the Unit.
Steps: Press MENU→press LEFT or RIGHT button to
choose ‘Information Center’→press SELECT to enter the interface →choose the item
by
or
→enter it by SELECT
8.1 Weather Information
●Press SELECT, it will enter the interface for you to choose whether ‘Add to Standby
Display’ or not; if Press SELECT, it will be in the model of Standby Display.
●In the interface of city weather, you can check the weather in recent 4 days by
or
.
●On the mode of Standby and with the display of weather forecast open,’ the present
EN 8
IR4000DAB / English Instruction Manual
time’ and the present weather will be shown by turns in every 10 seconds. Or You can
press SELECT to do the switch quickly.
●Above should be with available internet.
8.2 Financial Information
Tips: On the interface of ‘Financial Information’, you can aim at your interested items
by cursor, then the related
information will be shown
automatically.
8.3 System Information
Fuctions: To check the
software version, the
MAC,ID and IP of the
Wireless Internet.
Ⅵ Configuration
Fuctions: To set up Network, Alarm, Date &Time,
language, Weather, Dimmer and etc.
Steps: Press MENU→press LEFT or RIGHT button to
choose ‘Configuration’→press SELECT to enter the
or
→enter it by
interface →choose the item by
SELECT
Tips: Press LEFT button can return to the upper menu.
1. Manage My Media
Tips: ‘Enable’ means to manage my media ; ‘Disable’
means not to manage my media
2. Network
2.1 Wireless Network Configuration
Tips: It can search the wireless network automatically and
show the searched list of network, then press SELECT to
link it.(If the network is with password, you should input
the password)
2.2 Wireless Network (WPS PCB)
Tips: When choosing WPS PCB, it will show ‘Please
press the WPS button on your router within 120 Seconds,,
you must press the WPS button of Router, then the
network in both sides will be linked automatically.
2.3 Manual Configuration
Steps: Press
MENU→Configuration→Network→SELECT→choose
or
→SELECT>
‘Manual Configuration’ by
Wireless> SELECT→then three items in the list (DHCP,
Enter SSID, Manage)
Tips:
●In the model of ‘ON’(DHCP) ,the unit will check the IP
address of wireless network and link the network
automatically.
●In the model of ‘OFF’(DHCP) ,the unit will check the IP address of wireless network
and link the network automatically.
2.4 Check Network when Power On
EN 9
IR4000DAB / English Instruction Manual
Fuctions: When ‘Power On’, choose ‘Enable’ to check the status of network link
automatically; choose ‘Disable’ not to check it.
Tips: If the network is not linked on the model of ‘Enable’, it will automatically show the
choices for you to set up the network.
3 Date &Time
Steps: Press MENU→Configuration->press
or
button to choose ‘Date & Time’→press SELECT to
enter the interface →choose the item by
or
→enter it by SELECT.
3.1 Set Date and Time
3.2 Set Time Format
Tips: The format of 24 hour is acquiescent.
○ 12 Hour
○ 24 Hour
3.3 Set Date Format
Tips: The format of DD/MM/YY is acquiescent
○ YY/MM/DD
○ DD/MM/YY
○ MM/DD/YY
3.4 Daylight Saving Time (DST)
○ ON
Tips: On the model of ‘ON’, the time will be one hour more than the actual time.
○ OFF
Tips: On the model of ‘OFF’, the time will be same as the actual time.
(If it was on the model of the ‘Daylight Saving Time(DST)’and you choose ‘OFF’, the
time will be deducted one hour, that’s to say ,the time will be same as the actual time. )
3.5 GMT(HH: MM AM)
On the model of ‘Internet Radio’ without internet, the time will be set up automatically.
With internet, it will show the GMT time. If have setup the time, it will indicate the
current time(current GMT time plus the time difference)
Tips: For this item, it can be only browsed without the function of revision.
4. Alarm
To set up three alarms (Alarm 1, Alarm 2, NAP Alarm) and the Alarm Volume
Tips:
●The time of NAP Alarm is from 5 minutes to 120 minutes. And after the setup of the
NAP Alarm, it begins to count the time reversely until the time is over, then it will switch
to the Standby model automatically and rings.
●When alarm rings, it will enter the display of ‘Standby’ automatically.
●You can set up the alarm volume by ‘Alarm Volume’( Volume 15 is acquiescent )
●If you press any button when alarm rings, the alarm will be closed and enter the
model of Standby with 5 minute SNOOZE.
button ,it will exit the model of SNOOZE.
●To press
●After the alarm setup, you should exit it, then the new
setup can come into use.
●Two alarms won’t ring at the same time.(Only after one
alarm stop ringing, another alarm can be used)
4.1 Alarm 1
Turn On
EN 10
IR4000DAB / English Instruction Manual
Turn off
4.1.1 Repeat: To set up the Alarm Date
The choices are as below:
-Everyday
-Thu
-Once
-Fri
-Mon
-Sat
-Tue
-Sun
-Wed
Tips:
●When choosing ‘everyday’, it will select the day from Mon. to Sun.
or
button and press SELECT to confirm it, then
●To choose the item by
press LEFT to return the upper menu.
4.1.2 Time: To set up the Alarm time
4.1.3 Sound: To set up the Alarm sound
1) Beep
2) Melody
3) Internet Radio
4) FM
5) DAB/DAB+
Tips: There are 5 kinds of sound for the Alarm and Melody is acquiescent
5 Language
Steps: Press MENU→Configuration→press LEFT or
RIGHT button to choose ‘Language’→press SELECT to
or
enter the interface →choose the item by
→enter it by SELECT
Tips: It can support 8 Languages ( English,Deutsch,
Francais(France),Nederlands,Pyccknn,Svenska,
Norske,Dansk and Deutsch is acquiescent
6 Dimmer
Functions: To set up the brightness of the Unit display
Steps: Press MENU→Configuration→ press LEFT or
RIGHT button to choose ‘Dimmer’→press SELECT to
enter the interface →choose the item by
or
→enter it by SELECT to set up the brightness by LEFT
or RIGHT button
Tips: They are two items for your choice (‘Power Saving’
and ‘Turn On’)
① Power Saving
② Turn On
7 Sleep Timer
Functions: To Power off the unit automatically by setting
up the sleep timer
Steps: Press MENU→Configuration→Sleep
Timer→SELECT to set up the time of sleep timer
Tips: The time range is from 15 minutes to 180 minutes.
EN 11
IR4000DAB / English Instruction Manual
8 Buffer
Steps: Press MENU→Configuration→Buffer→SELECT
to set up the buffer from 2 seconds to 8 seconds.
9 Weather
Functions: To show the current weather of selected city on
the model of Standby
Steps: Press MENU→Configuration-> Weather->
SELECT to choose the city and below items are for your
choice:
9.1 Show ON Standby: To turn on or turn off the setup
9.2 Temperature Unit: To set up the Temperature Unit by
Centigrade or Fahrenheit
9.3 Set Location
To set up global city weather showing on the model of
standby
Tips : Choose ‘district’->‘country’ ->‘city’->press SELECT
to confirm it and show‘ADD to Standby Display’.
10 FM Setup
Steps: Press MENU→Configuration→ FM
Setup→Mode->SELECT to choose the status of FM
Radio by ‘Set Mono’ or ‘Set Stereo’
11 Local Radio Setup
Steps: MENU→Configuration-> Local Radio Setup
->SELECT to choose the status of Local Radio(The
station of Local Radio is decided by the Internet IP
address)
11.1 Manual Setup
Steps : MENU> Configuration> Local Radio Setup>
Manual Setup->choose ‘district’ →‘country’ to enter the
interface→press SELECT(‘Save as local Radio’) will show
on the display →confirm it by SELECT and it will return the
upper menu automatically
11.2 Auto Detect
Steps : MENU> Configuration> Local Radio Setup> ‘Auto Detect’ to check the
stations of Local Radio automatically.
Tips : It will create the radio station of local Internet automatically as per the local and
national ID
12 Playback Setup
Steps: MENU> Configuration> Playback Setup> SELECT to choose the play status
12.1 OFF
‘OFF’, means to just play the chosen item.
12.2 Repeat all
EN 12
IR4000DAB / English Instruction Manual
‘Repeat all’, means to play all the items in your playlist repeatedly.
12.3 Repeat One
‘Repeat one’, means to play the chosen item repeatedly.
12.4 Shuffle
‘Shuffle’, means to play all the items in your playlist at
random.
13 DLNA Setup
Rename (Air Music)
If using the PC, Win 7 will support the DLNA.
If using Samsung Smart Phone, it is with build-in DLNA
If using other Samsung Smart Phone, you can download
the APP like Bubbleupn or Skifta to use the DLNA.
14 Equalizer
Fuction: ‘Equalizer’ can strength the music impact
on-site
Steps: MENU→Configuration→Equalizer→SELECT
to choose different music impact (Normal→Flat→Jazz
→Rock→Movie→Classical→POP→News
15 Resume When Power On
Steps: MENU→Configuration→Resume When Power
On→SELECT to choose ON or OFF:
‘On’, means to continue the mode automatically when
the power was off
‘OFF’, means not to continue the mode and just show
the main menu when the power was off
16 Software Update
It’s just used for production and maintenance.
CAUTION: Before starting a software upgrade,ensure
that the unit is plugged into
a stable mains power connection. Disconnecting power
during a software may permanently damage the unit.
17 Reset to default
Choose this item, it will show ‘Are you sure to reset to
default setting’
‘YES’, It will delete all your present setup and resume to
the original mode.
‘NO’, It will keep all your present setup and return to the
upper menu.
EN 13
IR4000DAB / English Instruction Manual
Ⅶ Line out
You can switch the radio’s medium onto other speakers by a
3.5mm audio line.
Tips : By doing so, you can control the media volume only by
other speakers
Ⅷ Battery
●It’s with build-in battery of 2000mA/HR, which will be charged fully for 4 or 5 hours.
●The power flow of battery is 500mA±100mA.
Tips : When connecting to the adaptor, the battery will be charged
Please note below symbols :
, To show the electric capacity of the battery
, To show the battery is charging
, To show the battery is charged fully
, To show the battery is short of battery and will be power off with blank screen in
about one minute.
Tips:
●Charged fully, the battery can be used for about 3 hours with medium volume.
●Long time not to use the radio, you’d better slide the switch(on the back of the
product) to OFF and pluck the power.
●When the power is OFF, the battery will be charged with the connection to the DC
adaptor but there will be no hint for the TFT.
Ⅸ Caution
●Not allowed to be put in fire in case it’s exploded.
●The unit will be reset to default mode by electromagnetic interference in dry
environment, which has no effect on the normal operations.
EN 14
IR4000DAB / English Instruction Manual
ⅩTechnical Data
Input voltage ,current : 5.5V 2A
Power consumption: max. 12W
Radio Frequency range:
FM (87.50MHz – 108.00MHz , 50KHz/step)
DAB (Band III, 174.928MHz – 239.200MHz)
Store temperature::-10 ~ +60 ℃
Operating temperature: +5 ~ +40 ℃
Ⅺ Glossary
DAB
Digital Audio Broadcasting
FM
Frequency Modulation
UPnP
Universal Plug and Play
DLNA
Digital Living Network Alliance
AUX
Line Input
Hereby, Wörlein GmbH declares that this device is in compliance with the essential
requirements and other relevant provisions of Directive 1999/5/EC.
A copy of the Declaration of Conformity may be obtained at the following location:
Wörlein GmbH, Gewerbestrasse 12, D 90556 Cadolzburg, Germany
© by Wörlein GmbH
EN 15