1
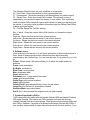
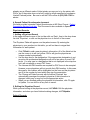
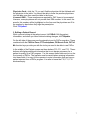
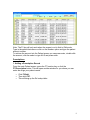
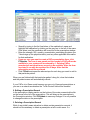
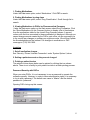
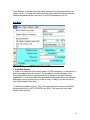
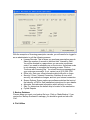
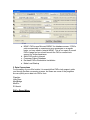
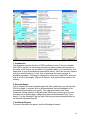
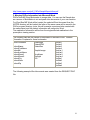
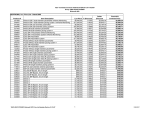
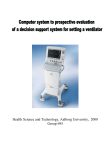
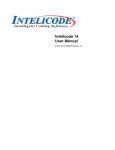
Patient Assistance Program Rx Software User Manual
(Version 1.0)
Introduction
1. Keyboard Operation
2. Software Icons
3. Printers supported by PAPrx
4. Sample Patient Questionnaire document
Physician Records
1. Adding a physician record
2. Editing the physician record
Patient Records
1. Adding a patient record
2. Step-by-step Data Entry
3. Editing a patient record
4. Deleting a patient record
5. Entering notes
6. Finding a patient record
Prescriptions
1. Adding a prescription record
2. Editing a prescription record
3. Deleting a prescription record
4. Using the ‘Tell Me’ function
5. Quick set order date, received info, dispense date
6. Quick set renew date on multiple prescriptions
7. Renewing/copying prescriptions
8. Printing prescriptions/PAP forms
9. Entering payment to multiple prescriptions
10. Understanding the @ code on the form name
Medications
1. Finding medications
2. Finding medications by drug class
3. Viewing medications in PAPrx by pharmaceutical company
Invoicing
1. Set all medication charges
2. Setting a patient account so they are not charged
3. Printing a patient invoice
File Menu
1. Auto Web Update
2. System Options
1
3. Backup Database
4. File Utilities
5. Data Conversion Tools
PAPrx Report Menu
1. Introduction
2. Renewal Reports
3. Additional Reports
4. Merging PAPrx information into Microsoft Word
Networking PAPrx
1. General Information
2. Peer-to-Peer Installation
3. Shared Server Directory
4. Cytrix Installation
To report errors to PAPrx Programming,
phone: (512) 306-1780
To request functions from PAPrx Programming,
fax: (512) 306-1926
Please check with www.paprx.com for updates to this manual!
Introduction
When you open the software, the main Patient Screen appears. All PAPrx
functions are available from here. There are only a few keys you need in order to
enter data into PAPrx software. You can type the function keys on your keyboard
(F1-F9) or mouse-click the corresponding buttons on the computer screen,
whichever is easiest for you.
1. Keyboard Operation
F1 - Medication list.
F2 - Search : Searches for the current record or opens a look-up window to cross
reference a code.
F3 - Add : Begins the process to create a new record. The Add process ends
with pressing the F3/Update key or is stopped by pressing the Cancel key.
F4 - Edit : Begins the process to change or modify an existing record. The Edit
process ends with pressing the F3/Update key or is stopped by pressing the
Cancel key.
F5 - Refresh : Looks up displayed data.
2
The following Function Keys are only displayed on a few forms:
F6 - Print Form : Shows the window to print a prescription form.
F7 - Prescriptions : Shows the window to add prescriptions to a patient record.
F8 - Screen Print : Prints the current PAPs screen. This will print a color (if
supported by your printer) image of the screen to your printer. This is primarily
used to provide PAPrx technical support with a picture of what you are seeing on
the screen. If you wish to print a patient information page the Patient Face Sheet
is faster and more legible.
F9 – Tell Me: Shows the ‘Tell Me’ window.
Esc - Cancel : Stops the current Add or Edit function or it closes the current
window.
Page Up : Shows the first record in the current window.
Left Arrow : Shows the previous record in the current window.
Up Arrow : Shows the previous record in the current window.
Right Arrow : Shows the next record in the current window.
Down Arrow : Shows the next record in the current window.
Page Down : Shows the last record in the current window.
2. Software Icons
Look to the left of the screen. You will see a vertical line of boxes with pictures in
them. Each of these buttons perform various functions that are usually
reproduced by the function keys. You can use the icons if it is easier for you to do
so.
Printer: Printer setup—this option allows you to select the target printer for
printouts.
Cross: enter prescription
Rx Bottle: medications
Blue Circle: query another
Man: physicians table
Paper: patient note
Document: print 1 page patient face sheet
Letter: print request letters
Dollar Sign: print invoice to patient
Label: mailing labels
Yellow Printer: print selected/today’s forms for this patient
Large Rx: print Rx form for prescription selected
Question Mark: trace status dates
Red X: Exit—click this and the program ends, all data is saved.
3. Printers Supported by PAPrx
PAPrx has been fully tested with the Hewlett Packard R60 and Hewlett Packard
700 series DeskJet. We believe the PAPrx program will work well with any
Hewlett Packard DeskJet or Inkjet printer. Other printers might work perfectly well
with PAPrx. However, if a printer of a different make does not work with PAPrx it
may not be a simple matter to make the printer work with the form creation. If you
3
already own a different make of Inkjet printer we urge you to try the printer with
PAPrx, but if the printer does not work it might be more expedient to purchase a
Hewlett Packard printer. Be sure to call the PAPrx office at (512) 306-1780 for
advice.
4. Sample Patient Questionnaire document
We have provided a sample Patient Questionnaire in MS Word Format - Patient
Prescription Service Form.doc. This Document is also available in Spanish.
Physician Records
1. Adding a Physician Record
In the upper left hand corner of the tool bar click on ‘Data’, then in the drop down
list click ‘Physician’, or click on the physician icon to the left of the screen.
The Physician Table will appear over the patient screen. By entering the
physicians in your practice into this table, you will not have to retype their
information for each patient.
•
•
•
•
•
Click F3/Add to add a new physician’s information. All of the fields but the
one the cursor is in will turn yellow. PAPrx will give the physician an
'unique number' automatically.
Use the drop box for the designation. If the appropriate designation is not
an option the professional designation will not be an option on most PAP
forms. You may type in a designation that is not displayed in the drop box
but it will not appear on many PAP forms.
The License and DEA number are required for PAP forms to be accepted.
However, some physicians will not provide their DEA number. In this case,
the area for this number will be highlighted on the form and the physician
can fill in the number by hand when they sign the prescription.
The ‘Change all Patient records with the above Physician’ box
automatically reassigns the patient’s physician if the information is
changed, which may or may not be the appropriate action.
When you are finished adding the physician’s information, click F3 again
to Update. You can hit Esc at any time to cancel.
2. Editing the Physician Record
While you are looking at the physician record, hit F4/Edit. Edit the physician
information, and when you have finished making changes, hit F3/Update.
Patient Records
4
1. Adding a Patient Record
Type or click on F3/Add. A new patient ID is automatically assigned and all of the
fields except for the one the cursor is in will turn yellow.
5
You will also notice that the F3 button now says ‘Update’. Begin typing in your
patient’s information. Any information can be edited at any time, so don’t worry
about making a mistake, especially as you are getting started. You may also
cancel at any time before you have updated by hitting Esc/Cancel. When you
are finished, hit F3 again. The patient record has now been created. To edit the
record, hit F4/Edit and when you have finished making changes, F3/Update.
2. Step-by-Step Data Entry
Click 'F3/Add'.
The ID will be added automatically.
Enter Last Name, First Name, MI, Address, Phone, Number of People in
House, Marital Status (M,S,D,W), Sex, Date of Birth (make sure you use
MM/DD/YY), SS# .
Referred by (this is not used on PAPrx forms, it is only for tracking referrals. A
report will be added to give you these statistics.
Primary Insurance
Source of Income - You can use the drop down box for or type in the selection.
Monthly - is the Monthly Income. If you have the annual income divide the
amount by 12.
Year - This year should match the year the patient provides Proof of Income
(POI).
Rx Card - If the answer is Yes the patient will be rejected from PAP programs.
6
Physician Code - click the ? if you can't find the physician hit the Add and add
the physician to the table. You should be able to enter the practice physicians
into the table once then used the table in the future.
License & DEA – These numbers are required for PAP forms to be accepted.
However, some physicians will not provide their DEA number. In this case, the
area for this number will be highlighted on the form and the physician can fill in
the number by hand when they sign the prescription.
Click 'F3/Update'.
3. Editing a Patient Record
While you are looking at the patient record, hit F4/Edit. Edit the patient
information, and when you have finished making changes, hit F3/Update.
On the left side of the screen are the principle icons for PAPrx operation. These
combined with the F6/Print Form, F7/Prescriptions, F8/Screen Print, F9/Tell
Me function keys provide you with the tools you need to be able to use PAPrx.
In the middle of the Patient screen are three buttons F10, F11, and F12. These
buttons will display additional information that is not always necessary for a
patient to qualify for a PAP program. For this reason these fields are not on the
front screen of PAPrx. The operator must be careful when entering information
into these fields. It is easy for the operator to enter information that can have a
patient rejected from a PAPrx program. It is safer to leave the F10, F11, F12
windows empty.
7
However, it is not always possible to leave these fields empty, especially the F12
Detail Financial Information. See below.
On the Patient main screen the POI (Proof of Income) column indicates if you
must provide the patients Proof of Income. It is not always possible to leave
these fields empty. Some PAP forms require you to enter something on the
financial information fields or provide a reason why the amounts are all zero.
4. Deleting a Patient Record
When a patient is added it is assigned a unique ID number which cannot be
deleted. However, since any of the information can be edited, the ID number can
be used for another patient. If you are absolutely sure you want to delete a
patient, just change the patient information to a different one. Recycle!
5. Entering Notes
To enter notes on the patient account click the ‘Patient Note’ button. These
notes are for internal office account information. It is not used on medication
forms.
6. Finding a Patient Record
From the main Patient screen, press the F2 function key or click the F2? button.
The patient search window will appear.
8
Note: The F2 key will only work when the screen is not in Add or Edit mode.
Type in the patient last name or click on the Number option and type the patient
account number.
To retrieve the account into the Patient screen you can press enter, double-click
the account, click the select or type Alt-S and press enter.
Prescriptions
1. Adding a Prescription Record
From the main Patient screen, press the F7 function key or click the
F7/Prescription button. This will open another window for you where you can
enter the drugs your patient needs.
•
•
•
Click F3/Add.
Then click F2?.
This will bring up the Rx lookup table.
9
•
•
•
•
Search by typing in the first few letters of the medication’s name and
highlight the medication by clicking on the grey box to the left of the name.
Click select, and the medication will be moved to the prescription window.
Enter the strength, SIG, quantity, renewal date, prescribing physician (the
? box brings up the physician table), and any other applicable information
for that medication.
If you are sure you want to create a PAPrx prescription form, click
F3/Update. The form is now saved and the number of PAPrx Records
available in your system will be reduced by 1. Deleting PAPrx
records does not permit more records to be available. After the form
is printed it can only be reprinted for 45 days. After that the
prescription must be re-entered.
Click F3/Add and repeat the above steps for each drug you want to add to
that particular patient.
When you are finished with that particular patient’s drug list, close that window
and the patient screen will automatically refresh.
If your PAPrx is in Demo mode because you are out of licensed prescriptions or
you are on a network workstation the ‘To Be Printed’ field will be checked.
2. Editing a Prescription Record
In the prescription viewing section on the bottom of the main screen double-click
on the arrow to the left of the prescription. This will bring up the prescription in
the Prescription window. Click F3/Update to save any changes. It is not possible
to change the date on the prescription.
3. Deleting a Prescription Record
While it may initially seem attractive to delete certain prescription records, it
should not be necessary to delete a prescription at all in most cases. If a
10
prescription is entered incorrectly, simply go back into the window for that
prescription and edit it to a different drug, dosage or physician. If you have
entered a duplicate prescription, simply do not print it and it can be used as a
renewal. If that particular patient will not be needing a renewal of that medication
or any other medication, then highlight the prescription, right click over it, select
‘delete prescription’ and click on ‘yes’ in the delete prescription box. The
prescription should be deleted from the list of medications, but you can still view
the prescription by checking the ‘show deleted’ box.
4. Using the ‘Tell Me’ function
To turn off the 'Tell Me' option on Print Form.
The Tell Me function is very useful but can be unnecessary as a popup for the
experienced operator. If you select the 'Turn off...' option the Tell Me window will
not appear automatically. The User can still click the 'Tell Me' option in PAPrx to
see the information on demand.
5. Quick set Order Date, Received Info, Dispense Date
You can set the Order date, Received Info and Dispensed date on one or several
prescriptions in much the same way as you copy prescriptions. In the image
above you see three prescriptions selected. You do this by pressing the Ctrl key
while clicking on the black arrow on the left of the prescription. The date in these
fields will be set to today's date.
This allows you to enter the Lot Number and the Quantity Received on the
Prescriptions. There is a report for ‘Prescriptions by Lot #’ for tracking.
6. Quick set Renew Date on multiple prescriptions
The Renew Date operates exactly like the other prescription menu options
except that a sub-menu with options for 60 and 90 days is presented to
determine the Renew Date used. See Record Counts, how much data is in the
system for additional information.
7. Renewing/copying prescriptions
When patients return for prescription renewal you can copy prescriptions instead
of re-entering the prescription. Using this function you can renew several old
prescriptions quickly. Select more than one prescription at a time by pressing the
Ctrl key while clicking on the black arrow to the left of each prescription.
After you have selected the prescriptions you right-click on the prescriptions to
popup the menu with 'Copy Prescriptions'. Clicking on 'Copy Prescriptions' to
have the selected prescriptions re-entered with today's date. The Renew date,
Print date, and Re-Print date are not copied.
NOTE: When you copy prescriptions they should appear in the patient’s
prescription table immediately. If they do not appear, please do not assume that
they did not copy and re-copy those prescriptions. First, search for a different
11
patient and/or exit PAPrx and then look at the account again. It is far more likely
that the view did not refresh correctly than that the prescriptions did not copy.
8. Printing prescriptions/Rx forms
To print the forms from the main patient screen, highlight the line of the
prescription you want to print the form for by double-clicking the grey box to the
left of it, then press the print form key.
• To print forms or prescriptions to the computer screen instead of directly to
the printer, look at the patient face sheet. To the right of the patient’s name and
F2 search button are the Printer/Preview buttons. Select Preview to have all
“printed” documents appear on the screen instead of going to a printer.
• Hit the "Print Form" key, and a window will appear with the form and another
screen will appear with 'Tell Me' notes specific to the Drug Company you are
submitting forms to.
• You may also print PAP forms from the Prescription entry window.
• When you preview a form it does not reduce the number of forms printed for
that PAPrx record.
9. To enter a payment to multiple prescriptions easily:
When a patient pays for a prescription you can enter a dollar amount to several
prescriptions with the Disburse Payment function instead of editing each
prescription with a payment. Using this function you can enter the same dollar
amount as payment to several prescriptions at the same time. Select more than
one prescription at a time by pressing the Ctrl key while clicking on the black
arrow to the left of each prescription.
After you have selected the prescriptions you can right-click on the prescriptions
to popup the menu with 'Copy Prescriptions' and 'Disburse Payment.' Clicking on
'Disburse Payment' makes the following window appear.
In this window enter the Payment Amount, Form of Payment and press the Done
button. The dollar amount, today's date and the Form of Payment will be entered
to on each prescription selected. Take note that the exact dollar amount will be
entered on each prescription. The payment will not be spread across all existing
prescriptions.
10. Understanding the @ code before the form name:
When you are entering prescriptions you will notice that some forms have a @
before the form name. This is a code for the user to know that there is
something special about the form. When you see the @ before the form name,
you must use the original form from the company. PAPrx software will, however,
fill out the form with all the data in the correct places.
Medications
12
1. Finding Medications
Under the Data menu option, select ‘Medications’. Click F2? to search.
2. Finding Medications by drug class
Under the Data menu option, select ‘Drug Classification’. Scroll through list to
search.
3. Viewing Medications in PAPrx by Pharmaceutical Company
Under the Data menu option on the main screen select Drug Companies. Click
the 'Show Medications for this Company' button to display a list of medications
from the medications table for the current Drug Company shown. A second
column with the form connected to these medications is displayed. Although you
cannot change records created by the PAPrx main office, we do encourage you
to fax us with any changes or updates you might encounter. We will then update
the Knowledgebase on the Internet. Fax changes in medications or PAP
coverage to (512) 306-1926.
Invoicing
1. Set all medication charges
See ‘Security / Prices / Internet Connection’ under ‘System Options’, below.
2. Setting a patient account so they are not charged
3. Printing a patient invoice
The patient invoice shown below can be printed by clicking the icon shown
above. There is not a facility to print patient invoices in a batch printing process.
Password Security with PAPrx
When you enter PAPrx, it is not necessary to use a password to operate the
software normally. However, in order to have administrative rights, it is necessary
to log in with a password. The default user name is “Master” and the default
password is “password”.
Opening PAPrx brings up this screen:
13
Type “Master” in the user name field and “password” in the password field, as
shown. Hit OK. You now have administrative rights within the software and can
change the password and user name if you find it necessary to do so.
File Menu
1. Auto Web Update
In order to be using the most recent version of PAPrx software, it is necessary to
download updates over the Internet. These updates contain changes to the
Patient Assistance forms, improvements to the software, and new reporting
capabilities. It is recommended that users download updates about once a week,
although a pop-up will remind you to do so every 14 days if you do not run an
Auto Web Update before then.
To download updates, click on ‘File’ in the upper-left-hand corner of the PAPrx
window and click on ‘AUTO UPDATE from Web’. This opens the Auto Web
Update Utility window.
14
You will notice 3 yellow bars in the top right of the window. Step 1: Get Update
List, Step 2: Download Updates, and Step 3: Exit. Click on ‘Step 1: Get Update
List’. This brings up a list of files to be downloaded, which are automatically
checked off. Click on ‘Step 2: Download Updates’. This initiates the download
process. Once the download is complete, a pop-up with the message ‘Update
Complete’ will appear on the screen. Click ‘OK’. Then click ‘Step 3: Exit’. The
Auto Web Update Utility window and PAPrx will both close, and the login screen
will appear. The updates will now have taken effect within the software.
2. System Options
15
With the exception of licensing prescription records, you will need to be logged in
as an administrator to edit the following screens.
a. License Records: This is where you purchase prescription records.
Select the number of records to add and click ‘License by Web’.
You will be directed to a page where you can enter a purchase
order if you need to reference one on the invoice. A purchase order
is not necessary to complete the licensing process. Click on
‘Continue with Licensing Rxs’. You should receive a message that
your order was successful. If not, contact us at (512) 306-1780.
b. Office Info: Sets your office information which will print on forms.
c. Security / Prices / Internet Connection: Switches to turn on/off
security, set medication charges, and test your Internet connection.
d. Screen Options: Screen options are software switches that control
the behavior of PAPrx. See Installation instructions for more details.
e. Advocate: Sets advocate information which will print on forms.
f. Ship To: determines the default ship to location of the medication.
g. Crystal Reports
3. Backup Database
Choose where you want your backup file to go. Click on ‘Make Backup’. If you
receive the ‘Backup Successful’ message, you should be good and can click
‘Exit’.
4. File Utilities
16
a. MDAC: PAPrx uses Microsoft MDAC for database access. If PAPrx
exits unexpectedly or experiences error messages on a regular
basis, you may need to reinstall MDAC. This is not a part of normal
PAPrx usage and you should consult the FAQ or contact tech
support for further assistance.
b. Send PAPs.mdb to Internet
c. Compress Patient Database
d. Re-install PAPrx Workstation Installation
e. Make Local Backup
5. Data Conversions
For the safety of your office’s data, it is essential that PAPrx tech support guide
you through the data conversion process, but these are some of the programs
we can quickly move data into PAPrx from:
Cheshire
Little River
MediBridge
MedPro
RX Assist
PAPrx Report Menu
17
1. Introduction
The extensive reporting function of PAPrx software is one of its most valuable.
With PAPrx reports you can renew prescriptions easily, prepare documents on
the value of the service you provide to your patients and to your community, and
keep track of your physicians and prescription activity. There are so many reports
with such varied functions, in fact, that an extensive document on them is
available separately. Following is a description of the most used PAPrx report as
well as a link to the lengthy “Reports Document” that deals with the matter in its
entirety.
2. Renewal Report
This is probably the most important and most often used report you will use with
PAPrx software. It provides a list of all prescriptions that are scheduled to be
renewed within the dates you specify. You type those dates in the Enter
Parameter Values window, as shown below. When you run this report you are
prompted for an Ending date, a Beginning Date and the Renewal Flag. If you
enter a 1 for the Renewal Flag, the report will only provide prescriptions that do
not have the Renewed flag set.
3. Additional Reports
For more information on reports, see the following document:
18
http://www.paprx.com/pdf/_PAPrxSampleReportsNum.pdf
3. Merging PAPrx information into Microsoft Word.
PAPrx uses MS Word Bookmarks to merge data. You can use the Sample.doc
as a source of BookMarks to cut and paste into documents of your own creation.
For Word files MS Word will be loaded, the selected Word document from the
NOTES directory will be loaded, the letter of the same name will be saved in the
PAPrx program directory (note: this will overwrite a previous letter created with
the same name) and the patient information will merge into Word.
The medication information will be from the single selected medication in the
prescription viewing section.
The following field are the names of Bookmarks in Microsoft Word. Patients
information is replace for these bookmarks.
SendToAddress
PatientName
PatientFirstName
PatientMI
PatientLastName
PatientStreet1
PatientStreet2
PatientCity
PatientState
PatientZip
PatientAge
PatientDOB
PatientSex
GraphicImage
DrugName
Strength
SIG
HisHer1
HisHer2
HisHer3
HisHer4
HimHer1
HimHer2
HimHer3
HimHer4
HeShe1
HeShe2
HeShe3
HeShe4
The following example Word documents was created from the REQUEST.DOC
file:
19
Example document REQUEST.DOC in Microsoft Word.
Networking PAPrx
1. General Information
PAPrx can easily be installed so multiple users can use the program entering
data from any station at the same time. When networking PAPrx, all computers
must run from the same program directory. We require this because PAPrx has
updates available every few days and these updates regularly change the file
structure of the database. To keep every workstation synchronized we require
each workstation to use the same directory.
In multi-user installations you must run the InstallPAPrx.exe on each workstation
and change the installation directory to the networked PAPrx directory. The
20
InstallPAPrx program is designed to that it will not overwrite any data files or
undo any updates from the regular Web Updates the PAPrx user runs. This
allows you to use a very old PAPrx installation CD on a network to add a new
computer to PAPrx operation. However, it is always a good idea to make a
backup of the users database file ‘PAPs.mdb.’
NOTE: Be careful not to run the Uninstall PAPrx without backing up the
PAPs.mdb database.
There are 3 typical network installations schemes for PAPrx:
Peer-to-Peer,
Shared Server directory, and
Cytrix (Terminal Server) installation.
2. Peer-to-Peer
The first step is to determine which machine is the main machine where the
PAPrx programs will reside. Do not install the PAPrx on each machine. On the
main machine either share a local drive or a directory on the local drive so others
can have full control of the PAPrx directory and its contents. PAPrx should then
be installed on the main computer into this directory.
On each workstation map a drive to the shared drive on the main computer. For
example: if the shared main computer file location is C: you would map this as a
local computer drive (e.g. ‘P:’).
You must run the installation program ‘InstallPAPrx.exe’ on each PAPrx
workstation computer. This will install the OCX’s, registry entries, and shortcuts
on each computer. During the installation you will be prompted to select the
installation directory, the default is ‘C:\PAPrx’. On a networked computer click
the Browse button and change the installation directory to “P:\PAPrx.”
Repeat this process on each computer so that each machine is executing the
program PAPs.exe from the same directory. The logical drive letter assigned to
each computer (‘P’ was used in our example) does not have to be the same drive
letter on the workstation computers.
3. Shared Server directory
The first step is to map a drive to the server file location.
For example: if the shared server file location is D:\Applications\Shared you
would map this as a local computer drive (e.g. ‘P:’).
When installing on a Server do NOT execute the installation program
‘InstallPAPrx.exe’ on the Server, as PAPrx is a client software package.
When PAPrx is shared between several computers from a Server the Server will
act as a file sharing device only. Each PAPrx user must run the installation
21
program ‘InstallPAPrx.exe’ on their computer. This will install the OCX’s, registry
entries, and shortcuts on each computer.
During the installation you will be prompted to select the installation directory, the
default is ‘C:\PAPrx’. On a networked computer click the Browse button and
change the installation directory to “P:\PAPrx.”
Repeat this process on each computer so that each machine is executing the
program PAPs.exe from the same directory.
4. Cytrix (Terminal Service) Server
Typically a Cytrix server configuration installation has a file sharing server and a
Terminal Services server. The first step is to pick the drive and the directory on
the file sharing server and map a drive to the server file location. For example: if
the shared server file location is D:\Applications\Shared you would map this as a
local computer drive (e.g. ‘P:’).
Do NOT execute the installation program ‘InstallPAPrx.exe’ on the Server, PAPrx
is a Client software package. Run the InstallPAPrx.exe program on the Cytrix
server. During the installation you will be prompted to select the installation
directory, the default is ‘C:\PAPrx’. On a networked computer click the Browse
button and change the installation directory to “P:\PAPrx.”
You do not need to run this process on the computers that access PAPrx through
the terminal services client as each computer will access the controls on the
Terminal Server.
22