1
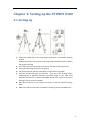
STONEX X300 User Manual __________________________________________________________________ Revision 06 June 2014 STONEX® Srl | Via Cimabue 39 | 20851 - Lissone (MB) | Italy Phone +390392783008 ; +390392785575 | Fax +390392789576 | Vat 06830030968 www.stonexpositioning.com II Contents Company Info: .......................................................................................................................... 1 Legal Notice: .............................................................................................................................. 1 Copyrights and trademarks ....................................................................................................... 1 Release Notice ........................................................................................................................... 1 Standard Limited Warranty ....................................................................................................... 1 General Warranty for Instruments. ........................................................................................... 1 Return policy Dead On Arrival instruments ............................................................................... 2 Firmware/Software warranty .................................................................................................... 3 Over Warranty repair(s) policy .................................................................................................. 3 Disclaimer and Limitation of Remedy........................................................................................ 3 Environmental recycling ............................................................................................................ 4 FOR COUNTRIES IN THE EUROPEAN UNION (EU) ...................................................................... 5 FOR COUNTRIES OUTSIDE EUROPEAN UNION (EU) .................................................................. 5 Chapter 1: Introduction ........................................................................ 7 1.1 1.2 1.3 1.4 1.5 1.6 1.7 1.8 1.9 1.10 1.11 1.10 1.11 General ....................................................................................................................... 7 Bundled components ................................................................................................. 7 Description of the system .......................................................................................... 8 Operational specifications.......................................................................................... 9 Precautions for Safety ................................................................................................ 9 Transport and shipping ............................................................................................ 10 Storage ..................................................................................................................... 11 Cleaning and Drying ................................................................................................. 11 Definition of Indication ............................................................................................ 12 Safety Standards for Laser........................................................................................ 13 Battery Specifications............................................................................................... 13 About User ............................................................................................................... 16 Exceptions from Responsibility ................................................................................ 16 Chapter 2: Setting up the STONEX X300.............................................. 17 2.1 2.2 2.3 Setting up ................................................................................................................. 17 Insert/remove the battery ....................................................................................... 18 Charging the battery ................................................................................................ 19 III Chapter 3: Operating the STONEX X300 .............................................. 21 3.1 3.2 3.2.1 3.2.1.1 3.2.1.2 3.2.2 3.3 3.3.1 3.3.2 3.3.3 3.3.4 3.3.5 3.3.6 3.4 3.4.1 3.4.2 3.5 3.5.1 3.5.2 3.5.3 3.5.4 3.5.5 3.5.5.1 3.5.5.2 3.5.5.3 3.5.6 Power on the scanner .............................................................................................. 21 Power off the scanner .............................................................................................. 21 Standard power off .................................................................................................. 21 Up to firmware version 0.4.100 ............................................................................... 21 Firmware version later than 0.4.100 ........................................................................ 22 Forced power off ...................................................................................................... 22 Led indicators ........................................................................................................... 23 Status LEDs ............................................................................................................... 24 GPS LEDs................................................................................................................... 24 Battery level alert ..................................................................................................... 25 Internal temperature alert ....................................................................................... 25 GPS offsets ............................................................................................................... 26 X300 Framework offsets (optional accessory) ......................................................... 27 Use of the onboard software ................................................................................... 28 Tested OS and web browsers ................................................................................... 28 Connect to X300 ....................................................................................................... 28 Web interface ........................................................................................................... 30 Home page ............................................................................................................... 30 Simple scan .............................................................................................................. 31 Files management .................................................................................................... 33 Camera ..................................................................................................................... 34 Preferences .............................................................................................................. 35 Language .................................................................................................................. 35 Security .................................................................................................................... 36 Upgrade firmware .................................................................................................... 36 Information .............................................................................................................. 39 Chapter 4: Manage data in Stonex Reconstructor software ................ 41 4.1 4.2 4.3 4.3.1 4.3.2 4.3.3 4.3.4 X300 files format ...................................................................................................... 41 File size ..................................................................................................................... 43 Import data in Stonex Reconstructor ....................................................................... 43 General import and export formats ......................................................................... 43 Convert x3r files with “X300 Converter” tool .......................................................... 44 Convert x3a files with “X300 Converter” tool .......................................................... 45 Import and color the X300 point clouds .................................................................. 46 IV Company Info: STONEX EUROPE S.R.L. Via Cimabue,39,20851 Lissone (MB) Italy Phone: +390392783008 Fax: +390392789576 Email: [email protected] Website: www.stonexpositioning.com Legal Notice: Copyrights and trademarks © 2012, STONEX® Limited. All rights reserved. STONEX®, the STONEX® logo, and X300 are trademarks of STONEX® Limited STONEX® Assistant, STONEX® GPS Processor, STONEX® SurvCE, STONEX® Cube, STONEX® GeoGis, STONEX® Data Manager, STONEX® GIS Processor are trademarks of STONEX® Limited. All other trademarks are the property of their respective owners. Release Notice This is the June 2014 release of the STONEX® X300 user guide. The following limited warranties give you specific legal rights. You may have others, which vary from state/jurisdiction to state/jurisdiction. Standard Limited Warranty General Warranty for Instruments. The terms and conditions of this Limited Warranty constitute the complete and exclusive warranty agreement between The Customer or Dealer and STONEX® for the Product and it supersedes any prior agreement or representation made in any STONEX® sales document or advice that may be provided to Customer by any STONEX® representative in connection with Customer’s purchase of the Product. No change to the conditions of this Limited Warranty is valid unless it is made in written form and signed by an authorized STONEX® supervisor. STONEX ® Europe warrants that its Products based on Laser Scanning technology: 1 (1) are free from defects in materials or workmanship for generally 1 year except for accessories or specific parts for which different limited warranty period shall apply. (2) have been tested/calibrated in proper working status prior to shipment. The warranty period starts from date of first sale of the instruments. At its sole discretion, under the warranty period, STONEX® Europe will repair the product or send parts for replacement at its expense. STONEX® Europe agree to repair or replace the defected instrument within thirty (30 ) days, only if STONEX® Europe recognizes that the defects of the instrument are not caused by human factors or no obvious damage to its surface is visible. STONEX® Europe warrants any new replaced parts or products are warranted to be free from defects in materials and workmanship for thirty (30) days or for the remainder of the Limited Warranty Period of the Product in which they are installed, whichever is longer. Faulty Parts or Products replaced under this Limited Warranty shall become property of STONEX® Europe. All products that have to be repaired have to be returned to our technical representative office location via any delivery company the customer prefers. NOTE: STONEX® Europe is not accountable for the unlikely event that the Products gets lost in transit. Any damage inflicted by the customer or by third party after the products has been delivered to the customer is excluded from the limited warranty as well any damage arising from an improper use, from any action or use not provided for in the enclosed user guides and/or manuals. Shipping policy The Customer or the dealer is required to pay for the charges for shipping of fault parts or instruments to STONEX® Europe representative office and STONEX® Europe (will provide) the shipping for return. Dealers needs to follow STONEX® Europe repair/service procedure to achieve a better and prompt service result. Return policy Dead On Arrival instruments All returned products have to be shipped to STONEX® Europe representative office. The original Purchaser has a period of seven (7) days, starting from date (data) of purchasing to signal the existence of a defect in the instrument for a full refund (less shipping and handling), provided the merchandise is in new, resalable condition and returned in the original, undamaged packaging. Customer has to pay for both the return and the original freight fees, regardless of the original freight paid by the Company. All warranty books, instruction manuals, parts and accessories must be included as well as the original box in which the item was shipped. We recommend to place the original carton inside another box, to avoid any additional damage to the carton itself. In some cases, returns of special items will require a 2 re-stock fee . Acceptance of returned merchandise is final only after inspection by STONEX® Europe. Above terms and (policy shall apply as for hardware.) Dealers needs to follow STONEX® Europe repair/service procedure to achieve a better and prompt service result. Firmware/Software warranty Stonex Europe doesn’t warrant that operation of Firmware/Software on any instruments will be uninterrupted or error-free, or that functions contained in Firmware/Software will operate to meet your requirements. Stonex will forward the Software/Firmware Fix to the dealer or customer. Firmware/software Fix means an error correction or other update created to fix a previous firmware version that substantially doesn’t conform to the instruments specification. Over Warranty repair(s) policy Customer shall pay the standard repair fees for any service (whether part replacement or repairs) and performed by STONEX® Europe under request and explicit authorization of the customer itself. In this case the customer is charged for return shipment’s fees as well. Disclaimer and Limitation of Remedy ALL OTHER EXPRESS AND IMPLIED WARRANTIES FOR THIS PRODUCT, INCLUDING THE IMPLIED WARRANTIES OF MERCHANTABILITY AND FITNESS FOR A PARTICULAR PURPOSE AND/OR NONINFRINGEMENT OF ANY THIRD PARTY’S RIGHTS, ARE HEREBY DISCLAIMED. STONEX® EXPRESSLY DISCLAIMS ALL WARRANTIES NOT STATED IN THIS LIMITED WARRANTY. ANY IMPLIED WARRANTIES THAT MAY BE IMPOSED BY LAW ARE LIMITED IN DURATION TO THE TERM OF THIS LIMITED WARRANTY. SOME JURISDICTIONS DO NOT ALLOW THE EXCLUSION OF IMPLIED WARRANTIES OR LIMITATIONS ON HOW LONG AN IMPLIED WARRANTY LASTS, SO THE ABOVE EXCLUSIONS OR LIMITATIONS MAY NOT APPLY TO CUSTOMER. CUSTOMER MUST READ AND FOLLOW ALL SET-UP AND USAGE INSTRUCTIONS IN THE APPLICABLE USER GUIDES AND/OR MANUALS ENCLOSED. IF CUSTOMER FAILS TO DO SO, THIS PRODUCT MAY NOT FUNCTION PROPERLY AND MAY BE DAMAGED. CUSTOMER MAY LOSE DATA OR SUSTAIN PERSONAL INJURIES. STONEX®, ITS AFFILIATES AND SUPPLIERS DO NOT WARRANT THAT OPERATION OF THIS PRODUCT WILL BE UNINTERRUPTED OR ERROR FREE; AS DO ALL ELECTRONICS AT TIMES. IF THIS PRODUCT FAILS TO WORK AS WARRANTED ABOVE, CUSTOMER’S SOLE AND EXCLUSIVE REMEDY SHALL BE REPAIR OR REPLACEMENT. IN NO EVENT WILL STONEX®, ITS AFFILIATES OR SUPPLIERS BE LIABLE TO CUSTOMER OR ANY THIRD PARTY FOR ANY DAMAGE IN EXCESS OF THE PURCHASE PRICE OF THE PRODUCT. THIS LIMITATION APPLIES TO DAMAGES OF ANY KIND WHATSOEVER INCLUDING (1) DAMAGE TO, OR LOSS OR CORRUPTION OF, CUSTOMER’S RECORDS, PROGRAMS, DATA OR REMOVABLE STORAGE MEDIA, 3 OR (2) ANY DIRECT OR INDIRECT DAMAGES, LOST PROFITS, LOST SAVINGS OR OTHER SPECIAL, INCIDENTAL, EXEMPLARY OR CONSEQUENTIAL DAMAGES, WHETHER FOR BREACH OF WARRANTY, CONTRACT, TORT OR OTHERWISE, OR WHETHER ARISING OUT OF THE USE OF OR INABILITY TO USE THE PRODUCT AND/OR THE ENCLOSED USER GUIDES AND/OR MANUALS, EVEN IF STONEX®, OR AN AUTHORIZED STONEX® REPRESENTATIVE, AUTHORIZED SERVICE PROVIDER OR RESELLER HAS BEEN ADVISED OF THE POSSIBILITY OF SUCH DAMAGES OR OF ANY CLAIM BY ANY OTHER PARTY. SOME JURISDICTIONS DO NOT ALLOW THE EXCLUSION OR LIMITATION OF INCIDENTAL OR CONSEQUENTIAL DAMAGES FOR SOME PRODUCTS, SO THE EXCLUSIONS OR LIMITATIONS MAY NOT APPLY TO CUSTOMER. THIS LIMITED WARRANTY GIVES CUSTOMER SPECIFIC LEGAL RIGHTS, AND CUSTOMER MAY ALSO HAVE OTHER RIGHTS WHICH VARY FROM COUNTRY/STATE/JURISDICTION TO COUNTRY/STATE/. One (1) year on STONEX® Products: Laser Scanner X300 : 1 year of warranty, excluding battery supply accessories (6 months). Repair/Service procedure for dealers. 1. S/N of the instrument and a detailed description of the defect (sometimes pictures or video) will be required to indicate the cause and problem. 2. If dealer wants to repair an instrument under warranty period on their site: 2.1 If dealers don’t have the part in stock they have to send an official order to STONEX® Europe and pay for it and then so STONEX® Europe will send the new part to them so they can repair the instrument. 2.2 When the repair is over, the dealer has to fill the “Spare Part Refund” module and send it to the dedicated mail address. 2.3 Must wait for STONEX® Europe’s authorization SPR. 2.4 When dealer receives the SPR authorization number they can send back to STONEX® Europe appointed office the broken part with attached the SPR module. 2.5 When STONEX® Europe receive the broken part STONEX® Europe shall verify it and if everything is ok the cost of the part shall be refund (refund will be done only after check of the failure part and final approval of STONEX® Europe). 3. If the instrument needs to be sent back to STONEX® Europe for repair/replacement, dealers/customers has to send to STONEX® Europe a “Returned Merchandise Authorization (RMA)” before they send back the fault instrument. STONEX® Europe shall, at its sole discretion, decide on the place of performance for work under warranty. Environmental recycling The cardboard box, the plastic in the package and the various parts of this product have to be recycled and disposed of in accordance with the current legislation of your Country. 4 FOR COUNTRIES IN THE EUROPEAN UNION (EU) The disposal of electric and electronic device as solid urban waste is strictly prohibited: they must be collected separately. Contact Local Authorities to obtain practical information about correct handling of the waste, location and times of waste collection centers. When you buy a new device of ours, you can give back to our dealer a used similar device. The dumping of these devices at unequipped or unauthorized places may have hazardous effects on health and environment. The crossed dustbin symbol means that the device must be taken to authorized collection centers and must be handled separately from solid urban waste. FOR COUNTRIES OUTSIDE EUROPEAN UNION (EU) The treatment, recycling, collection and disposal of electric and electronic devices may vary in accordance with the laws in force in the Country in question. 5 6 Chapter 1: Introduction 1.1 General STONEX is the manufacturer of the 3D-Laser Scanning system STONEX X300. Laser scanning is an automatic process during which real objects are surveyed and sampled almost completely to determine their location, size, orientation and form. The STONEX X300 rapidly determines high-resolution measurement results within very short time and within a field of view of max. 360° horizontal and 90° vertical (-25° to +65°). 1.2 Bundled components Bundled components Laser scanner STONEX X300 2x Battery Battery charger Tribrach Transport case 7 1.3 Description of the system 2 1 1. Transport handle 2. GPS mount 3. Laser window 3 4. Camera window (camera UP and camera DOWN) 4 Figure 2: X300 Rear-side Figure 1: X300 Front-right side 5 6 5. Power button 6. Led control panel 7. USB port 8. Smart port: Ethernet and external power supply 9. GPS port 9 8 7 10 11 10. Battery handle 11. Battery pack 8 1.4 Operational specifications X300 supports five predefined scan modes at different resolution (grid of points), the scan time varies according to the scan mode. Resolution H. res. (360°) V. res. (90°) Total points H. step (‘) V. step (‘) Time x 360° * Columns/sec. Fine 16000 4000 64000000 1.350 1.350 1h 6m 40s 4 Standard 8000 2000 16000000 2.700 2.700 0h 16m 40s 8 Fast 4000 1000 4000000 5.400 5.400 0h 4m 10s 16 Preview 2000 500 1000000 10.800 10.800 0h 1m 2s 32 Table 1: Scanner resolution (*: referred to scan time only, excluding warmup, initialization, positioning, photo capture) Grid step (cm) H. step V. step H. step V. step H. step V. step H. step V. step H. step V. step Distance (m) 10 10 30 30 50 50 100 100 200 200 Fine 0.3927 1.1781 1.9635 3.9270 7.8540 Standard 0.7854 2.3562 3.9270 7.8540 15.7080 Fast 1.5708 4.7124 7.8540 15.7080 31.4159 Preview 3.1416 9.4248 15.7080 31.4159 62.8319 Table 2: Distance reference 1.5 Precautions for Safety ◆ Don’t collimate the sun directly Don’t collimate the sun directly for protecting instrument. ◆ Avoiding the vibrations on the instrument When transporting, keep the instrument in the case and try your best to lighten vibrations. ◆ Carry the instrument When carrying, the instrument handle must be hold tight. ◆ Check the battery power Before using it, you should check the power whether it is enough. ◆Battery Maintenance If the instrument is not in using for a long time, the battery should be taken out from the instrument and store in separate place. Meantime, the battery should be charged every month. 9 ◆ Take out the battery It is not suggested to take out the battery when the instrument is on, otherwise, the stored data may be lost, so it is better to replace the battery after power off the instrument. ◆ Set up the instrument on the tripod When using it please insure the connection between tripod and instrument is firm. ◆ Assemble the tribrach on the instrument The setting of tribrach would influence the accuracy. The tribrach should be check frequently, the screw which connects the tribrach must be locked tightly. And the central fixing screw should be tight. ◆ High temperature condition Don’t put the instrument in high temperature condition for a long time, it is bad for the instrument performance. ◆ Temperature changing sharply The sharp temperature changing on the instrument will shorten the distance measurement range, for example, after taking the instrument out from a warm car to a cold condition, wait for some time, it can be used when it adapts the surrounding condition. ◆ The noise from the instrument When the instrument working, it is normal if you hear the noise from instrument motors, it will not affect the instrument work. ◆ Stored data responsibility STONEX should not be held liable for the lost data because of wrong operation. 1.6 Transport and shipping Transport in the field When transporting the equipment in the field, always make sure that you • either carry the product in its original transport container, • or carry the tripod with its legs splayed across your shoulder, keeping the attached product upright. Transport in a road vehicle Never carry the product loose in a road vehicle, as it can be affected by shock and vibration. Always carry the product in its transport container and secure it. Shipping When transporting the product by rail, air or sea, always use the complete original Stonex®packaging, transport container and cardboard box, or its equivalent, to protect against shock and vibration. 10 Shipping, transport of batteries When transporting or shipping batteries, the person in charge of the product must ensure that the applicable national and international rules and regulations are observed. Before transportation or shipping, contact your local passenger or freight transport company. Field adjustment After transport inspect the field adjustment parameters given in this user manual before using the product. 1.7 Storage Product Respect the temperature limits when storing the equipment, particularly in summer if the equipment is inside a vehicle. Refer to technical data for information about temperature limits. Field adjustment After long periods of storage inspect the field adjustment parameters given in this user manual before using the product. LiPoly batteries Remove batteries from the product and the charger before storing. After storage recharge batteries before using. Protect batteries from damp and wetness. Wet or damp batteries must be dried before storing or use. A storage temperature range of ‐20°C to +30°C/‐4°F to 86°F in a dry environment is recommended to minimize self‐discharging of the battery. 1.8 Cleaning and Drying Never touch the cover glass with your fingers. Use only a clean, soft, lint‐free cloth for cleaning. If necessary, moisten the cloth with water or pure alcohol. Do not use other liquids; these may attack the polymer components. Keep plugs clean and dry. Blow away any dirt lodged in the plugs of the connecting cables. 11 1.9 Definition of Indication For the safe of your product and prevention of injury to operators and other persons as well as prevention of property damage, items which should be observed are indicated by an exclamation point within a triangle used with WARNING and CAUTION statements in this manual. The definitions of the indication are listed below. Be sure you understand them before reading the manual’s main text. ! WARNING: ! CAUTION: Ignoring this indication and making an operation error could possibly result in death or serious injury to the operator. Ignoring this indication and making an operation error could possibly result in personal injury or property damage. ! Do not perform disassembly or rebuilding. Fire, electric shock or burns could result. Only STONEX authorized distributors can disassemble or rebuilt. Do not collimate the sun directly. Do not cover the charger. Fire could be result. Do not use defection power cable, socket or plug. Fire, electronic shock could result. Do not use wet battery or charger. Fire, electronic shock could result. Do not close the instrument to burning gas or liquid, and do not use the instrument in coal mine. Blast could be result. Do not put the battery in the fire or high temperature condition. Explosion, damage could result. Do not use the battery which is not specified by STONEX. Fire, electric shock or burn could result. Do not use the power cable which is not specified by STONEX. Fire could result. Do not short circuit of the battery. Fire could result. When this product encounters disturbance of severe Electrostatic Discharge, perhaps it will have some degradation of performance like switching on/off automatically and so on. ! WARNING CAUTION Do not touch the instrument with wet hand. Electric shock could result. Do not stand or seat on the carrying case, and do not turn over the carrying case arbitrarily, the instrument could be damaged. Be careful of the tripod tiptoe when setup or move it. Do not drop the instrument or the carrying case . 12 Do not touch liquid leaking from the instrument or battery. Harmful chemicals could cause burn or blisters. Please assemble the tribrach carefully, if the tribrach is not stable, series damage could result. Do not drop the instrument or tripod, series damage could result. Before use it, check the central screw is tight. GPS and Smart port connectors on the rear panel of the scanner are up to IP65 standard when the protective caps are well mounted, or used with cables specified by Stonex (GPS, Ethernet and power supply connection). The USB port is up to IP65 standard also without the rubber cap but it is mandatory to keep the connector free from dust and water before using it. It is recommended to keep the rubber cap on during the scan and to use the USB port in safe environment, in order to avoid harming the device. 1.10 Safety Standards for Laser STONEX X300 series adopt the class of Laser Product according to IEC Standard Publication 60825-1 Amd. 2:2001. According this standard, EDM device is classified as Class 1M Laser Product. When activate the laser pointer (red laser) , class of the laser is 2 . Follow the safety instructions on the labels to ensure safe use. CAUTION: CLASS 1M LASER RADIATION WHEN OPEN AVOID DIRECT EYE EXPOSURE. CAUTION: CLASS 2 LASER RADIATION WHEN OPEN DO NOT STARE INTO THE BEAM ! WARNING ● Never point the laser beam at other’s eyes, it could cause serious injury. ● Never look directly into the laser beam source, it could cause permanent eye damage. ● Never stare at the laser beam, it could cause permanent eye damage. ● Never look at the laser beam through a telescope or other optical devices, it could cause permanent eye damage. 1.11 Battery Specifications Information on the components Product: Lithium battery Product Type: Lithium Polymer Battery Energy: less than 100 W/h each cell Nominal Voltage: 3.7 Volt 13 Product composition Content (%) >40 Rare earths Li2CO3 (No metal Lithium at all) >10 >2.0 Mn >0.1 Ca >2.0 Graphite Na C >0.1 Fe >3.0 >3.0 PE >3.0 Cu >8.0 Al >5.0 K F >1.0 Sr >3.0 >1.0 Table 3: Battery specifications Hazard identification Main Hazard: Flammable under High temperature Effect of over exposure: Irritation of skin eyes and respiratory tract. Symptoms of (over) exposure: Coughing,headache,dizziness,unconsciousness. Skin: as result of adsorbption throught the intact skin, the substance may cause dry skyn redness. Eyes: Pain, redness. Ingestion: sore throat, stomach-ache,headache,dizziness,dullness. Fire fighting measures Suitable: Dry chemical ,powder, CO2 foam, sand,water (only large amount) Hazardous thermal decomposition and combustion products: Put on adequate protective equipment. Do not breathing vapour. Protective equipment: Wear full protective clothing and self-contained breathing apparatus. Accidental release measures Personal precautions: Put on adequate protective equipment. Do not breathing vapour Environmental precautions: Keep away from drains, surface water,ground-water and soil. Clean procedures: Collect as much as possible using clean container for disposal. Disposal according local regulations. 14 Temperature range Mode Continuous Occasional In storage + 30°C max • 30/+ 80°C -30/+80°C -30/+80°C 0/+75°C 0/75°C During discharge During charge Table 4. Battery temperature range Stability and reactivity Conditions to avoid : Heat above80 °C or incinerate. Deform, mutilate, crush, pierce, disassemble. Short circuit. Prolonged exposure to humid conditions. Materials to avoid : N/A Hazardous decomposition products: Corrosive/Irritant Hydrogen fluoride (HF) is produced in case of reaction of lithium hexafluorophosphate (LiPF 6) with water. Combustible vapors and formation of Hydrogen fluoride (HF) and phosphorous oxides during fire. Toxological information Stonex Lithium-Ion rechargeable batteries do not contain toxic materials. Ecological information When properly used or disposed, Stonex Lithium-Ion rechargeable batteries can be recycled and do not present environmental hazard during their life time. Disposal considerations Dispose in accordance with applicable regulations, which vary from country to country. Lithium-Ion batteries should have their terminals insulated and be preferably wrapped in individual plastic bags prior to disposal. Incineration: Incineration should never be performed by battery users but eventually by trained professionals in authorized facilities with proper gas and fumes treatment. Recycling: Send to authorized recycling facilities. Handling and storage Use the battery properly according to the product specification, do not disassemble or short circuit the battery. Store away from sources of heat or ignition. Over high temperature will make the cell inflate melt the separator,causing short circuit. The storage area should be cool,dry,well ventilated ,out of direct sunlight,away from metal or sharp edge, such as keys pins or wires. 15 1.10 About User 1. This product is for professional use only! The user is required to be a qualified surveyor or have a good knowledge of surveying, in order to understand the user manual and safety instructions, before operating, inspecting or adjusting. 2. Wear required protectors (safety shoes, helmet, etc.) when operating. 1.11 Exceptions from Responsibility 1. The user of this products is expected to follow all operating instructions and make periodic checks of the product’s performance. 2. The manufacturer, assumes no responsibility for results of a faulty or intentional usage or misuse including any direct, indirect, consequential damage, and loss of profits. 3. The manufacturer, assumes no responsibility for consequential damage, and loss of profits by any disaster, (an earthquake, storms, floods etc.). 4. The manufacturer, assumes no responsibility for any damage, and loss of profits due to a change of data, loss of data, an interruption of business etc., caused by using the product or an unusable product. 5. The manufacturer, assumes no responsibility for any damage, and loss of profits caused by usage except for explained in the user manual. 6. The manufacturer, assumes no responsibility for damage caused by wrong transport, or action due to connecting with other products. 16 Chapter 2: Setting up the STONEX X300 2.1 Setting up 1. Extend the tripod legs to the same length to allow for a comfortable working posture. Tighten the screws at the bottom of the legs. Fold the handles down to detain the length of the legs. 2. Place the tribrach on the tripod and secure it with the central fixing screw. 3. Drive the tripod’s legs firmly into the ground. 4. Set up the tripod so that the tripod plate is as horizontal as possible. 5. Level the tribrach using the circular level. Turn two of the leveling screws simultaneously in opposite directions. The index finger of your right hand indicates the direction in which the bubble should move. Now use the third leveling screw to center the bubble. 6. Place the instrument on the tribrach and secure it with the tribrach’s locking knob. 7. Make sure that the instrument is leveled by checking the built-in bubble level. 17 2.2 Insert/remove the battery There are different power supplies available for the STONEX X300: 1. X300 battery pack (for wireless operation) 2. X300 external power unit Figure 3 represents the X300 battery pack: for proper mounting, the connectors must be facing up and the handle must be on the outer side. Figure 4 represents the X300 battery housing, placed in the rear side of the scanner. pushing supports Figure 3: X300 battery pack Figure 4: X300 battery housing Plug the X300 Battery: To plug the battery pack, follow the instructions described in Figure 5 and Figure 6. Figure 5: Plug the battery pack Figure 6: Plug the battery pack 18 1. Insert the lower edge of the battery into the housing, placing it on the pushing supports. 2. Use the handle to press down the battery until stroke end. 3. Tilt the battery in vertical position. 4. Release the battery upward until it is firmly seated. Removing the X300 Battery: To remove the battery, follow the instructions described in Figure 7 and Figure 8. Figure 7: Unplug the battery pack Figure 8: Unplug the battery pack 1. Use the handle to press down the battery until stroke end. 2. Tilt the battery outward until the upper edge is out of the housing. 3. Lift out the battery from the pushing supports. 2.3 Charging the battery The X300 battery can be charged directly using the appropriate battery charger, included in the bundle (figure 10). Power specifications: Figure 10: Battery charger Figure 9: Battery power plug 19 Model: Li-ion battery charger Input: AC 100 ~ 240 V 50/60 Hz Output: 12.6 V / 2 A Charge X300 battery: 1. Connect the AC cable to the power pack as described in figure 11. 2. Plug the power connector to the battery as described in figure 12. 3. Connect the external power unit to the power source. Figure 11: Power pack Figura 12: Plug the power connector During the charge, the status light on the power pack will inform you about the charge progress (Figure 13). The charging time for a completely discharged battery is about 3 hours. Figure 13: Charge status light Red solid light: the charge is in progress. Do not disconnect the battery. Green solid light: the charge is complete. Disconenct the battery from the power source. 20 Chapter 3: Operating the STONEX X300 3.1 Power on the scanner This workflow describes the operations performed during the power on process. To power on the X300 simply press the power button on the top of the instrument. There’s no need to press and hold the button, just push and release it. After a moment, all LEDs will turn on for a moment and a single beep is played. Now the instrument is on The status LEDs start to blink, that means the X300 is doing the initialization procedures Two short beeps are emitted to signal that the system controller has done it’s work and the microcontroller has started After a while, the Green and Yellow LEDs stay on. The microcontroller is initializing all the devices If the devices initialization is ok: o Yellow LED turn off and Green LED stays on o Tree short beeps are emitted If the device initialization is not ok: o Yellow and Green LEDs turn off, Red LED blinks o One long beep is emitted o After a while, the microcontroller tries to initialize again If the system is not able to initialize correctly, it continues to retry until the system is powered off. 3.2 Power off the scanner There are two ways to power off the X300. 3.2.1 Standard power off 3.2.1.1 Up to firmware version 0.4.100 1. 2. 3. 4. Push and hold the power button After a while a beep will be emitted, continue to press the button A second beep will be emitted, continue to press the button After a while, a series of beep will be emitted. If you release the button during this phase, a Standard shutdown will occur: o A short beep is emitted o A long beep is emitted o The system is powered off 21 3.2.1.2 Firmware version later than 0.4.100 1. 2. 3. 4. Push and hold the power button After a while a beep will be emitted, continue to press the button A second beep will be emitted, continue to press the button After a while, a series of beep will be emitted. If you release the button during this phase, a Standard shutdown will occur: o A short beep is emitted o A long beep is emitted o STATUS LEDs: GREEN solid on YELLOW and RED blinking o GPS LEDs: GREEN off YELLOW and RED blinking o The progress bar displays a count-down (from right to left) o The system is powered off 3.2.2 Forced power off If the system does not shut down using the Standard power off procedure, you can try to force the shut down: 1. Follow the steps for the Standard power off (par. 3.2.1.1) but do not release the button after the step 4. 2. Another beep will be emitted 3. Immediately after the beep, an endless series of very short beeps will be emitted. Release the button now, the system will be forcibly powered off. WARNING! – Under normal circumstances, always use the Standard power off procedure. 22 3.3 Led indicators There are 14 LED indicators placed on the top of the instrument. Three LEDs on the left are dedicated to the X300 status. They are in different colors. Starting from the left: Red, Yellow, Green Ten Blue LEDs in the middle are used to display the progress of long operations (such as scan and saving) Three LEDs on the right are dedicated to display the GPS status, if connected. Starting from the left: Green, Yellow, Red Each LED can assume three different states: Figure 14: Led indicators Status Progress GPS Off. Blinking. Solid light. 23 3.3.1 LEDs status Status LEDs Description X300 is powered off The system is initializing. This state appears few seconds after power on The system is ready and waiting for user input System error. Use the controller to check the failure Scan initialization X300 is busy working on something (performing a scan, for example) X300 is storing data Scan completed successfully A new system controller firmware is uploading An indeterminate state. Something gone wrong Low battery. Please change the battery before continuing to work Internal temperature is above warning threshold Table 5: Status LEDs 3.3.2 GPS LEDs --- FUNCTION NOT AVAILABLE YET --- 24 3.3.3 Battery level alert The battery level is continuously monitored, the critical threshold is below 20% and the alarm is visible on the RED Status LED: At 20% : led is on, with 1 second off every 8 seconds At 15% : led is on, with 1 second off every 2 seconds At 10% : led is solid on A buzzer is also present: 3.3.4 At 15% : one short beep every 16 seconds At 10% : one short beep every 4 seconds At 5% : one long beep every 4 seconds Internal temperature alert Temperature is continuously monitored and the alarm is visible on the YELLOW Status LED: Temp < -15° or > +75°: led is on, with 1 second off every 8 seconds Temp < -20° or > +80°: led is on, with 1 second off every 2 seconds Temp < -25° or > +85°: led is solid on A buzzer is also present. In case of double alarm (critical temperature and low battery) the priority is given to temperature: Temp < -20° or > +80°: short beep every 16 seconds Temp < -25° or > +85°: short beep every 4 seconds Temp < -30° or > +90°: prolonged beep every 4 seconds 25 3.3.5 GPS offsets The following diagram shows the position of the origin point of the measures and the relative offsets to the GPS mount. Figure 15: GPS offsets 26 3.3.6 X300 Framework offsets (optional accessory) Figure 16: X300 Framework offsets 27 3.4 Use of the onboard software To operate the Stonex X300 laser scanner all you need is a control device equipped with a Wi-Fi hardware and a web browser, whether it is a pc, a tablet or a smartphone. You do not even need to install drivers or software, since the web interface server is built into the scanner. 3.4.1 Tested OS and web browsers The X300 web interface is based on HTML 5 markup language and it is compatible with most of the latest browsers on the market. The table 1 reports the operating systems and web browsers that have been successfully tested with X300 web interface. Tested OS Windows XP/ 7/ 8 OS X Android v.4.1.2 iOS 5 Tested browser Chrome, Firefox Safari, Chrome, Firefox Default browser, Chrome Safari Table 6: Tested OS and browsers 3.4.2 Connect to X300 1. Enable the Wi-Fi on your handset/smartphone/tablet/computer 28 2. Search for the X300 wireless network using the OS connection manager: the X300 is identified by the serial number (e.g: X300-DEMO-26) 3. Connect to the X300 network It is an open connection, no passkey is required. 4. Open the web browser: the the X300 main page will appear. If not, refresh the page or enter the following IP address: 192.168.1.11 29 5. The access to the main page is protected by User ID and password. Default settings: User ID: x300 or X300 (no case sensitive) Password: 1234 Users can later chose whether to change user ID and password or remove the protection (see par. 3.5.5). 3.5 Web interface 3.5.1 Home page The Home page is the main menu of the X300 web interface. From here users can access to all the X300 functions and settings Home page Functions Simple scan: Enter the scan procedure Files management: Browse and manage stored data Camera: Enter camera settings and preview thumbnail Preferences: Enter X300 preferences: Language: change program language Security: enable/disable network protection Calibration settings Enable/disable the red tracking line Upgrade X300 firmware Informations: Device and software details Power off: Note – All data will be lost if the scanner is Close current process and turn off the forced to power off during scanning or save scanner. process. 30 3.5.2 Simple scan The Simple scan menu provides access to the scan contro panel. It is possible to enter new scan parameters and options. Simple scan Functions Scan name: Enter the name of the new scan that you want to start. Scan mode: Select the scan resolution from the dropdown list (par. 1.4) Horizontal angle: Set the angle for the horizontal rotation of the scanner (deg. units). Photos: Tip: The center (c) of the scan area is placed along the bisector of the horizontal angle (α): c Enable/Disable the photo capture using the X300 internal cameras. When the control is enabled the X300 automatically takes the pictures right after the end ot the scan. The two synchronized onboard cameras allow to cover the vertical angle of the scan. The number of the picture is related to the the size of the horizontal angle. Camera button (upper right corner): Enter the Camera menu (see par. 3.5.4) Start: Press the button to start the scan, according to the settings. α Turn the laser window toward the center of the scene and set the scan angle in order to embrace the whole scene or just a portion. 31 The scan process go through three/four sequential steps. Initializing The scanner warms up, register the center position and turn until reaching the start position. Scan Starts the scan. Use either the software progress bar or the LEDs status bar to control the scan progress. When the scan is finished, the X300 will return to the center position. Shooting (optional) If the cameras are enabled the photos are automatically acquired right after scanning. Saving Data are stored in the internal solid memory of the scanner. Press “Done” button to return to the Simple scan menu. 32 3.5.3 Files management Files management Functions From this menu it is possible to browse the files stored in the internal memory. Select a file to download or delete it (par. 3.8). Available formats are: 1. ASCII text csv: exportable pointcloud in txt format (x,y,z,reflectance) 2. Stonex cloud file (x3s): data format of Stonex Reconstructor 3. X300 RAW file (x3r): raw data file format, contains the original scan measures. 4. X300 RAW archive (x3a): it is a NEW data format which wraps the raw scan “x3r”, the pictures “x3i” (if any) and the calibration files “cal” in a single file. Note – Refer to par. 4.1 for further details. Copy to USB USB download became available when a USB memory drive is connected to the X300 USB port. Note – Before connecting the USB memory drive, turn on the scanner and wait till the end of the initialization process. Remove the USB memory drive only after turning off the scanner. Download Download of the selected file through Wi-Fi or Ethernet cable (optional). Delete Erase the selected file from X300 internal memory. Note – Deleted files are permanently removed from the X300 solid memory. 33 3.5.4 Camera Camera Functions From this menu it is possible to check the light exposure of the digital cameras. Auto exposure Flag this checkbox to activate the light auto-exposure for each picture of the scan session. Press the “Take a shot” button to acquire a picture prewiev from the selected camera: Camera up: the upper camera, facing forward; Camera down: the lower camera, facing upward; Manual exposure Enter manually the exposure value or slide the cursor to change it. Press the “Take a shot” button to acquire the picture from the selected camera: Camera up: the upper camera, facing forward; Camera down: the lower camera, facing upward; Tip: In conditions of ambient high brightness, adjust the first slider to the minimum (25 ms) and move the second slider from left to right until you find the right balance Note – The preview pictures are not stored in the internal memory. 34 3.5.5 Preferences Preferences Functions From this menu it is possible to manage the system and tools preferences. System Language: change the software language (see par. 3.5.5.1); Security: modify the protection setting of the Wi-Fi/Lan cable connection (see par. 3.5.5.2); Calibration: enter the digital compensator menu; Tools Red line: enable/disable the visible laser tracking light (not for measures); Upgrade firmware: enter the menu for the upgrade of the X300 internal firmware (see par. 3.5.5.4); 3.5.5.1 Language Language Functions From this menu it is possible to change the default language of the X300 onboard software. Tap on a language to apply the change. Note – Stonex Europe will periodically release additional language packs, independently or upon request, at the discretion of Stonex Europe. 35 3.5.5.2 Security Security Functions In this menu it is possible to enable/disable the network authentication. When the network authentication is enabled, username and password are requested by the web browser, in order to prevent unauthorized access to the X300 web interface. Username and password are user-defined settings, Stonex Europe has no way of knowing or recovering the authentication settings defined by the users. Username: enter or change the username for the network authentication (factory setting: x300 or X300); Password/Confirm: enter or change the password for the network authentication (factory setting: 1234); Press Update to apply the changes. 3.5.5.3 Upgrade firmware Stonex Europe releases periodically new firmware versions for the X300 laserscanner. The need to update the firmware may have several reasons: release of new functions, bug fixing and improvements of existing software features. Firmware update can be carried out either by Stonex authorized dealers and end users. If you need further instructions or have questions about the procedure, please contact the Stonex LaserTeam support at: [email protected] IMPORTANT – Use only official firmware for Stonex X300 released by Stonex Europe srl. 36 Upgrade firmware Functions Follow the steps to upgrade the X300 firmware: Step 1: Browse your computer or server to locate the firmware file (*.bin) provided by Stonex Europe or Stonex authorized dealers. 1 Press the Submit button to upload the firmware file onto the X300 flash memory (red arrow). Step 2: Wait until the end of the upload procedure. It takes less than a minute to complete the process. Note – Do not turn off the scanner or remove the battery during the upload process. 2 Step 3: 1 The firmware is saved to the internal memory. Tap on it to apply the change and upload the system (red arrow). Note – It is possible to upload several firmware file on the same scanner, the files will be visible in the X300 firmware list, but it is possible to upgrade only one firmware at a time. 3 37 Step 4: Tap Upload to apply the selected firmware. Tap Delete to erase the file from the internal memory. 4 4 41 Step 5: Wait until the end of the upgrade procedure. It takes less than a minute to complete the process. When the procedure is complete, the X300 will automatically turn off. 1 Note – Do not turn off the scanner or remove the battery during the upgrade process. 5 4 11 38 3.5.6 Information Informations Functions Device information: Device: Device serial number Firmware: Version and build Tools: Status menu Advanced menu Download snapshot Upgrade firmware Reboot Status menu This page checks and displays whether the hardware components inside the scanner are correctly powered and running. The components that are working properly are marked with the initials “OK”. If the Status is not “Ready”, please contact Stonex support at [email protected] Download snapshot Download on the controller a log file of the EDM settings. The log file is useful to check the configuration of the sensor in case of malfunction. 39 40 Chapter 4: Manage data in Stonex Reconstructor software As explained in par. 3.5.3, the X300 can export data in four file formats: 4.1 X300 files format 1. ASCII comma separated values: this is an interchange format that can be adapted to many software platforms, different from Stonex Reconstructor. The data format is X,Y,Z,R (“.” as decimal separator) where “R” is the raw reflectance value acquired by the scanner (0≤ R ≤1). The ASCII format cannot be processed with the camera blending algorithm and cannot be merged with the pictures taken with the X300 integrated cameras. The time required to download ASCII files is usually longer, with respect to the other available formats, because the file must be first created inside the scanner and then made available for the download. 2. Stonex cloud file (x3s): this is the binary format ready for Stonex Reconstructor. It can be equipped with camera pictures that can be used to create the “color” layer when imported in Stonex Reconstructor. If a scan project is equipped with camera pictures, the final dataset is made by several files: - namefile.x3s: one or several files containing the scan; namefile-value.jpeg: several files for each scan containing the related pictures; The number of the pictures vary according to the width of the horizontal scan angle. Before downloading, the x3s file has to be generated inside the X300 memory. For this reason the download time can vary according to the dimension of the file. 41 3. X300 RAW file (x3r): this is the raw source format used to create the scan files in real time and store them inside the X300 memory. Compared to the previous two this is a more compact and lightweight format. It also has the consistent advantage of being directly available for download, not requiring intermediate steps. It can be equipped with camera pictures that can be used to create the “color” layer when imported in Stonex Reconstructor. If a scan project is equipped with camera pictures, the final dataset is made by several files: - namefile.x3r: one or several files containing the raw data; namefile-value.x3i: raw files containing the related pictures; The number of the raw pictures vary according to the width of the horizontal scan angle. Note – x3r and x3i files must be converted before importing them in Stonex Reconstructor. See par. 4.2.1 for further details. 4. X300 RAW Archive file (x3a): This is a new file format, starting from version 0.4.80 of the X300 firmware, which wraps the scan data into a single compact file. The files packed inside x3a are: - namefile.x3r: scan raw data file (see above point); - namefile-value.x3i: raw files containing the related pictures; - U_X300S/N.cal: calibration file of the camera UP; - D_X300S/N.cal: calibration file of the camera DOWN; The X300 Archive format is available for the download with both Wi-Fi/LAN and USB drive. Note – x3a archive must be converted before importing them in Stonex Reconstructor. See par. 4.2.2 for further details. 42 4.2 File size The following table reports the raw data size at different scan resolution. H. res. (360°) V. res. (90°) Total points x3r raw file (MB) n. points n. points Fine 16000 4000 64000000 491.943 Standard 8000 2000 16000000 122.986 Fast 4000 1000 4000000 30.746 Preview 2000 500 1000000 7.744 Table 7: File size 4.3 Import data in Stonex Reconstructor Stonex Reconstructor software can import raw scan data in text ASCII format (txt) and Stonex cloud file (x3s). See par. 4.1 for format description. x3s files can be directly imported into Stonex Reconstructor, while x3r and x3a files must be converted before importing. 4.3.1 General import and export formats Data type Import Formats Unstructured Kubit point cloud (.ptc) Kubit point cloud (.ptc) Point Clouds LAS format (.las) LAS format (.las) PLY point cloud (.ply) PLY point cloud (.ply) Text format (.txt) Text format (.txt) e57 unstructured point cloud e57 unstructured point cloud PCL point cloud (.pcd) Export Rec. Export Formats proprietary formats (.rup) (.rgp) Grid Point Comma separated values (.csv) Generic binary raster (.*) Clouds DEM ascii header+matrix (.asc) All the formats for unstructured point Radscan text file (.txt) JRC 3D Reconstructor range and reflectance (.rrf) clouds and proprietary formats format (.rrf) Text format (.txt) Stonex Reconstructor format (.x3s) 43 Triangle 3DS (.3ds) 3DS (.3ds) Meshes PLY mesh (.ply) DXF (.dxf) WRML (*.wrl) PLY mesh (.ply) JRC 3D Reconstructor vg3 (.vg3) WRML (.wrl) Text format (.txt) JRC 3D Reconstructor vg3 (.vg3) Text format (.txt) DXF polyline (.dxf) Polylines DXF polyline (.dxf) List of points (.txt) Trajectories DXF trajectory (.dxf) (.rtm) (rpl) (.rtr) Trajectory from point list (.txt) Movies AVI (any video codec supported by the OS) Complete projects (.recprj) (.r2s) (.siprj) Table 8: Import/export formats 4.3.2 Convert x3r files with “X300 Converter” tool X300 raw files (x3r) can be easily converted to Stonex Reconstructor format using the free tool X300 Converter. Reflectancy: manually set the range Conversion options values for the reflectance (only for ASCII conversion) (only for ASCII conversion) Deatination formats: Select the x3r file to convert - Stonex STX (x3s) - ASCII txt PW parms: - ASCII csv manually enter the pulse width-reflectance Enable picture conversion from x3i Press here to start file conversion to jpeg conversion parameners. (overwrite pre-set scanner settings) The converted files are placed in the same folder of the raw data. 44 4.3.3 Convert x3a files with “X300 Converter” tool X300 archive files (x3a) can be easily converted to Stonex Reconstructor format using the free tool X300 Converter (version 0.80 and following). Reflectancy: manually set the range Conversion options values for the reflectance (only for ASCII conversion) (only for ASCII conversion) Deatination formats: Select the x3a file to convert 1.Stonex STX (x3s) 2.ASCII txt PW parms: 3.ASCII csv manually enter the pulse width-reflectance conversion parameners. Enable picture Press here to start conversion from x3i file conversion to jpeg (overwrite pre-set scanner settings) The converted files are placed in the same folder of the X300 archive file. 45 4.3.4 Import and color the X300 point clouds Open Stonex Reconstructor from the Windows Program menu. Select New Project to create empty workspace or Open project to continue and existing Reconstructor project. The import workflow is identical in both cases. From the File menu select Import Format and then Grid point Cloud. Browse the hard disk and select the x3s files to import. Note - The program automatically creates a subforlder named “Imports” inside the project folder. The user can chose whether to use this subfolder to store the raw data or not (it is not mandatory). To enable the coloring of the point clouds with the pictures taken with the internal cameras, enter the calibration files (.cal) downloaded together wit the raw data in USB mode (par. 3.5.3). 46 IMPORTANT - The calibration files are two embedded into the X300 configuration, they are unique for each scanner and marked with the serial number of the unit. The use calibration files other that the ones associated with your scanner can lead to errors in the color blending process. Enter the calibration files: the prefixes “U” and “D” stand for UP camera and DOWN camera. Select the file marked with “U” (e.g: U_X300PS300111.cal) for the UP camera and the file marked with “D” (e.g: D_X300PS300111.cal) for the DOWN camera. Browse and select also the folder that contains the pictures. Press the Import button to start the import and colouring process. Press the Skip button to load the scan without applying the color blending. The program automatically creates the Cameras related to the pictures and the Grid Point Clouds related to the scan data. Cameras Point cloud 47 To display the point cloud on the screen, left click on the item in the Project window and select Load model. Project window The model is loaded into the workspace. To apply the pictures on the point cloud, select the item in the Project window, move to the the Property browser and change the Color Mapped property from Reflectance to Color. Property browser 48 The color mapping is applied on the point cloud. 49