1
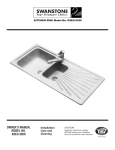
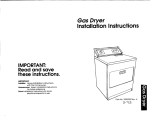
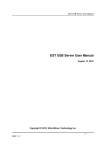
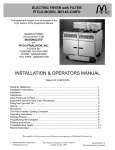
ENGLISH
FRANCAIS
Installation and Operation Manual
For Gas Fryers
Covering Models
DD-24RUFM
DESIGN
CE
RT IF I ED
Pitco Frialator, Inc.,
L20-247 Rev 2 (05/11)
P.O. Box 501, Jct I-89 & I-93 Concord, NH 03302-0501 • 509 Route 3A, Bow, NH 03304
(800) 258-3708 • (603) 225-6684 • FAX (603) 225-8497 www.pitco.com
TO THE PURCHASER, OWNER AND STORE MANAGER
Please review these warnings prior to posting them in a prominent location for reference.
WARNING
DO NOT store or use gasoline or other flammable
vapors and liquids in the vicinity of this or any other
appliance.
WARNING
Improper installation, alteration, service or
maintenance can cause property damage, injury or
death. Read the installation, operating and
maintenance instructions thoroughly before installing
or servicing this appliance.
WARNING
Installation, maintenance and repairs should be
performed by a Pitco Authorized Service and Parts
(ASAP) company technician or other qualified
personnel. Installation, maintenance or repairs by
unauthorized and unqualified personnel will void the
warranty.
WARNING
Installation and all connections must be made
according to national and local regulations and codes
in force.
WARNING
A country approved all pole circuit breaker with a
minimum open contact gap of 3mm must be used for
proper installation. (CE countries)
WARNING
During the warranty period if a customer elects to use a
non-original part or modifies an original part purchased
from Pitco and/or its Authorized Service and Parts
(ASAP) companies, this warranty will be void. In
addition, Pitco and its affiliates will not be liable for any
claims, damages or expenses incurred by the customer
which arises directly or indirectly, in whole or in part,
due to the installation of any modified part and/or
received from an unauthorized service center.
WARNING
This appliance, when installed, must be electrically
grounded in accordance with local codes, or in the
absence of local codes, with the National Electrical
Code, ANSI/NFPA 70, or the Canadian Electrical Code,
CSA C22.2, as applicable.
WARNING
DO NOT alter or remove structural material on the
appliance to facilitate storage or for any other reason.
WARNING
This appliance is intended for professional use only
and should be operated by fully trained and qualified
personnel.
WARNING
DO NOT use the electrical cord as a leash to move the
appliance. Series injury and appliance damage can
occur.
WARNING
If the supplied power cord or receptacle is damaged, it
must be replaced by a Pitco Authorized Service and
Parts (ASAP) company technician, or a similarly
qualified person in order to avoid a hazard.
WARNING
The appliance is NOT jet stream approved. DO NOT
clean the appliance with a water jet.
WARNING
DO NOT attempt to move this appliance or transfer hot
liquids from one container to another when the unit is
at operating temperature or filled with hot liquids.
Serious personal injury could result if skin comes in
contact with the hot surfaces or liquids.
WARNING
DO NOT sit or stand on this appliance. The appliance’s
top panel, filter pan, filter carriage, pan cover is not a
step. Serious injury could result from slipping, falling
or contact with hot liquids.
WARNING
NEVER use the appliance as a step for cleaning or
accessing the ventilation hood. Serious injury could
result from slips, trips or from contacting hot liquids.
WARNING
The filter pan should be dry and free of water droplets
prior to use. Serious injury could result from hot steam
vapors when hot oil/shortening mixes with water.
WARNING
DO NOT overfill filter pan with hot oil/shortening. Do
not leave appliance unattended while draining or
refilling with oil/shortening. Over filling the appliance
can cause serious injuries and damage the appliance.
WARNING
The contents of the crumb catch and/or filter pan of
any filter system must be emptied into a fireproof
container at the end of each day. Some food particles
can spontaneously combust if left soaking in certain
types of oil or shortening.
WARNING
Completely shut the appliance down when the
oil/shortening is being drained from the appliance. This
will prevent the appliance from heating up during the
draining and filling process. Serious injury and
appliance damage can occur.
WARNING
This appliance is intended for indoor use only.
WARNING
DO NOT operate appliance unless all panels and
access covers are attached correctly.
WARNING
It is recommended that this appliance be inspected by
a qualified service technician for proper performance
and operation on a yearly basis
WARNING
This appliance is designed to operate on a specific
voltage. This information can be found on the data
plate located on the rear of the appliance
.
WARNING
The power supply must be disconnected before
servicing, maintaining or cleaning this appliance.
2
L20-303
1. (05/11)
L20-247
Rev 2Rev
(05/11)
Pitco Frialator DD 24R-UFM Doughnut Fryer
Introduction
INTRODUCTION
This manual explains how to set up and operate the model DD24R-UFM Doughnut Fryer. When compared with earlier doughnut fryers, this unit uses less shortening and
40% less heat energy. The unit has a special shallow frying tank, designed to process
floating bakery products. The DD 24R-UFM includes a built in filter system, so it is not
necessary to store a separate filter.
3
L20-247 Rev 2 (05/11)
Pitco Frialator DD 24R-UFM Doughnut Fryer
Specifications
American Units
Metric Units
Shipping Weight
550 lbs.
249 kgs
Height Overall
57”
144.8 cm
Height to top of Fry Tank
34”
86.4 cm
Width of Fryer
29-½”
75.0 cm
Width of Drainboard
57-½”
146.1 cm
Hourly Gas Input
72,000 Btu’s
18150 kcal
Gas Connection
½” NPT
1.27 cm
Frying Area
24” X 24”
61 cm X 61 cm
Frying Depth
3”
10.2 cm
Recommended
Shortening Capacity
120 lbs.
54.5 kgs
Doughnut Screen Size
23” X 23”
58.4 cm X 58.4 cm
Electrical Requirements
L20-247 Rev 2 (05/11)
120 V AC, 60Hz, 15 Amps
220-240V AC, 50Hz, 10 Amps
4
Pitco Frialator DD 24R-UFM Doughnut Fryer
Safety Notes
SAFETY NOTES
WARNING! The Model 24R fryer is safe and reliable when it has been installed correctly,
and is operated safely. Pitco Frialator wants to be sure you get the best possible service
from your fryer. It is very important that you read the instructions in this manual before you
install or operate the fryer. If you follow the rules listed below, you should have years of
trouble-free service from your Pitco fryer.
WARNING! There is an open gas flame inside this fryer. The fryer can get hot enough to
set nearby materials on fire. When installing the fryer, allow at least 6 inches (15 cm) of air
space to any material that can burn. Do not stack paper, cardboard, or other burnable material
near the fryer. If you allow burnable material to touch the fryer, or stack it near the fryer,
the material may catch fire. Do not use gasoline near the fryer. Do not store gasoline or
other flammable vapors and liquids near the fryer.
WARNING! When the fryer is operating normally, you should never smell gas. If you do
smell gas, something is wrong. If there is a gas leak, the gas may collect in the building.
The gas may then be ignited by a spark or open flame, causing a dangerous explosion. LP
gas (propane) is heavier than air, and tends to collect at floor level. The gas smell may be
stronger near the floor. Here is some general safety rules:
If you smell gas, turn off the fryer right away, turn off the gas valve in the fryer right
away. Do not press the controller ON/OFF key. Instead, turn off the gas valve in the fryer.
Then turn off the gas at the main gas valve, on the gas tank outside the building, or at the
main gas pipe. Everyone should leave the building right away. Call the gas company and
the fire department, and wait outside the building until they arrive. On the telephone, be
sure to give your name, address and phone number. Do not go back into the building.
Do not light any matches or lighters. Do not turn any electrical switches on or off this can create a spark, which can ignite the gas. Do not use an electric fan to clear the gas.
For more detailed instructions, ask your local gas supplier. Write down the instructions
and post them in a visible place. Be sure everyone understands what to do if they smell
gas.
WARNING! Be sure the fryer can get enough air to keep the flame burning correctly.
When the flame is “starved” for air, it can give off a dangerous gas called “carbon
monoxide.” Even though you can’t see or smell this gas, it can still hurt you.
WARNING! The fryer can also give off carbon monoxide gas if the flue vent is blocked.
See Fig. 2. Blocking the flue vent can also cause the fryer to overheat and cause a fire
hazard. Do not set anything on top of the flue vent, or block it in any way.
WARNING! Each fryer is equipped to work with one type of fuel gas (either natural gas
or LP/propane). The type of fuel gas which the fryer is designed to use is stamped on the
data plate that is attached to the inside of the door. Do not operate the fryer with any other
kind of fuel gas.
5
L20-247 Rev 2 (05/11)
Pitco Frialator DD 24R-UFM Doughnut Fryer
Safety Notes
WARNING! Before operating the fryer, test all fuel gas connections for leaks. Use a
solution of soap and water, or a similar solution. Ask the gas supplier for an approved
substance. Do not use an open flame to test for gas leaks!
WARNING! The fryer is equipped with a three-prong electrical plug. This three-prong
plug is part of a “grounding” system that will protect you if something goes wrong with
the electrical wiring in the fryer. Be sure the three-prong plug is plugged into a matching
three-prong socket. Do not cut or break off the large third prong on this plug, or the protective
system won’t work.
If the fryer does not have a three-prong electrical plug, a qualified electrician should
make all of the main electrical connections. The 120V AC or 220/240V AC current can
cause severe burns, and can even kill you!
NO!
WARNING! Only a qualified electrician
should work with the electrical parts
inside the fryer. Be very careful to avoid
energized electrical parts. Depending on
the type of fryer, some of the internal parts
carry 120V AC or 220/240V AC. This
voltage can be dangerous. Always unplug
the power cord, or turn off the power
before working on the fryer. Plug the fryer
in only when this is necessary to make
test measurements on the electrical
system.
WARNING! Do not use the fryer until
the fryer itself and the installation have
been checked and approved. The fryer and
installation should conform with all
local building, gas, and electrical codes.
WARNING! Do not use the fryer until it
has been cleaned. Before shipment, the
fryer kettle is given a thin protective
coating. Before you use the fryer, clean
the kettle to remove this coating.
WARNING! Clean out the exhaust stack
regularly. Over time, greasy material can
collect in the hood. If this
greasy material becomes too hot, it can
catch fire. Install an automatic fire
extinguishing system if possible.
Fig. 2
WARNING! Turn the fryer control off before draining the shortening.
L20-247 Rev 2 (05/11)
6
Pitco Frialator DD 24R-UFM Doughnut Fryer
Safety Notes
WARNING! The shortening in the fryer may be as hot as 375°F (190°C). If you touch this
shortening, it can cause very bad burns! Always wear oil-proof insulated gloves when you
are pouring or filtering hot shortening.
Do not work on the fryer until the shortening in the kettle has cooled to 135°F (57°C)
or less. Do not move the fryer when it contains hot shortening. Wait until the shortening
has cooled to 135°F (57°C) or less.
WARNING! If the fryer has been turned on, some of the parts may be very hot! Do not fill
the kettle with shortening or touch these parts unless they have cooled to room temperature.
Do not touch the flue outlet, or go near the area over the flue outlet while the burners are
operating.
WARNING! Before turning on the fryer, be sure the burner tubes are covered by at least 1
inch (2.5 cm) of melted shortening. See Fig. 3. Never allow the burner tubes to become hot
while they are surrounded with air. The heating tubes will quickly overheat and scorch the
shortening.
Fig. 3
For testing purposes, you may cover the burner tubes with water. Before you use the
fryer, be sure to remove the water, and fill the kettle with shortening.
WARNING! Do not try to melt a block of solid shortening by placing it on top of the
burner tubes, as shown in Fig. 4. If you are using solid shortening, cut the shortening into
Fig. 4
7
L20-247 Rev 2 (05/11)
Pitco Frialator DD 24R-UFM Doughnut Fryer
Safety Notes
blocks and pack it around the burner tubes, leaving no air spaces. See Fig. 5. If you leave
any air spaces, the burner tubes may burn the shortening as they heat up. This could create
a fire hazard. This will also void the warranty on the frying kettle.
When melting solid shortening in the kettle, use the “melt” cycle, not the normal
heating cycle. During the “melt” cycle, the controller will turn the gas flame on and off
automatically, and heat the shortening slowly. This will help prevent the shortening from
burning.
Fig. 5
WARNING! Be careful not to aim the filtering hose at anyone. When the filtering pump is turned
on, it can shoot hot shortening through the filtering hose. Never turn on the pump switch unless the
end of the filtering hose is aimed into the kettle or the filter pan.
WARNING! If you allow some shortening to spill on the floor, it may be slippery. Clean up any
spilled shortening quickly.
WARNING! If the electrical power is cut oft, the fryer will stop working. Do not turn on the fryer
again for at least 5 minutes. This allows time for extra gas to clear from the area around the fryer.
WARNING! Do not drop any water into the hot shortening. The water can create steam, causing
the shortening to spatter. The hot shortening can cause burns.
L20-247 Rev 2 (05/11)
8
Pitco Frialator DD 24R-UFM Doughnut Fryer
Installation Instructions
INSTALLATION INSTRUCTIONS
Receiving and Assembly
1. Before you begin to install the fryer, read all of the safety notices in the previous
section. This is very important.
2. Unpack the fryer from its packing container. Check the fryer and any accessories to be
sure they weren’t damaged during shipment. If you do notice damage, report it to the
trucking company that brought the fryer. You should report any damage within 15 days
of the time you receive the fryer.
3. The legs may be installed at the factory. If they are not, be sure to install the legs
before you connect the gas supply line. There must be an air space under the fryer. This
allows for easy cleaning under the fryer. The burners must be able to get enough air. If
the burners are “starved” for air, they can give off a dangerous gas called “carbon
monoxide.” See the warnings in the section on “Safety Notes.”
Attach each leg using four 1/4-20 x 5/8 hex-head cap screws, with hex nuts and lock
-washers. These parts are supplied with the fryer. Be sure the screws are tight. Mount
the screws so the heads are inside the fryer, and the points face outward. It may be
easier to attach the legs if you set the fryer on its side or back. If you do this, be sure to
protect the outside of the fryer with cardboard when you lay it down. When you stand
the fryer up again, be careful not to put too much weight on anyone leg or pair of legs.
4. Assemble the drainboard. See Fig. 7. The drainboard can be installed so that it extends
to the right or the left of the fryer.
If you’re going to attach the drainboard to the right side of the fryer, set the drainboard
so the 3/8 inch clearance holes (1 cm) are at the left end of the board. To attach the
drainboard to the left side of the fryer, set the drainboard so these holes are on the right
end of the board.
Slide the hinge rod through the clearance holes in the drainboard, sliding from front to
back. The spacer is a hollow tube that is 1/2 inch (1.2 cm) in diameter and 2-5/8 inches
(6.6 cm) long. Slide this spacer over the part of the hinge rod which protrudes from the
rear hole on the drainboard. Insert the rear end of the hinge rod through the matching
hole in the splash guard.
A 3/8-16 x 2-1/2 hex-head cap screw (6.3 cm long) may be attached to the front top
corner of the kettle. If your fryer includes this screw, remove it. If the screw is not in
place on the fryer, you will find the screw packed with the other parts of the fryer. Fit the
washer under the head of this screw, then slide the screw through the hole in the hinge
rod post. Thread the end of the screw into the matching hole in the top of the fryer.
Tighten the screw securely.
Pivot the drainboard to the right (or left, depending on the direction you want the
drainboard to extend from the fryer). Both support legs should drop into position
against the cabinet side. The pitch of the drainboard can be adjusted by moving
the support legs. When you’re not using the fryer, swing the board back over the kettle
as a protective cover.
9
L20-247 Rev 2 (05/11)
Pitco Frialator DD 24R-UFM Doughnut Fryer
Installation Instructions
Fig. 7
5. A fryer can be converted to burn a different type of gas (LP to natural gas or natural gas
to LP). Several parts must be changed including the main burner orifice, the pilot burner
orifice, and the main gas valve. The user cannot make this conversion. This work should
be done by a Pitco Authorized Service and Parts Dealer.
Electrical Connections
1. If local electrical codes do not apply. Follow the National Electrical Code as you
install the electrical service. In Canada, follow C.S.A. Standard C22.1 and/or local
codes. You should find a copy of the wiring diagram on the inside of the door.
2. The fryer, when installed, must be electrically grounded. Follow the local electrical
codes. If local codes do not apply, follow the National Electric Code, ANSI/NFPA
70-Current. If the fryer is equipped with a three-prong (grounding) plug, this plug should
be plugged directly into a properly grounded three-prong socket. Do not cut or remove
the grounding prong from this plug.
Gas Connections
1. Install the fuel gas service, following local gas codes, if they apply. Otherwise, follow
the National Fuel Gas Code, ANSI/Z223.1-1980. In Canada, follow C.G.A. Standard
B149.1, B149.2 and/or local codes. Contact the local gas supply company to find out the
right size for the gas supply line. The fryer won’t work properly if the gas line is too
small. When making the gas supply connections, use a pipe joint compound that resists
the action of liquefied petroleum gasses.
2. Each fryer is designed to use one type of fuel gas (either natural gas or LP/ propane). The
type of fuel gas which the fryer is designed to use is stamped on the data plate that is
L20-247 Rev 2 (05/11)
10
Pitco Frialator DD 24R-UFM Doughnut Fryer
Installation Instructions
attached to the inside of the door.
WARNING! Do not operate the fryer with any other kind of fuel gas.
3. Before operating the fryer, test all fuel gas connections for leaks. Use a solution of
soap and water, or a similar solution. Ask the gas supplier for an approved substance.
WARNING! Do not use an open flame to test for gas leaks!
4. If you are pressure-testing the gas supply piping, disconnect the fryer from the gas supply.
If the test pressures will be greater than 1/2 psig (3.45 kP A), turn off the main shutoff
valve “upstream” of the fryer. This will disconnect the fryer, and its manual shutoff
valve. If the test pressures will be equal to or less than 1/2 psig., turn off the fryer’s
individual manual shutoff valve.
5. The burner manifold operating pressure should be as specified for the fuel gas for which
the fryer is equipped. Proper manifold operating pressures are indicated on the data plate
attached to the inside of the door of the unit.
6. The main burner flame should be adjusted using the air collars located on the lower
part of each burner. The air collar should be raised or lowered to provide a soft blue
flame with well-defined inner cones. The flames should enter the heat tube without
touching the outside rim of the tube. A properly adjusted flame should not exhibit
“lifting off” from the burner face. This indicates excessive flow. You should not see
yellow tips on the flames. This indicates insufficient combustion air. Once the flames
are properly adjusted, the air collar should be locked in place using the locknut or set
screw provided.
Ventilation, Flue Exhaust, and Fire Extinguishers
1. Refer to local codes if you install a grease extractor, ventilating hood, filter unit, or fire
extinguishing system. If local codes do not apply, refer to the following standards:
Grease Extractor..........ANSI/UL 710-Current..........ANSI/NFPA 96-Current
Ventilating Hood..........ANSI/UL 507-Current..........ANSI/NFPA 96-Current
Filter Unit....................ANSI/UL 900-Current and
ANSI/UL 586-Current........... ANSI/NFPA 96-Current
Fire Extinguishing
(CO2).................UL 154-Current.....................ANSI/NFPA 12-Current
(Dry Chemical)...UL 299-Current....................ANSI/NFPA 17-Current
(Water)...............UL 626-Current.....................ANSI/NFPA 13-Current
(Foam)..............................................................ANSI/NFPA 11-Current
(Sprinklers).........UL 199-Current....................ANSI/NFPA 13-Current
Smoke Detectors..........UL l68-Current.....................ANSVNFPA 72B-Current
Fire Detection
Therrnostats.......ANSI/UL 521-Current...........ANSVNFPA 72B-Current
This listing of installation standards is not necessarily complete. Other nationally
recognized standards may be equally appropriate. For additional information, contact
11
L20-247 Rev 2 (05/11)
Pitco Frialator DD 24R-UFM Doughnut Fryer
Installation Instructions
the American Gas Association, 8501 East Pleasant Valley Road, Cleveland, Ohio
44131.
2. The fryer must have adequate ventilation to prevent the formation of carbon monoxide
gas. We explained this problem in the section on “Safety Notes.” Excessive ventilation
can cause drafts, which may interfere with the proper operation of the burner. On units
with pilot ignition, drafts can also interfere with the pilot.
3. Leave at least 18 inches of open space between the fryer’s flue opening and the intake
of the exhaust hood. Do not connect the blower directly to the flue opening. This will
cause poor temperature recovery, and poor ignition. On units
with pilot ignition, too much draft may also cause the pilot to go out. Too much
draft will generally make the fryer work inefficiently.
The vent system should be designed so that it can be cleaned easily. Clean out grease
and dirt on a regular schedule. This will reduce any possible fire hazard. Install an
approved fire fighting system. Exhaust gas temperatures in the fryer may be as high as
1200°F (650°C). The sensing device that activates a fire fighting system should be
chosen and located properly to reduce “false alarms.”
Installing The Fryer
1. Set the fryer in position. Allow at least 6 inches of clearance from any combustible
walls or materials. In front of the fryer, allow at least 30 inches (76 cm) of space for
the operator.
WARNING! To avoid a possible fire hazard, keep all combustible materials at least 6
inches (15.5 cm) away from the fryer.
2. Be sure the fryer is level. Use the adjustments located in the base of each leg.
3. When the fryer is shipped from the factory, many of the metal parts are covered with a
thin layer of protective oil. Before you use the new fryer, be sure to clean it carefully to
remove this coating. This will also remove any dirt, dust, or foreign matter that may
have accumulated during storage and shipment.
4. If your fryer is equipped with a plain steel vat (not stainless), the surfaces of the vat
should be coated with shortening after it is washed. This will prevent rust from
forming. After the vat is “seasoned”, this not necessary.
L20-247 Rev 2 (05/11)
12
Pitco Frialator DD 24R-UFM Doughnut Fryer
Operating Instructions
OPERATING INSTRUCTIONS
Filling the Fry Kettle WARNING! Be sure the burner tubes are completely covered with fluid before you try to
light either the pilot or main burners.
1. Do not light the burners unless the burner tubes are covered with shortening. The fryer
may overheat and cause a fire hazard. See Figure 3. The pilot burner should be lit
whenever the fryer is waiting to be used. When you turn the fryer on, the flame from
the pilot will light the main burners.
2. Figure 8 shows how to set the valves when you are filling the fry kettle. Close the drain
valve. Swing the handle clockwise so it points to the left. Close the flush valve (yellow
handle). Close the return valve (red handle).
3. Pack the vat with solid shortening up to the min. fill line.
4. If you are using solid shortening, cut the shortening into chunks, and pack it around the
burner tubes, as shown in Fig. 5.
13
L20-247 Rev 2 (05/11)
Pitco Frialator DD 24R-UFM Doughnut Fryer
Fig. 9
“Pilot” position on unitrol
Operating Instructions
Fig. 10
“On” position on unitrol
WARNING! Do not leave any air spaces around the burner tubes. This can create “hot
spots,” which can burn the shortening and create a fire hazard.
Lighting the Pilot 1. The fryer should be plugged in.
2. To light the pilot, find the Unitrol knob inside the cabinet. See Fig. 8. The Unitrol knob
is light brown, and is marked with three positions: Off-Pilot-On. Turn the Unitrol
knob to the Pilot position and push it inward. See Fig. 9.
3. While you’re holding the knob in, light the pilot burner. This burner is located between
the two center burners. See Fig. 8.
4. Hold the knob in, and let the pilot burn for 30 to 60 seconds.
5. Release the knob. The pilot should keep burning. If the pilot goes out when you
release the knob, repeat steps 5, 6, and 7.
Preheating Fryer: Turn Fryer On
· Turn the unitrol knob to the On position. See Fig. 10.
· Press the ON/OFF key
o Controller beeps one standard tone
o Left display shows actual temperature.
o Right display shows temperature status (i.e. “Lo”, “HI” or “rEdY”)
Note: The control selects the last used product key as a default
L20-247 Rev 2 (05/11)
14
Pitco Frialator DD 24R-UFM Doughnut Fryer
Operating Instructions
Fig. 13
Preheating Fryer: Melt Shortening
· When shortening is below 150oF, the fryer is in Melt Mode
o Left display shows actual temperature.
o Right display shows “Lo”
o All Product ID lights are off
o Melt indicator light is on
Note: In Melt Mode the burners cycle on for 8 sec. then off for 22 sec.
Note: Allow 45 minutes for fryer to heat to cooking temperature.
Preheating Fryer: Heat Shortening
· When shortening exceeds 150oF, the fryer switches to Cook Mode
o Left display shows actual temperature.
o Right display shows “Lo”
o A Product ID light is on
o Heat indicator light on
Note: The Product ID light indicates which product program is selected
Using Fryer: Select Product to Fry
· Press the appropriate Product ID key
o Controller beeps three dull tones
o Left display shows actual temperature.
o Right display shows temperature status (i.e. “Lo”, “HI” or “rEdY”)
o Selected Product ID light is on
Heat indicator light cycles on and off with demand for heat
15
L20-247 Rev 2 (05/11)
Pitco Frialator DD 24R-UFM Doughnut Fryer
Operating Instructions
Using Fryer: Wait Until Ready
· Wait until right display shows “rEdY”
o Left display shows actual temperature.
o Right display shows “rEdY”
o Selected Product ID light is on
o Heat indicator light is off
Note: “rEdY” is shown when shortening within –5oF and +10oF of set point
Using Fryer: Start Fry Cycle
· Press the START key
o Controller beeps one standard tone
o Left display shows remaining time in “min:sec”
o Right display shows action required (i.e. droP, --, FLiP, Sub)
o Selected Product ID light is on
Note: Controller will beep a 4 second dull tone if not “rEdY” (i.e. -5/+10oF of set
temperature)
Using Fryer: Fry Yeast Donuts
· Drop a screen of yeast donuts
o Left display shows remaining time
o Right display shows “——”
o Selected Product ID light is on
Note: Since yeast donuts are dropped all at once at the beginning of the cycle a
drop action isn’t shown
Using Fryer: Fry Yeast Donuts
· Flip donuts when right display shows “FLiP” and controller beeps two standard
tones
o Left display shows remaining time
o Right display shows “FLiP”
o Selected Product ID light is on
Note: The controller also beeps two standard tones at end of flip period (i.e. 14
sec.)
Using Fryer: Fry Yeast Donuts
· Remove products
o Controller beeps five standard tones
o Both display flashes “donE“
Note: Controller will reset itself to previously selected product after beeping five
times
L20-247 Rev 2 (05/11)
16
Pitco Frialator DD 24R-UFM Doughnut Fryer
Operating Instructions
Using Fryer: Fry Cake Donuts
· Drop 30 cake donuts, 1 per second
o Left display shows remaining time
o Right display shows “droP”
o Selected Product ID light is on
Note: The Controller beeps one standard tone at the end of 30 second drop period
Using Fryer: Fry Cake Donuts
· Flip donuts when right display shows “FLiP” and Controller beeps two standard
tones
o Left display shows remaining
o Right display shows “FLiP“
o Selected Product ID light is on
Note: The Controller also beeps two standard tones at end of flip period (i.e. 14
sec.)
Using Fryer: Fry Cake Donuts
· Remove products
o Controller beeps five standard tones
o Both display flashes “donE“
Note: Controller will reset itself to previously selected product after beeping five
times
Using Fryer: Other Products
· Drop product – machine cut only
o Controller beeps one standard tone at end of drop period
o Left display shows remaining time
o Right display shows “droP“
Note: A screen of yeast or hand cut products is dropped once the start button is
pressed
Using Fryer: Other Products
· Flip product
o Controller beeps two standard tones at both beginning and end of period
o Left display shows remaining
o Right display shows “FLiP“
Note: 14 seconds are allocated for flipping the donuts
Using Fryer: Other Products
· Submerge products
o Controller beeps three standard tones at the beginning of the period
o Left display shows remaining
o Right display flashes “Sub“
Note: Yeast and cake donuts are not submerged
17
L20-247 Rev 2 (05/11)
Pitco Frialator DD 24R-UFM Doughnut Fryer
Using Fryer: Other Products
· Remove products
o Controller beeps five standard tones
o Both display flashes “donE“
Note: Controller will reset itself to previously selected product after beeping five
times
Turning off the Fryer
1. Press the ON/OFF key to turn the controller off. See Fig. 13. If the main burners are
on, they will go out.
2. Turn the Unitrol knob past the Pilot position, to the Off position. See Fig. 14. The pilot
flame will go out.
3. Do not turn the fryer on again for at least 5 minutes. This allows time for extra gas to
clear from the fryer.
Other features of the Controller
1. Check temperature. To check the temperature press and hold the “TEMP/TOGGLE
CLEAR” key. The left display will show actual temperature and the right display will
toggle between the actual temperature and the programmed temperature. Actual
temperature indicated in the right display is preceded by an “A”. Set (or programmed)
temperature is preceded by a “P”.
2. Hi temperature warning. When the shortening temperature is more than 10 degrees
above the set temperature, the display will show “Hi”. If a fry cycle is started, a 4
second dull tone will be heard at the beginning of the cycle countdown. The unit will
emit a continuous tone if the actual temp is over 400°F.
3. Low temperature warning. When the shortening temperature is more than 5 degrees
below the programmed vat temperature, the display will show “Lo”. If a fry cycle is
started, a 4 second dull tone will be heard at the beginning of the cycle countdown.
4. Probe warnings. If the temperature probe is “open” or “shorted” the computer display
will show “Prob” and will be accompanied by an audible alarm. Call an Authorized
Service Technician.
Fig. 14
“Off” position on unitrol
L20-247 Rev 2 (05/11)
18
Pitco Frialator DD 24R-UFM Doughnut Fryer
5. Check recovery. To check the heat recovery of the fryer, press and hold the “ENTER”
key. The left display will show “rEC” and the right display will show the recovery
minutes. If the recovery time is over 7 minutes, call an Authorized Service Technician.
6. Boil mode. The “BOIL MODE” key is used when boiling out the fryer. Pressing the
“BOIL MODE” key will program the set temperature to 225°F
NOTE: The actual temperature must be below 225°F to enter the boil mode.
NOTE: Monitor water level during boil out. Fry tank may be damaged (and warranty
voided) if water evaporates below top of heat tubes. Do not allow water to boil over
tank.
7. Drain switch. The controller will turn off if the drain valve is opened. If the controller
will not turn on, make sure the drain valve is closed.
8. Setback temperature. Pressing the Product ID button marked “300°F” will cause the
fryer to enter Energy Saving Setback Mode. The set temperature will be maintained
at 300°F. To resume normal frying operations, press the Product ID Key for the product
desired.
19
L20-247 Rev 2 (05/11)
Operating Instructions
Pitco Frialator DD 24R-UFM Doughnut Fryer
FILTER OPERATING INSTRUCTIONS
FILTERING THE SHORTENING
Do this once a day
Assemble the Filter
1. Remove the cover of the filter pan. Take out the filter assembly, shown in Fig. 16
and Fig. 17. If the filter envelope is discolored or dirty, install a new filter envelope.
Remove the round filter screw from the bottom of the filter housing. See Fig. 16. Pull
the filter screen and envelope away from the suction tube. Remove the old filter
envelope from the filter screen and throw it away.
Slide the new filter envelope onto the filter screen. The holes in the envelope should
line up with the holes in the filter screen. Line up the opening on the suction tube with
the holes in the filter envelope and the filter screen. Install the filter screw through the
hole in the filter screen, as shown in Fig. 16. Thread the filter screw into the opening
of the suction tube.
Fold the flap of the filter envelope over the edge of the filter screen. Place the filter
assembly in the filter pan. The filter screw should fit into the hole provided in the
bottom of the pan. Slide the edge of the filter assembly into the clamp on the bottom
of the filter pan. This clamp is designed to hold the folded edge of the filter envelope
in place.
Fig. 16
Filter suction tube
Screw fitting on
bottom of assembly
Filter screen
Filter Envelope
Fig. 17
L20-247 Rev 2 (05/11)
20
Pitco Frialator DD 24R-UFM Doughnut Fryer
Operating Instructions
Drain the Fryer
WARNING! Wear insulated oil-proof gloves when you do this!
2. Figure 18 shows how to set up the fryer. Press the controller ON/OFF button to turn
the controller off.
3. Turn off the gas valve. Turn the handle counterclockwise, so it points to the off
position.
4. Slowly push the filter pan back into the fryer until it stops.
5. Twist the drain nipple into the bottom of the drain valve. The drain hole in the cover of
the filter pan should be just below the opening of the nipple.
6. Connect the filter assembly to the white quick- disconnect fitting. Figure 19 shows
how to use the quick-disconnect. Sprinkle 12 oz. of precoat powder onto the filter
paper.
7. Connect the flush hose to the black quick-disconnect.
8. Open the drain valve by turning the handle counterclockwise, so that it points
downward. The oil will drain into the filter pan.
21
L20-247 Rev 2 (05/11)
Pitco Frialator DD 24R-UFM Doughnut Fryer
Operating Instructions
3
2
1
Ring snaps
back
Ring on
connector
Pull ring
back
Connector
and hose
Push in connector
and hose
Hose is
connected
Fig 19
Using a quick-disconnect
Flushing the Fryer
9. Lift the submerger screen out of the tank, and lock it in position.
10. Open the flush valve (yellow handle) as shown in Fig. 20.
11. Close the return valve (red handle).
12. Remove the tube screen. Carefully place the end of the flush hose inside the tank.
WARNING! Do not aim the end of the flush hose at anyone. Hot oil might come out
of the hose, and burn someone.
13. Hold the flush hose handle. Set the Pump On-Off switch in the Pump On position.
Rinse out the bottom of the tank with the shortening
14. When you are finished, press the pump power switch Off.
Circulate the Oil
15. Close the flush valve (yellow handle), as shown in Fig. 21.
16. Disconnect the flush hose from the black quick-disconnect. Drain the hose into the
filter pan.
17. Open the return valve (red handle).
18. Press the pump power switch to the On position. The shortening will be pumped from
the filter tank, into the fry kettle, and return to the filter tank. The filter paper and
the precoat will remove debris from the shortening. Allow oil to circulate for 5
minutes.
L20-247 Rev 2 (05/11)
22
Pitco Frialator DD 24R-UFM Doughnut Fryer
23
Operating Instructions
L20-247 Rev 2 (05/11)
Pitco Frialator DD 24R-UFM Doughnut Fryer
L20-247 Rev 2 (05/11)
24
Operating Instructions
Pitco Frialator DD 24R-UFM Doughnut Fryer
25
Operating Instructions
L20-247 Rev 2 (05/11)
Pitco Frialator DD 24R-UFM Doughnut Fryer
Operating Instructions
19. When you are through circulating the shortening, press the pump power switch to the
Off position. Allow the shortening to drain from the tank.
20. While the parts of the fryer are still warm (135°F, 57°C), wipe off the submerger
screen and the inside of the tank. Replace the tube screen.
Refill the Fry Tank
21. Place the tube screen back in the fry tank.
22. Close the drain valve as shown in Fig. 22. Move the handle clockwise until it stops.
23. Press the pump power switch to the On position. Wait until the shortening reaches the
level mark, or all of the oil has been pumped out of the filter pan, then press the
switch to the Off position.
24. Close the return valve (red handle).
25. Close the doors. The fryer is ready to operate.
Using the Filter Pan Heater
1. If you put shortening in the filter pan, the shortening will become solid when it cools.
The filter pan has an electrical heater which can be used to warm the shortening in
the filter pan. The pump will not be able to pump the shortening while it is solid.
2. To use the filter pan heater, find the filter carriage power cord at the rear end of the
filter pan. See Fig. 23. Push the filter back into the fryer as far as it will go.
3. Plug the power cord into the socket on the right side of the fryer.
4. Set the heater power switch to the On position. The Heater indicator will light.
5. Leave the heater on until the solid shortening has melted. Press the Heater power
switch to the Off position.
Weekly Cleaning/Boil Out
WARNING! Wear oil-proof insulated gloves as you do this.
1. Preheat shortening to 375°F.
2. Press the ON/OFF key to turn the controller off. If the main burners are on, they will
go out. Turn the Unitrol knob past the Pilot position, to the Off position. See Fig. 14.
The pilot flame will go out.
3. Drain the shortening into the filter pan and turn the pan heater on.
Note: Put clean filter paper in filter pan before draining shortening into pan.
4. Remove the tube screen. Use hot shortening to flush out any remaining sediment in the
bottom of the kettle.
5. While the fryer parts are still warm (135°F or less), wipe off the tube screen and the
inside of the kettle.
6. Close drain valve (handle to the left) and fill vat with water to one inch from top.
7. Relight pilot, turn computer on and press “BOIL MODE”.
L20-247 Rev 2 (05/11)
26
Pitco Frialator DD 24R-UFM Doughnut Fryer
Operating Instructions
NOTE: The fryer must be below 225°F to enter the boil mode.
8. Add the amount of boil-out compound indicated on package label.
WARNING! The fry vat will maintain 225°F and must be monitored so that it does not
boil over or that the water does not boil off below the burner tubes.
9. Let the vat boil for at least one hour or until the shortening deposits are softened.
10. Turn off the controller and pilot.
11. Use a scrub brush to scrub the top half of the fry vat and burner tubes to remove any
residue.
12. Remove filter pan and drain water down to burner tubes into a container that boiling
water will not melt.
13. Scrub the rest of the inside of the fryer and burner tubes with a nylon scouring pad.
14. Drain the remaining water.
15. With a nylon scouring pad, scrub any remaining carbon deposits.
Note: Do not use steel wool, wire brush or any type of abrasive cleaner to scrub tubes
and sensing bulbs.
16. With the drain valve open, rinse the vat.
17. Close the drain valve and refill with water to one inch from the top.
18. Relight pilot, turn controller on and press “BOIL MODE”.
19. When the water begins to boil, add one pint of vinegar to fryer and allow to boil for
five minutes.
20. Turn off the controller and pilot. Drain the water and vinegar, and rinse the vat with
clean water.
21. Wipe the vat dry with a clean cloth. Replace the tube screen.
22. Close the drain valve (points left). Pump the shortening back into the vat or pack the
vat with new shortening.
23. Remove the drain nipple. The fryer is ready to operate.
Cleaning As Needed
1. If any shortening spills or splashes onto the outside of the fryer, wipe it up while it is
still warm with a clean soft cloth.
2. If you have to clean any painted surfaces, use warm water and a mild detergent.
3. If you have to scrub to remove tough spots or stains, use a nonabrasive scouring
powder and/or pads.
Recommended Frying Practices
1. Use only the best quality shortening - it will last longer than the cheaper grades. Good
shortening will also produce foods that taste and look better.
2. The shortening will break down if it gets too hot, or if it is exposed to air or light, or if
it is mixed with water or salt. Fry the doughnuts at the proper temperature setting.
Keep the kettle covered with the drainboard when you’re not using the fryer.
3. Filter the shortening at least once a day.
27
L20-247 Rev 2 (05/11)
Pitco Frialator DD 24R-UFM Doughnut Fryer
Operating Instructions
4. Keep the kettle clean. Follow the instructions in the section on “Weekly Cleaning.”
5. Try to keep water out of the shortening.
If the Power Fails
If the main power (120V or 220/240V AC) fails, the fryer will stop operating and
turn off the main burner gas automatically. Shut off pilot by turning unitrol knob to the
off position.
If you smell gas
When the fryer is operating normally, you should never smell gas. If you do smell
gas, something is wrong. If there is a gas leak, the gas may collect in the building. The gas
may then be ignited by a spark or open flame, causing a dangerous explosion. LP gas
(propane) is heavier than air, and tends to collect at floor level. The gas smell may be
stronger near the floor. Here are some general safety rules:
If you smell gas, turn off the gas valve in the fryer right away. Do not press the
controller ON/OFF key. This switch could create a spark, and light the gas by accident.
Also turn off the gas at the main gas valve, on the gas tank outside the building, or at the
main gas pipe.
Everyone should leave the building right away. Call the gas company and the fire
department, and wait outside the building until they arrive. On the telephone, be sure to
give your name, address and phone number. Do not go back into the building.
Do not light any matches or lighters. Do not turn any electrical switches on or off this can create a spark which can ignite the gas. Do not use an electric fan to clear the gas.
For more detailed instructions, ask your local gas supplier. Write down the instructions
and post them in a visible place. Be sure everyone understands what to do if they smell gas.
L20-247 Rev 2 (05/11)
28
Pitco Frialator DD 24R-UFM Doughnut Fryer
29
L20-247 Rev 2 (05/11)
Pitco Frialator DD 24R-UFM Doughnut Fryer
L20-247 Rev 2 (05/11)
30
Pitco Frialator DD 24R-UFM Doughnut Fryer
31
L20-247 Rev 2 (05/11)
In the event of problems with or questions about
In the event of problems with or questions about
your order, please contact the Pitco Frialator factory,
from 8:00 a.m. - 5:00 p.m., Eastern Standard Time,
Monday through Friday, toll-free at:
your order, please contact the Pitco Frialator Authorized Service and Parts representative (ASAP)
covering your area, through Pitco at:
800) 258-3708 US and Canada only or
(603) 225-6680
L20-247 Rev 2 (05/11)
(603)-225-6684
(800) 258-3708 US only, 24 hours