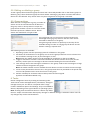
1
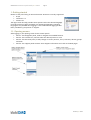
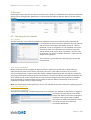
MobiDM 4.4. Customer Quick Guide Version: x.x MOBIDM Customer Quick Guide, 4.4. 2012 Index Index Introduction Help files & Tooltips Filtering 1. Getting started 1.1. Opening screen 2. Procedures 2.1. Objects 3. Contracts 4. Devices 4.1. Changing device details 4.1.1. Profile 4.1.2. Device enrollment 4.1.3. Trigger a connection. 4.1.4. Hardware & Software inventories 4.1.4. Compliance & Security: 4.1.5. Recovery 4.1.6. Backup & Restore 4.1.7. Remote wipe: 4.1.8. Locator: 4.1.9. Personal Enterprise Apps portal: 4.1.10. Usage monitor 4.1.11. APN settings: 4.2. Identity manager* 5. Groups 5.1. Add a group 5.2. Editing or deleting a group 5.3. Group-‐actions 6. Tasks 6.1. Procedures 6.2. Adding a task 6.2.1. BlackBerry Service Books 6.3. Configuration task 6.3.1. Passcode: 6.3.2. Nitrodesk Touchdown: 6.3.3. Restrictions 6.3.4. Device encryption 6.4.5. Exchange 6.4.6. VPN settings 6.4.7. APN and Wi-‐Fi settings 6.4.8. Web Clips 6.4.9. MobileConfig 6.4.10.Favorites 6.4.11. Device 6.5. File-‐task 6.6. Backup task 6.7. Enterprise App store 6.7.1. Personal Enterprise Apps store 6.8. Locator 6.9. Security-‐profile 6.10. Usage-‐monitor Page 1 1 3 3 3 4 4 5 5 5 6 6 6 6 6 7 7 7 7 7 7 7 8 8 8 8 8 9 9 9 10 10 10 10 10 11 11 11 12 12 12 12 12 13 13 13 13 14 14 14 14 14 © VeliQ April 2012 MOBIDM Customer Quick Guide, 4.4. 2012 7. Reports 7.1. Predefined reports 7.1.1. All Devices 7.1.2. Active Devices 7.1.3. Devices by creationdate 7.1.4. Inactive Devices by creationdate 7.5. Jailbroken Devices 7.1.6. Device status 7.1.7. Devices and groups 7.1.8. Invoicing 7.2. Custom reports 7.2.1 Add report 7.2.2. Data options 7.2.3. Filter options 7.3 Exporting reports Page 2 15 15 15 15 15 15 15 15 15 15 16 16 16 16 16 © VeliQ April 2012 MOBIDM Customer Quick Guide, 4.4. 2012 Page 3 Introduction MobiDM offers mobile device management for any device or any platform from a single portal. Customer administrators are able to start the device enrolment procedures, add groups and tasks to manage and configure devices. Help files & Tooltips In MobiDM 4.x much of the information regarding the use of the portal has been incorporated within the portal itself. In the portal help files are available, indicated with question mark icons and tooltips are indicated with and exclamation mark icon . Help files provide information regarding relevant screens or panels. They describe procedures, steps and further information about settings, tasks or groups. From time to time references are made to the MobiDM Wiki pages or to external sites for additional information. All the help file information is content related and only shows information regarding the current actions or screens. To open help files simply click on the icon. This opens a new screen. Tooltips provide lines of text with information regarding a specific field or reference. A tooltip is displayed the moment the mouse hovers over the icon and closes again when the mouse pointer is moved away. Fields colored orange are mandatory fields. The correct information must be entered here. Sometimes information is required in a specific format. The tooltip at these fields provides additional information. If a field changes from orange to red, the information entered does not conform to the required format. For example when confirming a password the two values entered may not match. When attempting to save the screen, error messages warn about incorrect details. Filtering Lists or overviews can be ordered per column. Simply click on the small triangle at the end for the column name. A submenu opens offering the option to sort the column in ascending or descending order. Note: This filter is not available for all columns. © VeliQ April 2012 MOBIDM Customer Quick Guide, 4.4. 2012 Page 4 1. Getting started Browse to the portal using an Internet browser. Browsers currently supported: • IE 8,9 • Firefox 3.6 – 9 • Chrome 16 The login screen already provides some options. Select the desired language. Currently German, English and Dutch are supported languages. Changing language is also possible after logging in. The credentials for logging in have been provided by your partner or supplier. 1.1. Opening screen After logging in, the opening screen shows several panels. • Panel 1. The Navigation panel, used to navigate the available features • Panel 2. The Context tree, used to select the desired partner or user • Panel 3. The Overview panel, to add, change or create: partners, users, contracts, devices, groups and tasks • Panel 4. The support panel contains some support information and a link to the Wiki pages. © VeliQ April 2012 MOBIDM Customer Quick Guide, 4.4. 2012 Page 5 2. Procedures As a customer a number of management options are available. This chapter explains the most common procedures for a customer administrator using the portal. The Partner administrator will have added at least one customer administrator account. More customer administrators can be added. Contact the partner administrator if more admin accounts are required. 2.1. Objects There are five objects available in the navigation panel. When selecting one of the objects in the navigation panel, the panel on the right will change showing the relevant information or lists. When the object ‘Contracts’ is selected the overview-‐ screen lists the available contracts. The same is true when selecting objects ‘Devices’, ‘Groups’, ‘Tasks’ or ‘Reports’. To enroll or manage large numbers of devices, start by editing the necessary information for each device. Devices can be imported using an excel sheet. This way quite a few additional details can be imported at the same time. Contact the MobiDM partner to assist in importing device details. To manage devices they need to be added to one or more groups. Several management tasks are available in the portal. Tasks can be created, changed or deleted. Adding tasks to de respective groups makes them available for all devices assigned to this group. 3. Contracts The procedure for managing devices starts with contracts. Customers have one or more contracts. Additional contracts can be acquired from the partner. Existing contracts can be extended increased. Each contract contains one or more devices. Only the partner is able to add or remove devices from a contract or add additional contacts with devices. The contract-‐overview panel lists the available contracts and devices per contract. © VeliQ April 2012 MOBIDM Customer Quick Guide, 4.4. 2012 Page 6 4. Devices Selecting the object ‘Devices’ the device overview-‐screen shows the available devices. Details of individual devices can be changed here. Double click or select the desired device and click ‘Edit’ to see the options available. 4.1. Changing device details 4.1.1. Profile This tab shows the various details available for the device. Some of the field contents can be altered. It is important to enter information about the security question and its answer. This enables the option to recover a device password in case it is forgotten*. It is also possible to instruct the users to enter the information for the security question and answer for their device. Enter a question in the first field for example: ‘my mother’s maiden name was: ’ Next enter the answer to the question. *This question is presented when attempting to recover the lost password. 4.1.2. Device enrollment Before the device can be managed through the portal it needs to be enrolled first. Quite often the administrator will start the enrolment procedure, but a user is also able to initiate it to (re) enroll a device. Enrolling a new or replacement device with a different operating system the original, change the operating system before attempting to enroll the device. To enroll the device, select the tab and click one of the buttons in the screen. Devices able to receive a text message can use the enrollment procedure using information in a text message send to the device. Devices able to receive only email can us an enrollment procedure from an email message. Note: For details about enrolling a device, see the user manual for the type of device or operating system: http://wiki.mobidm.com 4.1.3. Trigger a connection. This tab is not available for all operating systems. If it is available, for example for iOS devices, it triggers a connection from the device to the portal. Simply click ‘Send’ to send the command to the device. This may be used to update information or details immediately instead of waiting until the next automatic connection (Heartbeat) © VeliQ April 2012 MOBIDM Customer Quick Guide, 4.4. 2012 Page 7 4.1.4. Hardware & Software inventories These two tabs list an inventory of the available hardware on the device or the software, including installed apps. etc. The device must be enrolled first before this information can be retrieved from the device. 4.1.4. Compliance & Security: The compliance and security feature is available only for iOS devices. Under the device details a new tab is added showing the current state of the security settings, if the device complies with the Passcode policies, the iOS tasks assigned to the device and its current status. See the general Portal description for more information about Compliance & Security. wiki.mobidm.com 4.1.5. Recovery Only available for Windows Mobile and Symbian! If the administrator has set a security profile of 1 and higher and you have forgotten the access code for the device, it can be reset using a reset code. On the device login screen, use the menu option in the log-‐on screen for Windows Mobile, choose the option; ‘I forgot’ (Windows Mobile) or for Symbian the option ‘Recover password’. A so-‐called ‘Device Key’ is generated on the screen of the mobile device. Enter this code here and press ‘Generate recovery code’. Enter this recovery code on your mobile device. Choose a new password to regain access to the device. 4.1.6. Backup & Restore For Windows Mobile and Symbian devices it is possible to create a backup of (a part of) the information on the device. Earlier backups can be restored to the device. Backup and restore tasks defined by the administrator are listed below. Check the checkbox in front of the backup task and select the desired backup or restore function below, by clicking on the appropriate button. 4.1.7. Remote wipe: Devices, lost or stolen, can be wiped remotely. For iOS there is the option to lock the device, completely wipe the device or to select a partial wipe. The partial* wipe clears all (personal or business) data from the device, leaving the OS intact. Device Lock* locks a device requiring the user to enter the device password to gain access to the device. * Partial wipe and device lock are not available for all operating systems. Note: A device-‐ or partial wipe cannot be undone. Once the command has been sent, the device will be wiped as soon as it receives the command. For both a full and partial Wipe the device profile is wiped. The device needs to be re-enrolled to reinstate it in MobiDM. ATTENTION! Remote Wipe for Windows Mobile, Symbian and Android use a special text message. Wiping the device depends on the device actually receiving this message, no full guarantee can be given. 4.1.8. Locator: This tab shows the approximate location of the device. This is not available for all types of OS. Create the ‘Locator’ task to use this option. (See chapter: 6.10 for details) 4.1.9. Personal Enterprise Apps portal: To provide Apps for an iOS device uses the new Enterprise App store, the ‘Personal Enterprise Apps Portal’. Users will be presented with a Web Clip on the home screen of the device. Clicking the link opens the new Personal Enterprise Apps © VeliQ April 2012 MOBIDM Customer Quick Guide, 4.4. 2012 Page 8 Portal. The portal shows a list of available Apps. Click ‘Install’ to download and install Apps on the device. For more information about the Personal Enterprise Apps Portal is found in the MobiDM wiki. wiki.mobidm.com 4.1.10. Usage monitor When enabled, the device logs the usage of voice, data and text messaging. Data usage is logged per day, together with the used APN and roaming information. 4.1.11. APN settings: This tab provides the configuration to connect a device to a Wireless network. To set the APN for multiple devices use a config task. (See chapter 6.4.7) 4.2. Identity manager* This feature ensures a close relationship between the device and the business network environment. Identity manager makes it possible to exchange credentials from the internal fixed network (Active Directory) to the portal, enabling mail and PIM information to be exchanged between the mail server and the device. Using credential management sets the security policies for MobiDM according to the same level and policy of the internal network. * Identity manager is part of the Mobile Integrated Cloud. Different installation procedures are required. Consult additional information about Mobile Integrated Cloud. More information will be available on: wiki.mobidm.com 5. Groups In order to manage devices or enable tasks to be executed on multiple devices, they need to be assigned to at least one group. Add all the necessary groups and assign the devices to at least one of these. For example, create a group for each type of operating system. Devices can be assigned to more than one group. Remember that each device must to be part of at least one group in order to receive tasks and settings. 5.1. Add a group To add a new group, simply click ‘New’, enter a name for the group and click ‘Save’. Choose a name for a group indicating its purpose. For large numbers of devices the list of groups can grow extensively. The name of a group will help to distinguish between the purposes of different groups. It could indicate the operating system, anorganizational unit or a user profile. After saving the new group a new screen opens. Use this screen to select the devices that are to be assigned to the group. To add a device to a group, select the desired devices and click the arrow pointing to the group. Alternately drag the selected devices to the left panel into the group. On the left side is an overview of tasks that have been assigned to the group. (See chapter 6 for information about tasks.) Remember that a device can be a member of more than one group but a device must be assigned to at least one group in order to receive tasks, Apps or settings. © VeliQ April 2012 MOBIDM Customer Quick Guide, 4.4. 2012 Page 9 5.2. Editing or deleting a group To edit a group select the desired group and click ‘Edit’. Alternately double click on the chosen group. To delete a group, select the desired group and click ‘Delete’. Deleting a group does not mean that tasks or devices are also deleted. They remain intact only their assignment to the group is removed. 5.3. Group-actions When devices are assigned to a group, a number of actions can be set and executed for all devices in the group. Click on ‘Group actions’ to open the group action window. It shows an overview of tabs. Each tab represents a different action. Not all actions are available for all types of OS. For each group one or more actions can be executed. The advantage of using a group action is that the action will be executed to all devices in the group. Using these group actions is a quick way to send any of the available settings or tasks to a large group of devices at ones without creating a separate task. The following actions are available: 1. Operating system: Sets the operating system for all devices in the group. 2. Enrollment of all the devices in the group: Use to enroll a group of devices at once. Choose how the enrollment message is sent, by text message or e-‐mail. Note: Either the mobile number must be available for each device or the email address. 3. Trigger a connection: Initiates a connection between the devices and the server (only for iOS devices). Used to push new settings to devices instead of waiting for the next heartbeat. 4. Text message: Send a text message to all devices in this group. Used to send a message to a large number of devices assigned to the group. Note: the mobile number must be available for each device in order to receive the text message. 5. Create a new password for device users in this group. Reset the user password to the portal. Only use this if de password is the same for all users in the group. 6. Perform a backup for all devices when a backup task has been assigned. (Symbian and Windows Mobile only) 6. Tasks Device management starts by creating and executing tasks. Tasks can be used to add applications, information, settings or manage security etc. for devices. The portal offers a large number of different options and settings. They are available to devices, depending on the type of device or operating system. Note: Creating tasks and execute them on a device may affect the user. Proper communication about policy changes or different settings is advised to inform users of any changes they me be confronted with. © VeliQ April 2012 MOBIDM Customer Quick Guide, 4.4. 2012 Page 10 6.1. Procedures Use the following steps to create and execute tasks: 1. Create a task 2. Enter all the details required. 3. Save the task 4. Assign the task to a group. 5. Activate the task. 6.2. Adding a task Click ‘New’ in the task overview-‐screen to add a new task. The ‘Add task’ screen opens. The different tabs represent different types of tasks. Not all tasks are available for all types of operating system. When an operating system is selected the tabs of tasks not available for the selected operating system are not shown. First select the operating system before selecting the desired type of task. If no operating system is selected it is not possible to proceed. An error message will indicate that an operating system needs to be selected. Table 1. Tasks per operating systems Feature Android iOS Symbian Windows pro Windows Stn Enter a name for the task. Optionally, enter X X X X X additional information about the task, explaining its Configuration tasks File tasks X X X X purpose and use for certain devices. Backup task X X X Enterprise Appstore X X X X X Table 1. Shows the types of tasks available for the Locator task X X Security Profile X X X each operating system. Usage monitor X X X 6.2.1. BlackBerry Service Books For BlackBerry devices an overview of the available service books on the BlackBerry Enterprise Server (BES) is available. Select the desired services books for the task from the drop down list. The selected service Books are added to the overview screen below the ‘Select policy’ field. The figure on the left shows a screen shot of both the dropdown list and the Listed Rules. Table 2. 6.3. Configuration task Feature Passcode Nitrodesk Touchdown Restrictions Device Encryption Exchange VPN APN WiFi Web Clips Mobil Config upload Favorites Device Configuration task features Android iOS Symbian X X X X X X X X X X X X X X X X Windows pro Windows Stn Configuration tasks support a number of features. X X Table 2. lists the available features per operating X X system. (For BlackBerry tasks see paragraph 6.2.1.) X X X X X X The fields in the tabs are listed depending on the chosen operating system of the device. Select the X X X X desired tab and place a tick in the first box to enable entering the desired settings. Fields only become available to be changed after the feature has been enabled. 6.3.1. Passcode: The passcode-‐feature provides settings for a device regarding the quality of the passcode used to access the device. If selected and send to devices, using a pass code to gain access to the device becomes © VeliQ April 2012 MOBIDM Customer Quick Guide, 4.4. 2012 Page 11 mandatory. This tab provides a number of different settings for passcode duration, complexity, time out period and the number of attempts to enter the correct passcode. Use the tooltips at each field for more information about the field and the required settings. Note: When the maximum number of attempts to enter the passcode on the device is exceeded, the device will perform a hard reset! 6.3.2. Nitrodesk Touchdown: Nitrodesk Touchdown is a third party application for Android. It is used to set Exchange settings on a device, and includes a large number of settings to configure email, contacts agenda etc. To use Nitrodesk Touchdown a separate license is required. Tick the first box to enable the configuration of Nitrodesk Touchdown. For more detailed information about all the available field settings use the relevant tooltips. Using Nitrodesk Touchdown to manage mail server settings and device behavior for mail, contacts and agenda, Nitrodesk must be installed according to the process provided in the device quick guides. If Nitrodesk is not installed according to these procedures it may not be possible to manage the settings on the device even if this task is active and pushed to the android devices. See the device installation quick guides: wiki.mobidm.com Table 3. 6.3.3. Restrictions Quite a number of restrictions are available in this tab. Depending on the operating system the available tabs will vary. Table 2 provides a complete overview of all the restrictions available per operating system. (Settings for BlackBerry devices are available in the BlackBerry Service books. See paragraph 6.2.1.) iOS features the most restriction settings. Most of these are self-‐explanatory. Use the tooltips at each field for more information about the information required. Quite a few options only provide simple radio buttons to allow or disallow a particular feature or option on the device. Note: Blocking certain features, like Wi-‐Fi or Bluetooth may prevent users from accessing business information on a wireless network or prevents the use of accessories. Restrictions Feature Android iOS Windows pro Windows Stn Block Run screen X X Block External applications X X Block starting Apps from SD card X X Block Bluetooth X X Block WiFi X X Use Black/White l ist X X Allow App i nstallation X Allow use of camera X X Allow Facetime X Allow screen capture X Allow auto sync while roaming X Allow V oice dialing X Allow i n-‐App purchase X Allow Multi player game X Game centre friends X Force e ncrypted backup X Allow Youtube X Allow i Tunes X Allow Safari X Safari settings X Enable autofill X Force fraud warning X Enable Java script X Block pop-‐ups X Accept cookies X Allow e xplicit content X Allow Movies X Allow TV shows X Allow Apps X Enable microphone X 6.3.4. Device encryption The feature in this task is only available for Android. The available options are to allow or disallow encryption. © VeliQ April 2012 MOBIDM Customer Quick Guide, 4.4. 2012 Page 12 6.4.5. Exchange The configuration feature ‘Exchange’ provides the necessary settings to connect devices to the Exchange server. Enter all the required details of the server to enable the device to be configured to connect to the server and synchronize email, contacts or agenda details. Note: The option is provided to enter the username, email address and password. However in most cases these details are different per user. If that is the case leave these fields empty and request the users to enter these personal details on the device after the task has been executed. 6.4.6. VPN settings The VPN feature configures devices to connect to a network with a VPN connection. Enter the necessary details of the VPN in the fields to configure a device. The network administrator should be able to provide this information. The tooltips also give additional explanation. 6.4.7. APN and Wi-‐Fi settings The APN tab contains the necessary fields to configure a device for connection to the mobile network. In most cases the mobile operator provides the information for these settings. Incorrect settings will cause the device to be unable to connect to the mobile data network. A tab is also available to configure the Wi-‐Fi settings for the device. Using these two tabs configures all the devices assigned to the relevant group to be configured for the mobile and Wi-‐Fi network. Changes in any of these settings will be sent to all devices and reconfiguring them as specified. 6.4.8. Web Clips When an App is placed in the Personal Enterprise Apps Portal, a Web Clip, linking to the portal is placed on the home screen of the device. The App is placed in the Personal Enterprise Apps Portal. The settings in this tab provide the configuration for the corresponding Web Clips to the App. Enter the URL and select an icon file. Consult the tooltips for more information about the different fields. 6.4.9. MobileConfig Apple iOS has a built in feature to supply the configuration settings of a device using a MobileConfig file. MobiDM allows you to incorporate MobileConfig files and distribute them to the devices. Using MobileConfig means you no longer need to define each individual setting in the task. You can create a MobileConfig file using the iPhone Configuration Utility from Apple. For more information see: Apple support © VeliQ April 2012 MOBIDM Customer Quick Guide, 4.4. 2012 Page 13 6.4.10.Favorites Symbian and Windows Mobile devices support a feature to select a number of favorite website addresses. Using this tab these favorite URLS can be sent to a number of devices at once. Enter the requested details and assign the task to a group of Symbian or Windows Mobile devices. This tab also contains a field to enter the home page of the mobile browser. This is the page the browser opens on start-‐ up. 6.4.11. Device This task configures the settings for connecting the device with a PC. In some cases allowing the device to connect to a PC can be regarded as a security risk and should therefore be disallowed. This task also configures APN settings and Device power configuration. Consult the tooltips for more information. 6.5. File-task Select this task to send a file to a Windows Mobile or Symbian device. When the file-‐task screen opens click ‘New’ to add a file to the list. It is important to enter the correct file path on the device, where the file is to be stored. Next, browse to the desired file. For applications the file type should match the requirements of the operating system of the device. Click ‘Save’ to upload the file and ad it to the list. A file-‐task for distributing application packages is only suitable for one specific operating system. Create another file task for a different operating system. 6.6. Backup task This task allows the device to be configured for a backup and restore task. Enter the file path on the device that requires a backup. Also enter the file path were files can be restored. If information is restored, the original file in this folder on the device will be overwritten. To prevent this create a subfolder to restore a backup file. For example: \My Documents\restore\ or for Symbian C:\Data\restore\. The user can manually move individual files to the desired folder. Since the file paths for Symbian and Windows mobile are different this task is only to be used for one specific operating system. Create another task for another operating system. © VeliQ April 2012 MOBIDM Customer Quick Guide, 4.4. 2012 Page 14 6.7. Enterprise App store This feature is used to send Apps to a device. Create a task for the chosen App and add the App file to the list. When the task is executed on the device, the App can be installed. Click ‘New’ to add the file, provide a name for the app and a description. Optionally allow a ‘Silent install’, the installation proceeds ‘under water’ without the user’s intervention. Ticking the box ‘Mandatory’ makes the App a mandatory app on the device. 6.7.1. Personal Enterprise Apps store For iOS devices a personal Enterprise App store is available. A WebClip linked to the Personal Enterprise App store is placed on the users Home Screen. Enterprise Apps that are added in the portal will be placed in this App store. Apps can be added as Mandatory apps or suggested Apps. See screenshot for a iOS App store Task. 6.8. Locator Creating this task and assigning it to Windows Mobile devices provide information about the approximate location of the device. In the device overview window, a map is shown with the approximate location shown on the map. Click ‘Save’ to save the task and assign the task to a group for Windows Mobile devices. Disclaimer There may be privacy laws affecting the use of the ‘Locator’ feature. Legislation may require that users be informed if the device location information is used. Employees may have the right to grant explicit permission first or that they are able to opt-‐out. It is the sole responsibility of the employer’s to comply. 6.9. Security-profile For Windows Mobile and Symbian, the level of security can be selected for a device. Five levels are available where level 0 means no security level and level 5 the highest available security level for the device. The Overview-‐ screen contains a table listing the different security levels and its policies. 6.10. Usage-monitor This task enables a usage overview for Windows Mobile devices. Simply create and save the task. There are no additional settings necessary. The usage is shown in the device overview-‐screen of the devices assigned to the correct group. It is only available for Windows Mobile. © VeliQ April 2012 MOBIDM Customer Quick Guide, 4.4. 2012 Page 15 7. Reports Select the last option from the navigation panel ‘Reports’. The Report overview screen shows a list of predefined reports. It is also possible to create customized reports. 7.1. Predefined reports 7.1.1. All Devices This reports list all the available devices of a customer. This includes devices that have not yet been enrolled. It includes additional information like user details, email address etc. 7.1.2. Active Devices This report is similar to the previous one except it only lists the devices that have been activated in the portal. 7.1.3. Devices by creationdate This is an overview of the devices and the date the entries were added or created in the portal. 7.1.4. Inactive Devices by creationdate This is an overview of the devices that have been activated in the portal and the date these entries were added or created in the portal. 7.5. Jailbroken Devices For iOS devices this lists any devices that have been jailbroken. Jailbroken devices may cause a security risk or cannot be properly managed or supported. 7.1.6. Device status This report lists the device status as is shown in the portal. 7.1.7. Devices and groups This is an overview of all devices and the groups they belong to. 7.1.8. Invoicing If available, this is an overview of the usage of the device. This may assist in monitoring or managing the contract with the mobile network provider. Note: The Invoicing report is only available for partners, showing an overview of available partners, customers and devices. © VeliQ April 2012 MOBIDM Customer Quick Guide, 4.4. 2012 Page 16 7.2. Custom reports It is also possible to create customized reports. A number of sectors are available to create one or more custom reports. 7.2.1 Add report Click ‘New’ to create a new custom report. The Add Report screen opens. First enter a name for the report. Optionally enter a description for the report to explain the settings and use of this report. 7.2.2. Data options First tick the box ‘Customer’. A list of available options (selectors) becomes available. Select one or more of these selectors to specify the customer details for the report. The next column shows another set of selectors. Two options are available: Customer or Administrator. Selecting one of these provides another set of selectable details. Select one or more of these as required. If the option ‘Customer’ is selected in the second column a third column becomes available again with several options in the drop down menu. As before select the desired entity from the dropdown menu and next one or more options can be selected. Using these various selectors a detailed custom-‐made report is created. 7.2.3. Filter options Besides the custom-‐made report, it is also possible to set one ore more filters. In the panel ‘Filter options’ click ‘New’ and select an object from the dropdown menu. Next choose the desired operand from the second dropdown menu. Depending on the selected operand, enter the desired value in the third field. Add as many filters as required. Finally click ‘Save’ to save the report or on ‘Preview’ to check if the report shows the desired data. 7.3 Exporting reports All reports can be exported to an Excel format. Both in the Report overview window as the View report window click ‘Export to XLS’ to export. This will download the file in .xls format to the local computer. © VeliQ April 2012