1
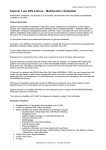
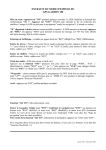
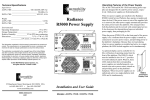
A-Series Displays
Quick Reference guide
About this document
Powering the display ON/OFF
This Quick Reference Guide summarizes the operation of your
A-series display. This guide assumes that the display has been
installed and set up in accordance with the procedures in the installation guide and that you have read the User reference manual on the
accompanying CD-ROM.
To Power ON:
Safety
Press and hold the POWER key until the power down
countdown reaches zero. The unit is powered OFF.
Releasing the POWER key before the countdown is complete cancels the power off sequence.
WARNING: Read the user manual
Before using the software read the safety information
contained within the user reference manual on the
accompanying CD-ROM.
WARNING: Navigation aid
This product is intended to serve only as an aid to
navigation. Use of specific features such as AIS
overlay, and various cartographic aids are meant
only to aid safety and decision-making. These
features cannot be relied upon as complete or
accurate as their use and availability may vary
locally. It is your responsibility to use caution,
sound judgement, official government charts,
notices to mariners and proper navigational skill
when using this or any other electronic device.
Press and hold the POWER key until the screen shows
the Raymarine logo. The unit starts up in the last used display configuration.
To Power OFF:
Simulator
Your A-Series display includes a simulator mode that enables you to
practice operating the unit without data from a GPS antenna or transducer unit.
Note: The simulator will NOT display any real-data, including any
safety messages (e.g. those received from AIS).
To turn the simulator ON or OFF:
1. Press and hold the PAGE/MENU key to display the setup menu.
2. Use the trackpad up / down keys to select System Setup.
3. Press trackpad right to select the System Setup options.
4. Select the Simulator option
5. Select ON or OFF as required.
6. Press the OK key to return back through the menus.
Screen information
Status bar
Data bar
Status icons
•
•
Confirm status of
Sounder, GPS, AIS and
Autopilot
•
Gives information specific to
each application.
Cannot be edited or moved.
•
•
•
•
Gives information associated with
your boat or the environment.
Customisable content.
Vertical or horizontal format.
Display or hide.
Normal or large size.
Data base lists
•
•
•
Contain information you have added to the
display's memory e.g. waypoints.
Highlight an entry using trackpad or rotary
control to display related information.
Editable using soft keys.
Pop-up messages
•
•
•
Alert you to a situation e.g. alarm, function
not available.
Not editable.
May require a response e.g. press
ACKNOWLEDGE to silence alarms.
AIS ALARM
Dangerous Target
Dialog boxes
Enable data to be edited or entered into a
store/list e.g. editing a waypoint.
ACKNOWLEDGE
Controls
WPTS/MOB
Press and release to display the
waypoints softkeys.
Press again to place a waypoint
at your boat's position.
Press and hold to place a Man Overboard (MOB)
marker at your current position
CANCEL
Press to quit the selected
on-screen option when editing data.
Also used to return to the previous
softkey or menu level.
Trackpad
Controls the on-screen cursor.
Also used to scroll through menus.
Press the correspnding edge of the trackpad
to move the cursor horizontally, vertically or
diagonally.
OK
Press to select an on-screen
option or return to the previous
softkey or menu level.
<
<
RANGE
Changes the display scale.
Press to display a smaller area
on the screen.
Press to display a larger area
Chart card slot
Open the cover to install
CompactFlash cards
Softkeys
Press to select the corresponding
function identified by the on-screen
label
PAGE/MENU
Press to display softkeys for
active page.
Press and hold to access the
Setup menu.
POWER
Press and release to turn ON.
Press and hold to turn OFF.
ACTIVE
Selects which of the split
windows is active. The
selected screen is outlined
in red and the associated
softkey labels are displayed.
Toolbars and softkeys
To Zoom in or out
WAYPOINT AT
CURSOR
WAYPOINT AT
VESSEL
WAYPOINT AT
LAT/LONG...
GO TO WAYPOINT
OPTIONS…
REVIEW AND EDIT
WAYPOINTS
A toolbar is a set of softkeys and labels which appear along the bottom of an application page or window. The label indicates the
function of the button below it. These labels and vary depending
upon how you are using the display.
Cursor
When you are using chart and fishfinder applications, the cursor is
used to move around the screen.
To move the cursor:
Press the trackpad in the direction you want the
cursor to move.
Panning and zooming
Use the RANGE button to change the scale of the
viewable area. Press ‘IN’ to see a smaller area of
the screen in more detail (large scale). Press ’OUT’
to see a greater area of the chart (small scale).
Display lighting and color
Your display unit has two distinct color palettes, for day or night operation. You can also manually adjust the backlight level.
Day/Night operation
To select the day/night mode of operation:
1. Press the Power key to display the palette select softkey and
brightness level.
2. Press the appropriate softkey to select between Day and Night
palettes.
Note: The display saves the current palette when the unit is
powered off. A display set to NIGHT may be difficult to see in
bright sunlight.
In the appropriate chart or fishfinder application windows, you can
pan and zoom the view to show a different geographic are (pan) or
change the scale at which an area is displayed (zoom).
Backlight level
To Pan the view
1. Press the Power key to display the backlight level bar.
Use the trackpad to move the cursor to the edge of
the screen, The view automatically moves in the
selected direction to bring a different area into view.
To adjust the backlight level:
2. Use the left / right trackpad keys to adjust the backlight level.
3. Press OK to accept the setting and exit the backlight adjustment.
Applications
Fishfinder
The A-Series features are provided within a number of applications.
Some applications are limited to certain models.
Chartplotter
• Locate where you are
• Interpret your surroundings.
• Monitor where you are going.
• Record where you have been.
D Models only.
•
•
•
•
•
See where the fish are.
Identify underwater objects.
View seabed structure.
View sea depth and temperature data.
Mark points of interest, like fishing spots
or wrecks
• Navigate to a specified position (waypoint).
• Build and navigate routes.
• View details of nearby features & services.
• View details of boats equipped with AIS.
• Measure distances and bearings.
Course Deviation Indicator (CDI)
• View real-time display of your vessel on a
'rolling road' in 3D perspective.
• Give details of any correction required to
steer your vessel along a given course.
• View data about the distance and time to
go until you reach a specified point.
Displaying applications
Data
The various applications that make up your A-Series system are
arranged in groups called page sets.
• View data generated by the system or by
instruments available on NMEA 0183,
NMEA 2000 or SeaTalkng.
Selecting a page set
To select a page set:
1. Press and hold the PAGE/MENU key to display the setup menu
2. Choose the Select Page Set option.
3d chart
Requires upgraded cartography (chart card).
Highlight appropriate
pre-configured page set
D9520-1
• Display a 3D view of land, sea & features.
• Locate where you are.
• Interpret your surroundings.
• Monitor where you are going.
• Go to an existing waypoint.
• Navigate a route.
• Synchronize with the 2D chart.
• Identify fishing spots.
Selecting an application page
Once you have selected the appropriate page set, as detailed above,
choose the application page that you want to use.
To view an application page:
1. Press PAGE/MENU to show the available pages in the toolbar.
2. Either select the application page you want from the toolbar or
toggle between the applications configured in the page set by
pressing PAGE/MENU.
3. Press OK or CANCEL.
Split screen pages
When the selected page has more than one application, the window
that is currently active has a red border.
When selecting between active windows, the toolbar changes
accordingly.
Active window highlighted
Emergencies and warnings
You can use your A-Series display to mark the position of a man
overboard (MOB) or to sound an alarm when a particular situation
occurs, e.g. when a depth limit is reached or a specified period of
time has elapsed.
Man overboard
If you lose a person or object overboard and need to return to the
spot, activate the Man Overboard (MOB) function immediately. The
MOB function is available at all times, whatever application is running on the A-Series display.
Soft keys associated with active window
To change the active window
1. Press ACTIVE to toggle active status between windows (the red
border moves to highlight the active window).
To toggle between split and single window views
1. In a multiple-window view, press and hold the ACTIVE button to
display the active window at full-screen.
2. Press ACTIVE once more to return to multiple-window view.
To activate the Man Overboard function
1. Press and hold the WPTS/MOB key for three seconds.
Note: To obtain an MOB position, you A-Series display must have a
GPS fix.
To cancel an MOB alarm:
1. Press and hold the WPTS/MOB button for four seconds.
Once the MOB alarm is cleared:
• the chart application motion mode is reset.
• the databar mode is reset.
• GOTO and route functions are restored.
Alarms
Alarms are used to alert you of a hazard or particular situation. When
an alarm sounds, a message box appears on-screen to explain the
reason for the alarm.
To cancel an alarm:
1. Press the ACKNOWLEDGE softkey.
.
Raymarine plc
Anchorage Park,
Portsmouth,
Hampshire PO3 5TD
United Kingdom
Raymarine Inc.
21 Manchester Street,
Merrimack,
New Hampshire 03054-4801
USA
Tel: +44 (0) 23 9269 3611
Fax: +44 (0) 23 9269 4642
Tel: +1 603.881.5200
Fax: +1 603.864.4576
www.raymarine.com
Document number: 86136-1
Date: August 2008