1
SmartSync Pro
Version 5.0
Copyright © 2000-2014, SmartSync Software
2
SmartSync Pro
Table of Contents
Foreword
0
4
Part I Getting started
1 Product
...................................................................................................................................
Overview
4
2 Copyright
................................................................................................................................... 5
3 Features
................................................................................................................................... 5
4 License
...................................................................................................................................
Agreement
6
5 System
...................................................................................................................................
requirements and installation
8
6 Uninstalling
................................................................................................................................... 9
10
Part II Basics
1 Profiles
................................................................................................................................... 10
2 Folders
................................................................................................................................... 11
3 Synchronization
...................................................................................................................................
Types
11
4 Packages
................................................................................................................................... 12
13
Part III SmartSync Pro Interface
1 Menus
................................................................................................................................... 13
File
View
Sync
Help
......................................................................................................................................................... 14
......................................................................................................................................................... 15
......................................................................................................................................................... 15
......................................................................................................................................................... 16
2 Tool
...................................................................................................................................
Bar
17
3 Profile
...................................................................................................................................
Properties
18
General ......................................................................................................................................................... 19
Packet Synchronization
......................................................................................................................................................... 22
Copy Options
......................................................................................................................................................... 23
File Com parison
......................................................................................................................................................... 25
Include Masks
......................................................................................................................................................... 27
Exclude Masks
......................................................................................................................................................... 29
Schedule ......................................................................................................................................................... 30
Events
......................................................................................................................................................... 33
Security ......................................................................................................................................................... 35
Notifications
......................................................................................................................................................... 36
4 Folder
...................................................................................................................................
Properties
37
Preferences
......................................................................................................................................................... 38
Include Masks
......................................................................................................................................................... 40
Exclude Masks
......................................................................................................................................................... 42
5 Synchronization
...................................................................................................................................
Parameters
43
6 System
...................................................................................................................................
Tray Icon
43
7 Options
................................................................................................................................... 44
Preferences
......................................................................................................................................................... 45
Startup ......................................................................................................................................................... 46
Copyright © 2000-2014, SmartSync Software
Contents
3
FTP
......................................................................................................................................................... 47
Em ail
......................................................................................................................................................... 48
Activity Logging
......................................................................................................................................................... 50
Service ......................................................................................................................................................... 52
Security ......................................................................................................................................................... 53
8 New
...................................................................................................................................
Profile Wizard
54
Welcom e ......................................................................................................................................................... 54
Select Folders
.........................................................................................................................................................
for Synchronization
55
Folder Properties
......................................................................................................................................................... 55
Include Files
......................................................................................................................................................... 56
Exclude Files
......................................................................................................................................................... 57
Schedule ......................................................................................................................................................... 57
Wizard Com
.........................................................................................................................................................
pleted
59
9 Restore
...................................................................................................................................
Wizard
59
Select Backup
.........................................................................................................................................................
Files
59
Dow nload.........................................................................................................................................................
Backup Files
60
Select Destination
.........................................................................................................................................................
Folders
60
Select Files
.........................................................................................................................................................
to Restore
60
10 Compare
...................................................................................................................................
Files
61
11 Connection
...................................................................................................................................
Security
62
12 Interface
...................................................................................................................................
Language
62
Part IV How to...
63
1 How
...................................................................................................................................
to backup files
63
2 How
...................................................................................................................................
to restore files
63
3 How
...................................................................................................................................
to synchronize files via local network
64
4 How
...................................................................................................................................
to synchronize files using packets
64
5 How
...................................................................................................................................
to run SmartSync Pro as a service?
65
6 How
...................................................................................................................................
to use command line options?
65
7 How
...................................................................................................................................
to backup to CD/DVD
66
Part V Ordering, Registration and
Support
67
1 How
...................................................................................................................................
to Register?
67
2 After
...................................................................................................................................
Registration
67
3 Contact
...................................................................................................................................
Information
68
Part VI What's new in SmartSync Pro 5?
Index
Copyright © 2000-2014, SmartSync Software
69
70
4
1
SmartSync Pro
Getting started
Product Overview
Copyright
Features
License Agreement
System requirements and installation
Uninstalling
1.1
Product Overview
SmartSync Pro is a universal full featured backup and synchronization tool that can mirror any
number of files or folders, whether on local disks and network shares or across locations that can
only be reached via removable media. SmartSync Pro’s local synchronization is an excellent safety
measure for backing up important data, and gives users the option to continue working locally in the
event of any server problems. SmartSync Pro also provides a quick, easy and foolproof method to
mirror large amounts of data between remote locations (e.g., home and office PC) by transferring
only the new, updated or deleted file information.
SmartSync Pro uses a flexible filtering system to keep synchronized only the files you need. It
synchronizes only files you have changed or deleted since last synchronization. One mouse click is
enough to move an exact copy of your files to another computer.
Copyright © 2000-2014, SmartSync Software
Getting started
1.2
5
Copyright
Copyright © SmartSync Software 2000-2014. All rights reserved.
Windows ® and Microsoft® are Registered Trademarks of Microsoft® Corporation. All trademarks
and registered trademarks used in this documentation are property of their respective owners.
1.3
Features
Common Features:
Attractive and easy to use interface.
Synchronizes your data only when it needs synchronizing.
Flexible filtering system to include only the files you want.
Tree-like structure of profiles and profile groups.
Drag and drop support for folders, profiles and profile groups.
Detailed activity log.
Easy to use New Profile Wizard for creating new profiles.
Color highlighting for new, modified and deleted files and file conflicts.
Detailed synchronization progress for all operations.
Resolves file conflicts when the same files have been modified on both sides.
Adjusts for different time zones, Daylight Saving Time.
Scheduling support to run profiles whenever you want.
Can dial-up before synchronization and hang up afterward.
Can run external programs before and after synchronization.
Profile access can be restricted to selected users only.
Detects locked files and asks to retry to overwrite them.
Command line support.
Can be run as a service (Both platforms x86 and x64 are supported).
Preserves up to 100 last versions of replaced and deleted files.
Local Synchronization/Backup Features:
Makes an exact copy of your folders on network computer, flash/USB drives or CD/DVD.
Synchronizes two or more folders with option for deleting unmatched files.
Allows for your backup files to be compressed in a ZIP archive.
Allows for restoring source files from a ZIP archive with an easy to use Restore Wizard.
Makes an incremental backup.
Allows for restoring source files from incremental backup with an easy to use Restore Wizard.
Can connect to a network drive with different user name and password.
Removable media could be identified by drive letter, label or serial number.
Strong (AES 256 bit) encryption for compressed backups.
Remote Synchronization/Backup Features:
Makes an exact copy of your folders on FTP server.
Supports FTP over Secure Socket Layer (SSL) protocol.
Supports synchronization with WebDAV servers.
Synchronizes two or more folders with option for deleting unmatched files.
Makes an compressed incremental backups.
Fast and easy restoring files from remote backup.
Unidirectional and Bidirectional synchronization with FTP folders.
Strong (AES 256 bit) encryption for compressed backups.
Copyright © 2000-2014, SmartSync Software
6
SmartSync Pro
Packet Synchronization Features:
Move modified files in a compressed package.
Can send packages to flash drive, floppy, FTP server or by Email directly from the program.
Can load packages from flash drive, floppy, FTP server or from POP3 server directly from the
program.
Split packages by a given size.
Disk spanning support.
Easy restoring of preserved files.
Password protection and strong encryption for packages.
1.4
License Agreement
SmartSync SOFTWARE
Electronic End-User Software License Agreement
THIS AGREEMENT IS A LEGAL DOCUMENT. READ IT CAREFULLY BEFORE COMPLETING THE
REGISTRATION PROCESS. IT PROVIDES A LICENSE TO USE THE SOFTWARE AND
CONTAINS WARRANTY INFORMATION AND LIABILITY DISCLAIMERS. BY REGISTERING AND
USING THE SOFTWARE, YOU ARE CONFIRMING ACCEPTANCE OF THE SOFTWARE AND
AGREEING TO BECOME BOUND BY THE TERMS OF THIS AGREEMENT.
1. Definitions
This agreement cover SmartSync Pro synchronization utility, related documentation and any and all
updates thereto, including Minor Updates and Major Updates, referred to as Software hereafter.
Any Software installation package released after a user has initially installed the Software is
considered as an Update. The Minor Update is a release containing the bug fixes, improving the
convenience of use and providing minor extensions to the Software functionality. The Major Update is
a release essentially changing or extending the Software functionality compared to the previous
version.
The Software may be installed in two versions: Demo Version and Registered Version. Both versions
are fully functional. The difference between them is that Demo Version does not contain the
information about the registered owner, while the Registered Version does. The Demo Version stops
working after 30 days of trial period. It may be converted into a Registered Version at any time,
before or after the expiration of the trial period just by entering the registration information provided by
the authorized software distributor. The Registered Version has an unlimited time of operation.
The Demo Version is free to copy, install and distribute as an original installation package. The
Registered Version may be distributed only by the Copyright Owners or by authorized distributors of
this software. The Copyright Owners are those listed in the "About" box, which appears when the
"About" menu item is selected from software Help menu.
2. License to use:
One copy of the registered version of Software may either be used by a single person who uses the
software personally on one or two computers, or installed on a single workstation used nonsimultaneously by multiple people, but not both.
If you are a registered user, you are entitled to use this product for your own work. You may not
Copyright © 2000-2014, SmartSync Software
Getting started
7
alter, sell, rent, or lease the software to others without the prior express written permission of the
Copyright Owners or their authorized distributor.
You must not give away your registration code. Doing so will result in an infringement of copyright.
The Copyright Owners retain the right of claims for compensation in respect of damage, which
occurred by your giving away the registration code. This claim shall also extent to all costs, which
Copyright Owners incur in defending themselves.
3. License to redistribute
You are licensed to make copies of the unmodified Demo Versions of this Software Installation
package as you wish and to give exact copies of the unmodified Demo Version to anyone.
You are specifically prohibited from charging, or requesting donations, for any such distribution
without the prior express written permission of the Copyright Owners.
4. No additional licenses
All rights to the Software and documentation not expressly granted under this Agreement are
reserved to Copyright Owners. You may not translate, decompile, disassemble or reverse engineer
the Software or documentation.
5. Software upgrades
If you had registered the Software, you are granted the right to receive (download) and install all the
Minor Updates to the version initially installed free of charge. Installation of a Major Update may or
may not require an upgrade fee, which is at sole discretion of the Copyright Owners.
Installation of the Minor Update does not require repeating the registration procedure, as the
registration data will be inherited from the previous installation. Installation of a Major Update will or
will not require new registration.
The users of the Demo Version may install the Minor Updates over their existing installation only
during their trial period. Installation of the Minor Update does not extend the evaluation period.
However, they can install Major Updates even after termination of the trial period and receive
additional 30 days for evaluation of the Update.
The Copyright Owners and their authorized distributors will keep the Software users informed about
the appearance of the software updates, using postings on the distributor Web sites of directly
through mailing lists, if the user wishes so.
6. Disclaimer of limited warranty
The Copyright Owners warrant, that
(i) When used with a recommended hardware configuration, the Software will perform in substantial
conformance with the documentation supplied with the Software;
(ii) The media on which the Software is furnished will be free from defects in materials and
workmanship under normal use.
(iii) The Copyright Owners will continue the work on improvement of the Software quality, issue and
distribute the Software updates as described above at appropriate time at their convenience. The
users are welcome to submit their comments on the software quality or suggestions to its
improvement through the authorized distributors and these comments and suggestions will be taken
Copyright © 2000-2014, SmartSync Software
8
SmartSync Pro
into account in the development process.
EXCEPT AS SET FORTH IN THE FOREGOING LIMITED WARRANTY, THE COPYRIGHT
OWNERS DISCLAIM ALL OTHER WARRANTIES OR CONDITIONS, EITHER EXPRESS OR
IMPLIED, INCLUDING THE WARRANTIES OR CONDITIONS OF MERCHANTABILITY, FITNESS
FOR A PARTICULAR PURPOSE AND NONINFRINGEMENT. IF APPLICABLE LAW IMPLIES ANY
WARRANTIES WITH RESPECT TO THE SOFTWARE, ALL SUCH WARRANTIES ARE LIMITED IN
DURATION TO THIRTY (30) DAYS FROM THE DATE OF SOFTWARE INSTALLATION.
UNDER NO CIRCUMSTANCES AND UNDER NO LEGAL THEORY, TORT, CONTRACT, OR
OTHERWISE, SHALL THE PRODUCERS OF THIS SOFTWARE OR ITS SUPPLIERS OR
RESELLERS BE LIABLE TO YOU OR ANY OTHER PERSON FOR ANY INDIRECT, SPECIAL,
INCIDENTAL, OR CONSEQUENTIAL DAMAGES OF ANY CHARACTER INCLUDING, WITHOUT
LIMITATION, DAMAGES FOR LOSS OF GOODWILL, WORK STOPPAGE, COMPUTER FAILURE
OR MALFUNCTION, OR ANY AND ALL OTHER COMMERCIAL DAMAGES OR LOSSES. IN NO
EVENT WILL THE PRODUCER OF THIS SOFTWARE BE LIABLE FOR ANY DAMAGES IN
EXCESS OF THE LIST PRICE FOR A LICENSE TO USE THE SOFTWARE.
(USA only). SOME STATES DO NOT ALLOW THE EXCLUSION OF IMPLIED WARRANTIES, SO
THE ABOVE EXCLUSION MAY NOT APPLY TO YOU. THIS WARRANTY GIVES YOU SPECIFIC
LEGAL RIGHTS AND YOU MAY ALSO HAVE OTHER LEGAL RIGHTS WHICH VARY FROM
STATE TO STATE.
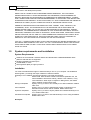
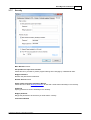
1.5
System requirements and installation
System Requirements
Windows 8.1/8/7/Vista/XP. Windows Server 2012 R2/2012/2011/2008 R2/2008/2003. Both
platforms x86 and x64 are supported.
20 MB of available hard disk space
512 MB RAM, or more
233-megahertz (MHz) or higher processor
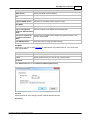
Installation
You must have administrator rights to install SmartSync Pro on your computer. The Installation
Wizard guides you through the steps needed to install the software.
SmartSync Pro installation supports the following command line switches:
/s
Silent install. With the silent install command line parameter set, the
entire installation will execute silently, without a user interface, or any
user intervention. When input is required on dialog boxes, the default
values of dialog controls will be used.
RunApp=True|False
Specify True if you want to run SmartSync Pro after installation. Default
value True.
x64=True|False
Specify True if you want to install 64 bits version of SmartSync Pro.
Otherwise 32 bits version will be installed. Default value False.
ImportV4=True|False
Specify True if you want to import profiles from installed SmartSync Pro
4.xx. Default value False.
UninstallV4=True|False Specify True if you want to uninstall SmartSync Pro 4 during installation.
Default value False.
Examples:
Copyright © 2000-2014, SmartSync Software
Getting started
ssyncpro5.exe /s RunApp=False x64=True ImportV4=True
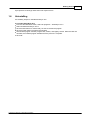
1.6
Uninstalling
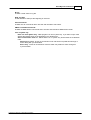
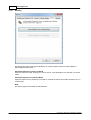
It is relatively simple to uninstall SmartSync Pro.
To uninstall SmartSync Pro:
From the Windows Start menu, select All programs > SmartSync Pro 5
Select Uninstall SmartSync Pro 5
Click the Next button to confirm that you want to remove the program.
Click the Finish button to perform the uninstall.
The uninstall program removes program files, folders, and registry entries. When the files are
removed, the uninstall program indicates that the process is complete.
Click OK.
Copyright © 2000-2014, SmartSync Software
9
10
2
SmartSync Pro
Basics
Profiles
Folders
Synchronization Types
Packages
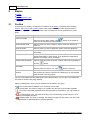
2.1
Profiles
A SmartSync Pro profile is an object that contains a set of folders, processing and scheduling
options, and inclusion and exclusion filters. Each profile has a unique name. Synchronization
profiles are organized in a tree-like structure. Sets of profiles can also be grouped into a profile
group.
How to...
Description
Create new profile
Select menu File | New | Profile, click
press Ctrl+N and follow the instructions.
button on the toolbar or
Rename profile name
Select a profile you want to rename. Select menu File | Rename or
press F2.
Duplicate profile
Select a profile you want to duplicate. Select menu File | Duplicate.
Delete profile
Select a profile you want to delete. Select menu File | Delete or press
Ctrl+Delete
Enable/Disable profile
Select a profile you want to enable/disable. Select menu File | Enable/
Disable respectively or press Ctrl+E. If you disable the profile then it
will now run manually and by scheduler.
Change profile properties
Select a profile and press Alt+Enter or select menu File | Properties or
click the
button.
Run profile
Select a profile you want to run. Click
Create a shortcut on the
Desktop
button or press F5.
Select a profile, select menu File | Create a ShortCut on the Desktop.
The program will create a shortcut on the Desktop to run the selected
profile and then exits the program.
You can move profiles between profile groups using drag and drop. You can also copy folders from
one profile to another using drag and drop.
Select a profile group to show common statistics for all profiles in the group.
Profiles are characterized by different icons according to their state
- Normal state. The profile is ready to run. Double click the icon to show profile properties.
- Error state. The profile generated errors during the last synchronization. See log window for
details.
- Synchronization state. The profile is backing up or synchronizing. Double click the icon to
show synchronization progress.
- Disabled state. The profile is disabled. Scheduling is skipped for this profile. Use menu File |
Enable/Disable to enable/disable the profile respectively.
Copyright © 2000-2014, SmartSync Software
Basics
11
- Inaccessible state. The profile is inaccessible for the current user. You need a password to
access the profile. Profile access is set in the Security page of the profile properties box.
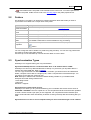
2.2
Folders
The SmartSync Pro folder is an object that contains information about which files you want to
synchronize. Each folder has a unique name within profile.
How To...
Description
Create new folder Select menu File | New | Folder and fill out the folder properties.
Rename folder
name
Select a folder you want to rename. Select menu File | Rename.
Duplicate folder
Select a folder you want to duplicate. Select menu File | Duplicate.
Delete folder
Select a folder you want to delete. Select menu File | Delete.
Enable/Disable
folder
Select a folder you want to enable/disable. Choose menu File | Enable/Disable.
If you disable a folder then it will be omitted from any processing.
Change folder
properties
Select a folder and press Alt+Enter or select menu File | Properties or click
button.
You can change the order of folders in a profile using drag and drop. You can also copy folders from
one profile to another using drag and drop.
Use Ctrl+Up to move the folder up in the list and Ctrl+Down to move it down.
2.3
Synchronization Types
SmartSync Pro supports three types of synchronization:
Synchronize/Backup files to a local/removable drive or to network share or NAS.
SmartSync Pro has many advanced features to backup or synchronize your important data to a
network drive, flash/USB disk, NAS or CD/DVD
You can copy source files to a destination folder, move files, synchronize source and destination
folders, compress source files to a single zip file, make a compressed incremental backups. You
can restore source files from a backup copy.
Note: Backups to CD/DVD are done via the Packet Writing interface to your CD/DVD drive.
Examples of Packet writing interfaces are:
- Roxio Drag-to-Disk
- Nero InCD
Windows 7 supports
Synchronize files with remote servers.
SmartSync Pro allows you to synchronize/backup your local folders with remote servers such as
FTP/FTPS or WebDAV. Files are copied as is or are compressed into ZIP archive and are uploaded
to server. Secure Socket Layer (SSL) is also supported. For compressed incremental backups it
keeps small index files which dramatically increases scanning of backup files and restoring files you
need.
Synchronize files on two or more computers that you can't connect through a local network
Copyright © 2000-2014, SmartSync Software
12
SmartSync Pro
(Packet Mode).
This is an ideal solution for using the same files both at home and in the office.
Trying to do this by hand is fraught with problems. Because files on the remote computer are
inaccessible, you have to remember which files have been created, modified updated and deleted on
either side. SmartSync Pro does this for you. Another problem is that you may makes this easy by
doing it for you. You might also want to synchronize a lot of files, possibly occupying several
hundred files or several gigabytes of information, but you usually change are only a couple of
hundred KBytes and you want to transfer only changed files to the second computer changing a few
hundred kilobytes of data. SmartSync Pro solves this problem makes this easy for you by tracking
any changes made since the last synchronization.
When you are ready to move changed files to the remote computer the program transfer your
changes to the second computer, it compresses and combines all the changed files into the a single
package, which is then copied that you can copy that to a floppy, Zip, USB drive or CD/DVD disk or
that you can send using email or uploaded to an FTP server.
Once the package arrives at the second computer, SmartSync Pro either loads the package from
the removable disk or download it from the FTP server and then applies apply any updates to the
destination folders.
2.4
Packages
Package is a ZIP file with .SSP extension used in synchronization between computers that you
can't connect through a local network. SmartSync Pro merges files that were created or modified
since the last synchronization into the package before sending it to the remote computer.
The root folder of a package contains a SmartSync.options file (with profile properties).
Each new and modified file of a folder are located in a subfolder with a folder name. The
SmartSync.options file in this subfolder contains folder properties and a list of deleted files.
You can split a package into several parts. The first part will have an extension .ssp, the second part
.s02, the third part .s03 and so on.
These parts are not valid spanned zip files, but a single zip file divided into several parts.
Copyright © 2000-2014, SmartSync Software
SmartSync Pro Interface
3
13
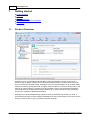
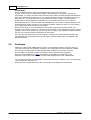
SmartSync Pro Interface
The main window contains the program controls.
Main menu
Toolbar
Profiles
Contains the menu items for performing program actions.
Contains buttons for the most commonly used functions.
Shows a tree-like structure of profiles and profile groups. Select a
profile to see its folders and synchronization parameters.
Folders
Shows the list of folders. Each folder has a name and other properties.
Synchronization Parameters Some of profile properties are collected into a synchronization
parameters group. The parameters list depends on type of
synchronization used.
Status bar
Shows hints and copyright information.
3.1
Menus
SmartSync Pro menus contains the following items:
File
View
Sync
Help
Copyright © 2000-2014, SmartSync Software
14
3.1.1
SmartSync Pro
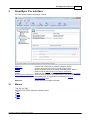
File
Menu Item
Description
New > Profile
Opens a New Profile Wizard to create new profile.
New > Group
Creates a new group that may contain subgroups and profiles. You can
run all the profiles within a group by a single click.
New > Folder
Add a folder to selected profile.
Rename
Renames the selected item (profile, group or folder).
Duplicate
Duplicates the selected item (profile, group or folder).
Delete
Deletes the selected item (profile, group or folder).
Disable/Enable
Disables/Enables the selected item (profile, group or folder).
Create a ShortCut on a
Desktop
Creates a shortcut on the desktop to run selected profile or profile
group and then exits.
Edit Profile
Opens an Edit Profile Wizard to edit profile properties using a wizard.
Properties
Opens a profile properties or a folder properties dialog box.
Import Profiles...
Imports profiles from a file with .profiles extension.
Export Profiles...
Exports selected profile or profiles group to a file with .profiles
extension.
Shutdown
Shutdown SmartSync Pro.
Close
Closes the SmartSync Pro window. If the option Exit when close main
window has checked then the program will shutdown.
Copyright © 2000-2014, SmartSync Software
SmartSync Pro Interface
3.1.2
3.1.3
15
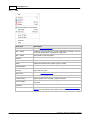
View
Menu Item
Description
Toolbar
Displays/Hides the toolbar.
Status bar
Displays/Hides the status bar.
Local Files...
Opens a Local Files dialog box to show you the list of files in the source
folders.
Remote
Files...
Opens a Remote Files dialog box to show you the the list of files in the
destination folders.
Log window
Shows/Hides the Log window to see program activity log.
Options
Opens an Options dialog box to change program options.
Language
Allows you to change the current language used by the program.
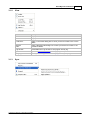
Sync
Copyright © 2000-2014, SmartSync Software
16
SmartSync Pro
Menu Item
Description
Copy Source to
Destination
Depends on the selected Operation this item may have other caption.
Choose this menu item to run selected profile or profiles group.
Note: this item is only available in normal state only.
Restore...
Opens Restore Wizard to restore source files from backup copies.
Note: this item is only available in normal state only.
Show Progress
Open synchronization progress window for selected profile.
Note: this item is only available in Synchronization state only.
Stop
Stops execution of the selected profile.
Note: this item is only available in Synchronization state only.
Choose this item to restore files from selected zip archive. New profile
Create new profile and >
Restore source from a ZIP will be created based on the zip archive and Restore Wizard dialog will
be displayed to guide you through the steps needed to restore files.
file
This option is useful when you have lost you SmartSync Pro profiles
and want to restore your files and start from scratch.
3.1.4
Create new profile and >
Restore source from
Incremental Backup
Choose this item to restore files from incremental backup files (.ssp
extension). You may select any of the backup files set. New profile will
be created based on the backup file and Restore Wizard dialog will be
displayed to guide you through the steps needed to restore files. This
option is useful when you have lost you SmartSync Pro profiles and
want to restore your files and start from scratch.
Create new profile and >
Apply Updates
Loads synchronization package, creates new profile for the package
and applies updates from selected package.
Suspend/Resume
Suspends/Resumes all running profiles.
Compare Files...
Opens a Compare Files dialog box to compare files between source
and destination folders.
Help
Copyright © 2000-2014, SmartSync Software
SmartSync Pro Interface
Menu Item
Description
Contents
Opens contents of SmartSync Pro Help System.
SmartSync Pro on the
Web > SmartSync Pro
Home Page
Opens your Web browser at SmartSync Pro home page.
www.smartsync.com
SmartSync Pro on the
Web > Version History
Opens your Web browser at SmartSync Pro version history page.
www.smartsync.com/smartsyncpro/whatsnew.html
17
Opens your Web browser at SmartSync Pro order page.
SmartSync Pro on the
Web > Online Registration www.smartsync.com/order/
3.2
SmartSync Pro on the
Web > Send Feedback
Opens your Web browser at SmartSync Pro support page. You can
write any questions and suggestions about SmartSync Pro and send it
to the support team.
www.smartsync.com/support/
Upgrade Wizard...
Opens an Upgrade Wizard to check if a new version of SmartSync Pro
is available.
Registration...
Opens a Registration dialog box to enter your registration key.
About...
Displays copyright and version information about SmartSync Pro.
Tool Bar
The toolbar in SmartSync Pro main window provides shortcuts for selected menu commands.
Toolbar hints are available. Depends on the current state of the program the toolbar may contain the
following buttons:
Copyright © 2000-2014, SmartSync Software
18
SmartSync Pro
Button
Description
Opens the New Profile Wizard to create new synchronization profile.
New Profile...
Opens the properties box for a selected item (profile or folder).
Properties
Run Now
Starts the synchronization process for a selected profile or a group of
profiles.
Note: this item is only available in normal state only.
Compare Files...
Shows which files were changed since last synchronization.
Note: this item is only available in normal state only.
Restore...
Starts Restore Wizard to restore source files from backup copy.
Note: this item is only available in normal state only.
Show Progress
Open synchronization progress window for selected profile.
Note: this item is only available in Synchronization state only.
Stop
Stops execution of the selected profile.
Note: this item is only available in Synchronization state only.
Shows/Hides the Log window to see program activity log.
Log Window
Suspends/Resumes all running profiles.
Suspend/Resume
Opens an Options dialog box to change program options.
Options
Buy Now!
3.3
Opens your Web browser at SmartSync Pro order page.
www.smartsync.com/order/
Profile Properties
Profile Properties dialog contains the following pages:
General
Packet Synchronization
Copy Options
File Comparison
Include Masks
Exclude Masks
Schedule
Events
Security
Notifications
Copyright © 2000-2014, SmartSync Software
SmartSync Pro Interface
3.3.1
19
General
The General page of the Profile Properties dialog box is used to specify general options for the
profile. Contents of this page depends on the synchronization type of the profile.
Common Options
Prompt to delete unmatched files - check this box if you want to confirm file deletions during
synchronization.
Use Volume Shadow Copy service - check this box to let SmartSync Pro to copy files that
are currently in use by other programs. You can copy database files, Outlook messages and
even registry files.
for open files only - SmartSync Pro will use VSS to copy open files only. Other files will
Copyright © 2000-2014, SmartSync Software
20
SmartSync Pro
be copied directly.
for all files - SmartSync Pro will copy all files from the Volume Shadow Copy. This will
allow to have a consistent backup.
Prompt to resolve file conflicts manually - check this box if you want to handle file conflicts
manually.
Default Action
Choose the default action for resolving file conflicts.
Span files across multiple removable disks - If you copy/compress files to a disk, and the
disk is too small SmartSync Pro will prompt you to insert new disk to continue operation.
Backup Type
Unidirectional Synchronization - files are copied as is from the source folders to the
destination folders. SmartSync Pro compares source and destination folders using File
Comparison criteria and copies new and modified files only.
Versioned Backup - files are copied to a version subfolder of the destination folder. SmartSync
Pro compares source and the last version of destination files using File Comparison criteria
and copies new and modified files only to the new version folder.
File Versions (available for Copy source to destination, Move source to destination, Synchronize
source and destination and Packet Synchronization only)
Keep last xxx versions of files - SmartSync Pro allows you to preserve old versions of files in
a special folder. To restore previous versions of files select the profile, open local popup menu
and select "Restore Previous Versions" item. The Restore Files dialog box will be opened.
Keep files in folder - specified number of previous versions of file are stored in a given folder.
Folder Settings - click this button to setup file versions folder settings:
Unlimited folder size - do not limit total folder size.
Maximum folder size xxx MB - limits the total size of the file versions folder to prevent
disk overload.
Keep file version xxx days - all files stored the specified number of days ago will be
deleted from the file versions folder.
Clean up the folder... - click this button to delete all files in the file versions folder. Be
careful using this function!
File Deletions (available for Copy source to destination, Move source to destination, Synchronize
source and destination and Packet Synchronization only)
Move deleted files to the File Versions folder - when File Versions option is used all deleted
files will be moved to the file versions folder.
Move to Recycle Bin - deletes files by moving them to Recycle Bin.
Erase from disk - deletes files from disk permanently.
Compression Options (available for Compress source into a single ZIP file, Incremental Backup and
Packet Synchronization only)
Compression Ratio - Specify the compression ratio to compress files. The default is set to the
optimum value. 0 means that all files will be placed in archive, but without compression. This is
a fastest method.
Encryption - click this button to protect your compressed backups using the latest encryption
techniques.
Do not encrypt - creates unprotected backups.
PKZip 2.0 compatible - creates password protected ZIP archives, compatible with PKZip
2.0 and built-in Windows zip browser (XP or later).
AES (Strong encryption) - encrypt your data using U.S. government-certified Advanced
Encryption Standard (AES 256-bit) encryption security.
Password - specify a password to access encrypted files.
Copyright © 2000-2014, SmartSync Software
SmartSync Pro Interface
21
Retype Password - retype the password for verification.
Backup Options (available for Incremental Backup only)
Backup Type - specify what type of backups do you want to do:
Incremental Backup - copies all of the files that have changed since the last backup was
made. They do this whether the last backup was a full one or an incremental copy. The
main advantage to incremental backups is that fewer files are copied in the period between
full backups, which means you will get a shorter backup time.
Differential Backup - copies those files that have been changed since the last full backup
took place. The key advantage of differential backups comes when data needs to be
restored. Because a full backup was taken and the differentials copied everything that
subsequently changed, only the full backup and the latest differential need to be restored.
Restart Full Backup - Restarts full backup at specified period. If you choose to restart every
week then every 7 days a full backup will be accomplished, between these 2 dates jobs will be
done as incremental/differential.
Next Full Backup - shows you the date of the next full backup. You may correct this date
manually.
Keep all backups - do not delete old backups. This option may overload backup drive.
Keep only last - this option allows you to specify how many backups will be preserved.
incremental backups - SmartSync Pro will keep 1 full backup and the specified number of
incremental/differential backups.
full with all incremental backups - SmartSync Pro will keep the specified number of full
backup and all subsequent incremental/differential backups.
Remote file list - Specifies how to get remote file list to compare with:
Keep file list locally - SmartSync Pro keeps a local copy of remote file list. Use this
option if you are sure that all former backups are available.
Get file list from the latest full backup - the program scans all backup files starting with
the latest full backup to get the file list. This option is used by default.
Get file list from all backup files - the program scans all available backup files to get the
file list.
Copyright © 2000-2014, SmartSync Software
22
3.3.2
SmartSync Pro
Packet Synchronization
This page available for packet synchronization profiles only.
Synchronization type
Bidirectional Synchronization - sets synchronization to and from remote computer.
SmartSync Pro loads packages from remote computer and applies it to the local one. New and
modified files will be placed to package and will be sent to the remote computer. If the packages
was applied and you do not want to create new package right after that then check box "Do not
create the package if remote one was applied before".
Send changes to remote computer - SmartSync Pro will always place new and modified files
into the package and send it to remote computer. It will not try to load package from remote
computer. This option is useful for unidirectional synchronization.
Apply changes from remote computer - SmartSync Pro will always loads packages from
remote computer and apply it to the local one. This option is useful for unidirectional
synchronization.
Copyright © 2000-2014, SmartSync Software
SmartSync Pro Interface
23
Advanced
Prompt to overwrite "In Use" files - if some files were locked during applying updates then
SmartSync Pro will show you the list of locked files and will ask you to close them.
Backup the latest packages - allows you to backup the latest packages from remote
computer. This may be useful for restoring remote files list.
Do not delete package after apply updates - check this box if you want to preserve package
after apply updates.
3.3.3
Copy Options
Use the Copy Options page of the Profile Properties dialog box to set an advanced copy options.
Security (for NTFS volumes only)
Copy File Security Information - causes SmartSync Pro to copy file permissions and other
security information when it copies files from an NTFS volume to an NTFS volume.
Copy Folder Security Information - causes SmartSync Pro to copy folder permissions and
Copyright © 2000-2014, SmartSync Software
24
SmartSync Pro
other security information when it copies folders from an NTFS volume to an NTFS volume.
Validation
Compare files after copy - causes SmartSync Pro to perform a binary comparison of the
source and copied files to be sure that it was copied correctly.
Advanced
Copy directly to destination file - causes SmartSync Pro to copy files directly over the
destination files. Normally SmartSync Pro copies the source file to a temporary file and then
renames it.
Use Windows copy routine - forces to use Windows built-in copy function instead of a
sequence of read/write operations.
Bandwidth Throttle - limits ("throttle") the quantity of data SmartSync Pro transmits and/or
accepts within a specified period of time. Bandwidth throttling helps limit network congestion.
Schedule - click this button to open traffic schedule dialog where you can setup when
SmartSync Pro could use all available bandwidth and when it will use a specified bandwidth
throttle settings.
If disconnected, retry xxx times - Sets the number of retries to restore connection and repeat
last operation. Available for Packet Synchronization only.
Copyright © 2000-2014, SmartSync Software
SmartSync Pro Interface
3.3.4
25
File Comparison
Use this page to set how SmartSync Pro should determine that file was changed and needs to
backup.
Copy if one of the following conditions are fulfilled
File date/time - the File Date/Time method should be sufficient for almost all of your
comparison needs. This method works by comparing last modified dates of the files. If either
differs, the files are marked as different. You can select how to define if files are different:
Copy if source later then destination - files are differ if source file later than destination
file.
Copy if source differ from destination - files are differ if source file date and destination
file date are differ.
Use Time Adjustment xxx hour(s) - Use this to compare files between computers in different
time zones, or with a server that has not properly accounted for Daylight Savings time. The Time
Adjustment only affects the file comparison display - it does not permanently change the
timestamps on files.
Copyright © 2000-2014, SmartSync Software
26
SmartSync Pro
Auto Detect - detects time difference automatically. Available for FTP synchronization only.
File Attributes - compares file attributes like Read Only, Hidden, System, etc.
File Sizes - compares file sizes.
File Security Information (ACLs) - compares files and folders security information (ACLs). An
ACL specifies which users or system processes are granted access to objects, as well as what
operations are allowed on given objects.
MD5 Hash of File Contents - very rarely two files have identical sizes and date/time stamps but
have different content. The MD5 method calculates and compares 128-bit message digests for
each of the files.
File Contents - the File Contents method does a binary comparison of the file contents.
Copy only files with archive bit set
Check this to let SmartSync Pro perform conventional backups that are based on file's archive bit.
With this option, SmartSync Pro only copies files that have the archive bit set.
Clear archive bit after copy - with this option, SmartSync Pro resets the archive bit after
copying the file.
Always copy all the files
SmartSync Pro perform full backups of all source files.
Detect files changes
Copying of changed files only, if possible - if you will check this option SmartSync Pro will
detect added/changed/renamed/deleted files and will sync those files only. This will synchronize
folders on the fly without full scan of folders.
Force rescan on first run - if SmartSync Pro just started then it does not know about changes
of files which were made before. This option will force scan of folders at first synchronization. All
subsequent synchronizations will copy files without full scan of folders.
Copyright © 2000-2014, SmartSync Software
SmartSync Pro Interface
3.3.5
27
Include Masks
Use the Include Masks page of the Profile Properties dialog box to specify which files to
synchronize.
Include all files
Select this option to include all files from source folders.
Include only selected files or file types
Included files or file types - specifies a list of file names and file masks to synchronize. Use
the Add button to add file name or file mask to the list. Use the Delete button to delete
selected rows. Press Browse button to select files on the disk.
Advanced
Click this button to open an advanced options.
Copyright © 2000-2014, SmartSync Software
28
SmartSync Pro
Include empty folders - synchronizes empty folders. If the folder contains only files which are
excluded by other criteria then this folder is also considered as empty.
File Time
Include files with any file time - does not filter files by time.
Include files that have been modified in the last - include only files with the last
modification date within the specified period.
Include files that have NOT been modified in the last - include only files with the last
modification date older than a specified period.
File Size
Include files with any file size - does not filter files by size.
Include files with size more than - include only files with the size more than the specified
size.
Include files with size less than - include only files with the size less than the specified size.
Copyright © 2000-2014, SmartSync Software
SmartSync Pro Interface
3.3.6
29
Exclude Masks
Use the Exclude Masks page of the Profile Properties dialog box to specify which files or folders you
want to exclude from synchronization.
Excluded files or file types
Specify files to exclude from synchronization. You can specify file mask (for example: *.bak) or file
name (for example: Thumbs.db)
Excluded folders
Specify folders to exclude from synchronization.
Advanced
Exclude file if exists - specifies special conditions to exclude files if there are files with the
same name, but with a different extensions. For example if you specify *.dcu in the Mask field
and pas in the Extension field then SmartSync Pro will excluded each file with dcu extension if
there is a file with the same name, but with pas extension in the same folder.
Copyright © 2000-2014, SmartSync Software
30
SmartSync Pro
File Attributes - you can exclude files by its attributes. For example you can exclude system
and hidden files.
Note
If you want to exclude all subfolders with name Doc then specify "Doc" in Excluded Folders.
If you want to exclude only root folder Doc and include all subfolders Doc like "My Job\Doc" then
specify "Doc\".
If you want to exclude only subfolders Doc and include root folder Doc then specify "*\Doc".
3.3.7
Schedule
Use the Schedule page of the Profile Properties dialog box to specify a schedule for the profile.
Copyright © 2000-2014, SmartSync Software
SmartSync Pro Interface
Select desired frequency.
Frequency
31
Description
Manual Start
Select Manual Start if you do not want SmartSync Pro to synchronize
files automatically. Once setup, you can manually run the profile from
the main window as needed.
Every Few Minutes
Run the profile every few minutes. You may select an interval in
minutes, a start date and a start time.
Every Few Hours
Run the profile every few hours. You may select an interval in hours, a
start date and a start time.
Every Day
Every Week
Every Month
One Time Only
Choose the recurrence interval for the profile and the date and time to
start the profile. An interval of 1 produces a daily schedule and an
interval of 2 produces an every other day schedule. The profile will start
at the specified time each day.
Choose the recurrence interval for the profile, the date and time to start
the profile, and the days of the week in which to start the profile. An
interval of 1 produces a weekly schedule and an interval of 2 produces
an every other week schedule. The profile will start at the specified time
on each of the specified days.
Choose the months in which you want to start the profile and the
weeks of the month and the days of the week for each month in which
you want to start the profile. You can also specify that you want to
start a profile on the last day of each month.
Run the profile once, at the specified time. You may select start date
and start time.
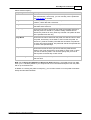
Note: For the Every Few Minutes and Every Few Hours frequency, the profile will run from Start
Time up to 11:59 PM by default. If you setup an End Time in the Advanced Options then the profile
will run up to the End Time.
In addition to a setting the profile run frequency, you can also choose to run the profile at Windows
startup and Windows shutdown.
Copyright © 2000-2014, SmartSync Software
32
SmartSync Pro
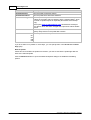
Also Run At
Description
Windows Startup
Run the profile at Windows startup.
Windows Shutdown
Run the profile before Windows shutdown.
On Folder Changes
Run the profile if any file in the source folder is modified. This option
makes for practically real-time backups (with a specified delay), which
is useful if a profile requires an especially fast refresh of the backup
copy.
If the option Copy of changed files only checked then SmartSync
Pro detects which files were changed and copies them without folders
rescan.
On Disk Insertion
Run the profile when specified removable disk has inserted. You can
specify delay before run the profile after insertion.
When the network is
Run the profile when the specified network is connected.
co
nn
ect
ed
If you do no want to run profiles on some days, you can specify them in the Do not run on these
days group.
Wait for profile
Check this box and select the profile from the list if you want to execute the profile right after the
finish of the selected profile.
Click the Advanced button to open the Advanced Options dialog to set additional scheduling
options.
Copyright © 2000-2014, SmartSync Software
SmartSync Pro Interface
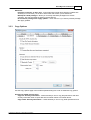
3.3.8
33
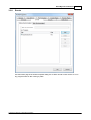
Events
Use the Events page of the Profile Properties dialog box to dial a remote access service or to run
any program before or after running a profile.
Copyright © 2000-2014, SmartSync Software
34
SmartSync Pro
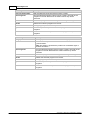
Before Synchronization
Description
Dial This Connection
Dial the selected connection before running a profile.
Run Programs
Run the selected programs before running a profile. The order of the
programs in the list determines the order in which they will be
executed.
Add
Adds a new program to the list using the Run Program dialog box.
Delete
Deletes the selected program from the list.
Edit
Modify program path and other options.
Up
Move item up. SmartSync Pro will run this program before next
programs.
Down
Move item down. SmartSync Pro will run this program after previous
programs.
After Synchronization
Hang Up Connection
Description
Hang up the selected connection after running a profile.
Shutdown Windows
Check this box if you want to shutdown Windows after
synchronization.
Note: This option is ignored if the profile runs at Windows logon or
Windows shutdown.
Run Programs
Run the selected programs before running a profile. The order of the
programs in the list determines the order in which they will be
executed.
Add
Adds a new program to the list using the Run Program dialog box.
Delete
Deletes the selected program from the list.
Edit
Modify program path and other options.
Up
Move item up. SmartSync Pro will run this program before next
programs.
Down
Move item down. SmartSync Pro will run this program after previous
programs.
Copyright © 2000-2014, SmartSync Software
SmartSync Pro Interface
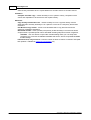
3.3.9
35
Security
Use the Security page of the Profile Properties dialog box to specify restrictions on accessing and
running profiles.
Allow to modify this profile for selected users only
Check this box to restrict access to the profile for selected users.
User List
Specifies the list of users allowed to access and run the profile. If the list is
empty then the password will be prompted for all users.
Add
Add a user name to the list. A user name is the Windows login name of the
user.
Delete
Deletes a selected user name from list.
Import
Import user names from a text file. The file should contain one user name per
line.
Password to access Set a password to run and change the profile. If you set an empty password
the profile can be run by selected users only. If you forget the password, it
Copyright © 2000-2014, SmartSync Software
36
SmartSync Pro
Retype password
cannot be recovered.
Re-enter the password for verification.
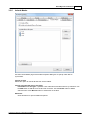
3.3.10 Notifications
Use the Notification page of the Profile Properties dialog box to control the program's behavior when
various events occur, for example you can select the sound that will be played when a backup
project is started or completed, or a critical error occurs etc...
Notification page contains two tabs to set a different set of notifications for:
Manual Profile Run - for projects, which were started manually.
Scheduled Profile Run - for projects, which were started automatically by a built-in scheduler.
Events
Profile Started - notify the launching of the profile.
Profile Finished - notify the completion of the profile.
Warning - notify about every warning which is occurred during the profile execution.
Copyright © 2000-2014, SmartSync Software
SmartSync Pro Interface
37
Error - notify about critical error which is occurred during the profile execution.
Summary - send an entire log for the last profile execution.
Notifications
Show Message Dialog - shows modal dialog.
Show Balloon Hint in System Tray - shows yellow balloon hint near the tray.
Play Sound - plays specified sound file.
Write to Windows Event Log - writes event to Windows events log. Section Application.
Send Email - send information to the specified email. If you want to send notification to several
emails then separate email addresses by a semicolon. Click Send test email button to check
email settings and send test email.
Send only if there are warnings or errors - if there are not warnings or errors in the summary
event then email will not be sent.
3.4
Folder Properties
Folder Properties dialog contains the following pages:
Preferences
Include Masks
Exclude Masks
Copyright © 2000-2014, SmartSync Software
38
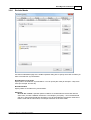
3.4.1
SmartSync Pro
Preferences
Use the Preferences page of the Folder Properties dialog box to specify source folder, destination
folder and to specify how to process subfolders and folder links.
Source Folder
Specify the full path of the folder containing the files you want to synchronize. You can also use the
button to select a folder. Environment variables can also be used in the folder path. Click the
button if you need to connect to a network drive with a different user name and password or if you
want to set how to identify removable disks.
Folder Name
Specify a unique folder name. This field available for Packet Synchronization and operations with
compression.
Destination Folder
Specify the full path of the folder containing the files you want to synchronize. You can also use the
button to select a folder. Environment variables can also be used in the folder path. Click the
button if you need to connect to a network drive with a different user name and password or if you
want to set how to identify removable disks.
Include Subfolders
Check this box to copy files from all of the sub folders in the source/destination location.
Copyright © 2000-2014, SmartSync Software
SmartSync Pro Interface
39
NTFS Junction Points
Since Windows Vista and Windows Server 2008 the default locations for user data and system data
have changed. For example, user data that was previously stored in the %SystemDrive%
\Documents and Settings folder is now stored in the %SystemDrive%\Users folder. For backward
compatibility, the old locations have junction points that point to the new locations. So if you want to
prevent duplication of the user files then uncheck both options.
If folder unavailable
Select what to do if source or destination folder unavailable.
Report as information - SmartSync Pro will skip this folder and will report information to the
log.
Report as warning - a warning message will be reported to the log and all other folders will be
processed.
Abort profile - SmartSync Pro will abort profile execution and will report the error.
Preview
Opens the Preview Files dialog box showing the list of all files matching the selected criteria.
Notes:
If either side of a synchronization is on a volume with folders available offline, SmartSync Pro cannot
properly determine whether the volume is online or not. To avoid this problem, do not use SmartSync
Pro with volumes that contain folders available offline.
Copyright © 2000-2014, SmartSync Software
40
3.4.2
SmartSync Pro
Include Masks
Use the Included Masks page of the Folder Properties dialog box to specify which files to
synchronize.
Include all files
Select this option to include all files in source folders.
Include only selected files or file types
Select this option if you want to include only specified files and file types.
Include files or file types
Specify a list of files and file masks to include in the synchronization process. Press Add button to
add new file name or file mask to the list. Press Delete button to delete selected items from the list.
Press Browse button to open dialog to select any existing file.
Advanced
Click this button to open an advanced options.
Copyright © 2000-2014, SmartSync Software
SmartSync Pro Interface
41
Include empty folders - synchronizes empty folders. If the folder contains only files which are
excluded by other criteria then this folder is also considered as empty.
File Time
Include files with any file time - does not filter files by time.
Include files that have been modified in the last - include only files with the last
modification date within the specified period.
Include files that have NOT been modified in the last - include only files with the last
modification date older than a specified period.
File Size
Include files with any file size - does not filter files by size.
Include files with size more than - include only files with the size more than the specified
size.
Include files with size less than - include only files with the size less than the specified size.
Reset Defaults
Press this button to discard changes and load include masks from the profile settings.
Preview
Opens the Preview Files dialog box showing the list of all files matching the selected criteria.
Copyright © 2000-2014, SmartSync Software
42
3.4.3
SmartSync Pro
Exclude Masks
Use the Excluded Masks page of the Folder Properties dialog box to specify what files or folders you
want to exclude from synchronization.
Excluded files or file types
Specify files to exclude from synchronization. Press Add button to add new file name or file mask to
the list. Press Delete button to delete selected items from the list. Press Browse button to open
dialog to select any existing file.
Excluded folders
Specify folders to exclude from synchronization. Press Add button to add new folder to the list.
Press Delete button to delete selected items from the list. Press Browse button to open dialog to
select any existing folder.
Advanced
Exclude file if exists - specifies special conditions to exclude files if there are files with the
same name, but with a different extensions. For example if you specify *.dcu in the Mask field
and pas in the Extension field then SmartSync Pro will excluded each file with dcu extension if
there is a file with the same name, but with pas extension in the same folder.
File Attributes - you can exclude files by its attributes. For example you can exclude system
and hidden files.
Copyright © 2000-2014, SmartSync Software
SmartSync Pro Interface
43
Note
· If you want to exclude all subfolders with name Doc then specify "Doc" in Excluded folders.
· If you want to exclude only root folder Doc and include all subfolders Doc like "My Job\Doc" then
specify "Doc\".
· If you want to exclude only subfolders Doc and include root folder Doc then specify "*\Doc".
Reset Defaults
Press this button to discard changes and load exclude masks from the profile settings.
Preview
Opens the Preview Files dialog box showing the list of all files matching the selected criteria.
3.5
Synchronization Parameters
Depends on the synchronization type Synchronization Parameters contains the most important
profile options.
Synchronization Types
Synchronize with a local/network computer
Synchronize with a remote computer
Synchronize with a remote computer (Packet Mode)
3.6
System Tray Icon
The System tray Icon will appear when you launch SmartSync Pro. It has the following appearance:
Idle state. SmartSync Pro does nothing.
Processing State. The program executes some profiles.
Error state. Some profiles finished with errors.
Suspended state. The program is in suspended state. All running profiles have been
suspended. Choose Resume command from the tray menu to continue profiles execution.
When you start Windows SmartSync Pro will automatically be launched in the system tray. To
change this behaviour go to the program Options, if you uncheck Start at log in then SmartSync
Pro will only start when you manually start it.
Note
If SmartSync Pro is not running in the system tray scheduled synchronizations will not occur.
You can open SmartSync Pro's main window from the system tray by left clicking on the icon.
The system tray icon has a menu with features that can be used whether the SmartSync Pro's main
window is open or not.
Copyright © 2000-2014, SmartSync Software
44
SmartSync Pro
Open SmartSync Pro - opens SmartSync Pro.
Log Window - opens the program activity log.
Suspend - pauses all executing profiles. Resume - resumes
execution of a paused profiles.
Copy Source to Destination - begins synchronization
process for the selected profile or profile group.
Help - displays the online help system.
About - displays program and copyright information.
Shutdown SmartSync Pro - shuts down SmartSync Pro.
3.7
Options
Options dialog contains the following pages:
Preferences
Startup
FTP
Email
Activity Logging
Service
Security
Copyright © 2000-2014, SmartSync Software
SmartSync Pro Interface
3.7.1
45
Preferences
Use the Preference page of the Options dialog box to set common options for the program.
Show the Progress Window
Check this to see progress reports during synchronization.
Exit when Close Main Window
Check this to exit program when the main window is closed. Otherwise, SmartSync Pro closes the
main window but continues running in the system tray.
Temporary Folder
Specify a location where the program can create temporary files.
Background process priority
Specifies the priority of each synchronization process.
Maximum number of concurrently running profiles
If greater then zero, be the maximum number of simultaneous profiles which can concurrently run.
This would be used to limit the number of processes where too many could flood a system, causing
performance issues.
Copyright © 2000-2014, SmartSync Software
46
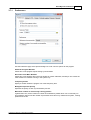
3.7.2
SmartSync Pro
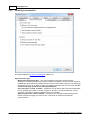
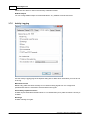
Startup
Use the Startup page of the Options dialog box to set startup options for the program.
Launch SmartSync Pro on startup
Check this box to start SmartSync Pro when you log in.
Wait xxx minutes before run profiles
Sets a number of minutes to delay after program loading before starting profiles to minimize
performance degrade.
Start minimized
Starts the program as an icon on the system tray. Uncheck it to see the main window when
SmartSync Pro starts.
Show the splash screen
Shows the splash screen at startup.
Copyright © 2000-2014, SmartSync Software
SmartSync Pro Interface
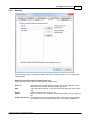
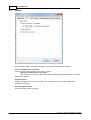
3.7.3
47
FTP
Use the FTP page of the Options dialog box to set FTP host options. SmartSync Pro can use an
FTP host as an intermediate storage location in Packet Synchronization mode.
Use a Direct Connection
Uses a direct connection to FTP hosts.
Use Proxy Server
Connects to FTP hosts using a proxy server.
Set Proxy Server Properties:
Address - proxy server address.
Port - proxy server port. Default value is 21.
FTP Servers
Click this button to edit the list of FTP (FTPS) servers. They address, port, user name, password
and other settings.
Copyright © 2000-2014, SmartSync Software
48
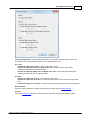
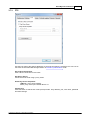
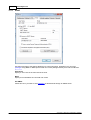
3.7.4
SmartSync Pro
Email
Use the Email page of the Options dialog box to set email options. SmartSync Pro can send
packages using SMTP or MAPI protocol and can receive packages directly from POP3 mailboxes.
User Name
Specify a user name in the From field of an email.
Email
Specify an email address in From field of an email.
Use SMTP
Check this box if you want to send packages as attachments through an SMTP server.
Copyright © 2000-2014, SmartSync Software
SmartSync Pro Interface
Menu Item
Description
SMTP Server
Specify the SMTP server’s address.
Port
Specify SMTP port (default 25).
Timeout, sec
Specify your SMTP server timeout.
Logon to SMTP Server
Check this if your SMTP server requires a logon.
User Name
Specify a user name for logon.
Password
Specify a password for logon.
49
Check this option if your SMTP server requires SPA.
Log on using Secure
Password Authentication
(SPA)
This server requires an
encrypted connection
(SSL)
Check this if your SMTP server requires encrypted connection. For
example: MSN, GMail.
Test SMTP Settings
Press this button to verify specified settings.
Use MAPI
Check this if you want to send packages as attachments using MAPI protocol. Your email client
must support MAPI.
Menu Item
Description
Prompt for MAPI Profile Check this box to select MAPI profile before send email.
Profile
Specify profile name if you want to use a special profile.
Password
Specify a password to log on to specified MAPI profile.
Click Advanced button to open Advanced Email Options dialog
Timeout
Specify timeout for smtp and pop3 servers. Default value 60 seconds.
Font Size3
Copyright © 2000-2014, SmartSync Software
50
SmartSync Pro
Select font size which is used in the summary notification emails.
Default Subject
You can change default subject for email notifications. Any variables could be used here.
3.7.5
Activity Logging
Use the Activity Logging page of the Options dialog box to define which information you want to see
in the log.
Maximum file size
Before every profile execution SmartSync Pro checks existing log file size. If it is larger than
specified value then it is renamed to .bak and starts new log file.
Successfully copied file names
Includes all processed file and folder names. If not checked then just a profile execution summary is
included.
Warnings
Includes warnings to log file.
Copyright © 2000-2014, SmartSync Software
SmartSync Pro Interface
51
Errors
Includes critical errors to log file.
Date and time
Include date/time stamp at the beginning of each line.
FTP Commands
Includes all FTP commands which are sent and received to FTP server.
SMTP and POP3 Commands
Includes all SMTP/POP3 commands which are sent and received to SMTP/POP3 server.
Icon in system tray
Hide icon from system tray - hides program icon from system tray. If you want to open main
window then double click on the SmartSync Pro desktop icon.
Show exclamation mark on - defines when icon in system tray should show an exclamation
mark.
Warnings or errors - shows an exclamation mark if at least one profile has warnings or
errors during last synchronization.
Errors only - shows an exclamation mark if at least one profile has errors during last
synchronization.
Copyright © 2000-2014, SmartSync Software
52
3.7.6
SmartSync Pro
Service
Use the Service page of the Options dialog box to switch program mode from Service-Mode to
Normal-Mode and vice-versa.
Switch SmartSync Pro to Service-Mode
Press this button to install SmartSync Pro as a service, close SmartSync Pro and start it in service
mode.
Switch SmartSync Pro to Normal-Mode
Press this button to stop SmartSync Pro service, uninstall the service and restart SmartSync Pro in
normal mode.
Note:
The Service page is accessible for administrators.
Copyright © 2000-2014, SmartSync Software
SmartSync Pro Interface
3.7.7
53
Security
Main Window section:
Ask password to open main window
Check this box if you want to protect program settings from changing by unauthorized users.
Retype Password
Re-enter the password for verification.
Remote Access section
Allow remote access by SmartSync Monitor
Check this box to allow SmartSync Monitor to view and control state of SmartSync Pro remotely.
Password
Specify password to access SmartSync Pro remotely.
Retype password
Retype the password to be sure that you have wrote it correctly.
Connection Method
Copyright © 2000-2014, SmartSync Software
54
SmartSync Pro
Named Pipes
Windows named pipes will be used to connect SmartSync Monitor to SmartSync Pro. This
options allows to connect to SmartSync Pro running in the local network.
TCP/IP Protocol
SmartSync Monitor will connect to SmartSync Pro using TCP/IP protocol and port specified
below.
You can find more infromation here: http://www.smartsync.com/monitor/
3.8
New Profile Wizard
New Profile Wizard guides you through the steps needed to create new profile:
Welcome.
Select folders to synchronize.
Folder properties.
Include files.
Exclude files.
Schedule.
Wizard completed.
3.8.1
Welcome
The first step is to define what you want to backup or synchronize and how.
What do you want to synchronize?
SmartSync Pro provided several predefined templates for frequently used profiles, such as My
Documents, My Favorites, etc. Check the box near template name you want to use.
I will select folders manually
If you prefer to choose folders manually you can do so during the next wizard step.
Synchronization Type:
Synchronize with local/network computer
Choose this type if you want to backup your important files from your hard drive to another location
such as removable media, like flash drive or USB drives, or to a network volume. Select the
operation you want to perform on your files. It can be one of the following:
Copy Source to Destination. You can also delete obsolete files from the destination folder.
Move Source to Destination. All files matched your criteria will be moved to the destination folder.
Synchronize Source and Destination. You can also synchronize file deletions.
Compress Source into a single ZIP file. You can also delete obsolete files from the destination ZIP
file.
Incremental Backup (with compression).
Synchronize with remote computer
Choose this type if you want to backup your important files from your hard drive to FTP or FTP over
SSL server. Select the operation you want to perform on your files. It can be one of the following:
Copyright © 2000-2014, SmartSync Software
SmartSync Pro Interface
55
Copy Local to Remote. You can also delete obsolete files from the remote folder.
Copy Remote to Local. You can also delete obsolete files from the local folder.
Synchronize Local and Remote. You can also synchronize file deletions.
Incremental Backup (with compression).
Synchronize with remote computer (Packet Mode)
Choose this type if you want to synchronize files on two or more computers that you can't connect
through a local network. It's an ideal solution if you use the same files both at home and in the office
or if you want to synchronize computers via email or FTP.
Click the Preview button to show which files you have selected for synchronization.
3.8.2
Select Folders for Synchronization
Select the folders/files you want to backup/synchronize.
The Available Folders shows a typical windows explorer tree. To select a folder for backup/
synchronize, check the box to the left of the appropriate icon. A check will appear in the box after it
has been selected. SmartSync Pro scans selected folders and shows the files statistics in a Total
Statistics group.
Selected folders are added to the Selected Folders list. The right column of the Selected Folders
list contains check boxes. If you want to backup/synchronize all of the subfolders within a selected
folder check this box, if you don't want to then uncheck it.
Press Add button to add folder or files manually.
Press Delete button to delete selected item from the list.
Click the Preview button to show which files you have selected for synchronization.
3.8.3
Folder Properties
Specify folder properties for each selected folder. Depending on the selected synchronization type
and operation this page may contain a combination of the following controls:
Use common destination folder and append folder name
Use this option if all of your source folders should be synchronized with the subfolders of the
common destination folder. For example if have common destination folder E:\Backup and want to
sync:
C:\Folder1 to E:\Backup\Folder1
C:\Folder2 to E:\Backup\Folder2
etc.
Use its own folder for each source
Use this option if you want to specify separate destination folder for each source folder.
For example:
C:\Folder1 to E:\Backup\Folder1
C:\Folder2 to \\Server\Share\Folder2
etc.
Folder Name
Copyright © 2000-2014, SmartSync Software
56
SmartSync Pro
Specifies a folder name that should be unique within the profile.
For example: A source folder "C:\My Documents" may have a folder name "My Documents".
Destination Folder
Type the full path of a folder where the files should be copied to. Environment variables can also be
used in the folder name.
For example: A folder on your computer may be named: "C:\Backups" or a folder on another
computer on the network may be named: "\\DocServer\Shared\Daily archives". Click the
button if
you need to connect to a network drive with a different user name and password.
Note
You can also use
button to select a folder from a list.
Click the Preview button to show which files you have selected for synchronization.
3.8.4
Include Files
Specify which files you want to backup/synchronize.
Folders
The list of folders you have selected for synchronization. - Profile Options - adjusts the common
settings for all folders in the profile. You may modify settings for each folder.
Include all files
Select this option to include all files from source folders.
Include only selected files or file types
Included files or file types - specifies a list of file names and file masks to synchronize. Use
the Add button to add file name or file mask to the list. Use the Delete button to delete
selected rows. Press Browse button to select files on the disk.
Advanced
Click this button to open an advanced options.
Include empty folders - synchronizes empty folders. If the folder contains only files which are
excluded by other criteria then this folder is also considered as empty.
File Time
Include files with any file time - does not filter files by time.
Include files that have been modified in the last - include only files with the last
modification date within the specified period.
Include files that have NOT been modified in the last - include only files with the last
modification date older than a specified period.
File Size
Include files with any file size - does not filter files by size.
Include files with size more than - include only files with the size more than the specified
size.
Include files with size less than - include only files with the size less than the specified
size.
Copyright © 2000-2014, SmartSync Software
SmartSync Pro Interface
57
Reset Defaults
Press this button to discard changes and load include masks from the profile options.
Click the Preview button to show which files you have selected for synchronization.
3.8.5
Exclude Files
Specify which files you want to exclude from backup/synchronization.
Folders
The list of folders you have selected for synchronization. - Profile Options - adjusts the common
settings for all folders in the profile. You may modify settings for each folder.
Exclude files or file types
Specifies the files and file types you want to exclude from backup/synchronization. The Exclude
files or file types table shows the current list of file types you want to exclude. Use the Add button
to add file name or file mask to the list. Use the Delete button to delete selected rows. Press
Browse button to select files on the disk.
Exclude folders
Specify folders to exclude from synchronization. Press Add button to add new folder to the list.
Press Delete button to delete selected items from the list. Press Browse button to open dialog to
select any existing folder.
Advanced
Exclude file if exists - specifies special conditions to exclude files if there are files with the
same name, but with a different extensions. For example if you specify *.dcu in the Mask field
and pas in the Extension field then SmartSync Pro will excluded each file with dcu extension if
there is a file with the same name, but with pas extension in the same folder.
File Attributes - you can exclude files by its attributes. For example you can exclude system
and hidden files.
Note
· If you want to exclude all subfolders with name Doc then specify "Doc" in Excluded folders.
· If you want to exclude only root folder Doc and include all subfolders Doc like "My Job\Doc" then
specify "Doc\".
· If you want to exclude only subfolders Doc and include root folder Doc then specify "*\Doc".
Reset Defaults
Press this button to discard changes and load exclude masks from the profile settings.
Click the Preview button to show which files you have selected for synchronization.
3.8.6
Schedule
Specify when you want the profile to run.
Select desired frequency.
Copyright © 2000-2014, SmartSync Software
58
SmartSync Pro
Frequency
Description
Manual Start
Select Manual Start if you do not want SmartSync Pro to synchronize
files automatically. Once setup, you can manually run the profile from
the main window as needed.
Every Few Minutes
Run the profile every few minutes. You may select an interval in
minutes, a start date and a start time.
Every Few Hours
Run the profile every few hours. You may select an interval in hours, a
start date and a start time.
Every Day
Run the profile every few days. You may select an interval in days, a
start date and a start time.
Every Week
Run the profile every few weeks. You may select an interval in weeks, a
start date and a start time.
Every Month
Choose the months in which you want to start the profile and the
weeks of the month and the days of the week for each month in which
you want to start the profile. You can also specify that you want to
start a profile on the last day of each month.
One Time Only
Run the profile once, at the specified time. You may select start date
and start time.
Note: For the Every Few Minutes and Every Few Hours frequency, the profile will run from Start
Time up to 11:59 PM by default. If you setup an End Time in the Advanced Options then the profile
will run up to the End Time.
In addition to a setting the profile run frequency, you can also choose to run the profile at Windows
startup and Windows shutdown.
Also Run At
Description
Windows Startup
Run the profile at Windows startup.
Windows Shutdown
Run the profile before Windows shutdown.
On Folder Changes
Run the profile if any file in the source folder is modified. This option
makes for practically real-time backups (with a specified delay), which
is useful if a profile requires an especially fast refresh of the backup
copy.
If the option Copy of changed files only checked then SmartSync
Pro detects which files were changed and copies them without folders
rescan.
On Disk Insertion
Run the profile when specified removable disk has inserted. You can
specify delay before run the profile after insertion.
When the network is
Run the profile when the specified network is connected.
co
nn
ect
ed
If you do no want to run profiles on some days, you can specify them in the Do not run on these
days group.
Wait for profile
Check this box and select the profile from the list if you want to execute the profile right after the
Copyright © 2000-2014, SmartSync Software
SmartSync Pro Interface
59
finish of the selected profile.
Click the Advanced button to open the Advanced Options dialog to set additional scheduling
options.
3.8.7
Wizard Completed
The last step is to set profile name. Enter a suitable name to identify this profile.
Setup Additional Parameters after Pressing Finish button
Check this box if you want to setup all profile properties.
Click the Finish button to close the New Profile Wizard.
3.9
Restore Wizard
Restore Wizard allows you to restore one or any source files from a backup copy.
1. Select backup files.
2. Select destination folders.
3. Select files to restore.
3.9.1
Select Backup Files
This page shows you all backup files in the Destination Folder which were created for the current
profile. A full backups have a symbol "#" at the end of file name. Mark backup files you want to use.
Select All
Click this button to select all available backup files.
Deselect All
Click this button to deselect all backup files.
Delete
Click this button to delete selected file from disk.
Check the Integrity of Backup Files
Check this box if you want to verify data integrity of all selected backup files. This may takes some
times to process.
When you click the Next button the Wizard will check data integrity of all marked backup files.
Note: This page available for "Compress source into a single zip file" and for "Incremental Backup
(with compression)" operations.
Copyright © 2000-2014, SmartSync Software
60
3.9.2
SmartSync Pro
Download Backup Files
This page shows you the progress of downloading backup and index files from remote server and the
progress of checking integrity of the backup files if that option was checked.
3.9.3
Select Destination Folders
This page shows you all folders in the marked backup files. Select which folders do you want to
restore and a path for each folder.
Select All
Click this button to select all folders.
Deselect All
Click this button to deselect all folders.
Click the
button to browse for the destination folder.
Click the Back button to select or deselect backup files.
Click the Next button to mark which files you want to restore.
3.9.4
Select Files to Restore
This page shows you the full list of files from selected backup files. Select files you want to restore.
Select All
Click this button to select all files to restore.
Deselect All
Click this button to deselect all files.
By Date
Click this button to mark files by a specified date range.
Select the latest versions to date - Use this option to select the latest versions of the files to
the specified date and time. This will allow you to restore original state of your source folders to
a given moment.
Selected date range - Allows you to select files within the specified date/time range.
View...
Click this button to open selected file and view its content.
Find
Finds file/folder by name.
Show deleted files
Shows the files that were deleted.
Click the Back button to modify destination folders.
Click the Finish button to restore selected files.
Copyright © 2000-2014, SmartSync Software
SmartSync Pro Interface
3.10
61
Compare Files
The Compare Files dialog box displays the list of files. New files appear in blue, modified files are in
green, deleted files are marked with a strike-out and conflict files are in red.
Item
Description
All Files
Press this button to show all files.
New
Press this button to show files that were created since the last
synchronization.
Modified
Press this button to show modified files.
Deleted
Press this button to show deleted files.
Conflicts
Press this button to show file conflicts.
Filter
Switches on/off filtering by file extension.
Files List
Shows the files and folders list.
Close
Closes the dialog.
Run Now
Closes the dialog and run the current profile.
Clear
Packet Synchronization:
Clears remote files list. All local files are treated as new and will be
included in the package.
Synchronize source and destination:
Clears a list of synchronized files. All files which are exist on one side only
will be treated as new.
Reset
Resets remote files list to the local ones. All remote files will be treated as
up to date.
Find
Opens Find Text dialog to look for a file name in the list.
Show Grid
Overlays a grid on the list.
Copyright © 2000-2014, SmartSync Software
62
SmartSync Pro
Open local menu under any item in the list if you want to exclude it or it's folder from processing.
3.11
Connection Security
The Connection Security dialog is used if the path is a network drive and you need to connect to the
remote computer using a specified user name and a password.
Connect to a Network Resource
Connect to a network drive using a specified user name and a password.
User Name
Specifies a user name.
Password
Specifies a password.
Test
Press this button to try to connect to the network drive using specified user name and password.
3.12
Interface Language
SmartSync Pro supports multi-language interface.
If your language is not listed in the menu View | Language you can add your language there. Just
send us an email that you want to make a localization. We will send you an instructions how to do
that and give you 3 SmartSync Pro copies for free!
Copyright © 2000-2014, SmartSync Software
How to...
4
63
How to...
How to...
Backup files
Restore files
Synchronize files via LAN
Synchronize files between remote computers
Run SmartSync Pro as a service
Use command line options
Backup to CD/DVD
4.1
How to backup files
Use the following steps to backup your important data.
Choose menu File | New | Profile. The New Profile Wizard will open.
On the first page of the Wizard choose Synchronize with Local/Network Computer.
Choose which operation you wish to perform: Copy source to destination, Move source to
destination, Compress source into a single ZIP file or Incremental Backup (with
compression).
Click the Next button and fill in all of the other pages of the wizard to define which files you want
to backup, where and when.
If you set schedule to Manual Start then press F5 key to start the backup process.
If you set schedule to run the profile at a specified time then minimize SmartSync Pro and it will
run the profile for you.
4.2
How to restore files
Use the following steps to restore your important data.
Restoring from a destination folder
Use these steps if you backup files using Copy Source to Destination or Move Source to
Destination operations.
Select the profile in the profiles tree.
Select menu Sync | Restore.
The Restore Wizard will open.
Perform all steps in the wizard.
Restoring from a ZIP archive
If you have a profile which was used to create a zip archive then select that profile in the profiles
tree, select menu Sync | Restore. If you have lost that profile select menu Sync | Create New
Profile and | Restore Source from a ZIP file and select a ZIP file.
The Restore Wizard will open.
Perform all steps in the wizard.
Restoring from an Incremental Backup
If you have a profile which was used to create an incremental backups then select that profile in
the profiles tree, select menu Sync | Restore. If you have lost that profile choose menu Sync |
Create New Profile and | Restore Source from Incremental Backup and select any of your
backup files.
Copyright © 2000-2014, SmartSync Software
64
SmartSync Pro
The Restore Wizard will open.
Perform all steps in the wizard.
4.3
How to synchronize files via local network
Use the following steps to setup bidirectional synchronization of your files.
Choose menu File | New - Profile. The New Profile Wizard will open.
On the first page of the Wizard choose Synchronize with Local/Network Computer.
Choose the operation Synchronize Source and Destination.
Click the Next button and fill in all of the other pages of the wizard to define which files you want
to synchronize and when.
If you set schedule to Manual Start then press F5 key to start the synchronization process.
If you set schedule to run the profile at specified time then minimize SmartSync Pro and it will run
the profile for you.
4.4
How to synchronize files using packets
SmartSync Pro has a unique feature: files synchronization between computers that are not
connected through a local network. Use the following steps to synchronize files.
On the first computer
Choose menu File | New - Profile. The New Profile Wizard will open.
On the first page of the Wizard choose Synchronize with Remote Computer (Packet Mode).
Click the Next button and fill in all of the other pages of the wizard to define which files you want
to synchronize and when.
Choose the transfer package method.
Choose menu Sync | Synchronize. SmartSync Pro scans source folders for targeted files and
compresses them into a package. The program then copies the package to disk, email or FTP
depending on the transfer method you have selected.
On the second computer
If you choose transfer package using Email or FTP then download the package using your Email
or FTP client. This operation only needs to be performed once.
Choose menu Sync | Create New Profile and | Apply Updates . SmartSync Pro will ask you to
select the package and press the Open button.
The program creates a new profile using information from the package.
The Destination Folders dialog box will open. Enter destination folder for every folder and press the
OK button.
SmartSync Pro will begin extracting files from the package. Wait until the process completes.
Now you can choose the transfer package method for the created profile.
Both computers are ready for two-way synchronization.
When you choose menu Sync | Synchronize SmartSync Pro will try to load package from remote
computer, apply it and then create package for the local computer.
Copyright © 2000-2014, SmartSync Software
How to...
4.5
65
How to run SmartSync Pro as a service?
The main advantage of using the service is that profiles can be run even if the user is not logged
on.
To install the service
You should have the rights of administrator to install SmartSync Pro as a service.
Choose menu View | Options and switch to page Service.
Press the button "Switch SmartSync Pro to Service-Mode".
SmartSync Pro will install the service, close SmartSync Pro and start the service.
To uninstall the service
You should have the rights of administrator to uninstall SmartSync Pro.
Choose menu View | Options and switch to page Service.
Press the button "Switch SmartSync Pro to Normal-Mode".
SmartSync Pro will stop the service, uninstall the service and restart SmartSync Pro in normal
mode.
4.6
How to use command line options?
You can run SmartSync Pro with the following command line options:
Option
Description
/? or /Help
Show this help window
/Exit
Exits application, wait for idle if busy
/ExitNow
Exits application immediately
/ShowAboutBox
Show the About Box
/Show
Show the main window
/ShowLog
Show the Log window
/Suspend
Suspends all profiles
/Resume
Resumes all profiles
/RunAll
Runs all profiles
/RunProfile=ProfileName
Run specified profile
/RunGroup=GroupName
Runs all profiles in a specified group
Examples:
SmartSync.exe /RunProfile=Backup /RunProfile="Daily Backups\My Documents"
Command line will start profile with name Backup and profile "My Documents" from the group
"Daily Backups".
SmartSync.exe /RunProfile="My Documents" /RunGroup=Backup /Exit
Command line will start profile with name "My Documents", all profiles within group "Backup" and
will exit SmartSync Pro when all profiles are finished working.
Copyright © 2000-2014, SmartSync Software
66
4.7
SmartSync Pro
How to backup to CD/DVD
Backups to CD/DVD are done via the Packet Writing interface to your CD/DVD drive.
Examples of Packet writing interfaces are:
Roxio DirectCD (Drag-to-Disc)
Nero InCD
Windows Vista and older supports Live File System. A file storage system that can be used to
create CDs and DVDs. Discs formatted with Live File System allow you to copy files to the disc at
any time, instead of copying (burning) them all at once.
Copyright © 2000-2014, SmartSync Software
Ordering, Registration and Support
5
67
Ordering, Registration and Support
Ordering, Registration and Support:
How to Register?
After Registration
Contact Information
5.1
How to Register?
To purchase SmartSync Pro, visit the Registration section of our Web site at http://
www.smartsync.com/order/. After purchasing you will receive a registration key via email.
Web-site: http://www.smartsync.com/
5.2
After Registration
When you receive your registration information (license number) you must enter it into the program.
To enter your registration information, please perform the following steps:
Run SmartSync Pro.
Choose Menu Help, option Registration.
The Registration Key dialog will open.
Switch to your email client and find the email with the registration information.
Right-click the message to display the popup menu. Select the Select All command there. The
menu will disappear, and the message will change its color (become selected). Then display the
popup menu again and select the Copy command.
Switch to SmartSync Pro. If the registration code has not appeared in the edit box automatically
then press the Paste button.
After the registration information has entered, press the OK button.
SmartSync Pro will prompt you to restart the program. Press the OK button.
If your data was entered correctly, SmartSync Pro will now be registered to the code you entered
and your name will be displayed in the About box.
You are now the lawful owner of the program.
Please, look at the flash demo on how to activate your copy:
http://www.smartsync.com/support/registration-tutorial.html
Note
Be sure to save your registration information in a safe place. You will need it again if you reinstall
Windows. Better safe than sorry.
Note
Don't give your registration information to others. Please review the License Agreement for details.
Copyright © 2000-2014, SmartSync Software
68
5.3
SmartSync Pro
Contact Information
Technical Support
Registered users are entitled to technical support, should the need arise. Please contact us here:
http://www.smartsync.com/support/.
Feedback
If you have any comments or concerns about this product please direct them to http://
www.smartsync.com/support/. Your feedback is important to us. It helps us to make this software a
better product for you. Many of its features and significant portions of its interface have been heavily
influenced by comments from users. So if you have a grand idea for a new feature, or a better way of
doing something, please drop us a note.
Web
Main site: http://www.smartsync.com/support/
Copyright © 2000-2014, SmartSync Software
What's new in SmartSync Pro 5?
6
What's new in SmartSync Pro 5?
- Backup and synchronize files to WebDAV servers.
- Now available in two editions 32 bit and 64 bit.
- Versioned backup. Backup file to time-stamped folders with automatic folders rotation.
- Real-time synchronization detects changed files without scan of the folders.
- Bandwidth schedule allows you to flexibly limit network traffic.
- Limit for total profile execution time.
- Wake up the computer to execute profile by schedule.
- Write notifications to Windows Event Log.
- Much improvements in compressed incremental backups.
- and much more...
Copyright © 2000-2014, SmartSync Software
69
70
SmartSync Pro
Copy directly to destination file
23
Copy File Security Information
23
Copy Folder Security Information
23
Copy if one of the following conditions are fulfilled
Copy only files with archive bit set
25
Copy Options
23
Copy Source to Destination
43
Copying of changed files only, if possible
25
Copyright
5
Index
-//?
65
/Exit
65
/ExitNow
65
/Help
65
/Resume
65
/RunAll
65
/RunGroup
65
/RunProfile
65
/Show
65
/ShowAboutBox
/ShowLog
65
/Suspend
65
25
-DDelete Unmatched Files
43
Detect files changes
25
Dial This Connection
33
Differential Backup
19
Do not delete package after apply updates
Does it work as a service?
65
65
-E-
-AActivity Logging
50
After Registration
67
Allow to modify this profile for selected users only
35
Always copy all the files
25
-BBackup Options
19
Backup the latest packages
Backup Type
19
Bandwidth Throttle
23
22
-FFeatures
5
File Comparison
25
File List
61
File menu
14
File Versions
19
Folder Properties
38, 40, 42
Folder Settings
19
Folders
11
Force rescan on first run
25
FTP
47
22
-CCD/DVD
66
Clear archive bit after copy
25
Command line options
65
Compare Files
61
Compare files after copy
23
Compress Source into a ZIP file
Compression Ratio
19
Connection Security
62
Contact Information
68
Encryption
19
Erase from disk
19
Events
33
Exclude Files
29, 42, 57
-H43
Hang Up Connection
33
Help menu
16
How to Backup Files
63
How to backup to CD/DVD
How to Register?
67
66
Copyright © 2000-2014, SmartSync Software
Index
How to Restore Files
63
How to Synchronize Files between Remote Computers
64
How to Synchronize Files via LAN
64
-I-
19
-R-
If disconnected, retry xxx times
23
Include Files
27, 40, 56
Incremental Backup
19
Incremental Backup (with compression)
Installation
8
Interface Language
62
Remote Files
10
Remote Synchronization
22
Restart Full Backup
19
Restore Wizard
59, 60
Run on disk insertion
30
Run on folder changes
30
Run Programs
33
43
-K-
-S-
Keep files in folder
19
Keep last xxx versions of files
19
-LLicense Agreement
6
-MMenu
14, 15, 16
Move deleted files to the File Versions folder
Move to Recycle Bin
19
-NNew Profile Wizard
54, 55, 56, 57, 59
Next Full Backup
19
Notifications
36
-OOptions
Profiles
10
Prompt to delete unmatched files
19
Prompt to overwrite "In Use" files
22
Prompt to resolve file conflicts manually
71
45, 46, 47, 48, 50, 52, 53
-P-
19
Schedule
30, 57
Security
35, 53
Select Destination Folders
60
Select Files to Restore
60
Send Email
36
Send only if there are warnings or errors
36
Services
52, 65
Show Balloon Hint in System Tray
36
Show Message Dialog
36
Shutdown Windows
33
SmartSync Monitor
53
Span files across multiple removable disks
19
Sync menu
15
Synchronization Parameters
43
Synchronization Types
11
Synchronize File Deletions
43
Synchronize Source and Destination
43
System requirements
8
System Tray Icon
43
-TTool Bar
Tray Icon
17
43
Packages
11, 12
Play Sound
36
Preferences
38
Profile Properties
19, 22, 23, 25, 27, 29, 30, 33, 35, Unidirectional Synchronization
36
Uninstalling
9
-U-
Copyright © 2000-2014, SmartSync Software
19
72
SmartSync Pro
Use Volume Shadow Copy service
Use Windows copy routine
23
19
-VVersioned Backup
View menu
15
19
-WWhat is SmartSync Pro?
4
What's new in SmartSync Pro 5
69
Write to Windows Event Log
36
Copyright © 2000-2014, SmartSync Software