1
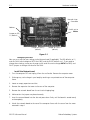
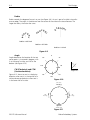
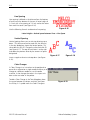
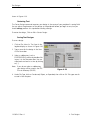
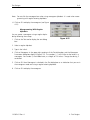
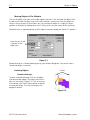
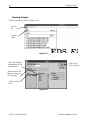
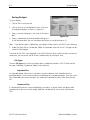
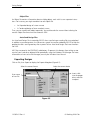
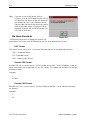
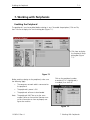
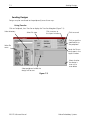
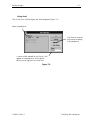
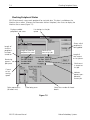
Operation Manual for
the EDS EZ
Design Software
•
A Melco Embroidery Design System
for use with Microsoft® Windows® 3.x
or Windows 95
Melco
Embroidery Systems
Part Number 110362-01 Revision A
A Saurer Group Company
1575 West 124th Avenue
Denver, Colorado 80234
United States of America
E-mail: [email protected]
© Copyright 1996 by Melco Embroidery Systems
ALL RIGHTS RESERVED No part of this publication may be reproduced, stored in a retrieval system,
or transmitted in any form or by any means (electronic, mechanical, photocopying, recording, or
otherwise) without prior written approval of Melco Embroidery Systems. Melco reserves the right
to revise this publication and to make changes in it at any time without obligation of Melco to
notify any person or organization of such revisions or changes.
All precautions have been taken to avoid errors or misrepresentations of facts, equipment, or
products. However, Melco does not assume any liability to any party for loss or damage caused by
errors or omissions.
Printed in the United States of America
Revision A, April 1997
Table of Contents
Table of Contents
1. How to use This Manual
Scope of this Manual
Using Microsoft® Windows®
EDS EZ Help
1-1
1-1
1-1
2. Installing EDS EZ
System Requirements
Hardware Installation
Software Installation
Configuring EDS EZ
2-1
2-1
2-4
2-5
3. An EDS EZ Overview
Starting EDS EZ
The Application Window
The Layout Window
3-1
3-2
3-3
4. Text Designs
The Text Tool
4-1
5. Working With Designs
Designs as Objects
Modifying Condensed Designs
Modifying Expanded Designs
Print
Using the Color Palette
5-1
5-7
5-9
5-10
5-10
6. Working With Files
Design Formats
Opening Designs
Importing Designs
Saving Designs
Exporting Designs
File Name Standards
6-1
6-2
6-3
6-4
6-5
6-6
i
Table of Contents
7. Working With Peripherals
Enabling the Peripheral
Sending Designs
Checking Peripheral Status
7-1
7-2
7-4
Index
Quick Reference Guide
ii
How to use This Manual
1-1
1. How to use This Manual
Using Microsoft® Windows®
Windows has many useful features. Refer to the Microsoft Windows User's Guide for more information.
EDS EZ Help
Online help allows you to access context-sensitive information. Information is available by pressing
the F1 key When you exit help, you are returned to your original position.
110362-01 Rev. A
1. How to use This Manual
1-2
EDS EZ Software Manual
How to use This Manual
Melco Embroidery Systems
System Requirements
2-1
2. Installing EDS EZ
System Requirements
•
486/33 (ISA or EISA standards) with math co-processor and 8 MB memory
•
80 MB hard drive (controller board must have a Western Digital or Goldstar chipset to use
Melco format disks)
•
3.5 inch disk drive, 1.44 MB capacity
•
Super VGA Monitor 800 x 600, 16 color
•
Melco Network Board
•
Parallel port for Melco Security Dongle
•
Mouse (Windows compatible)
•
MS-DOS Ver 5.0 (or higher)
•
Microsoft Windows Ver 3.1 (or higher) installed
You must completely install all included hardware and software using the procedures on the following pages.
Hardware Installation
Windows 3.x
If you are installing the system in Windows 3.x, install the card using the default jumper settings.
Skip ahead to the section for installing the Network card.
Windows 95
If you are installing the system in Windows 95, install the card using the instructions below.
Check for Available IRQ and DMA settings
1. Click on Start→Settings→Control Panel.
2. Double-click on the System icon.
3. Select the Device Manager tab, the click Properties.
4. Make sure the Interrupt Request (IRQ) radio button is selected, then pick an IRQ that is NOT
listed on the screen. Write down your IRQ.
5. Click the Direct Memory Access (DMA) radio button, then select a DMA that is NOT being
used (the DMA must be either 0, 1, or 3). Write down your DMA.
110362-01 Rev. A
2. Installing EDS EZ
2-2
Hardware Installation
Network interface cable
Address
Switch set to
Melco
Jumper on IRQ
11 (default)
Jumper on DREQ1
(default)
Jumper on DACK1
(default)
Figure 2-1
Configure your card
Now you must transfer your settings to the Network card (if applicable). The IRQ defaults to 11,
and the DMA (which comprises BOTH the DREQ and the DACK) defaults to 1. If you need to
change these settings, make your changes to the card. Be sure to change BOTH the DREQ and
DACK jumpers to change the value for the DMA.
Install the Network card
1. Turn the computer OFF and unplug it from the wall outlet. Remove the computer cover.
2. Discharge any static charge in your body by touching a non-painted area of the computer
frame.
3. Locate an empty expansion card slot.
4. Remove the expansion slot cover to the rear of the computer.
5. Remove the network board from the anti-static shipping bag.
6. Make certain the jumpers are placed correctly.
7. Insert the network board into the slot and press down firmly until the board is seated evenly
and completely.
8. Attach the network board to the rear of the computer frame with the screw from the cover
removed in step 4.
EDS EZ Software Manual
Melco Embroidery Systems
Hardware Installation
2-3
9. Replace the computer cover.
10. Turn the computer on and start Windows.
Note: The following steps apply only to Windows 95 users.
11. Click on Start→Settings→Control Panel.
12. Double-click on the Add New Hardware icon. Let Windows 95 detect the new card.
Installing the Dongle
The dongle is a security device that must be
installed in an active parallel port of your computer.
1. Locate the parallel port LPT1 on the rear of your
computer.
2. Turn the computer power OFF.
3. Secure the dongle with the captive screws.
Note: If you have a printer attached to your parallel port, remove the printer cable, attach
the dongle, then reinstall the printer cable
to the end of the dongle when installation
is complete.
Figure 2-2
Attaching the Peripheral
See your embroidery peripheral operator manual for instructions on installing the network cable
from the computer to the embroidery peripherals.
Software Installation
Microsoft Windows must be installed prior to installing EDS EZ. If Windows is not installed,
refer to the Windows installation manual.
1. Insert the EDS EZ Program Disk 1 into the floppy disk drive.
2. Click on Start→Run (or File→Run if you are using Windows 3.x) to display the Run dialog box.
3. Browse to your 31/2 floppy drive.
4. Select setup.exe and click Open (or OK if you are using Windows 3.x).
5. Click OK and follow the on-screen instructions to install EDS EZ.
110362-01 Rev. A
2. Installing EDS EZ
2-4
Software Installation
A message will appear warning that EDS EZ must be configured before use. Configuration is covered in the next section.
When the message displays instructing you to reboot the system, remove the disk from the disk
drive, exit Windows and turn your computer off. Wait 3 seconds and turn it on again.
Configuring EDS EZ
Before starting EDS EZ for the first time, use the Config program to configure EDS EZ. Start
Windows and follow these steps to configure EDS EZ:
1. Click on Start→Programs→Melco Apps→Config for Windows 95, or double-click on the config icon in the Melco Apps Group in Program Manager for Windows 3.x to display the EDS EZ
Configuration dialog box.
Click on Hardware
Figure 2-3
2. Click on the Hardware button to display the Advanced Configuration dialog box.
3. Select the appropriate IRQ and DMA
settings in the Network portion of the
dialog box. The settings you select here
MUST match your jumper settings on
the card.
4. Click Ok twice to close both dialog
boxes.
Figure 2-4
Seeing Which Options are Installed
Click on Options in the Hardware Configuration dialog to display the Set Options information box.
Options are in gray if installed or black if not installed.
If you encounter problems during software installation, call Melco Telephone Support at
(303) 457-2025 for assistance.
EDS EZ Software Manual
Melco Embroidery Systems
Starting EDS EZ
3-1
3. An EDS EZ Overview
This chapter provides an overview of the operation and features of EDS EZ.
Starting EDS EZ
Double click here
to start EDS EZ
Figure 3-1
The Application window
appears when EDS EZ is
started
Figure 3-2
110362-01 Rev. A
3. EDS EZ Overview
3-2
The Application Window
The Application Window
The Application window is the first screen EDS EZ displays. It has File, Peripheral, and Help in its
menu bar. Using these you can:
•
Open a new layout window
•
Open a file from a disk
•
Import designs from non-DOS disks
•
Send designs from the hard drive to the peripheral
File
Click on File in the menu bar and a drop-down menu (Figure
3-3) offers five options: New, Open, Import, Exit and a
Design List.
New opens an empty Layout Window.
Open requests information for retrieving a DOS file. A more
complete discussion of Open can be found in Chapter 7,
"Working With Designs".
Import requests information for retrieving a non-DOS
file.Exit closes EDS EZ and returns you to the Windows program manager.
Figure 3-3
The Design List is at the bottom of the menu. The last six
open files are listed here. Clicking on a name opens that design in the Layout Window.
Peripheral
Click on Peripheral to access the Transfer dialog box, which allows you to send .EXP or .ASD files
directly to the peripheral.
Help
Provides information about the version of EDS EZ you are running. See Chapter 1 for more information on how to use help.
EDS EZ Software Manual
Melco Embroidery Systems
The Layout Window
3-3
The Layout Window
Open the Layout window from the Application window by clicking on File then New. The menu
bar options are: File, Edit, View, Peripheral, and Help.
From the Layout window shown in
Figure 3-4 you can:
•
Create lettering
•
Add lettering to a design
•
Open files from the hard disk
and DOS format disks
•
Import designs from paper
tapes and non-DOS disk formats (Melco, Tajima, Barudan,
Premier, and ZSK)
•
Export designs to non-DOS
formats and paper tapes
•
Save design files to the hard
drive
•
Perform some customization
of designs
Menu bar
Title bar
Toolbar
Color palette
Status bar
Figure 3-4
The File Menu
Click on File in the menu bar and the drop-down menu
(Figure 3-5) offers the following options; only the options
in bold are available.
New opens an empty Layout window.
Open requests information for retrieving a DOS file. A
more complete discussion of Open is in Chapter 7
"Working With Designs".
Close removes the design file from the active window.
Save allows you to save a new design or changes to an
existing design. If you are saving for the first time, the Save
As dialog box will appear and prompt you for a file name.
If you are saving changes to an existing file, the original file
will be overwritten.
Figure 3-5
110362-01 Rev. A
3. EDS EZ Overview
3-4
The Layout Window
Save As displays the Save As dialog box. It prompts you for information to save your current
design as a new file, or a second copy of an existing file. If you change a design, you may want to
keep both the original and the modified versions. Each must have a unique name.
Import displays the Import dialog box.
Export prompts you for information necessary to copy a design file to a non-DOS disk or paper
tape.
Send transfers a design to a selected peripheral.
Print displays the Print dialog box.
Printer Setup prompts you for printer information. Clicking on Setup in the dialog box allows
you to change or update information about the selected printer.
Exit terminates EDS EZ and returns you to the Windows Program Manager after giving you an
opportunity to save any open files.
The Design List displays up to the last six opened designs.
The Edit Menu
Only commands in bold print are accessible (see Figure 3-6). Some
grayed-out commands will be available in other windows or when
screen objects are selected.
Center Design places the design's center in the exact center of the
peripheral's sewing field. This is an important step before sending
designs to be sewn.
Return to Origin is on when a check mark appears next to it.
Activate this option by clicking on it. It returns the needle to its origination point when a design has finished sewing.
Figure 3-6
Cut, Copy, Paste and Clear are used to duplicate or delete designs or portions of designs.
EDS EZ Software Manual
Melco Embroidery Systems
The Layout Window
3-5
The View Menu
Only the bold commands in the View menu can be accessed (see Figure
3-7).
Regenerate redraws the design in the current window.
Ruler allows you to measure on-screen designs.
Zoom In enlarges a portion of the design on the screen. Select the area by
clicking and dragging the magnifying glass cursor over it. This is useful for
more precise editing. It does not affect sewing size.
Zoom Out decreases the design size on the screen. Select the area by
clicking and dragging the magnifying glass cursor over it. It does not affect
sewing size.
Figure 3-7
Zoom Last returns you to the previous Zoom view.
Fit Window redraws the design to fill the entire screen.
Actual Size draws the design on the screen at its sewing size.
Show Zoom Factor displays the current zoom factor on the status bar.
Tool Bar allows you to hide or display the toolbar.
Status Bar toggles the design information displayed at the bottom of the screen on and off.
Design Status displays stitch count, number of color changes, size of the design, and other statistics about the current design.
The Peripheral Menu
Status displays the Machine Status dialog box. This provides information on the status of the currently sewing job.
110362-01 Rev. A
3. EDS EZ Overview
3-6
The Layout Window
The Layout Toolbar
The options in the toolbar allow you to customize your design and work with other features of
EDS EZ. They are represented by tools arranged down the left side of your screen as shown in
Figure 3-8.
The Text tool displays the Text dialog box where you create lettering objects for your designs.
The Zoom In magnifying glass enables you to look more closely at
a selected area of the current design
The Zoom Out magnifying glass enables you to see more of the
current design.
The Zoom Previous magnifying glass returns you to the previous
zoom level.
Figure 3-8
The Ruler tool allows you to measure a design in the Layout window.
The Normal Cursor tool returns you to the standard arrow-type
cursor.
EDS EZ Software Manual
Melco Embroidery Systems
Text Designs
4-1
4. Text Designs
Designs and alphabets are sometimes thought of as separate entities; but, alphabets are really a
set of designs. Normally there is a design for each letter, number, and punctuation mark in the
set.
The Text Tool
Creating text begins with the Text tool
. Click on it and the Text dialog box displays.
The Text Dialog Box
The options in this dialog box affect the way your lettering displays on the screen and the way it
embroiders.
Type text here
Select the
alphabet here
Figure 4-1
110362-01 Rev. A
4. Text Designs
4-2
Text Designs
Density
In the EDS EZ Text screen, the density box refers to the space
between each line of stitching (see Figure 4-2). When this
space is decreased, the lines of stitching per inch increases. To
create more lines of stitching per inch, decrease the density
value. A general rule of thumb is:
•
As design size increases, density value should
decrease
•
As design size decreases density value should
increase
EDS EZ defaults to a density of 4.2 points (about 60 lines of
stitching per inch). This is a useful density for many applications.
Figure 4-2
Note: Changing the density only affects column or satin stitches. Some alphabets are composed
of fill stitches and changing the density will not alter their appearance.
Enter the density
here
Figure 4-3
Length
Length refers to the underlay, walking, or running stitches used to move from one area of sewing
to another. These stitches are often covered by column stitching. Use the following as a guide:
Lettering Size
0.5 inch or greater
0.25 inch to 0.5 inch
0.25 inch or smaller
EDS EZ Software Manual
Running Stitch Length
30-40 points
25-30 points
20-25 points
Melco Embroidery Systems
Text Designs
4-3
Line Type Options
There are five choices for line type:
•
Line Center Middle
•
Line Center Bottom
•
Line Normal
•
Arc Normal
•
Arc From Center
You can sew in various types of arced or straight lines. Radius, Angle,
CW and CCW are used when sewing the arc line types.
Figure 4-4
Line Center Middle
Line Center Middle centers lettering both horizontally and vertically
around the needle starting and ending point (see Figure 4-4).
Line Center Bottom
Figure 4-5
Line Center Bottom centers lettering horizontally at the needle starting point, which becomes the lettering baseline (see Figures 4-5). In
most alphabets the tails of the lower case letters such as g, j, p, q,
and y extend below the baseline.
Line Normal
Line Normal starts the lettering at the current needle position, which
is also the lettering baseline (see Figure 4-6). When the lettering is
finished, the needle will not return to its original position.
Figure 4-6
Arc Normal
Arc Normal sews lettering in a curve. The needle starting position is
the lettering baseline, with the text centered around the needle point
(see Figure 4-7).
Figure 4-7
Arc From Center
With Arc From Center, the needle position prior to sewing is at the
center of a circle that would be formed if the arc were completed.
The first needle movement is from that center point to the circumference which is the lettering baseline (see Figure 4-8).
Figure 4-8
110362-01 Rev. A
4. Text Designs
4-4
Text Designs
Radius
A
A
FGH
J
DFG
SD
SDFGHJ
HJ
AS
Radius controls the degree of curve in an arc (see Figure 4-9). An arc is part of a circle's circumference or edge. The radius is the distance from the center of the circle to the circumference. The
larger the radius, the flatter the curve.
Radius = 0.25 inch
Radius = 0.75 inch
Radius = 1.0 inch
Figure 4-9
Angle
Angle determines the location of the text
center point. It is entered in degrees, with
0 at the top of a circle, and 180 at the
bottom (see Figure 4-10).
0˚
315˚
45˚
M
o
90˚
CW (Clockwise) and CCW
(Counterclockwise)
Figure 4-11 shows to sew in a clockwise
direction when text is in the top half of a
circle and counter-clockwise when text is
in the lower half of a circle.
e
lc
270˚
Angle=45°
225˚
135˚
180˚
Figure 4-10
CW 0˚ angle
January
0
90
270
February
A p ril
CCW
270˚ angle
CW
90˚ angle
180
M arc h
CCW 180˚ angle
Figure 4-11
EDS EZ Software Manual
Melco Embroidery Systems
Text Designs
4-5
Spacing
Sometimes text is too crowded or too loosely
spaced. This often happens to arc lettering (see
Figure 4-12). Use the following techniques to
adjust spacing.
Uniform Spacing
At the Text dialog box, locate Spacing in the middle
right corner. Under Spacing is an option which
allows you to increase or decrease the distance
between all the letters in your text by a uniform
amount. With letters of 0.75 inches in height,
adding 0.10" helped the spacing, but the E M B letters at the lowest part of the arc are still too close.
If more horizontal spacing is added, some of the
other letters would be too far apart. Now customized spacing is needed.
Figure 4-12
Figure 4-13
Customized Spacing
Place the cursor between the letters needing space added, then
press F8. A » symbol appears between the letters (Figure 4-14).
Repeat as needed until spacing is adequate (Figure 4-15).
Figure 4-14
Each » adds a space equal to 1/16 of the letter
height. For example, with a 1" letter the space
would be 1/16". With a 0.5" letter, the space
would be 1/32".
Figure 4-15
Deleting Space with the F7 Key
You can decrease the space between letters that are too far apart in a similar manner. In the Text
dialog box, place the cursor between the letters that are too far apart and click. Press F7 and a «
symbol appears between the letters. Click OK to move the letters closer together. Each « subtracts
a space equal to 1/16 of the letter height.
110362-01 Rev. A
4. Text Designs
4-6
Text Designs
Line Spacing
Line spacing is defined as the distance from the bottom
of one line to the bottom of the next. A letter height of
1.0 inch with a line spacing of 1.0 inch makes the letters
from each line touch (see Figure 4-16).
Use the following formula to determine line spacing:
Figure 4-16
Letter height + desired space between lines = Line Space
Vertical Spacing
Vertical spacing allows you to stair-step lettering up or
down. (This feature cannot be used with Arc formats.)
In the text dialog box, locate the Vertical option. This
value defaults to 0.00. Change the value and click OK
(see Figure 4-17). The top of each letter is to the right
and above the previous letter by the amount of space
designated.
Figure 4-17
Figure 4-18
Insert a negative value to stairstep down (see Figure
4-18).
Color Changes
A Color Change is an instruction to the peripheral to
pause for a rethread on a single-needle machine, or to
change to a different needle on a multi-needle
machine. It also changes the color in the Layout window to the next color in the palette.
To add a Color Change in the Text dialog box, place
the cursor between the letters and click, then press
the F6 key. A ^ symbol marks the Color Change as
Figure 4-19
EDS EZ Software Manual
Melco Embroidery Systems
Text Designs
4-7
shown in Figure 4-19.
Centering Text
The Center Design command recenters your design in the center of your peripheral's sewing field.
You can adjust the placement of the design at the peripheral before you begin to sew, but you
should always perform this step before sending a design.
To center the design, Click on Edit→Center Design.
Saving Text Designs
To save a design:
1. Click on File→Save As. The Save As dialog box displays as shown in Figure 4-20.
2. Type a name for the design in the Save
As File Name box.
3. Select a subdirectory (such as
EDSEZ\DESIGNS) or drive by double-clicking on it in the Directories box. You can
move back one level at a time by clicking
on [..].
Note: If you do not select a subdirectory,
your design will be saved in the EDS
EZ main directory (EDSEZ\).
Figure 4-20
4. Under File Type, click on Condensed, Object, or Expanded, then click on OK. File types are discussed in later chapters.
110362-01 Rev. A
4. Text Designs
4-8
Text Designs
The name of your file is now displayed in the EDS EZ title bar.
After the file has been named and saved once, you can resave
the file and any modifications by clicking on Save.
Monogramming
You can create a monogram in EDS EZ using either a monogram
alphabet or a regular alphabet in Monogram mode. Letters for
monograms are entered from the Layout window using the Text
tool and dialog box.
Figure 4-21
Using a Monogram Alphabet
To create a monogram using a monogram alphabet:
1. Click on the Text tool to display the text dialog box.
2. Select a Monogram Alphabet (for example, 3 LTR DIAMOND).
3. Type the initials (standard monogramming convention uses first, last, and middle initials in that
order).
4. Type in the Height of the center letter. The heights of the other letters are controlled by the
monogram alphabet.
5. Adjust the density as needed for the selected height.
EDS EZ Software Manual
Melco Embroidery Systems
Text Designs
4-9
Note: Do not click the monogram box when using monogram alphabets. It is used when monogramming with regular lettering alphabets.
6. Click on OK to display the monogram (see Figure
4-21).
Monogramming With Regular
Alphabets
You can create a monogram using a regular alphabet by following these steps:
1. Click on the Text tool to display the text dialog
box.
Figure 4-22
2. Select a regular alphabet.
3. Type in the initials.
4. Click on Monogram in the upper right quadrant of the Text dialog box, and the Monogram
Parameters dialog box displays (Figure 4-22). The numbers 1, 2 and 3 refer to the letters in a
monogram. Set number 2, the middle letter, at a height of 2.0 inches. Change the density, if
so desired.
5. Click on OK. Now Monogram is checked in the Text dialog box as an indication that you are in
the monogram mode and using a regular lettering alphabet.
6. Click on OK to display the monogram.
110362-01 Rev. A
4. Text Designs
4-10
EDS EZ Software Manual
Text Designs
Melco Embroidery Systems
Designs as Objects
5-1
5. Working with Designs
Designs as Objects
When EDS EZ draws a design in the Layout window, that design is referred to as an object. Each
object is a separate item and maintains its own attributes. This allows you to have a mixture of
expanded and condensed designs in the same window.
Using Cut, Copy, Paste, and Clear
The Cut, Copy, Paste, and Clear options are in the Edit menu and can be used with any object in
a selection box. The first three options work with the Windows clipboard, which is a temporary
memory area.
Cut copies the object to the clipboard and deletes it from the screen.
Copy copies the object to the clipboard but does not delete it from the screen.
Paste copies the contents of the clipboard to the screen.
Clear deletes an object from the screen without copying it to the clipboard. Once an object has
been cleared it cannot be recovered.
You can also delete objects by clicking them, then pressing the [DEL] key on the keyboard. As with
clear, objects that have been deleted cannot be recovered.
An object remains on the clipboard until you end your EDS EZ session or until you Copy or Cut
another object. There can only be one object on the clipboard at a time.
110362-01 Rev. A
5. Working with Designs
5-2
Designs as Objects
Moving Objects In The Window
Click on the object, and a box with handles appears around it. Click and hold the object within
the box (not the box handles) using the left mouse button, and you can move the object anywhere in the active area of the window. You can also move an object in a single axis (either
up/down or left/right) by holding down the [Ctrl] key while using the mouse to click and drag.
Double-click on an expanded design and the Object Parameters dialog box (Figure 5-1) appears. ,
Enter the new X and
Y position of the
object here
Figure 5-1
Double-clicking on a Condensed design brings up a different dialog box. You cannot move a
Condensed design numerically.
Rotating Objects
Arrows
Condensed Designs
To rotate a condensed design, click on the object
and drag handles appear. Click again and the handles turn into arrows (Figure 5-2). Click on a corner
of the design with the left mouse button and drag
to rotate the design. The status bar displays the
degree of rotation.
Figure 5-2
EDS EZ Software Manual
Melco Embroidery Systems
Designs as Objects
5-3
Expanded Designs
Expanded designs may also be rotated using the above procedure but may be rotated more precisely using the dialog box. Double-click on an expanded design to display the Object Parameters
dialog box (Figure 5-3).
Click here to lock an object; a
locked object may not be
moved or scaled
Click here
to accept
changes
Enter the degree of
rotation here; positive
values rotate objects
counter-clockwise and
negative values rotate
the object clockwise
Figure 5-3
Click to insert a trim
command after a
design
Click to insert a color
change command
after a design
Changing the Orientation of a Design
Sometimes design orientation must be altered for proper results. Figure 5-4 shows the various orientations available.
To change orientation, refer to
these instructions.
1. Click on the Object Parameters
tool to display its dialog box.
Figure 5-4
2. Click on the F under Orientation until the desired orientation displays.
3. Click on OK.
110362-01 Rev. A
5. Working with Designs
5-4
Designs as Objects
Deleting an Object
EDS EZ gives you the flexibility to delete an object in two different ways.
The Layout Window
1. Click on the object.
2. Press [DEL] on the keyboard.
The Menu Bar
1. Click on the object.
2. Click on Edit in the Menu Bar.
3. Click on Clear.
Centering a Design
The Center Design command recenters your design in the center of the sewing field. You can
adjust the placement of the design at the peripheral before you begin to sew, but you should
always perform this step before sending a design. To center the design, click on Edit, then Center
Design.
Scaling Designs
Condensed designs can be increased in scale by up to a factor of three and reduced by as much
as a factor of 0.2. Perform a test sewout if you dramatically change a design’s scale.
Rescaling a condensed design adds or subtracts stitches to or from the design. Rescaling an
expanded design does not.
EDS EZ Software Manual
Melco Embroidery Systems
Designs as Objects
5-5
Scaling a Condensed Design
To scale a condensed design, click on the object and drag handles appear (Figure 5-5). Click on a
corner of the design with the left mouse button and drag to scale the design. The status bar displays the new relative proportions.
Allows proportional scaling
Scales X axis only
Scales Y axis only
Figure 5-5
110362-01 Rev. A
5. Working with Designs
5-6
Modifying Condensed Designs
Scaling an Expanded Design
Expanded designs may also be scaled using the above procedure but may be scaled more precisely
using the dialog box. Double-click on an expanded design to display the Object Parameters dialog
box (Figure 5-6).
Click here to use customized scaling in
both X and Y directions (i.e., X=1.5 and
Y=0.5)
Click here to apply
the new scaling
Click here to cancel
the new scaling
Enter the new scale
here; if Scale XY is NOT
checked, Y will automatically be scaled the
same as X
Figure 5-6
EDS EZ Software Manual
Melco Embroidery Systems
Modifying Condensed Designs
5-7
Modifying Condensed Designs
EDS EZ allows you to modify the way a condensed design sews. This applies to condensed designs
only.
Follow these steps to modify a condensed design:
1. Load a .CND file into the Layout window.
2. Double-click on the object to display the Adjust dialog box (Figure 5-7).
Adjust length of running stitches here
Set column density and
width here
Turns underlays on or off
and sets parameters
Sets the max
length of a stitch
before it triggers a
jump stitch
Click here when
finished
Turns short stitches on or off
Resets all options
to EDS EZ
defaults
Turns lock stitches
on or off
Allows changes to scaling (relative proportions) of a
design’s density, stitch length, fill density (if applicable) and
fill stitch length (if applicable)
Figure 5-7
Stitching
Length
Length refers to the walking or running stitches used to move from one area of sewing to another. These stitches are usually covered by column stitching.
Max. Length
Enter the maximum stitch length up to 127 pts. The default is 127 pts.
110362-01 Rev. A
5. Working with Designs
5-8
Modifying Condensed Designs
Short Stitch On
Short Stitch sews less than the full column width on the inside of a curve or corner. This prevents
repeated needle penetrations in one spot. The default is On.
Lock Stitch On
Lock Stitch On sews three small stitches at the end of a letter to tack the stitching. The default is
Off. If the design already features lock stitches, enabling this command will add three more.
Column
Density
This is the space in a column between the lines of stitching. The value is entered in points.
Width
Width allows you to increase or decrease the width of the individual column. The height may also
be slightly affected. The value can be changed in increments of 10%, from +70% to -70%.
Fills
Fills converts column stitching to fill stitching. Instead of a single stitch across the entire width of a
column, there are a series of shorter stitches. Turn on Fills when letters are too large for column
stitching to be durable. Fills applies to all Alphabet, Monogram, and Design File column stitches.
Stitch Length
This sets the length of Fill stitches. The default is 40 points.
Line Sequence
When there are multiple stitches in a column, they can sew one directly under the other, or in a
staggered pattern. Line Sequence determines where the needle penetrations will be on each line.
Underlay
Turning Underlay On allows you to choose one of the three types of underlay for column stitching. Underlay works with Alphabet, Monogram, or Design files, but will not sew beneath fill
stitching.
Stitch Length
Length sets the underlay stitch length for Edge Walk and Center Walk.
EDS EZ Software Manual
Melco Embroidery Systems
Modifying Condensed Designs
5-9
Density
This is the underlay density for Narrow Column. The range is 2.6 to 84.7 pts.
Width
This is the underlay width by a percentage of the column width from 40% to 95%. It applies to
Narrow Column and Edge Walk underlays.
Scaling
This section allows you to change densities and stitch lengths by a percentage of the existing values. It does not change the overall size of the design.
Density
Density resets column density. Values over 1 increase the density and decrease the stitching coverage. Values less than 1 decrease the density and increase the stitching coverage.
Stitch Length
Stitch Length resets running stitch length based on a scale factor rather than points. A value of 2
doubles the stitch length, a value of .5 halves the stitch length.
Fill Density
Fill Density resets the density of fill stitching. Values over 1 increase the density and decrease the
stitching coverage. A value less than 1 decreases the density and increases the stitching coverage.
Fill Stitch Length
Fill Stitch Length resets fill stitch length. A value of 2 doubles the stitch length. A value of .5
halves the stitch length.
Modifying Expanded Designs
Double-click on an expanded object to display the Object Parameters dialog box. Following is a
description of the options:
Lock Object
If you have a mixture of text and a design, this will "lock" the objects together.
110362-01 Rev. A
5. Working with Designs
5-10
Print
Trim After
This will place a trim at the end of a design sewout.
Color Change After
This will place a Color Change command at the end of a design sewout.
Design Notes
This feature allows you to add notes to any Object (OFM) file.
Note: This option only works with Object files. It will not work with Expanded or Condensed
files.
To access the notes feature, click on File→Notes. The Notes dialog box (Figure 5-8) appears.
Type text
here
Click here to exit
without saving notes
Click here
to erase notes
Click here to
save notes
Click to print notes
Click to cut, copy, or
paste notes to or
from multiple designs
or other Windows
based programs
Figure 5-8
EDS EZ Software Manual
Melco Embroidery Systems
Using the Color Palette
5-11
Print
This feature allows you to print information about the currently loaded design to a connected
printer. To access this option click on File, then Print. The Print dialog box (Figure 5-9) appears.
Click to print
Click here for a list of
printable items
(described below)
Click to cancel
Select whether the design
should be printed at actual size or scaled to fit the
page
Change the number
of copies here
Figure 5-9
Design, Status, and Notes prints the current design, status, and any notes associated with the
design.
Print Design prints the current design as shown on-screen.
Object List prints the name of all objects within the current design, their location, and orientation.
Design Status prints the size, location, and number of stitches (total stitches and total each
color), and other information for the current design.
Notes prints the notes associated with the current design.
Using the Color Palette
EDS EZ allows you to choose the colors
used to draw your designs on the
screen. When the palette bar display is
on as shown in Figure 5-10, the colors
are shown at the bottom of the Layout
window. By changing these colors, you
get a preview of a sewn garment.
EDS EZ begins drawing with the first
color in the palette bar and moves
once to the right each time a colorchange command is encountered. EDS
EZ refers to the colors as "Needle 1",
"Needle 2", etc., but they do not control which needles are used at the
sewing peripheral.
110362-01 Rev. A
Background
color
Palette
Figure 5-10
5. Working with Designs
5-12
Using the Color Palette
24 needles are available in the color palette bar. The screen background color is permanently
located in the last, outlined box on the right end. The screen color can be changed the same way
you control the needle colors.
Working with the Palette Bar
In the Layout window, double click any colored square (called “needles”) to display the Needle
dialog box (Figure 5-11.
Shows the relative
composition (dithering) of the color
Displays the color
EDS EZ will display
Name a color (to
save it) here
Click to accept
changes
Click to cancel
changes
Use the scroll bars or
type in the value to
increase or decrease
a color’s presence
Click to save the
current color
Click to delete a
selected color
Figure 5-11
EDS EZ Software Manual
Melco Embroidery Systems
Major Heading
5-13
Color Information
The Red, Green, and Blue color values are in a range of 0 to 255. To see these colors on a 16color monitor, enter their numerical values in the needle dialog box.
Red
Green
Blue
Yellow
Magenta
Cyan
Reddish Brown
Darker Green
Darker Blue (Navy)
Ocher (Pale Yellow)
Turquoise
Violet
White
Gray
Light Gray
Black
110362-01 Rev. A
Red
Red
Red
Red
Red
Red
Red
Red
Red
Red
Red
Red
Red
Red
Red
Red
-
255
0
0
255
0
255
128
0
0
128
0
128
255
128
192
0
Green
Green
Green
Green
Green
Green
Green
Green
Green
Green
Green
Green
Green
Green
Green
Green
-
0
255
0
255
255
0
0
128
0
128
128
0
255
128
192
0
Blue
Blue
Blue
Blue
Blue
Blue
Blue
Blue
Blue
Blue
Blue
Blue
Blue
Blue
Blue
Blue
-
0
0
255
0
255
255
0
0
128
0
128
128
255
128
192
0
5. Working with Designs
5-14
EDS EZ Software Manual
Major Heading
Melco Embroidery Systems
Design Formats
6-1
6. Working With Files
This chapter covers opening existing files, importing files from other formats, saving new files, and
exporting new files to other formats.
Design Formats
Disks come in a variety of storage formats, but EDS EZ considers them as either a hard disk (DOS)
or a floppy disk. EDS EZ can access both, but uses different commands with each as shown in the
following table:
To perform this
operation
Load design file into EDS EZ
Save to hard drive (all files saved
on the hard drive are DOS
formats)
Save to floppy disk
110362-01 Rev. A
Use this command
For DOS formats
Open or Import
Save or Save As
For non-DOS formats
Import
N/A
Save, Save As, or Export
Format the disk
appropriately, then Export
6. Working With Files
6-2
Opening Designs
Opening Designs
Refer to Figures 6-1 and 6-2 to open a file.
Click on
File
Click on
Open
Figure 6-1
Click here to display
all directories for the
specified drive
Click on OK
when finished
Select the drive and
directory where the
file is located
Click on the file
name
Figure 6-2
EDS EZ Software Manual
Melco Embroidery Systems
Importing Designs
6-3
Importing Designs
Some of the designs you work with may be on a floppy disk. EDS EZ is compatible with DOS,
Melco, Premier, Tajima, Barudan FDR and FMC, and ZSK disks, all of which have unique formats.
The following chart outlines when to use each command.
To import a design, click on File, then Import. The Import dialog box (Figure 6-3) displays.
Click on the device reading the disk (or
reader if reading from a paper tape)
Click to import
the file
Select the file to
import from the
list of files
Click to read the
disk’s directory
Click on the proper
format
Figure 6-3
Note: If you click on the Options button while working with a Tajima format disk, a message box
will ask you if you want to update the Boot Record of the disk. This refers to some Tajima
disks that have an improper internal label and cannot be read by a DOS computer. If you
have problems loading a Tajima disk, click on the Options button and respond Yes to the
message.
110362-01 Rev. A
6. Working With Files
6-4
Saving Designs
Saving Designs
To save a design:
1. Click on File in the menu bar.
2. Click on Save As in the drop-down menu. The Save
As dialog box displays as shown in Figure 6-4.
3. Type a name for the design in the Save As File Name
box.
Figure 6-4
4. Select a subdirectory or drive by double-clicking on it
in the Directories box. You can move back one level at a time by clicking on [..].
Note: If you do not select a subdirectory, your design will be saved in the EDS EZ main directory.
5. Under File Type, click on Condensed, Object, or Expanded, then click on OK. File types are discussed in later chapters.
The name of your file is now displayed in the EDS EZ title bar. After the file has been named and
saved once, you can resave the file and any modifications by clicking on Save.
File Types
The term file type refers to the way design data is coded and named. In EDS EZ there are four
file types: Expanded, Condensed, Object, and Auto Send.
Expanded Files
An Expanded design file contains instructions for each individual stitch. Modification of an
expanded design is much more limited than modification of a condensed design. Once you save a
file as Expanded, you cannot change it to Condensed. Expanded file names have the extension
EXP.
Condensed Files
A Condensed file contains summarized design instructions. Its format allows the design to be
rescaled and its density and stitch length modified. Condensed file names have the extension
CND.
EDS EZ Software Manual
Melco Embroidery Systems
Saving Designs
6-5
Object Files
An Object file contains information about multiple objects, each with its own separate instructions. For instance, you might combine into one Object file:
•
An Expanded design of a team mascot
•
A Condensed design of team member's name
Then, you can modify each object separately. You could rescale the name without altering the
mascot. Object file names have the extension OFM.
Auto Send Design Files
An Auto Send Design file is created by EDS EZ when transferring or sending files to a peripheral.
In addition to your design data, the file contains special instructions added by EDS EZ to help the
peripheral make a sewing recovery after a power failure. Auto Send Design files have the extension ASD.
ASD files are stored in the EDSEZ\ASD subdirectory. To prevent this directory from taking up too
much of your hard drive, delete old files periodically using the Windows File Manager. For more
information on how to use File Manager, consult your Windows User Manual.
Exporting Designs
Click on File, then Export to display the Export dialog box (Figure 6-5).
Select the correct format
Select the correct device
Insert a disk
into the proper
drive, and click
to export
Enter name
of new file
Figure 6-5
110362-01 Rev. A
6. Working With Files
6-6
Exporting Designs
Note: If you are unsure of the format, click on
Unknown, then on the Directory button. EDS EZ
will determine the format of the disk and make
the selection for you. If you selected a Format
Type that does not match the format of the disk,
the error message shown in Figure 6-6 will be
displayed. If you are still unsure of the disk’s format, click on Unknown.
File Name Standards
Figure 6-6
The filename conventions for floppy disk formats are
given below. These rules must be followed for the disk to be read by other systems:
DOS Format
DOS format names consist of a 1-8 character filename and one of the following extensions:
.CND - Condensed Format
.EXP - Expanded Format
.OFM - Object (Layout format)
Barudan FDR Format
Barudan FDR uses a numeric format. The file number can be from 1 to 36. In addition, a label of
up to 8 characters may be specified with this file number. The number and the label must be separated by a colon.
Examples:
3
26:SNAIL
Barudan FMC Format
Barudan FMC uses a numeric format. The file number can be from 1 to 36. No character labels
are allowed.
Examples:
3
26
EDS EZ Software Manual
Melco Embroidery Systems
File Name Standards
6-7
Melco Format
MELCO format names consist of a 1-6 character filename and one of the following extensions:
.CND - Condensed Format
.EXP - Expanded Format
Premier/Stellar Format
The PREMIER/STELLAR format uses the Indirect mode of specifying file names (see your Premier or
Steller manual for a description of Indirect mode). In general, you can think of a Premier/Stellar
filename as a number between 1001 and 1999.
Examples:
1001
1930
The Options button allows you to specify 5 different sizes for the hardware scaling of the design
at sewout time. The defaults are:
Smallest:
50%
Smaller:
75%
Larger:
125%
Largest:
150%
Enter new sizes as a ratio to 1.00, for example 125% is entered as 1.25
Note: The Stellar 1 can only read files saved in this format. The Premier can read Tajima and DOS
(.EXP) files as well.
Tajima Format
Tajima format uses a numeric format with numbers ranging from 1-999. Beginning with EDS EZ
release 1.32, any 1-8 character name is also supported. In addition to a filename, a 1-8 character
label can be specified after the filename and separated by a colon (like the Barudan FDR format.)
Examples:
1
G001 (How the old Tajima format stored the name 1)
1:TEST
APPLE:TEST (The new Tajima Format)
110362-01 Rev. A
6. Working With Files
6-8
File Name Standards
ZSK Format
Zsk format uses a numeric format with numbers ranging from 1-999.
Examples:
1
12
234
EDS EZ Software Manual
Melco Embroidery Systems
Enabling the Peripheral
7-1
7. Working with Peripherals
Enabling the Peripheral
The peripheral(s) must be enabled before a design is sent. To enable the peripheral, Click on File,
then Transfer to display the Transfer dialog box (Figure 7-1).
Click here to display
the Peripheral Setup
dialog box (Figure
7-2)
Figure 7-1
Before sending a design to the peripheral, make sure
the following apply:
•
The computer network cable is connected to
the peripheral
•
The peripheral's power is ON
•
The peripheral software is downloaded
Click on the peripheral number
to enable it (if it is highlighted, it
is enabled), then click OK
Note: The peripheral MUST be set to the same
number. Refer to the machine Operator manual for information on how to properly configure the machine.
Figure 7-2
110362-01 Rev. A
7. Working With Peripherals
7-2
Sending Designs
Sending Designs
Designs may be transferred to the peripheral(s) one of two ways.
Using Transfer
Click on Peripheral, then Transfer to display the Transfer dialog box (Figure 7-3).
Select directory
Click to return to
the Layout window
Select file type
Click to cancel
Click to send the
specified file to
the peripheral
Select file
name
Sends the file currently open in the
Layout window
Select whether
the design is
auto run or
auto delete
Select peripheral where the
design will be sent
Figure 7-3
EDS EZ Software Manual
Melco Embroidery Systems
Sending Designs
7-3
Using Send
Click on File, then Send to display the Send dialog box (Figure 7-4).
Select the peripheral
Click here to automatically queue the design
at the peripheral
A name will be selected for the file (as it will
appear at the peripheral); to change the
default name, type the new name here
Figure 7-4
110362-01 Rev. A
7. Working With Peripherals
7-4
Checking Peripheral Status
Checking Peripheral Status
EDS EZ continuously surveys each peripheral for statistical data. This data is available on the
Machine Status screen. To access the information click on Peripheral, then Status to display the
Machine Status screen (Figure 7-5).
Displays enabled
peripherals and status
Length of
time the
peripheral
has been
turned on
Lists designs in the job
queue
Shows which
peripheral is
being polled
Length of time the
peripheral has sewn
Name of current or last job
Length of
time current
or last job ran
Remaining
space in
job queue
Stitch count
in current or
last job
Current
or last
sewing
speed
Color sequence list
(99 colors max)
Indicates
percent completed of
current job
Shows the number of thread
breaks
Color being sewn
Figure 7-5
EDS EZ Software Manual
Melco Embroidery Systems
Checking Peripheral Status
7-5
Detail
This option is available for peripherals designed to relay this information. It appears grayed out if it
is not available. Click to display the Thread/Bobbin Breaks information screen (Figure 7-6). Thread
Breaks: Displays the thread breaks on each needle.
Resets all counters to
zero
Updates counters
Displays information
for each needle
Saves current counts
to an ASCII text file
Select counter (by
day or by job)
Toggles information displayed above to each
different category
Figure 7-6
110362-01 Rev. A
7. Working With Peripherals
7-6
Checking Peripheral Status
EDS EZ Software Manual
Melco Embroidery Systems
EDS EZ Software Manual
INDEX
Actual Size ................................................3-5
Copy .........................................................3-4
Angle ........................................................4-4
Counterclockwise......................................4-4
Application Window .................................3-2
Customized Spacing..................................4-5
Arc From Center........................................4-3
Cut ...........................................................3-4
Arc Normal................................................4-3
Cut, Copy, Paste, and Clear.......................5-1
Attaching the Peripheral............................2-3
Auto Send Design Files..............................6-5
Deleting an Object ....................................5-4
Density.................................4-2-5-9, 5-8, 5-9
Barudan FDR Format .................................6-6
Design Formats .........................................6-1
Barudan FMC Format ................................6-6
Design List .........................................3-4, 3-2
Design Notes...........................................5-10
Center Design ...........................................3-4
Design Status...................................3-5, 5-11
Centering a Design ...................................5-4
Design, Status, and Notes .......................5-11
Centering Text...........................................4-7
Detail ........................................................7-5
Checking Peripheral Status........................7-4
DOS Format ..............................................6-6
Clear .........................................................3-4
Clockwise..................................................4-4
Edit Menu .................................................3-4
Close.........................................................3-3
EDS EZ Help ..............................................1-1
Color Change After.................................5-10
EDS EZ Installation.....................................2-4
Color Changes ..........................................4-6
Enabling the Peripheral .............................7-1
Color Information ...................................5-14
Exit............................................................3-4
Color Palette ...........................................5-11
Expanded Files ..........................................6-4
Column.....................................................5-8
Export .......................................................3-4
Condensed Files ........................................6-4
Exporting Designs .....................................6-5
Configuring EDS EZ...................................2-5
INDEX
File ............................................................3-2
EDS EZ Software Manual
Lock Stitch ................................................5-8
File Menu ..................................................3-3
File Name Standards..................................6-6
Melco Format............................................6-7
File Types...................................................6-4
Modifying Condensed Designs ..................5-7
Fill Density.................................................5-9
Modifying Expanded Designs ....................5-9
Fill Stitch Length........................................5-9
Monogram Alphabet.................................4-8
Fills............................................................5-8
Monogramming ........................................4-8
Fit Window ...............................................3-5
Mouse Installation .....................................2-3
Moving Objects .........................................5-2
Hardware Configuration............................2-6
Hardware Installation ................................2-1
Network Options.......................................2-6
Help ..........................................................3-2
New...................................................3-3, 3-2
Normal Cursor tool ...................................3-6
Import ...............................................3-2, 3-4
Notes ......................................................5-11
Importing Designs .....................................6-3
Installing the Dongle .................................2-2
Object Files ...............................................6-5
Object List ...............................................5-11
Layout Window.........................................3-3
Oom Out ..................................................3-5
Line Center Bottom...................................4-3
Open .................................................3-3, 3-2
Line Center Middle....................................4-3
Opening Designs .......................................6-2
Line Normal ..............................................4-3
Orientation................................................5-3
Line Sequence ...........................................5-8
Line Spacing..............................................4-6
Palette Bar ..............................................5-12
Line Type Options......................................4-3
Paste .........................................................3-4
Lock Object ...............................................5-9
PCB...........................................................2-1
EDS EZ Software Manual
INDEX
Peripheral..................................................3-2
Show Zoom Factor ....................................3-5
Peripheral Menu........................................3-5
Software Installation..................................2-4
Premier/Stellar Format ...............................6-7
Spacing .....................................................4-5
Print.................................................3-4, 5-11
StarGate Options ......................................2-6
Print Design ............................................5-11
Starting EDS EZ .........................................3-1
Printed Circuit Boards................................2-1
Status........................................................3-5
Printer Setup .............................................3-4
Status Bar .................................................3-5
Stitch Length .....................................5-8, 5-9
Radius .......................................................4-4
System Requirements ................................2-1
Regenerate................................................3-5
Return to Origin ........................................3-4
Tajima Format ...........................................6-7
Rotating Objects .......................................5-2
Text Dialog Box .........................................4-1
Ruler .........................................................3-5
Text tool .............................................3-6-4-1
Ruler tool ..................................................3-6
Tool Bar.....................................................3-5
Toolbar......................................................3-6
Save ..........................................................3-3
Transfer .....................................................7-2
Save As .....................................................3-4
Trim After................................................5-10
Saving Designs ..........................................6-4
Trims .........................................................4-6
Saving Text Designs ...................................4-7
Scaling ......................................................5-9
Underlay ...................................................5-8
Scaling an Expanded Design......................5-6
Uniform Spacing .......................................4-5
Scaling Designs .........................................5-4
Send ..................................................3-4, 7-3
Vertical Spacing.........................................4-6
Sending Designs........................................7-2
View Men .................................................3-5
Short Stitch ...............................................5-8
INDEX
Width ................................................5-8, 5-9
Zoom In .............................................3-6, 3-5
Zoom Last .................................................3-5
Zoom Out .................................................3-6
Zoom Previous...........................................3-6
ZSK Format ...............................................6-8
EDS EZ Software Manual
Quick
Reference
Guide
for
EDS EZ
Melco
Embroidery Systems
A Saurer Group Company
110362-01 Revision A
EDS EZ QUICK REFERENCE GUIDE
Create Lettering
1. Click on File.
2. Click on New.
3. Click on the Text tool.
4. Type in your lettering.
5. Choose Alphabet and other parameters
6. Click on OK.
Adjust Lettering
1. Double-click on the lettering.
2. Make the necessary adjustments.
3. Click on OK.
Open a Hard Disk File
1. Click on File.
2. Click on Open.
3. Choose the directory, file type, and design
name. Examples: A:boat.cnd, B:flower.exp,
C:\edsez\designs\july.ofm
4. Click on OK.
Import a Floppy Disk file
Melco, DOS, Premier, Barudan, Tajima, ZSK, or
Unknown
1. Click on File.
2. Click on Import.
3. Select Format type.
4. Choose the Directory and design name.
5. Click on OK.
Adjusting the Design
1. Click on the design and a box forms around
it.
2. Double-click on the design and a dialog box
appears.
3. Make the necessary adjustments.
4. Click on OK.
Move a Design
1. Click on the design and a box forms around
it.
2. Click and hold anywhere within the box.
3. Drag the design anywhere within the Layout
window.
Rotate or Scale a Design
1. Click on the design and a box forms around
it.
2. Click and hold on one of the box handles.
3. Drag the handle to change the design.
NOTE: For Expanded designs, double-click on
the design to rotate or scale.
Center a Design
1. Click on Edit.
2. Click on Center Design.
Save a Design
1. Click on File.
2. Click on Save As.
3. Choose the directory, file type, and design
name. Examples: A:boat.cnd, B:flower.exp,
C:\edsez\designs\july.ofm
4. Click on OK.
Export a Floppy Disk file
Melco, DOS, Premier, Barudan, Tajima, ZSK, or
Unknown
1. Click on File.
2. Click on Export.
3. Select Format type.
4. Choose the Directory and design name.
5. Click on OK.
Send a Design to the Peripheral
Design must appear on-screen
1. Click on File.
2. Click on Send.
3. Choose which machine will sew it.
4. Click on OK.
Transfer a Design to the Peripheral
1. From the Application window, click on
Peripheral
2. Click on Transfer.
3. Choose File Type (EXP or ASD)
4. Choose which machine will sew it.
5. Choose the directory.
6. Select one or more files to send.
7. Click on Send.
To View the Design Status Data
Design must appear on-screen
1. Click on View.
2. Click on Design Status.
3. Click on OK when done.
Stitch Density Chart
Stitches Per Inch
Points
2.4
105.8
2.6
97.6
3
84.6
74.7
3.4
70.5
3.6
4
63.5
57.7
4.4
4.6
55.2
50.8
5
5.4
47.0
45.4
5.6
42.3
6
39.6
6.4
38.5
6.6
7
36.3
34.3
7.4