1
Copyright 2015, PeopleFluent. All rights reserved. Proprietary and confidential.
PeopleFluent and the PeopleFluent and OrgPublisher logos are trademarks or registered trademarks of PeopleFluent.
All other brand and product names are trademarks or registered trademarks of their respective holders.
Revised 11/09/2015
PeopleFluent OrgPublisher Getting Started
Copyright 2015, PeopleFluent. All rights reserved. Proprietary and confidential.
PeopleFluent and the PeopleFluent and OrgPublisher logos are trademarks or registered trademarks of PeopleFluent.
All other brand and product names are trademarks or registered trademarks of their respective holders.
ii
Revised 11/09/2015
ORGPUBLISHER GETTING STARTED
GUIDE
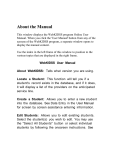
How to Use This Guide
This guide will help you quickly become familiar with the basic capabilities
of OrgPublisher. By reviewing the five main sections of this guide, you will
learn the key concepts that will help you to get the most out of your initial
OrgPublisher experience.
You can follow this guide chronologically, or you can link to a specific topic
listed below. Topics include:
Product Overview
Installation
Exploring the Samples
Creating Your First Chart
Getting Additional Help
Product Overview
OrgPublisher is offered as an on-premise application or a hosted option.
OrgPublisher delivers web-based robust org charting tools, visual
workforce reports, self-service analytics, and powerful organizational
modeling and succession planning tools.
To best understand OrgPublisher, let's first analyze what the product can
do:
Core Org Charting Capabilities
• Prebuilt Reports provide chart designs based on your selection for
the type of data you want to emphasize in your chart. This option
requires that your data conform to the Universal File Layout.
• Automated Org Charting draws charts automatically, based on your
data. Charts can be set to refresh automatically.
• Intelligent charting options provide robust support for multiple
reporting relationships including person-to-person, position-toposition, and matrix (indirect) reporting relationships.
• Configurable styles allow different views using the same source of
information; for example, open positions can be viewed as job
postings. You can also show or hide different types of information in a
Copyright 2015, PeopleFluent. All rights reserved. Proprietary and confidential.
PeopleFluent and the PeopleFluent and OrgPublisher logos are trademarks or registered trademarks of PeopleFluent.
All other brand and product names are trademarks or registered trademarks of their respective holders.
OrgPublisher Getting Started Guide
1
PeopleFluent OrgPublisher Getting Started
view that focuses on head counts, or you can create a view that
displays military information. In addition, you can use tabs in the style
bar to display names of available styles.
• Innovative OrgHistory archiving and chart comparison capabilities
deliver unique organizational auditing abilities.
• Flexible printing capabilities offer extremely adaptable and powerful
printing options, including wall chart and book style printing.
• Seamless integration transfers information to Microsoft®
PowerPoint, Microsoft® Excel, and Adobe® Acrobat® PDF.
• Numerous browser-based viewing and administration options
include thin-client (zero client-install), rich-client (active-x plug-in),
Microsoft Silverlight (cross-browser), and HTML5 (cross-browser).
Innovative Analysis and Modeling Features
• Self-service search and reporting capabilities provide users with
access to predefined queries along with powerful ad hoc search tools.
• Workforce analytics are delivered with an integrated summary
engine to help tabulate organizational statistics and display in bar
graph or pie chart format.
• Extensive formatting capabilities provides the ultimate flexibility to
display workforce information including succession planning, EEOC
analysis, skills inventory, compliance reporting, etc.
• Integrated corporate directories can be automatically created and
distributed for simple access across the enterprise.
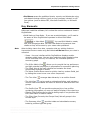
Note:
In addition, you can review the New OrgPublisher Features topic in the
application help file for more product features. Select Help from the main
menu the User manual.
Primary Roles in OrgPublisher
Now that you understand what OrgPublisher can do, let's focus on the
three different types of OrgPublisher users and how they typically work
with the software.
• Administrators create, format, secure, and publish various types of
charts, reports, and directories. The OrgPublisher application is
typically installed on the chart administrator’s PC for this purpose. A
Web Administration console, a secured server install that can be
accessed, the same as any web page, from any PC, is also available for
distributed administration.
Copyright 2015, PeopleFluent. All rights reserved. Proprietary and confidential.
PeopleFluent and the PeopleFluent and OrgPublisher logos are trademarks or registered trademarks of PeopleFluent.
All other brand and product names are trademarks or registered trademarks of their respective holders.
OrgPublisher Getting Started Guide/Product Overview
2
PeopleFluent OrgPublisher Getting Started
• End Users access the published charts, reports, and directories using
web-based viewing solutions (such as your company intranet) or offline options (such as Adobe PDF, Microsoft PowerPoint, or Microsoft
Excel).
Key Elements
Before we install the software, let's review the various modes and views in
OrgPublisher.
• Build Mode vs View Mode - If you are an administrator, you'll need to
be aware of this. OrgPublisher operates in either Build Mode
or View Mode
. You use Build Mode to create,
edit, and reorganize data. You use View Mode to format and view
charts as they will be seen by your users when published.
Note:
When building charts from data, remember that any editing of data or
hierarchical structure made using Build Mode will be lost when your chart is
refreshed.
– Views - the user interface within OrgPublisher displays smaller
windows called views. You can also maximize views, displaying less
of the chart and more of, for instance, the individual profile or
summary graph.
– The 9 Box Matrix View
allows you to compile the top performers
and high potential employees in preparation for succession planning.
– The Chart View is the main window and contains the chart
components arranged in boxes.
– The Hover Profile allows users to quickly view key custom fields just
by letting the cursor hover over a box component.
– The Tree View
arranges data hierarchy in an outline format.
– The List View
can be used as a telephone listing, and includes a
Search View that enables end users to search for and save their own
groups.
– The Profile View
can provide employee job or box profiles
containing information you may not want to display in the chart box.
– Side-by-Side Profiles can be used to build groups in conjunction with
the 9 Box Matrix or search results.
– The Filter View (formerly the Groups View) lists all groups in the
current style.
– The Summary View
provides totals and calculated summary
totals by position type and group.
Copyright 2015, PeopleFluent. All rights reserved. Proprietary and confidential.
PeopleFluent and the PeopleFluent and OrgPublisher logos are trademarks or registered trademarks of PeopleFluent.
All other brand and product names are trademarks or registered trademarks of their respective holders.
OrgPublisher Getting Started Guide/Product Overview
3
PeopleFluent OrgPublisher Getting Started
– Workforce Analysis Graphs, part of the Summary View, allow you to
present your data as pie charts, horizontal bar charts, or vertical bar
charts.
– The Styles View
displays a list of available styles within the
current chart. You can also use tabs to display style names.
Now that you've covered this material, you are ready to install
OrgPublisher.
Installation
Server System Requirements
Before installing OrgPublisher, verify that you meet the minimum
requirements for publishing and viewing a chart. See the System and
Hardware Requirements document if you plan to create and publish charts
other than the basic sample in this document.
Note:
If you plan to publish extremely large charts or schedule charts to
automatically publish, verify that Microsoft Task Scheduler (included in
Internet Explorer 4.0 and later) is installed on your PC.
Installing OrgPublisher
The activation key, required to install OrgPublisher, is included in the
email you receive when you download the product from the web site.
Copy the activation key to your clipboard before starting the installation.
If problems occur while installing OrgPublisher, please contact Product
Support.
1. If a previous version of OrgPublisher exists on the same machine, it
is recommended that you uninstall it.
2. Access the OrgPublisher download page, noted above, and follow the
instructions in the installation wizard.
3. Follow the dialog prompts to enter your license key, registered
company name, user name, and user company.
4. Select the OrgPublisher application radio button. The
OrgPublisher Custom Install is not used for this demonstration,
and requires prior setup on the server.
5. Click Next and accept the defaults for the rest of the dialogs.
Copyright 2015, PeopleFluent. All rights reserved. Proprietary and confidential.
PeopleFluent and the PeopleFluent and OrgPublisher logos are trademarks or registered trademarks of PeopleFluent.
All other brand and product names are trademarks or registered trademarks of their respective holders.
OrgPublisher Getting Started Guide/Installation
4
PeopleFluent OrgPublisher Getting Started
Note:
An OrgPublisher folder is created in the Program Files folder in your local C
drive, C:\Program Files\OrgPubX. In addition, the OrgPublisher folder
contains several sub-folders.
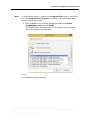
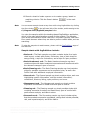
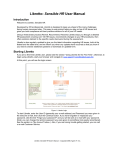
6. Once installation is complete, accept the default of Launch
OrgPublisher now and click Finish.
The OrgPublisher application opens and displays a list of sample
charts if you wish to review them.
Figure 1
Your installation was successful.
Copyright 2015, PeopleFluent. All rights reserved. Proprietary and confidential.
PeopleFluent and the PeopleFluent and OrgPublisher logos are trademarks or registered trademarks of PeopleFluent.
All other brand and product names are trademarks or registered trademarks of their respective holders.
OrgPublisher Getting Started Guide/Installation
5
PeopleFluent OrgPublisher Getting Started
Congratulations!
Now you are ready to review some of the samples installed with
OrgPublisher.
Explanation of the OrgPublisher directory structure:
Note:
“X” in the following folder names indicates the OrgPublisher version number.
OrgPublisher is installed to Program Files folder on your local drive.
• C:\Program Files\OrgPubX - the OrgPublisher folder containing all
application files and sub-folders
• •C:\Program Files\OrgPubX\assets- the sub-folder containing files and
graphics used with succession planning
• C:\Program Files\OrgPubX\ChartImages - the sub-folder containing
images used when publishing to EChart thin client
• C:\Program Files\OrgPubX\css - the sub-folder containing cascading
style sheets for thin client publishing
• C:\Program Files\OrgPubX\images - the sub-folder containing photos
used in the sample charts
• •C:\Program Files\OrgPubX\Microsoft.VC80.CRT - the sub-folder
containing supporting Microsoft files
• C:\Program Files\OrgPubX\OPE - the sub-folder containing files used
when you are working with OrgPublisher Executive for iPad; this folder
may not be included with your installation if you did not purchase
OrgPublisher Executive
• •C:\Program Files\OrgPubX\PDF - the sub-folder containing files to
support the creation of PDF documents
• C:\Program Files\OrgPubX\samples - the sub-folder containing the
sample charts
• C:\Program Files\OrgPubX\SAP - the sub-folder containing
documentation and files associated with OrgPublisher for SAP®
solutions; this folder may not be included with your installation if you
did not specify SAP as your data source
• C:\Program Files\OrgPubX\SearchDictionary - the sub-folder
containing the semantic dictionary files
Copyright 2015, PeopleFluent. All rights reserved. Proprietary and confidential.
PeopleFluent and the PeopleFluent and OrgPublisher logos are trademarks or registered trademarks of PeopleFluent.
All other brand and product names are trademarks or registered trademarks of their respective holders.
OrgPublisher Getting Started Guide/Installation
6
PeopleFluent OrgPublisher Getting Started
• C:\Program Files\OrgPubX\Silverlight - the sub-folder containing files
resulting from publishing charts to the XAML cross browser
• C:\Program Files\OrgPubX\Web - the sub-folder containing files
required to publish charts
• C:\Program Files\OrgPubX\XML - the sub-folder containing associated
files to create a chart using XML
Exploring the Samples
We suggest you take a few minutes to review the samples included with
the product. It is a great way to familiarize yourself with the major areas
of the product. It may also give you a few ideas on how to use the product
within your organization.
Depending on the width of the screen view, you can see the OrgPublisher
toolbars in either two or three rows across the top of the org chart
window. This procedure assumes that you see two rows of toolbars.
Using Sample Charts
1. Navigate through the charts by using the side or bottom scroll bar
, or by clicking one of the drill buttons
.
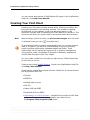
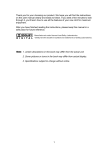
2. Use buttons in the lower-right side of the toolbar to open additional
views, such as the Profile View
or Styles View
. Click the
buttons again to close the views. Click the push-pin
in the upper
right-hand corner of the Styles View to keep the view open while you
work in the chart.
You can also access the Styles View by clicking on the current style
name in the left-hand corner of the Chart View or by clicking a tab.
Figure 2
Copyright 2015, PeopleFluent. All rights reserved. Proprietary and confidential.
PeopleFluent and the PeopleFluent and OrgPublisher logos are trademarks or registered trademarks of PeopleFluent.
All other brand and product names are trademarks or registered trademarks of their respective holders.
OrgPublisher Getting Started Guide/Exploring the Samples
7
PeopleFluent OrgPublisher Getting Started
3. To edit the data, you must click the Build Mode
button in
the center of the toolbar. (Normally, formatting the chart is done
using View Mode
.)
Once in Build Mode you can see additional information in each box.
This demonstrates how you can gather data from many areas yet
display only what you want your end users to see. However, any
manual editing to hierarchical data is lost the next time the
chart is refreshed.
4. You can view a simple reporting structure hierarchy from within the
chart, by selecting a chart box and clicking the Chain of Command
button
.
5. You can show or hide information in the chart by clicking the Show/
hide chart components
button in the far right-hand corner of the
toolbar. This opens the Show/Hide Chart Components dialog where
you can expand the table and select fields to hide, or choose how
many levels to display in the chart. You can even show or hide
components only for selected groups that you may create later.
6. Click the Chart Legend Properties
button to review or create a
legend to describe icons used in your chart.
7. Click the Zoom to point button
in the lower center of the toolbar
and then click on a box in the chart. This brings the selected box to
the center of the chart for better viewing. Click the Go to top of
displayed chart button
in the lower left-hand corder of the
toolbar to return to the top box of the displayed hierarchy.
8. Quickly format the chart by changing the background color, for
instance, by clicking the Change color button
in the far right side
of the toolbar. When the color grid displays click on a color box. The
color grid closes and the chart background color changes.
9. Open a new chart by clicking on the Open button
or you can
in the far-left
create a new chart by clicking on the New button
side of the toolbar. OrgPublisher prompts you to save the current
chart. You can click Yes to save or No to discard the changes made.
Copyright 2015, PeopleFluent. All rights reserved. Proprietary and confidential.
PeopleFluent and the PeopleFluent and OrgPublisher logos are trademarks or registered trademarks of PeopleFluent.
All other brand and product names are trademarks or registered trademarks of their respective holders.
OrgPublisher Getting Started Guide/Exploring the Samples
8
PeopleFluent OrgPublisher Getting Started
10.Search a chart to locate a person or to create a group, based on
matching criteria. Click the Search button
toolbar.
Note:
in the main
You can access sample charts at any time while using OrgPublisher by clicking
the Open button
in the left-hand side of the toolbar, and browsing to the
C:\Program Files\OrgPubX\samples folder.
You view the samples within the desktop-based OrgPublisher application,
which is the main administration console for the product. The samples
open as an administrator would view them. End users typically view them
from a web-browser where they are able to perform certain tasks, such as
searching.
Note:
To view the samples via web-browser, please visit the OrgPublisher page of
the Web site.
Sample charts with OrgPublisher include:
• Basic.ocb - The Basic samples org chart contains styles for a basic
chart layout, a chart with photos, a directory view, a plain chart for
easy printing, a style for contractors, and a style for open positions.
• Basic Headcount. ocd - The Basic Headcount sample org chart
contains styles with basic headcount summaries and headcounts with
the relevant manager’s span of control.
• Basic Planning.ocb - The Basic Planning sample org chart contains
styles for possible successors and a succession plan, as well a the
Profile View with additional employee information.
• General.ocb - The General sample org chart contains styles, each one
highlighting specific information, such as contact information,
contractors, directory listing, open positions, and more.
• Management.ocb - The Management sample org chart contains
styles that concentrate on head count and span of control.
• Planning.ocb - The Planning sample org chart provides styles with
modeling scenarios for salary and head count, span of control with
performance analysis, and talent review.
• Succession.ocb - The Succession sample org chart includes styles
that demonstrate succession candidates, ratings that include potential,
risk, and impact analysis, and 9 Box Matrix.
Copyright 2015, PeopleFluent. All rights reserved. Proprietary and confidential.
PeopleFluent and the PeopleFluent and OrgPublisher logos are trademarks or registered trademarks of PeopleFluent.
All other brand and product names are trademarks or registered trademarks of their respective holders.
OrgPublisher Getting Started Guide/Exploring the Samples
9
PeopleFluent OrgPublisher Getting Started
You can review descriptions of OrgPublisher file types in the OrgPublisher
Help File; click Help>User Manual.
Creating Your First Chart
Creating your first chart includes several tasks. Getting your data is the
first topic discussed in the following sections. The second is installing
OrgPublisher to your desktop, which was discussed earlier in this
document. Another task is Formatting the Chart before you publish it. This
document will show you a quick way to accomplish these last two items.
Note:
When building a chart from data, you will lose the changes when the chart
is refreshed unless you save
the edited chart.
To successfully build org charts automatically from your human resource
data, it is helpful if you have an understanding of how your company
stores reporting relationships (database tables and fields). These
relationships can be tracked by employee ID or position management
using position codes. Knowledge of Microsoft® Windows® applications
various data file types is also very helpful.
You can create a chart from virtually any data source. Follow these links
for tutorials on how to:
Create a chart using Prebuilt Reports - found in the OrgPublisher Help File:
click Help>User Manual.
Charts can be created from several formats. Details for all can be found in
the OrgPublisher Help File.
• Text file
• ODBC file
• Multiple data sources
• XML file
• Oracle HMS via ODBC
• PeopleSoft HCM via ODBC
• OrgPublisher for SAP® solutions - PeopleFluent provides an SAP data
extractor. Transports and documentation are located in the
C:\Program Files\OrgPubX\SAP folder.
Copyright 2015, PeopleFluent. All rights reserved. Proprietary and confidential.
PeopleFluent and the PeopleFluent and OrgPublisher logos are trademarks or registered trademarks of PeopleFluent.
All other brand and product names are trademarks or registered trademarks of their respective holders.
OrgPublisher Getting Started Guide/Creating Your First Chart
10
PeopleFluent OrgPublisher Getting Started
If you do not have access to your database or do not feel experienced
enough to properly manipulate your data, you can follow the Using
Sample Data procedure below.
Using Sample Data
A Microsoft Access database is included with OrgPublisher. You can utilize
this sample database if Access is installed on your PC, or you can move on
to the next section to create a chart Using Your Data.
Once you have imported data, you should map the fields to match the
OrgPublisher input file layout. In addition to standard fields, such as
name, department, and position, you can map custom fields to capture
pertinent data you track in your data source.
This example will map data for just a few fields.
1. Open OrgPublisher.
2. When the OrgPublisher list of files dialog opens, select the Run the
New Chart Wizard radio button. Click OK.
The New Chart Wizard opens.
3. Select the Organizational chart check box. Click Next.
The Select a data source dialog opens.
4. Select the ODBC database button. Click Next.
The ODBC Database dialog opens.
5. Click the down-arrow and select the MS Access Database option.
Click Next.
The Select Database dialog opens.
6. Browse to the C:\Program Files\OrgPubX\samples folder.
Select the PacificEastern.mdb file. Click OK.
7. Under the Select a database table, view or query radio button,
click the down-arrow and select the PacificEastern option. Click
Next.
The Data preview dialog opens.
8. Verify that the data is what you expect then click Next.
9. Accept the default radio button, Use standard OrgPublisher field
order. Click Next.
Copyright 2015, PeopleFluent. All rights reserved. Proprietary and confidential.
PeopleFluent and the PeopleFluent and OrgPublisher logos are trademarks or registered trademarks of PeopleFluent.
All other brand and product names are trademarks or registered trademarks of their respective holders.
OrgPublisher Getting Started Guide/Creating Your First Chart
11
PeopleFluent OrgPublisher Getting Started
10.Click the Launch the Style Wizard check box to clear it. Click
Finish.
OrgPublisher displays a black and white chart with the fields you
selected.
Using Your Data
You can create a new chart using the New Chart Wizard.
in the upper left corner of the toolbar or
1. Click on the New button
select the Run the New Chart Wizard radio button in the
OrgPublisher dialog. Click OK.
The New Chart Wizard opens to the Welcome dialog. Click Next.
2. Select the button that matches your data source, such as ODBC
Database or XML file.
You can also select Create a blank org chart to create a chart
manually.
3. Click Next and follow the wizard prompts, which vary depending on
the type of data source you select.
4. Accept the default radio button, Use standard OrgPublisher field
order. Click Next.
5. Clear the Launch the Style Wizard check box and click Finish.
OrgPublisher displays the chart.
Formatting the Chart
The chart opens in the View Mode and you can format it before
Publishing the Chart. OrgPublisher provides many formatting options
including powerful advanced box layout options. For this example, we will
cover just basic formatting.
Note:
The Style Wizard automatically performs many formatting functions, such as
box shapes and color.
When working with a chart built from data, you should not manually edit
data unless you save it as an OCP or text file because the next time you
update the chart all your changes will be overwritten. When you work with
the OCP file, however, you cannot refresh your data from your data
source.
Copyright 2015, PeopleFluent. All rights reserved. Proprietary and confidential.
PeopleFluent and the PeopleFluent and OrgPublisher logos are trademarks or registered trademarks of PeopleFluent.
All other brand and product names are trademarks or registered trademarks of their respective holders.
OrgPublisher Getting Started Guide/Creating Your First Chart
12
PeopleFluent OrgPublisher Getting Started
Selecting a Chart Design Template
1. Click the Chart Design Templates button
in the format toolbar.
The Chart Design Templates dialog opens.
2. Click on the design sample that best resembles what you want your
chart to look like.
Note:
You will lose all previous formatting when you accept a chart design
template.
3. Click OK or Cancel.
4. Work with the chart design or click the Chart Design Templates
button again to choose another preformatted design.
Selecting Individual Format Options
1. Click inside the chart background area then click on the Change color
button
in the far right-side of the toolbar.
2. Select a color from the color grid. The background of the chart
reflects that color change.
3. If you want to change the color of the chart boxes, click inside the
top box and select a color from the grid. This changes the color in all
boxes in the chart.
Note:
Boxes are formatted by position type. You can format boxes for all position
types or select a specific type, such as manager. For this example, we will
format all position types.
4. If you want to change the shape of the chart boxes, click inside the
top box in the chart. Click on the Format box button
right side of the toolbar.
in the far
5. When the Format dialog opens to the Boxes tab, click on the box
shape in the Value column.
6. From the drop-down list of box shapes, select the shape you want.
Click OK. The chart displays the boxes in the selected shape.
7. You can proceed to Publishing the Chart now.
Copyright 2015, PeopleFluent. All rights reserved. Proprietary and confidential.
PeopleFluent and the PeopleFluent and OrgPublisher logos are trademarks or registered trademarks of PeopleFluent.
All other brand and product names are trademarks or registered trademarks of their respective holders.
OrgPublisher Getting Started Guide/Creating Your First Chart
13
PeopleFluent OrgPublisher Getting Started
Publishing the Chart
There are several formats you can choose when publishing your chart, as
well as many different end user options. For this example, we’ll choose the
format most frequently used by our customers, PluginX, with fully
functioning end user options.
Now that you have created your org chart, you complete the process by
publishing the chart, or a portion of a chart, on your company intranet or
shared drive. This enables end users to view your org chart interactively.
In order to publish a chart, you must know which publishing option you
will use, for instance a graphic, PDF, OrgPublisher PluginX, HTML, EChart
rich or thin client, or, if you have OrgPublisher Executive, publish to Apple
iPad® mobile digital device. The format depends on the browser available
to your users, and whether or not you want to, or can, install plug-ins.
See the Apple store if you are interested in publishing employee data to
iPad® using OrgPublisher Premier.
Publishing as a Silverlight/HTML5, PluginX, or EChart rich client provides
the richest end user interface, and requires the installation of a browserbased active-x control.
The following exercise requires the OrgPublisher PluginX be installed on
your PC.
1. Click the Publish button
in the upper left-hand side of the
toolbar to open the Publishing Wizard.
2. Select the Express Mode ratio button. Click Next.
3. Select the type of express publishing you want. Options include:
– Chart - Publishes a chart that can be viewed with Internet Explorer.
– Chart with directory - Publishes a chart that includes a directory
view (telephone list) of the organization.
– PDF - Publishes a chart to a PDF document.
4. Accept the default Name of chart for your published chart. The
name can be the same as the chart name and does not need to
include publishing information. The name must, however, be unique
and cannot contain any special characters such as slashes (\ or /),
colons (:), asterisks (*), question marks (?), quotation marks ("),
and greater than or less than symbols (< or >). The publishing
definition name can be up to 255 characters. Click Next.
Copyright 2015, PeopleFluent. All rights reserved. Proprietary and confidential.
PeopleFluent and the PeopleFluent and OrgPublisher logos are trademarks or registered trademarks of PeopleFluent.
All other brand and product names are trademarks or registered trademarks of their respective holders.
OrgPublisher Getting Started Guide/Creating Your First Chart
14
PeopleFluent OrgPublisher Getting Started
5. Accept the default Location or Browse to the location to save your
chart file. For test purposes, this location can be your local C:/ drive.
Click Next.
Note:
OrgPublisher checks for invalid characters in this step and when you click
Finish. Invalid characters are replaced with a dash (-). A message displays at
the end of the wizard, and you can change the chart name to avoid the
dashes.
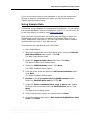
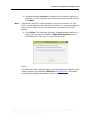
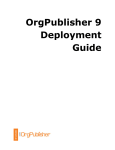
6. Click Finish. The Publishing Summary message displays the link, or
links if you also chose to publish a Chart with directory, to your
published chart. Click the link to preview the chart.
Figure 3
The Advanced Mode publishing option provides additional published chart
viewing options. the application Help File and OrgPublisher web pages
provide more detailed information on these formats.
Copyright 2015, PeopleFluent. All rights reserved. Proprietary and confidential.
PeopleFluent and the PeopleFluent and OrgPublisher logos are trademarks or registered trademarks of PeopleFluent.
All other brand and product names are trademarks or registered trademarks of their respective holders.
OrgPublisher Getting Started Guide/Creating Your First Chart
15
PeopleFluent OrgPublisher Getting Started
Getting Additional Help
You can obtain additional details about OrgPublisher functions, technical
information, or answers to your questions by utilizing the following
resources.
Online Knowledge Base
The PeopleFluent OrgPublisher web pages contain a vast collection of
tutorials, implementation documents, and general information, concerning
OrgPublisher and other products.
Click Support/Customer Care Center in the main menu to open the
Product Support page. From this page, you can access the Customer Care
Center, as well as Automation, which gives you access to APIs and sample
code if you need to customize OrgPublisher. Connector tools which help
you connect directly to your data source, such as PeopleSoft, Oracle HR,
etc.
User Manual and Application Help
The OrgPublisher application contains a detailed, web-enabled User
Manual accessed by clicking Help in the menu and selecting User
Manual. In addition, the User Manual is available in Acrobat Adobe PDF
format, and is located on the media device by which you received
OrgPublisher, or you can contact Product Support.
PeopleFluent prides itself with the high quality Customer Support supplied
for both evaluators and owners of the product. Complimentary support
services are available during the first 30 days after purchase.
Complimentary support
Defined as:
• Helping you locate documentation you need to answer your questions.
• Assistance in documenting feature requests and alternative solutions.
• Help in resolving product setup and OrgPublisher messages.
• Assistance in scheduling training and consulting services.
Copyright 2015, PeopleFluent. All rights reserved. Proprietary and confidential.
PeopleFluent and the PeopleFluent and OrgPublisher logos are trademarks or registered trademarks of PeopleFluent.
All other brand and product names are trademarks or registered trademarks of their respective holders.
OrgPublisher Getting Started Guide/Getting Additional Help
16
PeopleFluent OrgPublisher Getting Started
Online Demonstration
If you are just starting your evaluation, you can contact Sales at [email protected] for a product overview to provide you a quick
demonstration of OrgPublisher functionality.
OrgPublisher Support is available 8:00 AM - 6:00 PM CST. Call toll-free
(US and Canada): 888.ORG.CHART (888.674.2427) or 214.574.5020. You
can also email Product Support at [email protected].
Thank You
We appreciate your interest in OrgPublisher and hope that this guide has
been helpful.
Copyright 2015, PeopleFluent. All rights reserved. Proprietary and confidential.
PeopleFluent and the PeopleFluent and OrgPublisher logos are trademarks or registered trademarks of PeopleFluent.
All other brand and product names are trademarks or registered trademarks of their respective holders.
OrgPublisher Getting Started Guide/Thank You
17
PeopleFluent OrgPublisher Getting Started
Copyright 2015, PeopleFluent. All rights reserved. Proprietary and confidential.
PeopleFluent and the PeopleFluent and OrgPublisher logos are trademarks or registered trademarks of PeopleFluent.
All other brand and product names are trademarks or registered trademarks of their respective holders.
OrgPublisher Getting Started Guide/Thank You
18