1
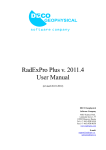
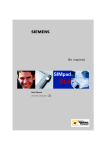
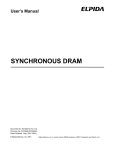
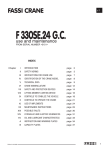
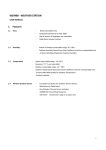
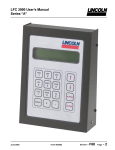
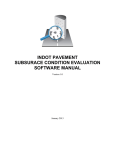
Teleskill Live Quick User Guide Conference Manager September 2013 <guide-TLive-v15.0> Teleskill Live – Quick User Guide – Conference Manager Index 1. Introduction .......................................................................................................................... 3 2. Access to the service........................................................................................................... 3 2.1. Technical features and minimum requirements of the service .................................... 3 2.2. Check minimum system requirements ............................................................................ 4 3. Teleskill Live ......................................................................................................................... 6 3.1. Structure ............................................................................................................................... 6 3.2. Conference Manager features............................................................................................ 7 3.2.1. Managing layouts ..................................................................................................... 7 3.2.2. Menu bar .................................................................................................................... 9 3.2.3. Event recording ...................................................................................................... 10 3.2.4. Managing participants at a live meeting ............................................................ 12 3.2.5. File sharing .............................................................................................................. 14 3.2.6. File viewer ............................................................................................................... 15 3.2.7. Screen sharing and Remote control .................................................................... 16 3.2.8. Chat .......................................................................................................................... 17 3.2.9. Questions and answers ......................................................................................... 17 3.2.10. Survey ................................................................................................................. 17 3.3. Features for the user......................................................................................................... 20 3.3.1. Access via mobile device ...................................................................................... 20 man_uso_TVCLive_en_v15.docx 2/20 Teleskill Live – Quick User Guide – Conference Manager 1. Introduction The Teleskill Live service is dedicated to interactive synchronous audio-visual communication over the Internet between remote users and is delivered online via SaaS (Software as a Service). Communication takes place directly through the use of a microphone and optional webcam connected to the personal computer and is based on modern technologies for the transport of audio/video and data over the Internet/IP (VOIP). In particular, the tool allows enabled users to communicate in audio/video with listeners in real time, showing slides, images, videos, documents and the contents of their screens (screen sharing of web pages, applications, ...). Users in listen mode can make their status known, request to intervene via audio/video through questions or comments, respond to questionnaires, as well as using file sharing, screen sharing and remote control. Application management tasks are delegated to the Conference Manager who has the ability to enable/disable users for the different features active on the system (presence in audio/videoconferencing, file viewer management, screen sharing management, ...) . 2. Access to the service 2.1. Technical features and minimum requirements of the service Access to the Teleskill Live service takes place online directly from a dedicated website or from the particular LMS platform on which it has been integrated. The following are the main features requirements for use of the service: and minimum hardware and software Windows • 2.33GHz x86-compatible processor, or Intel® Atom™ 1.6GHz processor for netbooks • Microsoft® Windows® XP (32-bit), Windows Server® 2003 (32-bit), Windows Server 2008 (32bit), Windows Vista® (32-bit), Windows 7 (32-bit and 64-bit) • Internet Explorer 7.0, Mozilla Firefox 4.0, Google Chrome, Safari 5.0, Opera 11 • 128MB RAM (1GB RAM recommended for netbooks), 128MB graphics memory • Adobe Flash Player 11.1 or higher • Java Virtual Machine (Version 6 Update 30 or higher) • Browser settings: CSS enabled, Javascript enabled, Cookies enabled • Webcam, microphone, speakers/headphones Mac OS • Intel Core™ Duo 1.33GHz • Mac OS X v10.6 or v10.7 • Safari 5.0, Mozilla Firefox 4.0, Google Chrome, Opera 11 • 256MB RAM, 128MB graphics memory • Adobe Flash Player 11.1 • Java Virtual Machine (Version 6 Update 30 or higher) • Browser settings: CSS enabled, Javascript enabled, Cookies enabled • Webcam, microphone, speakers/headphones Can be used with: • iPhone 4, iPhone 4S, iPad and iPad 2. Requires Operating System: IOS 4.3.5 or higher • the majority of Android devices 2.2 and above The compatibility of the live service on mobile devices is ensured by the use of dedicated apps, downloadable from the relevant app stores. man_uso_TVCLive_en_v15.docx 3/20 Teleskill Live – Quick User Guide – Conference Manager Network requirements for the user computer Required bandwidth: average of 300 Kbps upload and download to/from the server Access via Firewall and Proxy: the audio/video transmission of Teleskill Live is compatible with most firewalls. The quality and proper functioning of the service are not guaranteed through a proxy server. To verify the above requirements it is advisable to carry out the network access test and Internet bandwidth performance test as indicated below: Go to the url: http://live.teleskill.net/test/it, enter the name and location from which the test will be performed and click "START TEST". If the test is done abroad, use the link: http://live.teleskill.net/test/eng, repeating the above procedure. Await the outcome of the test. Upon completion two messages will be displayed that will indicate whether it is possible or not to correctly access the videoconferencing service. (See image below) In the case of a negative outcome to the first test (colour other than green), it is advisable to contact your system administrator in order to open firewall/proxy port 1935 or 80 for RTMP protocol to/from the addresses: fms1.teleskill.it, fms2.teleskill.it. 2.2. Check minimum system requirements On access to the Teleskill Live videoconferencing service the system performs a check on the minimum requirements of the computer evaluating: - presence of Flash Player and Java Virtual Machine Internet bandwidth test video test to assess correct operation of the webcam audio test to assess correct operation of the speakers/headphones microphone test to assess correct operation of the microphone man_uso_TVCLive_en_v15.docx 4/20 Teleskill Live – Quick User Guide – Conference Manager At this stage the user can install any plugins not present on the computer, can select a webcam from those installed, verify the correct operation of speakers/headphones, select the microphone and adjust its level. man_uso_TVCLive_en_v15.docx 5/20 Teleskill Live – Quick User Guide – Conference Manager 3. Teleskill Live 3.1. Structure The Teleskill Live service consists of a series of windows, each of which is dedicated to a specific function of the application (videoconferencing, file viewer, chat, list of participants, screen sharing, file sharing, survey, ...). Each window of the application is managed independently by the Conference Manager, who determines its size, position and visibility for the whole audience. The windows that make up the application are the following: - Videoconferencing - in which the audio/video streams of all users enabled to relay pictures and sound are transmitted. - List of participants - contains the list of all users present in the live session. - Chat - dedicated to the online chat service used to send public or private messages to users of the live session. - Screen sharing - window dedicated to sharing the contents of the desktop or of an application with remote users, and to managing the remote control of an application. - File sharing - window dedicated to the upload/download of files that the Conference Manager and participants intend to make available to all users connected online. - File viewer - window dedicated to the display, for all remote users, of PowerPoint presentations, videos, documents or images preloaded onto the system. - Questions and answers - window available for remote users and dedicated to questions to put in private to the speaker of the videoconferencing session. - Survey - window dedicated to the creation by the Conference Manager of surveys dedicated to assessing learning or enjoyment/preferences of the users. man_uso_TVCLive_en_v15.docx 6/20 Teleskill Live – Quick User Guide – Conference Manager 3.2. Conference Manager features 3.2.1. Managing layouts As previously described, the structure of the Teleskill Live application is entirely manageable by the Conference Manager who can define size, visibility and position of each window. The Videoconferencing tool has different types of predefined layouts (Presentation, Discussion and Share) which can be activated directly from the "Layout" menu on the toolbar. The Presentation layout, which the system starts with by default, is used primarily for presentation to the remote users of PowerPoint slides, Microsoft Office and Adobe Acrobat documents, videos in Flash Video (.flv) format or images, preloaded onto the system and manageable directly by the Conference Manager or one of the participants who has been enabled. In this configuration, the application consists of the following windows: Videoconferencing, List of participants, File sharing, File viewer and Chat. The Discussion layout is mainly for videoconferencing sessions dedicated to debate amongst users (question and answer sessions, discussion between experts, ...) in which more weight is given to the audio/video of the speakers and in which remote participants intervene using Chat. man_uso_TVCLive_en_v15.docx 7/20 Teleskill Live – Quick User Guide – Conference Manager In this configuration, the application consists of the following windows: Videoconferencing, List of participants and Chat. The Share layout is dedicated to videoconferencing where it is necessary to share with the remote users the desktop or specific applications installed on the computer of the Conference Manager or of one of the participants. The Screen sharing feature also allows granting remote control of shared resources to one of the participants in the live session. In this configuration, the application consists of the following windows: Videoconferencing, List of participants and Chat. In addition to the predefined layouts, the Conference Manager can customise the look of the application by resizing, moving, activating/disactivating each window as desired and according to the communication needs of the event. To resize the windows, just hover your mouse over the bottom right corner of the window concerned and drag it outwards to enlarge it, or inwards to reduce it. If it is required to expand a single window to full screen, click the mouse on the square symbol at the top right of the window. To move the windows, you must place the mouse on the top border of the window and move it to the desired position. To close a window, click on the X symbol on the top right of the window or deselect the window in question from the Windows menu. From the same menu you can also reopen a previously closed window. man_uso_TVCLive_en_v15.docx 8/20 Teleskill Live – Quick User Guide – Conference Manager 3.2.2. Menu bar The Teleskill Live application has a menu bar consisting of the following items: Meeting, with which the Conference Manager can open and close the videoconferencing room. Options, with which you can: o Select the microphone to use and set the audio level. During adjustment of the microphone's audio levels, it is necessary to adjust the microphone volume so that, when talking, the coloured slider never goes beyond a green colour, as illustrated. o Select a webcam from those offered. o Set the privacy level for access to the service. Layout, with which you can choose one of the layouts available according to communication requirements. Windows, with which you can manage (activate/deactivate) the individual windows that make up the application. Webcam button with which you can activate/deactivate your own webcam. By default, when a user is enabled for videoconferencing, the webcam is activated. If it is deactivated, the system transmits the still image of the user. Microphone button with which you can activate/deactivate the microphone. By default, when a user is enabled for videoconferencing, the microphone is activated. Start recording, a button to activate the recording of the event. This button is present if your contract allows for recording events. Selecting "Start recording" causes the system to display a message asking for confirmation of recording. On confirmation of which the system begins server-side recording the entire event. man_uso_TVCLive_en_v15.docx 9/20 Teleskill Live – Quick User Guide – Conference Manager 3.2.3. Event recording The menu bar of the application has an event recording feature that can be activated by clicking on "Start recording". The system displays a confirmation message and recording begins. The Teleskill Live system is able to record everything that happens during the videoconferencing session. To stop recording, just select the "Stop recording" button. When recording has finished, the system shows a window in which you can enter a title for the recording and choose the final recording format from these options: standard - the recording makes available everything that happened during the videoconferencing session. audio/video - the recording includes only what happened in the Videoconferencing window. screen sharing + audio/video - the recording includes what happened in the Screen sharing and Videoconferencing windows. screen sharing + audio - the recording includes what happened in the Screen sharing window and just the audio commentary. slides + audio/video - the recording includes what happened in the File viewer and Videoconferencing windows. After recording you can select the "Scorm" checkbox to obtain, from the recording, a course in SCORM format to be loaded onto an LMS platform compatible with that standard. Receiving the recorded file The file of the recording of the event can be received as a link contained in the email that is sent automatically by the system to an e-mail to the customer's choice. Or it can be deposited automatically in a space made available by the FTP client. The file of the recording of the event is sent to the customer within 72 hours of completion of the agreed recording in video format (.Flv or .Mp4), in the case of SCORM courses you receive. Zip file of the course to be published in the LMS. The recordings will be available on the server Teleskill for 30 days. Start the lesson The videoconferencing sessions provided with Teleskill Live can be entered as didactic element in a training course on-demand enjoyed by an LMS. It is possible to manage the completion on the basis of parameters such as: stay in a virtual classroom and percentage of correct answers to the questionnaires proposed. At the end of the lesson the system Teleskill Live sends man_uso_TVCLive_en_v15.docx 10/20 Teleskill Live – Quick User Guide – Conference Manager tracking data to the LMS platform that verifies the existence of the completion requirements for the user and or will not track the completion of the activity. man_uso_TVCLive_en_v15.docx 11/20 Teleskill Live – Quick User Guide – Conference Manager 3.2.4. Managing participants at a live meeting Participant management functions are available in the List of participants window and can be accessed by clicking the symbol. As shown in the image, by selecting the gear symbol, the system opens a panel in which the Conference Manager can: - enable/disable users connected to: videoconferencing, file viewer, file sharing, remote control, screen sharing - disconnect a specific videoconferencing participant or all participants from Enable/disable a user for videoconferencing With the "Videoconference" function you can enable or disable the transmission of a user's audio-video stream. In particular, to enable/disable a user for videoconferencing, you must select the name of the user, with a mouse click, from the list of participants, and then enable or disable him/her by using the appropriate function just described. Alternatively, you can enable a user for videoconferencing using drag and drop, dragging the name from the list of participants into the Videoconferencing window. Disable a user clicking on the X symbol positioned on the video of the participant in question. The Teleskill Live service allows you to activate a certain number of concurrent users for audio/videoconferencing, depending on the profile of the service purchased. As users are enabled for audio/video, they are shown in the Videoconferencing window and the size of their image is optimised for the dimensions of the Videoconferencing window (see figure). Enable/disable a user for file viewer The Conference Manager can enable one of the users connected online for access to documents, images or videos shown in the File viewer window. To enable/disable a user for access to such documentation, just select his/her name, with a click of the mouse, from the list of participants and enable/disable it using the function available under the "File Viewer" item, as illustrated. man_uso_TVCLive_en_v15.docx 12/20 Teleskill Live – Quick User Guide – Conference Manager Alternatively, you can enable a user for the file viewer using drag & drop, dragging him/her from the list of participants into the File viewer window. Enable/disable a user for file sharing From the menu available in the list of participants, the Conference Manager can also enable or disable the file sharing function for a user. A participant enabled for file sharing can place files to share with remote users into the window in question. Enable/disable a user for remote control From the menu accessible from the list of participants, you can enable/disable a user for remote control of what has been shared in screen sharing. To use this function, the user's name must be selected with a click from the list of participants. You may then enable or disable him/her for remote control. An enabled user will not be able to operate on the computer of someone who shares his/her desktop if the other person does not accept the sharing of his/her machine by clicking on "Allow remote control" in the Screen sharing window. Enable/disable a user for screen sharing From the menu accessible from the list of participants, you can enable/disable a user for screen sharing. To use this feature the user's name must be selected with a click from the list of participants. You may then enable or disable him/her for screen sharing. Alternatively, you can enable a user for screen sharing using drag & drop, dragging the name from the list of participants to the Screen sharing window. Disconnecting users from the live meeting From the managing participants menu, it is also possible to disconnect a selected user or all remote users from the videoconference. man_uso_TVCLive_en_v15.docx 13/20 Teleskill Live – Quick User Guide – Conference Manager 3.2.5. File sharing File sharing allows the Conference Manager and enabled users to preload to the application any type of resource to be made available for download to remote users. To preload a file to the File sharing window, select "upload file". In the window that then opens, use the “Browse” key to select the file to be loaded to the application, then select "Allow download of the file" if you want to make the file downloadable for all connected users. Then click the "OK" button. When the upload of the file and the relevant conversion have completed, click the "OK" button. During the upload, files of type Microsoft PowerPoint (.ppt), Word (.doc), Excel (.xls), Adobe Acrobat (.pdf), Adobe Macromedia Flash (.swf), Flash Video (.flv) or images (.jpg, .png, .bmp) are converted to Adobe Macromedia Flash format, in order to be displayed in the File viewer window. Selecting "file list" shows a list of all files loaded to the system. Each entry has an icon to indicate file type. Resources available for download are marked with the floppy disk symbol. A click on this icon saves the file onto your own computer. Clicking on the dustbin icon, a loaded resource can be deleted. The Conference Manager can delete all preloaded files, while each user can only delete the resources loaded by him/her. man_uso_TVCLive_en_v15.docx 14/20 Teleskill Live – Quick User Guide – Conference Manager 3.2.6. File viewer Files preloaded to the system and available in the File sharing window can be shown to remote users by dragging (drag & drop) them to the File viewer window. A user enabled for the file viewer can drag to the area in question only those resources which he/she preloaded using file sharing. When the resource has been dragged to the File viewer window, it may be accessed via the command bar at the bottom of the window. In particular, you can use: - the forward and backward buttons to navigate through the various pages of the document, or through the slides, or to choose a specific slide/page of the loaded document - the keys to fit the document to the height or width of the window - the zoom function to increase or decrease the size of the document - the coloured markers and the pointer to highlight parts of the document during the discussion - the gear symbol to close the shared file The resource may be managed by the Conference Manager or delegated by him/her to one of the remote participants, using the "File Viewer" function in the managing participants menu (see section 3.2.4). man_uso_TVCLive_en_v15.docx 15/20 Teleskill Live – Quick User Guide – Conference Manager 3.2.7. Screen sharing and Remote control The screen sharing feature allows the Conference Manager to: - Start screen sharing, showing the users connected to the videoconferencing session the contents of the entire screen, of an application or of one of the active windows. - Allow a user to remote control, via mouse and keyboard, what is shown in the Screen sharing window. "Screen sharing" mode Activating this function, you can share with remote users the contents of the entire screen, of an application or of one of the active windows. Clicking on the "Start screen sharing" key, the system displays a window from which you can choose what to share with the remote users, choosing between: - Desktop sharing for sharing the screen. This feature allows remote users to see the entire desktop of the computer from which you are connected. - Application sharing for sharing one of the active applications with remote users. - Window sharing for sharing a window among those active on the computer. Choose which type of share you want and then just click on the "OK" button to start sharing. Screen sharing can be interrupted at any time by clicking on the "Stop screen sharing" key in the Screen sharing window of the videoconferencing application or by clicking on the "Stop Sharing" key visible on the application that is shared. "Allow remote control" mode When this function is activated, users enabled for remote control can interact via mouse and keyboard with the contents of the Screen sharing window (applications, desktop, application windows). With the remote control feature, the user able to manage shared resources will see appear in the Screen sharing window a green pointer with which he/she can interact, from his/her computer and with his/her own mouse and keyboard, with the shared resource. To stop remote control, just stop screen sharing. To activate remote control, the Conference Manager should click on "Allow remote control" and then select the user's name in the list of participants and enable it for remote control with a click on the symbol. man_uso_TVCLive_en_v15.docx 16/20 Teleskill Live – Quick User Guide – Conference Manager 3.2.8. Chat The Chat window is available for all connected users and allows you to send public or private messages during the videoconference session. To send a public message, type the text in the text box and send the message. To start a private chat session with a specific user, you must select the user name from the participant list and drag it into the Chat window. The system will open another area dedicated to the private chat. The Conference Manager can, by clicking on the gear symbol, delete all chat messages or disable the sending of private messages. 3.2.9. Questions and answers The Questions and answers window is for sending questions or other communications from remote users to the Conference Manager. Requests transmitted using this function will be seen exclusively by the Conference Manager and not by all remote users. The Conference Manager can, by clicking on the gear symbol, delete all questions received. 3.2.10. Survey The Survey feature allows the Conference Manager to create and submit to remote users one or more multiple-choice questions to check enjoyment or to assess learning. In particular, the system allows the creation of a survey composed of a number of questions that can be delivered to the users one after the other, or at different times during the entire live event. Selecting the Survey window, the Conference Manager can create a new question by selecting "New survey" and inserting, in the appropriate fields, the text of the question and the supplied answers. If you want to create an evaluative type of survey, you can indicate the correct answer by clicking on the checkbox next to the correct answer (as shown in the figure). Having inserted the question and the answers to it, confirm with a click on "OK". If the survey is made up of several questions, you can enter other questions by selecting "New survey" and repeating the above steps. man_uso_TVCLive_en_v15.docx 17/20 Teleskill Live – Quick User Guide – Conference Manager Once the different questions have been inserted, they can be submitted to the remote users by selecting the graphic image next to the question (as shown in the figure). When the survey is in progress, all participants can respond by selecting the answer and clicking on the "Vote" button. When the answers of all the participants have been collected, the Conference Manager will see in real time a graphic display of the answers given by the participants. To display in real time the answers/preferences given by each user who responded to the survey, just click on "Show answers". The list of answers given by each participant will be shown in real time. Once the survey is complete, the Conference Manager can decide to show the distribution of answers to all users connected, by clicking on the gear symbol and the "Show results to everyone" item. The results that are shown to remote users are not the detailed data on individual answers given by each participant, but rather a summary of the percentage distribution of answers given (as shown in the figure). "Close the survey" allows the Conference Manager to disable voting by remote users while maintaining the survey and its results visible if necessary. man_uso_TVCLive_en_v15.docx 18/20 Teleskill Live – Quick User Guide – Conference Manager All data on the survey, as well as data on access to the service, is recorded and made available after the event. The survey tracking data, as well as the access log for the live event, are available online via a dedicated link provided on request by Teleskill. They can be downloaded in Excel format and also used, in the field of certified training, for the acquisition of training credits. man_uso_TVCLive_en_v15.docx 19/20 Teleskill Live – Quick User Guide – Conference Manager 3.3. Features for the user Users can access the Teleskill Live service using webcam and microphone, to participate in audio/video during the event. Or with microphone only, participating just in the audio, using speakers or headphones to listen to what occurs during the live event. The user that accesses the live event sees and hears the Conference Manager and any other participants able to intervene and, depending on how the service is structured by the Conference Manager, can by default: - Set their status for participation in audio/video at the event - Use chat or the speaker questions feature to communicate via text with the other participants of the live event or to put questions to the speaker - Respond to surveys - See the contents of the instructor's desktop in the screen sharing section, and the resources displayed in the file viewer section - Download from the file sharing section the resources made available Subject to the approval of the Conference Manager, the user can: - Participate in audio/video at the event - Manage file viewer resources (slides, documents, images, videos ...) - Use the screen sharing feature - Use the remote control feature - Use the file sharing feature for uploading resources to be shared with remote users To participate actively in the live session, the user can set his/her status to "Request to intervene in audio/video". In this way the Conference Manager can decide to enable the user to participate in audio/video. If the Conference Manager enables the user for use of the File viewer window, at the bottom of the window dedicated to the presentation will appear a command bar. Using the command bar, you can move back and forth amongst the slides and documents, forward the video and use the highlighting tools available. Managing his/her status allows the user to express opinions in real time about what is happening in the live session, even if he/she is not enabled for audio/video. On the other side, the Conference Manager, seeing the status of the participants, can monitor tendencies among users as well as any difficulties or concerns. Proper management of their status by users allows the Conference Manager to decide who to enable for audio/video. 3.3.1. Access via mobile device Participation in the live event is possible for the majority of mobile devices such as iPad, iPhone, tablets and smartphones generally. Participation requires prior download and installation of the free "TELESKILL LIVE" app, available from the Apple Store or Google Play Store. The procedure for access is as follows: From the browser of your mobile device, go to the link that accesses the videoconference (as if you were connecting from a normal PC). The system will automatically detect that the user has installed the app on his/her mobile device (no need to open the app) and will allow the user in possession of the code or the link to directly access the live event. man_uso_TVCLive_en_v15.docx 20/20