1
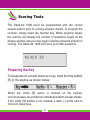
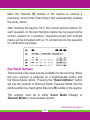
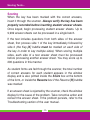
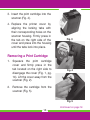
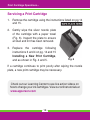
User’s Manual
800. 827. 9219 • www.apperson.com
Table of Contents
About DataLink1200 . . . . . . . . . . . . . . . . . . . . . . . . . . . . . . . 1
Scoring Tests . . . . . . . . . . . . . . . . . . . . . . . . . . . . . . . . . . . . . 2
Preparing the Key..............................................2
Key Reset Options............................................3
Scoring..............................................................4
Getting a Summary of the Test Results............. 5
Processing Ballots...................................................................7
Getting Election Results.................................... 8
Getting Survey Results.....................................10
Installing a New Print Cartridge........................14
Removing a Print Cartridge..............................15
Servicing a Print Cartridge...............................16
Obtaining Service for DataLink1200.................25
Problems and Solutions...................................26
Processing Surveys . . . . . . . . . . . . . . . . . . . . . . . . . . . . . . . . 9
Data Collection Operation . . . . . . . . . . . . . . . . . . . . . . . . . . 11
Print Cartridge Operations . . . . . . . . . . . . . . . . . . . . . . . . . . 14
Connecting the DataLink1200 to a Computer.. . . . . . . . . . . 17
Calibrating the DataLink1200 . . . . . . . . . . . . . . . . . . . . . . . .18
Cleaning the Read Sensors and Clearing Paper Path . . . . .20
Displaying Machine Information . . . . . . . . . . . . . . . . . . . . . . 23
Ordering Supplies . . . . . . . . . . . . . . . . . . . . . . . . . . . . . . . . 24
Troubleshooting . . . . . . . . . . . . . . . . . . . . . . . . . . . . . . . . . . 25
FCC Compliance Statement . . . . . . . . . . . . . . . . . . . . . . . . 29
About DataLink™1200
The DataLink 1200 is a versatile scanner designed to score
tests, process ballots and tabulate surveys. It can perform these
functions in stand-alone mode or connected to a computer for
advanced data collection.
The DataLink 1200 uses reflective read technology for
superior pencil mark recognition. Always use a No. 2
lead pencil when completing DataLink scan sheets. The
scanner will not read marks from ink pens or markers,
even if the marks are black.
A large selection of DataLink answer sheets, ballots, surveys
and analysis forms are available. These forms have been
specifically designed to utilize the advanced features of the
DataLink 1200 including paper skew detection and reading
student ID numbers.
-1-
Scoring Tests
The DataLink 1200 must be programmed with the correct
answer pattern prior to scoring answers sheets. To program the
scanner, simply insert the teacher key. When properly keyed,
the scanner will display the number of questions keyed on the
display window and you may begin inserting answers sheets for
scoring. The DataLink 1200 will score up to 200 questions.
Preparing the Key
To designate an answer sheet as a key, mark the Key bubble
[K] in the keyline as shown below.
When the Verify [V] option is marked on the keyline,
correct answers are printed on individual student answer sheets.
If the Verify [V] bubble is not marked, a dash (-) prints next to
incorrect responses.
-2-
Mark the Rescore [R] bubble in the keyline to rescore a
previously scored test. Rescoring a test automatically enables
the verify option.
After marking the keyline, fill in the correct answer pattern for
each question on the test. Multiple marks may be keyed as the
correct answer for a question. Questions keyed with multiple
marks will be indicated with an ‘X’ printed next to the question
for verification purposes.
Key Reset Options
There are two key reset options available for test-scoring. When
the your scanner is powered on it automatically enters into
the Score Mode option. Pressing the “Reset Options” button
will put the scanner in Rescore Mode. Rescore Mode has the
identical effect as marking the Rescore [R] bubble in the keyline.
The scanner must be in either Score Mode (Ready) or
Rescore Mode to score answer sheets.
-3-
Continued on page 4
Scoring Tests…
Scoring
When the key has been marked with the correct answers,
insert it through the scanner. Always verify the key has been
properly recorded before inserting student answer sheets.
Once keyed, begin processing student answer sheets. Up to
9,999 answer sheets can be processed in a single batch.
If the test includes questions from both sides of the answer
sheet, first process side 1 of the key immediately followed by
side 2 (the Key [K] bubble must be marked on each side of
the key in order to key multiple sides). When scoring multiple
sides, each side of a test answer sheet must be processed
before processing another answer sheet. You may score up to
200 questions in this manner.
As student forms are fed through the scanner, the total number
of correct answers for each student appears in the window
display and is also printed inside the Score box at the bottom
of the form, or inside the Rescore box if the Rescore [R] bubble
was marked.
If an answer sheet is rejected by the scanner, check the window
display for the cause of the problem. Take corrective action and
reinsert the answer sheet. If the problem persists, refer to the
Troubleshooting section of the user manual.
-4-
Getting a Summary of the Test Results
There are several summary options available once a test has
been scored. Summaries can be printed using an Item Analysis
report form or viewed on the display panel. When viewing
summary information you may insert additional answer sheets
for continued scoring at any time.
Class Average
Press “Summary Display” on the display panel to view the
class average and number of sheets processed.
-5-
Continued on page 6
Scoring Tests…
Tally of Incorrect Answers & Frequency Distribution
Report
After processing a batch of answer sheets use the Item
Analysis Form 23570 to get a detailed report of the test. The
Item Analysis report will provide a frequency distribution of
scores in 5% increments. The report also lists the number of
wrong answers selected for each test question.
If the Item Analysis Form is not available, the number of
wrong answers per question can be viewed in the display
window. To view the number of wrong answers for each
question, press the “Summary Display” button twice. Follow
the instructions displayed in the window for viewing the tally
of wrong answers. While viewing this information you can
continue processing additional answer sheets at any time.
-6-
Processing Ballots
Ballot Form 26440 is specifically designed for processing
ballots with the DataLink 1200. This form tabulates the votes
for up to 100 candidates. Election results can be obtained by
inserting Item Analysis Form 23570 through the scanner when
the batch processing is complete, or by viewing results on the
display window. Up to 9,999 ballots can be processed in a single
batch.
Ballot response bubbles are labeled 1 through 100. Assign
each candidate a unique number which corresponds to a
number on the ballot form. You have an option of allowing
multiple votes per row or accepting only a single selection per
row. Allowing only single selections per row can restrict students
from voting for more than one candidate for an office. The default
option allows multiple selections per row.
To accept only one selection per row, you must mark the
first ballot processed as indicated below. In this mode, if
a ballot contains multiple selections on a row, none of the
-7-
Continued on page 8
Processing Ballots…
selections for that row will be included in the tally. After each
ballot is scanned, a verification number is printed inside the
Ballot Verification box.
For information on how to process elections with more than
100 candidates or when using a standard answer sheet for
elections, refer to the section titled “Data Collection Operation”
on page 11.
Getting Election Results
To obtain the results of an election, insert side 1 of Item
Analysis Form 23570 through the scanner. The Item
Analysis Form can be inserted at any time during or after batch
processing without interruption of the tabulation proces
Warning: pressing the “Reset Options” button will clear
all election results.
In the event an Item Analysis Form 23570 is not available, the
election information can be viewed in the display window. To
view election results press the “Summary Display” button after
batch processing and follow the instructions displayed in the
window for viewing the results.
-8-
Processing Surveys
Survey Form 28010 is specifically designed for processing
surveys with the DataLink 1200. This form can be used for
surveys with up to 40 questions. It includes 5 choices for each
question. Survey results can be obtained by inserting Item
Analysis Form 23570 through the scanner when the batch
processing is complete, or by viewing results on the display
window. Up to 9,999 surveys can be processed in a single
batch.
Design your survey questions and selections to match the
bubble pattern on the survey form. On Survey Form 28010
you can choose to accept multiple marks per question or
accept only single marks. Mark your selection on the top of the
first survey scanned, as shown below. If no selection is made
then the scanner will accept multiple marks for each question.
After each survey is scanned, a verification number is printed
inside the Survey Verification box.
-9-
Continued on page 10
Processing Surveys…
For information on how to process surveys with more than 40
questions or when using a standard DataLink 1200 answer
sheet for surveys, refer to the section titled “Data Collection
Operation” on page 11.
Getting Survey Results
To obtain the results of a survey, insert side 1 (and side 2, if
necessary) of Item Analysis Form 23570 (or Tally Report Form
23580) through the scanner. The Item Analysis Form can be
inserted at any time during or after batch processing without
interruption of the tabulation process.
Warning: pressing the Reset Options button will
clear all survey results.
In the event an Item Analysis Form 23570 or Tally Report
23580 are not available, the survey information can be
viewed in the display window. To view survey results press the
“Summary Display” button after batch processing and follow
the instructions displayed in the window for viewing the results.
- 10 -
Data Collection Operation
Placing the DataLink 1200 in data collection mode disables
standard test scoring operations. This can be useful when
processing surveys, evaluations or ballots with standard
test answer sheets or customized scan forms. When in data
collection mode, the scanner will create a tally of all marks
made on the sheets. The tabulation results can be obtained by
inserting Item Analysis Form 23570 through the scanner when
the batch processing is complete, or by viewing results on the
display window. Up to 9,999 scan sheets can be processed in
a single batch.
To enter into Data Collection Mode press the “Reset Options”
button 2 or 3 times until Data Collection appears in the display
window.
In this mode, all selections for each question will be tabulated.
Up to 100 questions can be tabulated in Data Collection mode.
When tabulating questions which are on both sides of an
answer sheet, scan side 1 of a sheet followed by side 2 before
continuing onto the next sheet.
- 11 -
Continued on page 12
Data Collection Operation…
The following data collection options can be enabled by making
the appropriate selection on the keyline of the first sheet
scanned.
MARK THESE OPTIONS ON THE FIRST SHEET ONLY
Mark ‘R’ if you will be
performing data collection
on both sides of the sheet.
Mark ‘ V’ if you want a scan
verification number printed in the
score box of each sheet.
Mark ‘K’ to accept only one selection per
row. If you select the ‘K’ option, when a sheet
contains multiple selections on a row, none of
the selections for that row will be included in the
tally. If the ‘K’ option is not marked on the first
sheet scanned, multiple marks will be allowed
throughout batch processing.
- 12 -
To obtain the results from data collection processing, insert
side 1 (and side 2, if necessary) of Item Analysis Form 23570
through the scanner. This form will provide a tabulation of all
marks entered during batch processing. The Item Analysis Form
can be inserted at any time during or after batch processing
without interruption of the tabulation process.
Warning: Pressing the “Reset Options” button will clear
all data collection information.
In the event an Item Analysis Form 23570 is not available, the
results can be viewed in the display window. To view the results
press the “Summary Display” button after batch processing
and follow the instructions displayed in the window for viewing
the tabulated results.
- 13 -
Print Cartridge Operations
The DataLink 1200 uses a disposable Hewlett-Packard ink
cartridge (Item #26370) for print operations. Under normal
operating conditions the cartridge should provide reliable
service for up to a year.
Installing a New Print
Cartridge
1. Squeeze the print cartridge
cover and firmly press in the
tab located on the right side to
disengage the cover (Fig.1). Lift
the cover away from the scanner
(Fig. 2).
2. Remove all packaging materials
from the new ink cartridge
including the protective tape that
covers the silver nozzle place of
the cartridge. (Fig. 3, pg. 15).
- 14 -
Fig. 1
Fig. 2
3. Insert the print cartridge into the
scanner (Fig. 4).
4. Replace the printer cover by
aligning the locking tabs with
their corresponding holes on the
scanner housing. Firmly press in
the tab on the right side of the
cover and press into the housing
until the tabs lock into place.
Fig. 3
Removing a Print Cartridge
1. Squeeze the print cartridge
cover and firmly press in the
tab located on the right side to
disengage the cover (Fig. 1, pg.
14). Lift the cover away from the
scanner (Fig. 2).
Fig. 4
2. Remove the cartridge from the
scanner (Fig. 5).
Fig. 5
- 15 -
Continued on page 16
Print Cartridge Operations…
Servicing a Print Cartridge
1. Remove the cartridge using the instructions listed on pg 14
and 15.
2. Gently wipe the silver nozzle plate
of the cartridge with a paper towel
(Fig. 6). Inspect the plate to ensure
all dust and lint has been removed.
3. Replace the cartridge following
instructions 3 and 4 on pg. 14 and 15
Installing a New Print Cartridge,
and as shown in Fig. 4 and 5.
Fig. 6
If a cartridge continues to print poorly after wiping the nozzle
plate, a new print cartridge may be necessary.
Check out our Learning Center to see live action videos on
how to change your ink cartridges. View our online tutorials at
www.apperson.com
- 16 -
Connecting the DataLink™1200 to
a Computer
The DataLink 1200 can connect to a
computer using the USB cable that came with
the scanner. To use the USB cable , it is first
necessary to install the DataLink Connect
software.
DataLink Connect is a data-collection
software program developed by Apperson for retrieving data
from the Apperson family of data-enabled scanners. Using your
scanner with DataLink Connect software allows you to turn
your test data into valuable data-rich reports. DataLink Connect
reports can be printed, saved, converted into PDFs, or exported
into Microsoft® Excel® spreadsheets. DataLink Connect allows
you to immediately access test data including Item Analysis,
Class Roster, Student and Class Proficiency Reports and more.
DataLink Connect also allows you to export the test scores to
most major electronic gradebook programs.
If you are building a customized interface for a specific
application, contact Apperson for documentation on
communication specifications.
- 17 -
Calibrating DataLink™1200
To ensure consistent and accurate pencil mark recognition,
your scanner should be calibrated annually or after every
7,500 sheets processed, which ever comes first. A Calibration
Sheet form 74290 has been provided with your scanner for this
purpose. Please keep the calibration sheet in a convenient and
memorable location for easy retrieval as needed.
To determine how many sheets have been processed since last
calibration, press the “Summary Display” button 3 times. The
display window will show how many sheets have been scanned
since the previous calibration.
If 7,500 sheets have been processed since your last
calibration the message below will appear on your display
window whenever the scanner is powered on. This message will
no longer display after the scanner has been calibrated
- 18 -
If you are experiencing irregular test scoring, take corrective
action by calibrating the scanner. In most cases this will resolve
the problem. We recommend cleaning the scanner read sensors
prior to calibration (refer to page 20).
To calibrate the your scanner, follow the instructions printed on
the calibration sheet.
Calibration Sheet
Check out our Learning Center to see live action videos on
how to calibrate your scanner. View our online tutorials at
www.apperson.com
- 19 -
Cleaning the Read Sensors and
Clearing Paper Path
Paper dust or erasure debris can interfere with normal
operation of the read sensors. If you are experiencing
inconsistent scoring or a blocked paper path, take the following
steps to correct the problem. After cleaning, always calibrate the
scanner (refer to page 18).
Removing Cover Assembly
1. Unscrew the thumbscrew
on the backside of the
scanner (Fig. 1).
2. Remove the cover assembly
from the back chassis.
Fig. 1
- 20 -
Fig. 2
Fig. 3
Cleaning the Scanner
1. Using a slightly damp paper
towel clean any paper dust or
ink spray on the back chassis
(Fig. 2, pg. 21).
2. Use canned air spray to clear
any dust particles on the read
sensors (Fig. 3).
Fig. 4
3. If there is dust build up in the printer slot then remove the
print cartridges and clean the slot with an unfolded paperclip
(Fig. 4).
- 21 -
Continued on page 22
Cleaning the Read Sensors and Clearing Paper Path . . .
Fig. 5a
Fig. 5b
Securing the Cover Assembly
1. Insert the tab located at the lower right of the cover into slot
in the back chassis and pivot the cover downward and flush
(Fig. 5a and 5b, pg. 22)
2. Tighten the thumbscrew (Fig. 1, pg. 20) securely and
inspect to ensure the cover is secured flush onto the
back chassis.
3. Always calibrate the scanner after cleaning (refer to
page 18).
Check out our Learning Center to see live action
videos on how to clean and calibrate your scanner. View
our online tutorials at www.apperson.com
- 22 -
Displaying Machine Information
To display information about your scanner, power on the scanner
and press the “Summary Display” button. Successively
pressing “Summary Display” will show additional information.
The following information will be displayed:
•
The scanner serial number
•
The DataLink 1200 firmware version of your scanner
•
The total number of sheets processed
•
The number of sheets processed since the last
calibration
•
The number of sheets processed since the last factory
service
- 23 -
Ordering Supplies
You can order DataLink1200 supplies from Apperson. General
supplies available include:
•
Standard DataLink answer sheets
•
Customized DataLink answer sheets
•
Print cartridges
•
Serial or USB computer cables
•
Calibration sheets
For a detailed description of test answer sheets, ballots, surveys
and supporting forms, call your Apperson representative, or visit
our web site at www.apperson.com.
DataLink™1200 Supplies
800.827.9219
www.apperson.com
- 24 -
Troubleshooting
Obtaining Service for DataLink™1200
If you are experiencing inconsistent operation or irregularities
with the your scanner, try re-calibrating the scanner using the
calibration sheet provided with the machine. In many cases a
simple calibration will resolve the problem.
Use the following guide to troubleshoot basic operational
problems that you have encountered. If you are unable to
resolve the problem or have service questions, please call the
number below and ask for Technical Support.
For Service and Repair, call...
800.827.9219
Check out our Learning Center to see live action videos
on how to calibrate and troubleshoot your scanner. View
our online tutorials at www.apperson.com
--25
25-
Troubleshooting…
Problems and Solutions
Poor Print Quality
Refer to page 14 — Print Cartridge Operations
1. Remove the print cartridge cover.
2. Remove the print cartridge from the scanner.
3. Gently wipe the silver nozzle plate of the cartridge with a lint
free paper towel. Inspect the plate to ensure all dust and lint
has been removed.
4. Replace the print cartridge and the print cartridge cover.
Make sure the print cartridge cover is securely seated and
locks into place.
Marks are Not Detected
Refer to page 18 — Calibrating DataLink1200
Very light or thin pencil marks may not be recognized by the
sensors. If the marks are made in ink the scanner will not detect
the marks. Mark over the intended marks with a No. 2 pencil. If the
marks appear to be valid but are not recognized, try cleaning the
read sensors and re-calibrating the scanner.
Inconsistent Scoring
Refer to page 18 — Calibrating DataLink1200
Check the marks that are being scored inconsistently. Make
sure the marks are dark and fill in the entire bubble area. Check
erasure marks for completeness. If you continue to experience
inconsistencies, clean the read sensors and re-calibrate the
scanner.
- 26 -
Paper Jams
Refer to page 20 — Removing Cover Assembly
Check the paper path for materials that may be lodged between the
plates. If you see an object blocking the pathway, carefully remove
it by inserting a stiff sheet of paper through the plates. If you are
unable to remove the object, remove the cover assembly.
Invalid ID Number
refer to page 18 — Calibrating DataLink1200
Check the ID number marked by the student for accuracy. An
invalid ID number message will appear if a row totals greater than
9. If you receive an invalid ID message for a form that does not
have an ID grid, try re-calibrating the scanner.
Paper Misfed
refer to page 20 — Removing Cover Assembly
There may be an object interfering with the paper path which is
causing the scan sheet to skew. If there is an object blocking the
paper path, carefully remove it with a stiff sheet of paper. If you
are unable to remove the object, refer to page 20 to remove the
front cover. Always make sure the guide edge of the scan sheet is
laying flat in the insertion channel. If scan sheets are fed crooked a
paper misfed message will appear. If this error message continues,
try re-calibrating the scanner. If this error message persists
even though the sheet is being fed properly, you can press the
“Next Display” button after the error occurs to override the error
- 27 -
Continued on page 28
Troubleshooting…
on the next sheet. Pressing “Next Display” twice will disable this
error for the remaining batch. Take care to insert sheets properly
after disabling this error detection.
DataLink1200 Will Not Power On
Check the power supply to ensure it is firmly inserted into the
scanner’s power socket and into the electrical outlet. Make sure
the power supply is labeled with the DataLink1200 logo. The power
supply should be rated as 24 volts DC, 400mA.
Rows in Sheet Differs from Key
refer to page 18— Calibrating DataLink1200
This error generally occurs when the student answer sheet does
not match the form used as a key. If the answer sheets differ from
the key either remark the answer sheets onto forms which match
the key or remark the key to match the form used on the answer
sheets. If the sheets are identical, erase any extraneous marks
made on the answer sheet or the key that appear near the black
timing marks on the left edge or the black markings at the top of the
sheets. If the problem persists try cleaning the read sensors and
re-calibrating the scanner.
Motor Runs Continuously
Power off the scanner by unplugging the power supply. Wait 5
seconds and replug the power supply. If the motor continues to run,
call 800.827.9219 and ask for the Technical Support Department.
- 28 -
FCC Compliance Statement
FCC Compliance
This equipment has been tested and found to comply with the limits
for a Class A digital device, pursuant to Part 15 of the FCC Rules.
Operation is subject to the following two conditions:
1. This device may not cause harmful interference, and
2. This device must accept any interference received, including
interference that may cause undesired operation.
Industry Canada Regulations
This Class A digital apparatus meets all requirements of the
Canadian Interference Causing Equipment Regulations.
Cet appareil numérique de la classe A respecte toutes les exigences
du Règlement sur le matériel brouilleur du Canada.
Copyrights © 2000 - 2012. Apperson.
All Rights Reserved. Reproduction, adaptation, or translation without prior written
permission is prohibited, except as allowed under the copyright laws.
DataLink™1200 is a trademark of Apperson
851 SW 34th Street, Bldg. B • Renton, WA 98057
800.827.9219
www.apperson.com
--29
29-
800.827.9219
www.apperson.com
1200M (04-12)