1
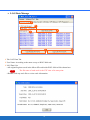
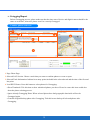
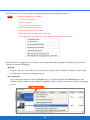
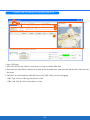
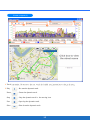
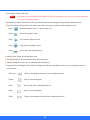
WSG_Tool User Manual
Ð
Version & Language
1.
2.
1.
WSG_Tool Version.
2.
Language Page: Select a language here.Please be aware the language setting only for WSG_Tool but not for
WSG-2000.
1
Ð
LOG Data Manage
1.
2.
4.
3.
5.
1. Tab: LOG Data Tab.
2. User Name: According to the name set up on WSG-2000 unit.
3. LOG Data List:
• All original log data saved in the Micro-SD card inside WSG-2000 will be shown here.
Note
The file name of each track is the UTC time of its start point.
• Double click any track file to review track information.
2
6.
• Use right key function to copy or delete one or more log files.
4. Clear All LOG Data:
Press this button to clear all log data stored in the Micro-SD card.
5. Copy All LOG Data to PC:
Press this button to copy all log data stored in the Micro-SD card to PC.
6. Copy LOG Data from PC:
Press this button to copy log data (*.NAL) backup in PC to the Micro-SD card of WSG-2000.
3
ÐLOG
Data Transfer
1.
2.
3.
4.
5.
6.
7.
8.
1. Tab: LOG Data Transfer Tab.
2. Reference Unit: Select Metric or Imperial measure shown on track records. This is set as units for the
transfeering the tracks and not related to the ones setting on WSG-2000
3. Reference Zone: Adjust the time zone for the process of transferring log data format.
Note
A Geo-tagging process is based on the time zone here.
4. LOG Data Source: Select a LOG data from the Micro-SD card to transfer the format.
5. LOG Data Format: Select a format that you want to transfer to.
6. China Map: When the track is logged in Mainland China, please tick “China Map” and transfer to Google Maps
again.
7. Transfer: After confirming above items, press this button to convert to the format assigned.
8. Track List:
• All transferred track file will be shown here.
• Use right key function to copy, delete or e-mail those files.
Note
For Google Maps & Virtual Earth, the maximum of one track is 10,000 points.
If a track includes more than 10,000 points, it will be separated into two tracks automatically.
4
Ð
LOG Mode
1.
2.
3.
4.
5.
1. Tab: LOG Mode Tab.
2. LOG Mode: Select a log mode and press “Set Log Mode” button to confirm the setting.
• User Define: The detail can be set according to point 3 as below.
• Walk: Log a track point per 20 sec. or 50 m when the velocity is between 1~150 km/h.
• Bicycle: Log a track point per 10 sec. or 100 m when the velocity is between 1~150 km/h.
• Car: Log a track point when a heading change is bigger than 7 degrees when the velocity is between 1~2000
km/h.
3. User Define LOG Mode: Set by time interval, the ranges of movement, direction, speed or the mixed mode as
conditions.
Note
1. Please be aware that the moving speed should lie in between the valid speed for record;
otherwise, the point won’t be saved.
2. You also can set the valid speed to filter some shift points.
4. Factory Setting: Restore the setting to the factory setting.
5. Mix Mode: Combine following conditions by your preference and log a point only one of them is conformed.
•Time Interval (T)
•Distance Interval (D)
•Heading Change (H)
•Speed Change (S)
5
Ð
GPS Behavior
1.
2.
3.
4.
5.
1. Tab: GPS Behavior Tab.
2. NMEA Output: Select NMEA output items by your requirement, and press SET button to confirm it. GPRMC,
GPGGA, GPGSA & GPGSV are fixed because they are basic necessaries of navigation and data logging;
GPVTG, GPZDA and GPGLL are option.
3. GPS LED Setting: Define the behavior of LED getting acquisition.
• GPS LED Blink Cycle: Time includes one LED light on and one LED light off, a complete cycle.
• GPS LED Off Cycle: Time for LED light off during a complete cycle.
• For instance by above picture, a LED cycle is 1 second. Light on for 0.2 second and light off for 0.8 seconds.
4. GPS Re-Start: Include Cold Start, Warm Start and Hot Start.
• Cold Start is suggested for quicker acquisition if one of below mentioned is confirmed.
a) The WSG-2000 didn’t be operated for more than 3 months.
b) The distance between your current location and the last time device turn off location is more than 800 km.
• Warm Start is suggested if the device was used over 15 minutes in a week, but you just can not get acquisition
when you use it again.
• Hot Start is suggested when you often use the device, the GPS signal is okay and several satellites are received;
however the device still can not get acquisition.
5. SBAS: Enable (ON) or disable (OFF) the SBAS function, and press the SET button to confirm it.
6
Ð
GPS Parameters
1.
2.
3.
1. Tab: GPS Parameters Tab.
2. GPS Mode: Select a GPS mode and press “Set GPS Parameter” button to confirm it.
Note
Please be aware that the higher accuracy is selected, the longer acquisition time is needed, that is
to say, the faster acquisition time is chosen, the lower accuracy is provided.
3. GPS Parameters: In GPS mode, if the “User define” is selected, and the detail can be set here.
7
Ð
Additional Tool
1. Geotagging/Report: Press this button to enter Geotagging screen for further application.
2. View Mark: Press this button to enter View Mark screen for further application.
3. GIS Shapefile Tool: Press this button to enter GIS Shapefile screen for further operation.
4. My Favorite Track: Press this button to enter My Favorite Track screen for further application.
5. Make Report: Press this button to enter the report program for further application.
8
Ð
Gotagging/Report
Before Geotagging process, please make sure that the time zone of device and digital camera should be the
same as each other; otherwise photos won’t be correctly Geotagged.
Combine photos with track
1.
2.
3.
6.
4.
5.
1. Page: Photo Page.
2. Selected LOG Section: Choose a track that you want to combine photos or create a report.
3. Selected Track Information: Indicate how many points included in the selected track and the time of the first and
last point.
4. Load JPEG Photos: Press this button to select photos for Geotagging.
• Show Thumbnail: Tick this item to show minimized photos you chose. Please be aware this item would slow
down the photo selecting process.
• Ignore already Geotagging Photo: When selected photos have had geographic data inside will not be
Geotagged again.
• Generate Original backup photo after Geotagging: Tick this item to backup all selected photos after
Geotagging.
9
5. JPEG Photos Area: All selected photos including geographic data will be shown here.
Note
Right key functions are available:
1. Cancel selected photo
2. Cancel all photos
3. Pre-view/Check photo position
4. Add/Change photo description
5. Manual geotaging selected photo
6. Make Shapefile including photo name only
7. Make Shapefile including photo name and the absolute path information
6. When the auto-Geotagging is not working or you want to modify the geographic coordinates, please use the
function of manual Geotagging.
• By Map:
Drag the “red sign” on the map to the correct position, and press the “Manual Geotagging” button (right
key function) to complete Geotagging process.
• By Coordinates:
Key in the exact Latitude (format: dd.ddddddd degree), Longitude (format: ddd.ddddddd degree) and
Altitude in blanks, and press the “Manual Geotagging” button (right key function) to complete Geotagging
process.
Right Click
10
Combine URL (web picture or video link) with track
1.
2.
3.
6.
4.
5.
1. Page: URL page.
2. Selected LOG Section: Choose a track that you want to combine URL link.
3. Selected Track Information: Indicate how many points included in the selected track and the time of the first and
last point.
4. Add URL: Press this button to add URL item to the [URL Link] area for Geotagging.
• URL Type: Select a URL type for photo or video.
• URL Link: Key in a link of web photo or video.
11
5. [URL Link] area: All added URL link will be shown here.
Note
Right key functions are available:
1. Cancel selected URL item
2. Cancel all URL items
3. Pre-view /Check selected URL item position
4. Add/Change the description for selected URL item
5. Manual Geotaging selected URL item
6. Make Shapefile including all geotagged URL item
6. The Geotagging for URL link can be done by Map or Coordinates.
• By Map:
Drag the “red sign” on the map to the correct position, and press the “Manual Geotagging” button (right key
function) to complete Geotagging process.
• By Coordinates:
Key in the exact Latitude (format: dd.ddddddd degree), Longitude (format: ddd.ddddddd degree) and Altitude
in blanks, and press the “Manual Geotagging” button (right key function) to complete Geotagging process.
Right Click
12
Create a track file including photos and URL link
1.
2.
3.
4.
5.
6.
1. Max. Photo Show Size: Select a size of photo shown on your track.
2. Map Type: Google Earth or Google Maps.
Note
When you choose Google Maps, the extra function of Google Maps API key as below will show
up. Please key in your exclusive “Google Maps API Key” if you want to share your track in your
Blog.
3. Track Line Option: Set the color, transparency and width of the track line, also tick the item of
“3D Track” if you need the track on Google Earth with height.
Note
When you choose Google Maps, the item of “Hybrid Map” will show up instead of “3D
Track”. Tick it if you prefer the map consisted of road and satellite image.
4. Photo Map: Create a file only showing Geotagged photos on map (The initial file’s name will be “PGM”)
5. Photo-Track Map: Create a file showing Geotagged photos and track on map (The initial file’s name will be
“PTGM”)
13
6. File Area: All files from point 4 & 5 will be shown here.
Note
Right key function is available for copying and deleting those files.
14
Create a report (1)
1. Track information: Mouse move here can watch the detailed track information or change the track.
2. Play
: Re-start the dynamic track.
Pause
: Pause the dynamic track.
Stop
: Stop the dynamic track i.e. the moving icon.
Fast
: Speed up the dynamic track.
Slow
: Slow down the dynamic track.
15
3. Description: Key in some detail you want to show in report.
4. Create Report: Press this button to create a report with html format and open it by browser automatically.
Save Report: Press this button to save it in the specifi c area you assigned; The complete report can be
demonstrated anytime by double clicking the report file.
5. Check the box to smooth the series line.
6. You can click the block of color to change the series line’s color, or you can select the information you want
to see from the combobox, which including the Speed, Altitude, Temperature, Air Pressure, Wheel Speed,
Cadence, Heartrate, Slope, and None.
7. Set up the x-axis of the chart to reveal the distance or the time information.
16
Create a report (2)
1. Choose a track that you want to creat a report.
2. Click here to make the basic information of the track peg to the procedure window or hide.
3. Track Information: Present detailed data about this track.
17
4. Progress bar and information window: Can click to appear in the chart.
Progress bar publishes the position of information chosen in the chart of current track point.
Information reveals serial number, time and informations of current track point.
5. Can alter the high size of the chart and webpage window here.
6. Instantaneous Basic Information: The basic information will be changed along with the dynamic track.
7. Track Point Bar: Indicates the total track points and a moving one along with the dynamic track.
8. Click the checkbox can reveal or hide scene of the street on current track point.
18
A Complete Report File
19
1. Track Map: A map with track.
Note
If you have created a Photo-Track Map (PTGM) file during previous process, the track presented
on report will include photos.
2. Instantaneous Basic Information: The basic information will be changed along with the dynamic track.
3. Track Point Bar: Indicates the total track points and a moving one along with the dynamic track.
•Stop
: Stop the dynamic track i.e. the moving icon.
•Pause
: Pause the dynamic track.
•Play
: Re-start the dynamic track.
•Fast
: Speed up the dynamic track.
•Slow
: Slow down the dynamic track.
4. Moving Icon: Stand for the dynamic track.
5. Track Information: Present detailed data about this track.
6. Analytic Diagrams: There are seventeen kinds of diagrams.
7. Operation Bar for Diagram: The default of diagrams will auto-switching around, you can stop this action via
operation bar.
•Previous
: Back to last diagram and stop auto-switching behavior.
•Pause
: Stop in current diagram.
•Play
: Re-start the Auto-switching behavior.
•Stop
: Stop in current diagram.
•Next
: Skip to next diagram and stop auto-switching behavior.
20
Note
1. The report save in the folder should contain the anaylitical data including the graphic jpeg files
and tracks in html format and the detailed tracks data in .xml file.
When sharing the report or
files to others, please be sure to provide all of the data in the folder to make sure the report can
be demonstrated completely.
2. Please click as the following pic the file name as “report.html” to play the track report.
21
Ð
View Mark
View Mark Manage
1.
7.
2.
3.
5.
6.
4.
1. Mark Icon display
2. Mark information: To set the name on the mark and display the related information.
3. Add new marks to the device mark list
Note
Please note that the increase to the device mark list is temporary saved rather than formally to
WSG-2000 units.
4. Device Market List: Display the temporary mark lists.
5. Save Marks to Device: Save marks device list to WSG-2000.
6. Reload Marks from Device: Reload marks in WSG-2000 to the device mark list.
7. Marks Display: Display all of the device mark list on the map.
22
Mark editor
.
Left Click
1. Add New Mark: To edit the latitude, longitude, altitude and the name to the device mark list
Note
The name and altitude cannot be changed after the mark has been added.
2. Delete the Mark: Select one of them from the Device Mark List and press the “Delete” key on the keyboard.
3. Modiy the Mark: You can change the latitude and longitude of the mark directly on the maps to make the
position change or change the icons, altitude, and name. Please note that you need to save a
new mark in the list in advanceand delet the original one.
Note
1. The changed on the content of new mark will not replace the original one automatically.
2.When complete the edition: please click “ Add Mark to device mark list” to save the marks to
WSG-2000。
4. Mark information: Move the arrow to the icon and click left button on the mouse to get the detailed information
about the icons on the map.
23
Ð
GIS Shapefile Tool
If there is any demand for GIS (Geographic Information System) application, please into GIS Shapefile
Tool to transfer the format.
1.
2.
3.
4.
1. Selected LOG Section: Choose a track that you want to transfer to shapefile format.
2. Selected Track Information: Include the Time for the first and last point, and the amount for Total points, Push
points and Shake on points.
3. Shapefile Type: Select PolyLine or Point, and press “Transfer” button to confirm it.
Note
1. For PolyLine, a track should include 2 points at least; otherwise, the format transfer
process is not acceptable.
2. For Point, as following, it provides 2 kinds of log points for transfer.
4. Shapefile Area: All transferred Shapfile will be shown here.
Note
1. The shapfile will be presented by zip file, and each zip file is composed of
*.shp, *.shx and *.dbf.
2. Right key function is available for copying and deleting.
24
Ð
My Favorite Track
My Favorite Track Mangement
1.My Favorite Track Managment:Track lists.
Note
a) You can click the right mouse button to copy or delete the tracks。
1. Copy the selected file to the designated place (Copy to…)
2. Copy all of the files to the designated place (Copy all to…)
3. Copy the favorite tracks from the computer (*.MFT) toWSG-2000 unit [Copy
from…(MFT)]
4. Copy the file as GPX format(*.GPX) to WSG-2000 unit and covert it into my favorite
track. [Copy from…(GPX)]
5. Delete the selected file (Delete…)
6. Delete all of the files(Delete all …)
7. Change the selected “My Favorite Track” name.
b) There are at most 20 tracks that can be saved as my favorite tracks
25
2. GPX tracks filter parameter (m): set filter parameter from this selection based on the unit (meter). That means
when the distance of two points shorter than that set on parameters. The unit will ignore the points below the
parameters setting and not covert into the track file.
Note
1. There are at most 4800 points of GPX file that can be saved as in a favorite track.
2. “Non” stands for not performing the filter setting.
3. My Favorite Track Information area.
Survey the selected "My favorite Track" by double clicking the left mouse button.
26
Ð
Help
1.
2.
3.
4.
5.
6.
1. Page: Help page.
2. WSG-2000 User Manual: Link to a complete WSG-2000 user manual.
3. WSG_Tool User Manual: Link to a complete WSG_Tool user manual.
4. Download TimeMachineX: Link to download TimeMachineX software.
5. MSCHART Register: Execute the MSCH ART Register when the report function is not working.
Note
The computer which is login should be administrator or the one has the same authorities.
6. Download latest WSG_Tool: Download the latest WSG_Tool update file.
27
WSG_Tool Update Process
1. Decompress the update file downloaded from WSG_Tool Link.
2. Switch the WSG-2000 to MSD mode (please do not execute the WSG_Tool).
3. In”My Computer”, opens WSG-2000 MSD via Explore.
Right Click
28
4. Copy”WSG_Tool.exe”from decompressed update files and paste to the mass storage of WSG-2000 instead of
the existing one.
Right Click
29