1
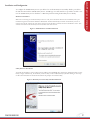
A760 Proximity Locator discover. track. monitor. User Manual Contents Preface 4 4 4 5 5 A760 Proximity Locator 5 5 5 5 5 6 7 8 9 9 9 10 10 10 10 11 11 11 11 11 11 11 11 11 11 11 11 12 13 14 14 Warranty & Service 15 15 15 15 15 Trademarks FCC Compliance CE Compliance Copyright Statement Overview Features Contents Requirements A760 People/Event Correlation Process Proximity Logic Details Notes for A760 Proximity Locator and Tag Deployment Installation and Configuration Hardware Installation Utility Software Installation Launching Proximity Locator Utility Configuration Launch the Utility View Manufacturer Default Settings Proximity Code Proximity Cycles Maximum Communication Attempts Maximum Successful Cycles A760 Signal Strength Thresholds Combined Minimum For Immediate Success Combined Minimum To Compete Minimum At Tag To Report Tag Signal Strength Thresholds Minimum At Tag To Compete Saving Device Configuration File Upgrade Device Firmware Device Diagnostics Mounting Best Practices Environmental Limits Limited Standard Warranty Terms Standard Warranty Limitations Obtaining Service & Support RF Code Customer Support PN01908 REV00 A760 Proximity Locator User Manual 2 Preface Trademarks RF CodeTM and the RF Code logo are trademarks of RF Code, Inc All other product names are copyright and registered trademarks or trade names of their respective owners. Information in this document is provided solely to enable system and software implementors to use RF Code products. There are no express or implied copyright licenses granted hereunder to design or fabricate any integrated circuits or integrated circuits based on the information in this document. RF Code reserves the right to make changes without further notice to any products herein. RF Code makes no warranty, representation or guarantee regarding the suitability of its products for any particular purpose, nor does RF Code assume any liability arising out of the application or use of any product, and specifically disclaims any and all liability, including without limitation consequential or incidental damages. The user of this system is cautioned that any changes or modifications to this system, not expressly approved by RF Code, Inc., could void the warranty. Copyright Statement Copyright © 2011 - 2012 RF Code, Inc. All Rights Reserved. This document, as well as the hardware and firmware described therein, are furnished under license and may only be used or copied in accordance with the terms of such license. The information in these pages are furnished for informational use only, are subject to change without notice, and should not be construed as a commitment by RF Code, Inc. RF Code assumes no responsibility or liability for any errors or inaccuracies that may appear in these pages. Every effort has been made to supply complete and accurate information. However, RF Code assumes no responsibility for its use, or for any infringements of patents or other rights of third parties, which would result. RF Code, Inc. 9229 Waterford Centre Blvd. Suite 500 Austin, TX 78758 www.rfcode.com PN01908 REV00 A760 Proximity Locator User Manual 3 FCC Compliance This equipment has been tested and found to comply with the limits for a Class A digital device, pursuant to Part 15 of the FCC Rules. These limits are designed to provide reasonable protection against harmful interference when the equipment is operated in a commercial environment. This equipment generates, uses, and can radiate radio frequency energy and, if not installed and used in accordance with the instruction manual, may cause harmful interference to radio communications. Operation of this equipment in a residential area is likely to cause harmful interference, in which case the user will be required to correct the interference at his own expense. RF Code is not responsible for any radio or television interference caused by using other than recommended cables and connectors or by unauthorized changes or modifications to this equipment. Unauthorized changes or modifications could void the user’s authority to operate the equipment. This device complies with Part 15 of the FCC rules. Operation is subject to the following two conditions: (1) this device may not cause harmful interference, and (2) this device must accept any interference received, including interference that may cause undesired operation. CFR Rule – 15.21 Changes or modifications not expressly approved by the party responsible for compliance could void the user’s authority to operate the equipment. RF Code, Inc. 9229 Waterford Centre Blvd. Suite 500 Austin, TX 78758 www.rfcode.com Industry Canada Compliance Statement This Class A digital apparatus meets the requirements of the Canadian Interference-Causing Equipment Regulations. Avis de conformité à la réglementation d’Industrie Canada Cet appareil numérique de la classe A respecte toutes les exigences du Règlement sur le matériel brouilleur du Canada. The system is design to operate with RFCode Active Tags – Whose operating frequency is 433.92 MHz which have been certified or are in the certification process. These devices comply with part 15 of the FCC rules. Operation is subject to the following two conditions: (1) these devices may not cause harmful interference, and (2) these devices must accept any interference received, including interference that may cause undesired operation. a. FCC ID: P6F2005433 for beacon intervals greater than, or equal to 10 seconds. b. FCC ID: P6F433MHZ for the security tag with beacon intervals less than 10 seconds. WEEE Compliance Do Not Dispose Product with Municipal Waste. Special Collection/Disposal Required. Battery Statement RF Code warrants all tags to be free from defects in materials and workmanship for a period of 1 year. Based on the ratings and specifications from the battery manufacturers, RF Code develops usage models to calculate the life of the active RFID Tags. Like all models there are assumptions and approximations involved. The values are to be taken as engineering estimates - not guaranteed performance. In most asset tag deployment scenarios, RF Code tags with a 10-second beacon rate have a useful life of 5-to-7 years. In most sensor tag deployment scenarios, RF Code tags will typically have a useful life of 3 or more years. Exposure to extreme temperatures for all tags will shorten the battery life. 4 PN01908 REV00 A760 Proximity Locator Overview The A760 Proximity Locator is a wall-mounted unit used in conjunction with R142 Proximity Badges to provide a method of locating people and correlating events within tightly-defined coverage areas. Each Proximity Locator transmits an RF pulse pattern containing a unique code when the attached switch is actuated by a door opening or other event. The A760 also communicates with R142 Proximity Badges that are located near the event (typical coverage is 3 meters) and transmits event payload information to an RF Code reader infrastructure. When used with RF Code’s Asset Manager or other 3rd-party software, the solution enables tracking of who did what, when, and where. Features • Battery-powered wall-mounted unit (3 AA batteries) • 2-year battery life (50% duty cycle) • Low-battery indicator • Field-upgradable firmware • Communication status indicator LED Contents • A760 Proximity Locator • Proximity Locator Utility CD • User Manual Requirements • Windows XP, Windows Vista, or Windows 7 PN01908 REV00 A760 Proximity Locator User Manual 5 A760 People/Event Correlation Process The A760 Proximity Locator works in conjunction with A750 Room Locators and R142 Proximity Badge tags. A750 Room Locators are positioned to cover specific areas, such as rooms, closets or entire floors. The IR-enabled R142 tags can report specific location data when it transmits its RF location payload to an RF Code reader. As a person moves from one room to another, their badge tag will transmit the location code it detected from the last seen A750. Each A750 Room Locator is assigned a unique ID for distinct room locations. A760 Proximity Locators are also assigned ID’s which allow for people and event tracking with sub-room level accuracy. For example, if a supply cabinet door is instrumented with a reed switch connected to an A760, door open events can be correlated with a wearer of an R142 Proximity Badge. The communication between the solution components is as follows: 1. Battery-powered wall unit detects event (wired dry contact or reed switch connected to door or other device). 2. Wall unit and badge tag communicate (send/receive) via low power 915 MHz broadcasts. Wall unit determines closest badge tag if multiple badge tags are within close proximity. 3. Badge tag transmits via 433 MHz RF, broadcasting its unique tag ID, room location, and event payload to the RF Code reader infrastructure. 4. The wall unit also has a unique ID and signals events via 433 MHz RF to the existing RF Code reader infrastructure. 5. Time stamps, payloads and IDs from the wall unit and badge tag transmissions are correlated via software to accurately report who did what, when, and where. Because the software system is informed of all nearby badges, it is capable of compiling an inventory of badges that were present for the Proximity Event and not just the badge that was closest. Figure 1: A760 People/Event Correlation Process 6 PN01908 REV00 The antenna pattern of the A760 determines the RF field strength at various points near the A760. Generally, the field strength decreases as you move farther away from the A760 but the rate at which it decreases is relative to the orientation of the A760. The diagram below (Figure 2) shows an approximation of the A760 antenna pattern. It is designed in such a way that the signal strength will be highest for a person standing directly in front of the A760 (as opposed to a person standing beside or behind the A760). 1. Zone 1 represents the physical area in which the signal strength from the A760 is above a user-configurable “immediate” threshold. This area is close to the A760 such that, under normal operating conditions, only one person, and therefore only one badge, can be within Zone 1 at any given time. Following a Proximity Event Activation, if a badge’s signal strength indicates it is within this zone, then the badge is immediately given credit for the Proximity Event (no additional polling cycles). 2. Zone 2 represents the physical area in which the signal strength from the A760 is below the “immediate” threshold but above a user-configurable “compete” threshold. Following a Proximity Event Activation, if a badge’s signal strength indicates it is within this zone, then the badge is considered a candidate to receive credit for the Proximity Event. Multiple polling cycles will be used to collect responses from badges in Zone 2 to ensure that all badges respond and the badge with the strongest response to any of the polling cycles will receive credit for the Proximity Event. 3. Zone 3 represents the physical area in which the signal strength from the A760 is below the “compete” threshold but still high enough to allow communication between the A760 and a badge. Badges within this zone, although detectable, are not considered candidates to receive credit for a Proximity Event. Badges in this zone can still report the event to zonal readers even though they do not get credit for the event. 4. Zone 4 represents the physical area in which communication with badges is possible, but the signal strength from the A760 is below a user-configurable “ignore” threshold such that the badges in this zone ignore (do not respond to) the A760 polling cycles and they do not report the event to the zonal readers. 5. Beyond Zone 4 the signal strength from the A760 is too weak to allow communication between the A760 and a badge. Badges in this area are unable to detect the A760. Following a Proximity Event Activation, the A760 begins a series of polling cycles to collect badge responses from all badges in Zone 1 and Zone 2. If a badge in Zone 1 responds to any polling cycle, it is immediately given credit for the Proximity Activation and no further polling cycles are used. Otherwise, the A760 continues polling. After a certain number of polling cycles with at least one badge responding from Zone 2, the A760 gives credit to the badge with the strongest RSSI (received signal strength indication). The strongest RSSI is the maximum RSSI that a given badge reported in any one of the polling cycles. If no badge responds within a certain number of polling cycles, the A760 does not give any credit for the Proximity Event. These are some of the advantages of this 4-zone method of proximity determination: 1. Badges within Zone 1 are given credit for the Proximity Event very quickly. A quick determination is often needed when the dwell time of the badge is short. 2. Badges within Zone 2 are given multiple polling cycles to respond. This ensures the most accurate RSSI is determined so that the correct badge is given credit for the Proximity Event. 3. A badge that starts in Zone 1 or Zone 2 and then moves into Zone 3 or Zone 4 can still communicate with the A760 and therefore still receive credit for the Proximity Event even if it is in Zone 3 or 4 at the time when the winner is decided and communicated to the system. 4. Because the “immediate”, “compete”, and “ignore” thresholds as well as the polling cycle requirements are user-adjustable, the A760 can be adapted to monitor a variety of different Proximity Events depending on the range and dwell time requirements of each situation. PN01908 REV00 7 Proximity Logic Details Proximity Logic Details Figure 2: A760 Antenna Pattern Notes for A760 Proximity Locator and Tag Deployment If there is IR interference in a deployment area, the tag’s RF signal will not be affected but the IR location code will not be received by the tag. To avoid any IR interference refer to the following notes: • IR-enabled active tags are NOT designed to work outdoors. In direct sunlight, the IR tags will not detect the A750 transmissions. • Do not cover the IR sensor by wearing the badge under a jacket or in a pocket. This will affect the ability of the tag to read A750 signals. • A Room Locator’s transmissions can interfere with other Room Locators operating within the same location. The A750 Room Locators have a team operating mode to allow multiple room locators to synchronize their IR transmissions at unique times. 8 PN01908 REV00 To configure the A760 Proximity Locator you will need to use the Proximity Locator Utility which is provided on the CD that came with the A760 Proximity Locator. A USB Type A to mini-B cable (not provided) is needed to connect the A760 Proximity Locator hardware to a Windows platform running the Proximity Locator Utility. Hardware Installation When first connecting the A760 Proximity Locator to a PC, the A760 driver will need to be installed. This is performed through the Found New Hardware Wizard that should automatically load when the Proximity Locator is connected to the PC. Follow the steps in the wizard to locate the driver software for the A760 Room Locator. This software is located on the Proximity Locator CD that came with the unit. Figure 3: A760 Hardware Installation Wizard Utility Software Installation To install the Proximity Locator Utility insert the CD into the CD-ROM drive and click on Install Proximity Locator Utility to begin. Alternatively, the Proximity Locator Utility can be installed directly by double clicking on the setup. exe file. This will launch the install wizard. Follow the prompts to install the utility. Figure 4: Proximity Locator Utility Installation Wizard PN01908 REV00 9 Installation andConfiguration Configuration InstallationAnd Installation and Configuration Launching the Proximity Locator Utility After installing the application from the CD, select Start > All Programs > RF Code > Proximity Locator Utility to launch the application and display the main screen. The A760’s USB cable needs to be plugged into an available USB port on the computer on which the utility software is running. Configuration It is suggested that you use the utility to configure your Proximity Locator before you mount it on a wall or other surface. The steps for initial configuration of an A760 Proximity Locator are described below: 1. Launch the Utility: Ensure that the A760 Proximity Locator is connected to the PC through the USB cable and launch the Proximity Locator Utility software. 2. View Manufacturing Default Settings: The Proximity Locator Utility GUI will open and the Device Details section should display the status, model number, the version of the firmware installed on the device, and the device’s serial number. If the Status reports Disconnected, the device may need to be discovered by selecting the Device > Select device menu item. A window will appear. Click the Discover button. The utility will discover any A760’s that are connected to the PC. Select the device from the drop-down list and click the OK button. The A760 will display default values for Proximity Code and other settings set during manufacturing time. If the utility does not show any A760’s connected, unplug the USB cable to the device(s), wait 10 seconds and plug the USB cable back into the device. Figure 5: Proximity Locator Utility Figure 6: Device Discovery 10 PN01908 REV00 4. Proximity Cycles Maximum Communication Attempts: after an event is detected via the reed switch, this is the number of times that the A760 attempts to communicate with a nearby badge tag. Note that setting this value too high may result is inaccurate reporting. That is, if the wall unit continues trying to communicate with a badge after a detected event, then someone with a badge tag may move within range and incorrectly will receive “credit” for the detected event. Also note that the LED on the wall unit will light green at the beginning of each communication attempt. Maximum Successful Cycles: this is the maximum number of times that the A760 and the R142 Badge tag will communicate. A smaller number will result in faster reporting to the system, but may also reduce accuracy if other badge tags are nearby. 5. A760 Signal Strength Thresholds Combined Minimum For Immediate Success: this is a measurement of the combined signal strength detected between the badge tag and the Proximity Locator. When this number is exceeded by an A760/ badge combination, the A760 will not perform any more attempt/cycles and will immediately declare a “winner” (based on the strongest RSSI or in the case of a tie, the first badge that responded). Setting this value to a higher number will require that the “winning” badge will need to be closer to the wall unit when compared to other badges that are farther away. ombined Minimum to Compete: this is a measurement of the signal strength needed for a nearby badge C to be considered to be associated with an event. inimum At Tag To Report: this is a measurement of the signal strength detected at the badge tag for it M to be considered to be associated with an event. Setting this to a smaller value will consider badges that are farther away from the wall unit. 6. Tag Signal Strength Thresholds Minimum At Tag To Compete: this is a measurement of the signal strength detected at the badge tag for it to be considered to be associated with an event. Setting this to a smaller value will consider badges that are farther away from the wall unit. aving Device Configuration File: The Proximity Locator Utility allows saving a set of device settings for S backup purposes. To save the currently connected Proximity Locator’s set of device settings, select the File > Save or File > Save As menu option. This will prompt a file browser window. Select a location and a name for this device configuration file and click the Save button. The Proximity Locator’s configuration file is saved with a .rlc extension. pgrade Device Firmware: To upgrade the firmware for the A760 unit, access the Device > Upgrade U device firmware menu option. A dialog prompt will appear. Next click the Start button to begin the upgrade process. A message indicating the firmware upgrade is complete will be displayed. Click the Done button to finish this process. If the Proximity Locator already has the latest firmware installed, a message will display indicating that an upgrade is not necessary. Do not disconnect the device during the upgrade process. Doing so may cause problems with the device and its ability to upgrade the firmware properly. ! PN01908 REV00 11 Installation Configuration NoteFsoA r760Proxm i& ty iLoca toA rndTagDepo l yment 3. Proximity Code: Under the Settings section the Proximity Code field will determine what will be transmitted from the A760 to the RF Code reader infrastructure. It can be configured to transmit proximity code values ranging from decimal 0001 to 7167. 7. Device Diagnostics: To utilize the diagnostics tool, access the Device > Diagnostic menu option. The diagnostics window will appear. This tool can be used to help adjust your device settings to better suit your deployment scenario. In the diagnostics window there will be three options available for you to test the function of the unit with the badge tags. he Test Continuously check-box, when selected, will continuously display the latest Tag IDs, Tag RSSI, T Device RSSI and Combined RSSI readings of the tags that are in proximity to the Proximity Locator device. he Test Once button will take a snapshot of the moment and display the tag data for the badge tags that are T in proximity to the locator at that particular point-in-time. he Add button will prompt a dialog box to enter in a tag ID number. One or more tag IDs can be entered T to test for proximity data readings. Once tag IDs are entered, click either the Test Once button or the Test Continuously check-box to enable the diagnostic testing. If more than one tag is entered, the tag with the closest proximity to the locator will appear as highlighted. Using the Diagnostic mode of the Proximity Locator Utility temporarily disables the reed switch correlation function of the Proximity Locator device until diagnostic testing is complete. Figure 7: Test Continuously Diagnostic Reading Figure 8: Closest Tag Proximity Diagnostic Reading 12 PN01908 REV00 Flush Wall Mount - The A760 unit is intended to be mounted with the supplied mounting plate flush onto a wall. However, it can also be mounted under a cabinet, for example, if use-case testing yields satisfactory results. Mounting Mounting 1. Attach the rear plastic mounting casing and metal mounting plate to the mounting surface using anchors and screws or mounting adhesive. Figure 9: Plastic Mounting Casing and Metal Mounting Plate 2. Slide the A760 unit onto the mounting plate. Ensure it is secure. 3. Extend the reed switch near to the contact point and secure in place using the adhesive mounting on the back of the switch. When mounting the reed switch, avoid pressing directly on the center of the reed switch disk since this could damage the reed switch. Always press on the outer edge of the disk 4. Attach the adjoining magnet near to the contact point for the reed switch with the adhesive backing to ensure proper readings. PN01908 REV00 13 5. Snap the plastic cover onto the unit. Figure 10: A760 Unit Cover Best Practices • Mount the A760 at approximately the same height above the floor and directly facing the typical location where the R142 Proximity Badge will be worn. • Keep in mind the traffic pattern of persons who activate the A760 Proximity Locator. Try to mount the A760 in a location where it will be still be close to the R142 Proximity Badge immediately after the A760 has been activated. This is especially important when mounting the A760 unit near a door or in a hallway. • Avoid mounting the A760 unit in locations with obstructions (walls, metal, water pipes, etc.) between the A760 unit and the R142 Proximity Badge. • Do not mount the A760 unit in a location where it will get wet or where fluid might leak onto it. 5SUR[LPLW\EDGJHVDUHVKLSSHGLQVXVSHQGPRGHWRSUHVHUYHEDWWHU\OLIH 2QFHWKHWDJVDUHDFWLYDWHGWKH\VKRXOGQRWEHVWRUHGZLWKLQIHHWRIDQDFWLYH$3UR[LPLW\/RFDWRU GRLQJVRPD\VKRUWHQWKHEDWWHU\OLIH Environmental Limits The A760 unit is approved for use within the ranges set forth below. • Operation: -20 to +70 degrees Celsius • Humidity: 10% to 90% RH non-condensing 14 PN01908 REV00 Warranty & Service Limited Standard Warranty Terms F Code warrants its products to be free from defects in materials and workmanship for a period of 1 year (12 R months) for hardware and software from the date of purchase from RF Code. Its obligation under this warranty is limited to repairing or replacing, at its own sole option, any such defective products. This warranty does not apply to equipment that has been damaged by accident, negligence, or misapplication or has been altered or modified in any way. This warranty applies only to the original purchaser (end-user) and is not transferable. Standard Warranty Limitations xcept as provided herein, the entire liability of RF Code and its suppliers under this limited warranty will be that RF E Code will use reasonable efforts to repair or replace, without charge, all defective Products returned to RF Code by Customer, all as more particularly described in the End User Warranty. Except for the express warranties STATED HEREIN, RF Code makes no other representations or warranties and RF Code hereby disclaims all other warranties, express, implied, statutory, or otherwise, including without limitation, any warranty of merchantability, non-infringement of third party intellectual property rights, fitness for a particular purpose, performance, satisfactory quality, or arising from a course of dealing, usage or trade practice. Obtaining Service & Support in-warranty service, customers have several options. Customers having difficulty with RF Code products should For attempt to solve those problems through RF Code’s Technical Support Problem Escalation Process: irst, contact the RF Code representative or other distributor from whom the RF Code product was purchased for F information on how to obtain local support. Second, contact the RF Code Customer Support via e-mail. Third, contact the RF Code Customer Support via the Support Line. or product returns, the support engineer will give you a return material authorization (RMA) number. No returns F will be accepted without an RMA number. If the warranty expired, there is a charge for repair or replacement per RF Code’s out-of-warranty policy. For full details of the RF Code RMA policy, please review the “RF Code Warranty, RMA, and Extended Warranty Policy” document. RF Code Customer Support F Code Customer Support gives entitled customers and partners the ability to contact RF Code about installation R and usage-related questions as well as make defect inquiries about eligible products that are covered under RF Code warranty agreements. A team of technical specialists can be contacted electronically or via phone. he Support Line is available to provide General Support during normal business hours: Monday through Friday, T 8:00 am to 5:00 pm Central time, excluding national holidays. E-mail: [email protected] Support form: http://www.rfcode.com Voice: 512.439.2244 or toll-free at 866.830.4578 PN01908 REV00 A760 Proximity Locator User Manual 15 discover. track. monitor.