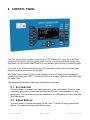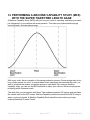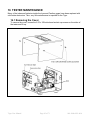
1
1.1
Larson Systems Inc.
Tiger Free-Length Spring Gage
User Manual
Version 1.0.7
Larson Systems Inc.
10073 Baltimore Street N.E.
Minneapolis, MN 55449-4425
www.larsonsystems.com
Tiger User Manual
Phone: 763-780-2131
Toll-Free: 1-877-780-2131
Fax: 763-780-2182
E-mail: [email protected]
Page 1 of 71
060-1000-0091-00A
Tiger User Manual
Page 2 of 71
060-1000-0091-00A
About This Manual
This manual could contain technical inaccuracies or typographical errors. Changes are
periodically made to the information contained herein. These changes will be incorporated in
new editions of the manual.
Copyright © 2009 Larson Systems Inc.
All rights reserved. No part of this manual may be reproduced by any means without written
permission of the author, except portions necessary for internal use only by the purchaser of
the LSI system.
Tiger User Manual
Page 3 of 71
060-1000-0091-00A
1 INTRODUCTION TO THE TIGER FREE-LENGTH GAGE .................................................... 8
2
UNPACKING AND INSTALLING YOUR TIGER GAGE ..................................................... 8
2.1
Unpacking and inspection ...................................................................................................................................8
2.2
Installing the Tiger Gage on Your Coiler ...........................................................................................................8
2.3
Using the Tiger Gage with a CNC Controller ....................................................................................................9
3
INSTALLING THE READ SWITCH ..................................................................................... 9
4
INSTALLING A SHUTDOWN CABLE................................................................................. 9
5
PROBE SELECTION......................................................................................................... 12
6
RECOMMENDED PROBE STANDOFF DISTANCES ...................................................... 12
7
THE TIGER: BASIC OVERVIEW ...................................................................................... 13
8
CONTROL PANEL ............................................................................................................ 14
8.1
Sort Indicator........................................................................................................................................................14
8.2
Adjust Buttons .....................................................................................................................................................14
8.3
Measure .................................................................................................................................................................15
8.4
Stop........................................................................................................................................................................15
8.5
Arrow Keys ...........................................................................................................................................................15
8.6
Power Indicator....................................................................................................................................................15
9
BACK PANEL CONNECTIONS ........................................................................................ 16
9.1
Power Switch........................................................................................................................................................16
9.2
Probe......................................................................................................................................................................16
9.3
Read Switch..........................................................................................................................................................16
9.4
CNC Connection ..................................................................................................................................................17
9.5
Sorter Controls ....................................................................................................................................................17
9.6
Pitch Adjuster.......................................................................................................................................................17
9.7
Shutdown Cable...................................................................................................................................................17
Tiger User Manual
Page 4 of 71
060-1000-0091-00A
9.8
USB Connection ..................................................................................................................................................17
10
ACTIVATION CODE........................................................................................................ 17
11
MAIN MENU/FUNCTION KEYS ...................................................................................... 18
11.1 Cub: Main Menu .................................................................................................................................................18
11.1.1 Cub: Monitor Menu ......................................................................................................................................19
11.1.2 Cub: Setup Menu .........................................................................................................................................19
11.1.3 Cub Setup Menu: Length Adjust Setup......................................................................................................20
11.1.4 Cub Setup Menu: Coiler Shutdown ............................................................................................................20
11.2
Cub: Diagnostics Menu ....................................................................................................................................21
11.3 Cub Diagnostics: Probe Tests ........................................................................................................................21
11.3.2 Cub Diagnostics: Length Adjust Test .........................................................................................................22
11.3.3 Cub Diagnostics: Sorting Chute Test .........................................................................................................23
11.3.4 Cub Diagnostics: Keypad Tests..................................................................................................................23
11.3.5 Cub Diagnostics: Audible Beep ..................................................................................................................23
11.3.6 Cub Diagnostics: Hour Meter ......................................................................................................................23
11.4 Tiger: Main Menu ...............................................................................................................................................24
11.4.1 Tiger: Monitor Menu.....................................................................................................................................24
11.4.2 Tiger: Setup Menu .......................................................................................................................................24
11.4.3 Tiger: Diagnostics ........................................................................................................................................28
11.5 Tiger Settings .....................................................................................................................................................30
11.5.1 Configuration ................................................................................................................................................30
11.5.2 Activation code.............................................................................................................................................30
11.5.3 Company Name ...........................................................................................................................................30
12
SUPER TIGER: MAIN MENU.......................................................................................... 31
12.1.1
Super Tiger: Monitor Menu .........................................................................................................................31
12.2 Super Tiger: Setup Menu .................................................................................................................................35
12.2.1 Super Tiger: Job Setup................................................................................................................................35
12.3
Super Tiger: Probe Setup-STD........................................................................................................................38
12.4 Super Tiger: Probe Setup—UltraCal ..............................................................................................................39
12.4.1 UltraCal Warnings........................................................................................................................................39
12.5 Super Tiger: Length Adjust Setup..................................................................................................................41
12.5.1 Type: .............................................................................................................................................................41
12.6 Super Tiger: Sorting Setup ..............................................................................................................................43
12.6.1 Mode Selection ............................................................................................................................................43
12.6.2 Tolerance......................................................................................................................................................43
12.6.3 Sort Time ......................................................................................................................................................44
12.7 Super Tiger: Coiler Shutdown.........................................................................................................................44
12.7.1
Consecutive Bad.........................................................................................................................................45
12.7.2 No Cutoff ......................................................................................................................................................45
12.7.3 Total Good (Lot Size) ..................................................................................................................................45
12.7.4 CpK Limit ......................................................................................................................................................45
12.7.5 Excess Adjust...............................................................................................................................................46
Tiger User Manual
Page 5 of 71
060-1000-0091-00A
12.8 Super Tiger: SPC Setup ...................................................................................................................................46
12.8.1 Subgroup Size..............................................................................................................................................46
12.8.2 Sample Frequency.......................................................................................................................................47
12.8.3 Collect ...........................................................................................................................................................47
12.8.4 Limits.............................................................................................................................................................47
12.9 Super Tiger: Diagnostics .................................................................................................................................48
12.9.1 Super Tiger Diagnostics: Probe Tests ......................................................................................................48
12.9.2 Super Tiger Diagnostics: Length Adjust Test ............................................................................................49
12.9.3 Super Tiger Diagnostics: Sorting Chute Test ............................................................................................49
12.9.4 Super Tiger Diagnostics: Keypad Tests.....................................................................................................50
12.9.5 Super Tiger Diagnostics: Audible Beep .....................................................................................................50
12.9.6 Super Tiger Diagnostics: Hour Meter .........................................................................................................50
13
SUPER TIGER SETTINGS.............................................................................................. 50
13.1
Configuration .....................................................................................................................................................50
13.2
Company Name..................................................................................................................................................52
13.3
Default Run Screen ...........................................................................................................................................52
14 PERFORMING A MACHINE CAPABILITY STUDY (MCS) WITH THE SUPER TIGER
FREE LENGTH GAGE............................................................................................................ 53
14.1
Machine Capability Study (MCS) terms .........................................................................................................54
14.2
Using MCS ..........................................................................................................................................................55
15 STATISTICAL PROCESS CONTROL WITH THE SUPER TIGER FREE-LENGTH
SPRING GAGE ....................................................................................................................... 57
15.1
The SPC Concept ..............................................................................................................................................57
15.2
Xbar and R Charts .............................................................................................................................................58
15.3 SPC Monitoring..................................................................................................................................................59
15.3.1 Data ..............................................................................................................................................................59
15.3.2 X-Bar Chart ..................................................................................................................................................60
15.3.3 R Chart .........................................................................................................................................................60
15.3.4 Sample Histogram .......................................................................................................................................60
15.3.5 Total Histogram............................................................................................................................................61
16
TESTER MAINTENANCE ............................................................................................... 62
16.1
Removing the Cover .........................................................................................................................................62
16.2
Changing a Fuse................................................................................................................................................63
17
TIGER SPECIFICATIONS ............................................................................................... 64
17.1
Physical dimensions.........................................................................................................................................64
17.2
Weight..................................................................................................................................................................64
Tiger User Manual
Page 6 of 71
060-1000-0091-00A
17.3
Electrical Specifications...................................................................................................................................64
17.4 Connector Pinouts ............................................................................................................................................65
Probe ...........................................................................................................................................................................65
3-way sort ....................................................................................................................................................................65
5-way sort ....................................................................................................................................................................65
Control .........................................................................................................................................................................65
Read ............................................................................................................................................................................65
Shutdown.....................................................................................................................................................................65
CNC .............................................................................................................................................................................65
18
TIGER SOFTWARE PACKAGES ................................................................................... 66
19
ACCESSORIES FOR THE TIGER FREE-LENGTH GAGE ............................................ 68
TITLE....................................................................................................................................... 70
WARRANTY............................................................................................................................ 70
Tiger User Manual
Page 7 of 71
060-1000-0091-00A
1 INTRODUCTION TO THE TIGER FREE-LENGTH GAGE
The Tiger® Free-Length Spring Gage is the latest generation of Spring Gages manufactured
by Larson Systems Inc. Based on the Lion Precision line of non-contact spring length testers,
the Tiger is smaller than the previous Lion, Lynx and Panther versions, but offers greater
accuracy and speed. It is designed to help spring manufacturers adjust their coilers to produce
springs at the desired length. We’ve also made it easier to use.
Tiger Spring Gages use a temperature-stable probe that is completely interchangeable with all
other Larson spring gages. The advanced design of the probe virtually eliminates drift from setup points. Tiger gages work with older Larson probes.
The Tiger line includes the Tiger Cub, the Tiger and the Super Tiger.
• The Tiger Cub is an electronic upgrade that retrofits into the 300-9 Series Lion spring
gage case and is set for 3-way sorting. It has no printing capabilities.
• The Tiger is the mid-range model, has more features than the Lynx and can do 3-way or
5-way fixed range sorting.
• The Super Tiger has more features than the Panther and can run 2-, 3- or 5-way
adjustable range sorting operations. Both the Tiger and the Super Tiger attach to a
printer through a standard USB cable.
2
UNPACKING AND INSTALLING YOUR TIGER GAGE
2.1 Unpacking and inspection
The Tiger Gage has been shipped to you in protective packaging. Take care when you
remove it from its packaging to prevent damage or loss of contents. A packing slip listing all
the items in the package is included with the shipment. Make sure you have received
everything listed. Make a thorough inspection of the gage as you unpack it to make sure it
has not been damaged during shipment. If there are any damages, notify the carrier
immediately to file a claim for the damaged merchandise. Contact Larson Systems Inc. for
a replacement. Note: Do not attempt to operate a damaged instrument.
2.2 Installing the Tiger Gage on Your Coiler
The Tiger spring gage should be placed in a location where it’s easy to see and adjust and
convenient to an input power outlet. (Power requirements are listed on the back of the unit.)
Typically, operators place the gage on top of the spring machine. Follow this quick-start
guide:
1. Plug the Tiger into an electrical outlet.
2. Plug the probe into the back of the Tiger.
3. Connect the probe to the coiler.
4. Press the power button on the back of the Tiger.
5. Position the probe in front of the coiler.
6. Wind a spring to cutoff.
7. Move the probe toward the coiler until the tip is approximately 0.04” to 0.5” (1 mm-20
mm) from the end of the spring.
8. Go to the Probe Setup Menu on the Tiger.
Tiger User Manual
Page 8 of 71
060-1000-0091-00A
9. Press F2 to zero the probe. Move the probe, using the micrometer, and press F3 or F4 to
set the appropriate sorting points. Press F5 to save your information.
10. Start making springs!
NOTE: The shutdown signal is active for a few milliseconds when the gage is first turned
on. The coiler may shut down when the Tiger is activated. To avoid shutdown, turn the
Tiger on prior to coiler setup.
2.3 Using the Tiger Gage with a CNC Controller
The Tiger Gage can be used with a CNC coiler. The CNC controller signals trigger the gage to
read and implement the adjustment output from the gage to adjust spring length. A CNC
connector is located on the upper left corner of the gage’s rear panel. With a standard
mechanical coiler, the Tiger gage turns a motor to adjust the pitch. Using the CNC these
values must be rescaled as pitch table multipliers or offsets by the CNC software. CNC
connector pinouts are listed in Section 17.4. The sorter may be controlled by the CNC using
signals from the Tiger or by the Tiger sorter cable directly.
3
INSTALLING THE READ SWITCH
The Read Switch triggers the gage to
measure the spring length, sort the
spring, and adjust the pitch rod if
necessary. The system consists of two
basic parts—the read switch, and the
magnet that triggers it. System accuracy
can be affected by improper positioning of
the read switch. Please confirm the
proper position before operating.
Install as follows:
1. Install magnet assembly on the coiler’s
camshaft. It can also be installed on any
rotating part that turns once per cycle.
2. Mount the read switch so the magnet
passes within 0.1 inch of the switch each
revolution.
3. Position the magnet on the shaft so it triggers the read switch after the wire stops feeding
and before the cutoff tool touches the spring. The read switch should be triggered as soon as
possible after the wire feed stops. This allows maximum time for the reading to be taken before
the cutoff tool touches the spring.
4. Connect the read switch cable to the appropriate connector on the back of the Tiger.
4
INSTALLING A SHUTDOWN CABLE
To use the shutdown feature a contactor device must be installed on the coiler. Installing a
shutdown cable between the coiler and the Tiger is the same as installing a shutdown cable
between the coiler and a Panther. Shutdown Cable installation should only be done by a
Tiger User Manual
Page 9 of 71
060-1000-0091-00A
qualified electrician. Improper installation can result in injury and or damage to the
coiler and gage!
The relay inside the Tiger is not capable of handling the coiler power lines directly! The
gage provides one set of normally closed contacts and one set of normally open contacts. The
normally closed contacts can be wired in series with the contactor de-activation circuit. When a
shutdown condition occurs the contacts will open, causing the contactor to remove power from
the coiler. The normally open contacts can be used to activate an alarm or beacon if desired.
The current rating for each set of contacts is 5A @ 125/250 VAC.
Once the coiler has been wired for a shutdown cable, a normally closed set of contacts is
required to run the coiler. The Larson Shutdown Cable Bypass (P/N A014-6180) can be used
to run the coiler without a gage.
The shutdown cable contains four wires and has a connector that mates to the SHUTDOWN
connector on the rear of the gage. The wiring diagram and schematic are shown below.
The letters indicate the pins of the connector.
Tiger User Manual
Page 10 of 71
060-1000-0091-00A
The illustration below includes a schematic of a typical contactor box with shutdown installed.
Typical Installation Procedure:
1. Cut the wire in line with the stop switch.
2. Connect the one of the cut ends of the wire to the Red shutdown wire
3. Connect the other cut end to the White Shutdown Wire
!WARNING!
Confirm coiler and contactor manufacturers’ instructions before proceeding.
Tiger User Manual
Page 11 of 71
060-1000-0091-00A
5
PROBE SELECTION
Spring Coil Diameter
Regular Tip Size
Extended Tip Size
0.125 in. (3.1 mm) and smaller
0.250 in. (603 mm) – 0.125 in. (3.1 mm)
0.375 in. (10.5 mm) – 0.250 in. (6.3 mm)
0.625 in. (16.8 mm) – 0.375 in (10.5 mm)
1 in. (25.4 mm) – 0.625 in. (16.8 mm)
1.5 in. (38.1 mm) – 1 in. (25.4 mm)
2 in. (50.8 mm) – 1.5 in. (38.1 mm)
Use probe without tip
in. (6 mm)
5/8 inc. (16 mm)
5/8 in. (16 mm)
1 in. (25 mm)
1 in. (38 mm)
2 in. (51 mm)
1/8 in. (3 mm)
in. (6 mm)
3/8 in. (10 mm)
5/8 in. (16 mm)
1 in. (25 mm)
None
None
The diameter of the probe tip should be equal to or slightly greater than the diameter of the
spring to be monitored. If the probe tip is too large, problems may arise with short springs.
A probe tip that is too small may have to be positioned off-center to be effective. Short
springs may require the use of a guarded probe tip.
Probe tips are available from LSI in diameters up to 2 inches.
6
RECOMMENDED PROBE STANDOFF DISTANCES
The best gap between the probe tip and the spring will vary for different size springs and
different tolerances. This gap should be small enough to provide adequate sensitivity, but it
should be large enough so that larger, over-size springs do not hit or hang up on the probe
tip. Achieving the proper spring-to-tip gap enables you to have enough meter deflection to
operate the trip relays yet keep springs away from the probe.
Recommended Standoff Distances
Spring Diameter
0.062-1.25” (1.6-3.2 mm)
0.125-.250” (3.2-6.4 mm)
0.250-.375” (6.4-9.5 mm)
0.375-.500” (9.5-12.7 mm)
0.500-.625” (12.7-15.9 mm)
0.625-.750” (15.9-19.1 mm)
0.625-1.00” (15.9-24.4 mm)
Tiger User Manual
Tip Size
Initial Standoff
1/8” (3.17 mm)
”(6.35 mm)
3/8” (9.52 mm)
” (12.7 mm)
5/8” (15.9 mm)
” (19.1 mm)
1” (25.4 mm)
.065” (1.65 mm)
.125” (3.17 mm)
.200” (5.08 mm)
.275” (6.98 mm)
.350” (8.89 mm)
.450” (11.4 mm)
.650” (16.5 mm)
Page 12 of 71
Use the chart at left as a
guide when you set up your
probe. These are only
recommendations—your
standoff distances may
differ greatly.
060-1000-0091-00A
7
THE TIGER: BASIC OVERVIEW
The Tiger Gage is a digital control unit that measures the length of springs as they are made
and provides output to pitch adjusters and sorters according to predetermined tolerances. The
gage measures springs when they have completed the winding cycle, but before they are cut.
Springs are sorted into Long, Good and Short lengths with accessory chutes or air solenoids.
The Super Tiger also provides on-screen Statistical Process Control (SPC) analysis of free
length measurements. It operates via a simple menu that even a first-time user can learn
quickly and easily. It features:
• 2-way, 3-way and 5-way spring sorting
• Pitch adjustment feedback to the coiler for length correction
• Coiler shutdown under certain conditions
• Supplies power and feedback control signals to probe, sorters, and coiler
• On-screen SPC charts
• Monitor up to 70,000 springs per hour
• Compatibility with older accessories, including sorting chutes and pitch controllers
Tiger Upgrade with a future
Tiger User Manual
Tiger & Super Tiger
Page 13 of 71
060-1000-0091-00A
8
CONTROL PANEL
The Tiger control panel includes six function keys, LED indicators for Long, Good and Short
springs, two buttons for adjusting spring length, a button to measure individual springs and a
stop button. An LED shows when Power is on, and another lights up when you reset the gage.
The center of the control panel features an LCD screen that you will use to set up the gage,
diagnose problems and monitor job progress.
With Super Tiger software, the screen also displays Xbar and R charts and histograms for
statistical process control (SPC). You can also perform a machine capability study (MCS) with
the Super Tiger.
The temperature-stabilized probe plugs into the back of the tester.
8.1 Sort Indicator
The sort indicator is located in the upper right corner of the control panel. When the coiler
produces a spring that is longer than specified, the LED next to the illustration of a long
spring lights. Good and Short springs are indicated by the LED lights next to the Good and
Short illustrations.
8.2 Adjust Buttons
Use these buttons to adjust spring length at the coiler. To shorten a spring, press Adjust
Shorter. To lengthen a spring, press Adjust Longer.
Tiger User Manual
Page 14 of 71
060-1000-0091-00A
8.3 Measure
Push this button to measure springs as they come off the coiler.
8.4 Stop
Press the Stop button to shut down the coiler. The Tiger screen will show
!!
SHUTDOWN
!!
MANUAL STOP
F6 Off
8.5 Arrow Keys
There are four arrow keys at the bottom center of the control panel—up, down, left and
right. Depending on the sub-menu you are in, you will use these keys to enter numbers or
letters into the Tiger.
8.6 Power Indicator
When this LED is lit, the power is on.
Tiger User Manual
Page 15 of 71
060-1000-0091-00A
9
BACK PANEL CONNECTIONS
9.1 Power Switch
The electrical power switch for the Tiger is located on the back panel, just above the power
supply receptacle. The switch is a toggle switch. Push the side marked “__” to supply
power to the Tiger. Push the side marked “O” to turn off the power. A circuit breaker is
located above the push button.
9.2 Probe
The Tiger can be used with any Larson spring gage probe. It is designed to take advantage
of the PX595G Temperature Stable Probe (P/N 025-0000-0658-02 (English) or 025-00000658-02 (Metric). Plug the probe into this connector.
9.3 Read Switch
Any standard Larson magnetic read switch for non-CNC coilers can be connected here.
See Installing the Read Switch (Section 3) for details.
Tiger User Manual
Page 16 of 71
060-1000-0091-00A
9.4 CNC Connection
This connection is for use with CNC coilers. It is a high-density 9-pin D-sub connector. The
connector carries all the signals used on the various mechanical coiler control cables. With
CNC coilers a read signal must be sent to the Tiger to tell the gage when to read the spring
length. The Tiger sends signals to the coiler that the CNC software interprets and uses to
pitch adjust the spring length. The shutdown and sorter signals are there if the CNC coiler
manufacturer chooses to use them, but generally these functions are controlled with the
separate cables directly from the Tiger to the sorter or to shut down the coiler. See Section
17.4, for pinout details. (Connector is an option with Tiger 300 upgrade.)
9.5
Sorter Controls
The Tiger has connections for 3-Way and 5-Way sorters. These connect to any sorting
chute or air solenoid. The outputs are 115 VAC, 24 VAC, or 24 VDC. (5-way sort
connector is an option of the Tiger 300 upgrade.)
9.6 Pitch Adjuster
The Tiger has a separate connection for the Pitch Adjuster.
9.7 Shutdown Cable
This connector is for a Larson automatic shutdown cable (P/N 025-1000-0426). It provides
a set of normally closed relay contacts and a set of normally open relay contacts that switch
when a shutdown occurs. See Installing a Shutdown Cable, Section 4, for specific details.
9.8 USB Connection
The Tiger has a USB connection in case you would like to connect your tester to a
computer or printer. (The USB connector is an option if you bought a Tiger 300 upgrade.)
Version 1.0 software does not include a computer interface to the USB print connection.
10 ACTIVATION CODE
Each Tiger gage is shipped requiring an
activation code. LSI will provide an activation
code to you when full payment for the gage
has been received.
ACTIVATION
F1 ACTIVATE GAGE
1000.00 HOURS LEFT
SN 0000000000000000
F6 CONTINUE
This is the first screen you will see. To begin
using the gage immediately, press F6 Continue to get to the Main Menu. The Activation
screen allows you 1,000 hours of use. Without an activation code, the gage will cease to
function after 1,000 hours of use.
To enter your activation code, press F5 from the Main Menu to go to the Settings menu.
Press F2 to go to the Configuration menu. Press F3 to enter the code. Use or to scroll
through the character list. Use the left or right arrow to move the cursor from side to side.
Tiger User Manual
Page 17 of 71
060-1000-0091-00A
NOTE: F2 Enter Password is for factory
use only.
SETTINGS
F1 MAIN MENU
F2 CONFIGURATION
F3 COMPANY NAME
F4 DEFAULT RUN SCREEN
CONFIGURATION
F1 BACK
F2 ENTER PASSWORD
F3 ACTIVATION CODE
V1.07 SN 11111111111111
11 MAIN MENU/FUNCTION
KEYS
MAIN MENU
F2 MONITOR
F3 SETUP
F4 DIAGNOSTICS
F5 SETTINGS
When you plug any Tiger Gage into an
electrical outlet and press the Power button,
you will see the Main Menu. This is where you
will select the operating outputs you want to
watch. Various functions are available to you, depending on the software package you have
purchased. The Super Tiger offers the most functions.
Because there are subtle differences between the Tiger Cub, Tiger and Super Tiger software
programs and the way they affect tester function, we have split this section into three
subsections, according to tester model.
11.1 Cub: Main Menu
When you access the main menu of the Cub,
you are given three functions: Monitor, Setup
and Diagnostics. Press F2 to access the
Monitor menu.
Tiger User Manual
MAIN MENU
F2 MONITOR
F3 SETUP
F4 DIAGNOSTICS
F5 SETTINGS
Page 18 of 71
060-1000-0091-00A
MONITOR
11.1.1 Cub: Monitor Menu
This screen acts like the needle in a scale. If
the springs are too short, the “needle”
displays on the Short side of the scale. If the
springs are too long, the needle displays on
the Long side of the scale. If the springs are
within tolerance, the needle will appear
between the two extremes. Press F1 to
return to the Main menu.
11.1.2 Cub: Setup Menu
Use this menu to set up your production
runs, your probe, length adjustment, and
sorting operations. You can also shut down
the coiler through the Setup menu. From
the Main menu, press F3 to reach the
Setup menu. You will see the following
choices: Probe Setup, Sorting Setup,
Length Adjust Setup, and Coiler Shutdown.
11.1.2.1 Cub Setup Menu: Probe
Setup
This screen is used to set up the probe.
The Tiger uses an internal digital bar to
imitate the meter on an analog screen.
Access this screen by pressing F2 on the
Setup screen. See Section 5, for Probe
Selection, and Probe Setup—STD,
Section 12.3, for standard setup
procedures and recommendations.
F1 BACK
SHORT
LONG
SETUP
F1 MAIN MENU
F2 PROBE SETUP
F3 SORTING SETUP
F4 LENGTH ADJST SETUP
F5 COILER SHUTDOWN
PROBE SETUP
F1 BACK
F2 ZERO
SHORT
LONG
To zero the probe, press F2. An audible beep will sound, then the Set Sort option will
become available on-screen.
To set Long and Short sort points, rotate the gage on the probe to the left or right until
you reach the desired specification. Press F3 to set the sort.
WARNING: Entering the Probe Setup screen will disable the Read Switch and cause
current gaging activities to cease.
Tiger User Manual
Page 19 of 71
060-1000-0091-00A
11.1.2.2 Cub Setup Menu: Sorting Setup
From the Setup menu, press F3 to get
SORTING SETUP
to the Sorting Setup menu. The Tiger
F1 BACK
Cub offers only 3 Way sorting.
However, you can change the sorting
interval (the length of time the sorting
F4 TIME: 0.20 s
chute is held open). Press F4 Time.
The cursor will blink. To increase a
number, press . To decrease a
number, press . To move the cursor one digit to the right, press the right arrow. To
move the cursor to the left, press the left arrow. To Accept the Sort Time, press F1.
Press F1 again to return to the Setup menu.
11.1.3 Cub Setup Menu: Length
Adjust Setup
LENGTH ADJUST SETUP
F1 BACK
TYPE: EACH
F3 AMOUNT: 10
F4 TRIP: 50
This screen displays the length
adjustment type, the amount of time
the motor will turn when activated
and the tripping points at which the
adjuster is activated. The Tiger Cub
is set to the EACH mode, which makes an adjustment each time a spring is produced
that exceeds the TRIP POINT.
11.1.3.1 Amount
Press F3 to go to the Amount screen. Use the arrow keys to change the amount of time the
motor turns. To move the cursor to the left or right, press the left or right arrow. To increase a
number, press the arrow. To decrease a number, press the arrow. To accept the adjustment
amount and return to the Length Adjust Setup screen, press F1.
Press F4 to change the trip points to a
percentage of the sort points that were
set during probe setup. Possible
percentages range from 5 to 95
percent, in 5 percent increments.
LENGTH ADJUST SETUP
F1 ACCEPT AMOUNT
10
11.1.4 Cub Setup Menu: Coiler
Shutdown
The Tiger Cub will trigger an automatic
shutdown of the coiler when nine (9)
consecutive bad springs have been
produced. To set this feature, press F5
in the Setup menu. Toggle F2 to turn
this feature on or off.
Tiger User Manual
COILER SHUTDOWN
F1 BACK
F2 9 CONSEC. BAD
Page 20 of 71
(ON/OFF)
060-1000-0091-00A
11.2 Cub: Diagnostics Menu
You can perform routine tests on the
coiler/probe interface with the Tiger
Cub. Access the Diagnostics menu
by pressing F4 in the Main menu.
DIAGNOSTICS
F1 MAIN MENU
F2 PROBE TESTS
F3 LENGTH ADJUST TEST
F4 SORTING CHUTE TEST
F5 KEYPAD TESTS
F6 MORE 11.3 Cub Diagnostics: Probe
Tests
PROBE TESTS
F1 BACK
F2 PROBE SETUP
F3 FUNCTIONAL TEST
F4 DRIFT TEST
VOLTAGE:
-0.0000
Press F2 in the Diagnostics menu to
access the Probe Tests screen. From this
screen, you will be able to perform various
diagnostic tests, including probe setup,
function and drift.
Press F2 to go to the Probe Setup
Screen.
11.3.1.1 Cub Diagnostics: Probe Setup
This is the same setup procedure outlined in Section 12.3. To zero the probe, press F2.
An audible beep will sound, then the Set Sort and Set Control options will become
available on-screen. To set Long and Short Lengths, rotate the gage on the probe to the
left or right until you reach the desired specification. Press F3 to Set the sort. Press F1
to return to the Probe Tests menu.
11.3.1.2 Cub Diagnostics:
Probe Functional Test
As the name implies, this test is a
check of the functionality of the
probe. Press F3 in the Probe Tests
menu to access this screen. Press
F2 to begin testing the probe. You
will get immediate feedback on the
status of the probe, as shown on the
following page.
There are three possible outcomes:
• Probe function passes
• The probe and/or its tip is not
working
• Tiger electronics may need
repair.
Tiger User Manual
PROBE SETUP
F1 BACK
F2 ZERO
SHORT
LONG
PROBE FUNCTIONAL TEST
F1 BACK
F2 BEGIN
Page 21 of 71
060-1000-0091-00A
If a failure is found, you will be prompted to disconnect the probe from the gage. Contact LSI
regarding repairs.
If the probe status passes, press F1 to return
to the Probe Test screen.
PROBE FUNCTIONAL TEST
F1 BACK
ZERO: PASS
PROBE GAIN = 1.000
STATUS: PASS
11.3.1.2.1 Cub Diagnostics: Probe Gain
Gain values represent the difference in probe
readings between two different, yet known,
zeroed points, i.e., the probe is zeroed, and a
reading is taken. The difference between the two zeroed points is the gain.
11.3.1.3 Cub Diagnostics: Probe Drift Test
Perform this test if you are concerned about temperature drift. The drift test provides longterm monitoring of the probe output and length measurement. Always allow the probe to
warm up for ten minutes before starting this test.
The screen shows the maximum and minimum
voltage used by the probe. “CUR” is a real-time
reading of the voltage passing through the
proble and the reading will fluctuate. The Tiger
automatically runs a continuous test on the
probe. Test the probe as long as you want;
press F2 to restart. Press F1 to return to the
Probe Test screen
PROBE DRIFT TEST
F1 BACK
F2 RESTART
VOLTAGE
MAX 0.0117
CUR 0.0058
MIN
0.0000
00:03:44
11.3.2 Cub Diagnostics: Length Adjust Test
From the Diagnostics menu, press F3 to
access the length adjust test. Press F2 to
make the spring pitch shorter, F3 to make it
longer. The Adjust Count number will change
accordingly. When you press F1 to go back
to the Diagnostics menu, the pitch adjust will
return to its initial position.
Tiger User Manual
Page 22 of 71
LENGTH ADJUST TEST
F1 BACK
F2 ADJUST SHORTER
F3 ADJUST LONGER
COUNT: 0
060-1000-0091-00A
11.3.3 Cub Diagnostics: Sorting Chute Test
Use this test to make sure your sorting
chutes are operating correctly. The Cub does
only 3 way sorting; only F2 and F6 send
signals to the sorting chutes. Press F2 to test
the Short chute; the Bad Short light lights up.
Press F4, the Good LED lights. Press F6, the
Long LED lights. To return to the Diagnostics
screen, press F1.
SORTING CHUTE TEST
F1 BACK
F2 BAD SHORT
F3 5-WAY SHORT
F4 GOOD
F5 5-WAY LONG
F6 BAD LONG
11.3.4 Cub Diagnostics: Keypad Tests
Ensure that your keypad is functioning
properly. Select F5 from the Diagnostics menu.
Press any key on the keypad. The on-screen
display should correspond to the key you
pushed. If you pressed F2, for example, you
should see F2 on the screen. Press F6 move
down to return to the Diagnostics screen.
KEYPAD TESTS
F1 BACK
Press A Key
Press F1 to return to the Diagnostics screen. F6 gives another screen with “more”
diagnostic options. You will see two additional Diagnostics tests: Audible Beep and
Hour Meter.
11.3.5 Cub Diagnostics: Audible Beep
To make sure this alarm is functional, Press F5 in the More Diagnostics menu. You
should hear an audible beep. Press F1 to return to the Main menu.
11.3.6 Cub Diagnostics: Hour Meter
Press F6 to display the Tiger gage’s hour
meter. This display tells you how many hours
the Tiger has been in operation.
HOUR METER
F1 BACK
75.22 HOURS
Tiger User Manual
Page 23 of 71
060-1000-0091-00A
11.4 Tiger: Main Menu
When you access the Main menu of the Tiger,
you are given three functions: Monitor, Setup
and Diagnostics. Press F2 to access the
Monitor menu.
MAIN MENU
F2 MONITOR
F3 SETUP
F4 DIAGNOSTICS
F5 SETTINGS
11.4.1 Tiger: Monitor Menu
When you press F2, you can get one of
MONITOR
three instant reports, displayed in a digital
F1 MAIN MENU
bar char on the lower portion of the screen:
F2 LAST
• The length of the last spring
F3 RESET
manufactured
GOOD
0
• The mean of the last 5 springs
SHORT
produced
• The length of the last 5 springs
made
You will also see the number of Good springs
made. Press F3 to reset the counter. Press F1 return to the Main menu.
LONG
11.4.2 Tiger: Setup Menu
Use this menu to set up your production
runs. This is where you set up your
probe, length adjustment, sorting
operations and activate the coiler
shutdown option. From the Main menu,
press F3 to reach the Setup menu. You
will see the following choices: Probe
Setup, Sorting Setup, Length Adjust
Setup, and Coiler Shutdown.
Tiger User Manual
SETUP
F1 MAIN MENU
F2 PROBE SETUP
F3 SORTING SETUP
F4 LENGTH ADJST SETUP
F5 COILER SHUTDOWN
Page 24 of 71
060-1000-0091-00A
11.4.2.1 Tiger Setup Menu: Probe Setup
This screen is used to set up the probe. The Tiger uses an internal digital bar to imitate
the meter on an analog screen. Access this screen by pressing F2 on the Setup screen.
See Section 5, for Probe Selection, and Section 12.3, Probe Setup—STD for standard
setup procedures and recommendations.
To zero the probe, press F2. An audible beep will sound, and the Set Sort option will
become available on-screen.
To set Long and Short Lengths, rotate the gage on the probe to the left or right until you
reach the desired specification. Press F3 once to set the sort for short springs and once
for long springs.
WARNING: Entering the Probe Setup
screen will disable the Read Switch
and cause current gaging activities to
cease.
PROBE SETUP
F1 BACK
F2 ZERO
SHORT
LONG
11.4.2.1 Tiger Setup Menu: Sorting Setup
3-way sorting is the traditional method of sorting where the shorts and longs as determined
in your Job Setup values are shunted to opposite sides of the sorter and the good springs
fall straight through the center.
5-way sorting separates the reject longs
and reject shorts the same way, but
divides the good springs into three equal
divisions: long good, good, and short good.
The 5-way points are set at 33% of the
tolerance set in Job Setup.
SORTING SETUP
F1 BACK
F4 TIME: 0.20 s
From the Setup menu, press F3 to get to
the Sorting Setup menu. The Tiger offers
3- or 5-way sorting according to the connector used on the back panel. You can change the
sorting interval to increase or decrease the amount of time the sorting gage stays open.
Press F4 Time. The cursor will blink. To increase a number, press . To decrease a
number, press . To move the cursor one digit to the right, press the right arrow. To move
the cursor to the left, press the left arrow. To accept the Sort Time, press F1. Press F1 again
to return to the Setup menu.
Tiger User Manual
Page 25 of 71
060-1000-0091-00A
11.4.2.2 Tiger Setup Menu: Length Adjust Setup
This screen displays the current length adjustment type, the amount of time the motor will
turn when activated, and the tripping point at which the adjuster is activated. Access this
screen by pressing F4 in the Setup menu.
Press F2 to change the adjustment type.
You can choose from EACH, NONE, or
AVERAGE. The Tiger Cub is set to the
EACH mode, which makes an
adjustment each time a spring is
produced that exceeds the TRIP POINT.
Press F4 to change the trip points to a
percentage of the sort points that were
set during probe setup. Possible
percentages range from 5 to 95 percent,
in 5 percent increments.
LENGTH ADJUST SETUP
F1 BACK
F2 TYPE: EACH
F3 AMOUNT: 10
F4 TRIP: 50%
:
:
11.4.2.2.1 Type
11.4.2.2.2 None
11.4.2.2.3 Average
This mode uses a length-predicting system to anticipate the length of the spring being produced.
The amount of adjustment is based on this calculation and the adjust amount setting. This setting
turns Length Adjust off. If there is a problem in the setup that should be corrected, adjusting
length can cover it up. For maximum yield, setup and wire should be as good as possible without
adjusting length. Length adjustment is designed to compensate for natural variances in the
process, not bad setup or bad wire.
11.4.2.2.4 Each
The EACH mode makes an adjustment each time a spring is produced that exceeds the TRIP
POINT. When you reach the EACH screen, you can also adjust the amount of time the motor
turns and the tripping point at which the motor will start.
11.4.2.2.5 Amount
Enter a value from 0-99 to change the length of time the pitch adjust motor runs. Press F3 to go
to the Accept Amount screen. To move the cursor to the left or right, press the left or right arrow.
To increase a number, press the arrow. To decrease a number, press the arrow. To accept
the adjustment amount and return to the Length Adjust Setup screen, press F1 twice.
11.4.2.2.6
Trip
Press F4 to change the trip points to a percentage of the sort points that were set during probe
setup. Possible percentages range from 5 to 95 percent, in 5 percent increments.
Tiger User Manual
Page 26 of 71
060-1000-0091-00A
11.4.2.3 Tiger Setup Menu: Coiler
Shutdown
The Tiger has the ability to shut down the
coiler under certain conditions. To use the
shutdown function, the coiler must be
connected to the gage with an automatic
shutdown cable (P/N 025-1000-0426-00).
See Installing a Shutdown Cable,
Section 4, for installation instructions.
COILER SHUTDOWN
F1 BACK
F2 CONSECUTIVE BAD
F3 NO CUTOFF
When shutdown occurs, an audible alarm sounds and the Shutdown screen is displayed.
The screen will flash, SHUTDOWN SHUTDOWN and display the reason for the shutdown.
Silence the alarm by pressing F6, or cut power to the Tiger by turning off the switch on the
back of the tester. The alarm will shut off by itself in five minutes. Because many coilers will
continue to produce springs while the motor coasts to a stop, the short side sorter will
activate for 20 seconds when a shutdown occurs.
With the Tiger, there are two shutdown conditions: CONSECUTIVE BAD, and NO CUTOFF.
11.4.2.3.1 Consecutive Bad
When the number of bad springs reaches its limit, the Tiger shuts down the coiler. The number at
the bottom of the screen indicates the number of bad springs. A value of 0 disables the
Consecutive Bad check.
If you want to change the number, press F2 to bring up the Accept Consecutive Screen. You
will see a blinking cursor at the bottom of the screen. Use the arrow keys to move the
cursor. The left and right arrow keys move the cursor to the left and right. To increase a
number, press the arrow. To decrease a number, press the arrow. To accept the
number and return to the Coiler Shutdown screen, press F1.
11.4.2.3.2 No Cutoff
No Cutoff, when on, stops the coiler the instant a non-cutoff spring touches the probe tip. A
spring that contacts the tip after the cutoff will not cause a shutdown. To enable or disable No
Cutoff, press F3 on the Coiler Shutdown menu. To return to the Setup menu, press F1.
WARNING!
When you exit the shutdown screen, the shutdown relay will immediately re-close. If the
shutdown cable is not wired correctly through a contractor box, the coiler could start
unexpectedly.
Tiger User Manual
Page 27 of 71
060-1000-0091-00A
11.4.3 Tiger: Diagnostics
You can perform routine tests on the
coiler/probe interface with the Tiger
and make adjustments to improve
productivity. Access the Diagnostics
menu by pressing F4 in the Main
menu.
11.4.3.1 Tiger Diagnostics:
Probe Tests
Press F2 in the Diagnostics menu to
access the Probe Tests screen.
From this screen, you will be able to
perform various diagnostic tests,
including probe setup, function and
drift.
DIAGNOSTICS
F1 MAIN MENU
F2 PROBE TESTS
F3 LENGTH ADJUST TEST
F4 SORTING CHUTE TEST
F5 KEYPAD TESTS
F6 MORE PROBE TESTS
F1 BACK
F2 PROBE SETUP
F3 FUNCTIONAL TEST
F4 DRIFT TEST
VOLTAGE :
-0.0000
Press F2 to go to the Probe Setup
Screen.
11.4.3.1.1 Tiger Diagnostics: Probe Setup
This is the same setup procedure
outlined in Section 12.3. To zero
the probe, press F2. An audible
beep will sound, then the Set Sort
option will become available onscreen.
To set Long and Short Lengths,
rotate the gage on the probe to the
left or right until you reach the
desired specification. Press F3 to
set the sort. Press F1 to return to
the Probe Tests menu.
PROBE SETUP
F1 BACK
F2 ZERO
SHORT
LONG
11.4.3.1.2 Tiger Diagnostics: Probe Functional Test
As the name implies, this test is a check of the functionality of the probe. Press F3 in the Probe
Tests menu to access this screen. Press F2 to begin testing the probe. You will get immediate
feedback on the status of the probe, as shown on the next page.
There are three possible outcomes:
• Probe function passes
• The probe and/or its tip is
not working
• Tiger electronics may need
repair.
PROBE FUNCTIONAL TEST
F1 BACK
ZERO: PASS
PROBE GAIN = 1.000
STATUS: PASS
If a failure is found, you will be
prompted to disconnect the probe
from the gage. Contact LSI regarding repairs.
Tiger User Manual
Page 28 of 71
060-1000-0091-00A
If the probe status passes, press F1 to return to the Probe Test screen.
11.4.3.1.3 Probe Gain
Gain values represent the difference in probe readings between two different, yet known,
zeroed points, i.e., the probe is zeroed, and a reading is taken. The difference between the
two zeroed points is the gain.
11.4.3.2 Tiger Diagnostics: Probe Drift Test
Perform this test if you are concerned about
temperature drift. The drift test provides
long-term monitoring of the probe output and
length measurement. Always allow the probe
to warm up for ten minutes before starting
this test.
The screen shows the maximum and
minimum voltage output by the probe. “CUR”
is a real-time reading of the voltage passing
through the probe and will fluctuate.
PROBE DRIFT TEST
F1 BACK
F2 RESTART
VOLTAGE
MAX 0.0117
CUR 0.0058
MIN
0.0000
00:03:44
The Tiger will automatically run a continuous
test on the probe. You can test the probe for
as long as you want; press F2 to restart. Press F1 to return to the Probe Test screen. Press F1 to
return to the Main menu.
11.4.3.3 Tiger Diagnostics: Length
Adjust Test
From the Diagnostics menu, press F3 to access
the length adjust test. Press F2 to make the
spring pitch shorter, F3 to make it longer. The
Adjust Count number will change accordingly.
When you press F1 to go back to the
Diagnostics menu, the pitch adjust will return to
its starting number.
LENGTH ADJUST TEST
F1 BACK
F2 ADJUST SHORTER
F3 ADJUST LONGER
COUNT: 0
11.4.3.4 Tiger Diagnostics: Sorting Chute Test
Use this test to make sure your sorting chutes are
operating correctly. The Tiger is capable of 5 way
sorting.
Press F2 to test the Bad Short chute; the Short
light lights up. Press F3 to test the 5 Way sort on
Short springs. Press F4 to test the Good chute;
the Good LED lights. Press F5 to test the 5 Way
sort on Long springs. Press F6 to test the chute
for Bad Long springs; the Long LED lights. To
return to the Diagnostics screen, press F1.
Tiger User Manual
Page 29 of 71
SORTING CHUTE TEST
F1 BACK
F2 BAD SHORT
F3 5-WAY SHORT
F4 GOOD
F5 5-WAY LONG
F6 BAD LONG
060-1000-0091-00A
11.4.3.5 Tiger Diagnostics: Keypad Tests
Ensure that your keypad is functioning properly.
Select F5 from the Diagnostics menu. Press any
key on the keypad and see if the on-screen
display corresponds to the key you pushed. If you
pressed F2, for example, you should see F2 on
the screen. When finished, press F1 to return to
the Diagnostics screen. F6 gives another screen
with “more” diagnostic options.
KEYPAD TESTS
F1 BACK
Press A Key
11.4.3.6 Tiger Diagnostics: Audible Beep
To make sure this alarm is functional, Press F6 in the Diagnostics menu. You should hear
an audible beep. Press F1 to return to the Main menu.
11.4.3.7 Tiger Diagnostics: Hour Meter
Press F6 to display the Tiger gage’s hour
meter. This display tells you how many hours
the Tiger has been in operation.
HOUR METER
F1 BACK
11.5 Tiger Settings
75.22 HOURS
11.5.1 Configuration
This screen grants access for entering
passwords and activation codes.
F2 is for Factory use only; users cannot enter
a password here.
F3 is used to gain access for you to enter an
Activation code. The Tiger is shipped requiring
an activation code. LSI will provide an activation
code to you when full payment for the gage has
been received.
CONFIGURATION
F1 BACK
F2 ENTER PASSWORD
F3 ACTIVATION CODE
V1.07 SN 11111111111
Press F1 to return to the Settings Screen.
11.5.2 Activation code
See Section 10
11.5.3 Company Name
Future versions of the Tiger may include this feature.
Tiger User Manual
Page 30 of 71
060-1000-0091-00A
MAIN MENU
SUPER TIGER
12 SUPER TIGER: MAIN
MENU
Press F2 to access the Monitor menu. As you
can see, the Super Tiger is designed to
provide you with several types of production
information to help you fine-tune your springmaking operation. Press F2 to access the
Monitor Menu.
F2 MONITOR
F3 SETUP
F4 DIAGNOSTICS
F5 SETTINGS
12.1.1 Super Tiger: Monitor Menu
This menu gives you access to Job Summary (F2), Strip Charts (F3), the Production
Monitor (F4), Statistical Process Control (SPC, F5) and Machine Capabilities Study (F6)
menus.
MONITOR
F1 MAIN MENU
F2 JOB SUMMARY
F3 STRIP CHARTS
F4 PRODUCTION MONITOR
F5 SPC
F6 MCS
12.1.1.1 Super Tiger: Job Summary
To access a summary of the job press
F2. The Job Summary screen shows
• Spring length specifications
• The length of the last spring
produced
• The mean of the last 50 springs
produced
• The CpK of the last 50 springs
produced
After you have viewed this screen, press
F1 to return to the Monitor menu.
JOB SUMMARY
F1 BACK
F2 JOB SUMMARY
0.5 in +LAST:
MEAN:
CPK:
0.01
0.50
0.50
0.00
12.1.1.2 Super Tiger: Strip Charts
Strip charts give you an easy, graphic way to track trends during the spring manufacturing
process.
The Super Tiger has five different strip chart screens. When you press F3 in the Monitor
menu, you will immediately go to one of four (4) Strip Charts. Press F2 or F3 to scroll
forward or backward through the list. The gage will “remember” the chart that was last used
Tiger User Manual
Page 31 of 71
060-1000-0091-00A
and return to it when you press F3 from the Monitor menu.
1. Strip chart shows last 50 reads only.
2. Strip chart displays last 40 reads with Good and Bad counts displayed at the right.
3. Strip chart displays last 40 reads, with a histogram on the right side.
4. Strip chart displays last 40 reads with Length Adjust displayed on the right.
5. Strip chart displays last 40 reads with the tolerance specification number displayed
on the right side.
Each of these five strip charts has a job status display line at the top of the screen. This line
shows one of four job status possibilities. Press F4 or F5 to scroll through the list.
1. Rt = Production Rate- pph
2. X = last read value
3. x = mean of the last 50 springs
4. CpK = process capability index of the last 50 springs
12.1.1.2.1 Specifications
Displays the nominal and tolerance
numbers that were entered in Job
Setup.
12.1.1.2.2 Histogram
The bar chart shows the history of the
last 40 reads. For more information on
the use of histograms, see Section 15,
Statistical Process Control.
STRIP CHARTS
F1 BACK
CPK =
………………………………
______________________
………………………………
____________________
0.0000
0.0000
0.0000
0.0000
Specifications
12.1.1.2.3 Good/Bad
To quickly track the number of Good
and Bad springs produced, press F2 or
F3 to access the Good/Bad screen.
NOTE: You can continue to see these
statistics when you Press F4 or F5 to
view job status numbers.
STRIP CHARTS
x = 0.0000
F1 BACK
____________________
Histogram
F1 BACK
STRIP CHARTS
x = 0.0000
____________________ GOOD
0000
____________________ BAD
0000
Good/Bad
Tiger User Manual
Page 32 of 71
060-1000-0091-00A
12.1.1.2.4 Length Adjust
To view the Length Adjust screen,
press F2 or F3. Here you can see the
type of Adjustment Mode (Each, None,
Average or Centering) that has been
set, the Trip point and the Amount of
time the pitch adjust motor runs. (See
Section 12.5, Length Adjust Setup for
more information on these settings).
Length Adjust can be changed on this
screen. Press or to select the
item to be changed. Press the right or
Left arrows to change the value. The
changes will take effect immediately.
STRIP CHARTS
F1 BACK
TYPE
…………………………
EACH
TRIP
__________________
0.000
…………………………
AMOUNT
__________________
0000
Length Adjust
To change the Trip point when the adjustment Type is set to Each, push to go to the numerical
Trip setting. To increase the amount, press the right arrow. To decrease the amount, press the
left arrow. To accept the amount, press or .
Press or to scroll to the Amount setting. To increase the amount, press the right arrow. To
decrease the amount, press the left arrow. Changes take effect immediately.
12.1.1.3 Super Tiger: Production
Monitor
PRODUCTION MONITOR
F1 BACK
F2 SORT SUMMARY
F3 TEST TIMES & RATES
F4 RESET COUNTS
This screen allows you to see how many
parts you’re making each hour. Access it by
pressing F5 in the Main Menu. To return to
the Main Menu, press F1.
12.1.1.4 Sort Summary
Press F2 to access the Sort Summary
Screen, which shows you how many of
the springs just produced are within
specifications, and how may are too
short or too long. Press F1 to return to
the Production Monitor menu.
Tiger User Manual
SORT SUMMARY
F1 BACK
GOOD:
BAD SHORT:
GOOD SHORT:
GOOD LONG:
BAD LONG:
Page 33 of 71
8
29
15
30
0
060-1000-0091-00A
12.1.1.4.1 Test Times & Rates
TEST TIMES & RATES
Press F3 to access the Test Times &
Rates screen.
INST RATE (Instantaneous Rate)
measures the time, in seconds,
between the production of the last
two springs.
F1 BACK
INST RATE
AVG RATE
CYCLE TIME
SINCE LAST
F6 RESET
0.0 pph
0.0 pph
0.00 s.ss
0.00 s.ss
AVG RATE is the average rate of
part production.
CYCLE TIME is the total time, from
beginning to end, of the spring-making process, defined in seconds.
SINCE LAST is the amount of time, in seconds, elapsed since the last spring was made.
Press F6 to reset the gage. Press F1 to return to the Production Monitor screen.
12.1.1.4.1.1 Reset Counts
Press F6 from the Main Menu to access
this screen. To clear all counts and data,
press F6. This will also initiate a new
machine capability study. To return to the
Main Menu, press F1 twice.
RESET COUNTS
F1 BACK
WARNING!
This will clear ALL counts to zero and
clear ALL SPC data!
F6 CONFIRM
SPC MONITOR
12.1.1.5 Statistical Process
Control (SPC)
F1 BACK
F2 DATA
F3 X BAR CHART
F4 R CHART
F5 SAMPLE HISTOGRAM
F6 TOTAL HISTOGRAM
Press F5 in the Monitor Menu to access
the SPC Monitor Screen. Here you will
find all the functions you need to run an SPC program. For more complete information on
SPC, see Section 15. For SPC setup instructions, see Section 12.8. For information on
Machine Capability Studies see Section 14.
Tiger User Manual
Page 34 of 71
060-1000-0091-00A
12.2 Super Tiger: Setup Menu
Use this menu to set up your production
runs, your probe, length adjustment, and
sorting operations. You can also shut down
the coiler through the Setup menu. Press F3
on the Main Menu to get to the Setup menu.
SETUP
F1 MAIN MENU
F2 JOB SETUP
F3 PROBE SETUP-STD
F4 LENGTH ADJUST SETU
F5 SORTING SETUP
F6 MORE SETUP
F1 MORE F2 PROBE SETUP-STD
F3 LENGTH ADJUST SETUP
F4 SORTING SETUP
F5 COILER SHUTDOWN
F6 SPC
12.2.1 Super Tiger: Job Setup
When you press F2, you will be taken to
the Job Setup menu. Press F2 again, and
you can set the unit length, nominal length
and tolerance.
12.2.1.1 Length Unit
Choose the unit of measurement you
wish to use. Toggle F2 for inches or
millimeters (mm). Note: The actual
numbers don’t change, just the units and
the way they’re expressed. Press F1 to
return to the Job Setup menu.
SETUP
F1 BACK
F2
0.5000 +- 0.0100
F3 CUSTOMER
F4 PART #
F5 LOT #
F6 COMMENTS
JOB SETUP
F1 BACK
F2 LENGTH UNIT: INCH
F3 NOMINAL: 0.5000
F4 TOLERANCE: 0.0100
Tiger User Manual
Page 35 of 71
060-1000-0091-00A
12.2.1.2 Nominal
Press F3 to go to the nominal spring
length setting. Use the arrow keys to
change numbers. Press the left or right
arrows to move the cursor to the left or
right. Press the arrow key to increase
the length. Press the arrow to
decrease length. Press F1 to accept your
chosen setting and return to the Job
Setup menu.
JOB SETUP
F1 ACCEPT NOMINAL
0.5000
12.2.1.3 Tolerance
Press F4 to set or change spring length
tolerance. Press the left or right arrows
to move the cursor to the left or right.
Press the arrow key to increase a
number; press the arrow to decrease
a number. Press F1 to accept your
chosen setting and return to the Job
Setup menu.
JOB SETUP
F1 ACCEPT TOLERANCE
0.01
Spring length tolerance can be changed at any time without resetting the probe. The SPC
Histogram X-axis is calculated when the first spring is measured. If the tolerance change is
more than 20-30 percent, we recommend that you reset the probe to maintain maximum
accuracy. To recalculate the Histogram X-axis, spring counts must be reset to zero.
12.2.1.4 Accept Customer
When you press F3 in the Job Setup menu, you’ll go to this screen. Use this screen to add
your customer’s name to the job printout. You’ll have 40 alpha-numeric characters to do so.
To move the cursor to the right or left,
press the right or left arrows. The
and arrows help you scroll up and
down through the alphabet to change
the customer’s name. When you have
finished entering the customer’s name,
press F1 to accept the customer and
return to the main Job Setup menu.
Tiger User Manual
JOB SETUP
F1 ACCEPT CUSTOMER
Customer
Page 36 of 71
060-1000-0091-00A
12.2.1.5 Part #
Press F4 to reach this screen, which allows you to enter a part number into the job. You can
enter up to 20 alpha-numeric characters.
To move the cursor to the right or left, press the right or left arrows. To increase a number,
press the arrow. To decrease a number, press the arrow. To accept the number and
return to the main Job Setup menu, press F1.
JOB SETUP
F1 ACCEPT PART #
9999999
12.2.1.6 Lot #
Press F5 to go to the Lot # screen.
Here, you can enter the Lot number of
the job, up to 20 alpha-numeric
characters.
JOB SETUP
F1 ACCEPT LOT #
9999999
To move the cursor to the right or left,
press the right or left arrows. To
increase a number, press the arrow.
To decrease a number, press the arrow. To accept the number and return to the main
Job Setup menu, press F1.
JOB SETUP
12.2.1.7 Comments
Press F6 to reach the Comments
screen. Here, you can make note of
special job requirements or out-of-theordinary specifications. You have 40
alpha-numeric characters to do so.
F1 COMMENTS
Full run 01/27/08.
To move the cursor to the right or left, press the right or left arrows. To scroll forward
through the alphabet, press the arrow. To move backward, press the arrow. To accept
the comment and return to the main Job Setup menu, press F1.
When you’re finished with the Job Setup menu, press F1 to return to the Main Menu.
Tiger User Manual
Page 37 of 71
060-1000-0091-00A
12.3 Super Tiger: Probe Setup-STD
This screen is used to set up the probe. Press
F5 to proceed to the Probe Setup screen, or F6
to return to the Main Setup menu.
WARNING!
Entering probe setup will disable
read switch & gaging will stop.
Proceed?
The Super Tiger uses an internal digital bar to
imitate an analog meter. The entered
specifications for SPRING LENGTH and TOLERANCE
F5 YES
are displayed across the top. (These values
F6 NO
were set in the Job Setup menu, Section
12.2.1.) In the center is a box with a “needle”
and a line marking the center. In the center is a ZERO indicator for zeroing the probe. The
SHORT and LONG settings will not activate until the probe has been zeroed.
Remember these important points when performing a probe setup:
The probe shipped with the Tiger has a built-in heater to stop temperature drift. Allow a
10-minute warm-up time after power-up before setting the probe.
Move the probe the same amount as the tolerance listed at the top of the screen.
The Tiger automatically “remembers” the
probe setup. If power is turned off, the probe
PROBE SETUP—STD
will return to its previous setting when power is
0.5000 +- 0.0100
turned back on (wait for warm-up).
At each step in probe setup, a double beep
F1 BACK
will sound when that step is complete. If a step
F2 ZERO
fails or is set incorrectly, a triple beep will
sound.
F4 RUN MODE
SHORT
LONG
1. Plug the probe into the Tiger Gage.
2. Position the probe so it faces the coiler.
3. Wind a spring to cutoff.
4. Move the probe toward the coiler until the
tip is approximately 0.04” to 0.500” (1mm to 20mm) from the end of the spring. The
distance depends on the diameter of the spring and tip, and the tolerance that will be
set for sorting. Larger diameters and tolerances can use larger initial gaps. Make sure
that the gap between the probe and the spring is wide enough so that the spring does
not get hung up on the probe, but passes through to the sorter.
5. At the bottom of the Probe Setup—STD screen is a graphic that shows the short sorting
point on the left, the nominal spring length in the middle, and the long sorting point on
the right. When you press F2 (Zero), Set Sort becomes active.
6. Press F2. Zero will flash on the screen, and the probe will mark this as the zero point.
7. Move the probe to a sort point. To set the Short value, move the probe AWAY from the
coiler. To set the Long value, move the probe TOWARD the coiler. Be sure to move the
probe the same amount as the tolerance listed at the top of the screen!
8. Press F3 to set the Short limit. Press F3 again to set the Long limit.
9. Press F4, the Tiger goes to user-defined default Monitor screen.
Tiger User Manual
Page 38 of 71
060-1000-0091-00A
12.4 Super Tiger: Probe Setup—UltraCal
UltraCal is an additional probe setup option that removes measurement errors created by
proximity of the coiler on shorter springs. The
UltraCal probe setup is optional. For most springs,
PROBE SETUP—STD
the traditional probe setup can be used.
0.5000 +- 0.0100
The UltraCal setup is done the same way as
standard setup, except there is no spring in the
cutoff position. This is because a probe in UltraCal
mode is extremely sensitive to everything around
it. A no-spring setup allows the probe to see the
difference between a spring and no spring so that
it can ignore everything except the spring.
F1 BACK
F2 ZERO
F3 SET SORT
F4 RUN MODE
F5 PROBE SETUP--ULTRA
1. Set up the probe as described in Section 12.3, steps 1-6.
2. To set the Short value, move the probe AWAY from the coiler. To set the Long
value, move the probe TOWARD the coiler. Be sure to move the probe the same
amount as the tolerance listed at the top of the screen!
3. Press F3 to the limit for Short spring. Press F3 again to set the limit for Long springs.
4. F5 Probe Setup-Ultra becomes available at the bottom of the screen.
5. Press F5 to go to the UltraCal setup screen.
PROBE SETUP—ULTRA
6. Press F2 to go to the nominal spring length
0.5000 : 0.0100
setting. Press F3. Set Sort will appear Press
F3 again. The percentage shown on the
F1 BACK
right of the screen is the amount of
F2 NOMINAL
correction applied. If the number is less
than 10 percent, UltraCal is unnecessary. If
F4 RUN MODE
the number is less than 99 percent, the
SHORT
LONG
probe will be in UltraCal mode and it will
now stay in UltraCal mode until a standard
probe setup is done. If the number is more
than 95 percent, accurate spring
measurement is unlikely under any circumstances with any gage. If it is over 99
percent, UltraCal will automatically disable.
7. Press F4 to go to user-defined default Monitor screen.
12.4.1 UltraCal Warnings
In normal setup, small length changes in short springs are lost in all the background metal
of the coiler. To read these springs accurately, the signal from the probe must be amplified.
With amplification, the range of the probe increases, making it sensitive to changes further
away than usual. This is only a part of what UltraCal does, but it is this fact that requires
that UltraCal to be used carefully.
UltraCal is best used for small, short springs that are difficult to measure.
Tiger User Manual
Page 39 of 71
060-1000-0091-00A
As the percentage of correction displayed on the UltraCal screen increases, so does:
Sensitivity to other objects around the spring
Sensitivity to the operator’s hand catching springs
Temperature Drift
With a normal setup, the effective
measurement area of the probe is
the tip.
With a high-percentage UltraCal setup,
this area of sensitivity can increase to near
12 inches.
12.4.1.1 Other Objects
During UltraCal setup, objects in the area of the spring (tooling, sorting devices, etc.) must
be in the exact same position and location as they are when the read switch triggers the
gage. In normal setup, the probe senses only objects within one or two inches of the tip.
With a high-percentage UltraCal setup, this area of sensitivity can increase, up to 12 inches.
12.4.1.2 Operator’s Hand
At high-percentage UltraCal setups, the operator’s hand can be sensed as far as a foot from
the tip. When catching springs for testing, keep your hands far from the probe tip.
12.4.1.3
Temperature Drift
The amplified probe signal also amplifies any temperature-related errors. The temperature
drift of the Tiger probe is nearly non-existent with a normal setup. With a high-percentage
UltraCal setup, however, the temperature drift of the probe, while still small, may become a
factor in tight-tolerance springs. Expansion of tooling, probe holder and even spring wire can
also affect the final result.
Tiger User Manual
Page 40 of 71
060-1000-0091-00A
12.5 Super Tiger: Length Adjust
Setup
LENGTH ADJUST SETUP
0.9200
F1 BACK
This screen displays the current length
F2 TYPE: NONE
adjustment type, the amount of time the
motor will turn when activated, and the
tripping point at which the adjuster is
activated. Access this screen by pressing F4 in the Setup menu.
12.5.1 Type:
Press F2 to change the adjustment mode. You can choose from EACH, NONE,
AVERAGE or CENTERING.
LENGTH ADJUST SETUP
12.5.1.1 EACH
The EACH mode makes an adjustment each
time a spring is produced that exceeds the TRIP
POINT. When you reach the EACH screen, you
can also adjust the amount of time the motor
turns and the tripping point at which the motor
will start.
F1 BACK
F2 TYPE: EACH
F3 AMOUNT: 10
F4 TRIP: 0.0500
:
:
12.5.1.1.1 Amount
Enter a value between 0-99 to change the length of time the pitch adjust motor runs. Press F3 to
go to the Accept Amount screen. Use the arrow keys to change the amount of time the motor
turns.
To move the cursor to the left or right, press the
left or right arrow. To increase a number, press the
arrow. To decrease a number, press the
arrow. To accept the adjustment amount and
return to the Length Adjust Setup screen, press
F1.
LENGTH ADJUST SETUP
F1 ACCEPT AMOUNT
10
12.5.1.1.2 Trip
The Trip point can be adjusted from 5-150 percent
of tolerance. Press F4 to go to the Accept Trip
screen. To move the cursor to the left, press the
left arrow; press the right arrow to move the cursor
to the right. To increase a number, press the
arrow. To decrease a number, press the
arrow. To accept the trip setting and return to
the Length Adjust Setup screen, press F1
Tiger User Manual
Page 41 of 71
LENGTH ADJUST SETUP
F1 ACCEPT TRIP
0.0500
060-1000-0091-00A
12.5.1.2 NONE
Length Adjust is turned off. Using no control
helps evaluate the quality of the setup. If there
is a problem in the setup that should be
corrected, adjusting length can cover it up.
LENGTH ADJUST SETUP
0.9200
F1 BACK
F2 TYPE: NONE
For maximum yield, the setup and wire should
be as good as possible without adjusting
length. Length adjustment is designed to
compensate for natural variances in the process, not bad setup or bad wire.
12.5.1.3 AVERAGE
LENGTH ADJUST SETUP
This mode uses a length-predicting system
to anticipate the length of the spring being
produced. The amount of adjustment is
F1 BACK
based on this calculation and the adjust
F2 TYPE: AVERAGE
amount setting. Press F3 to go to the
F3 AMOUNT: 10
Accept Amount screen. To move the cursor
to the left or right, press the left or right
arrow. To increase a number, press the
arrow. To decrease a number, press the arrow. To accept the adjustment amount and
return to the Length Adjust Setup screen, press F1.
12.5.1.4 CENTERING
Centering makes adjustments to the coiling
process, based on the average length of
recent springs. The length of time the motor
turns depends on the adjust amount setting
and the amount of error in average length.
The more error in the average spring length,
the longer the motor turns. With centering,
you can quickly adjust the amount of time
the motor turns without over-controlling the
coiler.
LENGTH ADJUST SETUP
F1 BACK
F2 TYPE: CENTERING
F3 AMOUNT: 10
Press F3 to go to the Accept Amount screen. To move the cursor to the left or right, press
the left or right arrow. To increase a number, press the arrow. To decrease a number,
press the arrow. To accept the adjustment amount and return to the Length Adjust Setup
screen, press F1.
Tiger User Manual
Page 42 of 71
060-1000-0091-00A
12.6 Super Tiger: Sorting Setup
The Super Tiger does 2-, 3- or 5-way sorting.
•
•
•
•
2-Way Bad triggers the sorter when bad
springs come off the coiler. Whether the
SORTING SETUP
springs are short or long, the “Short” light
remains lit, indicating that the sorter
switch is activated.
F1 BACK
2-Way Good activates the sorter on good
F2 MODE: 5 WAY
springs. As long as the springs are good,
F3 25% TOLERANCE
the “Short” light remains lit, indicating that
F4 TIME: 0.20s
the sorter switch is activated.
3-Way sorting is the traditional method of
sorting where the shorts and longs are shunted to opposite sides and the good
springs fall straight through the center.
5-Way sorting separates the reject longs and reject shorts the same way, but divides
the good springs into three categories: long good, good, and short good. The fiveway points are selectable as a percentage of the tolerance. For five-way sorting, the
Super Tiger must be connected to a five-way sorting chute.
Access the Sorting Setup mode from the Setup Menu by pressing F5. NOTE: Tiger software
does 5-way sorting based on a 1/3 split of good parts. It works only if a 5-way cable is
attached. If a 3-way cable is attached, normal 3-way sorting is done.
12.6.1 Mode Selection
Your Mode Selection choices are 5-Way, None, 2-Way Bad, 2-Way Good, and 3-Way.
Please note: When you select 5 Way, you also have the option to set tolerances.
12.6.1.1 Mode
Press F2 to change the sorting mode. If you select 5-way sorting, you will automatically be
given the opportunity to set the tolerances.
12.6.2 Tolerance
Press F3 to go to the Accept Tolerance screen. Note that the tolerance is expressed in
percentages. To move the cursor to the left or
SORTING SETUP
right, press the left or right arrow. To increase a
number, press the arrow. To decrease a
number, press the arrow. To accept the
F1 ACCEPT TOLERANCE
adjustment amount and return to the Sorting
Setup screen, press F1. Note: You can also
change the tolerance without going through the
25
Mode menu: press F3 in Sorting Setup menu
and follow the above procedures.
Tiger User Manual
Page 43 of 71
060-1000-0091-00A
12.6.3 Sort Time
Timed Sorting is the traditional method where the chute flapper or air solenoid is
activated for a set period of time when a bad spring is produced. The Super Tiger can
set a sorting flap to open from 0.05 to 9.95 seconds.
In order to minimize activating the same flapper several times in succession, you can
set the sort time to the maximum setting of 9.95 seconds. The machine will keep the
flap open until 9.95 seconds has elapsed, or it receives a different activation signal.
Press F4 to go to the Accept Sort Time screen. To move the cursor to the left or right,
press the left or right arrow. To increase a number, press the arrow. To decrease a
number, press the arrow. To accept the sort time and return to the Sorting Setup
screen, press F1.
12.7 Super Tiger: Coiler Shutdown
The Super Tiger has the ability to shut down the
coiler under certain conditions. To use the shutdown
function, the coiler must be connected to the gage
with an automatic shutdown cable (P/N 025-10000426-00). See Installing a Shutdown Cable,
Section 4, for installation instructions.
COILER SHUTDOWN
F1 BACK
F2 CONSECUTIVE BAD 0
F3 NO CUTOFF
OFF
F4 TOTAL GOOD
F5 CPK LIMIT
0.0000
F6 EXCESS ADJUST OFF
When shutdown occurs, an audible alarm sounds
and the Shutdown screen is displayed. The screen
will flash, SHUTDOWN SHUTDOWN and display
the reason for the shutdown. Silence the alarm by
pressing F6, or cut power to the Tiger by turning off the switch on the back of the tester.
The alarm will shut off by itself in five minutes. Because many coilers will continue to
produce springs while the motor coasts to a stop, the short side sorter will activate for 20
seconds when a shutdown occurs.
The Super Tiger recognizes five shutdown conditions: TOTAL GOOD (Lot Size),
CONSECUTIVE BAD, CPK LIMIT, NO CUTOFF, and EXCESS ADJUST.
Warning!
When you exit the shutdown screen, the shutdown relay will immediately re-close. If the
shutdown cable is not wired correctly through a contactor box, the coiler could start
unexpectedly.
Tiger User Manual
Page 44 of 71
060-1000-0091-00A
12.7.1 Consecutive Bad
When the number of bad springs reaches its
limit, the Super Tiger shuts down the coiler.
The number at the bottom of the screen
indicates the number of bad springs. A value
of 0 disables the Consecutive Bad check.
COILER SHUTDOWN
F1 ACCEPT CONSECUTIVE
10
If you want to change the number, use the
arrow keys. The left and right arrow keys
move the cursor to the left and right. To increase a number, press the arrow. To
decrease a number, press the arrow. To accept the number and return to the Coiler
Shutdown screen, press F1.
12.7.2 No Cutoff
No Cutoff, when on, stops the coiler the instant a non-cutoff spring touches the probe
tip. A spring that contacts the tip after the cutoff will not cause a shutdown. To enable
or disable No Cutoff, press F5 on the Coiler Shutdown menu.
12.7.3 Total Good (Lot Size)
Total Good on the Super Tiger is the same as Lot Size on the Panther gage. When the
correct number of good springs has been produced, the Super Tiger will shut down the
coiler. A value of 0 disables the Total Good shutdown check.
Access the Accept Total Good screen by pressing F2 in the Coiler Shutdown menu. At
the bottom of the screen you will see the
COILER SHUTDOWN
number of good springs in the lot. If you want
to change the number, use the arrow keys.
The left and right arrow keys move the cursor
F1 ACCEPT TOTAL GOOD
to the left and right. To increase a number,
press the arrow. To decrease a number,
10
press the arrow. To accept the number
and return to the Coiler Shutdown screen,
press F1.
12.7.4 CpK Limit
Set process capability index limits (CPK) to make your spring-making process more
efficient. If the CPK of the last 50 springs falls below the limit you set, the coiler will shut
down. This shutdown mode can be very effective, since the process stops when
something begins to go wrong, instead of waiting for bad springs to be made. A value of
0 disables the CPK Limit check.
Tiger User Manual
Page 45 of 71
060-1000-0091-00A
After a CPK shutdown, the Super Tiger
disables CPK shutdown for next 50 springs.
This allows springs that caused the
stoppage to clear the system before reengaging the CPK shutdown.
COILER SHUTDOWN
F1 ACCEPT CPK LIMIT
0.0000
The CPK limit is posted at the bottom of the
screen. To change the number, use the
arrow keys. The left and right arrow keys move the cursor left and right. To increase a
number, press . To decrease a number, press . To accept the number and return to
the Coiler Shutdown screen, press F1.
12.7.5 Excess Adjust
To prevent possible tool damage, Excess Adjust monitors the amount of adjustment and
turns them off if the motor turns for too long in one direction. When Excess Adjust is
triggered, it automatically turns the adjuster motor back to its original position, ensuring
the pitch adjustment is reasonably close to correct when the coiler starts up again.
There are three Excess Adjust options: On, Off and Warn. When Excess Adjust is ON,
the coiler will shut down the same as other shutdown functions. When Excess Adjust is
OFF, the coiler will not shut down. When Excess Adjust is set to WARN, the coiler
continues to run. Springs are gaged and sorted, but no more adjustments will be made.
During this time, an alarm sounds and the Tiger screen flashes an “excess adjust”
warning. This allows those without shutdown cables to prevent tool damage.
12.8 Super Tiger: SPC Setup
Press F6 on the Setup screen to access the SPC Setup menu. From this menu, you will be
able to set the Subgroup Size, Sample
SPC SETUP
Frequency, Collection parameters, and Limits.
12.8.1 Subgroup Size
Super Tiger subgroups range from 5 to 25
springs. To increase the subgroup size,
press . To decrease subgroup size, press
. To accept the subgroup size, press F1.
You will return to the SPC Setup menu.
Tiger User Manual
Page 46 of 71
F1 BACK
F2 SUBGROUP SIZE
5
F3 SAMP FREQ
10
F4 COLLECT ON
ALL
F5 LIMITS
ENTERED
F6 ENTER LIMITS
060-1000-0091-00A
SPC SETUP
12.8.2 Sample Frequency
F1 ACCEPT SUBGROUP SIZE
You can set your sample frequencies from 10 to
99,999. Use the arrow keys to set the sample
5
frequency. Scroll to the left or right by pressing
the left or right arrows. To increase a number,
press . To decrease a number, press .
To accept the sample frequency, press F1. You will
SPC SETUP
return to the SPC Setup menu.
F1 ACCEPT SAMPLE FREQ
12.8.3 Collect
10
Press F4 to choose between collecting All
springs or Good springs only.
SPC SETUP
12.8.4 Limits
Press F6 to enter your Upper Control Limits
(UCL) and Lower Control Limits (LCL). Use the
arrow keys to set the Limits. Scroll to the left or
right by pressing the left or right arrows. To
increase a number, press . To decrease a
number, press . To accept the Limit, press
F1.
F1 BACK
F2 SUBGROUP SIZE
5
F3 SAMP FREQ
10
F4 COLLECT ON
ALL
F5 LIMITS
ENTERED
F6 ENTER LIMITS
SPC SETUP
Press F5 to check that Limits have been
entered and calculated.
F1 ACCEPT UCL
Press F1 to return to the Setup menu.
For more information on Statistical Process Control, see p. 54.
Tiger User Manual
Page 47 of 71
060-1000-0091-00A
12.9 Super Tiger: Diagnostics
The Tiger’s Diagnostics menu allows you to perform routine tests on the coiler/probe interface
and make adjustments to improve productivity.
Access the Diagnostics menu by pressing F4 on the
DIAGNOSTICS
Main Menu.
12.9.1
Super Tiger Diagnostics:
Probe Tests
The opening screen in the Probe Tests menu
lists three functions you can test--setup,
functionality and drift. It also gives a real-time
voltage and length reading.
12.9.1.1
F1 MAIN MENU
F2 PROBE TESTS
F3 LENGTH ADJUST TEST
F4 SORTING CHUTE TEST
F5 KEYPAD TESTS
F6 MORE Probe Setup
Assess the condition of the probe by pressing F2. This will take you to the Probe Setup
screen. Follow the standard probe setup instructions in Section 12.3.
12.9.1.2
Probe Functional Test
This test checks the probe and its driving
circuitry. Press F3 in the Probe Tests menu.
Make sure the probe is not touching anything.
Press F2 to begin.
•
•
•
•
PROBE TESTS
F1 BACK
F2 PROBE SETUP
F3 FUNCTIONAL TEST
F4 DRIFT TEST
VOLTAGE:
0.0176
LENGTH:
.5000
There are three possible outcomes:
Probe function passes
The probe and/or its tip is not
functional
Tiger electronics may need repair. If a failure is found, you will be prompted to
disconnect the probe from the gage. Contact LSI regarding repairs.
If the Probe status passes, press F1 to return
to the Probe Test screen.
PROBE FUNCTIONAL TEST
F1 BACK
F2 BEGIN
12.9.1.2.1 Probe Gain
Gain values represent the difference in probe
readings between two different, yet known, zeroed points, i.e., the probe is zeroed, and a reading
is taken. The zeroed value is changed a known amount and a second probe reading is taken. The
difference between the two zeroed points is the gain.
Tiger User Manual
Page 48 of 71
060-1000-0091-00A
12.9.1.3
Probe Drift Test
PROBE DRIFT TEST
Perform this test if you are concerned about
temperature drift. The drift test provides longterm monitoring of the probe output and length
measurement. Always allow the probe to warm
up for ten minutes before starting this test.
The screen shows the maximum and minimum
voltage used by the probe. “CUR” is a real-time
reading of the voltage passing through the
problem and will fluctuate.
F1 BACK
F2 RESTART
VOLTAGE
MAX 0.0117
CUR 0.0058
MIN
0.0000
00:03:44
LENGTH
2.5096
2.4975
2.4906
The Tiger will automatically run a continuous test on the probe. You can test the probe for
as long as you want; press F2 to restart. Press F1 to return to the Probe Test screen.
12.9.1.3.1 Setting up a drift test
1. Position the probe holder so the probe faces a flat spot on the face of the coiler. This area
should be clean and free of grease and dirt.
2. Adjust for probe position for a reading within 1 volt of 0, or reset the probe. Setting up the
probe is not necessary unless you want accurate length numbers on the display. The spring
length value for setup is not important, nor is tolerance critical. 0.005” is a typical value.
12.9.2 Super Tiger Diagnostics: Length Adjust Test
From the Diagnostics menu, press F3 to
access the length adjust test.
Press F2 to make the spring pitch shorter, F3
to make it longer. The Count number will
change accordingly. When you press F1 to
go back to the Diagnostics menu, the pitch
adjust will return to its starting number.
LENGTH ADJUST TEST
F1 BACK
F2 ADJUST SHORTER
F3 ADJUST LONGER
COUNT: 0
12.9.3 Super Tiger Diagnostics:
Sorting Chute Test
Use this set of tests to make sure your sorting
chutes are operating correctly. Press F2 to
test the Bad Short chute; F3 to test 5-Way
Short; F4 to test the Good chute; F5 to test 5Way Long, and F6 to test Bad Long.
When finished, press F1 to return to the
Diagnostics screen.
Tiger User Manual
Page 49 of 71
SORTING CHUTE TEST
F1 BACK
F2 BAD SHORT
F3 5-WAY SHORT
F4 GOOD
F5 5-WAY LONG
F6 BAD LONG
060-1000-0091-00A
12.9.4 Super Tiger Diagnostics: Keypad Tests
Ensure that your keypad is functioning property. Select F5 from the Diagnostics menu.
Press any key on the keypad and see if the on-screen display corresponds to the key
you pushed. If you pressed F2, for example, you should see F2 on the screen. When
finished, press F1 to return to the Diagnostics screen.
KEYPAD TESTS
12.9.5 Super Tiger Diagnostics: Audible
Beep
F1 BACK
Press A Key
To make sure this alarm is functional, press F6
in the Diagnostics menu. You should hear an
audible beep. Press F1 to return to the Main
menu.
12.9.6 Super Tiger Diagnostics: Hour Meter
Press F6 to display the Tiger gage’s hour meter. This display tells you how many hours
the Tiger has been in operation.
13 SUPER TIGER SETTINGS
Access this menu from the Main menu to enter your
company name. Press F5 to bring up the next
screen.
SETTINGS
F1 MAIN MENU
F2 CONFIGURATION
F3 COMPANY NAME
F4 DEFAULT RUN SCREEN
MAIN MENU
SUPER TIGER
F2 MONITOR
F3 SETUP
F4 DIAGNOSTICS
F5 SETTINGS
13.1 Configuration
This screen grants access for entering
passwords and activation codes.
F2 is for Factory use only; users cannot enter
a password here.
CONFIGURATION
F1 BACK
F2 ENTER PASSWORD
F3 ACTIVATION CODE
V1.07 SN 11111111111
F3 is used to gain access for you to enter an
Activation code. The Super Tiger is shipped
requiring an activation code. LSI will provide an activation code to you when full payment
for the gage has been received.
Press F1 to return to the Settings Screen.
Tiger User Manual
Page 50 of 71
060-1000-0091-00A
Tiger User Manual
Page 51 of 71
060-1000-0091-00A
13.2 Company Name
Press F3 to access the Company Name screen.
To change the name on the screen, press F2.
COMPANY NAME
F1 BACK
The Super Tiger has 40 characters for entering
F2 COMPANY NAME
your company name, including upper and
lowercase letters, numbers and symbols. To
Your company name
scroll forward through the alphabet, press the
arrow. To move backward through the
alphabet, press the arrow. Press F1 to Accept the Customer and return Company Name.
Press F1 to return to Settings.
COMPANY NAME
F1 ACCEPT CUSTOMER
Larson Systems Inc.
13.3 Default Run Screen
The Default Run Screen is a shortcut to the
Monitor menu where you can choose the type of
monitoring information you want to see. Your
choices are Strip Chart-Histogram, Strip chartSpecs, Job Summary, SPC Total Histogram, SPC
Sample History, SPC R Chart, SPC X Bar Chart,
SPC Data, Test Times & Rates, and Sort
Summary. Press F2 to scroll backward through
the menu; press F4 to scroll forward. This shortcut
is accessed from the Probe Setup menu F4.
Tiger User Manual
Page 52 of 71
MONITOR
F1 BACK
F2 SPC R CHART
F4 060-1000-0091-00A
14 PERFORMING A MACHINE CAPABILITY STUDY (MCS)
WITH THE SUPER TIGER FREE LENGTH GAGE
A Machine Capability Study (MCS) tells you how your coiler is operating, and helps you match
job tolerances to your machine with more precision. This helps you produce better springs
more efficiently, and can reduce scrap.
With every coiler, there is variation in the spring production process. Some springs may be too
long; others may be too short. In a world where close tolerances are becoming the norm, you
want to minimize the number of rejected springs in each batch. By running a machine
capability study, you can use the MCS statistics to adjust your coiler so that more springs are
producing within tolerance levels.
The study that you can perform with Super Tiger software samples 100 springs and calculates
the values used for the SPC charts. Machine capability studies are started from MCS setup or
when counts are cleared. A Machine Capability Study should be done before you begin
charting Statistical Process Control.
Tiger User Manual
Page 53 of 71
060-1000-0091-00A
14.1 Machine Capability Study (MCS) terms
Start: The spring count at which the last study started
Good: The number of good springs produced during the study
Bad: The number of bad springs produced during the study
Mean: The average length of springs produced during the study
Sigma: The standard deviation of springs produced during the study
CPK: The CPK of springs produced during the study
X UCL: The upper control limit for the SPC X bar charts
X LCL: The lower control limit for the SPC X bar charts
R MEAN: The average range of springs produced during the study (used on
R charts)
R UCL: The upper control limit for the SPC R charts (the R chart lower limit is always 0)
14.2 MCS, Step by Step
1. Plan. Are you making the study to determine the machine’s capability or to diagnose a
problem?
2. Measure. Make sure your Super Tiger gage is calibrated and working correctly before
starting the study. Check afterward to make sure the gage did not drift during use.
3. Have the person who is most familiar with the coiler operate it during the study.
4. Sample size. The default sample size for the Super Tiger is 100 springs.
5. Data recording. The Super Tiger will give you data on the springs; you should also
record feed rate, speed, cycle times, tool changes, ambient temperature—any factors that
could have a bearing on your production.
Remember, a Machine Capability Study gives you short-term analysis. For long-term
analysis, you should review long-term data gleaned from Statistical Process Control (SPC).
Tiger User Manual
Page 54 of 71
060-1000-0091-00A
14.3 Using MCS
MONITOR
Access the MCS menu by pressing F6 in the Monitor
menu.
F1 MAIN MENU
F2 JOB SUMMARY
F3 STRIP CHARTS
F4 PRODUCTION MONITOR
F5 SPC
F6 MCS
Pending % shows the percentage of springs measured so far. When the percentage
reaches 100, you’ll get a report on the spring
MACH CAPABILITY STUDY
count at the beginning of the study (Start), the
number of good springs (Good), and the
F1 BACK
number of bad springs (Bad).
PENDING %
START
To view more information, press F6.
GOOD
0
BAD
0.0000
F6 MORE The next screen brings up the Mean, the average length of the springs made during the study.
This screen shows the process capability index
limits (CPK) for this study.
MACH CAPABILITY STUDY
F1 BACK
PENDING %
F3 MORE MEAN
CPK
F6 MORE Tiger User Manual
Page 55 of 71
0.00
060-1000-0091-00A
This screen shows the upper control limit for
the SPC X bar charts.
MACH CAPABILITY STUDY
F1 BACK
PENDING %
F3 MORE CPK
X UCL
F6 MORE This screen shows the lower control limit for
the SPC X bar charts.
MACH CAPABILITY STUDY
F1 BACK
PENDING %
F3 MORE X UCL
X LCL
F6 MORE This screen shows the average range (R Mean)
of springs produced during the study, which is
displayed on R Charts. It also shows the R UCL,
the upper control limit for the SPC R charts. (The
R chart lower limit is always 0.)
To return to the Main menu, press F1.
Tiger User Manual
Page 56 of 71
0.00
0.0000
0.0000
0.0000
MACH CAPABILITY STUDY
F1 BACK
PENDING %
F3 MORE X LCL
R MEAN
R UCL
0.0000
0.0000
0.0000
060-1000-0091-00A
15 STATISTICAL PROCESS CONTROL WITH THE SUPER
TIGER FREE-LENGTH SPRING GAGE
The Super Tiger is a complete statistical process control (SPC) data collection/analysis
system. SPC is a great way to analyze the cause for scrap and to warn the operator if the
scrap rate is about to increase.
15.1 The SPC Concept
When a spring coiler produces springs, it is impossible for the coiler to make all springs the
same. Anyone who has ever operated a spring coiler is well aware of this fact. There are
certain things that cause consecutive springs to differ. The wire may change a little, there’s
a little slop in the tooling, even changes in line voltage can affect spring quality. These are
a part of the process of making a spring that we can’t do much about. In SPC language,
things that affect the process that we can't do much about are called common
causes.
Sometimes other things affect spring quality. The de-reeler binds up, the wire tangles, or
the tooling starts to come loose. In SPC language, things that go wrong with the
process that we can fix are called assignable causes.
One of the main purposes of SPC, especially Xbar and R charts, is to separate assignable
causes from common causes. Using SPC techniques, we can tell if the current scrap rate is
just the nature of the job or if something has begun to go wrong with the process.
In order to separate assignable causes from common causes, we have to test the coiler
setup to see how well it can make springs. This is called a Machine Capability Study
(MCS) (see Section 14). This study samples 100 springs and calculates the values used for
the SPC charts. Machine capability studies are started from MCS setup or when counts are
cleared.
All SPC charting will use the values calculated during this machine capability study. For
SPC charting to be useful, it is important that spring production proceeds normally during
the study. If anything unusual occurs during the study, the study should be restarted.
The measured lengths of these 100 springs are used to calculate control limits for the Xbar
and R charts. Control limit values are calculated so that more than 99% of the springs
made should fall between the control limits.
SPC takes occasional samples from the length measurements of springs as they’re
produced. The average length of the samples and the range of the samples is calculated
and charted. Each batch of spring lengths sampled is called a subgroup. The number of
measurements in each batch is the subgroup size. How often the subgroups are taken is
the sample frequency.
Tiger User Manual
Page 57 of 71
060-1000-0091-00A
15.2 Xbar and R Charts
To make Xbar and R charts, the gage takes samples every so often and plots them on the
chart. How often a sample is taken is
called the sample frequency. The
number of springs measured in a
sample is called the subgroup size
(usually 5). The average length of the
springs in the sample is plotted on the
Xbar chart.
The range, the difference between
the longest and the shortest spring in
the sample, is plotted on the R chart.
The Xbar and R charts have lines that mark the upper and lower control limits.
If the points on the Xbar and R charts are between the control limits, the process is
proceeding normally, and the variation in spring length is due to common causes. If they
are outside the control limits, there may be an assignable cause for reduced quality that
can be fixed.
When the points are outside the control
limits, SPC language says the process
is out of control. This doesn’t mean the
job has gone wild, just that a point was
outside the control limits and may have
an assignable cause. When a point is
outside the control limits, it does not
necessarily indicate a bad part. Xbar
and R charts do not indicate good or bad parts. They only indicate if the process is
operating normally.
All the Xbar and R charting is based on the machine capability study. For the Xbar and R
charts to mean anything, the springs produced during the capability study must be typical
for the setup. If anything out of the ordinary happens during the machine capability study,
the study should be restarted.
Before charting SPC, you need to run a Machine Capability Study (see Section 14) to
determine the coiler’s ability to make good springs.
Tiger User Manual
Page 58 of 71
060-1000-0091-00A
15.3 SPC Monitoring
Access the SPC Monitor menu by pressing F5
(SPC) on the Main Menu screen. This menu gives
you five viewing options: Data, X Bar Chart, R
Chart, Sample Histogram and Total Histogram.
15.3.1 Data
This screen displays current SPC data
values. These are the values generated
since the count was reset to 0.
SPC MONITOR
F1 BACK
F2 DATA
GOOD
0
F3 X
BAR CHART
BAD
0.0% 0
F4 R
CHART
MEAN
0.0000
F5 SAMPLE
SIGMA HISTOGRAM
0.000
F6 TOTAL
HISTOGRAM
MORE These values include:
• Good count: Total good springs produced. Collecting data on all the springs is
a better record of machine performance. Collecting data on the good springs
gives the customer SPC data only on the springs they are receiving.
• Bad percentage and count: The percentage of bad springs produced and the
total count.
• Mean: Average length of sampled springs.
• Sigma: Standard deviation of sampled springs.
• CPK: CPK of sampled springs, calculated as the lesser of subgroup size or
sample frequency.
• Subgroup Size: The smallest subgroup is 5 and the largest is 25; 5 is by far
the most common.
• Sample Frequency: The sample
SPC MONITOR
frequency is the number of springs
produced between SPC samples.
F1 MORE
The smallest is 10 and the largest is
MEAN
0.0000
99,999.
SIGMA
0.000
CPK
0.00
SUBGROUP SIZE 0
To return to the Monitor screen, press F1
SAMPLE FREQ
0
three times.
Tiger User Manual
Page 59 of 71
060-1000-0091-00A
15.3.2 X-Bar Chart
To access this chart from the Monitor menu,
press F3. This chart shows the last 40 samples
taken, their nominal length, and the control limit
values.
15.3.3 R Chart
Press F4 to access this strip chart from the Monitor
menu. This chart displays the range of the last 40
samples taken. The average R value from the machine
study is represented by the center line.
15.3.4 Sample Histogram
Press F5 to access this screen from the Monitor menu. The first screen displays the
statistics based on the sampled data. Press F6 to go to the next screen, which displays
a histogram based on the sampled data.
To go back one screen, press F1. Press F1
again to return to the SPC menu.
SAMPLE HISTOGRAM
F1 BACK
0.5000 +0.0000
x
=
0.0000
3
=
0.0000
CPK =
0.0000
F6 SAMPLE HISTOGRAM
SAMPLE HISTOGRAM
|
|
I
T
Tiger User Manual
Page 60 of 71
|
|
|
|
| ___ |______
M
N
T
060-1000-0091-00A
15.3.5 Total Histogram
TOTAL HISTOGRAM
Press F6 to access this screen from the
Monitor menu.
The first screen displays the statistics based
on the sampled data. To view the histogram,
press F6. The Mean value is marked by an ‘M’
and a vertical line.
F1 BACK
0.5000 +x
=
3
=
CPK =
F6 TOTAL HISTOGRAM
The 3 Sigma points are marked by 3s and
vertical lines.
The Total Histogram displays the histogram of
all the springs produced. The statistics shown
reflect the entire job and are based on the data
presented in the histogram. Springs beyond
the range of the histogram are not accounted
for in the calculations. If a significant
percentage of springs are beyond the range of
the histogram, the statistics values will lose
accuracy.
0.0000
0.0000
0.0000
0.0000
TOTAL HISTOGRAM
|
|
I
3
T
||
|
||
|
| I____|______
M
3
N
T
To move back one screen, Press F1. To return to the SPC menu, press F1 again.
Tiger User Manual
Page 61 of 71
060-1000-0091-00A
16 TESTER MAINTENANCE
Many of the tubes and batteries inside the Lynx and Panther gages have been replaced with
solid-state electronics. Thus, very little maintenance is required for the Tiger.
16.1 Removing the Cover
To remove the cover, loosen the 6-32 x 3/8 buttonhead socket cap screws on the sides of
the tester and lift up.
Tiger User Manual
Page 62 of 71
060-1000-0091-00A
16.2 Changing a Fuse
The Tiger uses standard 4-amp fuses in the AC and DC Relay Modules, which are the only
user-serviceable parts on the Tiger. Occasionally, you may have to replace a fuse.
1. To access the fuses in the back panel (see the above diagram), disengage the fuse access
door lock at the top of the door and let the door drop down. Pull the red fuse holder out and
replace the fuses.
2. To access the internal fuses, follow the cover removal instructions above. There is one fuse
in each fuse holder. The LED will glow if the fuse is good and power is applied correctly.
3. If the LED does not glow, take a straight-slot screwdriver and loosen the cap on the fuse
holder. Replace the fuse and screw the cap back in place.
4. If you have replaced the fuse and the tester still does not work, the entire relay module must
be replaced.
Contact LSI for the Tiger AC Relay PCB Assembly (P/N 025-100-0588-00) or Tiger DC Relay
PCB Assembly (P/N 025-1000-0589-00).
AC Relay PCB Assembly
DC Relay PCB Assembly
Cylindrical fuse holders are in the upper right corner of the circuit board.
Tiger User Manual
Page 63 of 71
060-1000-0091-00A
17 TIGER SPECIFICATIONS
Tiger & Super Tiger
Tiger Cub
17.1 Physical dimensions
Tiger Cub: 7 ” L x 10” H x 8 3/8” D (184.15 mm L x 254 mm H x 212 mm D)
Tiger, Super Tiger: 6 7/8” L x 4 7/8” H x 7 ” D (174.63 mm L x 123.82 mm H x 190.5 mm
D)
17.2 Weight
Tiger Cub
Tiger, Super Tiger
8.6 lbs. (3.9 kg)
3 lbs. (1.36 kg)
17.3 Electrical Specifications
Power In
Tiger Cub
Tiger
Super Tiger
Sort & Control Power Output
Shutdown Relay Contacts
Maximum Gaging Rate
Tiger User Manual
120 VAC (60 Hz) in/120 VAC out
120/240 (50/60 Hz) VAC in/24 VDC out
120/240 VAC in/ 24 VAC out
240 VAC (50 Hz)
120 VAC (100W), 24 VAC (48W), 24 VDC
(24W)
5A AC or DC
70,000/hour
Page 64 of 71
060-1000-0091-00A
Sort Active Time
Control Active Time
Length Measurements
Resolution
Recommended Operating Temperature
Range
Display
0.05-9.95 seconds
.015-3.0 seconds
(Actual values depend on setup)
better than 0.0001 inches
50°F - 100°F (10°C – 37°C)
Backlit LCD
17.4 Connector Pinouts
A Probe Drive (1 Mhz)
B Probe Return
C +15 VDC
D Ground
A Over
B Under
C Common
A Over
B Under
C Under Good
D Over Good
E No Connection
F Common
A Over
B Under
C Common
A Read signal
B +15 VDC
Probe
3-way sort
5-way sort
Control
Read
Shutdown
CNC
2-7, 9 are digital inputs and outputs
and are low active TTL.
Tiger User Manual
A Norm Closed Contact 1
B Norm Closed Contact 2
C Norm Open Contact 1
D Norm Open Contact 2
1. Probe voltage ~+- 3VDC
2. Over Sort Active (Out)
3. Under Sort Active (Out)
4. Shutdown (Out)
5. Ground
6. Under Control Active (Out)
7. Over Control Active (Out)
8. Good Pulse (NPN Open collector
output, 100mA max)
9. Read (In)
Page 65 of 71
060-1000-0091-00A
18 TIGER SOFTWARE PACKAGES
Description
Cub
Tiger
Super Tiger
Diagnostics
Probe Tests - Probe Setup - Standard
*
*
*
Probe Tests – Functional Test
*
*
*
Probe Tests – Drift Test
*
*
*
Length Adjust Setup Test
*
*
*
Sorting Chute Tests
*
*
*
Keypad Test
*
*
*
Audible Beep Test
*
*
*
Settings
Company Name
*
*
*
Setup
Job Setup – Nominal & Tolerance
*
Job Setup – Customer Name
*
Job Setup – Part Number
*
Job Setup – Lot Number
*
Job Setup – Comments
*
Probe Setup – Standard
*
*
*
Probe Setup – UltraCal
*
Length Adjust Setup – Each
*
*
*
Length Adjust Setup – Centering
*
Length Adjust Setup– Averaging
*
*
Length Adjust Setup – None
*
*
*
Length Adjust Setup – Amount
*
Length Adjust Setup – Set Point for Each
*
Sorting Setup – 2 Way Good
*
Sorting Setup – 2 Way Bad
*
Sorting Setup – 3 Way
*
*
*
Sorting Setup – 5 Way with Percent of Tolerance
*
*
Sorting Setup - Timed
*
*
Sorting Setup- Non-release
*
Coiler Shutdown – Consecutive Bad
*
*
*
Coiler Shutdown – No Cutoff
*
*
Coiler Shutdown – Total Good
*
Coiler Shutdown - CpK
*
Coiler Shutdown - Excess Adjust
*
SPC - Subgroup Size
*
SPC - Sample Frequency
*
SPC – Collect on All/Good Only
*
SPC – Limits Calculated/Entered
*
Monitor – Cub & Tiger: Bar Graph Display; Super Tiger: Unique Graphical Touch-Screen
Display
Last Reading
*
*
Last 5 Readings
*
Tiger User Manual
Page 66 of 71
060-1000-0091-00A
Last 5 Mean
Good Count
Job Summary
Strip Charts – With Specs
Strip Charts – With Histogram
Production Monitor – Sort Summary
Production Monitor – Testing Times and Rates
SPC – Data
SPC – X-Bar Chart
SPC – R Chart
SPC – Sample Histogram
SPC – Total Histogram
Machine Capability Study
Tiger User Manual
Page 67 of 71
*
*
*
*
*
*
*
*
*
*
*
*
*
*
060-1000-0091-00A
19 ACCESSORIES FOR THE TIGER FREE-LENGTH GAGE
Part No.
050-1000-0050-05
025-0000-0711-03
025-0000-0711-05
025-0000-0711-04
025-0000-0658-02
025-0000-0658-03
025-0000-0655-00
018-0000-2535-00
018-0000-2531-00
018-0000-2535-00
018-0000-2533-00
018-0000-2534-00
025-0000-0654-00
025-0000-0655-01
025-0000-0631-00
025-0000-0631-01
025-0000-0631-02
025-0000-0631-03
025-0000-0631-04
025-0000-0597-03
025-0000-0597-00
025-0000-0597-01
025-0000-0597-02
025-0000-0640-00
025-0000-0679-00
025-0000-0573-00 A
025-0000-0648-00
025-0000-0648-01
025-1000-0426-00
025-0000-0652-00
025-0000-0589-00 B
025-0000-0590-00
018-0000-2551-01
018-0000-2551-02
018-0000-2551-03
018-0000-2515-01
Tiger User Manual
Part Name
Tiger Software
Tiger Software: Super Tiger Package
Free-Length Gage
Tiger Gage Standard 120 VAC in & 120 VAC out
Tiger 240 VAC in & 24 VAC out
Tiger 120/240 VAC in & 24 VDC out
Probes
Temperature-Stable Heated Probe – PX595G (English)
Temperature-Stable Heated Probe – PX595G (Metric)
Probe Tips
Extended Probe Tip – Kit (1 Base & 5 Tips)
Extended Probe Tip – 1/8 x1”, Threaded (3 x 25 mm)
Extended Probe Tip – x 1”, Threaded (6 x 25 mm)
Extended Probe Tip – 3/8 x 1”, Threaded (9 x 25 mm)
Extended Probe Tip – 5/8 x 1”, Threaded (16 x 25 mm)
Extended Probe Tip – 1 x 1”, Threaded (25 x 25 mm)
Extended Probe Tip – Base Assembly, Threaded
Extended Probe Tip – Kit (5 single piece assemblies)
Probe Tip Assembly, 1/8 dia
Probe Tip Assembly, dia
Probe Tip Assembly, 3/8 dia
Probe Tip Assembly, 5/8 dia
Probe Tip Assembly, 1 dia
Guarded Probe Tip – 5/8” Dia. (16 mm)
Guarded Probe Tip – 1.0” Dia. (25 mm)
Guarded Probe Tip – 1.5” Dia. (38 mm)
Guarded Probe Tip – 2” Dia. (52 mm)
Probe Holders
PB309B: Fixed Probe Holder
Manual Swing-Away Probe Holder
PR2: Retractable Probe Holder
Read Switches
RS2E- Read Switch Assembly
Magless: Read Switch Assembly
Shutdown Control
Cable Assy: Shut Down, 4 pin
Shutdown Bypass Connector
Pitch Control
AC336 Driver Assembly
AC336 Gear Box, 20:1
AC336 Adapter 10-32, W100A
AC336 Adapter -28, W10A
AC336 Adapter 3/8-24. W11A
AC336 Adapter Kit, -20, W115A
Page 68 of 71
060-1000-0091-00A
018-0000-2551-00
018-0000-2515-00
013-5000-0151-00
025-0000-0596-00 E
025-0000-05-95-00
025-0000-0593-01
025-0000-0593-03
025-0000-0593-02
025-0000-0593-00
025-0000-0593-04
013-5000-0155-00
018-0000-2578-00
025-0000-0600-00 A
025-0000-0566-00
025-0000-0538-00 B
005-0000-0537-00 D
025-0000-0582-00
025-0000-0580-00
025-0000-0576-00
025-0000-0578-00
Tiger User Manual
AC336 Adapter Blank (up to 3/8” or 10 mm thread)
AC336 Adapter Kit, Blank (1/4 – ” or 6 – 12 mm thread)
AC336 Flex Shaft, 8” (200 mm)
Heavy Duty Pitch Control
AC337 Heavy Duty Driver Assy
AC337 Gear Box, 50:1
AC337 Adapter Kit, 3/8-24
AC337 Adapter Kit, -20
AC337 Adapter Kit, 5/8-18
AC337 Adapter Kit, -16
AC337 Adapter Kit, Blank (1/4-3/4” or 6-10 mm thread)
AC337 Flex Shaft, 12” (304 mm)
AC337 Anti-rotation Bracket
Sorting Devices
ASR1 – 2 Way Air Jet, 120 VAC
MC34-2 – 2 Way Air Powered Sorter, 120 VAC
MC46-3 – 3 Way Air Powered Sorter, 120 VAC
MC46-5 – 5 Way Air Powered Sorter, 120 VAC
SC48-3AP – 3 Way Air Powered Sorter with Stand, 120 VAC
SC48-5AP - 5 Way Air Powered Sorter with Stand, 120 VAC
SC48-3 – 3 Way Electric Powered Sorter with Stand, 120 VAC
SC48-5 – 5 Way Electric Powered Sorter with Stand, 120 VAC
Page 69 of 71
060-1000-0091-00A
TITLE
Title to the described equipment shall remain in the seller until full, actual payment therefore shall have been
made. In the event of a default, the seller shall have the right to repossess the said equipment and whatever
monies shall have been paid on account shall be deemed to have been rental for the use thereof to the date of
such repossession. The seller shall also have the right to hold the purchaser liable for a sum equivalent to the
unpaid balance of the purchase price together with all expenses and damages that the seller may have sustained,
the purchaser to receive credit however, for the net monies realized on the sale of the equipment. At the election
of the seller, the seller may deem title to have passed to the purchaser, in which event the seller need not
repossess the equipment, but may sue at law for the balance unpaid thereon.
WARRANTY
The Tiger Free-Length Spring Gage parts and labor are warranted against defects in material and workmanship
to the consumer for a period of twelve months from the date of purchase. This warranty covers all parts, except
consumable items. It applies only to machines and accessories which have been installed and operated in
accordance with instructions in our reference manuals, have not been tampered with in any way, misused,
suffered damage through accident, neglect or conditions beyond our control and have been serviced only by
authorized personnel. Larson Systems Incorporated is not responsible for loss in operating performance due to
environmental conditions, such as humidity, dust, corrosive chemicals, deposition of oil or other foreign matter,
spillage or other conditions beyond our control. There are no other warranties expressed or implied, and Larson
Systems Incorporated shall not be liable under any circumstances for incidental or consequential damage.
Warranty service is conducted at LSI’s facilities in Minneapolis, MN. Return the tester freight prepaid during the
warranty period, and Larson Systems Incorporated will make a warranty determination, repair and return the
tester freight collect. Shipments sent collect will be rejected.
Tiger User Manual
Page 70 of 71
060-1000-0091-00A
Larson Systems Inc.
10073 Baltimore Street NE
Minneapolis, MN 55449-4425
763-780-2131
Fax: 763-780-2182
1-877-780-2131
www.larsonsystems.com
[email protected]
Tiger User Manual
Page 71 of 71
060-1000-0091-00A