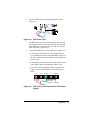
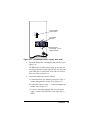
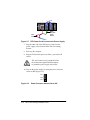
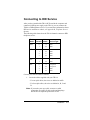
1
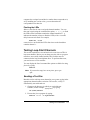
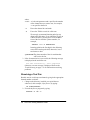
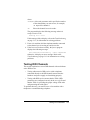
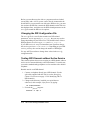
TR114 PCI Analog Hardware Guide Document Number 930-412-81 Printed January 1999 410 First Avenue Needham, MA 02494-2722 781-449-4100 www.brooktrout.com Copyright© 1998 - 1999 Brooktrout Technology, Inc. All rights reserved. This product may not, in whole or in part, be copied, photocopied, reproduced, translated, or reduced to any electronic medium or machine readable form without prior consent, in writing, from Brooktrout Technology, Inc. Information contained in this document is subject to change without notice. Printed in the United States of America. Trademarks Brooktrout Technology, TR Series, TR114, TRNIC, and Universal Port are trademarks of Brooktrout Technology, Inc. Windows, Windows 95, Windows NT, MS-DOS and Visual C++ are registered trademarks of Microsoft Corporation. Solaris and SPARC are trademark of Sun Microsystems. Other company or product names mentioned herein may be trademarks or registered trademarks of their respective companies. Brooktrout Technical Support If you need to contact Brooktrout Technical Support, refer to Chapter 4, Contacting Technical Support for instructions and methods of contact. LIMITED WARRANTY Brooktrout Technology, Inc. (“Brooktrout”) warrants the hardware component of the product described in this documentation (the “Product”) to be free from defects in materials and workmanship under normal and proper use for a period of one year from the date of purchase from Brooktrout. This warranty applies to the tangible media on which software and firmware are recorded, but does not apply to the software and firmware themselves. This warranty also does not apply to any expendable components, any damage resulting from abuse of the Product, or normal wear and tear. In the event of a warranty claim, the defective item will be repaired or replaced, at Brooktrout's option, upon delivery to Brooktrout of the defective item. Brooktrout is not responsible for transportation and related charges in connection with shipment of items to Brooktrout for warranty service. Brooktrout reserves the right to charge for inspection of returned items if it is determined that the items were not defective. With respect to software and firmware, it should be understood that these components are complex works which may contain undiscovered defects. Although the software and firmware provided with the Product contain substantially the features described in the documentation, to the extent applicable to the product purchased, no assurance can be given that operation of such software and firmware will meet the user's requirements or be uninterrupted or free of errors. Except as expressly agreed by Brooktrout in writing, Brooktrout makes no representations or warranties of any kind, express or implied, with respect to the Product or any hardware, software or firmware components thereof. In particular, but without limitation of the foregoing, Brooktrout disclaims all implied warranties of merchantability or fitness for a particular purpose. Some states do not allow the exclusion of implied warranties so the above exclusion may not apply to you. In no event shall Brooktrout be liable for loss of profits or indirect, special, incidental, or consequential damages relating to the Product. Brooktrout's total liability, in contract, tort or otherwise, in any way connected with the Product shall be the correction, repair or replacement of any defective item or, at Brooktrout's option, the payment of actual direct damages not to exceed the payments made to Brooktrout for the Product in question. Some states do not allow the limitation or exclusion of liability for incidental or consequential damages, so the above limitation and exclusion may not apply to you. This warranty gives you specific legal rights. You may also have other rights which vary from state to state. Contents Preface About This Manual . . . . . . . . . . . . . . . . . . . ix Related Documents . . . . . . . . . . . . . . . . . . . ix Manual Conventions . . . . . . . . . . . . . . . . . . x Chapter 1 Introduction TR114 PCI Models . . . . . . . . Features . . . . . . . . . . . . . . Recommended Computer Platforms System Requirements . . . . . . . Hardware Requirements . . . Operating Requirements . . . . . . . . . . . . . . . . . . . . . . . . . . . . . . . . . . . . . . . . . . . . . . . . . . . . . . . . . . . . . . 1-1 1-1 1-3 1-3 1-3 1-4 Chapter 2 Installation Hardware Description . . . . . . . . . . . . . . . Configuring the Hardware . . . . . . . . . . . . . Using PCI and ISA Boards in the Same System Installing the TR114 Board in the Computer . . . Connecting to Loop-start Service . . . . . . . . . Installing a Power Supply for DID Service . . . . Connecting a Tellabs 8012 Power Supply . . Connecting a Tellabs 8001 Power Supply . . Connecting to DID Service . . . . . . . . . . . . Testing Your TR114 . . . . . . . . . . . . . . . . . . 2-1 . . 2-2 . 2-3 . . 2-4 . . 2-4 . . 2-5 . . 2-6 . . 2-8 . 2-11 . 2-12 Chapter 3 Testing Your Installation Using the Test Software . . . . . . . . . . . . . . . . 3-1 v TR114 Test Files . . . . . . . . . . . . . . . Installing the Test Software . . . . . . . . . . Changing the TR114 Configuration . . . . . . Testing the Configuration Settings . . . . . . Identifying Channel Connections . . . . . . . . . Channel Assignments When Using Multiple TR114s . . . . . . . . . . . . . . . . . . . . . Using Btdriver to Identify Channels . . . . . . Btdriver Output . . . . . . . . . . . . . . Flashing the LEDs . . . . . . . . . . . . . Testing Loop-Start Channels . . . . . . . . . . . Sending a Test Fax . . . . . . . . . . . . . . Receiving a Test Fax . . . . . . . . . . . . . Testing DID Channels . . . . . . . . . . . . . . . Changing the DID Configuration File . . . . . Testing DID Channels without Active Service . Testing DID Channels with Active Service . . Troubleshooting . . . . . . . . . . . . . . . . . . Board Installation/Test Conditions . . . . . . DID Conditions . . . . . . . . . . . . . . . . Sending Test Results to a File . . . . . . . . . . Rebooting under Your Preferred Operating System Configuring Your LAN Fax Software . . . . . . . . . . . . . . . . . 3-2 3-2 3-3 3-4 3-5 . . . . . . . . . . . . . . . . 3-6 . 3-6 . 3-6 . 3-7 . 3-7 . 3-7 . 3-8 . 3-9 3-10 3-10 3-12 3-13 3-13 3-16 3-17 3-18 . 3-18 Chapter 4 Contacting Technical Support Getting Technical Support . . . . . . . . . . . . . . 4-1 Downloading Test Software . . . . . . . . . . . . . . 4-2 Returning a Defective TR114 Board . . . . . . . . . 4-3 Appendix A Monitoring Channel Activity TR114 PCI Loop-start LEDs . . . . . . . . . . . . . A-1 TR114 PCI DID LEDs . . . . . . . . . . . . . . . . . A-2 Appendix B Telephone Service Options Loop-Start Telephone Service . . . . . . Ordering Loop-Start Telephone Service DID Telephone Service . . . . . . . . . . DID Operation . . . . . . . . . . . . . DID Answer Supervision Signaling . . vi TR114 PCI Analog Hardware Guide . . . . . . . . . . . . . . . . . . . . . . . . . . . . . B-1 B-1 B-2 B-3 B-4 Ordering DID Telephone Service . . . . . . . . . B-4 DID Service Options . . . . . . . . . . . . . . B-5 Appendix C Telephone Jack Pinout Appendix D North American Standards Compliance Telephony Regulations . . . . . . . . . . . . . . FCC Rules Regarding Fax Branding . . . . . IC Equipment Attachment Limitations (CS-03) Electromagnetic Emissions . . . . . . . . . . . . FCC Emissions Information . . . . . . . . . . IC Emissions Notice . . . . . . . . . . . . . . Safety . . . . . . . . . . . . . . . . . . . . . . . . . . . . . . . D-1 . D-3 . D-3 . D-4 . D-4 . D-5 . D-5 Index vii Preface About This Manual This hardware guide describes how to install and use the Brooktrout PCI-based TR114 analog boards. The manual explains how to install the board, connect the TR114 to loop-start and DID analog telephone service, and test your installation. This manual is written for those who install and configure telephony boards. Related Documents TR114 ISA Analog Hardware Guide (if you are also using TR114 ISA boards in your system) The following documents are available for developers: TR114 Firmware Installation and Release Notes Fax, Voice, and Data API V4.0, Volume 1, User’s Guide Fax, Voice, and Data API V4.0, Volume 2, Programmer’s Reference ix Manual Conventions This manual uses the following conventions: • Italics denote file names, directory names and program names within the general text, for example, “the btcall.cfg file”. • The Courier font in bold indicates a command sequence entered by the user at the system prompt, for example: cd /usr/sys/bfax/app.src • The Courier font not bolded indicates system output, for example: c:>Files installed. • The icon below indicates a Caution note, meaning that the software or hardware may be damaged if the proper precautions are not observed. x TR114 PCI Analog Hardware Guide Chapter 1 Introduction The TR114 PCI family of analog boards consists of two-channel and four-channel loop-start and DID models for use in computers with PCI buses. The TR114 is a powerful fax and voice product that can be used for many applications, including fax broadcast, fax-on-demand, fax store and forward, LAN fax servers, e-mail to fax services, and combined voice and fax applications. TR114 PCI Models The TR114 PCI analog board is available in these configurations: TR114+P2L TR114+P4L TR114+P2C TR114+P4C TR114+P2D TR114+P4D - Two loop-start interfaces Four loop-start interfaces One loop-start and one DID interface Two loop-start and two DID interfaces Two DID interfaces Four DID interfaces Each model can use the same type and number of telephone lines as interfaces on the board. Features The following TR114 PCI features provide high performance fax and voice capabilities: • Two or four independent fax and/or voice channels in one 32-bit PCI bus slot. Each channel has a 25 MHz NS32FX164 microprocessor (32-bit CISC with built-in DSP) and 2 MB RAM with parity checking. • Full Group 3 fax send and receive functionality on each channel, with advanced features such as Error Correction Mode and MR or MMR compression. 1-1 • Speech record and playback. Each channel can record and play back ADPCM and µ-law PCM, permitting you to build a variety of fax and voice systems – voice-prompted fax retrieval systems, fax mail systems with voice annotation capability, integrated voice/fax mail systems – using a single TR114. • Downloadable firmware for new functionality. Updates are easily installed, even in the field, from a diskette or downloaded from the Brooktrout web site. • DTMF (Touch Tone), SIT, CNG, and CED detection capability. • Group 3 and 4 fax compression; auto conversion of ASCII, MH, MR, MMR, TIFF, and PCX/DCX files; and binary file transfer. • Automatic reduction or expansion of the page width on transmission. • Adaptive call progress detection capability that works world-wide. • LED status indicators. • FCC Rules, Part 68 and Part 15 Class A approval; Industry Canada Approval; ETL recognition for US and Canadian safety certification. • Fax autorouting capability using optional DID interfaces. DID and DNIS circuitry can be used to automatically route an inbound fax to the proper destination in a multiuser or LAN environment. • Application Programmer's Interface tools and software drivers that work with many operating systems. Contact Brooktrout technical support for the latest information on supported operating systems. 1-2 TR114 PCI Analog Hardware Guide Recommended Computer Platforms Brooktrout recommends the following computer manufacturers: Diversified Technology, Inc. 800-443-2667 Industrial Computer Source 800-523-2320 Compaq Proliant servers: 1600, 2500, 5500, 7000 www.compaq.com System Requirements To run a Brooktrout TR114 PCI analog board, your system requires the following: Hardware Requirements Each TR114 PCI board requires the following: • One 32-bit PCI slot • A hardware interrupt (assigned by the system BIOS) • A block of consecutive I/O ports (assigned by the system BIOS): - 12 addresses for two-channel boards - 20 addresses for four-channel boards • Telephone service for loop-start TR114 telephone interface (analog single-line extension for PBX or Key telephone systems), and/or for DID TR114 telephone interface. Appendix B, Telephone Service Options explains how to order telephone service. • External -48V DC power supply for DID operation You need to purchase a power supply separately from the TR114. Brooktrout offers Tellabs 8012 or 8001 power supplies. The 8012 (recommended) is UL and CSA certified for use with the TR114. Introduction 1-3 Operating Requirements • Temperature: 0° - 50° C (32° - 122° F) • Humidity: 10% - 95% (noncondensing) • Power requirements for a PCI board (±5%): Type +5VDC +12VDC -12VDC Total Power 2-channel 1.08 A 4 mA 30 mA 5.8 W 4-channel 1.9 A 6 mA 42 mA 10.1 W • Power requirements for DID operation: Tellabs Current Model Supplied Current Used per Channel DID Trunks Supported 8001 1A 40 mA 25 8012 0.25 A 40 mA 6 1-4 TR114 PCI Analog Hardware Guide Chapter 2 Installation This chapter shows the layout of the TR114 PCI boards and explains the following: • How to install the TR114 for loop-start service • How to install the TR114 for DID service • How to install a Tellabs 8012 or 8001 power supply for DID service • How to ensure that the board is working Hardware Description Figure 2-1 shows the layout of the TR114 PCI analog loop-start boards. Refer to Appendix A, Monitoring Channel Activity for a description of the LEDs. RJ-45 Phone Jack LEDs for TR114 Channels Mounting Bracket PCI Bus Connector Figure 2-1. TR114+P2L and P4L Loop-start Board Figure 2-2 shows the layout of the TR114 PCI analog DID boards. Refer to Appendix A, Monitoring Channel Activity for a description of the LEDs. 2-1 TR114 DID Daughter Board RJ-45 Phone Jack DID Power Supply Socket LED for DID Power LEDs for TR114 Channels Ground Switch Mounting Bracket PCI Bus Connector Figure 2-2. TR114+P2D, P4D, P2C and P4C DID Board RJ-45 Jacks The PCI analog board has a single RJ-45 telephone jack. Depending on the number of channels your board supports, either a two-split cable or a four-split cable is supplied with the board. DID Power Supply Socket The socket for connecting the DID power supply is located on the mounting bracket below the RJ-45 jacks. Ground Switch A ground switch, located on the DID daughter board, is set toward the bracket (grounded). If you have problems with noise on the DID lines, Brooktrout Technical Support may tell you to reset this switch. Do not change the switch unless Brooktrout instructs you to do so. Configuring the Hardware There is no interrupt jumper or address switch to set on the TR114 PCI board. The system BIOS configures the hardware interrupt and I/O port addresses for TR114 boards plugged into a PCI bus. 2-2 TR114 PCI Analog Hardware Guide Using PCI and ISA Boards in the Same System For PCI boards, the PC BIOS automatically configures the addresses and hardware interrupts (IRQs), which may change when the system is rebooted, especially if devices are added or moved. If you have a TR114 ISA board in your system when you install a TR114 PCI board, the BIOS will not recognize the ISA board when it configures the PCI board. All TR114 ISA boards share one unique IRQ. An IRQ can be shared among PCI boards, but not between PCI boards and ISA boards. The Brooktrout drivers will not load if such a conflict exists. If you select an IRQ when installing the Brooktrout driver, the driver will reserve that IRQ, but will not use it for the PCI board. If you select a DMA channel (which is not used by PCI boards), the driver will reserve that channel, but will not use it for the PCI board. Thus, you will be wasting the IRQ or DMA channel and could cause a conflict with another board or device. If there are conflicts between your TR114 PCI and ISA boards’ resources, you may need to make changes to the computer BIOS or setup. The method you use depends on your brand of computer. Check the manufacturer’s instructions for techniques for dealing with conflicts between boards. Generally, you can avoid conflicts between PCI and ISA boards by doing the following: 1. Let the PC BIOS assign the IRQ and I/O addresses to the TR114 PCI board. 2. Use the tools supplied with the operating system to determine the interrupts and addresses used by the PCI board. 3. Configure the interrupts and addresses for the TR114 ISA boards. 4. If you are installing a TR114 ISA board in an EISA slot, create an EISA configuration file. Using the BIOS, reserve the interrupt, I/O addresses, and DMA channel (if used). The BIOS will not use the resources that are reserved for ISA (or EISA) boards for your PCI board. Installation 2-3 Installing the TR114 Board in the Computer Install the TR114 board in the computer using the instructions supplied by the manufacturer of your computer for installing boards. The TR114 PCI analog board is an electrostaticsensitive device. Follow the proper ESD procedures when handling the board. CAUTION After the TR114 is installed in the computer, you can connect the telephone cables if you are connecting to loop-start service. If you are connecting to DID service, you need to connect a -48VDC external power supply to the TR114. The procedures are explained in the following sections. Connecting to Loop-start Service After you install the TR114 in the computer, connect the TR114 loop-start channels to loop-start telephone lines using the following procedures. If you need more information about loop-start service and how to order it, see Appendix B, Telephone Service Options. The TR114 channels connect to loop-start service as follows: TR114 Model TR114 Channel Cable Labels P2L 0 1 A B P4L 0 1 2 3 A B C D Connect your TR114 telephone cables using the following procedure: 1. Locate the cable(s) supplied with your TR114 board. - For two-split cables, the wires are labeled A and B - For four-split cables, the wires are labeled A, B, C and D. 2-4 TR114 PCI Analog Hardware Guide Note: If you make your own cable, to ensure a stable connection, use an RJ-45 plug on the end of the cable that plugs into the RJ-45 jack on the TR114. 2. Plug the end with a single RJ-45 plug into the RJ-45 jack on the board; plug the RJ-11 plugs at the other ends of the cable into separate loop-start telephone jacks. The TR114 loop-start channels are now connected to loop-start telephone lines. Installing a Power Supply for DID Service The TR114 must supply the DID trunk line with continuous -48VDC power; service can be lost if the telephone company does not detect -48VDC power on the line. A Tellabs 8012 or 8001 (or equivalent) regulated power pack supplies the necessary -48VDC power. The 8012 is adequate for up to six DID trunks (6 TR114 channels); and the 8001 is adequate for up to 25 DID trunks (25 TR114 channels). After you install the TR114 board in the computer and before you connect the telephone lines for DID service, connect a power supply to the TR114. You can connect multiple TR114 boards to a single Tellabs power supply. However, Brooktrout recommends that each board have its own power supply so that power is not lost for multiple boards if a single power supply fails. Once the DID power supply is installed, leave it on to ensure continued DID service. You can turn off the computer without turning off the DID power supply. Installation 2-5 Connecting a Tellabs 8012 Power Supply You can connect up to six (6) TR114 channels to a single Tellabs 8012 power supply by connecting the boards’ DID power cords to the same contacts. Connect the power supply as follows: 1. If the power supply is plugged into a wall socket, unplug it. 2. Power off the computer. 3. An 8012 power supply from Brooktrout comes with a ground wire connected to the contacts labeled 48V RET and FRM GRD (Figure 2-3). Verify the ground wire is connected to the contacts. If your Tellabs 8012 is supplied by another vendor, you may have to provide your own ground wire (any wire will do). Power Plug Contact Block -48V NC 48V RET NC FRM GRD Ground Wire Figure 2-3. Tellabs 8012 Power Supply, Rear View 2-6 TR114 PCI Analog Hardware Guide 4. Locate the DID power cord supplied with the TR114 (Figure 2-4). Figure 2-4. DID Power Cord The DID power cord has a plastic plug on one end, and two metal connectors on the opposite end. The split end of the DID power cord consists of one red wire and one black wire with a green sleeve. 5. Connect the DID power cord as follows (see Figure 2-5): a. Connect the metal connector on the end of the black wire with the green sleeve to the 48V RET contact (on the same contact with the ground wire) and tighten the contact screw. b. Connect the metal connector on the end of the red wire to the -48V contact and tighten the contact screw. c. If you are connecting multiple TR114s to the power supply, connect each DID power cord using steps a) and b). -48V Red wire NC 48V RET NC Black wire with green sleeve FRM GRD Ground wire Figure 2-5. DID Power Cord Connected to 8012 Power Supply Installation 2-7 6. Plug the other end of the DID power cord(s) into the power supply socket located on the TR114 mounting bracket. 7. Power up the computer. 8. Plug the power supply into a grounded wall socket. The wall socket must be grounded. Follow the instructions supplied with the adapter to ground the wall socket. CAUTION Connecting a Tellabs 8001 Power Supply This section explains how to connect your TR114 to a Tellabs 8001 power supply. You can connect up to 25 TR114 channels to a single Tellabs 8001 by connecting the boards’ DID power cords to the same contacts on the power supply. Connect the power supply as follows: 1. If the power supply is plugged into a wall socket, unplug it. 2. Power off the computer. 3. On the back of the power supply, make sure the three-position power selection switch is set to Off (Figure 2-6). 4. On the contact block on the back of the power supply (Figure 2-6), make sure the metal plate is connecting the contacts labeled “+” and “COM”. If it is not, use a screw driver to loosen the contacts and move the metal plate so “+” and “COM” are connected. Do not tighten the “+” or “–” contact screws yet. Make sure the contact labeled “–” is not connected to another contact. 2-8 TR114 PCI Analog Hardware Guide Three-position power switch 24V OFF 48V U SE FU Line Fuse COM F + SE – Contact Block Ground plate connecting '+' and COM contacts Figure 2-6. Tellabs 8001 Power Supply, Rear View 5. Locate the DID power cord supplied with the TR114 (see Figure 2-4). The DID power cord has a plastic plug on one end, and two metal connectors on the opposite ends. The split end of the DID power cord consists of one red wire and one black wire with a green sleeve. 6. Connect the DID power cord as follows: a. Connect the black wire with the green sleeve to the “+” contact and tighten the contact screw (Figure 2-7). b. Connect the red wire to the “–” contact and tighten the contact screw (Figure 2-7). c. If you are connecting multiple TR114s to the power supply, connect each DID power cord using steps a) and b). Installation 2-9 – + COM Black wire with green sleeve Red wire Figure 2-7. DID Power Cord Connected to Power Supply 7. Plug the other end of the DID power cord(s) into the power supply socket located on the TR114 mounting bracket. 8. Power up the computer. 9. Plug the Tellabs 8001 power cord into a grounded wall socket. The wall socket must be grounded. Follow the instructions supplied with the adapter to ground the power supply wall socket. CAUTION 10. Turn on the power supply by setting the power selection switch to 48V (Figure 2-8). 24V OFF 48V Figure 2-8. Power Selection Switch Set to 48V 2-10 TR114 PCI Analog Hardware Guide Connecting to DID Service After you have installed the TR114 PCI board in the computer and connected a DID power supply to the TR114, you can connect the TR114 to DID telephone service. If you need more information about DID service and how to order it, see Appendix B, Telephone Service Options. The following table shows how the TR114 channels connect to DID telephone service. TR114 Model Cable Channel Labels Service Type P2D 0 1 A B DID DID P4D 0 1 2 3 A B C D DID DID DID DID P2C 0 1 A B Loop-start DID P4C 0 1 2 3 A B C D Loop-start Loop-start DID DID Connect your TR114 cables as follows: 1. Locate the cables supplied with your TR114: - For two-split cables, the wires are labeled A and B - For four-split cables, the wires are labeled A, B, C and D. Note: If you make your own cable, to ensure a stable connection, use an RJ-45 plug on the end that plugs into the RJ-45 telephone jack on the TR114. Installation 2-11 2. Plug the end with a single RJ-45 plug into the RJ-45 jack on the TR114 mounting bracket; plug the RJ-11 plugs at the other end into wall-mounted DID phone jacks. Do not plug a DID cable into a loop-start line – this can cause serious damage to the TR114. CAUTION The TR114 DID channels are now connected to the DID lines. Testing Your TR114 When you have installed your board and connected the cables to the telephone service, we strongly recommend that you test your setup using the Brooktrout test program supplied on diskette with the board. See Chapter 3, Testing Your Installation for the procedures for testing. 2-12 TR114 PCI Analog Hardware Guide Chapter 3 Testing Your Installation This chapter explains how to use the Brooktrout test software to ensure that the TR114 has been installed correctly and that the telephone lines are connected properly. The test software, supplied on diskette with the board, can be used to test all TR114 series boards in a system. You can also download a copy of the test program from Brooktrout’s FTP or web site; see Chapter 4, Contacting Technical Support. Using the Test Software In order to test your system using the test software, the TR114 must be installed in your computer, telephone service must be installed, and the TR114 must be connected to the telephone lines. If you are using DID service, the power supply for DID must be powered on. If you installed more than one model of TR series board, or changed the default I/O address or IRQ on a TR114 ISA board, you must edit the btdriver.cnf configuration file before you can send or receive test faxes. The following tasks are required to test your board. They must be performed in the order listed. • Insert the test software diskette in your disk drive and copy the test software • If necessary, edit the TR114 configuration parameters in the btdriver.cnf file • Boot up your system under DOS • Test the configuration settings • Test loop-start and DID service • Reboot the system under your preferred operating system • Remove the test program 3-1 TR114 Test Files The test software includes the files listed below. These files must remain together; do not store them in separate directories. Table 3-1. TR114 Test Files File Name Description btdriver.bat, btk1.exe, btk2.exe A batch file and DOS TSR, which you must install before you run the faxtest program. btdriver.cnf A configuration file that contains the interrupt, DMA channel, and I/O port addresses of any TR114 ISA fax board(s) installed in your system. The btdriver.bat file uses this file. country.cfg A read-only configuration file containing country-specific information. digital.cfg A configuration file used for testing the TRNIC board with TR114 digital boards. faxtest.exe A test program used to send and receive facsimiles and to verify DID operation. send.fil A single page Group 3 fax file; send automatically with the test fax. test-16.pex, test-164.pex Test firmware the faxtest program automatically downloads to the TR114. user.cfg A configuration file that contains a number of run-time configuration parameters. Installing the Test Software You can copy the contents of the test diskette to your hard drive or you can run the program from the diskette. Note: If you are using OS/2, Windows NT, or Unix, do not use the test program from a DOS window. Boot from a DOS diskette and run the test software from the disk drive. 1. Make the directory in which to store the test software (for example, bfax\faxtest) by typing: mkdir \bfax\faxtest 3-2 TR114 PCI Analog Hardware Guide 2. Make the new directory the current directory: cd \bfax\faxtest 3. Copy the files from the diskette to the current directory: copy A:*.* 4. For Windows and DOS systems: If there are other software applications or TSRs for Brooktrout boards running on your system, create a temporary autoexec.bat file that does not contain the lines that run such software. 5. For Windows and DOS systems: Reboot your system using the modified autoexec.bat file. Remember to restore the original autoexec.bat file when you finish testing. Changing the TR114 Configuration Depending on the number and models of TR114 boards you installed and whether their installation caused any conflicts with other hardware or software in your system, you may need to edit the btdriver.cnf configuration file. You can use your system’s text editor or any ASCII text editor to change the parameters in this file. The btdriver.cnf configuration file contains the following default values for the interrupt, DMA channel and address parameters: intnum 5 dmachan 1 addrs 264 4 The configuration file is set up for a single 4-channel TR114 ISA board installed at base address 260, using interrupt 5 and DMA channel 1. If you install only TR114 PCI boards, make the following changes to the file: 1. Change the interrupt and DMA channel parameters to -1: intnum -1 dmachan -1 2. Delete the line containing the default address: addrs 264 4 Testing Your Installation 3-3 If you have Brooktrout ISA cards in addition to PCI cards, specify the appropriate values for the ISA cards, but do not specify any values for the PCI cards. Testing the Configuration Settings Test the configuration settings using the following procedures: 1. Boot up your system to run under DOS. 2. Change to the directory where you copied the test software (in this example, \bfax\faxtest) by typing: cd \bfax\faxtest 3. Execute the btdriver batch file: btdriver btdriver.cnf Verify that the display shows the same number of channels you installed in your system (number of boards multiplied by the number of channels per board). For example, if you installed one TR114 four-channel PCI board in your system, you should see the following output: PCI TR114 at port 6000 and IRQ 9 with 4 channels at Bus 0, Dev 16, Func 0. fax0 6004 TR114+ fax1 6008 TR114+ fax2 600c TR114+ fax3 6010 TR114+ Total Channels: 4 TR114; 0 Trufax; 0 TR112/TR111MC; 0 TR200 No BRI TR114s found. BFAX driver version 3.7 installed for 4 channels, interrupt -1 dma -1, bufsize 8192, int queue size 10. The first line of the display shows the system-assigned port address and interrupt, as well as the number of channels the system detected for PCI boards. 4. If the program finds the correct number of channels, skip to the Testing Loop-Start Channels on page 3-7 or to the Testing DID Channels on page 3-9. If the program fails to find the correct number of channels, check to see if the LEDs on the TR114 flash once when you power up the system. 3-4 TR114 PCI Analog Hardware Guide If the LEDs fail to flash or if they remain on, a problem may exist with the TR114 or with the computer. To determine where the problem lies: a. Install the TR114 in another slot and power up the system. b. If the LEDs still fail to operate correctly, install the TR114 in another computer if possible, and try again. c. If the LEDs fail to operate correctly in the new computer, contact Brooktrout Technical Support or the reseller from whom you purchased your TR114 card. See Chapter 4, Contacting Technical Support for contacting Brooktrout. Identifying Channel Connections The telephone cables for your model TR114 should be connected as shown in the following table. TR114 Model TR114 Cable Channel Labels Service Type P2D 0 1 A B DID DID P4D 0 1 2 3 A B C D DID DID DID DID P2C 0 1 A B Loop-start DID P4C 0 1 2 3 A B C D Loop-start Loop-start DID DID Testing Your Installation 3-5 TR114 Model TR114 Cable Channel Labels Service Type P2L 0 1 A B Loop-start Loop-start P4L 0 1 2 3 A B C D Loop-start Loop-start Loop-start Loop-start Channel Assignments When Using Multiple TR114s When you are using multiple TR114s, the faxtest program assigns channel numbers sequentially (0, 1, 2, 3, 4, 5,...), starting with the first channel on the TR114 that occupies the lowest base I/O address and ending with the last channel on the TR114 that occupies the highest base I/O address. Using Btdriver to Identify Channels If multiple TR114 PCI boards are in use, it may not be apparent which board corresponds to which addresses and which channel numbers. Btdriver provides two features that can help identify boards and channels – the screen display, and the LEDs. Btdriver Output When btdriver is run, it displays information about each TR114 PCI board it detects, in particular, the base address, bus number, device number, and function number (function number is currently always 0) and the IRQ the system has assigned to the TR114, for example: PCI TR114 at port F800 and IRQ 9 with 4 channels at Bus 0, Dev 14, Func 0. From the base address (in the above example, port F800) you can determine which channels are on the board. From the bus and device numbers (in the example, Bus 0, Dev 14), you can determine the slot in the computer in which the board is located. Each slot in the 3-6 TR114 PCI Analog Hardware Guide computer has a unique bus and device number that corresponds to it, so by installing one card at a time, you can determine the correspondence for that slot. Flashing the LEDs Btdriver must first be run to assign the channel numbers. You can then run it again using the command line option, -f x[+y], to flash the LEDs on the board that contains the channel numbered x. y indicates the number of times to flash the LEDs, with a 1-second delay between each flash. For example, btdriver -f 2+4 causes btdriver to flash all the LEDs four times on the board that contains channel 2. Testing Loop-Start Channels This section explains how to send and receive test faxes on TR114 loop-start channels. Before you run these tests, the btdriver program must have successfully loaded, and the TR114 cables must be connected to the loop-start telephone lines. To perform these tests, you need access to a fax machine. You can display the list of command line options available for using faxtest by typing: faxtest Note: If you need to stop faxtest at any time, press q to quit. Sending a Test Fax Run this test for each loop-start channel in your system, typing in the appropriate channel number each time. The test file, send.fil, is automatically sent with each test. 1. Change to the directory in which you copied the test software (in this example, \bfax\faxtest) by typing: cd \bfax\faxtest 2. Execute the faxtest program by typing: faxtest -u <#> -s w<phonenum> Testing Your Installation 3-7 where: -u <#> -u is the unit parameter and # specifies the number of the channel that you want to test, for example, -u 0 specifies channel 0. -s w Places the channel in send mode. Forces the TR114 to wait for a dial tone. We strongly recommend inserting w before any digits in the dial string. If you install the TR114 on a PBX extension, you may have to insert w9w in front of the fax machine’s phone number, for example, faxtest -u 0 -s w9w5551212. Inserting p before the first digit in the dial string causes the board to pulse dial; otherwise, it uses touch tones to dial. <phonenum> The phone number of the fax machine that will receive the fax. 3. If the fax transmission is successful, the following message is displayed at the end of the test: Fax Sent Successfully - Test Completed. Otherwise, an error message is displayed. Refer to the Troubleshooting on page 3-13 for information on solving problems. Receiving a Test Fax Run this test for each loop-start channel, typing in the appropriate channel number each time. 1. Change to the directory in which you copied the test software (in this example, \bfax\faxtest) by typing: cd \bfax\faxtest 2. Execute the faxtest program by typing: faxtest -u <#> -r 3-8 TR114 PCI Analog Hardware Guide where: -u <#> -u is the unit parameter and # specifies the number of the channel that you want to test, for example, -u 0 specifies channel 0. -r Places the channel in receive mode. The program displays the following message when it is ready to receive a fax: waiting for a call If this message fails to display, refer to the Troubleshooting on page 3-13, for information on solving problems. 3. From a fax machine, dial the telephone number connected to the channel you are testing to send it a test fax. 4. If the fax is received successfully, the faxtest program displays the following message: Fax received successfully - Test Completed Otherwise, it displays an error message. Refer to the Troubleshooting on page 3-13 for information on solving problems. Testing DID Channels This section explains how to test DID channels with and without active DID service: • Testing without active DID service (with a telephone connected directly to the DID channel) ensures that the hardware and power supply are functioning properly. • Testing with DID service ensures that the TR114 DID parameters are configured correctly in the user.cfg file and that the TR114 is providing the proper voltage to the telco and generating the wink signal. To perform the tests, you need access to a fax machine with a telephone or a standard analog telephone. Testing Your Installation 3-9 Before you run either test, the btdriver program must have loaded successfully, and a -48 VDC power source must be connected to the board. Before you can run the test with active DID service, you must also activate the DID line, connect the DID channels on the TR114 to the telephone lines, and make sure the DID-related parameters in the user.cfg file match the DID service options. Changing the DID Configuration File The user.cfg file is a text file that contains two DID-related parameters, service type and did_digits, that you may need to change depending on your DID service. The default values of these DID parameters are service type: wink and did_digits: 4. If your DID service is set up for immediate-start operation, change the service type from wink to immediate. Depending on your DID service, you may also need to change the number of DID digits. Use any ASCII text editor to change these values in the user.cfg configuration file. Testing DID Channels without Active Service This section explains how to test reception on a DID channel without active service connected directly to the DID channel. To run this test, you need a standard analog telephone or a fax machine with a built-in telephone. Run this test for each DID channel. 1. Connect a telephone directly into a DID channel. Use the split cable supplied with the TR114 (see the Identifying Channel Connections on page 3-5 for identifying TR114 DID channels). 2. Change to the directory in which you copied the test software (in this example, \bfax\faxtest) by typing: cd \bfax\faxtest 3. Execute the faxtest program: faxtest -u <#> -r 3-10 TR114 PCI Analog Hardware Guide where: -u <#> -u is the unit parameter and # specifies the channel number that you want to test, for example, -u 0 specifies channel 0. Places the channel in receive mode. -r The program displays the following message: waiting for a call If this message fails to display, refer to the Troubleshooting on page 3-13 for information on solving problems. 4. Pick up the handset and dial the appropriate number of DID digits from the fax machine/telephone connected to the DID channel you are testing. Note: If you use a “smart phone” (i.e., one that will not dial unless it hears a dial tone), set did_digits to 0. If the DID digits are detected successfully, the digits are displayed on the screen, and the TR114 generates a fax answer tone. If the DID digits do not display or if there is no fax answer tone, run the faxtest program again and see if you can hear the DID digits in the telephone receiver as you enter them. a. If you can hear the digits, check the setup of the user.cfg configuration file: - If the DID parameter values are incorrect, change them. - If the DID parameter values are correct, run the faxtest program again, and make sure it's really waiting for a call. b. If you cannot hear the digits, the line is not receiving voltage. Check the power supply, the power connection, and the cable to the TR114. Note: If you need to stop faxtest at any time, press q to quit. Testing Your Installation 3-11 Testing DID Channels with Active Service This section explains how to test call reception on any DID channel with active DID service. 1. Connect the DID channel to the DID telephone line. Use an RJ-11 cable or the splitter cable supplied with the TR114. 2. Change to the directory in which you copied the test software (in this example, \bfax\faxtest) by typing: cd \bfax\faxtest 3. Execute the faxtest program by typing: faxtest -u <#> -r where: -u <#> -u is the unit parameter and # specifies the number of the channel that you want to test, for example, -u 0 specifies channel 0. Places the channel in receive mode. -r The program displays the following message: waiting for a call If this message fails to display, refer to the Troubleshooting on page 3-13, for information on solving problems. 4. Make a call to your DID channel and check to see if you hear fax tones. If so, the line is fine. If instead, you hear a fast busy signal right away, the telephone company may not have yet activated the line. Check with the telephone company; if they tell you that the line is activated, check the Troubleshooting on page 3-13 for more information. Note: If you need to stop faxtest at any time, press q to quit. 3-12 TR114 PCI Analog Hardware Guide Troubleshooting This section provides troubleshooting suggestions for board test and installation conditions, and also for DID and btdriver test problems. Board Installation/Test Conditions You may encounter some of the error conditions described in this section when you run the test program on TR114 PCI analog boards. SYMPTOM(S): The driver will not load. Probable Cause: PCI interrupt and base address conflicts. When you reboot the system, TR114 PCI base addresses and interrupt assignments may change, especially if devices were added or moved. Interrupts can be shared between PCI boards (and some other devices, depending on your BIOS), but not between PCI boards and ISA boards. Solution: If you are using only TR114 PCI boards, you must set the interrupt and the DMA channel to -1 in the btdriver.cnf file. If you are using TR114 ISA boards as well as TR114 PCI boards, you may need to change the base address assignments and interrupts on your ISA boards. Refer to your ISA analog manual for instructions. SYMPTOM(S): When you run faxtest, you get the message no dial tone Probable Cause: Cables are not connected correctly or the telco is sending an SIT vacant tone to signal an inactive or incorrect number. Solution: Make sure that telephone service has been activated on the line. Solution: Make sure that your loop-start cable is connected to a loop-start phone line; make sure your DID cable is connected to a DID phone line. Testing Your Installation 3-13 SYMPTOM(S): When you run btdriver, you get the message no fax or voice boards found Probable Cause: The system cannot find any boards. Btdriver should detect 4 channels for each 4-channel board Solution: Put the TR114 in a different slot. Make sure that all the channel LEDs of the board flash once at power up SYMPTOM(S): faxtest displays the message Reorder Busy. Probable Cause: On outdialing, the TR114 always reports a fast busy on the line. Solution: The system is dialing prematurely. Insert a dialing prefix ww or w, at the beginning of each dial string. Check your PBX to ensure that calls are routed correctly. You may have to dial 8 or 9 to dial outside. SYMPTOM(S): Cannot send and/or receive faxes properly. The fax can be received but is unrecognizable; or faxtest reports reset failed Probable Cause: faxtest hangs when downloading firmware because of a DMA or interrupt conflict. Solution: 1. Check your btdriver.cnf file setting to ensure that the dma and interrupt are both set to -1. 2. Move the board to a different PCI slot. If the reset still fails, contact Brooktrout Technical Support (see Getting Technical Support on page 4-1). SYMPTOM(S): Probable Cause: Solution: btdriver displays the message No BRI TR114s Found. This message is informational. It means that you do not have a TR114 BRI ISDN board in your system. No action is required. 3-14 TR114 PCI Analog Hardware Guide SYMPTOM(S): faxtest displays the message Originate_call: Final Call Progress: Probable human detected. Probable Cause: A human voice or telco recording was probably detected instead of a fax tone. Solution: Check the telephone number and have the board dial the correct fax number. SYMPTOM(S): btdriver displays the message Cannot set BFAX_INFO env var. X bytes needed, only found Y. Aborting. Probable Cause: The driver required more temporary environment space for the BFAX_INFO variable than was available. Solution: The environment is limited in space. Different DOS versions use different amounts of default environment space. Change the environment space to a larger setting by putting a SHELL directive in your CONFIG.SYS file. This directive is used to specify a different command interpreter. The default is \COMMAND.COM. To change the environment space setting, insert the following line into CONFIG.SYS for DOS versions earlier than 5.0: SHELL=C:\COMMAND.COM /P /E:2048 or for DOS 5.0 and later: SHELL=C:\COMMAND.COM C:\ /P /E:2048 The number 2048 seems to work best in every case. After editing CONFIG.SYS, reboot and try again. To set and free the environment variable FOO, at the command line, enter these lines: set FOO=0000000000000000000000000000000000 00000000000000000000000000000000 set FOO= Testing Your Installation 3-15 DID Conditions The following conditions may be caused by DID problems. SYMPTOM(S): DID line does not work, or there is a fast-busy signal. Probable Causes: DID service may not be activated, or; The number of DID digits may not be set correctly in the user.cfg file, or; There is a polarity problem; the telephone wiring may be reversed. That is, although the output of the TR114 has the correct polarity across the telephone line's two wires (tip and ring), a wiring reversal could exist elsewhere in the building. Solution: Verify that the number of DID digits is set correctly in the user.cfg file. Make sure that DID service is active by testing the line using the procedures in the Testing DID Channels without Active Service on page 3-10. If the telephone test works, but you still have problems with your DID line, make sure the telephone wiring is not reversed. . SYMPTOM(S): Noise on a DID trunk when you make a call to it. Probable Cause: Grounding problem. Solution: Remove the ground jumper on the DID power supply contact block (see Figure 2-3 or 2-6). Remove the TR114 from the computer and move the ground switch on the daughter board away from the mounting bracket end of the board. See Figure 2-3. Contact Brooktrout Technical Support. See Chapter 4, Contacting Technical Support. 3-16 TR114 PCI Analog Hardware Guide SYMPTOM(S): DID line was working but now it stops working. Probable Cause: Power from the DID power supply has been interrupted, or; Service may have been discontinued by the telco. Solution: Make sure the DID line is connected to the TR114 and that the board is receiving -48VDC power from the DID power supply. Call one of the telephone numbers in your block of DID numbers. If a busy signal sounds immediately, the service has probably been disconnected by the telco. Sending Test Results to a File If you cannot correct the problems you encountered, run the test program and redirect the output to a file. Brooktrout Technical Support or the reseller from whom you purchased your TR114 board will want to examine the diagnostic test results to determine the cause of the malfunction. In the following steps, # is the number of the channel you are testing, phonenum is the telephone number to dial, and log is the name of the output file. The option, -v, specifies verbose mode, to collect the trace data. Always use verbose mode when collecting trace data. 1. On sending a fax, to redirect the output from the test program to a file, type: faxtest -u <#> -v -s wphonenum >log 2. On receiving a fax, to redirect the output from the test program to a file, type: faxtest -u # -v -r >log Note: If the program fails to exit on its own, press q to quit. We recommend that you fax or e-mail the test results to Brooktrout Technical Support or to the reseller from whom you purchased your TR114 card. For instructions on how to contact or send test results to Brooktrout Technical Support, see page 4-1. Testing Your Installation 3-17 Rebooting under Your Preferred Operating System Reboot your system to run under the operating system you normally use. If your system normally runs under DOS, and you booted your system with a special autoexec.bat file to run the test software, reboot your system now using the original autoexec.bat file that contains the lines that run your fax application software. You can now configure your fax software and start sending and receiving faxes with your TR114 PCI analog board. Configuring Your LAN Fax Software See your LAN fax application’s user manual for instructions on configuring your LAN fax software. After you have set up your LAN fax software to support the TR114, you can begin sending and receiving faxes using that software. 3-18 TR114 PCI Analog Hardware Guide Chapter 4 Contacting Technical Support Brooktrout provides technical support for customers who have purchased their TR114 product directly from Brooktrout Technology, Inc. If you purchased your TR114 board from a reseller, please contact that reseller for technical support. In the event of equipment malfunction, Brooktrout Technology, Inc. or an authorized agent should perform all repairs. The user is responsible for reporting the need for service to Brooktrout or to one if its authorized agents. Getting Technical Support If you call Brooktrout Technical Support, please be prepared to work with the support personnel. You may be asked to do several things, such as taking down your server. Please have the following information ready: • The part number (PN) of the TR114 card in question. Part numbers begin with the digits 802. The part number is on the back, or solder-side, of the TR114 board. • Test results obtained from running the faxtest program (see the section, Sending Test Results to a File on page 3-17). Contact Brooktrout Technical Support by: • E-Mail: US: [email protected] Belgium: [email protected] Japan: [email protected] Singapore: [email protected] 4-1 • Telephone: U.S.: 781-433-9600 Monday through Friday 8:30AM – 8:30PM Eastern Time Europe: +32-2-658-0170 Singapore: +65-224-4485 Japan: +81-3-5800-9102 • FTP Site: ftp://ftp.brooktrout.com • Web Site: http://www.brooktrout.com Downloading Test Software You can download copies of the latest TR114 test software (diag.exe) from the Brooktrout FTP or web site. To connect to the Brooktrout FTP site: 1. Type: ftp.brooktrout.com 2. Select the support directory. 3. Select diag.zip. To connect to the Brooktrout web site: 1. Start your Internet browser. 2. Type: http://www.brooktrout.com 3. Select technical support. 4. Select downloads. 5. Select diag.exe. Click the appropriate file from the list that is displayed; the software downloads automatically. 4-2 TR114 PCI Analog Hardware Guide Returning a Defective TR114 Board If you suspect that your TR114 board is malfunctioning, contact Brooktrout Technology, Inc. or the reseller from whom you purchased it. Typically, Brooktrout Technical Support or your reseller will request that you run the diagnostics on the TR114 board in question, to determine whether it has a hardware defect. If it does, you need to return the board for repair to Brooktrout Technology, Inc. or to the reseller from whom you purchased it. If you purchased the TR114 directly from Brooktrout Technology, Inc., Brooktrout will issue a Return Material Authorization (RMA) number for it. If your TR114 is out of warranty, you must get a Purchase Order Number before Brooktrout will issue you an RMA number. When returning product on RMA to Brooktrout Technology, Inc., you must supply the RMA number clearly on the shipping container and send the container to the following address: Brooktrout Technology, Inc. 152 Second Avenue Needham, MA 02494-2722 Contacting Technical Support 4-3 Appendix A Monitoring Channel Activity TR114 PCI Loop-start LEDs Figure A-1 shows the LEDs and RJ-45 jack on the mounting bracket for the TR114 PCI analog loop-start board. RJ-45 Phone Jack TR114 Channel Status LEDs Figure A-1. Mounting Bracket: P2L and P4L A-1 Each LED indicates the activity status of its associated channel. The LEDs will: • Flash once at PC power up. • Flash periodically after firmware is downloaded to the TR114. • Become solid red when the channel goes off hook. • Flash when the channel is receiving data from the host computer. TR114 PCI DID LEDs Figure A-2 shows the LEDs, RJ-45 jacks and plug for the DID power supply on the mounting brackets of the TR114 PCI analog DID board. The green LED shows the status of the DID power supply. The red LEDs show the status of the TR114 channels. RJ-45 Phone Jack Power Supply Plug (J50) Power Supply LED (Green) TR114 Channel Status LEDs (Red) Figure A-2. Mounting Brackets: P2C, P4C, P2D, and P4D A-2 TR114 PCI Analog Hardware Guide Each red LED indicates the activity status of its associated channel. The LEDs will: • Flash once at PC power up. • Flash periodically after firmware is downloaded to the TR114. • Become solid red when the channel goes off hook. • Flash when the channel is receiving data from the host computer. The green LED remains on when the DID power supply is supplying power. Monitoring Channel Activity A-3 Appendix B Telephone Service Options This appendix describes: • Loop-start telephone service and what you need to order • DID telephone service and what you need to order Loop-Start Telephone Service Loop-start telephone service is the same service the telephone company installs in residences. One loop-start telephone line connects one telephone number to the local telephone company’s central office or to a remote switching system. Ordering Loop-Start Telephone Service For simple loop-start service, you must obtain the following from the telephone company: • One loop-start telephone line for each TR114 loop-start interface (channel). A P2L supports up to two loop-start lines; a P4L supports up to four. A P2C supports one loop-start line; a P4C supports up to two. • One USOC-RJ-11C wall jack for each telephone line. Make sure the telephone number or extension number is clearly marked on the cover of each jack. For PBX or Key telephone systems, you must obtain the following from the PBX administrator: • An analog single-line extension for each loop-start interface. An analog single-line extension provides service compatible with telephone company loop-start trunks. Note: If you use a telephone system extension, make sure it is an analog single-line extension, not a digital extension. B-1 • A telephone system feature, such as DIL (Direct Inward Line termination), to provide outside callers direct access to the TR114 extension. • One USOC-RJ-11C wall jack for each telephone line. DID Telephone Service DID (Direct Inward Dialing) lines support incoming calls only. More than one telephone number is assigned to a pair of wires. DID analog service can enable automatic routing of facsimiles to the proper destination within a multiuser fax system. For example, Company ABC is assigned one DID trunk that is composed of one hundred telephone numbers ranging from 239-9400 to 239-9499. When any one of the numbers in this range is dialed, the telephone company seizes the trunk and transmits the last few digits (usually 3 or 4) of the dialed number to the TR114. By detecting these digits, the TR114 can tell which of the hundred numbers was actually dialed. If the trunk is busy, callers to any of the other numbers encounter a busy signal. Because of this situation, many fax messaging systems require more than one DID trunk to which the range of DID telephone numbers is assigned. The number of trunks required depends on the traffic demands on the system. Since DID trunks are one-way (inward), a two-way fax messaging system using DID requires one or more loop-start telephone interfaces for sending facsimiles. The TR114+P2C, which contains one loop-start and one DID interface, or the TR114+P4C, which contains two loop-start and two DID interfaces, are attractive options for smaller systems that need only one or two inbound lines and one or two outbound lines. The TR114+P2D, which contains two DID interfaces, and the TR114+P4D, which contains four DID interfaces, are intended for larger systems that employ two or more DID trunks and service a large volume of calls. B-2 TR114 PCI Analog Hardware Guide DID Operation When a person or a fax machine dials a number connected to a TR114 DID channel, the telephone company (telco) seizes that number’s line, causing loop current to flow through the board. The board detects the loop current and recognizes it as an incoming call. The next step depends on how the DID line has been configured – with wink-start (the most common configuration) service, or with immediate-start service. On a line configured for wink-start service, the board performs a “wink” after it detects seizure of the line; that is, it momentarily reverses the voltage polarity applied across the phone line (i.e., tip and ring), signaling the telco that it is ready to receive the last few digits of the dialed number. The telco transmits these digits to the board with DTMF signals (or in some cases with pulse signals). You must inform the telco of the number of DID digits you want the them to transmit. When the TR114 board has detected all of the DID digits, it reverses the polarity across the phone line again, signaling the telco that it has accepted the call. If the board does not detect the correct number of DID digits, it plays a fast busy signal. On a line configured for immediate-start service, the board does not perform a wink. Instead, the telco waits a fixed amount of time after seizing the line before it sends the DID digits to the board. Then, when it detects or fails to detect the correct number of DID digits, the board responds the same as it does when configured for wink-start service. Telephone Service Options B-3 DID Answer Supervision Signaling In compliance with FCC DID registration, Brooktrout includes the following information regarding TR114 models P2C, P2D, P4C and P4D for the customer: 1. Allowing this equipment to be operated in such a manner as to not provide proper answer supervision signaling is in violation of FCC Rules, Part 68. 2. This equipment returns answer supervision signals to the PSTN when 1) Answered by the called station, 2) Answered by the attendant, 3) Routed to a recorded announcement that can be administered by the CPE user, and 4) Routed to a dial prompt. 3. This equipment returns answer supervision on all DID calls forwarded back to the PSTN. Permissible exceptions are: 1) A call is unanswered, 2) A busy tone is received, or 3) A recorder tone is received. Ordering DID Telephone Service The following specifications are for direct connection using a wall jack. If you will be connecting through a PBX, check with your PBX support person to see if your PBX supports DID service. For DID service, you must obtain the following from the telephone company: • One DID telephone trunk for each TR114 DID interface. • A block of telephone numbers (usually 100 or 1000 numbers per block) associated with the trunk. For DID telephone service, a power supply must be installed and running on the TR114 before the telephone company can activate a DID line. Once the DID line is activated, -48VDC power must be continuous, or the telephone company may disconnect the DID service. You must provide the telco with a specification of the DID service options you want. B-4 TR114 PCI Analog Hardware Guide DID Service Options Before you order DID service from your telephone company, you need to find out what DID service options are available in your area and decide which options you want. These service options define how your DID service will operate. DID service options include: Service type Signaling type Number of digits Trunk Type - Wink Start/Immediate Start DTMF (Touch-Tone)/Pulse Three/Four Loop start (2-wire) – works off battery reversed Brooktrout recommends the options listed in bold type. Note: After you know what service options you will have, you must specify the service type and number of digits in your software configuration file (in the Brooktrout API 4.0, it is called btcall.cfg). Service Type The TR114 supports both wink-start and immediate-start service. Brooktrout recommends wink-start service because it is faster and less prone to errors than immediate-start service. The following table describes the difference between wink-start and immediate-start service. Service Type Interdigit Delay Time Wink-Start The TR114 expects to see the first DID digit within 5 seconds after the telephone is activated. Each successive digit must arrive within 5 seconds of the previous one. Immediate-Start The TR114 expects to receive the first DID digit within 18 seconds after the telephone is activated. The maximum interdigit delay is 18 seconds. This service type may be easier to use for hand-dialed testing. If immediate-start is the only service available from your telephone company, consult the documentation supplied with your software for information on how to support it. Telephone Service Options B-5 Signaling Type The signaling type can be pulse or DTMF (touch-tone). • Pulse signals are those generated by rotary-dial telephones. • DTMF tones are those generated by touch-tone telephones. The TR114 generates and detects DTMF and pulse signals automatically, so you do not specify them through software. Number of Digits DID analog service sends the last few digits of the dialed telephone number to the TR114 as a routing address. You must specify the number of DID digits the TR114 expects to receive to the telephone company and in the software. B-6 TR114 PCI Analog Hardware Guide Appendix C Telephone Jack Pinout Brooktrout provides pinout information for users who may want to make their own telephone cords and who may want to access only one or two channels on the four-channel TR114 or only one channel on two-channel boards. The cable included with the board connects the channels to single-pair wiring. Two-channel boards are supplied with a two-split cable; four-channel boards are supplied with a four-split cable. The TR114 PCI analog boards have one RJ-45 telephone plug. On 4-channel boards, this jack accesses channels 0, 1, 2, and 3; on 2-channel boards, the RJ-45 jack accesses channels 0 and 1. The pinout for the RJ-45 jack is as follows (pin 1 is closest to the PCI bus connector - refer to Figure 2-1 or Figure 2-2 for the location): Pin Number Signal TR114 Channel 8 Ring 3 3 7 Tip 3 3 6 Ring 1 1 5 Tip 0 0 4 Ring 0 0 3 Tip 1 1 2 Ring 2 2 1 Tip 2 2 C-1 Appendix D North American Standards Compliance Note to developers, system integrators, value added resellers and distributors: The following compliance information must be provided to your customer and the end user as part of your system documentation. In the United States, the Federal Communications Commission (FCC) and in Canada, Industry Canada (IC), regulate all electronic devices that connect to the telephone system and/or generate radio frequency signals. The TR114 is such a device and must comply with the regulations specified below. Telephony Regulations FCC Regulations Regarding Connection to the Phone Line (Part 68): The Federal Communications Commission (FCC) has established rules which permit the TR114 to be directly connected to the telephone network. • Jacks used in the premises wiring for connection to the telephone network must comply with FCC Rules, Part 68. Please refer to information below for the correct jack to use for each service. An FCC-compliant modular cable with compliant plugs on each end is supplied to interconnect the board and the premises wiring or telephone network. • This equipment may not be used on coin service provided by the telephone company. Connection to party lines is subject to state tariffs. (Contact your state public utility commission or corporation commission for information.) D-1 A malfunctioning circuit can harm the telephone network. Disconnect a malfunctioning TR114 board from the telephone network until you determine the cause of the malfunction and repair it. If a malfunctioning TR114 remains connected, the telephone company may temporarily disconnect service. The telephone company may make changes in its technical operations and procedures. If such changes can affect compatibility with the TR114, the telephone company must give adequate notice of the changes. The telephone company may request information on equipment connected to its lines. Give its representative the following information: • The telephone number(s) to which the TR114 is connected • The FCC registration number See back of board For Loop-Start boards: • The ringer equivalence number (REN) See back of board • The type of wall jack required USOC-RJ-11C • The facility interface code 02L52 For DID boards: • The service order code. 9.0F • The type of wall jack required USOC-RJ-11C • The facility interface code 02RV2-T The ringer equivalence number (REN) determines how many devices can be connected to your telephone line. In most areas, the sum of the RENs of all the devices on any line should not exceed 5. If too many devices are attached, they may not ring properly. REN does not apply to DID or digital lines. When assembling a system, the registration numbers of all devices must be listed on the exterior of the final assembly for easy access. D-2 TR114 PCI Analog Hardware Guide FCC Rules Regarding Fax Branding The Telephone Consumer Protection Act of 1991 makes it unlawful for any person to use a computer or other electronic device to send any message via a telephone fax machine, unless such message clearly contains, in a margin at the top or bottom of each transmitted page, or on the first page of the transmission, the date and time the message is sent and an identification of the business, other entity, or other individual sending the message and the telephone number of the sending machine or such business, other entity, or other individual. Users: To program this information into your fax machine, complete the procedure described in your user's manual. Developers: You must include facilities in your application to enable the user to enter the required information. Use the BfvFaxHeader function to place this information on the transmitted page(s) as required. You must also include in your user's manual instructions for entering this information into your system. IC Equipment Attachment Limitations (CS-03) The Industry Canada label identifies certified equipment. This certification means that the equipment meets certain telecommunications network protective, operational, and safety requirements. Industry Canada does not guarantee the equipment will operate to the user's satisfaction. Before installing this equipment, users should ensure that it is permissible to be connected to the facilities of the local telecommunications company. The equipment must also be installed using an acceptable method of connection. In some cases, the company's inside wiring associated with a single line individual service may be extended by means of a certified connector assembly (telephone extension cord). The customer should be aware that compliance with the above conditions may not prevent degradation of service in some situations. North American Standards Compliance D-3 Repairs to certified equipment should be made by an authorized Canadian maintenance facility designated by the supplier. Any repairs or alterations made by the user to this equipment, or equipment malfunctions, may give the telecommunications company cause to request the user to disconnect the equipment. Users should ensure for their own protection that the electrical ground connections of the power utility, telephone lines, and internal metallic water pipe system, if present, are connected together. This precaution may be particularly important in rural areas. Users should not attempt to make installation connections themselves, but should contact the appropriate electric inspection authority or electrician, as appropriate. The Ringer Equivalence Number (REN) assigned to each terminal device provides an indication of the maximum number of terminals allowed to be connected to a telephone interface. The termination on an interface may consist of any combination of devices subject only to the requirement that the sum of the Ringer Equivalence Numbers of all the devices does not exceed 5. The Industry Canada certification number is found on the back of the board. Electromagnetic Emissions This product was tested for emissions in a personal computer meeting the limits of FCC Rules, Part 15 Class B. In order to ensure that it continues to meet the Class A emissions limits, it should be installed in a host computer or other enclosure which also meets the Class B limits and bears an FCC Rules, Part 15 registration number, an FCC logo and/or a CE marking. FCC Emissions Information All computing devices utilizing clock frequencies in excess of 10 kHz must be tested for compliance with RF emission limits set by the FCC. The TR114 has been tested as a Class A computing device. Changes or modifications to this unit not expressly approved by Brooktrout Technology, Inc. could void the user’s authority to operate the equipment. D-4 TR114 PCI Analog Hardware Guide Pursuant to Part 15 of the FCC Rules, this equipment has been tested and found to comply with the limits for a Class A digital device. These limits provide reasonable protection against harmful interference when the equipment is operated in a commercial environment. This equipment generates, uses, and can radiate radio frequency energy, and if not installed and used in accordance with the instruction manual, may cause harmful interference to radio communications. Operation of this equipment in a residential area is likely to cause harmful interference, in which case, the user will be required to correct the interference at his or her own expense. IC Emissions Notice This Class A digital apparatus complies with Canadian ICES-003. Cet appareil numérique de la class A est conforme à la norme NMB-003 du Canada. Safety The TR114 is recognized by ETL; the component recognition number is on the back of the board. The TR114 has been tested and complies with UL Standard 1950, 3rd ed./ CSA C22.2 No. 950-95, 3rd ed. “Safety of Information Technology Equipment, Including Electrical Business Equipment.” This product must be mounted in the final assembly so that it is isolated from exposure to any hazardous voltages (voltages greater than 42.4V peak or 60Vdc) within the assembly. Adequate separation and restraint of cables and cords must be provided. To maintain the safety certification of the system, ensure that the power drawn from the power supply does not exceed its capacity. Please refer to the power usage table elsewhere in this manual for information on the voltages and currents required for proper operation. North American Standards Compliance D-5 Index A D adding another TR114 2-3 answer supervision signaling B-4 defective TR114 how to get service 4-3 DID connecting service 2-11 installing power supply 2-5, 2-6, 2-8 ordering service B-4 service options B-5 testing channels 3-9 See also testing DID DID configuration 3-10 changing 3-10 downloading software updates 4-2 B btdriver using to identify boards 3-6 btdriver.cnf file 3-1, 3-2 C cable pinouts C-1 capturing trace information 3-17 channels identifying 2-4, 3-5 configuration testing 3-4 configuring PCI board 2-3 configuring TR114 2-2 E EISA, configuring 2-3 F faxtest running from DOS 3-2 firmware updates, downloading 4-2 Index-1 I R identifying boards 3-6 identifying channels 3-5 ISA boards using with PCI boards 2-3 returning a defective TR114 4-3 L sending test results to a file 3-17 LEDs for DID A-2 for loop-start A-1 how to flash 3-7 loop-start connecting service 2-4 ordering service B-1 testing channels 3-7 M multiple boards, using PCI with ISA boards 2-3 multiple TR114s identifying boards 3-6 P PCI using with ISA boards 2-3 pinouts, for cable connector C-1 power supply connecting Tellabs 8001 2-8 connecting Tellabs 8012 2-6 S T technical support 4-1 test files 3-1, 3-2 btdriver.cnf 3-3 user.cfg 3-10 testing DID 3-9 with active service 3-12 without active service 3-10 testing loop-start receiving a fax 3-8 sending a fax 3-7 troubleshooting 3-13 board installation 3-13 DID 3-11 loop-start 3-4 test program results 3-13 using LEDs 3-7 Index-2 TR114 PCI Analog Hardware Guide