1
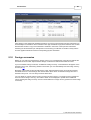
Account Pro
5
Transactions
5.1
Transaction entry form
14
Date entry field
Enter the date in the format compatible with the date format selected under 'International' of the Windows
Control menu. Simply press [Tab] to enter the actual date. No entry of the calendar year is necessary, not
even if the accounting period covers periods of two subsequent calendar years. Since each calendar month
is present only once in any accounting period, ACCOUNT PRO will automatically allocate a transaction to
the appropriate calendar year. Transactions on the first day of the accounting period are permitted in
conjunction with the capital account only. This will ensure that the 'balance carried forward' appears as the
first entry on the account sheets
Amount entry field
ACCOUNT PRO uses the terms 'Debit' and 'Credit' in its displays and printed reports only. When entering
transactions, the amount sign will determine whether an amount is debited or credited to an account. See
the topic 'Sign of amount' for a detailed explanation of the amount sign rule.
Account (Acc.) and contra-account (C.-Acc.) entry fields
See under the topic 'Account and contra-account'
Description entry field
Under 'Options'/'Transaction entry form' you can set up ACCOUNT PRO for the description being a
mandatory or an optional entry. The description can contain a maximum of 30 characters.
Cost center/project number entry field
A separate entry field for cost center and project numbers will only then be available if you have defined at
least one cost center or project.
Voucher No. entry field
A separate entry field for voucher numbers will only then be available if you select the corresponding option
under 'Options'/'Transaction entry form'. The voucher numbers must be numeric figures between 1 and
99999.
'Foreign currency' command button
Note that this button will only then be visible if you have defined foreign currencies.
'Memo' command button
You can attach a memorandum to a transaction. Please see under the topic 'Memos and open items' for a
detailed explanation
'Calculator' command button
Please see under the topic 'Calculator' for the calculator operating instructions.
'Standard transaction' button
With this function you can call up the standard (and automatic) transactions that you have previously defined
under 'Options'/'Define standard transactions'. For detailed explanations please refer to the topics 'Standard
transactions' and 'Define standard transactions'.
'Start split transaction' and 'End split transaction' buttons
Click on 'Start split transaction' before entering a split transaction. Please refer to the topic 'Split
transactions' for a detailed explanation about entering split transactions.
'Edit, 'Copy' and 'Delete' buttons
© 1996-2005 AccSoft Shareware