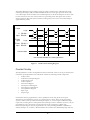
1
IP-Quadrature
Four Channel
Quadrature Decoder
IndustryPack®
User’s Manual
Manual Revision: 9 7/26/99
Hardware Revision: A
IP-Quadrature
Four Channel
Quadrature Decoder
IndustryPack®
This document contains information of proprietary interest to
GreenSpring Computers. It has been supplied in confidence
and the recipient, by accepting this material, agrees that the
subject matter will not be copied or reproduced, in whole or in
part, nor its contents revealed in any manner or to any person
except to meet the purpose for which it was delivered.
GreenSpring Computers has made every effort to ensure that
this manual is accurate and complete. Still, the company
reserves the right to make improvements or changes in the
product described in this document at any time and without
notice. Furthermore, GreenSpring Computers assumes no
liability arising out of the application or use of the device
described herein.
The electronic equipment described herein generates, uses, and
can radiate radio frequency energy. Operation of this
equipment in a residential area is likely to cause radio
interference, in which case the user, at his own expense, will be
required to take whatever measures may be required to correct
the interference.
GreenSpring’s products are not authorized for use as critical
components in life support devices or systems without the
express written approval of the president of GreenSpring
Computers, Inc.
This product has been designed to operate with IndustryPack
carriers and compatible user-provided equipment. Connection
of incompatible hardware is likely to cause serious damage.
SBS GreenSpring Modular
I/O
181 Constitution Drive
Menlo Park, CA 94025
(415) 327-1200
(415) 327-3808 FAX
© SBS GreenSpring Modular I/O, Inc.
IndustryPack is a registered trademark of SBS GreenSpring Modular I/O
Manual Revision vii
Table of Contents
Product Description............................................................................................................................................... 6
Theory of Operation.............................................................................................................................................. 9
Input Circuitry ................................................................................................................................................ 9
8 MHz Output Clock .................................................................................................................................. 11
Input Polarity ................................................................................................................................................ 12
Floating Inputs.............................................................................................................................................. 12
Timing Diagrams.......................................................................................................................................... 12
Counter Circuitry ......................................................................................................................................... 15
Counting and Control Input Modes......................................................................................................... 16
Quadrature Count Direction...................................................................................................................... 19
Interrupt Logic.............................................................................................................................................. 19
Interface Logic.............................................................................................................................................. 20
VMEbus Addressing............................................................................................................................................ 21
NuBus Addressing................................................................................................................................................ 23
ISA (PC-AT) Bus Addressing ............................................................................................................................ 24
Programming......................................................................................................................................................... 26
Detailed Register Descriptions.................................................................................................................. 26
Output Latch [OL] .............................................................................................................................. 26
Preset/Compare Register [PCR]....................................................................................................... 27
Status Register [SR].............................................................................................................................. 27
Counter Control Register [CR].......................................................................................................... 28
Input Control Register [ICR]............................................................................................................. 29
Output Control Register [OCR] ....................................................................................................... 30
Quadrature Register [QR] .................................................................................................................. 30
Channel Configuration Register [CHCR]........................................................................................ 31
Control and Status Register [CSR].................................................................................................... 33
Vector Register [VR] ........................................................................................................................... 34
Power Up and Reset Initializing................................................................................................................ 34
I/O Pin Wiring ..................................................................................................................................................... 35
IndustryPack Logic Interface Pin Assignment............................................................................................... 37
ID PROM .............................................................................................................................................................. 38
Construction and Reliability ............................................................................................................................... 39
Warranty and Repair ............................................................................................................................................ 40
Specifications......................................................................................................................................................... 41
QuickStart Software Support ............................................................................................................................. 42
3
List of Figures
Figure 1
Simplified Block Diagram of IP-Quadrature........................................................................... 8
Figure 2
Input Termination Resistor Networks .................................................................................... 11
Figure 3
Wiring Input Detail Drawing .................................................................................................... 11
Figure 4
Wiring Input Options ................................................................................................................. 12
Figure 5
Quadrature Timing Diagram..................................................................................................... 14
Figure 6
Basic Down Counting Timing Diagram ................................................................................. 15
Figure 7
Basic Control Timing Diagram................................................................................................. 15
Figure 8
Gated Counter Timing Diagram .............................................................................................. 16
Figure 9
Counting Modes .......................................................................................................................... 18
Figure 10
Control Modes ............................................................................................................................. 19
Figure 11
Z Control Function Programming Summary ........................................................................ 20
Figure 12
Interrupt Vector Low Bit Encoding........................................................................................ 20
Figure 13
VMEbus Address Map ............................................................................................................... 24
Figure 14
Nubus Address Map ................................................................................................................... 25
Figure 15
ISA Address Map......................................................................................................................... 26
Figure 16
Register Abbreviations and Locations..................................................................................... 27
Figure 17
Control Function Selection ....................................................................................................... 34
Figure 18
I/O Pin Assignment ................................................................................................................... 37
Figure 19
Logic Interface Pin Assignment ............................................................................................... 38
Figure 20
ID PROM Data (hex)................................................................................................................. 39
4
5
Product Description
IP-Quadrature provides high density, cost-effective flexible implementation of four quadrature
decoder channels. Channels may also be used as general purpose counters. Four independent
channels provide 24-bit resolution, programmable modes, programmable polarity, interrupt
capability, differential or single-ended (RS-422 or TTL/CMOS) input, read-on-the-fly capability, and
a count frequency of 0 to 10 MHz.
Quadrature encoders are popular sensors that provide accurate, low cost incremental motion sensing.
Most commonly, they are shaft encoders that provide 512 to 2048 counts per revolution. They are
also commonly used as linear encoders with resolutions down to 0.005 inch. They are available in
nearly any length desired. Most encoders are now optical, using molded assemblies consisting of a
pair of LEDs, lenses, photo-sensors, and simple electronics. For rotary motion the assembly senses
alternating opaque and clear lines on a rotating wheel. For linear motion the alternating lines may be
on a fixed bar and the sensor assembly moves, or vice-versa. The pair of LED and photo-sensors are
offset about one-half line width so that direction of motion may be sensed by observing the relative
phase of the two outputs. Typical quadrature encoder outputs are a pair of digital logic signals that
are nominally 90° out of phase. Some encoders also provide an “index” pulse output once per
revolution to provide absolute position information. Most modern encoders run from +5 volts and
provide CMOS/TTL logic outputs and/or RS-422 differential logic outputs. RS-422 is
recommended where possible because of its inherent noise immunity and the ability to run long
distances. TTL logic levels should normally be restricted to cables less than ten feet in length.
Quadrature encoders are available from Hewlett-Packard, US digital, and other sources.
The general purpose input structure permits differential input from line drivers (RS-422 levels) or
single-ended logic level input (“TTL”) directly from most sensors. Programmable TTL resistive
terminators provide for flexible high-quality signal termination.
There are three inputs per channel. For normal quadrature operation the two quadrature inputs are
called X and Y. These inputs are sometimes called A and B lines from encoders. The X and Y inputs
are normally driven 90° out of phase. There is also a control input on each channel called Z. Its
function is programmable, but it typically operates, if used, as an index or latch input.
There is a programmable prescaler for each channel that may be set for X1, X2 or X4 operation.
Vectored interrupts are fully supported. Interrupts are individually maskable. Selectable conditions
are interrupt on borrow and interrupt on match (compare).
RS-422 differential input lines are normally terminated with 120? resistors. Users may remove these
socketed resistor networks or replace them with a different value if desired.
Each channel consists of a programmable input section, a 24-bit up/down counter block, a 24-bit
capture/match register, and a 24-bit output latch. The output latch permits accurate “on-the-fly”
reading of quadrature position values. The capture/match register may be used as either a hardware
“capture” register to record exact mechanical position or to provide an interrupt an any arbitrary
programmable quadrature position value.
The all CMOS design is inherently low power. Up to 16 quadrature channels may be implemented in
one host system slot.
6
Key Features
•
•
•
•
•
•
•
•
•
•
•
•
•
•
•
•
•
•
Four quadrature decoder channels, independently programmable
Any channel may also act as a general purpose counter
24-bit resolution per channel
DC to 10 MHz general purpose count rates
DC to 1.2 MHz quadrature count rates (higher count rate in X1 and X2 modes)
Counters readable “on the fly”— 24-bit output register
24-bit register for capture or match interrupt on each channel
Inputs may be differential or single-ended
Direct connection to most sensors
Programmable TTL resistor termination
Each channel has a programmable control input
Control input may be used to capture exact position on the fly
Each channel may be used as a general purpose up/down counter
Full programmable interrupt support
Programmable modes; programmable prescaler: 1X, 2X, 4X.
Individually programmable polarities for Count and Control inputs
All CMOS
Up to 16 counter channels per VME slot
A block diagram of the IP-Quadrature is shown in Figure 1 below.
24-bit
Counter
IC
+
–
Logic
Interface
+
X Input
–
one of four
channels shown
one of four
8
+
–
interrupt and
Routing
Logic
Figure 1
+
–
Simplified Block Diagram of IP-Quadrature
7
+
Y Input
–
+
Z Input
–
Special Order Options
Versions of IP-Quadrature may be special ordered from the factory. Normally, special orders require
a minimum shipment of 25 units. Special order options include:
•
•
•
•
•
Depopulating for fewer channels
Special input voltage requirements
Special interrupt requirements
Extended temperature
Special testing and labeling
8
Theory of Operation
IP-Quadrature consists of the following functional blocks:
•
•
•
•
•
Input Circuitry
Polarity and Function Selection
Counters
Interrupt Logic
IP Interface Logic
There are four quadrature decoder channels on the IP. The channels are independent, although
some input termination options are implemented in groups of two channels.
Each channel has three inputs, called X, Y, and Z. Normally X and Y are the two quadrature inputs
and Z is the optional control or index input. If the channel is used as a general purpose counter then
there are more programmable options for the use of X, Y and Z.
Each channel has its own 24-bit count register, 24-bit preset/comparitor register and 24-bit output
latch register, and its own control and status registers.
The interrupt logic, polarity and function select logic, and IP interface logic is all located in a single
100-pin Xilinx programmable logic cell array (LCA). There are separate registers in the Xilinx LCA
for each channel. These registers select the input polarities, counting functions, and interrupt control
for the four channels.
Input Circuitry
A detail diagram of the input circuit is shown in Figure 3 on the next page. The input circuitry
consists of RS-422 differential receivers (comparitors) with resistors to implement termination
options. Standard input is differential RS-422, terminated with 120? across the input. The
termination resistors are socketed and may be removed or changed by the user. The resistor
designators in Figure 3 are for reference here only; they do not correspond to designators on the
actual IP.
Alternatively the input may be TTL or similar logic levels. One side of the RS-422 input is biased at
approximately 1.75 volts, permitting single-ended TTL, NMOS, CMOS, or opto-coupler input to be
directly connected. When running in this mode, one volt of hysteresis is implemented on the
receiver to reduce noise. The IP-Quadrature can be converted from RS-422 input to TTL input by
removing the RS-422 terminating resistor networks from their sockets. A termination network for
TTL input may be switched in electronically through software.
R1, as shown in Figure 3, is the termination resistor for the differential RS-422 input. The IPQuadrature is shipped with a default termination resistor value of 120? . This resistor is implement
in SIP networks, and may be removed or changed by the customer, or by GreenSpring for special
orders. Typical terminator values range from 75? to 330? , and depend on the customer’s cabling
and type of driver. This resistor should be removed for single-ended logic-level input, by following
the table of Figure 2 no the next page:
9
Channel
1
2
3
4
RS-422 input
RN10 in
RN8 in
RN7 in
RN1 in
TTL input
RN10 out
RN8 out
RN7 out
RN1 out
Note: All four resistor-pack networks are 120? , default.
Figure 2
Input Termination Resistor Networks
R2 and R3, as shown in Figure 3, are used to support single-ended logic-level input. R2 is connected
to a nominal 1.75 volt source to bias the comparitor at a suitable logic threshold. R3 is used to
implement about one volt of hysteresis when the single-ended logic-level input is used. The parallel
combination of R2 and R3 is equivalent to about a 10K? load on the + input to the comparitor.
This is a small load for RS-422 inputs, and does not unbalance the input significantly. Thus R2 and
R3 may be left in place, even when using the RS-422 input mode.
R4 is part of an electronically enabled termination network. A Unitrode UC5603Z provides a voltage
reference, buffer, laser-trimmed resistors, and electronic switches. There is one switchable network
for each group of two channels. When switched in, the network provides a 110? termination resistor
to 2.85 volts. The resistance value and the voltage are fixed. This termination value is reasonably
close to the characteristic impedance of most flat cable and twisted pair cable.
Caution: When using the X and Y inputs with the TTL terminator turned off, DO NOT leave
inputs floating. Floating inputs will not produce a consistent output from the comparitor, and thus
could produce inconsistent operation (count up versus count down, for example) of IP-Quadrature.
+1.75 V
R3
47Kž
R2
13Kž
+RS-422 input
+
R1
120ž
Output to
Counter Logic
–
–RS-422 input
and TTL input
R4
110ž
R1 = RS-422 terminator (removable)
R2 = Logic threshold resistor
R3 = Hysteresis resistor
R4 = TTL terminator (switchable)
Note: R1..R4 are part of resistor
networks. See actual schematic
for correct reference designators.
Figure 3
+2.85 V
Wiring Input Detail Drawing
10
When enabled, the terminator prevents ringing of the received TTL signal. Termination of TTL
signals is generally recommend. Some drive circuits, typically those that use older NMOS, will not
have the necessary 20 mA of sink current capability to drive the terminator. Appropriateness of
termination can best be determined by examining connected and toggling inputs with an oscilloscope
at the IndustryPack’s I/O pins. Ideal signals would show good DC voltage swing from a low of at
least 0.7 volts to a high of at least 3 volts, and should have minimal ringing following the edges.
The termination network for channels 1 and 2 is enabled by writing a one to bit [0] of the general
control register. The termination network for channels 3 and 4 is enabled by writing a one to bit [1]
of the general control register. These bits are reset to zero on reset of the IndustryPack. Thus the IP
powers up with the TTL termination network disabled. The termination network must be disabled
for proper operation of RS-422 inputs.
There is about one volt of hysteresis (±500 mV) on the receiver when using single-ended logic-level
inputs. Typically an input voltage must go below 0.75 volts to be reliably received as true, then rise
to above 2.75 volts to be reliably received as false. This hysteresis provides more reliable operation
when using single-ended logic-level inputs. The LS7166 counter ICs have no internal filtering. Noisy
signals, including signals that ring, bounce, or have very slow edges would produce spurious
operation of the LS7166 if not for hysteresis on the inputs.
The output of the input comparitor goes through the Xilinx polarity and routing logic to the Counter
IC.
Figure 4 below summarizes the input modes, and how to implement them. See the Configuration
Details section below for specific component usage and locations on the IP-Quadrature.
Wiring Input Options (X, Y, and Z Inputs)
RS-422, Terminated into 120?
Factory default.
RS-422, Terminated into non-standard ?
Remove 120? socketed SIP terminator network,
Install user-provided SIP resistor network.
Logic Level, with hysteresis
Remove 120? RS-422 SIP terminator resistor
network from socket.
Logic Level, with 110? termination
Remove 120? RS-422 SIP terminator resistor
network from socket, set terminator enable bit
through software.
Caution: DO NOT leave X nor Y TTL inputs floating with 110? termination disabled.
See Table in Figure 2 for selection of correct resistor network.
Figure 4
Wiring Input Options
8 MHz Output Clock
The IP-Quadrature provides a RS-422 level buffered, 8 MHz clock output. This continuous clock
may be connected by the user to the X or Y count input of any channel. The user then may use the
Z control input as a gate, effectively making that channel into a gated 24-bit timer with a resolution
of 125 nanoseconds when properly programmed.
11
Input Polarity
The polarity of both the X and Y inputs of each counter channel are individually programmable.
Programmable polarity is implemented in the Xilinx LCA. There is a default polarity, called
“standard” for both inputs. The standard polarity is represented by “0” in the polarity bits of the
Channel Configuration Register for each counter. The timing diagrams below show the standard
polarity. If the polarity bit in the Channel Configuration Register is set to “1”, then “reversed
polarity” is set. The standard polarity is assumed in the text and figures in this document unless
otherwise stated.
Standard polarity signals consist of a “positive” level, pulse or edge in RS-422 input mode. (This
means the + input has a higher, more positive, voltage than the – input.) In single-ended logic-level
input mode, standard polarity consists of a “negative” level, pulse or edge. (This means the input is
at logic zero, about 0.7 volts or less.)
This definition of polarity is by convention. TTL signals have been historically “active low.” Many
sensors and opto-couplers are “active low.”
Polarity reversal on RS-422 signals may be accomplished by reversing the + and – inputs signals, or
by programming the polarity bit in the Channel Configuration register to be a “1”. These do not
have precisely the same effect, because floating inputs will have a different effect. In general, with
standard polarity, a floating (disconnected) input goes to the most benign state. This is generally not
the case for floating inputs where the polarity has been programmed for “reverse”.
Floating Inputs
Floating (disconnected) inputs for X, Y and Z, if in single-ended logic-level input mode with the
TTL termination enabled, will reliably float high, to logic “1”, following the input comparitor.
If in RS-422 input mode or if the TTL termination is disabled, the input state is not predictable.
It is recommended that unused inputs (– side) be connected to ground. The polarity may be
programmed if necessary to achieve the proper mode of these grounded inputs. Normally, the
default, non-inverted polarity produces the desired count operation. Do not ground both sides of an
RS-422 input, ground only the “–” input.
Timing Diagrams
The Timing Diagram in Figure 5 on the next page shows the basic quadrature counting mode. When
programmed in this mode, the X Input is routed to the A input on the LS7166, and the Y is routed
to the B input. Although both single-ended logic-level input (TTL) and differential RS-422 count
and control inputs are shown, only one of these input modes would be active. Standard polarities for
the inputs are shown. For the phase relationship between X and Y shown, the Counter counts up.
Changing the programmed polarity of either input would cause the Counter to count down for the
shown phase relationship. This figure does not show small propagation delay times (about 50
nanoseconds typical); it does show correct relationship of signals based on polarity.
Maximum input frequency of the inputs in quadrature mode is 1.2 MHz (corresponding to a
maximum counting rate in X4 submode of 4.8 MHz). The minimum time for each of the four
phases (for example, X high; Y low) is 208 nanoseconds.
12
X Input
Logic
RS-422 +
RS-422 –
Logic
Y Input
RS-422 +
RS-422 –
Internal Up Clock (X1)
Internal Up Clock (X2)
Internal Up Clock (X4)
Note: Standard Polarities for X and Y Inputs Shown.
Figure 5
Quadrature Timing Diagram
Each channel may also be programmed to operate as a general purpose timer.
The Timing Diagram in Figure 6 on the next page shows the basic down counting mode. Standard
polarity for the X Count Input is shown. Although both single-ended logic-level input (TTL) and
differential RS-422 inputs are shown, only one of these input modes would be active. This figure
does not show small propagation delay times (about 50 nanoseconds typical); it does show correct
relationship of signals based on polarity and edges.
13
X Input
Logic
X
Input
RS-422 +
RS-422 –
Counter Value
000002
000001
000000
FFFFFF
FFFFFE
Interrupt Request
(active low)
Borrow Toggle
Sign Bit
Note: Standard Polarities for Inputs Shown.
Figure 6
Basic Down Counting Timing Diagram
The Timing Diagram in Figure 7 below shows the timing of the basic control functions that can be
programmed for the Z input: These functions are Clear Counter, Load Counter, and Load Output
Latch. Standard polarity for the Z Control Input is shown. Although both single-ended logic-level
input (TTL) and differential RS-422 control inputs are shown, only one of these input modes would
be active. This figure does not show small propagation delay times (about 50 nanoseconds typical); it
does show correct relationship of signals based on edges.
Z Input
Z
Input
Logic
RS-422 +
RS-422 –
Counter or Output
Latch Value
old value
new value
Note: Standard Polarities for Z Input Shown.
Figure 7
Basic Control Timing Diagram
14
The Timing Diagram in Figure 8 below shows the gating control function. Although both singleended logic-level input (TTL) and differential RS-422 X count and Z gate inputs are shown, only
one of these input modes would be active. Standard polarity for the X and Z Inputs are shown. The
Counter value shows the state of the Counter in Up Counting mode. This figure does not show
small propagation delay times (about 50 nanoseconds typical); it does show correct relationship of
signals based on polarity.
X input
Logic
X
Input
RS-422 +
RS-422 –
Z Gate
Input
Logic
Z Gate
Input
RS-422 +
RS-422 –
Counting Disabled
Counting Enabled
Counter Value
000050
000051
000052
Note: Standard Polarities for X and Z Inputs Shown.
Figure 8
Gated Counter Timing Diagram
Counter Circuitry
The IP-Quadrature counters are implemented with an LS7166 IC. There is one IC per channel; four
LS7166 ICs per IP-Quadrature. The LS7166 IC contains the following internal components:
•
•
•
•
•
•
•
•
•
•
24-bit Counter
24-bit Preset/Compare Register
24-bit Output Latch
24-bit Comparitor
6-bit Control Register
6-bit Input Control Register
6-bit Output Control Register
2-bit Quadrature Register
Input Logic
Output Logic
Each channel may be programmed to count in quadrature mode, using the X and Y inputs.
Alternatively each channel may operate as a general purpose counter, where the X and Y inputs
operate as either Count-Up and Count-Down pulse inputs, or as Count input and Direction input
respectively. Counting down is often preferred for interrupts, because underflow (“borrow”) may be
programmed to cause an interrupt. An interrupt may also be generated on a Match. The
Preset/Compare Register may be programmed to any value, including $FFFFFF or $000000 (to
simulate interrupt on “overflow”). Both underflow and overflow have dedicated flip-flops that may
15
be read by reading the counter’s control register. The counter registers and flip-flops are accessed as
registers in the LS7166 counter IC.
The LS7166 IC has two count inputs, called A and B at the chip, and two control inputs, which may
each be programmed for one of two functions. Both the A and B count inputs and the two control
inputs on the LS7166 are driven by the Xilinx LCA, which provides routing and polarity functions.
The X Input to the IP-Quadrature is normally routed to the A input, and the IP's Y Input is routed
to the chip's B input. The IP's Z input is routed to either of the two Control Inputs on the chip. The
polarity of all three input signals is individually programmable. There is a software controlled gating
bit implemented in the Xilinx LCA for the Z input. There are software controlled gating bits for the
X and Y inputs implemented in the LS7166.
In general, counting modes and control functions are available independently. Figure 9 lists basic
counting modes and Figure 10 lists basic control functions. If no Control Function is desired, the Z
Control input may be left unconnected.
The 24-bit Preset/Compare Register has two functions. It is used when the host software wishes to
load a specific value into the Counter, as is typical for down counting. This register may also be
transferred into the Counter by the Control input, if the appropriate control function has been
programmed.
The 24-bit Preset/Compare Register is also used to produce an interrupt when the Counter reaches
a particular value. Note that this register may be used to first load the Counter, then changed to
support the interrupt-on-match function. The register may be changed while the Counter is
operating. Multiple Match interrupts can be programmed by reloading this register after each
interrupt (making sure after doing so that the Counter has not already passed the desired interrupt
point).
The 24-bit Output Latch has two functions. It is used to read the Counter. The 24-bit Counter may
not be read directly, but is first transferred to the Output Latch to provide reliable on-the-fly
reading. The transfer is initiated by the host software setting bit [1] of the counter’s control register
to one. After the Output Latch has been read, bit [1] of the control register is automatically reset
back to zero. The host software needs to access the control register only once to read the Counter.
The 24-bit Output Latch is also used as a hardware capture register. In this mode the Z control input
to be used as a hardware trigger to initiate the transfer of the Counter to the Output Latch, if the
appropriate control function has been programmed
Counting and Control Input Modes
Figure 9 on the next page summarizes the counting modes available. Figure 10 summarizes the
available control functions. Figure 11 is an abbreviated programming summary of the control
functions. Generally speaking, the counting modes and the control functions are independent. The X
and Y inputs are the “count” inputs, and the Z input is the “control” input.
See the detailed register description in the Programming section of this Manual for more
information.
16
Counting Mode
Basic Operation of the Mode
Quadrature Counting
The X Input acts as the A Quadrature input.
The Y Input acts as the B Quadrature input.
Control functions are available using the Z input.
Control functions may be executed through software.
Input may be multiplied by 1X, 2X or 4X.
Program Input Control Register [5..4] to 00.
Program Quadrature Control Register [1..0] to 01, 10, or 11.
Up/Down Counting
The X Input counts UP; the Y Input counts DOWN.
Control functions are available using the Z input.
Control functions may be executed through software.
Program Input Control Register [0] to 0.
Program Quadrature Control Register [1..0] to 00.
Do not leave X nor Y inputs floating.
Ground unused X (–) or Y (–) input.
Count/Direction Counting
The X Input counts; the Y Input controls DIRECTION.
Control functions are available using the Z input.
Control functions may be executed through software.
Program Input Control Register [0] to 1.
Program Quadrature Control Register [1..0] to 00.
Do not leave X nor Y inputs floating.
Figure 9
Counting Modes
17
Control Function
Basic Operation of the Control Function
No control input
Leave control input open.
Counting is enabled.
Program Input Control Register [5..4] to 00.
Program Channel Configuration Register [4..2] to 0xx..
Load Counter
An input pulse on Z will load the Counter from the Preset Register.
Minimum pulse width is 80 nanoseconds.
Program Input Control Register [5..4] to 00.
Program Channel Configuration Register [4..2] to 111
for std polarity pulse, or 110 for inverted polarity.
This function may be used to establish a known
reference position in a mechanical system,
or to load starting value prior to down counting.
The Counter may also loaded from the Preset Register
under program control.
Load Latch
An input pulse on Z will transfer the Counter value to the
Output Latch register.
Minimum pulse width is 80 nanoseconds.
Program Input Control Register [5..4] to 10.
Program Channel Configuration Register [4..2] to 111
for std polarity pulse, or 110 for inverted polarity.
This function may be used to capture a position
in a mechanical system, or to capture an intermediate
value while counting.
The value loaded is always valid, even if the Counter is
in the middle of a transition.
The Output Latch may also be loaded from the Counter
under program control.
Input Gate
Control Input level on Z enables or disables counting.
Program Input Control Register [5..4] to 01.
Program Channel Configuration Register [4..2] to 101
for std polarity hold, or 100 for inverted polarity hold.
Opposite polarity enables counting.
Counter Reset
An input pulse on Z will clear the Counter.
Minimum pulse width is 80 nanoseconds.
Program Input Control Register [5..4] to 10.
Program Channel Configuration Register [4..2] to 101
for std polarity pulse, or 100 for inverted polarity.
This function may be used to establish a known
home or reference position in a mechanical system,
or to prepare for event counting.
The Counter may also be reset under program control.
Figure 10
Control Modes
18
Counting
Function
CHCR
Z Gate
Bit [4]
CHCR
Z Function
Z Bit [3]
LS7166
CR
Bits [5,4]
No control function
Load Counter from Preset/Compare Register
Interrupt if Preset/Compare Register = 0
Load Output Latch from Counter
Reset the Counter
Gate the Counter
0
1
1
1
1
1
don't care
1
1
1
0
0
00
00
00
10
00
01
Figure 11
Z Control Function Programming Summary
Quadrature Count Direction
Up/down count direction in quadrature systems is controlled by the relative phase of the X and Y
inputs. Count direction will be reversed by any one of the following conditions:
•
•
•
•
Mechanical motion direction reverses
The X and Y input connections are reversed
The X polarity bit is reversed
The Y polarity bit is reversed
Because the IP-Quadrature can easily generate an interrupt on borrow (down counting through zero)
it may be more desirable to make counting down the default for systems that move in only one
direction. For counting in either direction the interrupt-on-match capability can generate an interrupt
at any arbitrary position.
Interrupt Logic
The interrupt logic on the IP-Quadrature consists of output selection from the LS7166 counter ICs,
programmable logic implemented in the Xilinx LCA, and a single IP vector register.
Each LS7166 counter IC has one output that may be used to generate an interrupt. The counter IC
also has several flip-flops that may be read and cleared under program control. The IC’s output may
be programmed to generate an interrupt either on zero (“borrow”) or on comparitor match.
All interrupts occur on IRQ0. The interrupts are vectored. The upper six bits of the vector are
programmed by the user while the lower two bits indicate which channel is requesting service. The
interrupt vector may be read at any time by the software, with the two low order bits indicating the
highest priority channel then requesting service.
Vector [D1, D0]
00
01
10
11
Channel
1
2
3
4
Note: Channel 4 is the highest priority.
Figure 12
Interrupt Vector Low Bit Encoding
19
For each of the four channels there is an interrupt enable flip-flop and an interrupt pending flip-flop.
These eight flip-flops are implemented in the Xilinx LCA. On reset, these flip-flops are cleared.
Each counter’s interrupts must be explicitly enabled under program control, as required by the IP
Specification.
A pending interrupt is cleared by writing a one, then immediately writing zero to the Clear Interrupt
bit [7] of the corresponding Channel Configuration Register. The interrupt service routine (ISR) may
wish to clear the corresponding pollable flip-flop in the LS7166. Interrupts may be masked by
writing a zero to the Interrupt Mask bit [6] of the Channel Configuration Register. This only masks
the requesting of the interrupt by the IP; it does not block the control logic from latching an
interrupt request from the counter IC. This Interrupt Mask bit [6] should generally be used to
temporarily block an interrupt from occurring, if desired. Changing the Mask bit back to a one will
then cause an immediate interrupt if one is pending from that channel. Interrupts may be blocked
completely by keeping the Clear Interrupt bit [7] at zero. It is recommended that the Clear Interrupt
bit [7] be set high then low just prior to setting the Interrupt Mask bit [6] to a one the first time
interrupts are enabled for each channel in order to clear any undesired pending interrupt.
Each channel's LS7166 will generate an interrupt request, set its dedicated internal flip-flop and set
the dedicated external flip-flop in the Xilinx LCA each time the appropriate condition has been met.
Thus each time the Counter reaches zero or has a comparitor match these flip-flops will be set. The
flip-flops are edge triggered, so if the interrupting condition is still present in the Counter during the
ISR, and the ISR clears the flip-flop, it will not cause another interrupt until the interrupting
condition has ended and then occurs again. This feature means that the ISR will never have to wait
in a polling loop until it is safe to clear an interrupt. If more than one counter is requesting an
interrupt, and the ISR clears only one counter’s flip-flop, the IRQ line will still be asserted at the end
of the ISR. This will typically cause an immediate second interrupt, with a different vector.
Note that a dedicated second flip-flip (inside the Xilinx LCA) to record a pending interrupt is
necessary due to the pin limitations of the LS7166. Although it has three internal flip-flops, overflow
(“carry”), zero (“borrow”) and match, these flip-flops do not have dedicated lines out of the chip.
They may be read any time by software, but are not directly usable by interrupt circuitry.
There is an internal flip-flop in the LS7166 IC that records overflow when counting up. This flipflop may be polled, but may not be used to generate an interrupt. If counting up is required, the
match register may be programmed to all ones, $FFFFFF, and interrupt on match enabled. This will
produce almost the same operation as interrupt on overflow.
Interface Logic
The interface logic on the IP-Quadrature consists the ID PROM, a decoder and some control logic.
This logic implements the address map for the six counters, the vector register, and the interrupt
control flip-flops. It generates the necessary internal control signals on the IP. It also generates the
zero or one wait-state delay required during accesses. All of these functions are implemented in a
single Xilinx logic cell array (LCA).
20
VMEbus Addressing
The address map of the IP-Quadrature is given below in Figure 13. All accesses are byte wide, on
data lines D0..D7. This byte is the odd byte in 68K family host architectures, and the even byte in
Intel host architectures.
Some registers in the LS7166 counter ICs are selected by decoding D7 and D6 during write
operations. In the tables below, if D7 and D6 are shown, then these data bits must be appropriately
set during the write operation. If D7 and D6 are not shown, they contain the selected register data
value.
The Counter, the Preset/Compare Register and the Output Latch are all 24-bits. The Counter may
not be read or written directly by the software. The other two registers provide an automatic, internal
two-bit address sequencer. To read or write these registers, the control register is written first with
bit [0] set to one to reset the internal two-bit byte counter, then the desired register is accessed in
three consecutive cycles to the same address. The LSB is always transferred first.
21
68K
Address
D7, D6
Counter
Read/
Write
0,0
0,1
1,0
1,1
1
1
1
1
1
1
1
Read
Write
Read
Write
Write
Write
Write
Counter 1 Output Latch (24 bits)
Counter 1 Preset/Compare Register (24 bits)
Counter 1 Status Register
Counter 1 Control Register (six bits)
Counter 1 Input Control Register (six bits)
Counter 1 Output Control Register (six bits)
Counter 1 Quadrature Register
0,0
0,1
1,0
1,1
2
2
2
2
2
2
2
Read
Write
Read
Write
Write
Write
Write
Counter 2 Output Latch (24 bits)
Counter 2 Preset/Compare Register (24 bits)
Counter 2 Status Register
Counter 2 Control Register (six bits)
Counter 2 Input Control Register (six bits)
Counter 2 Output Control Register (six bits)
Counter 2 Quadrature Register
0,0
0,1
1,0
1,1
3
3
3
3
3
3
3
Read
Write
Read
Write
Write
Write
Write
Counter 3 Output Latch (24 bits)
Counter 3 Preset/Compare Register (24 bits)
Counter 3 Status Register
Counter 3 Control Register (six bits)
Counter 3 Input Control Register (six bits)
Counter 3 Output Control Register (six bits)
Counter 3 Quadrature Register
0,0
0,1
1,0
1,1
4
4
4
4
4
4
4
Read
Write
Read
Write
Write
Write
Write
Counter 4 Output Latch (24 bits)
Counter 4 Preset/Compare Register (24 bits)
Counter 4 Status Register
Counter 4 Control Register (six bits)
Counter 4 Input Control Register (six bits)
Counter 4 Output Control Register (six bits)
Counter 4 Quadrature Register
21
25
29
2D
1
2
3
4
R/W
R/W
R/W
R/W
Channel Configuration Register
Channel Configuration Register
Channel Configuration Register
Channel Configuration Register
31
35
all
all
R/W
R/W
Control and Status Register
Interrupt Vector Register (five bits)
Figure 13
VMEbus Address Map
01
01
03
03
03
03
03
05
05
07
07
07
07
07
09
09
0B
0B
0B
0B
0B
0D
0D
0F
0F
0F
0F
0F
Function
22
NuBus Addressing
NuBus addressing requires computing the address from the byte addresses given above under
VMEbus Addressing. The formula is:
NuBus byte address = (VMEbus byte address * 2) – 1
All byte data is still transferred on data lines D0..D7. The address map is given below in Figure 14.
See the text in the VMEbus Addressing section above for important information on 24 bit register
access. Interrupt mapping is a function of the selected carrier board. See your IP carrier board User
Manual for more information.
68K
Address
D7, D6
Counter
Read/
Write
0,0
0,1
1,0
1,1
1
1
1
1
1
1
1
Read
Write
Read
Write
Write
Write
Write
Counter 1 Output Latch (24 bits)
Counter 1 Preset/Compare Register (24 bits)
Counter 1 Status Register
Counter 1 Control Register (six bits)
Counter 1 Input Control Register (six bits)
Counter 1 Output Control Register (six bits)
Counter 1 Quadrature Register
0,0
0,1
1,0
1,1
2
2
2
2
2
2
2
Read
Write
Read
Write
Write
Write
Write
Counter 2 Output Latch (24 bits)
Counter 2 Preset/Compare Register (24 bits)
Counter 2 Status Register
Counter 2 Control Register (six bits)
Counter 2 Input Control Register (six bits)
Counter 2 Output Control Register (six bits)
Counter 2 Quadrature Register
0,0
0,1
1,0
1,1
3
3
3
3
3
3
3
Read
Write
Read
Write
Write
Write
Write
Counter 3 Output Latch (24 bits)
Counter 3 Preset/Compare Register (24 bits)
Counter 3 Status Register
Counter 3 Control Register (six bits)
Counter 3 Input Control Register (six bits)
Counter 3 Output Control Register (six bits)
Counter 3 Quadrature Register
0,0
0,1
1,0
1,1
4
4
4
4
4
4
4
Read
Write
Read
Write
Write
Write
Write
Counter 4 Output Latch (24 bits)
Counter 4 Preset/Compare Register (24 bits)
Counter 4 Status Register
Counter 4 Control Register (six bits)
Counter 4 Input Control Register (six bits)
Counter 4 Output Control Register (six bits)
Counter 4 Quadrature Register
41
49
26
59
1
2
3
4
R/W
R/W
R/W
R/W
Channel Configuration Register
Channel Configuration Register
Channel Configuration Register
Channel Configuration Register
61
69
all
all
R/W
R/W
Control and Status Register
Interrupt Vector Register (five bits)
00
00
05
05
05
05
05
09
09
0D
0D
0D
0D
0D
11
11
15
15
15
15
15
19
19
1D
1D
1D
1D
1D
Figure 14
Function
Nubus Address Map
23
ISA (PC-AT) Bus Addressing
ISA (PC-AT) bus addressing requires computing the address from the byte addresses given above
under VMEbus Addressing. The formula is:
ISA bus byte address = VMEbus byte address – 1
The effect of this formula is to change all 68K odd byte addresses into Intel architecture even byte
addresses. All byte data is still transferred on data lines D0..D7.
See the text in the VMEbus Addressing section above for important information on 24 bit register
access. Interrupt mapping is a function of the selected carrier board. See your IP carrier board User
Manual for more information.
24
ISA Bus
Address
D7, D6
Counter
Read/
Write
0,0
0,1
1,0
1,1
1
1
1
1
1
1
1
Read
Write
Read
Write
Write
Write
Write
Counter 1 Output Latch (24 bits)
Counter 1 Preset/Compare Register (24 bits)
Counter 1 Status Register
Counter 1 Control Register (six bits)
Counter 1 Input Control Register (six bits)
Counter 1 Output Control Register (six bits)
Counter 1 Quadrature Register
0,0
0,1
1,0
1,1
2
2
2
2
2
2
2
Read
Write
Read
Write
Write
Write
Write
Counter 2 Output Latch (24 bits)
Counter 2 Preset/Compare Register (24 bits)
Counter 2 Status Register
Counter 2 Control Register (six bits)
Counter 2 Input Control Register (six bits)
Counter 2 Output Control Register (six bits)
Counter 2 Quadrature Register
0,0
0,1
1,0
1,1
3
3
3
3
3
3
3
Read
Write
Read
Write
Write
Write
Write
Counter 3 Output Latch (24 bits)
Counter 3 Preset/Compare Register (24 bits)
Counter 3 Status Register
Counter 3 Control Register (six bits)
Counter 3 Input Control Register (six bits)
Counter 3 Output Control Register (six bits)
Counter 3 Quadrature Register
0,0
0,1
1,0
1,1
4
4
4
4
4
4
4
Read
Write
Read
Write
Write
Write
Write
Counter 4 Output Latch (24 bits)
Counter 4 Preset/Compare Register (24 bits)
Counter 4 Status Register
Counter 4 Control Register (six bits)
Counter 4 Input Control Register (six bits)
Counter 4 Output Control Register (six bits)
Counter 4 Quadrature Register
20
24
28
2C
1
2
3
4
R/W
R/W
R/W
R/W
Channel Configuration Register
Channel Configuration Register
Channel Configuration Register
Channel Configuration Register
30
34
all
all
R/W
R/W
Control and Status Register
Interrupt Vector Register (five bits)
00
00
02
02
02
02
02
04
04
06
06
06
06
06
08
08
0A
0A
0A
0A
0A
0C
0C
0E
0E
0E
0E
0E
Figure 15
Function
ISA Address Map
25
Programming
This section gives the bit assignments of the registers for the IP-Quadrature. It also provides basic
sequencing information for programming the IP-Quadrature, and gives power-up defaults.
All accesses to the IP-Quadrature are byte-wide, and use data lines D0..D7. This is the odd byte in
68K family host systems. All examples below assume 68K host systems. See the NuBus Addressing
and ISA (PC-AT) Addressing sections above for other hosts, or contact GreenSpring Computers.
Caution: Many registers must be read by a short sequence of writes and reads. This
sequence must not be interrupted by other reads or writes to addresses within the same
channel. The programmer should assure that either (1) his routine is the only place within
the system where these registers will be accessed, and that this routine is not re-entrant; or
(2) disable interrupts during key sequences so that no context switch can occur, potentially
disrupting the read sequence in progress.
Detailed Register Descriptions
The following table in Figure 16 shows recommended abbreviations for use in programming. It also
shows where in the hardware the register is implemented.
Register Name
Output Latch
Preset/Compare Register
Status Register
Counter Control Register
Input Control Register
Output Control Register
Quadrature Register
Channel Configuration Register
Control and Status Register
Vector Register
Figure 16
Abbreviation
Quantity
OL
PCR
SR
CR
ICR
OCR
QR
CHCR
CSR
VR
4
4
4
4
4
4
4
4
1
1
Location
LS7166
LS7166
LS7166
LS7166
LS7166
LS7166
LS7166
Xilinx
Xilinx
Xilinx
Register Abbreviations and Locations
Output Latch [OL]
There is one Output Latch (OL) register for each of the four channels.
This is a 24-bit register that is used to hold the position (Counter) data for reliable reading. The
Output Latch always has stable data transferred to it, even if the Counter data is changing at the time
data is transferred. The Counter data may be transferred to the Output Latch under either program
control or as one of the programmable control functions. The Output Latch data is read one byte at
a time, LSB first, from a single address. The Control Register bit [0] is first written to a “1” to
initialize the internal two-bit Output Latch byte pointer.
26
Typical programming sequence to read the Output Latch is:
1. Write bits [1..0] of the Control Register to “11” or use the
external control function to load the Output Latch from
the Counter and set bit [0] of the Control Register to “1”
2. Read LSB of Output Latch (OL7..OL0)
3. Read middle byte of Output Latch (OL15..OL8)
4. Read MSB of Output Latch (OL23..OL16)
5. Assemble the three bytes into a 32-bit unsigned integer
Preset/Compare Register [PCR]
There is one Preset/Compare Register (PCR) for each of the four channels.
This is a 24-bit register that has two functions. It is used to hold data prior to loading the Counter
which may be loaded from the Preset/Compare Register under either program control or as one of
the programmable control functions.
The Preset/Compare Register is also used in the Match function. If enabled, an interrupt may be
generated when the Counter value matches the value in the Preset/Compare Register. There is also a
Compare Toggle Flip-Flop in the Status Register that may be read by the software independently of
the Compare interrupt.
The Preset/Compare Register data is loaded by the host software one byte at a time, LSB first, to a
single address. The Control Register bit [0] is first written to a “1” to initialize the internal two-bit
Preset/Compare Register byte pointer.
Typical programming sequence to write the Preset/Compare Register is:
1. Disassemble a 32-bit unsigned integer into three bytes
2. Set bit [0] of the Control Register to “1”
3. Write LSB of Preset/Compare Register (PCR7..PCR0)
4. Write middle byte of Preset/Compare Register (PCR15..PCR8)
5. Write MSB of Preset/Compare Register (PCR23..PCR16)
6. Transfer data from Preset/Compare Register to Counter if desired, by
writing bit [3] to “1” or by using the programmable control function.
The Preset/Compare Register is set to all ones $FFFFFF by the Master Reset bit (bit [5]) of the
Counter Control Register.
Status Register [SR]
There is one Status Register (SR) for each of the four channels.
The Status Register has five useful bits, [4..0]. Bits [7..5] read as “111”.
Bit [0] = D0 LSB Borrow Toggle Flip-Flop (BWT)
This reads the Borrow Toggle Flip-Flop (BWT). This bit is normally a “0”. It is cleared by the
Master Reset and Counter Reset bits (bits [5] and [2] respectively) of the Counter Control Register.
This bit toggles every time Counter underflow occurs, generating a borrow. This bit changes
simultaneously with the Counter changing from $000000 to $FFFFFF.
If interrupt on borrow is enabled, the interrupt will occur at the same time as this bit changes state.
Thus an interrupt service routine (ISR) that is triggered by a borrow interrupt can reliably expect to
see the BWT bit toggled. Typically the ISR would reset the BWT bit by setting bit [2] of the Control
Register.
27
Bit [1] = D1
Carry Toggle Flip-Flop (CYT)
This reads the Carry Toggle Flip-Flop (CYT). This bit is normally a “0”. It is cleared by the Master
Reset and Counter Reset bits (bits [5] and [2] respectively) of the Counter Control Register. This bit
toggles every time the Counter overflows, generating a carry. This bit changes simultaneously with
the Counter changing from $FFFFFF to $000000.
There is no interrupt on carry function available. A similar effect may be achieved by using the
interrupt on Match function, and loading the Preset/Compare Register with $FFFFFF or $000000.
Alternatively, down counting may be used instead of up counting.
Bit [2] = D2
Compare Toggle Flip-Flop (COMPT)
This reads the Compare Toggle Flip-Flop (COMPT). This bit is normally a “0”. It is cleared by the
Master Reset and COMPT Reset bits (bits [5] and [4] respectively) of the Counter Control Register.
This bit toggles every time the Counter matches the contents of the Preset/Compare Register.
If interrupt on Match is enabled, the interrupt will occur at the same time as this bit changes state.
Thus an interrupt service routine (ISR) that is triggered by a match interrupt can reliably expect to
see the COMPT bit toggled. Typically the ISR would reset the COMPT bit by setting bit [4] of the
Control Register.
Bit [3] = D3
SIGN
This is the Sign bit (SIGN). This bit is normally a “1”, and is set by the Master Reset and Counter
Reset bits (bits [5] and [2] respectively) of the Counter Control Register. This bit is reset to “0” every
time the Counter underflows and set to “1” every time the Counter overflows.
Bit [4] = D4
Count Direction (U/D)
This is the Count Direction (U/D) bit and is valid only in quadrature counting mode. In nonquadrature mode this bit is set to “1”. In Quadrature mode a “0” indicates counting down and a “1”
indicates counting up. The correspondence of CW and CCW direction to up and down count
direction is determined by the programmed polarities of the two inputs (X and Y) and by the user
wiring from the quadrature detector to the IP.
See Figure 5 above for a timing diagram of quadrature counting.
Bits [7..5]
These three bits always read as “111”.
Counter Control Register [CR]
There is one Counter Control Register (CR) for each of the four channels. Do not confuse this
register with the Channel Configuration Register (CHCR).
This is a byte-wide, write only register that contains six bits. Reading from the same address will
access the counter’s Status Register (SR). Writes to this register MUST have D7 and D6 set to zero.
If D7 and D6 are not zero, then another register will be accessed.
After the operation requested by writing a bit of this register to a “1” has been completed, the bit is
automatically reset to “0”. More than one bit may be set to one for combined operations.
Bit [0] = D0 LSB
Writing this bit to a one resets the internal two-bit byte sequence pointer in preparation for accessing
the Preset/Compare Register or the Output Latch. Write this bit to a one just prior to accessing
either of these registers. The bit is reset to zero automatically after all three bytes of the
Preset/Compare Register or the Output Latch have been transferred.
Bit [1] = D1
28
Writing this bit to a one transfers the 24-bit contents of the Counter to the Output Latch where they
may be read. Write this bit to a one just prior to reading the value of the Counter through the
Output Latch. The bit is reset to zero immediately after the Counter contents have been transferred.
Bit [2] = D2
Writing this bit to a one resets the 24-bit Counter, the Borrow Toggle Flip-Flop, and the Carry
Toggle Flip-Flop. The bit is reset to zero immediately.
Bit [3] = D3
Writing this bit to a one transfers the contents of the Preset/Compare Register to the 24-bit
Counter. The bit is reset to zero immediately after the Counter is loaded.
Bit [4] = D4
Writing this bit to a one resets the Comparitor Match Toggle Flip-Flop. The bit is reset to zero
immediately.
Bit [5] = D5
Writing this bit to a one is the master reset for the Counter. Setting this bit to “1” resets the 24-bit
Counter, the Input Control Register, the Output Control Register, the Quadrature Register, the
Borrow Toggle Flip-Flop, the Carry Toggle Flip-Flop, the Comparitor Toggle Flip-Flop and the two
bit byte sequence pointer. This bit should be set to a one to initialize the Counter and the
IndustryPack. The bit is reset to zero immediately.
D7, D6
These bits MUST be set to zero for all writes to the Counter’s Control Register. If these bits are not
set to zero, a different register will be accessed.
Input Control Register [ICR]
There is one Input Control Register (ICR) for each of the four channels.
This is a byte-wide, write only register. Reading from the same address will access the Counter’s
Status Register. Writes to this register MUST have D7 and D6 set to zero and one respectively If D7
and D6 are not set to “01”, then another register will be accessed.
Bit [0] = D0
This bit is set to “0” in normal operation for Up/Down counting and Quadrature counting. In
Up/Down mode, the X input counts Up and the Y input counts Down. A “1” in this bit selects
Count/Direction counting mode, where the X input counts and the Y input determines direction.
The Y input may only be changed when the X input is high (standard polarity).
Bit [1] = D1
This bit is set to “0” for normal operation. Setting this bit to “1” causes the Counter to increment
once, assuming that the X and Y inputs are “1” and bit [3] is set to “1” (standard polarity).
Bit [2] = D2
Set this bit to “0” for normal operation. Setting this bit to “1” causes the Counter to decrement
once, assuming that the X and Y inputs are “1” and bit [3] is set to “1” (standard polarity).
Bit [3] = D3
Set this bit to “0” to disable the counting. Set this bit to “1” to enable counting.
Bit [4] = D4
Set this bit to “0” to select the Counter Reset control function. Set this bit to “1” to select the
Counter Gate control function. Use “0” for no control function or for other control functions.
Selecting control functions also requires programming the Channel Configuration Register.
29
Bit [5] = D5
Set this bit to “0” to select the Counter Load control function. Set this bit to “1” to select the
Output Latch Load control function. Use “0” for no control function or for other control functions.
Selecting control functions also requires programming the Channel Configuration Register.
D7, D6
These bits MUST be set to “01” for all writes to the Input Control Register. If these bits are not set
to “01” a different register will be accessed.
Output Control Register [OCR]
There is one Output Control Register (OCR) for each of the four channels.
This is a byte-wide, write only register that contains six useful bits. Reading from the same address
will access the Counter’s Status Register. Writes to this register MUST have D7 and D6 set to one
and zero respectively If D7 and D6 are not set to “10”, then another register will be accessed.
This register must be configured by the host software prior to using the Counter.
Bit [0] = D0 LSB
Set this bit to “0” for normal operation. This setting selects binary count mode (overridden if bit [3]
= “1”). Setting this bit to “1” selects BCD count mode, which is not recommended for IPQuadrature.
Bit [1] = D1
Set this bit to “0” for normal operation, this selects recycle mode (overridden if bit [3] = “1”).
Setting this bit to “1” selects non-recycle mode, which is not recommended for IP-Quadrature. In
the non-recycle mode, the Counter is enabled with a load or reset, and disabled with generation of
carry or borrow. In this mode no interrupt is possible, and BWT or CYT bits must be polled.
Bit [2] = D2
Set this bit to “0” for normal operation. This setting selects normal mode. Setting this bit to “1”
selects divide-by-N mode in which the Counter is loaded with data from the PCR upon carry or
borrow.
Bit [3] = D3
Set this bit to “0” for normal operation. This setting selects binary or BCD counting modes. Setting
this bit to “1” selects 24-hour clock mode, which is not recommended for IP-Quadrature. In the 24hour clock mode, the LSB contains seconds, the next byte contains minutes, and the MSB contains
hours.
Bits [5..4] = D5, D4
Set these bits to “01” to select interrupt on borrow. Interrupt on match is programmed by setting
these bits to “11”. The Borrow Toggle Flip-Flop (BWT) is connected to pin 17 of the LS7166 by
setting these bits to “01”. Pin 17 is used by the Xilinx based interrupt logic to know that the counter
IC is requesting an interrupt. Setting these bits to “11” connects the Compare Toggle Flip-Flop
(COMPT) to pin 17. These two bits should be programmed to one of these two values.
D7, D6
These bits MUST be set to “10” for all writes to the Output Control Register. If these bits are not
set to “10” a different register will be accessed.
Quadrature Register [QR]
There is one Quadrature Register (QR) for each of the four channels.
30
This is a byte-wide, write-only register that contains two useful bits. It is normally set once to
configure the Counter channel and not changed during operation. It must be configured by the host
software prior to using the Counter.
Bits [1..0] = D1, D0
Quadrature Control
Setting these bits to “00” disables quadrature mode. Most general purpose counting options and
functions of IP-Quadrature operate with the quadrature mode disabled. For all quadrature mode
operations these bits must be set to values of “01”, “10”, or “11”. Setting these bits to “11” (X4) is
the most common setting.
Quadrature
Prescaler
Quadrature Counting Disabled
X1
X2
X4
Low Bits in QR
D1, D0
00
01
10
11
Recommended
Setting bits one and zero to “01” enables quadrature mode with X1 counting. X1 counting causes
the Counter to increment or decrement one count for each full cycle of the quadrature inputs. A
setting of “10” enables quadrature mode with X2 counting. X2 counting causes the Counter to
increment or decrement one count for each half cycle of the quadrature inputs. The Counter
changes state when the Control input changes state. The recommended setting of “11” enables
quadrature mode with X4 counting. X4 counting causes the Counter to increment or decrement one
count for each quarter cycle of the quadrature inputs. The Counter changes state when either the
Count or the Control input changes state. All interrupt modes (interrupt on borrow, interrupt on
match) are available.
See Figure 5 above for a timing diagram showing quadrature counting and examples of the three
quadrature counting options. See also the previous subsection, Quadrature Count Direction, for a
brief discussion of count direction. See also the LS7166 Data Sheet included in the IP-Quadrature
Engineering Kit for more information on internal counting operation in quadrature mode.
D7, D6
These bits MUST be set to “11” for all writes to the Quadrature Register. If these bits are not set to
“11” a different register will be accessed.
Channel Configuration Register [CHCR]
There is one Channel Configuration Register (CHCR) for each of the four channels.
This register is implemented in the Xilinx LCA. This is a byte-wide read/write register that contains
seven useful bits. This register is set to all zero on reset. All bits are read/write and retain the value
written to them except bit [7], the Interrupt Pending bit. This register may be written or read at any
time, however changing the mode of the channel while it is operating may produce a spurious count
or control function.
Bit [0] = D0 LSB X Invert
X Input Invert. This bit selects the polarity of the X input prior to passing it to the A input of the
LS7166. Setting this bit to “0” selects no inversion. A setting of “1” selects inversion. No inversion
is the reset default, and it means that standard RS-422 input levels (the P input side more positive
than the N input side) provide a logic high at the LS7166 A input. Note that TTL input is normally
connected to the N input, so there is a built in polarity inversion in the input circuit for TTL level
input.
31
Bit [1] = D1
Y Invert
Y Input Invert. This bit selects the polarity of the Y input prior to passing it to the B input of the
LS7166. Setting this bit to “0” selects no inversion. A setting of “1” selects inversion. No inversion
is the reset default, and it means that standard RS-422 input levels (the P input side more positive
than the N input side) provide a logic high at the LS7166 B input. Note that TTL input is normally
connected to the N input, so there is a built in polarity inversion in the input circuit for TTL level
inputs.
Bits [2] = D2
Z Invert
Z Input Invert. This bit selects the polarity of the Z input prior to passing it to one of the two
control inputs of the LS7166. Setting this bit to “0” selects no inversion. A setting of “1” selects
inversion. No inversion is the reset default, and it means that standard RS-422 input levels (the P
input side more positive than the N input side) provide a logic high at the LS7166 input. Note that
TTL input is normally connected to the N input, so there is a built in polarity inversion in the input
circuit for TTL level inputs. See Figure 17 below for a table of programmable functions. See also the
discussion above on “Input Polarity” and Figures 6, 7 and 8 where “standard polarity” is shown.
Bit [3] = D3
Z Function Select
Z Function Select. This bit selects the function of the Z input by selecting which of two control
inputs on the LS7166 receives the Z input. See Figure 17 below for a table of programmable
functions. Note that the bits in the LS7166's Input Control Register (ICR) must be also be
programmed to implement a given control function. Setting this bit to “0” routes the Z input to pin
4 of the LS7166. A Setting of “1” routes the Z input to pin 3 of the LS7166. This bit is set to “0” on
reset.
Bit [4] = D4
Z Function Enable
Z Function Enable. A “0” blocks the Z input from having any affect on the channel. A “1” enables
Z functions. This bit is set to “0” on reset. See Figure 17 below for a table of programmable
functions.
Note that the four primary control functions listed in below in Figure 17 are also available under
software control, by accessing the Counter Control Register. That is— load Counter from PCR;
transfer Counter to OL; clear Counter; hold Counter— may be executed by writing the correct bits
of the appropriate control registers.
Note that with standard polarity, a floating (disconnected) Z Control Input will cause none of the
first three functions to occur (normal counting), but if Counter Hold function is programmed, a
floating Z Input will disable counting.
Bit [5] = D5
This bit is not used. It is recommended that it be written as a “1” and masked out on all reads.
32
Configuration
Register
Bits [4..2]
Input Control
Register
Bits [5..4]
0xx
00
No control functions, count only.
*111
*110
00
00
Load Counter from PCR on std polarity Z pulse.
Load Counter from PCR on inverted polarity Z pulse.
111
110
10
10
Transfer Counter data to OL on std polarity Z pulse.
Transfer Counter data to OL on inverted polarity Z pulse.
101
100
10
10
Clear Counter on std polarity Z pulse.
Clear Counter on inverted polarity Z pulse.
101
01
100
01
Counter holds on std polarity Z input.
Counter runs on inverted polarity Z input.
Counter holds on inverted polarity Z input.
Counter runs on std polarity Z input.
*Note:
Note:
Control Function
The two lines above marked * can be used to generate
an interrupt if interrupt-on-Match is enabled, and
the Preset/Compare Register is loaded with zero.
Std Polarity:
Inverted Polarity:
Figure 17
Definitions below apply to pulses and levels.
RS-422 input, + input more positive than – input.
TTL input is low, and connected to – input.
RS-422 input, + input more negative than – input.
TTL input is high, and connected to – input.
Control Function Selection
Bit [6] = D6
Interrupt Enable
Interrupt Enable. Setting this bit to “0” disables interrupts from this counter channel. A setting of
“1” enables interrupts. Note that the interrupt masking occurs after the interrupt pending flip-flop. If
an interrupt is pending and this bit is changed from a “0” to a “1” an interrupt request will occur
immediately. This permits interrupts to be temporarily masked, if necessary, while the Counters are
running without the danger of “losing” an interrupt that would have occurred. This bit resets and
powers up to “0”.
Bit [7] = D7
Interrupt Pending
Interrupt Pending. This bit has separate functions for read and write. This bit is read as a “1” when
there is an interrupt pending for this counter channel. If bit [6] is set to “1”, there is an active
interrupt request. Reading a “0” in this bit indicates the Counter channel is not requesting an
interrupt. To clear this bit from a “1” to a “0”, and thus turn off the active interrupt request
(normally done in the interrupt service routine), write a “1” to this bit followed by a "0". This bit
must be set to “0” to enable interrupts on this channel. Setting this bit to "1" has the same
effect as disabling interrupts on this channel. All interrupts that occur while this bit is "1"
will be lost.
Control and Status Register [CSR]
There is one Control and Status Register (CSR) for the entire IP-Quadrature. It is a byte-wide
read/write register that contains three useful bits.
33
Bit [0] = D0
Terminator #1 Enable
Terminator #1 Enable. Setting this bit to “1” enables the 110? to 2.85 volts TTL terminator.
Terminator #1 applies to all inputs X, Y, and Z for channels 1 and 2. Writing this bit to a “0”
disables the terminator. For RS-422 input, the terminator should be disabled. This bit resets and
powers up to a “0”.
Bit [1] = D1
Terminator #2 Enable
Terminator #2 Enable. Setting this bit to “1” enables the 110? to 2.85 volts TTL terminator.
Terminator #2 applies to all inputs X, Y, and Z for channels 3 and 4. Writing this bit to a “0”
disables the terminator. For RS-422 input, the terminator should be disabled. This bit resets and
powers up to a “0”.
Bit [2] = D2
Tbit1. This bit is used for debugging and should not be set by the user. Write to a “0”, and mask on
reads.
Bits [7..3] = D7..3
These five bits are not used. It is recommended that they be set to a “1” on writes, and masked on
reads.
Vector Register [VR]
There is one six-bit Vector Register for IP-Quadrature. The MSB six bits (D7..D2), when
programmed, become the upper six bits of the interrupt vector. The low two bits encode the highest
priority Counter channel requesting service. Channel 1 has the lowest priority; channel 4 the highest.
The low two bits are encoded as follows:
Counter
Channel
1
2
3
4
Low Bits in Vector
D1, D0
00
01
10
11
For additional information on interrupts see your IP Carrier board's User Manual. Interrupts from
the IndustryPacks are mapped to the host bus or processor by the carrier board.
Power Up and Reset Initializing
The Interrupt Vector Register initializes to all ones. The Channel Configuration Registers initialize to
all zeros. The initial state of the registers in the LS7166 is unknown, and should be programmed.
34
I/O Pin Wiring
This section gives the pin assignments for IP-Quadrature.
The pin numbers given in Figure 18 on the next page correspond to numbers on the 50-pin
IndustryPack I/O connector, to the wires on a 50-pin flat cable plugged into a standard IP carrier
board, and to the screw terminal numbers on the IP-Terminal block.
For more information of interpretation of “polarity”, see the Theory of Operation section, above.
35
Pin
Number
Channel
RS-422 Differential
Signal Input
1
2
3
4
5
6
7
8
9
10
11
12
1
1
1
1
1
1
1
1
1
1
1
1
X1+
GND
X1–
GND
Y1+
GND
Y1–
GND
Z1+
GND
Z1–
GND
no connect
GND
X1
GND
no connect
GND
Y1
GND
no connect
GND
Z1
GND
13
14
15
16
17
18
19
20
21
22
23
24
2
2
2
2
2
2
2
2
2
2
2
2
X2+
GND
X2–
GND
Y2+
GND
Y2–
GND
Z2+
GND
Z2–
GND
no connect
GND
X2
GND
no connect
GND
Y2
GND
no connect
GND
Z2
GND
25
26
27
28
29
30
31
32
33
34
35
36
3
3
3
3
3
3
3
3
3
3
3
3
X3+
GND
X3–
GND
Y3+
GND
Y3–
GND
Z3+
GND
Z3–
GND
no connect
GND
X3
GND
no connect
GND
Y3
GND
no connect
GND
Z3
GND
37
38
39
40
41
42
43
44
45
46
47
48
4
4
4
4
4
4
4
4
4
4
4
4
X4+
GND
X4–
GND
Y4+
GND
Y4–
GND
Z4+
GND
Z4–
GND
no connect
GND
X4
GND
no connect
GND
Y4
GND
no connect
GND
Z4
GND
49
50
n/a
n/a
Figure 18
Single -Ended Logic
Signal Input
8 MHz +
8 MHz –
I/O Pin Assignment
36
IndustryPack Logic Interface Pin
Assignment
Figure 19 below gives the pin assignments for the IndustryPack Logic Interface connector on the
IP-Quadrature. Pins marked n/c below are defined by the specification, but not used on IPQuadrature. See also your User Manual for your IP Carrier board for more information.
GND
CLK
Reset*
D0 IDSel*
D1 n/c
D2 MEMSel*
D3 n/c
D4 INTSel*
D5 n/c
D6 IOSel*
D7 n/c
n/c
n/c
n/c
n/c
n/c
n/c
n/c
n/c
BS0*
n/c
BS1*
n/c
+5V
GND
GND
+5V
R/W*
4
5
6
7
8
9
10
11
A1
n/c
A2
n/c
A3
IntReq0*
A4
IntReq1*
A5
n/c
A6
Ack*
n/c
GND
1
2
3
27
28
29
30
31
32
33
34
35
36
12
13
14
15
16
17
18
19
20
21
22
23
37
38
39
40
41
42
43
44
45
46
47
48
24
25
Note 1: The no-connect (n/c) signals above are defined by the IndustryPack Logic Interface
Specification, but not used by this IP. See the Specification for more information.
Note 2: The layout of the pin numbers in this table corresponds to the physical placement of pins
on the IP connector. Thus this table may be used to easily locate the physical pin corresponding
to a desired signal. Pin 1 is marked with a square pad on the IndustryPack.
Figure 19
26
Logic Interface Pin Assignment
37
49
50
ID PROM
Every IP contains an ID PROM, whose size is at least 32 x 8 bits. The ID PROM aids in software
auto configuration and configuration management. The user's software, or a supplied driver, may
verify that the device it expects is actually installed at the location it expects, and is nominally
functional. The ID PROM contains the manufacturing revision level of the IP. If a driver requires
that a particular revision be present, it may check for it directly.
Standard data in the ID PROM on the IP-Quadrature is shown in Figure 20 below.
For more information on IP ID PROMs refer to the IndustryPack Logic Interface Specification,
available from GreenSpring Computers. The ID PROM on the IP-Quadrature is implemented
internally in the Xilinx LCA.
The location of the ID PROM in the host's address space is dependent on which carrier board used.
Normally for VMEbus carriers the ID PROM space is directly above the IP's I/O space, or at IPbase + $80. Macintosh drivers use the ID PROM automatically. RM1260 address may be derived
from Figure 20 below by multiplying the addresses given by two, then subtracting one. RM1270
addresses may be derived by multiplying the addresses given by two, then adding one.
The ID PROM is equivalent to an AMD 27LS19A.
3F
(available for user)
19
17
15
13
11
0F
0D
0B
09
07
05
03
01
CRC
No of bytes used
Driver ID, high byte
Driver ID, low byte
reserved
Revision
Model No IP-Quadrature
Manufacturer ID GreenSpring
ASCII “C”
ASCII “A”
ASCII “P”
ASCII “I”
Figure 20
ID PROM Data (hex)
38
(E0)
(0C)
(00)
(01)
(00)
(A1)
(41)
(F0)
(43)
(41)
(50)
(49)
Construction and Reliability
IndustryPacks were conceived and engineered for rugged industrial environments. The IPQuadrature is constructed out of 0.062 inch thick FR4 V0 material. The six copper layers consist of
two signal layers on the top and bottom, and four internal layers. Two of the internal layers are
power and ground planes.
Through hole and surface mounting of components are used. IC sockets are use gold plated screwmachine pins. High insertion and removal forces are required, which assists in keeping components
in place. If the application requires unusually high reliability or is in an environment subject to high
vibration, the user may solder the four corner pins of each socketed IC into the socket, using a
grounded soldering iron.
The IndustryPack connectors are keyed, shrouded and gold plated on both contacts and receptacles.
They are rated at 1 Amp per pin and a minimum of 200 insertion cycles. These connectors make
consistent, correct insertion easy and reliable.
The IP is secured to the carrier with four M2 metric stainless steel screws. The heads of the screws
are countersunk into the IP. The four screws provide significant protection against shock, vibration,
and incomplete insertion. For most applications they are not required.
The IndustryPack provides a low temperature coefficient of 0.89 W/°C for uniform heat. This is
based on the temperature coefficient of the base FR4 material of 0.31 W/m-°C, and taking into
account the thickness and area of the IP. This coefficient means that if 0.89 Watts is applied
uniformly on the component side, that the temperature difference between the component and the
solder side is one degree Celsius.
39
Warranty and Repair
GreenSpring Computer warrants this product to be free from defects in workmanship and materials
under normal use and service and in its original, unmodified condition, for a period of one year from
the time of purchase. If the product is found to be defective within the terms of this warranty,
GreenSpring Computer's sole responsibility shall be to repair, or at GreenSpring Computer's sole
option to replace, the defective product. The product must be returned by the original customer,
insured, and shipped prepaid to GreenSpring Computers. All replaced products become the sole
property of GreenSpring Computers.
GreenSpring Computer's warranty of and liability for defective products is limited to that set forth
herein. GreenSpring Computers disclaims and excludes all other product warranties and product
liability, expressed or implied, including but not limited to any implied warranties of
merchandisability or fitness for a particular purpose or use, liability for negligence in manufacture or
shipment of product, liability for injury to persons or property, or for any incidental or consequential
damages.
GreenSpring’s products are not authorized for use as critical components in life support devices or
systems without the express written approval of the president of GreenSpring Computers, Inc.
Service Policy
Before returning a product for repair, verify as well as possible that the suspected unit is at fault.
Then call the Customer Service Department for a RETURN MATERIAL AUTHORIZATION
(RMA) number. Carefully package the unit, in the original shipping carton if this is available, and
ship prepaid and insured with the RMA number clearly written on the outside of the package.
Include a return address and the telephone number of a technical contact. For out-of-warranty
repairs, a purchase order for repair charges must accompany the return. GreenSpring Computers will
not be responsible for damages due to improper packaging of returned items. For service on
GreenSpring Products not purchased directly from GreenSpring Computers contact your reseller.
Products returned to GreenSpring Computers for repair by other than the original customer will be
treated as out-of-warranty.
Out of Warranty Repairs
Out of warranty repairs will be billed on a material and labor basis. The current minimum repair
charge is $100. Customer approval will be obtained before repairing any item if the repair charges
will exceed one half of the quantity one list price for that unit. Return transportation and insurance
will be billed as part of the repair and is in addition to the minimum charge.
For Service Contact:
Customer Service Department
GreenSpring Computers
1204 O’Brien Drive
Menlo Park, CA 94025
(415) 327-1200
(415) 327-3808 fax
40
Specifications
Logic Interface
IndustryPack logic Interface, 0.7 compatible
Single-high size
Number of Channels
Four
Number of Inputs/Channel
Three: two count inputs and one control input
Count Rate
DC to 10 MHz general purpose counting,
DC to 1.2 MHz (4.8 MHz count rate) quadrature
Input Levels
RS-422 differential and Logic (single-ended),
selectable
RS-422 Input Termination
120? as resistor SIP standard,
may be changed or removed by user.
TTL Input Termination
110? to 2.85 volts selectable by software
Input Polarity
All inputs have programmable polarity
Counter LSI
LS7166
Counter Bits
24 bits
Counter Registers
Counter, Preset/Compare, Output Latch,
all 24-bits
Read Mode
Read-on-the fly supported
Counter Modes
Up, Down, Quadrature, Divide-by-N
Clock Output
8 MHz, RS-422
Control Functions
Load Output Latch
Load Counter
Reset Counter
Gate Counter
Interrupts
Programmable,
interrupt on borrow or interrupt on match
Interrupt Vector
8 bits,
6 bits programmable, 2 bits indicate channel
Control Logic LSI
Xilinx® LCA handles bus interface, interrupts,
polarity
Wait States
Data read and write: one
ID read: zero
Power Dissipation
770 mW typical @ 5.0 V
1.04 W max @ 5.0 V
Temperature Coefficient
0.89 W/°C for uniform heat,
component side to solder side
Dimensions
1.800 by 3.900 by 0.340 inches maximum
Environmental
Operating temperature: 0 to 70°C
Humidity: 5 to 95% non-condensing
Storage: –10 to +85°C
41
QuickStart Software Support
QuickStart software provides a simple software functional test of the IP hardware. It is not a driver
or an application programming library. Please consult with your GreenSpring sales representative on
the availability of QuickPack or DriverPack software for this IP.
QuickStart software is provided in ANSI C source code format. This software has been tested on a
Motorola MVME162 running OS-9 v3.0 and compiled with Ultra C v1.1.1 from Microware in ANSI
C mode. Some modifications will be necessary to use a different compiler or operating system. The
areas specific to OS-9 or Microware software tools have been marked as thoroughly as possible.
QuickStart software is supplied as is with no warranty or guarantee. The recipient may reuse and/or
modify this software for use with GreenSpring IndustryPacks only.
Function summaries are provided here for customer reference only. This information was current at
the time the manual was last revised. This information is not necessarily current or complete
manufacturing data, nor is it part of the product specification. All information following is copyright
GreenSpring Computers, Inc.
Current code listings, including print outs and floppy disk (DOS 3.5" 1.44 MB format), are available
from GreenSpring Computers as part of the Engineering Kit option or from your international
distributor.
42
------------------------------------------------------NAME
initLS7166 - initialize the LS7166 as a quadrature decoder
SYNOPSIS
initLS7166( LS7166 *pCtr )
DESCRIPTION
initLS7166() initializes the LS7166 chip as a 4X quadrature
decoder.
RETURNS
SUCCESS
------------------------------------------------------NAME
readLS7166 - read the LS7166 quadrature counter
SYNOPSIS
INT32 readLS7166( LS7166 *pCtr )
DESCRIPTION
readLS7166() reads the 24 bit counter of the LS7166 and
returns a 32 bit sign extended integer value.
RETURNS
24 bit counter value sign extended to 32 bits.
------------------------------------------------------NAME
loadPrLS7166 - load the preset register of the LS7166
SYNOPSIS
INT32 loadPrLS7166( LS7166 *pCtr, INT32 value )
DESCRIPTION
loadPrLS7166() loads the given value into the preset
register of the LS7166. The preset register is NOT loaded
into the counter.
RETURNS
SUCCESS
------------------------------------------------------NAME
loadCtrLS7166 - load counter from preset register of the LS7166
SYNOPSIS
INT32 loadCtrLS7166( LS7166 *pCtr )
DESCRIPTION
loadCtrLS7166() loads the contents of the preset register into
the counter register of the LS7166.
RETURNS
SUCCESS
43