1
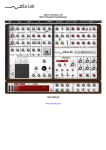
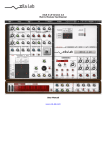
XILS 4
Ultimate Matrix Modular Synthesizer
User Manual
www.xils-lab.com
Table of contents
1 INTRODUCTION................................................................................................................................................4
2 XILS 4 FEATURES:............................................................................................................................................5
2.1SYNTHESIZER MODULES:....................................................................................................................................... 5
2.2INPUT MODULES:................................................................................................................................................. 5
2.3EFFECT MODULES:............................................................................................................................................... 5
3 DIGITAL AUDIO WORKSTATION COMPATIBILITY:.............................................................................. 5
4 INSTALLATION:................................................................................................................................................ 6
4.1 ELICENSER DRIVERS:............................................................................................................................................ 6
4.1.1If you already own a eLicenser: .............................................................................................................. 6
4.1.2If you have received a eLicenser dongle from XILS-lab:......................................................................... 6
4.2 ILOK DRIVERS: ................................................................................................................................................... 6
4.3 WINDOWS (XP, VISTA, WINDOWS 7):................................................................................................................ 7
4.4 MAC (OSX 10.4 AND LATER):.............................................................................................................................7
5 QUICK START.................................................................................................................................................... 9
5.1 LAUNCH, PLAY:.................................................................................................................................................. 9
5.2 TOOLBAR:.......................................................................................................................................................... 9
5.3 ADJUSTING THE INSTRUMENTS PARAMETERS (KNOBS, SWITCHES):................................................................................9
6 PRESET MANAGEMENT:.............................................................................................................................. 11
6.1 MAIN TOOLBAR:............................................................................................................................................... 11
6.2 PRESET MENU:...................................................................................................................................................11
6.3 SORT MENUS:....................................................................................................................................................13
6.3.1 Sorting Menu: Additional Functions: ...................................................................................................14
6.4 A/B COMPARISON:............................................................................................................................................ 15
7 XILS 4 GUI DESCRIPTION............................................................................................................................16
8 XILS 4 COMMON GUI DESCRIPTION:...................................................................................................... 17
9 XILS 4 MATRIX DESCRIPTION:..................................................................................................................18
10 XILS 4 TRIG CONNECTION DESCRIPTION...........................................................................................19
11 XILS 4 SYNTHESIZER ROUTING:.............................................................................................................21
12 XILS 4 MODULES DESCRIPTION:............................................................................................................22
12.1 MAIN SYNTHESIZERS:....................................................................................................................................... 22
12.1.1 Oscillators:.......................................................................................................................................... 23
12.1.2 Filter:...................................................................................................................................................24
12.1.3 Envelope Shaper:.................................................................................................................................24
12.1.4 Noise Generator:................................................................................................................................. 25
12.1.5 Ring Modulator:.................................................................................................................................. 25
12.1.6 Reverb:................................................................................................................................................ 26
12.1.7 Output filter:........................................................................................................................................ 26
12.1.8 Input Level:..........................................................................................................................................26
12.1.9 Joy-Stick and output levels:.................................................................................................................27
12.1.10 The Drop-Down Matrix Modulation:................................................................................................ 27
12.2ADDITIONAL MODULES:..................................................................................................................................... 30
12.2.1 Two additional Envelopes:.................................................................................................................. 30
12.2.2 Tempo synced LFO:............................................................................................................................. 30
12.2.3 Sample and Hold:................................................................................................................................ 31
12.2.4 Voltage Processor:...............................................................................................................................31
12.3 SEQUENCER:................................................................................................................................................... 32
12.3.1 Front sequencer controls:....................................................................................................................32
12.3.2 Connecting the Sequencer:..................................................................................................................33
12.3.3 Recording a Sequence:........................................................................................................................ 33
12.3.4 Playing a Sequence:............................................................................................................................ 33
12.3.5 Using the Sequencer Editor:................................................................................................................34
12.3.6 Using the Sequencer preset menu:...................................................................................................... 35
12.4 VIRTUAL KEYBOARD AND CONTROLS:................................................................................................................. 35
12.5 INPUT MODULES:............................................................................................................................................. 37
12.5.1 Transient follower:.............................................................................................................................. 37
12.5.2 Envelope follower:...............................................................................................................................37
12.5.3 Pitch Tracker:...................................................................................................................................... 38
12.5.4 Input Gate: ..........................................................................................................................................38
12.6 EFFECTS MODULES:.......................................................................................................................................... 39
12.6.1 Delay:.................................................................................................................................................. 39
12.6.2Chorus:................................................................................................................................................. 40
12.6.3Phaser:................................................................................................................................................. 40
13 OPTION MENU:............................................................................................................................................. 41
13.1.1Main:.................................................................................................................................................... 41
13.1.2Display:................................................................................................................................................ 41
13.1.3Misc...................................................................................................................................................... 42
14 CREDITS:........................................................................................................................................................ 42
1
Introduction
Thank you for choosing the XILS 4.
The XILS 4 is a virtual instrument, based on the architecture of a classic matrix modular synthesizer.
Modularity and the Modulation Matrix are the basis of these synthesizers: Up to 1080 connections are
available to build any synthesizer structure, using many finely emulated synthesis modules.
The XILS 4 is based on two main Synthesizers, with hard synchronization available between the
oscillators. It also incorporates a 3-layer sequencer.
The left-hand example shows
the Main Matrix, with 16 inputs
and 16 outputs. The right-hand
example shows the Extended
Matrix, with 15 inputs and 15
outputs.
Other matrices are available
for connecting the sequencer,
and/or the various trig signals.
“like” us on Facebook
http://www.facebook.com/XILSLabs and join in the conversation.
Note 1: We plan to release a series of tutorial videos to help you to get the most out of XILS 4.
When available, you will be able to view these videos on our YouTube channel.
Please visit:http://www.youtube.lcom/user/xilslab
Note 2: If you have a question about the XILS 4, we strongly encourage you to join, then post on the XilsLab forum: http://www.xils-lab.com/xo_phpBB/.
Posting on our forum is the fastest way to get an answer, if you experience some trouble with XILS 4.
If you also need information about a specific subject, or want to exchange ideas or patches with other
Xilsonauts, it is the best way to get connected to the Xils-lab world.
2
XILS 4 Features:
Synthesizer Modules:
2.1
•
•
•
•
•
•
•
•
•
•
Input Modules:
2.2
•
•
•
1 Envelope Follower.
1 Pitch Tracker.
1 Gate.
Effect Modules:
2.3
•
•
•
3
12 Oscillators, grouped in 6 pairs.
2 self-oscillating Low Pass Filters (12db, 18db, 24db) with analog-like behaviour.
4 Amplitude Envelopes (ADSR or Trapezoid).
1 tempo-synced LFO.
2 Polyphonic Ring Modulators.
1 Voltage Processor.
2 Spring Reverbs.
1 Sample and Hold Generator.
2 Noise Generators.
4 Output Filters.
1 Delay.
1 Chorus.
1 Phaser.
Digital Audio Workstation compatibility:
XILS 4 is available in the following formats:
•
•
Mac OSX 10.4 (32 bits), 10.6 (32&64bits) and later: VST, Audio Unit, RTAS (Pro Tools 7.0 and
later), AAX (32 & 64 bits).
Windows 7, XP and Vista: VST, RTAS (Pro Tools 7.0 and later), AAX (32 & 64 bits).
AAX
Minimum system requirements: 1 Gigabyte of RAM and a 2 GHz processor.
XILS 4 is a plug-in, and is not available as a standalone application.
Please note: The screen resolution must be set at least to 1024 pixels width.
4
Installation:
XILS-Lab offers you the choice of using an eLicenser, or an iLok.
eLicenser drivers:
4.1
The XILS 4 uses an eLicenser dongle. You must have this dongle connected to a USB port on your
computer to make the XILS 4 work.
Important : Please take care of your dongle. You need it to run the XILS 4, as it carries your license!
4.1.1 If you already own a eLicenser:
Please Note: Even if you have already installed the eLicenser drivers for a previous product, please install the
latest version of the eLicenser License Control.
To download the latest eLicenser Control Center (eLC), please go to:
http://www.elicenser.net/en/latest_downloads.html
You will need a XILS 4 Activation Code, to load your license onto the dongle:
First, plug your dongle into a USB port of your computer, then launch the License Control Center. Launch the
Enter authorization code. Enter your Activation Code in the reserved field, and press Next.
Wait for the license to be downloaded, and then check to see if the license is correctly loaded on to the
dongle, in the main section of the License Control Center.
4.1.2
If you have received a eLicenser dongle from XILS-lab:
You must first install the eLicenser drivers (eLicenser Control Center, eLC).
To download the latest eLC please go to:
http://www.elicenser.net/en/latest_downloads.html
You can then plug your dongle into any free USB port on your computer. Launch the License Control Center,
then enter the authorization code you have received, as explained above.
4.2
iLok drivers:
To use the iLok version of the XILS 4, you need to plug an iLok USB key into your computer.
After downloading and installing the latest PACE drivers, please login into your ilok.com account, to
download your XILS 4 license on to your iLok USB key. You may need to redeem the license, using the
license code you received. Follow the “redeem license code” link in your ilok.com account)
To download the latest PACE drivers, please go to:
http://www.ilok.com/download-ilok-software.html
4.3
Windows (XP, VISTA, Windows 7):
To install the XILS 4 on Windows XP, Vista or Windows 7, launch the XILS 4 installer file.
Please download the latest version from the XILS-lab website.
http://www.xils-lab.com/pages/XILS 4_Download-Installer.html
Once you have accepted the license agreement, you will be asked to select the components to be installed :
You can choose which format is to be installed, selecting any or all of RTAS, AAX and VST2.4 (32 and 64 bits).
You will then be asked to choose the various install directories.
A destination directory is provided as a default. Presets and various files used by the XILS 4, such as this
manual, will be stored in this directory. Please note that this location is different from the VST install directory,
which you will need to specify in the next step of the installation.
Once the installation directory is specified, you will be asked to select the VST plug-in directory, with a suggested
default location. Make sure that the path for the 32 bits plug-in differs than for the 64 bits plug-in (as does the
default path)
Important notice for Vista or Windows 7: Be sure to use a folder that is write-enabled, and owned by the
user. (Do not use “c:/program files” for instance). Otherwise you will have to run your music application with
“administrator rights”.
The RTAS plug-in and its table control management Pro-Tools are directly copied into the following directory:
C:\Program Files\Common Files\Digidesign\DAE\Plug-Ins
4.4
Mac (OSX 10.4 and later):
To install the XILS 4 on a computer equipped with Mac OSX 10.5 or later, download the latest version of either
the iLok or eLicensor versions from the XILS-lab website, to make sure you have the latest version of the
software.
First, download from:
http://www.xils-lab.com/pages/XILS 4_Download-Installer.html
Next, launch the install program XILS 4.pkg, and follow the instructions.
Warning: the install program will ask you for your system password.
Just after selecting the drive where the XILS 4 will be installed, you can choose which components are to be
copied, by clicking on “customize” and selecting or deselecting them :
The various files of the XILS 4 will be copied into the following directories:
Library/Application Support/XILS-lab/XILS 4
Library/Application Support/Digidesign/Plug-Ins
Library/Application Support/Avid/Audio/Plug-Ins
Library/Audio/Plug-Ins/Components
Library/Audio/Plug-Ins/VST
Library/Application Support/Documentation/XILS-lab/XILS 4
And for the User Preset and various option :
..users/username/Library/Preferences/XILS-lab/XILS 4
5
5.1
Quick Start
Launch, Play:
When you launch XILS 4 in your host, an INIT preset will be loaded.
It is a simple filtered one-oscillator sound, which can be seen as a basis for your sound design.
You can directly use or modify this preset, or load one of the factory presets.
To browse the preset library, just select a category of instruments, using the BANK drop down menu found at
the left of XILS 4 Tool Bar. (See Picture Below)
You can then use the up and down arrows located at the right of the preset name, or open the bank drop down
list by clicking in the PRESET NAME AREA
Note: We have also provided different INIT Patches, which can be seen as a good basis to begin to design new
presets.
5.2
Toolbar:
Note: The toolbar at the top of the interface lets you load or save presets (as well as BANKS of presets), make
a comparison between two different versions of the current preset (A & B), or modify the options. These
functions are described in detail later in this manual.
Selecting a preset: Click on the PRESET NAME AREA to display the list of the available presets in the current
sorted group.
Warning: Please note that selecting a new preset without saving your current settings will erase any changes
you have made to those settings.
Selecting a group of presets: Click on one of the two CRITERIA buttons to change criteria, and define a group
of presets that will match the two filtering criteria.
You can sort presets by: Author, Feeling, Type, Style, Bank or Projects.
Info: Please note that XILS 4 will display presets sorted by instruments Categories (Type = Bass, Keys, Leads
etc.) and Library Bank by default.
Please note that the XILS 4’s powerful preset management is fully detailed in chapter 6 of this manual.
5.3
Adjusting the instruments parameters (Knobs, switches):
On XILS 4, most sound parameters, such as the pitch of an oscillator, or the filter’s Cut-Off Frequency, are
controlled using knobs.
To adjust the parameters of XILS 4 with the mouse, you have two axes: horizontal and vertical, which will give
the same results.
To increase a parameters value, click and drag the knob to the right, or to the top
To decrease a parameter value, click and drag the knob to the left, or to the bottom.
Fine adjustments: If you right-click on a parameter, or if you hold shift while clicking, you can adjust the
selected parameter with greater precision (the ? button of the toolbar displays a panel summarizing these
shortcuts).
Keyboard shortcuts:
In addition we have provided some soft keys combination to perform several very useful tasks:
Windows:
•
•
•
•
CTRL+left click: reset parameter to its default value.
CTRL+right click or CTRL+Shift+left click: initialize the default value of the parameter.
Win+Alt+CTRL + click: open the MIDI Control panel, with the parameter already selected.
Mouse wheel on the matrix: open a zoom.
OSX:
•
•
•
•
Apple+left click: reset parameter to its default value.
Apple+Shift+left click: initialise the default value of the parameter.
Apple+Alt+CTRL + click: open the MIDI Control panel, with the parameter already selected.
Mouse wheel on the matrix: open a zoom.
The switches are simpler: just left click to change their state. A right click will change the state only while the
button is pressed, and return to the previous state when it is released.
When a parameter is chosen via a drop down menu, just click on the button or label and select the item.
6
6.1
Preset Management:
Main Toolbar:
In the toolbar you can find two Criteria buttons, displaying the criteria name (Bank, Author, Type, Style, Feeling
or Project), which open the sort management menus.
The first two text fields show the current sorting criteria, and the third shows the chosen preset of the resulting
selected group of presets.
Clicking on the arrow to the left of the category, or preset names, opens the corresponding menus.
Info: Once any one parameter of a preset has been modified, the name of the preset is followed by a *,
indicating that the current settings of XILS 4 no longer match the stored preset.
When you want to save a modified preset, click on the Save or Save As button.
The SAVE function will overwrite the current preset with all the edits you have made. The Save As function
gives you the opportunity to save your preset under another name, in a different bank, and with different tags.
Factory Preset Protection: In order to prevent you from erasing them, the Factory presets cannot be
overwritten using the SAVE function. When you edit a Factory preset, the Save button will therefore be grayed,
and you MUST use the “Save As” function to save it in another bank.
If you edit any preset other than a Factory one, the Save and Save As functions will both be available.
As soon as an edited preset has been saved, the * will disappear, until you start to edit that saved version yet
again.
6.2
Preset menu:
Click in the Preset Name Area to display the preset list. Here you can choose and load another preset from
the current selected group of presets into the XILS 4.
In this menu, other actions are also available:
Delete Preset: Use this to delete the current preset (a pop-up confirmation window appears). This option is
only available if the current preset is not a factory one.
Export Preset: Use this function to export the current preset to an external file location. This file can be
imported later as a new bank. It always makes sense to back up your presets on external media.
Open Preset Information (or click on SAVE AS): This opens the following preset information window
where, not only the name, but all the other information related to the current preset can be displayed or
changed.
This window allows you to specify or change the data below, to be saved with the newly named preset:
•
•
•
•
•
Author: (Your name, mostly used by Sound Designers for factory presets)
Type: (Category of the instrument such as Keys, Leads, Basses, etc.)
Style: (Musical Genre, Groove Type, etc.)
Feeling: (e.g. Cold, Warm, Soft, Sweep).
Project: (My Favorites, My Song, My_Live_Project, Patches for my next CD, etc.).
You can also see its creation date, and the last update date.
All the above can also be determined when moving presets to another file location.
To modify a preset name, click in the preset NAME field, and enter the new preset name.
To change the preset location, click on the BANK display. This will open a menu when you can select one
of the existing sound-banks, or create a new bank.
Note: You can add a new item in any category, and therefore create custom banks (My Sound-bank),
custom styles (Musical genres), categories of instruments, and custom projects etc.
Creating custom tags and sound-banks: To add a new item in any field, click in this field, then instead
of using an existing item, select “New….”, which will appear at the bottom of the list. This will open a
separate new window, in which you can write the name of the new item. Click OK to confirm this, then the
name and the newly created tag will now be active and selected for the current preset.
Note: You may have to browse down to the bottom of the list in order to select “new”, depending on the
length of the list.
TIP: How to create a Favorite Sound-bank:
There are two possibilities:
1. Just create a bank, named “My Favorites”, and save all the interesting patches into this sound-bank. To
browse all your favorites, just set the first criteria to BANK, then select “My Favorites”. You can still use
the second criteria to filter the results by categories of instruments, in order to browse all your favorite
basses, for example. This method is fast, but it will duplicate your patches.
2. Just create a new tag in the Project field, and name it “My Favorites”, then just re-save any interesting
patch with this tag, using the SAVE AS option. To browse your favorites, just choose this tag in the
project field as the first criteria. This method is maybe more interesting because you can reverse it.
Should you later decide that a particular patch no longer deserves to be honored with it's “Favourites” tag,
simply remove the tag, then re-save it.
Note: Please be aware that creating too many categories can also have its drawbacks; making browsing
change from slightly difficult, to very cumbersome. Should you create around 200 different custom
instrument categories, it would become very difficult to browse the library using the Style (Category)
sorting. Use these options wisely.
Once you have filled out all the desired/required fields:
SAVE AS: Will save the current preset in the chosen Bank, with its new (or unchanged) Name, and tagged
with all the fields you have filled in.
MOVE TO: Allows transferring the current preset into another location (Bank). This is handy to gather a
lot of presets into a single location, or User Bank, which you can then export as a single file, containing all
the presets you have created or edited for a given project.
CANCEL: This will just cancel all operations, and return to the standard XILS 4 GUI.
Sort menus:
6.3
The sorting menus are a unique and powerful tool. They allow you to perform sophisticated tasks, such as
displaying the preset list, but organized in a variety of different and specific ways.
Examples:
• All the Basses in your Sound Library
• All the Basses tagged with a specific musical genre.
• All the Pads created by a particular Sound Designer.
• All instruments tagged for a chosen musical genre, such as Electronica, or Funk.
• All instruments that were recently imported into a bank (like additional sound-sets from Xils-Lab, or it's
3rd party vendors)
There are many possibilities, but we are confident that you will find the best way to customize it to your
personal needs.
In order to perform such selections, all you have to do is to select an item in the first sort menu. This
represents the first, and main criteria for the search engine.
•
Author: (Your name, or a Sound Designer's name for factory presets),
•
•
•
•
•
Type: (Category of the instrument require: Keys, Leads, Basses, etc.)
Style: (Musical Genre),
Feeling: (Cold, Warm, Soft) and finally,
Project: (My Song, My_Live_Project).
All: (This item is not used for sorting the preset)
These primary results can then also be filtered according to the second criteria, which can be chosen from
a similar list in the secondary sort menu.
Sometimes a picture is better than a lot of text. There is an example below, showing how to select all the
basses designed by a given Sound Designer.
Please note that, once you are familiar with this system, you can also perform some operations in a single click,
by using the Sub Groups to choose a preset.
In the picture below, the primary sort menu is used to browse through the different banks. In a factory bank,
the author Xils-Lab is selected, and then the Preset -Init2Osc Left-. In this example , the preset is selected in a
single click operation, and the presets available in the preset list will be all the Xils-Lab presets available in the
entire Factory Sound Library.
Click on the row of the sorting buttons to open the menu used to manage this sorting group (or sub group).
Here you can directly select and load any preset, from any group or subgroup.
6.3.1
Sorting Menu: Additional Functions:
In this menu, other actions are also available:
Delete: This deletes all of the presets of the current group, that are not factory ones.
WARNING: Use this function with EXTREME care: If the bank does not contain any factory presets, ALL
PRESETS IN THIS BANK WILL BE PERMANENTLY DELETED.
Rename: This modifies the current group name. Selecting this choice will open a window where the new name
can be entered.
Use Factory: This enables or disables the display of factory presets.
Sort By: This function sorts the presets according to bank, author, project, or shows all presets (Bank Name,
Author Name, Project Name, All Presets). The preset menu will show presets of the same category (same
author, same project or same bank).
Export Bank: This function exports a bank in XILS 4’s proprietary cross platform format, (Mac and PC).
The selected bank (i.e. the bank which contains the currently active preset) will be exported to a user specified
location on your hard drive.
Import Bank: This function allows you to browse through your hard drives to select a Bank file, and then
imports an XILS 4 bank.
Please note: These last two functions (Import, Export) are not available from the second sort menu.
6.4
A/B Comparison:
You can store two different versions of a patch simultaneously in the A and B (non-permanent) memory slots,
and instantly switch from one to the other to compare their settings.
When you launch XILS 4, the default-activated memory is A. When you load or modify a preset, this memory –
A- is also modified in real time according to your edits. You can switch to B memory by clicking on the B button.
To copy the current active memory content to the other memory slot, just press the button labeled -> or <-,
according to the current active memory.
With this A/B comparison system, you can easily have two settings, and compare them in a convenient way.
Note: Please note that by default, the B memory slot, until you copy settings into it, or until loading another
preset into the other memory slot, is populated with the INIT patch loaded in the A memory, when you first start
XILS 4.
7
XILS 4 GUI description
The XILS 4 features 2 main synthesizers and, for this reason, requires a specific GUI management.
It is best to think of this machine as a three panel instrument: Left Synthesizer panel, Right Synthesizer
panel, and the Sequencer/Modules panel.
This is not so convenient for a computer screen, so a scrolling system has been incorporated.
You can display either both of the synthesizers, or one of them beside the sequencer/modules panel.
The left arrow allows switching between the left and the right synthesizer. The right arrow allows closing
the sequencer/modules panel.
When the Sequencer/Modules panel is closed, then the two synthesizers are displayed:
The right arrow allows the opening of the Sequencer/Modules panel, by pushing the two synthesizers to
the left.
This workflow allows:
•
•
•
8
Playing with two synthesizers, when no sequencer/modules are used.
Playing with one synthesizer and the sequencer, when a simple patch is needed.
Playing with the two synthesizers, modules and sequencer, when complex patches are needed.
XILS 4 common GUI description:
As you have seen, your XILS 4 is based on one or two main synthesizers, and other possible modules.
The main synthesizer is a matrix-based modular machine, for which every connection has to be made.
There is NO default connection between modules, and even triggers must be taken into account. This is
why the XILS 4 is so powerful, albeit having a learning curve worth the extra effort.
The main synthesizer has two matrixes, one 16x16 called the Main Matrix, and another 15x15 called the
Extended Matrix. You can display either or both of the Main and Extend matrices, by clicking on the
corresponding tab.
In the Sequencer/Modules panel, you can switch between several tabs to display various functions:
Env/LFO, Inputs, Effects, Sequencer, and Sequencer connections.
In the same way, you will find a tab to display either the keyboard trig matrix, or the keyboard controls
(velocity, mod. wheel ranges, etc)
9
XILS 4 Matrix description:
All the XILS 4 audio paths and trigs are done with the matrix, so having some information regarding this
major component is important.
A matrix is a component that allows you to connect the output of one module to the input of another.
In all the XILS 4 matrices, outputs are listed in the horizontal row, and the inputs in the vertical column.
Placing a pin will connect the corresponding output to the corresponding input.
Input or output can be an audio signal (oscillators, filters,) or control signals (Trapezoid, Stick, Osc
Frequency, Filter frequency,...)
There is no limitation, you can always connect audio signal outputs to control inputs, and it will be
accepted at it's audio rate.
For instance in this matrix:
Oscillator 1 saw output is connected to the filter
audio input.
Filter audio output is connected to the VCA audio
input (named ENV as in the original model)
Finally output VCA (ENV. SIGNAL) is connected to
the output of the synthesizer (OUT 1/2)
Connection is always made from left to right and
bottom to top.
The matrix can sometimes seem too small. Clicking on the magnifier, or using the mouse-wheel over the
matrix, will open it in a big pop-up, for an easier reading experience.
When a connection is made, you can adjust the amount by clicking and moving the mouse. The pin will
turn, giving you an idea of the current value. Turned fully to the right, the value is at a positive maximum.
Turned fully to the left, the value is at a negative maximum.
The color of the pin helps you to see the adjusted value, and its polarity (positive or negative), in a glance.
To remove a connection, just right click on a pin.
For a trig connection, there is obviously no amount setting.
10
XILS 4 Trig connection description
As we explained, there are absolutely no internal or default connections in the XILS 4. This means that
even the connection between the keyboard and the envelopes, for instance, must be made.
Two trig sources are available: the Keyboard and the Sequencer. They are grouped in two different panels:
You will find the Keyboard trig matrix at the right of the virtual keyboard, and the Sequencer matrix in the
sequencer/module panel (under the tab “seq connection”)
A “trig” connection is connecting a “trig” or “gate” signal to an envelope, sequencer start, stop, or LFO
reset.
As shown in the picture below, a “trig” is a one-pulse information event for initiating an envelope cycle,
resetting a LFO, or starting a sequencer. A “gate” is a pulse with a certain width. For example, when you
play a note on the keyboard, the gate signal it generates stays on until the note is no longer held down.
From the sequencer, the gate length is dependent on the “sustain” knobs (see the sequencer chapter).
Details will be explained in the chapter relating to those particular modules which require a trig or gate.
11
XILS 4 Synthesizer routing:
The XILS 4 provides two synthesizers, the one on the left and the one on the right; mimicking the old EMS
VCS4, or the Crystal Machine dual AKS used by Tim Blake. These two synthesizers are mixed together
with their own level and pan parameters, before being sent to the effects unit (delay, chorus and phaser).
But before its level and pan are applied, the left synthesizer is sent to the right synthesizer, though the
main matrix “INPUT FROM LEFT” source. This opens a very wide range of new possibilities, as these new
inputs allow the right synthesizer to treat the 3 left oscillators, filtered or not, as well as its own. This
creates a 6 oscillator, 2 low-pass analog-type filter, and 4 envelope synthesizer.
12
XILS 4 modules description:
The XILS 4 GUI is divided into four areas: Two cabinets are dedicated to the main synthesizers. One
cabinet is dedicated to the keyboard and it's controls, and another cabinet is dedicated to the advanced
analog-like 3 layer sequencer (based on the old EMS 256 unit) and other modules.
12.1 Main synthesizers:
Both the left and right synthesizers are divided in two parts; the synthesis, and the matrix and level part.
The matrix part itself has tabs that can display the main 16x16 matrix, the advanced 15x15 matrix with
extended connection menus, or both of the matrices. When only one matrix is displayed, the output level
and pan are shown, as well as a joystick.
The synthesis part is build with:
(from the left to the right, top to bottom)
•
•
•
•
•
•
•
•
Three oscillators.
One ring modulator.
One self oscillating filter.
One envelope shaper, with its dedicated
amplifier (VCA).
One noise generator.
One input level (for using the XILS 4 as an
effect processor, or for connecting the left
synthesizer to the right.)
One output static filter.
One vu-meter.
The second part shows the connection matrix and
the output level and pan.
A (MIDI controllable) Joystick can be connected
through the matrix.
12.1.1
Oscillators:
Three oscillators are available. The first one
outputs a sine wave and a saw wave, with
independent level. The Shape knob allows changes
to the sine waveform, and to add a new pulse to the
saw wave.
The second oscillator provides a square wave and a
triangle wave; both with independent level control.
The Shape knob changes the pulse width of the
square wave, and the symmetry of the triangle
waveform.
The third oscillator outputs the same waveforms as
the second, but two octaves lower, so it can be used
as an LFO.
The pitch of the oscillator is set by the internal knob
for fine-tuning (from -12 to +12 semi-tones), or by
the external ring for the octave range.
The XILS 4 also provides the ability to hard
synchronize osc2 to osc1, and also osc3 to either
osc2 or osc 1.
Please Note: The pitch control for an oscillator must be connected.
This connection is created in the advanced 15x15 matrix. Putting a pin between the Keyboard follow (1 or
2) and the Oscillator Frequency modulation will do the trick. To tune the oscillators according to the
standard midi notes, the keyboard follow level (in the Keyboard control panel) must be set to 0.5 and
the value of the pin must be set at maximum.
Shape: This knob sets the shape of the sine, square, ramp or triangle waveforms. For the sine wave, it
adds odd harmonics. For the square waves, it modifies the impulse width. For the ramp wave, it adds a
second front, and for the triangle wave, it modifies the raising front or leading edge.
Shape
Ramp
Square
Triangle
0 or 50%
20%
Frequency: This knob has two parts, one for coarse tuning and the other for fine-tuning. The outside ring sets
the octave of the oscillator frequency: you can set it from -2 to +2 octaves, or it can be set to Low. This “Low”
setting gives a very low frequency oscillator, which can be used for effects. The inside part of the knob finetunes the frequency. When tuning with the left mouse button, it sets the frequency by semitone steps. When
tuning with the right mouse button, it fine-tunes the frequency with more precision.
Level: This knob modifies the output level of each waveform. This can be useful for blending the mix of
the waveforms, and setting the amount of modulation created between them.
The oscillator’s frequency, shape and level can be modulated with control or audio signals, thanks to the
matrix connection (for shape, see the advanced matrix setting panel).
12.1.2
Filter:
There are three modes for this low pass filter which
can be selected by the horizontal switch:
•
•
•
12-db/Oct-attenuation mode.
18 db/Oct self-oscillating analog filter.
24 db/Oct self-oscillating analog filter.
Frequency: Sets the cut-off frequency. It can be modulated (audio or control rate) by connecting a pin at
the corresponding destination in the matrix.
Response: Sets the emphasis (the Q-factor) of the filter. If set at over 3.8, it begins to self-oscillate for
the 18 and 24 db modes. The response can also be modulated (see advanced matrix explanation).
Level: Sets the output level of the filter.
Note: The internal non-linearities of the 18db and the 24-db filters are not the same. The 18-db filter has
been finely emulated reproducing as closely as possible, the behavior of the original 18db diode layer filter.
12.1.3
Envelope Shaper:
The envelope shaper of the synthesis part is linked
with an internal amplifier (it is the only internal
connection of the synthesizer)
The amount of the amplifier level modulated by this
envelope is set by the TRAPEZOID knob, and the
output level is set by the SIGNAL knob.
The envelopes of the XILS 4 have two modes. The Trapezoid is as per the original model, whereas ADSR is
like that found on almost all standard synthesizers.
On the left is an illustration of both cycle
types: Envelope (ADSR), and Trapeze.
ATTACK: Sets the speed of Attack, and is
common to both modes.
ON: Sets the ON (or Hold) duration of the
Trapeze mode.
DECAY: Sets the Decay duration, and is
common to both modes.
SUSTAIN: Sets the level of the sustain phase
the Envelope (ADSR) mode.
RELEASE: Sets the release duration of the
Envelope (ASDR) mode.
OFF: Sets the OFF duration of the Trapeze
mode. This is the time between the end of the
decay and the beginning of a new cycle. When
this knob is turned fully clockwise, there is no
loop.
As you can see in this diagram, the sustain
step is only maintained if the Gate is
connected.
In the same way, if the gate is not connected,
the Trapeze mode will loop indefinitely, if the
OFF time is not set to maximum.
12.1.4
Noise Generator:
Most of the sounds you can hear in instruments and nature have a noise component in the background, or
during the attack. To reproduce this sound feature, the XILS 4 incorporates a noise generator module.
Level: this knob sets the output level of the noise.
Colour: this knob sets the colour of the noise, from
a very coloured noise (with less high frequency), to
a standard white noise, passing through a standard
pink noise.
The level and colour can be modulated through the
advanced connection matrix.
12.1.5 Ring Modulator:
LEVEL: this knob sets the output level of the ring
modulator.
RMV DC: By clicking on this check box, you remove
any DC component of the input ring modulator
signals.
By connecting the Joystick to one of the inputs, the
effect can be heard only while moving it. Otherwise
the level is null
12.1.6
Reverb:
A monophonic spring reverb unit is available. This means that any polyphonic sounds will be mixed
together before being sent to the reverb unit. The output of the reverb can, however, be used as an input
for polyphonic modules.
LEVEL: This knob sets the output level of the
Reverb.
MIX: This knob balances the mix between the dry
and the wet signals.
TYPE: This switch sets the Reverb type.
12.1.7
Output filter:
There is a static filter, which can be set to either low pass or high pass, for each of the two outputs, left
and right. This filter can be useful for limiting some high frequencies, or removing rumble, while
maintaining an otherwise full range for the dynamic filter.
The two knobs set the cut-off frequency of the filters
and the switch selects the type; high-pass or lowpass.
When the switch is set to the centre, no filter is
activated.
12.1.8
Input Level:
The XILS 4 can also be used as a versatile audio
effect processor.
In this case, the Audio Input of the plugin is directed
into the Main matrix, and the level can be adjusted
with these two knobs.
In the XILS 4, only the left synthesizer is connected
to the Audio inputs of the plug-in. The right
synthesizer inputs are connected to the output of the
left synthesizer. In this way, you can use any
modules of the left synthesizer inside the right one.
12.1.9
Joy-Stick and output levels:
As in the original model, the XILS 4 also has a
joystick, but in this case is fully controllable by MIDI
messages.
The V-RANGE and H-RANGE set the level of the
horizontal and vertical modulation.
CTRL+click puts it back to the centre, and right click
allows you to keep the mouse moving the Joystick
without keeping the button pressed. This could be
useful in certain performance situations.
The “ATTACK” button, named as in the original
model, allows you to trig the main Trapezoid
envelope (also MIDI controllable).
The LEVEL and PAN knobs set the output level and
pan of this synthesizer part.
There is also a “SOLO” button that mutes the other
synthesizer.
12.1.10
The Drop-Down Matrix Modulation:
The Advanced Modulation Matrix offers two freely assignable sources, and four freely assignable
destinations.
You select the source of modulation in the left field drop down list, and the destination in the top dropdown menu. Put a pin in the corresponding hole, then set the value.
The Sources of the Modulation are separated in three different
groups: Oscillators, Envelopes and Modulators.
For the XILS 4 you will find oscillators and envelopes for both
synthesizers.
In the case of the XILS 4, having access to both synthesizers
helps create a much wider range of sound design possibilities.
The Destinations of the Modulation are separated in five groups:
Oscillators, Filters, Envelopes, Modulators and Effects.
For the XILS 4 you will find Oscillators, Filters and Envelopes for
both of the synthesizers.
In the case of the XILS 4, having access to both synthesizers helps
create a much wider range of sound design possibilities.
12.2 Additional modules:
For some patches, the VCS3 core is not enough, so we added some extra modules. These include an LFO,
Envelopes, Sample and Hold, and a Voltage Processor.
12.2.1 Two additional Envelopes:
Two envelopes were added to the VCS3 core, for a total of three envelope modulators. These two
additional envelopes are similar to the main envelope shaper, apart from the fact that they are not
connected to the internal VCA. To use them, you need to put a pin in the advanced matrix, and selecting
either Env 1 or Env 2 raw.
Clicking on the label changes the mode from trapezoid to standard ADSR (see the Envelope Shaper chapter
above).
12.2.2
Tempo synced LFO:
To avoid having to use the third oscillator as a low frequency modulator, we added an independent LFO.
RATE : Sets the frequency of the LFO.
SYNC : When engaged, this switch synchronizes the
frequency to a multiple or sub-multiple of the DAW
tempo.
WIDTH : Sets the width of the waveform.
LEVEL : Sets the output level of the LFO.
TYPE : Sets the waveform type of the LFO.
DELAY : Sets the delay offset between the gate and
the beginning of the modulation.
FADE : Sets the ramp rate of the modulation rise
after the Delay.
Notice : DELAY and FADE work only when a Gate
(Keyboard or Sequencer) is connected to the LFO.
12.2.3
Sample and Hold:
This very useful module allows the sampling of its input, and holds it over until it receives the next clock.
If no input is selected, then a white noise is used instead. The Input and Output must be connected in the
advanced matrix, by using the drop-down menus.
RATE : Sets the frequency of the Sample & Hold.
SYNC : When engaged, this switch synchronizes the
frequency to a multiple or sub-multiple of the DAW
tempo.
LEVEL : Sets the output level of the Sample & Hold.
12.2.4 Voltage Processor:
This module allows the delay and/or modification of any modulation (or audio rate), by applying a attackrelease process.
DELAY : Sets the internal delay between input and
output.
ATTACK : Sets the attack time.
RELEASE : Sets the release time.
LEVEL : Sets the output level of the Voltage
Processor.
12.3 Sequencer:
The sequencer of the XILS 4 is extremely useful, and can create endless sound design ideas. It is well
worth the learning curve, as it will help unleash the full potential of this synthesizer.
12.3.1 Front sequencer controls:
The XILS 4 sequencer is inspired by the original EMS 256 sequencer, which was, in its time, a very
revolutionary machine. It has three layers, each having two tracks.
This means that each of the layers can send trig information, and can record two independent values.
The sequencer has six output tracks, organised into
three independent layers of two linked banks. The
section of the sequencer panel shows the six tracks,
and how the three layers are used.
The external ring of the corresponding double-knob
(with the small triangle) shows each current output
value. You can set the current output value of a
sequencer step, by clicking on the corresponding
double-knob’s external ring.
The internal part of each double-knob sets the range
of the corresponding output bank, and thereafter
the amount of modulation. Used as pitch modulator,
this inner ring should be set to 12 o’clock to provide
a normal scaled pitch modulation.
Switching ON the RECORD button, allows you to
enter sequence with your Midi keyboard instead
using the Sequencer edit panel.
In this mode, when you hit a note, the pitch will be
memorised in the steps of the first bank of the
corresponding layer, and the velocity into the steps
of the second bank. The current layer on which the
keyboard acts, is set with the three-position LAYER
knob.
A series of MIDI controllable buttons controls the sequencer, and a double-knob controls the sequencer’s
clock rate.
To help with your creative workflow, independent sequencer presets can be saved and recalled.
This preset management is found under the Sequencer 256 label:
12.3.2
Connecting the Sequencer:
Above the sequencer controls you will find the Sequencer Connection tabs.
With these matrices you can connect the sequencer outputs to synthesizer parameters, such as Oscillator
pitch, PWM, filter cut-off frequency, or output level.
You can also trig envelopes, or reset the LFO with one of the three layer trig outputs.
For instance, you can connect layer 1 trig to the first Trapezoid envelope, and layer 1 bank A to the
oscillator frequency. With these connections, the Trapezoid envelope will be trigged at the beginning of
each step, gated according to the “SUSTAIN” knob (see below), and the oscillator pitch will be modulated
according to the sequencer output A value.
12.3.3
Recording a Sequence:
First you need to:
_ Connect the sequencer output to some parameters (see above).
_ Start the sequencer by clicking on the start button.
_ Switch ON the “RECORD” button with the 1/2/3 LAYER knob set to 1. If you wish to record the other
layer, just set this knob to 2 or 3 and adapt the example below to the corresponding sequencer layer and
banks.
Each time you hit a note on your MIDI keyboard (or on the virtual keyboard), the value is recorded in the
sequencer (Pitch for the Bank A, Velocity for the Bank B).
At this time, if the switch CONT/KEYB/STEP is set to the CONT position, the recording is made to the
current step, which is continuously changing. Although useful for live performance, this could be too tricky
for entering a sequence.
For this, set this switch to the KEYB position: the current sequencer step is changed after entering each
new note. Setting this switch to the STEP position allows you to change the value of the current step:
with your Midi keyboard or directly by moving the outer ring of the corresponding bank/layer.
Of course, you can also enter your sequencer using the edit panel you will find under the Sequencer Edit
Tab (see below).
To erase all of your sequence, just hit the “erase all” button: a confirmation pop-up will open. To erase
the current step (removing the trig information and setting the value a zero), hit the “ erase evt” button.
12.3.4 Playing a Sequence:
If a sequence is already recorded in the sequencer, in order to play it, you need to:
_ Connect the recorded sequencer output to some parameters (see above)
_ start the sequencer by hitting the start button.
The sequencer will start outputting trig and value information. To stop it, just hit the stop button.
If you need to reset the sequencer clock, hit the reset button.
The keyboard can perform starting, stopping or resetting operations on the sequencer, once you have
connected the keyboard trig information to the corresponding sequencer trig inputs (see the Keyboard trig
Matrix).
When the sequencer is running, you can alter the speed by turning the inner knob of the sequencer clock.
The outer ring sets the number of steps, from 2 to 128. These two values are displayed in the LED-like
display.
The switch LOOP/1SHOT/REVERSE allows you to select to mode of the sequencer. In the first case, the
sequencer will read the information in the forward mode, looping from the end back to the beginning of the
sequence. In the 1 shot mode, the sequence will be read only once, stopping at the end. To read/play the
sequence yet again, the start button must be used again (or trigged).
In the reverse mode, the sequencer will loop in reverse mode (the sequence will be read backwards)
The switch CONT/KEYB/STEP allows you to select the clock mode: CONT (Continuous) when you need
the sequencer playing continuously, KEYB - changing when a note is pressed on the keyboard or STEP,
changing when the “NEXT” button is pressed.
12.3.5
Using the Sequencer Editor:
The XILS 4 provides a simple mouse editor for the sequencer. Using the old analog push-button method
to enter or modify a sequence can be difficult. That is why this editor was created to help you.
On the left of the screen you will find check buttons. The left ones are for selecting which track will be
changed by the mouse, while the right one are for selecting which tracks are to be displayed.
For instance, clicking on the A edit check will enable the Layer1/Track A to be edited by the mouse. Left
clicking on a step will add trig information, and dragging the coloured rectangle will change the
corresponding value.
Only one track can be changed at a time. If you need to modify a different track, you will need to change
the Edit check selection.
To remove a step, just right click on it. This will remove the trig information, and set the value at zero for
the corresponding track.
Clicking on the + or – button allows zooming in the sequencer piano roll.
The SUSTAIN knobs set the time duration for which the trig information is held. When set to 0.0, the trig
is held during the entire current step; otherwise it is held according to the value input.
If the sustain value is greater (longer) than a step, then some trig information won't be initiated (the
envelope, if connected, cannot restart its cycle).
The TEMPO SYNC switch allows the sequencer to clock to the sync of your DAW tempo.
TRIPHONIC: This switch has a particular action. The sequencer has three layers and also three trig
inputs. You can send each of them to a different envelope. Should you need two envelopes (or more) for
your sound, three layers is not useful. Switching on the TRIPHONIC button allows the sequencer to send
trig information to three independent voices. This way you will get a “three voice” sequencer.
12.3.6
Using the Sequencer preset menu:
The XILS 4 provides a useful menu to save sequencer settings.
Only the sequencer values, and the sequencer trig and connection configuration are saved within this
feature. If you need to start/stop/or reset the sequencer with the keyboard, you will need to set this
independently of this Save feature.
Clicking on the sequencer 256 label opens the menu, where you can launch a preset, save the current one
or create a new one (either with the current settings, or with the default values).
The Random option allows users to initialize the sequencer with random values, and trig and step numbers.
12.4 Virtual keyboard and Controls:
The illustrated red keyboard lets you send notes to the XILS 4, by clicking on its keys. The keyboard also
reflects the MIDI note ON information that the XILS 4 receives, whether triggered by an external keyboard
controller, or your DAW.
When the HOLD button is engaged, all the notes are held until this button in disengaged.
In this panel, you will also find global controls, and an number of keyboard related parameters.
NBR VOICES: Sets the number of available voices, in the case of polyphonic sounds.
KEYBORD MODE: Sets the playing mode of the synthesizer. This is a drop-down menu where you can
choose between several options.
•
•
MONO: Monophonic mode, only one note playing at a time, with low note priority.
CIRCULAR POLY: A polyphonic mode with up to 18 active notes at a time. Each voice is chosen in a
circular manner. When a lot of voices are available, and/or long release are set up, this mode can be
very heavy on CPU use.
•
•
•
•
RESET POLY: A polyphonic mode with up to 18 active notes at a time. Each new note is played with
the first free voice, cutting the current release and reducing the CPU load.
UNI2: A monophonic mode with two active notes of the same pitch playing. Thanks to the detune
knob, a phasing effect can be created.
UNI4: A monophonic mode with four active notes of the same pitch playing.
UNI6: A monophonic mode with six active notes of the same pitch playing.
The portamento/glide parameters define how the note transitions behave. In monophonic mode, only one note
is played, so each transition glide occurs between two successive notes. When a polyphonic mode is enabled,
note transitions are cyclic. This means that note transitions are undetermined, and the note from which the
glide is calculated is one of the previously played notes. The following parameters are available:
PORTAMENTO: Activates or deactivates the portamento mode. When the portamento mode is enabled, the
note transitions are progressive in pitch.
GLIDE TIME: This knob adjusts the transition time between the notes.
GLISSENDO: This switch activates semitone transitions between notes. When deactivated, the glides are
continuous.
LEGATO: This switch determines if the notes have to be legato to activate the glide function - i.e. if the previous
‘note off’ has to occur after the current ‘note on’.
PRIORITY: This switch allows the selection of the mono priority mode; High or Low. In Low mode, when a
second note is pressed, it will change the pitch only if this new note is below the previous one. In High
mode,when a second note is pressed, it will change the pitch only if this new note is above the previous one.
There are two tabs in this section: TRIG and CTRL. The first one displays the keyboard related trig
connection, and the second the values of various keyboard parameters.
In the Trig tab, you can easily setup a connection
between a trig source and a trig destination.
The trig destinations are obviously the envelopes
but also the LFO reset (and Delay), as well as the
sequencer Start, Stop and Reset.
A trig delay has also been integrated: this function
allows delaying the keyboard trig information. This
delay is set by the DELAY knob in either
milliseconds, or a multiple of the DAW tempo when
the SYNC switch is engaged.
Note: Only the trig information is delayed. Velocity
and keyboard follow are not taken into account.
As you can see, the keyboard is sending a note ON
trig and a Note GATE information. This is used to
control the envelope for sustain and looping (see the
envelope chapter)
This tab displays the various values and ranges of
the keyboard related controls: Velocity, After Touch,
Keyboard follow, Modulation wheel and Pitch Bend.
Finally, in this keyboard panel you will fine the GLOBAL LEVEL, which is applied after all the internal
treatment. The GLOBAL TUNE, which sets the overall tuning of the synthesizer, is also found here.
Please note this parameter is a global parameter, and is not saved within a preset.
The ANALOG knob increases or decreases the internal instability of the modules emulating the random
variance of vintage equipment.
The GLIDE TIME sets the rate at which the keyboard will alter its pitch control information.
12.5 Input modules:
When using the XILS 4 as an effect processor, the input travels through the Input modules, before being
sent to the Main matrix.
These input modules can also be used as new modulation sources.
12.5.1 Transient follower:
The transient follower provides a trig information (to be used in the keyboard trig matrix) as well as an
envelope-like control signal: The RELEASE knob sets the time this control takes to return to zero, after a
transient has been detected.
The SENSITIVITY knob sets the sensitivity of the transient detection: more detection occurs when turned
to the right, and less when turned to the left.
LVL OUT sets the level of this control signal.
12.5.2
Envelope follower:
The envelope follower provides an envelope-like control signal: The ATTACK and RELEASE knobs set the
time this control takes to raise the input signal level, then to return to zero after the input signal has
ceased.
LVL OUT sets the level of this control signal.
12.5.3
Pitch Tracker:
This module extracts the pitch of the input signal. The resulting pitch signal can then be applied to the
oscillators, but it can also be used to modulate any other modules, via the connection matrix.
QUALITY: This knob sets the smoothing of the pitch tracking. Turned to the left, the smoothing is minimal and
the modulation is almost unpredictable, whereas when turned to the right, the smoothing is maximal, and the
modulation is very slow. When applied to oscillators, it creates a glide effect.
SNAP: This switch activates the tune option of the pitch tracker: the pitch will be tuned to scale notes.
ZERO: This double-knob shifts the pitch. It allows you to change the pitch of all the modules that use the pitch
tracker signal. The inner ring of the knob adjusts the shift in semi-tones, while the external ring adjusts it in
octaves.
LOW FREQ: This knob sets the lowest frequency of the pitch tracker. It sets the lowest note that the pitch
tracker can handle.
HIGH FREQ: This knob sets the highest frequency of the pitch tracker. It sets the highest note that the pitch
tracker can handle.
The settings of the pitch tracker’s frequency range must be adjusted according to the input signal. It affects the
pitch tracker’s tessitura (the range from lowest to highest note expected) and tracking responsiveness. The
broader the tessitura, the less precise the detection will be.
Adjust these two settings according to your input signal.
corresponding to the lowest and highest frequencies.
As you adjust them, you can see the notes
LVL OUT: Sets the level of this control signal.
12.5.4
Input Gate:
This module is applied to the two effect inputs, when the XILS 4 is used as an effect processor.
ATTACK: This knob sets the duration the gate will take to open.
RELEASE: This knob sets the time the gate will take to close.
OPENING THRESHOLD: This knob sets the opening threshold of the gate. The external input signal must
be at or over this level, to open the gate.
CLOSING THRESHOLD: This knob sets the closing threshold of the gate. The external input signal must
below this level to close the gate.
GATE LEVEL: This knob sets the level for opening or closing the gate.
12.6 Effects modules:
12.6.1 Delay:
DRY/WET: Sets the mix balance between the initial signal and the processed signal.
DELAY: Sets the time delay (right or left).
FEED B: Sets the amount of the delayed signal which is recirculated to the input (left and right) .
TIME: Sets the time of the delay.
DAMP: Sets the amount of high frequencies that are filtered out during the feedback.
MIDI S: Sets the time delay according to the DAW tempo (the time will change each time the current
tempo of the host application changes)
12.6.2 Chorus:
DRY/WET: Sets the mix balance between the initial signal and the processed signal.
SPEED: Sets the rate of the internal low frequency oscillator of the chorus.
AMOUNT: Sets the amount of the effect.
TYPE: Toggles through the three available types of chorus.
12.6.3 Phaser:
DRY/WET: Sets the mix balance between the initial signal and the processed signal.
SPEED: Sets the rate of the internal low frequency oscillator of the phaser..
AMOUNT: Sets the amount of the effect. Use this to set the intensity of the internal filter sweep.
SWEEP: Sets the centre frequency around which the sweep is performed.
RES: Sets the amount of the internal audio feedback, or resonance.
STEREO: Sets the phase difference between the right and the left channel.
13
Option menu:
This menu allows the setting of the global settings. These settings are defined for all instances of XILS 4.
Each time an option is changed, the related option file is saved.
13.1.1
Main:
In the toolbar, the Options button opens a menu for selecting various options for XILS 4.
This menu shows the following options settings:
XILS 4 About: displays information about the XILS 4 (version, build date and credits).
Open MIDI settings panel: Opens a pop-up menu, where you can assign MIDI controllers for each of
XILS 4’s parameters. Click on the parameter label to select the parameter you want assign, then enter the
MIDI controller number (from 0 to 127), or switch on the learning switch and send a MIDI command with the
correct MIDI controller number. The XILS 4 will memorize this setting. This pop-up menu can also be opened
by using CTRL+ALT+Apple+Left-click (Mac) or CTRL+Win+ALT+Left-click (Win) on the desired XILS 4
parameter.
13.1.2 Display:
Display low frequency as BPM: Allows displaying the low frequency (LFO, oscillator 2 in low mode, clock rate)
in BPM instead of Hz.
GUI follows presets: When checked, this option allows the GUI to follow the presets. This means that the
special display modules are refreshed following the preset settings. If not checked, these displays remain
unchanged.
Output level follows presets: When checked, this option allows the output level to follow the presets. This
means that the output level is programmed with the value saved in the preset. If not checked, this value
remains the same.
Pop-up On: Shows a value pop-up window while modifying the value of a knob.
Pop-up Over On: Shows a pop-up window when the mouse is over a switch, showing the value.
Pop-up Name On: The name of the current parameter is displayed, when it is being edited.
GUI update: low: Slow refresh rate for the GUI. This is useful when it is necessary to save CPU power.
GUI update: middle: Selects the standard refresh rate for the GUI.
GUI update: fast: Selects a fast refresh rate for the GUI. This is useful when it is necessary to precisely follow
the sequencer's LEDs, for instance.
GUI Small: Selects a “small” GUI of 1024x800 pixels.
GUI Reduced: Selects the reduced version, with the keyboard part dispatched in the Tab panels. This is
designed for low-resolution screens
GUI Big: Selects the big GUI (not yet available)
13.1.3 Misc.
Init settings from current settings: initializes the default values of XILS 4 from the current settings.
All the new presets will be created from these settings, when the init settings option is selected.
These parameters will also be used when setting a control to its default value. (Win: CTRL+click,
OSX: ALT+Apple+Click).
Wheel Incr: 0.01: Parameter increment of 0.01 when using of the mouse wheel.
Wheel Incr: 0.05: Parameter increment of 0.05 when using of the mouse wheel.
Wheel Incr: 0.1: Parameter increment of 0.1 when using of the mouse wheel.
14
Credits:
Thanks to the artists and musicians who really helped us during XILS 3 and XILS 4 development:
Tim Blake, Mathias Brüssel, Paul Barret.
The presets were done by:
Laurent Bourgeon (Lotuzia), Simon Ball (Soundsdivine), Nori Ubukata, Pascal Laigle (Tzadi), Xavier Oudin,
Kevin Lamb, Drew Neumann, Cliff Douse, Chris Pitman
The graphical user interface was created by:
Xavier Oudin and Yannick Bonnefoy
The graphical element and 3D design was created by:
Yannick Bonnefoy
This manual was written by
Xavier Oudin
And proofread and corrected by:
Michael Logue and Paul Barrett.
The plug-in design, algorithm and Digital Signal Processing was done by:
Xavier Oudin