1
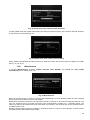
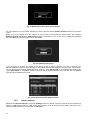
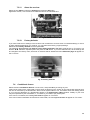
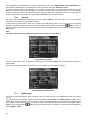
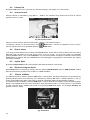
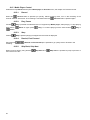
Content 1. 2. 3. 4. 5. 6. 7. 8. 9. 1 Important safety instructions ......................................................................................................................................................... 2 Brief Description of the Receiver .................................................................................................................................................. 3 Complement ................................................................................................................................................................................. 3 Receiver Description and Illustrations........................................................................................................................................... 3 4.1. Front panel ......................................................................................................................................................................... 3 4.2. Rear panel ......................................................................................................................................................................... 4 4.3. Channel cards .................................................................................................................................................................... 4 4.4. Remote Control .................................................................................................................................................................. 5 Installation .................................................................................................................................................................................... 6 Connection of the Receiver to TV Set, Video Player or DVD and ETHERNET ............................................................................ 6 6.1. Connection of the receiver to a TV set and ETHERNET .................................................................................................... 6 6.2. Connection of the receiver to a video player or DVD ......................................................................................................... 7 6.3. Connection of the receiver to a digital audio decoder ........................................................................................................ 7 Setting of the Receiver ................................................................................................................................................................. 8 7.1. First start-up of the receiver ............................................................................................................................................... 8 7.2. Main menu ....................................................................................................................................................................... 10 7.3. Information on channels, channel management .............................................................................................................. 10 7.3.1. Channel list ........................................................................................................................................................... 10 7.3.2. Channel manager .................................................................................................................................................. 11 7.3.3. Favourite groups ................................................................................................................................................... 12 7.3.4. EPG Now/Next ...................................................................................................................................................... 12 7.3.5. EPG Schedule....................................................................................................................................................... 13 7.3.6. Channels volume................................................................................................................................................... 14 7.4. Channels search .............................................................................................................................................................. 14 7.4.1. Automatic search................................................................................................................................................... 15 7.4.2. Manual search ....................................................................................................................................................... 15 7.5. Settings ............................................................................................................................................................................ 16 7.5.1. Language .............................................................................................................................................................. 16 7.5.2. Parent menu .......................................................................................................................................................... 16 7.5.3. Video settings........................................................................................................................................................ 17 7.5.4. Audio settings........................................................................................................................................................ 17 7.5.5. Timers ................................................................................................................................................................... 18 7.5.6. Regional settings ................................................................................................................................................... 19 7.5.7. Firmware update ................................................................................................................................................... 19 7.5.8. Miscellaneous ....................................................................................................................................................... 22 7.5.9. Record settings ..................................................................................................................................................... 23 7.5.10. Network settings (only CIC-412HD and CIC-402HD models) ............................................................................... 24 7.5.11. About the receiver ................................................................................................................................................. 26 7.5.12. Factory defaults..................................................................................................................................................... 26 7.6. Conditional Access .......................................................................................................................................................... 26 7.7. Media ............................................................................................................................................................................... 27 7.7.1. Scheduler .............................................................................................................................................................. 27 7.7.2. Records ................................................................................................................................................................. 29 7.7.3. Media player .......................................................................................................................................................... 29 Receiver Control ......................................................................................................................................................................... 31 8.1. Channel switching ............................................................................................................................................................ 31 8.2. Channel list ...................................................................................................................................................................... 33 8.3. Volume control ................................................................................................................................................................. 33 8.4. Picture freeze ................................................................................................................................................................... 33 8.5. Aspect Ratio..................................................................................................................................................................... 33 8.6. Electronic Program Guide ................................................................................................................................................ 33 8.7. Teletext, subtitles ............................................................................................................................................................. 33 8.8. Main menu. Settings ........................................................................................................................................................ 34 8.9. Returns to previously watched channel ........................................................................................................................... 34 8.10. Page up, Page down ........................................................................................................................................................ 34 8.11. Television, radio ............................................................................................................................................................... 34 8.12. Audio selection................................................................................................................................................................. 34 8.13. Timers .............................................................................................................................................................................. 34 8.14. Colour buttons.................................................................................................................................................................. 34 8.14.1. Red button............................................................................................................................................................. 34 8.14.2. Green button ......................................................................................................................................................... 34 8.14.3. Yellow button ......................................................................................................................................................... 34 8.15. Media Player Control ....................................................................................................................................................... 35 8.15.1. Record................................................................................................................................................................... 35 8.15.2. Play, Pause ........................................................................................................................................................... 35 8.15.3. Stop ....................................................................................................................................................................... 35 8.15.4. Rewind, Fast Forward ........................................................................................................................................... 35 8.15.5. Skip Back, Skip Next ............................................................................................................................................. 35 Technical Specifications ............................................................................................................................................................. 36 1. Important safety instructions This symbol indicates dangerous voltage inside the product that presents a risk of electric shock or personal injury. This symbol indicates important instructions accompanying the product. Please read this manual carefully before using this product. Before connecting the AC power cord to the outlet, make sure the voltage designation of the digital receiver corresponds to the local electrical supply. If you are unsure of your power supply, ask your local power company. Never insert anything metallic into the cabinet openings of the digital receiver; otherwise it may create the danger of electric shock. To avoid electric shock, never touch the inside of the digital receiver. Only a qualified technician should open the case of the receiver. Never use your digital receiver if the power cord has been damaged. Do not allow anything to rest on the power cord, and keep the cord away from place where people can trip over it. Be sure to hold the plug, not the cord, when disconnecting the receiver from an electric socket. Two position power network switch turns on the receiver for operation or turns off. Its function is described in detail in chapter 7.1 First start-up of the receiver. Power network switch does not turn off the receiver from power network totally. There remain, however, some parts with voltage. Device that completely disconnects receiver from power network is power network plug. For this reason power network outlet must be easily reached. Batteries shall not be exposed to excessive heat such as sunshine, fire or the like. Ensure a minimum distance of 5 cm around the apparatus for sufficient ventilation. Ensure that the ventilation is not impeded by covering the ventilation openings with items such as newspapers, table-cloths, curtains, etc. Do not place naked flame sources, such as lighted candles on the apparatus. Take attention to the environmental aspects of battery disposal. Do not threw away batteries with the domestic waist but only to special gathering points. Use the apparatus only in moderate climates (not in tropical climates). Openings in the digital receiver cabinet are provided for ventilation. To prevent overheating, these openings should not be blocked or covered. Also, avoid using the receiver on a bed ,sofa ,rug, or other soft surface. Doing so may block the ventilation openings in the bottom of the cabinet. If you put the receiver in a bookcase or some other enclosed space, be sure to provide adequate ventilation. Do not expose the digital receiver to extreme temperature conditions or to extreme humidity conditions. The apparatus shall not be exposed to dripping or splashing and that no objects filled with liquids, such as vases, shall be placed on the apparatus. Do not place the digital receiver on an unstable cart, stand, tripod, bracket, table, or floor where it can fall. It is damaged if dropped, hit or scratched. Do not clean the front with keton-type materials (e.g. acetone), ethyl alcohol, toluene, ethy lacid, methyl, or chloride - these may damage the panel. If your digital receiver does not operate normally in particular, if there are any unusual sounds or smells coming from it unplug it immediately and contact an authorized dealer or service centre. High temperature can cause problems. Don`t use your LCD TV/monitor in direct sunlight, and keep it away from heaters, stoves, fireplaces, and other sources of heat. Unplug the power network plug when it is going to be left unused for an extended period of time. Also it is recommended to disconnect the receiver from power network at the time of thunderstorm. To reduce the risk of fire or electric shock, and annoying interference, use the recommended accessories only which are listed in chapter 3 Complement. If the receiver is broken, do not try to repair it yourself. Contact qualified service personnel. Unplug power cable from the AC outlet before any service. Be sure the service technician uses authorized replacement parts or their equivalents. Unauthorized parts may cause fire, electrical shook, or other hazards. Following any service or repair, be sure the service technician performs safety checks to certify that your digital receiver is in safe operating order. 2 2. Brief Description of the Receiver DVB-C receivers CIC-412HD, CIC-402HD and CC-402HD enable receiving signals of digital cable television. The devices can be used together with analogue TV sets, sound amplifiers, video players and other domestic receiving and recording devices. Moreover, they can receive channels encoded by the system “Conax”, and HD (high definition) channels. All receivers have a media player that allows recording and watching received channels, as well as to watch photos of digital formats and play musical records. 3. Complement - DVB-C digital cable receiver CIC-412HD, CIC-402HD or CC-402HD - Remote control - AAA type batteries - SCART cable - User manual 4. 1 u. 1 u. 2 u. 1 u. 1 u. Receiver Description and Illustrations 4.1. Front panel Fig. 1 Front panel 1. On / standby indicator (CIC-402HD, CC-402HD) - it is red in standby mode, green in operation mode. Digit indicator (CIC-412HD) – in standby mode displays time, in operation mode – channel number. 2. Remote control sensor. 3. USB link (behind the cover). 4. Touch sensor buttons (only CIC-412HD). CH +/ - intended for switching channels, VOL + / - for adjusting volume, for switching receiver between standby and operating mode. 5. “Conax” card reader (behind the cover). 3 4.2. Rear panel Fig. 2 Rear panel 1. CABLE OUT, radio frequency (RF) output It is intended for transmission of RF TV signal into other devices: video player, DVD, etc. 2. CABLE IN, radio frequency TV signal input It is intended to connect a cable of digital cable TV network to the receiver. 3. SCART TV, peritelevision connector It is intended for connection of a TV set to the receiver through SCART cable. 4. HDMI, high definition media interface It is intended for connection of a TV set to the receiver through HDMI cable. 6. ETHERNET, a port to connect to computer network (only CIC-412HD and CIC-402HD). It is intended for connecting to file server. 7. S/PDIF, digital sound link It is intended for connection of sound output into stereo, home theatre. 8. Power switch. 9. Power cable – AC from 207 V to 250 V. 4.3. Channel cards 1. Card reader The card reader is integrated in the receiver and may decode the channels encoded by the system “Conax”. 2. The channel cards must be inserted with yellow scheme downward and into the hole intended for cards. 4 4.4. Remote Control 1. 2. 3. 4. 5. 6. 7. 8. 9. 10. 11. 12. 13. 14. 15. 16. 17. 18. 19. 20. 21. 22. 23. Fig. 3 Remote control 24. 25. 5 Mute Turns off / On volume. Standby Turns on / turns off (turns on standby mode) the receiver. 0-9 Buttons marked by numbers. They are intended for selection of television or radio channels or menu options Freeze Stops / plays picture. Aspect Ratio It is intended for selection of aspect ratio of the TV screen: 4:3 or 16:9. Guide It is intended to show Electronic Program Guide (EPG). TXT Turns on / turns off teletext. Help Button not used. OPT Opens Settings menu. Back Returns to previously watched channel. OK Shows the channel list or confirms selection in menu list. / They are intended to switch over (upwards / downwards) various displayed options and channels to be selected. / They reduce / increase volume. In the menu, they allow to move to the left / right in the line. Menu Opens main menu. Exit It is intended to exit from menu without saving changes. Info Shows the information on channel and program on the TV screen. Vol + / They reduce / increase volume. Ch + / They are intended to switch channels. Page up / Page down Switches between pages in channel and file lists. Coloured (hot buttons) Red, green, yellow, blue buttons may be programmed for control of the most frequently used functions. TV/R It is intended for switching from television to radio channel mode and vice versa. SUB (Subtitle) Turns on or turns off subtitles. Timer It is intended for setting a timer. LANG (Language) It is intended for selection of language track. Media Player Control Buttons: Record, Play, Pause, Stop, Rewind, Skip Back, Skip Next, Fast Forward. They are intended to control Media player. 5. Installation Please familiarize yourself thoroughly with this manual before installing the receiver The receiver must be placed close to a TV set or any other domestic devices in order to connect them together through cables included in the complement. Safety requirements and the following important rules must be followed: - the receiver cannot be placed close to heat sources. - the receiver cannot be placed close to devices emitting radio waves, for instance, mobile phones. - the receiver must be directly visible by user to control it by means of the remote control. 6. Connection of the Receiver to TV Set, Video Player or DVD and ETHERNET 6.1. Connection of the receiver to a TV set and ETHERNET Fig. 4 Connection of receivers to a TV set (through SCART or HDMI cable) and CIC-412HD, CIC-402HD models to computer network Connecting RF signal to analogue TV set If RF cable is used to receive television or radio signals intended for not only this receiver but also an analog TV set, TV OUT of the receiver must be connected to television antenna input through RF cable. Connecting Standard definition (SD) signal to analogue TV set Connect SCART cable as shown in Fig. 4. When the receiver is turned on, red colour of the indicator turns into green. At that moment, AV mode is automatically turned on for TV. This means that a TV set connects to the receiver through SCART cable and digital television picture appears on the screen. Connecting high definition (HD) signal to analogue TV set (only for model TC-402HD) Connect HDMI cable as shown in Fig. 4. Select HDMI input in your TV set menu. High definition digital television picture appears on the screen. Video settings are described in detail in section 7.5.3 Video settings. Connecting receiver to computer network (only CIC-412HD, CIC-402HD models) Connect ETHERNET cable as shown in Fig. 4. Computer network settings are described in detail in section 7.5.10 Network settings. Notes If using SCART cable full wired (21 pins) SCART cable is necessary for functioning of the feature of automatic switching of TV into AV mode. The feature of automatic switching of TV into AV mode may not function in older TV sets. In this case, a TV set must be switched into AV mode manually by following its manual. 6 6.2. Connection of the receiver to a video player or DVD Fig. 5 Connection of the receiver to a video player or DVD Interconnections must be made as shown in Fig. 5 Connection of the receiver to a video player or DVD. For functioning of the system, all devices must be plugged into power outlets. This manual and the manuals of other devices must be followed. 6.3. Connection of the receiver to a digital audio decoder Interconnection for the receiver and a digital audio decoder (stereo, home theatre) is made via RCA-RCA cable (is not included in complement). The receiver contains coaxial digital audio output socket (S/PDIF). Digital audio signals are fully decoded inside the connected decoder. The channels must be broadcast in Dolby AC3 standard, and the correct path must be chosen, as it is described in section 7.5.4 Audio settings. Note Do not connect digital output S/PDIF to any analogue audio input device. Fig. 6 Connection of the receiver to a digital audio decoder 7 7. Setting of the Receiver 7.1. First start-up of the receiver Plug the digital receiver’s power cable to power network outlet. Press the button Power On / Off on the rear panel to turn on the receiver power. When power switch button is pressed up receiver is turned on, when button is pressed again and sticks out from cabinet receiver is turned off. When the power is turned on, the indicator in front panel lights orange until receiver’s software boots up. Then it changes colour to green. At the time of software booting advertising saver will appear on the television screen, and then the installation wizard will be shown. If HDMI output of receiver TC-402HD is connected to HDMI input of TV set using HDMI cable, before appearing an installation wizard on TV screen, the message Do you want to try optimal video mode? will appear. If you will choose Yes and then press OK, receiver will set the best high definition resolution mode supported by TV. If you will choose No, standard resolution will be set. Fig. 7 Welcome page (Installation wizard) Language When the installation wizard appears, menu language line is selected. Enter language menu by pressing OK button, and select the desired language for menu, audio tracks and Electronic Program Guide (EPG) by using / buttons on the remote control. To save options press the OK button again. Default language is English. Fig. 8 Language selection menu Regional settings Select the lower line Regional settings by using button on the remote control. The default settings are the Time zone, GMT+0. Time zone can be changed by using button on the remote control to select the line Time zone and using buttons / to select GMT. In case of Region / City time mode option, select the region where you are on the line Region / City. Local time is automatically set after search of channels and selection of synchronization channel. If the region is chosen incorrectly (which is a different time zone), the time shown will vary from local insofar as the time between the different time zones. If you want to sort the channels found in the order recommended by the broadcaster, select ON in the line LCN. To save options press the OK button. 8 Fig. 9 Regional settings menu Automatic search Mark the next lower line Automatic search by using button on the remote control. Press OK button. Receiver will ask to enter symbol rate. Enter it using number buttons of remote control. Symbol rate is defined by a broadcaster. Press button OK, automatic channel search will start. If search will be successful symbol rate will be saved and repeatedly doing channel search You will not need to enter it again. Fig. 10 Automatic channel search. Enter symbol rate When it ends (this may last up to 3 minutes), colour of search indicator will show that the search is executed by 100%, and all found channels will be shown, the message Scan complete, Enjoy watching will appear and the picture of one found channels will be shown on TV screen, and the sound will be heard inside the speakers. Fig. 11 Automatic channel search window Manual and automatic channel search is described in details in chapter 7.4 Channels search. 9 7.2. Main menu Main menu includes a lot of settings which allow to configure the receiver. To enter main menu, press Menu button on the remote control. Menu options may be changed by using / buttons on remote control. Each option is defined by different colour, name and is shown by pop up submenus. Each line in chosen submenu window may be selected by using / buttons, and to enter the window of selected menu line, press OK button. To exit from main menu press either Menu or Exit button. Fig. 12 Main menu 7.3. Information on channels, channel management When you enter the main menu, submenu Channels appears with the selected line Channel list. 7.3.1. Channel list Press OK button on the selected line of submenu Channel list. The list of channels will appear. Fig. 13 Channel list This window contains a bulleted list of channels at each channel name, meaning whether the channel is coded (paid) or not, and whether the channel is locked or unlocked. To select the desired channel press / buttons and press OK to confirm the selected one. Exit the channel list by pressing the button Menu or Exit. The list of channels can be accessed directly, not through the main menu, by pressing the OK button. By pressing the button TV/R, the list of television and radio channels can be selected (if the radio channel is broadcast). Selected lists can be sorted. Sorting window is opened by pressing the button Info. The list of favourite groups may be selected on the top line, on the second - encoded (paid) ones and free admission channels, on the third – locked and unlocked channels, on the last line the selected list can be sorted alphabetically from A to Z or vice versa. 10 7.3.2. Channel manager In this menu the channels can be deleted, locked, renamed or moved to another place on the list. Select the line Channel manager on submenu Channels and press the OK button. A small picture of selected channel, a bulleted list of channels at each channel name, the list of labelled selection buttons TV/R and Info as well as the marked coloured buttons that match coloured buttons of the remote control are visible on Channel manager menu. To select the desired channel press / buttons and the OK button to confirm the selected button. To exit the channel manager you can by pressing Menu or Exit button. The list, where you want to edit channels, is selected by clicking the button TV/R, and favourite group is selected by pressing the button Info. If you want to delete the channel, press the red Delete button. The question asking “Are you sure you want to delete channel?” will appear on the screen. With buttons / select the desired option Yes or No and press the OK button. The selected channel will be deleted. Fig. 14 Channel manager. Delete If you want to lock the selected channel, press the green Lock button. At the name of selected channel the lock icon will appear. In order that the picture of locked channel does not appear while switching it and the receiver would request a password, the Channel view lock must be set in Parent menu. For more details about the options of receiver locking and changing password see chapter 7.5.2 Parent menu. Fig. 15 Channel manager. Lock There is a possibility to rename channels in Channel manager. At the end of search, names of channels on the list are those which are transmitted by the broadcaster. If you want to change the name of the selected channel, press the yellow button Rename. The picture of keyboard will appear on the TV screen and the line where you can enter the name of desired channel. Letters and keyboard functions may also be chosen by pressing buttons / . To confirm new name press the OK button. To edit the register, that is to choose uppercase and lowercase letters, use yellow button, and to change the the keyboard language – by blue button. 11 Fig. 16 Channel manager. Rename At the end of search the channels are sorted the way they are transmitted by the broadcaster. If you want to move the channel to another place in the list, select it by pressing the buttons / on the remote control, press the blue button Move. With / buttons move the channel to the other place of the list and press the blue button End move. 7.3.3. Favourite groups Select the line Favourite groups from submenu Channels and press OK button. There is a list of TV - all or Radio - all channels on the left side of the screen where the channels for the list of favourite channels are selected. Lists of TV - all or Radio - all are selected by pressing the TV/R button. By pressing the yellow button Group selection on the right side of the screen, you can choose favourite groups where you want to save your favourite channels from the general list. You can add channel to favourite list by pressing the green Add button. If you want to delete the channel from any group, choose it with the yellow button Group selection, using button button move the cursor to the right side of the screen, select the channel and press the red Delete button. The review of list of favourite channels is carried out by pressing yellow button Group selection, and desirable channel is chosen by using / buttons and pressing OK. Fig. 17 Favourite groups 7.3.4. EPG Now/Next Select the line EPG Now / Next of menu Channels, press the OK button. You may enter this menu directly, not through the main menu by pressing the Guide button. Now / Next is a variation of Electronic Program Guide. The program which information you which you want to read, can be selected by buttons / , and the selection is confirmed by pressing the OK button. The appearance of the program information on the screen may take a few seconds. The current program (Now) or successive one (Next) is selected by buttons / . The name and description of the program is shown on the upper part of the screen. 12 Fig. 18 EPG Now/Next If the description does not fit into one line, all the description of program can be seen after pressing the Info button. By pressing the green button Schedule switch, program is marked which will be automatically switched by the receiver from another program or will switch on from the standby mode when the program start time will come. After pressing the yellow button For week, you can go to EPG Schedule (program schedule for a week). The function of red button is described in chapter 7.7.1 Scheduler. Fig 19 EPG Now/Next. Full description of program 7.3.5. EPG Schedule Select the line EPG Schedule in Channels menu and press OK button. Fig. 20 EPG Schedule By using / buttons, you may review the schedule of desirable program. The appearance program schedule on the screen can take a few seconds. Using button move to the right of the screen where the selected program schedule is. Via buttons / the program is selected, the description of which you want to read. Full description of the program can be seen by using button Info. By pressing the green button Schedule switch, program is marked which will be automatically switched by the receiver from another program or will switch on from the standby mode when the program start time will come. After pressing the yellow button For Now/Next you can go to EPG Now/Next. 13 After pressing the blue button Day you may select the week day, the program schedules of which you want to see. The function of red button is described in Chapter 7.7.1 Scheduler. Note EPG information is visible only if it is provided by the broadcaster. 7.3.6. Channels volume If channels are rebroadcast by different providers, thus their volume level may differ. Channel volume control function is intended for unification of volumes of different channels. Select the line Channel volume from menu Channels and press OK button. Select the channel by using remote control buttons / , and the volume is adjusted via / buttons. Via button TV/R the list of TV or radio channels is selected. Fig. 21 Channels volume 7.4. Channels search Automatic search is performed by the receiver, when the receiver is turned on for the first time and after performance of all recommended procedures. However, the broadcaster may supplement the channel list and change channels, or you may delete some channels by mistake. In such case, it is necessary to perform the search of channel once more. Select submenu Channels search from the main menu. Fig. 22 Channels search 14 7.4.1. Automatic search Select the line Automatic search from channels search menu and press OK button. The window of automatic search will appear. Fig. 23 Automatic search Firstly symbol rate must be entered. If search was successful when receiver was turned on for the first time, symbol rate was saved and there is no need to enter it again, see 7.1 First start-up of the receiver. Pressing button go to next line and select search type via buttons / : Replace – all channels will be deleted from the memory and all channels will be searched anew, Update – only newly broadcast channels will be searched. Select search filter: All – all broadcast channels will be searched, Free – only free to air channels will be searched, Scrambled – only scrambled (paid) channels which require a special card to be provided by a broadcaster will be searched. Select the line Start search and press the remote control button OK, search process will start. In case of full automatic search, the process runs as described in chapter 7.1 First start-up of the receiver. When updating channels, the search runs as described before, only the list is supplemented by newly found channels, and previously found ones are left. 7.4.2. Manual search Manual search is usually used only if channels are updated and if it is known which channels or frequencies are used for their broadcasting. Select the line Manual search in submenu of channels search, press OK button. The window for manual search will appear. Fig. 24 Manual search Search by channel, frequency as well as other special frequency bands - cable channels or the channel with 7 MHz frequency band for users from the countries of Western Europe - are selected in the line Search Type. In the line Frequency, kHz, number or frequency of the channel to be searched is entered. If any digital television signal has been detected in that channel and symbol rate is entered correctly, level indicator indicates this. Network Search may be switched off or on. In the first case, the channels will be searched only in the set channel or frequency, and in the second case, they will be also searched in all channels used by the broadcaster for transmitting digital television signals. The difference from automatic search is that in case of automatic search digital television signals are searched in all possible channels, and in case of manual search in network, 15 only in those channels which are used for transmission of digital television signals, thus the search time is significantly shorter in the latter case. In the line Search filter, select the channels to be searched in the same way as in case of automatic search. Select the line Start search and press OK button. Fig. 25 Manual search. Extracting of channels The list of found channels will appear in the window of extracting channels. After the message Search completed, press button Menu to leave this window. The picture of one of channels found will appear on TV screen. 7.5. Settings Having selected this submenu, you may change the receiver settings by customizing it. Fig. 26 Settings 7.5.1. Language Languages are chosen analogously to the ones described in chapter 7.1 First start-up of the receiver. 7.5.2. Parent menu In this menu window, you may turn menu lock on, set child age, i.e. children under this age are not allowed to watch age-restricted movies, and change password The access to parent menu for the first time, when all the locks are switched off, may be through Parent menu and by pressing the button OK. For the access to parent menu when the locks are on, it is necessary to enter the password. Initial password is 0000. When you enter the parent menu for the first time, it is recommended to change this password. In order to do this, you have to press green button Change password. The receiver will ask you to enter an old password, then enter the new password and repeat it. Settings for parent menu are selected using buttons / , and the locks are switched On/Off via / buttons. Settings are saved, and exit from adult menu is by pressing button OK. Do not forget your password. Otherwise after locking menu, you will have to apply to the service companies regarding rewriting of the receiver software. 16 Fig. 27 Parent menu Broadcasters usually provide information on age limits for watching one or another channel. Having selected the line Age, you may set the child’s age for watching age-restricted channels. If the age set by you is less than the age specified by the channel broadcaster, channel will be automatically locked and may be unlocked only by entering a password which is required by the receiver when turning on that channel. In order to lock the channel with a limited viewing age and the channel with reference to be locked, the lock of viewing channels must be set in parent menu. As soon as this lock is switched on, other locks are switched on automatically, too. 7.5.3. Video settings In this menu window, you may select settings of video signal from the receiver’s HDMI or SCART socket into a TV set. Fig. 28 Video settings Aspect ratio can be selected in the first row – 16:9 or 4:3. In second row output interface can be selected – HDMI or SCART. In third row interface mode can be selected. If HDMI is used the modes that TV set supports and several standard modes are displayed. If TV set supports auto-selection Auto can be selected. Otherwise, choose the highest resolution and frame rate according video watched. If SCART is used usually the defaults must be left. However, modern TV sets maintain RGB output, which determines higher quality of picture output. Video output RGB is to be selected for this purpose. Other correct settings are the following: Colour standard PAL and Aspect ratio 4:3. If the TV set is widescreen, aspect must be selected through the TV set. 7.5.4. Audio settings Select the line Audio settings and press the OK button. Via buttons / select one of the digital sound options: LPCM or Passthrough. In the first case, digital sound signal will be widely used in S/PDIF output, which does not need a special decoder for processing audio in the digital input of music centre. In the latter case, the digital sound signal in AC3 format will be passed into S/PDIF output for the decoding of which a special Dolby Digital decoder should be available inside stereo or home theatre system. 17 Fig. 29 Audio settings 7.5.5. Timers In this menu window, you may specify time to turn the receiver on/off, switch channel or time to show the reminder. Select the line Timers and press OK button. To add timer you should press green button Add. The window offering various types of timers appears. To add any of types offered, choose the relevant line by pressing buttons / and then – OK. 20 of each different type of timers may be added. Fig. 30 Timers. Add The date and time of reaction for each timer may be set on the right side Properties, as well as the time period, that is, for the timer would trigger every week at the same time, at the same time every day or once on fixed day and time. In the last case, after the completion of the task the timer will be deleted. For passing to the side of the screen Properties forward and backward, use buttons / . To confirm your selected properties and start of each timer, select the line Start via button and press OK. If two identical timer properties are set, the message Timers conflict will appear while starting them. Click OK and correct errors. Fig. 31 Timers. Properties 18 Sleep – timer will switch the receiver off on fixed day and time. Wake up - the timer will switch on the receiver on fixed day and time. Change channel - the timer will switch channel set in features on fixed day and time. Show message - the timer will show message written the features on fixed day and time. The use of the keyboard is described in chapter 7.3.2 Channel manager. To delete unnecessary timer, press the red button Delete. The message confirming the deletion will appear on the screen. If you really want to delete the selected timer, select Yes and press OK. Fig. 32 Timers. Delete 7.5.6. Regional settings Regional settings are carried out in the same way as described in Chapter 7.1 First start-up of the receiver. Once you have found the channels, you can choose a channel under which the time of the receiver is going to be synchronized. In order to avoid setting errors, it is desirable to select local channels. There is also a function Preferable Network ID. The selection of the desired network ID is necessary if the receiver finds the same channels in the interface of various transmitters broadcasting transmission zones. To avoid duplication, select the network ID, which results in better video quality. Consult with the broadcaster, service companies or dealers distributing these receivers concerning this function. 7.5.7. Firmware update The firmware of the receiver is a sophisticated information system. It is possible that some mistakes or uncertainties of firmware are detected only during long-term operation or under specific circumstances. Therefore, after firmware correction it is necessary to save it in the receiver. For this purpose the update of firmware is intended. Remarks: Firmware update over the air (OTA) is possible only if broadcaster supports it. Receivers sold by retail, when their software is not associated with particular operator, do not have this function. In submenu Settings select the line Firmware update and press OK. Firmware update window will open. If broadcaster does not support firmware update over the air (OTA) and there is no this function in receiver’s menu, when the row Firmware update is chosen and OK is pressed firmware update from USB will start immediately. In this case USB memory stick with new firmware update file must be inserted into USB connector. 19 Fig. 33 Firmware update window Update from USB Open the cover on the front panel of the receiver and insert the memo with recorded new version of firmware into USB link. New firmware You can find www.selteka.eu In the firmware update window select Update from USB and press OK. Firmware searching will start Fig. 34 Firmware update. Searching When update is found, the message Start update will appear on the screen. Press the button OK, the update of firmware will start. Fig. 35 Firmware update. Start update The signature is checked at first. This is necessary for you not to record any pirated firmware and your receiver would not be damaged. 20 Fig. 36 Firmware update. Checking signature After check of signature update process itself will start (saving of update in receiver). This may take several minutes. Fig. 37 Firmware update. Installation Do not turn the receiver off during installation of the firmware in no case. Otherwise the firmware will be damaged and you will have to apply to the service company for rewriting of the firmware. When firmware update is finished receiver will reboot automatically. Update from cable network (OTA) When operator starts to broadcast firmware update in cable network user gets a message in TV screen and can choose to start update process or not. This function is active when in submenu Miscellaneous automatic OTA checking is turned on, see 7.5.8 Miscellaneous. To start update select Yes and press OK. Fig. 38 Notification about OTA update Existence of OTA update You can check by pressing OK on OTA update in Firmware update window. Update searching will start. When update is found the button Download will appear. 21 Fig. 39 Update from cable network. Start download To start update press OK. Update downloading and saving to internal memory of the receiver will start. Duration of this process can take about 25 min. Fig. 40 Update from cable network. Downloading When update is downloaded to internal memory of receiver process will continue similar as update from USB, see Fig. 34, 35, 36, 37. 7.5.8. Miscellaneous In window Miscellaneous functions Update channels after Standby and Check for OTA update automatically can be switched On / Off. Fig. 41 Miscellaneous When the second function is turned on receiver will automatically find OTA firmware update and the message will be shown as described in the previous chapter. Broadcaster sometimes introduces new channels in the list of channels or removes the unpopular channels. The user may update the list of channels from time to time as described in Chapter 7.4.1. Automatic search. The function of channels list update informs the user about the changes in the channels list, and he decides whether to update the list or not. Receiver checks whether there are changes in channel list when it is turned on from Standby. To start channel list update process select Yes and press OK. 22 Fig. 42 Notification about channel list changes You can update a list of channels manually by clicking the blue button Update channels now on the remote control. When you turn the receiver on in the morning or the next day or after pressing the blue button, the message Updating channel list appears. Please wait appears on the screen. If you do not want to update the channels list, press OK button and the search will be terminated. Fig. 43 Updating channel list If you are going to continue the search, at the end of it and in case of changes in the list of channels, the removal window for search of new channels or unavailable channels will appear on the TV screen. At this stage, you can also take the decision: update the list of channels - press OK, Accept, or not to update the channels list - press Exit, Reject. If acceptable, the list of channels will be supplemented by new channels, and unavailable channels will be deleted from the list. Fig. 44 Channel list update. Search results 7.5.9. Record settings Select the line Record Settings in submenu Settings and then click OK. Open the cover on the front panel and insert the USB memory stick into USB socket. Free memory must be able to stow 500 MB. The stow of less memory is determined by a short duration of Timeshift. 23 Fig. 45 Record settings This window is for activation of Timeshift function. The point is as follows: if Timeshift mode is switched in this window, after pressing the button Freeze on the remote control, the picture on the screen will stop (stop frame) and the content of the channel watched will be recorded in the memory stick. After re-pressing the button Freeze, the recording will continue and video playback from memory stick will start from the moment when you first pressed the Freeze button. In this way, you may postpone watching the desirable channel for desirable interval of time. The message Timeshift on appears on the TV screen after pressing the Freeze button. Rewind of recording backward / forward is via joystick buttons / or Media Player Control buttons / (Rewind / Fast Forward), see Fig. 3 Remote control. Rewind interval can be changed by pressing yellow button Rewind Interval. The channel cannot be changed in Timeshift mode. You may exit this mode by pressing Exit. The message Timeshift off will appear on TV screen. Buffer size determines possible duration for Timeshift function. 500 MB corresponds to the record of 30-40 minutes, 3500 MB - to 1.5-2 hours of record time. 7.5.10. Network settings (only CIC-412HD and CIC-402HD models) Submenu Settings select the line Network settings and press OK. There you can set computer network parameters of the receiver and specify shared directory of NFS file server, in case such exists on your network. Fig. 46 Network settings. Common In window Common you can set computer network parameters of the receiver. If DHCP service is active on your network place a tick on checkbox next to DHCP – network parameters will be set automatically. If no, uncheck DHCP and set parameters manually. When you will finish press Save. Select NFS window. There you can set parameters for accessing file server. 24 Fig. 47 Network settings. NFS. Add Press green RCU button – Add. In appeared window enter server IP address and path to shared directory. To enter a path select row Directory and press OK. Fig. 48 Network settings. Keyboard Select required symbols using RCU in a keyboard appeared on the screen. Press yellow button to change case, blue button to change keyboard language. When you are finished select button OK on the screen. Fig. 49 Network settings. NFS Activate NFS shared directory by putting a tick on checkbox near the entry pressing OK. If you want to delete entry – remove a tick from checkbox and press red button. To add one more shared directory – press green button, to search shared directories automatically – yellow button, to edit record – blue button. NFS server shared directories marked by a tick will be seen and files accessible using Media player (see 7.7.3 Media player). To exit network settings window press Menu. 25 7.5.11. About the receiver Select the line About in submenu Settings and press the OK button. Application version, Core version and Hardware version are indicated here. Fig. 50 About 7.5.12. Factory defaults If you have made a lot of settings of the receiver and it is difficult to recover some of unwanted settings, or some of faulty settings appeared in your receiver, you can restore the factory (original) settings. Select the line Factory defaults and then press OK. The message “Are you sure you want to set the factory defaults? Yes / No” will be shown on TV screen. Via buttons / select the required option and press the OK button. If you have selected Yes, all the settings will be changed to the factory ones, all the list of channels will be deleted and menu Welcome page will appear on the TV screen. Fig. 51 Factory defaults 7.6. Conditional Access Select submenu Conditional Access in main menu, and press OK by choosing any line. Insert Conax card into the card reader. Picture does not appear on the screen for the first several seconds until the card is confirmed by the broadcaster. When Conax system starts to run, information about the validity period of your card and attributes of a broadcaster appear in the Subscription status window. Validity of your card may be suspended by the broadcaster, if, for instance, you failed to pay subscription. If the card is not inserted, the message No card will appear on TV screen. If the card of other broadcaster is inserted into card reader, the message No access will appear on TV screen. 26 Fig. 52 Conditional Access. Subscription status Selecting the line Maturity rating, you will enter the window where you can indicate the card level, from which Conax will ask you to enter CA PIN number so as you are allowed to watch the desirable channel. Access function is possible if the broadcaster transmits information on age limit. Fig. 53 Conditional Access. Maturity rating You will get CA PIN from broadcaster along with Conax card, and if you want to change it, you will have to go to window Change CA pin. You will find information about Conax system after entering the window About Conax. Functions Event status and Tokens status in Conax menu are not activated. 7.7. Media This submenu of main menu is intended for control of media player and recording of programs. 7.7.1. Scheduler Select the line Scheduler via buttons / of the remote control and press the OK button. The planning window for records to USB memory stick will appear. Open the cover of front panel and insert USB memory stick into USB socket. Maximum size of one record when FAT32 file system is used is 4 GB. If NTFS file system is used size of record is not limited. By accessing the scheduler for the first time, you will find it empty. To add a new timer recording press green button Add and after having set the parameters for recording – press OK. You may add up to 20 recording timers. 27 Fig. 54 Media. Scheduler. Add In scheduler you may select the desired channel, date, time, record duration and enter your title of the channel to be recorded. In addition, you may select the desired periodicity of recording: Once, Daily and Weekly. In the second and third cases, the recording of the selected channel will be performed in the indicated periodicity, at the same time, starting from the indicated date, and in the first case, once at the indicated time and after the recording, the timer will be deleted from scheduler. Select line OK and press OK. When the time comes, the receiver will switch the indicated channel or turn on, if it was turned off, and will start recording which will finish when the indicated time runs out or the memo is full. The 4 GB memo fits some 2 hours of recording. If you try to switch a channel when recording is on, a message Do you want to switch channel and stop current record? Yes/No. If you select Yes, the channel will be switched and recording will be cancelled. The records are saved in memo folder Records. You can exit the recording mode by pressing the red button or media player control button Record on the remote control. The unnecessary timer may be deleted by pressing the red button Delete by selected a desired action and pressing OK. Fig. 55 Media. Scheduler. Delete There is a possibility to add timer from menu EPG Now/Next or EPG Schedule, see chapters 7.3.4 EPG Now/Next 7.3.5 EPG Schedule. Fig. 56 Add to scheduler from Now/Next 28 If the broadcaster provides Electronic Program Guide (EPG), in the menu EPG Now/Next or EPG Schedule you may select the desired channel and program and then press the red button Schedule record. The record settings window will appear on TV screen, in this window, all record settings will be taken from Electronic Program Guide. Select line OK and press OK. The timer mark will appear in the line of the selected channel, and the record timer for the selected channel will be added to the scheduler window. You may enter the record control window by pressing the yellow button Records in the scheduler window. 7.7.2. Records You may enter the Records window from the main submenu Media in the main menu or from the scheduler window as it was indicated in the previous chapter. In this window you may see the list of your records in the USB memory stick. You may play them by selecting preferred record and pressing remote control button OK or Media Player Control button Play, see Fig. 3 Remote control. The record image, sound and play indicator will appear as it is provided in the following chapter Media player. Note Encoded programs can be played only by the receiver they were recorded in. Fig. 57 Media. Records Any file on the memo may be deleted by selecting the red button Delete and confirming the selection by pressing OK. When the yellow button Scheduler is pressed, you may switch to record planning window. Fig. 58 Media. Records. Delete 7.7.3. Media player The receiver has media player which can play video and music records from USB memory stick and review photos. You may enter the media player control window by selecting submenu Media line Media player and OK. TV the media player window appears on the TV screen, it contains record folders and records (files). The easiest way to play a video or music record or view a photo is to select a desired record and press remote control button OK or Media Player Control Button pressing Menu or Exit. 29 Play, see Fig. 3 Remote control. The playing or review may be cancelled by You may distinguish photo, music or video files by pressing red, green and blue buttons. In addition, you can sort the records in alphabetic order. In this way, all records may be saved in one folder, the types of records are recognized and grouped when it is wanted. Photo review Select one of the photos and press Guide, Actions button. The review control window will appear. In this window you may select the following modes: Normal – the selected photo will be shown, if you want to view the next photo or the previous one, press / buttons. Show folder – all photos contained in the folder will be shown in a row. Loop folder – the photos contained in the folder will be shown in a row by repeating them. The review may be stopped by pressing Menu or Exit buttons. The duration for one photo may be indicated by selecting Time interval 1 to 10 seconds. The review starts when the line Start is selected and OK button is pressed. If you want to delete the selected photo, select the line Delete and press OK. You may exit the review control window by pressing Guide, Menu or Exit buttons. You may view information on the selected photo by pressing Info button. Fig. 59 Media player. Photo review Playing video and music records Select one of the video or music records (files), and press Guide, Actions. The playing control window will appear on TV screen. Normal – only the selected record will be played. Repeat file – the record will be repeated from the beginning. Play folder – all records contained in the folder will be played in a row. Loop folder – all records will be repeated in the folder. You may stop the paying by pressing Menu, Exit or Media Player Control button Stop, see Fig. 3 Remote control. The playing starts when the line Play is selected and OK button is pressed. If you want to delete the selected record, select the line Delete and press OK. You may exit the playing control window by pressing Guide, Menu or Exit buttons. You may view information on the selected record by pressing Info button. Fig. 60 Media player. Video or audio playing To begin playing a record (file) is possible directly pressing button OK of a joystick or Media Player Control button Play. At the beginning of the playing, the playing indicator appears on TV screen for some seconds, the record duration is shown in the right upper corner of the indicator and time from the beginning is shown in the left upper corner. The record (file) title is provided below. This indicator can be opened by pressing button Info. If Info is pressed once again, detailed information of played record is shown. 30 While playing a record you may wind or rewind it by pressing remote control joystick buttons / or Media Player Control buttons / (Rewind / Fast Forward). Then the indicator appears again. The wind interval may be changed by pressing the yellow button Rewind interval. Playing can be paused by pressing Media Player Control buttons Play or press them once again. Quickly jump to other records in a folder press buttons back. Pause. Continue playing Skip next or Skip Fig. 61 Media player. Playing video record. 8. Receiver Control The receiver is controlled exclusively by the remote control, see 4.4 Remote Control. The receiver is turned on and turned off by pressing Standby button. When the receiver is on, LED on the front panel of the receiver is green, and when it is off, LED is red. After switching on, you will see the channel you were watching before switching the receiver off. 8.1. Channel switching The desired channel may be turned on by entering the number of the channel by means of 0...9 buttons, or switching channels in sequence up and down by using Ch + / -. When the channels are switched by the means of Ch + / - buttons, information bar appears on the TV set screen, and when the channels are switched by the means of 0...9 buttons, information bar and channel number appears in the upper corner of the screen. Fig. 62 Information bar It contains the following information: 1. Number and name of the channel watched at the moment. 2. Name of program watched at the moment (if a broadcaster has provided such information). 3. Name of the next program (if a broadcaster has provided such information). 4. Icon TV / Radio. 5. Multi channel Audio icon. Appears when there are 2 and more audio tracks. 6. Indicator of the elapsed / remaining time of a program. 7. Subtitle icon. 8. Teletext icon. 9. Lock means that channel is locked. 10. Mark means that channel is paid. 11. Date and time. 31 This infobar may be called up by means of Info button, and closed by repeatedly pressing Menu or Exit buttons. If you press Info button repeatedly, the detailed information on broadcast program will appear on the screen. This information requires comprehensive description and is necessary for a broadcaster, when the problems of video or audio quality appear; therefore it is not described in details in this manual. Fig. 63 Program info Fig. 64 Channel info In the left upper corner of the TV set screen, the following marks, which in most cases duplicate text messages or the same marks in different menus and windows. - no channels, the channel list is empty. - no signal, the receiver is not synchronized for the broadcasted channel or antenna is not plugged in. - reload of active antenna supply, short circuit. - channel is not available (encoded). - not available. The Conax card has expired. - lock, blocked channel. - no card in the card reader. - volume off, Mute button is pressed. - pause, image on the screen is frozen, Freeze button is pressed. - channel wait icon. Recording is unavailable if timer switches to channel which is not broadcasted. - record wait icon. Recording is temporarily unavailable when timer turns on playing from Standby mode. - recording to USB memory stick. 32 8.2. Channel list By pressing OK button to you can enter the channel list directly, see chapter 7.3.1 Channel list. 8.3. Volume control Channel volume is controlled by using Vol + / - buttons. The indicator which shows the set level of volume appears on the TV screen. Fig. 65 Volume control Control of volume of each channel is described in chapter 7.3.6 Channels volume. If necessary, volume may be turned off by using Mute button. “Volume off” appears on the TV screen. Volume may be turned on by repeatedly pressing 8.4. Mute button. Picture freeze If you want to freeze picture that you liked, press Freeze button. Picture will be frozen at that moment, the above described mark will appear in the left upper corner of the TV screen. You may play further by repeatedly pressing Freeze button. If the mode Timeshift is on, the receiver starts recording the watched channel when Freeze button is pressed, and when Freeze button is pressed again, the playback of record starts, see chapter 7.5.9 Record settings . 8.5. Aspect Ratio By pressing Aspect Ratio button picture aspect ratio switches between 4:3 and 16:9. 8.6. Electronic Program Guide When Guide button is pressed you directly enter the window EPG Now/Next and then EPG Schedule. Please follow the information provided in the chapter 7.3.4 EPG Now/Next. 8.7. Teletext, subtitles The teletext window is called by pressing TXT button. In this window, the teletext language may be selected by pressing / buttons and confirming your selection by pressing OK button. Teletext appears on the TV screen. Press TXT button again to exit. When a channel is switched, teletext is automatically turned off. The subtitle window is called by pressing SUB button. In some seconds, the subtitles of your selected language appear. The subtitles will be only on the channel on which they were turned on. You have to turn on the subtitles on other channels again. Subtitles are turned off by pressing SUB button again. The message Subtitles off appears on the TV screen. Fig. 66 Teletext 33 8.8. Main menu. Settings Pressing OPT button on the remote control will be entered Main menu with selected submenu Settings. 8.9. Returns to previously watched channel Pressing Back button on the remote control receiver will switch to previously watched channel. 8.10. Page up, Page down Pressing Page up, Page down in all channel and record lists cursor jumps over the page (over a channel or record group that is displayed on the screen). 8.11. Television, radio Television or radio channels are selected by repeatedly pressing TV/R button. The above described marks appear in the information bar. The channels of this type appear in appropriate list. If there are no radio channels, the message No Radio channels appear on the TV screen and the receiver continues showing the selected TV channel. 8.12. Audio selection The audio mode (Mono / Stereo) or sound track (desired language) may be quickly selected by pressing LANG button. Audio selection window will appear on TV screen. Select the necessary line by using / buttons, and in every line select by using / buttons, confirm your selections by pressing OK button. Sometimes different languages are available through different audio channels (left or right). In such case, it is necessary to select left or right channel. Fig. 67 Audio selection 8.13. Timers By pressing Timer button, you may directly enter into the timer window, see 7.5.5 Timers. 8.14. Colour buttons 8.14.1. Red button When the red button is pressed you quickly, without entering menu, turn on the recording of the channel watched at that time. The recording is cancelled when the red button is pressed again. Analogously acts also Media Player Control Record button. 8.14.2. Green button When the green button is pressed, you quickly, without entering menu, enter the Media player window. The control of medial player is described in the chapter 7.7.3 Media player. 8.14.3. Yellow button When the yellow button is pressed, you quickly, without entering menu, enter the record window. The control of records is described in chapter 7.7.2 Records. 34 8.15. Media Player Control All buttons except Record works just in Media player or Records menu, see chapter 4.4 Remote Control. 8.15.1. When the Record Record button is pressed you quickly, without entering menu, turn on the recording of the channel watched at that time. The recording is cancelled when the 8.15.2. If button Record button is pressed again. Play, Pause Play is pressed the selected record, if supported by Media player, starts playing. To stop playing press button Pause or again press Play. To continue playing use the same buttons Play or Pause. 8.15.3. If button Stop Stop is pressed playing is stopped and record list is displayed. 8.15.4. Using buttons recording. 8.15.5. Rewind, Fast Forward / (Rewind and Fast forward) it is possible to go quickly back or forward in the Skip Back, Skip Next When record is playing using buttons next record in the list. 35 Skip back and Skip next it is possible to jump to previous or 9. Technical Specifications Receiver fully conforms the requirements of standard ETSI 300429 Tuner & Demodulator: - Frequency Range: 51 MHz - 858 MHz - Input Signal Level 45 dBμV – 75 dBμV - Demodulation 16/32/64/128/256 QAM Ethernet (only CIC-412HD and CIC-402HD) - MAC 10/100 Mb/s - Standartas: IEEE 802.3 Video Decoding: - MPEG-2 MP@ML - MPEG-4 H264 MP@L4 - Video Resolutions 1920x1080i, 1280x720p, 720x576 PAL - Aspect Ratio 4:3; 16:9 Audio decoding: - MPEG-1/MusiCAM layer I/II - MPEG-2 layer 2 - MPEG-4 AAC, AAC-HE - AC3, E-AC3, LPCM, MP3 Media Player - File system: FAT32, NTFS - Maximum volume of one record for FAT32 file system: 4 GB - Supported containers: AVI*, MKV* - Supported codecs: MPEG2, H.264/AVC, DIVX*, XVID*, MP3 - Picture decoding: JPEG Power supply: - 207-250VAC; 50Hz internal power supply - Power Consumption, max. 15 W Input / Output Connectors: - SCART TV - HDMI - ETHERNET RJ45 (only CIC-412HD and CIC-402HD) - S/PDIF coaxial - IEC 60169-2 (Female) RF input - IEC 60169-2 (Male) RF Output Physical Specifications: - Size: ● CIC-402HD and CC-402HD – 260 x 150 x 40 mm ● CIC-412HD – 265 x 150 x 50 mm - Weight (net): ● CIC-402HD and CC-402HD – 700 g ● CIC-412HD – 1000g o o - Operating temperature: 0 C to +45 C - Storage Temperature: -10oC to +70oC - Relative humidity, max. 95 % Remarks: 1. * - In some receiver versions marked containers and codecs are not supported. 2. In manual’s menu illustrations possible negligible uncertainties comparing with real receiver’s menu. 36