1
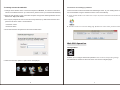
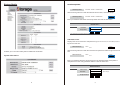
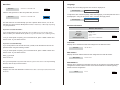
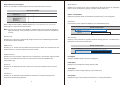
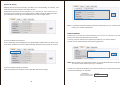
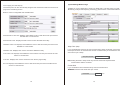
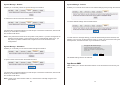
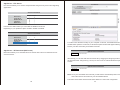
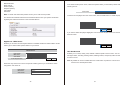
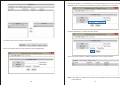
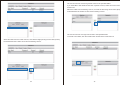
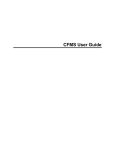
Configure RAID
RAID Modes
STANDARD
JBOD (USB only)
2 Bay NAS / Enclosure
COMBINE
Span (Big)
MIRRORING
RAID 1
3.5” SATA HDD
STRIPING
RAID 0
Set RAID
1. Turn off the unit, pushing the Power button on the front panel.
2. Set the RAID switch to the RAID mode of your choice.
3. Press and hold the set “RAID button” as you power on the enclosure by pressing
the “Power button”.
4. Once the enclosure has turned on, release the set “RAID button”..
5. Your Desired RAID configuration is now set.
Note: When changing RAID configuraitons, follow the above steps to set the unit back
to STANDARD (JBOD), before setting to a different configuration.
Access Web GUI
Once the enclosure has been attached to a local area network and your RAID configuration
has been set. You can access additional operation and configuration settings using the builtin web GUI by accessing the NAS IP address using any web browser.
By default the IP address when connected directly to a PC for the DLA012NAS ecnlosure
is: http://192.254.0.1
Note: In order for any device to access the Built-in web GUI, both the enclosure and that
device must be on the same subnet. Once the web GUI has been accessed the default
IP address can be changed therein.
1
To initially access the web GUI
Connections and setting by windows
1. Change the IP address of the connected computer to 192.168.0.1, so it will be on the same
subnet as the NAS enclosure. (For instructions, please contact your network administrator)
Connect the SSI unveil the Professional Hub/Charger series to your existing DHCP router
and DLA012NAS will get IP address from the router automatically.
2.Open the web browser on the connected computer and type the following address into the
address bar: http://192.254.0.1
A. Firstly, double click & run the “Sdisk.exe” and you may need to download and install the JAVA
runƟme.
3.You may be prompted to enter a user name and password, by default the username and
password are both ‘‘admin’’ as listed below.
Usermane: admin
Password: admin
B. Click the “Connect” to enter the seƫng page. (Default user name: admin, password: admin)
4. Enter the username and password and click the OK button.
Web GUI Operation
Conriguration
5. When the web GUI opens a 5 option menu is displayed.
2
Enables you to configure advanced operations of the enclosure. All operating settings
are listed below. Please use the main menu on the left to navigate pages.
3
Status-Statis
Host/Group Name
Host/Group Name
STORAGE-10AABC / WORKGROUP
Change
Click the change button to alter the Network device name, and Work Group.
Host/Group Name
STORAGE-10AABC / WORKGROUP
Change
Enter your desired Host Name and Group Name then click the OK button.
Identification
Host Name
Group Name
STORAGE-10AABC
WORKGROUP
OK
Cancel
Note: “Host Name” first characte cannot be anumber (0-9).
Admin/Password
Displays the current username and password (password characters are hidden) used to
log into the web GUI.
Admin/Password
Enables you to view and edit System and Network Information.
Change
Click the change button to alter the username and password used to login into the web
GUI.
Admin/Password
System Information:
admin /
admin /
Change
Enter your desired Username and Password in the specified fields and repeat the
new password in the verify password field then click the OK button.
Administration
Administrator
admin
Password
(Max 12 Bytes)
Verify Password
OK
4
Cancel
5
Data/Time
Language
Displays the current language the GUI content is displayed in.
Data /Time
2014/07/21 14:49:03 GMT 8:00
Change
Web Language
English
Click the change button to alter the system date, and time.
Data /Time
2014/07/21 14:49:03 GMT 8:00
Change
To adjust the GUI content language, select the language you would prefer the GUI to
be displayed in using the drop down menu, and click the Apply button.
Web Language
The date and time can automatically sync with a specific SNTP server, or it can be
manually set. Next to Renew Mode place a bullet in Automatic, or Manually depending
on your preference.
English
Network information
Network Information
if you have selected Automatic:
If you would prefer to use one of our three pre-set SNTP servers, use the drop down
menu to select your desired server (clock.isc.org / time.windows.com / stdtime.gov.hk).
Or if you would prefer to specify your own SNTP server, place a bullet in Other and
enter the URL of your desired server.
Internal IP
External IP
Mac Address
PPPoE
WebDAV,External URL
192.168.100.47
192.168.1.14
00:0b:b4:10:aa:bc
0.0.0.0
Connect
http://192.168.1.14:8080/webdav
Internal IP
if you have selected Manually:
If you would prefer to set the date and time yourself, enter the date and time in the
specified fields using the following formula:
Or if you would prefer to specify your own SNTP server, place a bullet in Other and
enter the URL of your desired server.
Displays the IP address that has been assigned to the NAS Enclosure.
Internal IP
192.168.100.47
MAC Address
Displays the MAC address that has been assigned to the NAS Enclosure.
Date: yyyy/mm/dd
Mac Address
Time: hh:mm:ss
Or if you would prefer to sync the time with the system of the device currently browsing
the GUI, click the Sync with PC button.
Firmware Version
Displays the name and distribution of the firmware that is currently installed on the NAS
Enclosure.
6
00:0b:b4:10:aa:bc
PPPoE Address
Displays the IP address that the NAS enclosure is connected to if the NAS has been
configured for PPPoE Internet access. See: Network PPPoE for details regarding
PPPoE Internet configuration.
PPPoE
0.0.0.0.
Connect
7
Status-Servoce Inforamtion
Media Service
Allows you to Enable or Disable specific services supported by the enclosure.
Enables you to stream video, music, and pictures to DLNA and UPnP AV supporting
devices, such as televisions, gaming consoles, media centers, etc.
Server Information
ENABLE / DISABLE
DHCP Server
Status - Disk Status
Displays information about the hard drives and RAID array in two categories:
Samba Server
WebDAV Server
FTP Server
Media Server
Disk Name
Place a bullet under Enable or Disable depend ing on your preference for each service.
A description of each service is listed below:
Lists JMicron as the chipset and displays your specified RAID array.
Interface Information
Note: As soon as you click on the disable or enable switch the enclosure will attempt to
Disk ID
apply the settings. It may take the encl osure a couple of seconds to complete the
process.
DHCP Server
JMicron H/W RAID1
2/94.44 GB Free / 2/94.4 / GB Total
Capacity
Disk Capacity
Enables your enclosure to automatically assign Internet Protocol Addressing information
for automatic network integration.
Displays current information regarding availa ble storage space on your RAID array. A
description of each field is listed below.
SMB Service
Interface Information
Enables you to browse and map folders from the enclosure within the computer’s file and
folder browsers or network browsers across the network.
Disk ID
JMicron H/W RAID1
2/94.44 GB Free / 2/94.4 / GB Total
Capacity
WebDAV Service
Enables your local computer, tablet, iPhone or smartphone to access files and play media
stored on your NAS Enclosure with any web browser or third party WebDAV file
management app.
Free Space
Displays available storage capacity in Gigabytes.
Used Space
BT Server
Displays the percentage of storage capacity used.
Enables you to download and host Torrent fi les to and from external sources over the
Internet.
Total Space
Displays the entire storage capacity of your RAID array.
FTP Service
Enables you to upload and download files to and from the enclosure using the FTP
protocol and supporting applications.
8
File System
Displays the type of file system the RAID array is currently formatted in.
9
Network-IP Setting
Displays Internet Protocol information, and allows you to automatically, or manually set a
static Internet Protocol address Information therein.
By Default the Internet Protocol Information is set to Automatic IP. If you would prefer to
manually set your internet protocol address place a bullet in Static IP address and fill in
your information accordingly in the fields below, then click the apply button.
Note: For detailed information regarding the best configuration for your network, please
contact your network administrator.
Network-PPPOE
If you have selected Automatic IP:
The IP Information will be displayed in the specified fields, please take note while in this
mode the IP address of the unit is obtained through DHCP and may change at any time.
Enables you to connect your enclosure directly to the Internet via a PPPoE (Point-to- Point
Protocol over Ethernet) Internet Service Provider.
To setup, enter the username and password provided by your Internet Service
provider into the specified fields and click the apply button.
Note: Service Name is an option field used for your personal identification of the ISP.
The Service Name will not impact your connection.
If you have selected Static IP as below:
Enter your desired IP information in each specified field and click Apply.
The service on Demand field allows you to specify whether you would prefer the service to
connect automatically or on manually.
Auto Dial-Up
10
DISABLE
11
By default the service is set to Disabled meaning it will always try to connect automatically. If
you would prefer to only connect manually, change the drop down to Enable.
Click the apply button.
Note: To enable manual connection use the Connect button on the status page. See:
Status - PPPoE Address for manual connection instructions.
Network-DDNS
Enables you to assign an Internet Domain Name using a DDNS service for external access
to your enclosure over the Internet.
Note: It may take up to an hour for the DDNS server to refresh and direct to the Enclosure.
For further assistance please contact your DDNS service provider.
Network-Service Port
UPnP Port Mapping (Universal plug and play)
Enables the enclosure to automatically find and communicate with your router and open
any ports required for network communication.
To setup, select Enable from the bullet menu.
If you are using a generic Dynamic DNS service, select Dyn from the service provider drop
down menu. Or if you are using No-IP as your service provider select NO-IP from the
DDNS service provider drop down menu.
Service Provider
Dyn
In the Host Name field, enter your Host Name which you’ve registered on the DDNS server.
Host Name
In the User Name field, enter the Username for the DDNS server.
Place a bullet under Enable or Disable next to UPnP Port Mapping depending on your
preference.
User Name
In the password field, enter the Password for your DDNS server.
Password
UPNP Port Mapping
ENABLE
DISABLE
Note: Once you have click enabled the enclosure will automatically attempt to update the
router which could take several seconds. If you have chosen to enable UPnP
please ensure UPnP has also been enabled on your router. For further assistance
please contact your network administrator.
12
13
Port mapping and URL Display
System Manage-Disk manage
The access ports can also be manually assigned and viewed from within the Service Port
page of the networking section.
Enables you to set a sleep timer, format your RAID array, and view S.M.A.R.T (SelfMonitoring, Analysis and Reporting Technology) data for each of the attached drives.
Below is a list of configurable and viewable items:
Displays and enables the user to alter the access port
Administration Listen Port: Displays and enables te user to alter the access port used for
the Web GUI to communicate.
Administration URL: Displays the URL used to access the Web GUI locally.
WebDAV Listen Port: Displays and enables the user to alter the access port used for the
WebDAV to communicate.
WebDAV URL: Displays URL used to access the WebDAV locally.
FTP Listen Port: Displays and enables the user to alter the access port used for the FTP
service to communicate
Sleep Time (idle)
If you would like the enclosure to enter a power saving sleep mode when it is inactive, use
the drop down menu to and select the amount of inactive time you would like the drive to
wait until it is put to sleep.
Sleep Time (minutes)
10 Min Later
FTP URL: Displays URL used to access the FTP Service page locally.
BT Port: Displays and enables the user to alter the access port used for the Bit Torrent
service to communicate.
Note: Setting the drive to sleep mode may result in slower than expected initial
communication with the enclosure.
Format Disk
If you would like to format the RAID array click the Format button.
WARNING!: All drive data will be lost upon format.
Format Disk
14
Format
15
help
To Create a new RAID array click the RAID System Manage - RAID Link from the
Main menu.
Select your desired RAID mode from the RAID mode drop down menu and click the Main
menu.
RAID 1
RAID Mode
Create
Disk Information
Displays the model and capacity of each attached hard drive.
Disk Information
SATA0: ST3000DM001-CH166 / 279GB
SATA1: ST3000DM001-CH166 / 279GB
Delete
System Manage-Firmware Update
WARNING!: All drive data will be lost upon deleting the RAID array. A message will appear
warning that all written data will be lost. Click the OK button if you wish to
continue.
The page at 192.168.100.47 says:
x
This will format the hard disk and erase all data on this
disk.
Are you sure?
OK
Cancel
Access the Enclosure web GUI and select System Manage --Firmware from the main menu
Click the browse button, a Windows Explorer window will appear, locate and select the
firmware download in the location it was saved, and click the Open button.
Upon creation of the new RAID array the S.M.A.R.T table for available drives will be
displayed.
The firmware upgrade will install.
WARNING! During the firmware upgrade do not turn off the enclosure or attempt to make
any configuration changes until the update is completed.
Once the upgrade has completed the enclosure will automatically reboot.
Note: Update may take several minutes. The below progress indicator will appear providing
a countdown to system reboot.
RAID Status
Displays the current RAID array and the S.M.A.R.T status.
RAID 1 / Normal
RAID Status
18
19
System Manage - Reboot
System Manage - Default
Enables you to remotely reboot the system through the web GUI.
Enables you to restore the enclosure to its default settings (reset) through the web GUI.
To reboot the enclosure click the Reboot button.
To restore default settings click the Reset button.
You will receive a message alerting you that all open connections will be reset, click the OK
button if you would like to continue.
The enclosure will reboot.
Note: It may take several seconds for the system to fully reboot. If you have changed the IP
address of the enclosure or if the enclosure is set to automatically obtain an IP, you
may have to update the address bar to regain access to the enclosure’s web
configurations.
You will receive a message alerting you that all default settings will be restored, and
advising you not to turn off the enclosure power, or close your web browser during the
Reset process, click the OK button if you would like to continue.
The page at 192.168.100.47 says:
x
System Manage - Shutdown
This will restore device’s default setting.
Please don’t off the power and close the web
browser when the system is changing the settings.
Are you sure?
Enables you to remotely turn off the enclosure through the web GUI.
OK
Cancel
The default settings will now be restored.
To power off the enclosure click the Shutdown button.
App Server-SMB
SMB enables you to browse the folders and file on the enclosure access across your
network.
You will receive a message alerting you that all open connections will be reset, click the OK
button if you would like to continue.
The enclosure will reboot.
Note: It order to turn the enclosure make on, it must be done manually using the front
power button.
20
21
App Server – WebDAV
From the SMB Status section you can enable or disable SMB service.
Depending on your preference place a bullet in Enable or Disable.
Server Information
WebDAV enables your local computer, tablet, iPhone or smartphone to access files and
play media stored on your NAS Enclosure with any web browser or third party
WebDAV file management app.
From the WebDAV Status section you can enable or disable the WebDAV service.
Depending on your preference place a bullet in Enable or Disable.
ENABLE / DISABLE
DHCP Server
Server Information
Samba Server
WebDAV Server
FTP Server
Media Server
ENABLE / DISABLE
DHCP Server
Samba Server
WebDAV Server
FTP Server
Media Server
22
23
App Server - FTP Server
FTP Server enables you to access and upload files using the FTP protocol and supporting
applications.
Server Information
ENABLE / DISABLE
DHCP Server
Samba Server
WebDAV Server
FTP Server
Media Server
From the FTP Status select you can enable or disable FTP service.
Depending on your preference place a bullet in Enable or Disable.
Server Information
ENABLE / DISABLE
DHCP Server
Samba Server
WebDAV Server
FTP Server
Media Server
To add a torrent file that is locally on your computer or network, click thebrowse button
located below Upload a Torrent File, a Windows Explorer window will appear allowing you
browse your files and locate your desired torrent file.
App Server – BT Download (BitTorrent)
BitTorrent enables you to download and host Torrent files to and from external sources
over the Internet.
Upload Your Torrent File
Choose File
No file chosen
Alternatively you can also add the local torrent file by dragging and dropping the file into
the area that reads “Drag & Drop (*.torrent) on Here” from an external Windows Explorer
window.
Upload Your Torrent File
Choose File
No file chosen
Note: Once you have added the torrent file you will host the downloaded portion of the
torrent file until it is removed from your Downloaded Queue.
The button menu below the Download Queue allows for control and configuration.
24
25
The BT option menu enables you to set the following configurations using the value boxes
listed:
Note: entering a value of 0 will allocate the maximum amount available resources for each
field.
Upload Your Torrent File
Choose File
No file chosen
The Download Queue shows the status of currently hosted and downloading files.
Upload Limits:
Enter the amount of bandwidth you would like to allocate for uploading your hosting data in
Kilobytes.
0
Upload Limit
KB (0 is unlimited)
Download Limits:
Enter the amount of bandwidth you would like to allocate for downloading your torrent files
in Kilobytes.
Note: Once you have added the torrent file you will host the downloaded portion of the
torrent file until it is removed from your Downloaded Queue.
The button menu below the Download Queue allows for control and configuration.
0
Download Limit
KB (0 is unlimited)
Max Peers Per Torrent :
Enter the number of torrent users you are willing to host to/download from at any given
time.
Max Peers Per Torrent
Activate Download
Pause Stop Delete Settings
0
KB (0 is unlimited)
Mail Notification
Once you have defined the values you’ve chosen to specify click the apply button.
Functionality of each button is listed below:
Activate Download: Enables you to activate a torrent to begin the download process.
0
KB (0 is unlimited)
Pause: Enables you to pause the download.
Apply
Stop: Enables you to stop the download.
Return
Delete: Removes Torrent files from the Downloaded Queue
Settings: Opens the BT Option menu.
Mail Notification
Enables you to receiver an alert message via e-mail for each torrent file that has completed
downloading
To activate e-mail notification, place a check in the Enable box.
If your e-mail server requires authentication please place a check in the Authentication box
as well.
The following information will be required to send e-mail notifications please enter the
information in the specified fields:
26
27
Mail Notification
SMTP Server
Sender (Name)
Recipient (Name)
User Name
Password:
From within the drop down menu, select the specific folder you would like pull the selected
media type from.
Photo Folder
Note: To obtain this information please contact your e-mail service provider.
To build a iTunes playlist form the music folder, click the build button to create the playlist.
The General and Details Tabs below the Download Queue show you specific Information
regarding the selected torrent file in the Download Queue.
Build
Remove
If you wish to delete the playlist highlight it from the iTunes Playlist section and click the
Remove button.
App Server - Mdia Server
Enables you to build a iTunes Playlists based on available media and which folders contain
which type of media within specific folders on your drives.
Media Server
Photo Folder
Music Foler
Video Folder
iTunes Playlist Cache
Build
User Set-Account
PUBLIC
Enables you to create, modify, limit, disable or delete specific user accounts. You an also
manage Folders, including creating folders, deleting folders, and specify folder accessibility
for each account.
PUBLIC
PUBLIC
Not found
Build
Remove
Select the drop down menu next to the specific media type that you would like to share
using DNLA and UPnP AV.
Note: By Default an account entitled Guest is created with no password. The account has
access to the default public folder.
PUBLIC
Photo Folder
Music Foler
Video Folder
PUBLIC
PUBLIC
28
Remove
29
Next specify whether you would like the account to be Read only (can only access files), or
Read/Write (Can access save and edit files) by placing a bullet in your preference.
Click the add button to complete account creation
To create a new account, click the New button.
Enter your desired username and password in the specified fields.
The account has now been created is listed in the account List box below.
Note: A new folder for specific user content is also created with each account and listed
under folder list.
30
31
To change the settings for any account, select the account from the account box, and
click the modify button.
The account has now been disabled.
To enable an account, select the account from the account box, and click the Enable
button.
Enable
From the modify window, change the password or the read/write access depending on
your preference, and click the Modify button.
Note: Enable/Disable button is displayed based on account status.
To delete an account, select the account from the account box, and click the Delete button.
The account changes have now been saved.
To disable an account, select the account from the account box, and click the Disable
button.
You will receive a message alerting you that the account will be deleted; click OK if you
wish to continue.
The account has now been deleted.
You can specify which Accounts have access to each folder on your NAS enclosure using
the Folder and Share List boxes.
If you would like to grant Folder access to a specific account, select the account from the
account box.
32
33
The user account has now been granted access to the specified folder.
If you would like to limit folder access from a specific account, select the account from the
account box.
Johnny
------
RW
ENABLED
Select the folder from the Sharing List box, and click the left facing Arrow button (Red)
located between the Folder List box and the Sharing List box.
The user account has no longer has access to the specified folder.
To create a new folder, click the Create button located in the Folder List box.
Select the folder from the Folder List box, and click the Right pointing Arrow button (Green)
located between the Folder List box and the Sharing List box.
Johnny
Johnny
------
RW
34
------
RW
ENABLED
35
ENABLED
Enter your preferred folder name in the text box, and click the OK Button.
The folder has now been created and is listed in the Folder List box.
To rename a folder select the folder from the Folder List box, and click the Rename button.
Johnny
------
RW
ENABLED
Johnny
The Folder name has now been changed.
To delete a folder select the folder from the Folder List box, and click the Delete button.
Johnny
------
RW
ENABLED
Johnny
Enter your preferred new name in the New Name Box and Click OK.
You will receive an alert notifying you that the folder and its entire contents will be
permanently deleted.
Click the OK button if you wish to continue.
The folder has now been deleted.
36
37