1
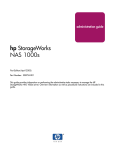
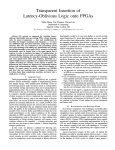
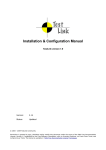
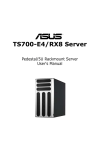
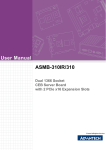
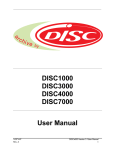
Course Name: M. Sc. in Computer Science (Conversion) Module Name: Virtualisation and Cloud Computing Module Code: COMP41500 Lecturer: Mr. Tom Brett Assignment Details: Create a User Manual outlining the steps involved in a number of pre-defined tasks Due Date: 20th December 2013 Submitted Date: 19th December 2013 Abstract: The purpose of this user manual is to outline and explain the reasons for taking particular steps when completing given tasks while also guiding the user through the main steps by the use of modified screenshots and written procedures Author/Student Name: Mr. Michael Kelly Student Number: 12253058 Page 1 of 127 Table of Contents Table of Contents ....................................................................................................................... 2 Overview .................................................................................................................................... 4 Task A.9 - Introduction to Virtualisation ................................................................................... 5 Virtualisation Benefits ...................................................................................................... 5 Virtualisation Disadvantages ............................................................................................ 6 Task A.1 - Connecting to and Installing vSphere Client ........................................................... 9 Task Overview.................................................................................................................. 9 Technical Issues................................................................................................................ 9 Task Guide ..................................................................................................................... 11 1. Install ESXi host ............................................................................................... 11 2. Install vSphere Client. Then connect to and access the ESXi Host .................. 18 Task A.2 - Creating Virtual Machines using VMware ESXi and vSphere Client ................... 24 Task Overview................................................................................................................ 24 The Differences between vCenter Server and vCenter Server Appliance ..................... 24 Technical Issues.............................................................................................................. 26 Task Guide ..................................................................................................................... 29 1. Upload both Operating System ISO image files as well as the vCenter Server ISO image file to the Datastore ............................................................................ 29 2. Create a New Virtual Machine ........................................................................ 32 3. Install Windows Server 2008 R2 Operating System ........................................ 36 4. Change the ISO to vCenter Server ................................................................... 41 5. Install vCenter Single Sign-On......................................................................... 43 6. Install vSphere Web Client ............................................................................... 48 7. Install vCenter Inventory Service ..................................................................... 52 8. Install vCenter Server ...................................................................................... 57 9. Install vSphere Client on this Windows Server 2008 R2 machine ................... 64 10.Start all VMware services from the Task Manager ......................................... 64 11.Login to vCenter Server ................................................................................... 65 12.Install Microsoft Windows 7 Operating System............................................... 66 Task A.3 - Creating a Typical Organisation Environment ...................................................... 71 Task Overview................................................................................................................ 71 Task Guide ..................................................................................................................... 71 1. Create Folders for the various locations where the organisation is based ....... 71 2. Add Datacenters to the appropriate location folder ......................................... 72 3. Add the appropriate Hosts to the Datacenters.................................................. 73 4. Create virtual machines within these Hosts ..................................................... 75 5. Organise as appropriate.................................................................................... 78 Task A.4 - Creating, Managing and Reverting to a Snapshot ................................................. 79 Task Overview................................................................................................................ 79 Snapshot Example .......................................................................................................... 79 Task Guide ..................................................................................................................... 79 1. Create snapshot of running Virtual Machine ................................................... 79 2. Create snapshot of Virtual Machine that is not running .................................. 81 3. Open the Virtual Machine Snapshot Manager ................................................ 82 4. Delete a snapshot ............................................................................................. 83 5. Revert to a snapshot ......................................................................................... 84 Task A.5 - Creating a Gold Image (Template) ........................................................................ 86 Task Overview................................................................................................................ 86 Page 2 of 127 Technical Issues.............................................................................................................. 86 Task Guide ..................................................................................................................... 86 1. Update Operating System and Applications appropriately .............................. 86 2. Convert or Clone the virtual machine to a template ........................................ 89 Task A.6 - Deploying a Virtual Machine using a Gold Image ................................................ 91 Task Overview................................................................................................................ 91 Task Guide ..................................................................................................................... 91 1. Create a Customization Specification using the Customization Specification Manager ................................................................................................................ 91 2. Deploy a Virtual Machine from a Template .................................................... 94 3. Turn on the virtual machine ............................................................................. 97 Task A.7 - Converting a Physical Computer to a Virtual Computer ..................................... 100 Task Overview.............................................................................................................. 100 Technical Issues............................................................................................................ 100 Task Guide ................................................................................................................... 100 1. Install VMware vCenter Converter ................................................................ 100 2. Virtualise the appropriate virtual machine ..................................................... 102 Task A.8 - Installing Debian Linux ....................................................................................... 107 Task Overview.............................................................................................................. 107 Technical Issues............................................................................................................ 107 Task Guide ................................................................................................................... 108 1. Create a New Virtual Machine ...................................................................... 108 2. Install Linux Debian ....................................................................................... 111 Endnotes................................................................................................................................. 125 Page 3 of 127 Overview The purpose of this assignment is to provide a thorough understanding of virtualisation environments; how to set them up and how to manage them by increasing the reader’s practical knowledge and skills in relation to both. In order to do this, I will create a virtual environment using VMware vSphere, a leading enterprise virtualisation software suite. Within this environment, a number of Virtual Machines (VMs) will be created and pre-defined tasks will be explained, completed and a guide through provided, as outlined in the Table of Contents on pages two and three. I have created this user’s manual which documents in detail all of the steps necessary to complete each task. It also outlines the benefits of taking these steps and when they may be justified. All screenshots have been cropped and compressed in order to reduce file sizes, as well as to highlight specific areas. Certain sections of the screenshots have been highlighted in order to pinpoint specific areas of significance. Explanations of the purpose and relevance of each task are provided in the first few paragraphs. All technical issues in relation to software and hardware requirements are also addressed. References are then provided to facilitate sourcing further information in relation to the task if required. Instructions as regards how to implement the task are then provided. For clarity, easy to follow numbered steps are outlined, along with the appropriate screenshots. The following naming convention is used. Specific styles are used for each naming convention in order to make it simple to make modifications throughout the report: Buttons that have to be pressed/clicked are in this italic Cambria style (named Steps). Names of software/programs are in this italic Times New Roman style (named Software). If you have to type something, it is surrounded in 'inverted commas and also uses the Courier New' style (named Commands). If you do not like one of these styles or would like to highlight a particular style, any of the styles can be modified by changing the style within Microsoft Word’s Styles section. Page 4 of 127 Task A.9 - Introduction to Virtualisation The following section will first give an overview and definition of what virtualisation is. Following on from this, the benefits and disadvantages of virtualisation will be discussed. The final paragraph will give an overview of the section and will draw conclusions based on the previous paragraphs. Traditionally, there has been one Operating System (OS) with multiple applications on each physical machine. The physical machine must be powerful enough to run this OS and its applications at their peak workload. Even if this peak only happens for one hour per day, this hardware is still required. A consequence of this is that for twenty three hours, the hardware is underutilised. This is where virtualisation comes into play. Virtualisation allows an organisation to run multiple operating systems and applications on one physical machine. This helps use the physical machines to their full potential. Kusnetzky (2007) gives a detailed overview of what virtualisation is: ‘Virtualization is a way to abstract applications and their underlying components away from the hardware supporting them and present a logical view of these resources. This logical view may be strikingly different than the physical view. The goal usually is one of the following: higher levels of performance, scalability, reliability/availability, agility or to create a unified security and management domain.’1 Virtualisation Benefits Performance and Hardware Utilisation: As mentioned above, if computers are used for just one purpose and are fully active for only specific periods of time, they are going to be underutilised. Virtualisation technology allows you to manage how your hardware is used so it can be used more effectively. Multiple ‘Virtual Machines’ can all use the same underlying hardware. Hence, if setup properly, the full potential of the hardware can be used all of the time (and also cater for redundancy). Limits, reservations and shares can be used to ensure that specific machines always have specific amounts of hardware available to them, and limit the amount of hardware that they can use. This enables an administrator to ensure that ‘critical machines’ always have enough hardware available to them. Cost: Although there are costs associated with implementing a virtualised environment, there can be long term financial benefits. These long term benefits will be discussed here. If the number of required servers is reduced, there are resulting savings in terms of both energy and space. As less power is consumed due to the decrease in computers and cooling systems required, energy costs are reduced. As well as this, the saved space can be used for other purposes if necessary. Because fewer computers are in use, there is also less maintenance required. There are consequent savings in relation to both labour and hardware. As well as this, maintenance can often be completed without incurring any downtime, meaning fewer interruptions for both staff and customers. Testing Environments: Virtual Machines can be used as testing environments by developers and software testers. They are ideal environments, as features such as snapshots, and vApps enable developers to create environments to which they can revert if necessary (i.e. if they damage the environments). They can also clone environments if they need to use the same environment for multiple purposes. This can save on time as installations do not have to be Page 5 of 127 completed multiple times. There is also no risk of damaging the underlying hardware as the software is abstracted from the hardware. Repair of damage could prove costly if physical machines were being used for testing purposes. Scalability: Virtualised environments can be configured to scale automatically. For example, with VMware’s vSphere, ‘if all virtual machines on a host spike at the same time and require all of their memory allocation, VMware DRS can automatically load balance by performing vMotion live migrations of virtual machines to other hosts in the DRS cluster.’2 This means that, if configured appropriately, if there are adequate resources available to run the VMs, there should not be any significant performance related issues. As well as this, a number of memory management features are available in VMware’s vSphere. These comprise of transparent page sharing, guest ballooning, hypervisor swapping and memory compression. These features come into play when you over-allocate hardware, and they can be used for getting the most of your hardware (although this would not be recommended). ‘By more intelligently managing virtual machine memory use, VMware lets you maximize the number of virtual machines your hardware can support.’3 Management, Reliability and Agility: Features such as Distributed Resource Scheduling, High Availability and Fault Tolerance allow administrators to ensure that the hardware requirements of virtual machines are automatically distributed evenly between computers, and that there is guaranteed uptime if there are problems with a server. These features do, however, require at least two servers. Other features such as vMotion allow administrators to remotely move virtual machines from server to server, by simply using vCenter Server. As well as this, as mentioned above, Cloning can be used to provision servers very quickly on demand. You can create Templates that act as ‘Gold Images’ of specific environments. This enables an administrator to efficiently deliver ready-to-go environments by cloning the template. You can also use Linked Clones to minimise hardware requirements if necessary. ‘A linked clone is a duplicate of a virtual machine that uses the same base disk as the original, with a chain of delta disks to track the differences between the original and the clone.’4 This can be very useful for saving disk space. Virtualisation Disadvantages Security: One of the main disadvantages of virtualisation is Security. CIO defines the top five security concerns relating to server virtualisation5. These concerns include: Managing oversight and responsibility, patching and maintenance, visibility and compliance, VM sprawl and managing Virtual Appliances. I have identified various issues below: Because VMs are stored as files, they can simply be copied onto a USB. This is a disadvantage from a security standpoint as VMs can quickly be copied. This compares to physical machines where it would take longer to be copy a machine and require additional software. This in itself can be a risk. Also, if a template is misconfigured, any clone of this template is also misconfigured leading to significant security vulnerabilities, especially if this template is cloned multiple times. Ensuring templates are actually ‘Gold Images’ is essential. If IT staff do not fully understand virtualisation, they can unwittingly leave security vulnerabilities exposed. Virtualisation requires new skills and a new understanding as it combines the understanding of physical hardware and software with the understanding of Page 6 of 127 virtualisation hardware and software. As a result, a virtualised environment is more complex. A clear understanding of how virtualisation works is essential if security is to be catered for. Hardware Requirements: This section relates to the section above. VMware offer support only for specific tried and tested hardware. If purchased hardware is not in line with VMware’s recommendations, they may not support it. Hence, it is essential that the appropriate compatible hardware is used. Microsoft and Citrix offer a more lenient approach to hardware requirements due to their underlying architectures.6 As well as this, some hardware does not support virtualisation. This mainly relates to processors and chipsets. Intel Virtualisation (VT-x) and AMD Virtualisation (AMD-V) are both examples of processors that support virtualisation. Finally, virtualisation itself requires certain resources in order to abstract hardware from software. Management of this environment also requires resources. For example, VMware ESXi requires resources which vary depending on its usage. In order to take full advantage of ESXi features and run virtual machines in typical production environments, at least 8GB of RAM is recommended.7 On top of this you have to cater for vCenter Server and vSphere Client.8 Cost: This section has been included in both the advantages and disadvantages of virtualisation. This is because virtualisation implementation incurs costs as well as generating savings. Firstly, virtualisation requires additional software to be used. There are various vendors, but the main enterprise players are VMware vSphere, Microsoft Hyper-V and Citrix XenServer. They come at varying costs and their features differ. Secondly, there may be a learning curve for existing IT staff. As new software is being used, and a new concept must be learned, staff may need training. This is costly as staff need to be paid while undergoing training, despite the fact that they are not available to do any work inhouse and on top of this, the individuals providing the training need to be paid. Thirdly, it may also be necessary to incur costs related to purchase of new hardware. As mentioned above, certain virtualisation-supported hardware may be required in order to make use of virtualisation. It should be noted that most modern day hardware supports virtualisation but it is an important factor to consider if you are planning to implement virtualised environments using older systems. Mismanagement: Although virtualised environments can be very beneficial for administrators, if they are mismanaged, the consequences can be serious. In comparison to before where one or two servers may go down due to mismanagement, the potential is that the whole environment goes down. Hence, it is essential to ensure that not only is the virtualised environment configured properly, but that disaster recovery plans are in place, and that they are tested to ensure that they work effectively. This is essential to ensure that there is no significant downtime. In conclusion, based on the above arguments, I think it is easy to recognise that virtualisation can significantly improve efficient and effective use of hardware within an organisation. In many cases, this makes administration easier and lowers the administration costs. However, virtualisation does have some disadvantages. It can cost quite a lot of money to implement initially and security becomes more complex. All factors involved with virtualisation must be Page 7 of 127 taken into account and catered for. It is without doubt an exciting new technology that has changed the look of datacentres throughout the world. Finally, I will leave you with the following quote: ‘Over the last 30 years, virtualization technology has been developed to enhance how individuals access computing solutions, how applications are developed and deployed, how they are processed, where and how they are stored, how systems communicate with one another, and, of course, how an extended system environment can be made both secure and manageable. This broad view is very important if an organization hopes to make optimal use of this technology.’9 Page 8 of 127 Task A.1 - Connecting to and Installing vSphere Client Task Overview In order to connect to and install a vSphere Client, the first thing you have to do is install the ESXi host. This installs very like any Operating System. You install it on the physical machine by inserting a CD or connecting a USB and booting from the appropriate location. ESXi can come pre-installed (like Windows 7 on a laptop) in some cases whereby the hardware is certified by VMware (known as ESXi Embedded). However, for the purposes of this assignment, we will be using the installable version which is used when ESXi is not preinstalled. What does ESXi actually do? ‘VMware ESXi is an operating system-independent hypervisor based on the VMkernel operating system interfacing with agents that run atop it. ESXi is the exclusive hypervisor for VMware vSphere 5.x licenses.’10 It is essentially contains the software that allows you to abstract the hardware from the software. However, in order to connect to the ESXi host, you must install further software. This is where vSphere Client comes into play. vSphere Client allows you to connect to the ESXi host in order to create and manage virtual machines on that ESXi host. There are two vSphere Client versions; vSphere Client and vSphere Web Client. vSphere Client can be installed on an Operating System, while vSphere Web Client can be used from any web browser. In this case, vSphere Client will be installed on an Operating System. For further information relating to the task outlined, please see Scott Lowe’s Mastering VMware vSphere 5, Chapter 2.11 Technical Issues As discussed in the introduction to virtualisation section, ESXi has certain hardware and software requirements. One hardware requirement is that the processor within the ESXi host supports virtualisation. There are then system requirements that are necessary for ESXi 5.1 to work. These system requirements are taken directly from VMware’s website12 and relate to ESXi 5.1: Supported server platform For a list of supported platforms, see the VMware Compatibility Guide. 64-bit Processor ESXi 5.1 will install and run only on servers with 64-bit x86 CPUs. ESXi 5.1 requires a host machine with at least two cores. ESXi 5.1 supports only LAHF and SAHF CPU instructions. ESXi 5.1 requires the NX/XD bit to be enabled for the CPU in the BIOS. ESXi 5.1 supports a broad range of x64 multicore processors. For a complete list of supported processors, see the VMware Compatibility Guide. RAM 2GB RAM minimum Page 9 of 127 Provide at least 8GB of RAM to take full advantage of ESXi 5.1 features and run virtual machines in typical production environments. Hardware Virtualization Support To support 64-bit virtual machines, support for hardware virtualization (Intel VTx or AMD RVI) must be enabled on x64 CPUs. To determine whether your server has 64-bit VMware support, download the CPU Identification Utility from vmware.com. Network Adapters One or more Gigabit or 10Gb Ethernet controllers. For a list of supported network adapter models, see the VMware Compatibility Guide. SCSI Adapter, Fibre Channel Adapter or Internal RAID Controller Any combination of one or more of the following controllers: Basic SCSI controllers. Adaptec Ultra-160 or Ultra-320, LSI Logic Fusion-MPT, or most NCR/Symbios SCSI. RAID controllers. Dell PERC (Adaptec RAID or LSI MegaRAID), HP Smart Array RAID, or IBM (Adaptec) ServeRAID controllers. Installation and Storage SCSI disk or a local, non-network, RAID LUN with unpartitioned space for the virtual machines. For Serial ATA (SATA), a disk connected through supported SAS controllers or supported on-board SATA controllers. SATA disks will be considered remote, not local. These disks will not be used as a scratch partition by default because they are seen as remote. Note: You cannot connect a SATA CD-ROM device to a virtual machine on an ESXi 5.1 host. To use the SATA CD-ROM device, you must use IDE emulation mode. Supported storage system: ESXi 5.1 supports installing on and booting from these storage systems: o SATA disk drives. SATA disk drives connected behind supported SAS controllers or supported on-board SATA controllers. LSI1068E (LSISAS3442E) LSI1068 (SAS 5) IBM ServeRAID 8K SAS controller Smart Array P400/256 controller Dell PERC 5.0.1 controller o SATA disk drives. Supported on-board SATA include: Intel ICH9 NVIDIA MCP55 ServerWorks HT1000 Note: ESXi does not support using local, internal SATA drives on the host server to create VMFS datastores that are shared across multiple ESXi hosts. Page 10 of 127 Serial Attached SCSI (SAS) disk drives supported for installing ESXi 5.1 and for storing virtual machines on VMFS partitions. Dedicated SAN disk on Fibre Channel or iSCSI For a list of USB devices supported for installing ESXi 5.1, see the VMware Compatibility Guide. You can install and boot ESXi from an FCoE LUN using VMware software FCoE adapters and network adapters with FCoE offload capabilities. See the vSphere Storage documentation for information about installing and booting ESXi with software FCoE. vSphere Client also has some software requirements. The main recommendation is that Microsoft .Net is installed (if installing on a Microsoft Operating System). ‘The vSphere Client requires Microsoft .Net to be installed and updated so if this is not already done it can take some time to perform.’13 VMware’s Compatibility Guide can be used to find the most up to date information in relation to supported Operating Systems.14 Please note that vSphere Web Client requires Adobe Flash in order to work. Task Guide 1. Install ESXi host a. Insert CD of VMware ESXi into CD Drive. You may also install this by means of a USB Drive b. Boot from CD/USB by pressing F12 when you power on the machine (this may vary depending on vendor) Page 11 of 127 c. Select the preferred drive to boot from and press Enter d. Select ESXi-5.5.0-*******-standard installer and press Enter e. You can press Enter to boot quicker Page 12 of 127 f. The ESXi Installation begins g. ESXi automatically goes through a number of screens. This may take some time h. An installation wizard appears. Press Enter to continue Page 13 of 127 i. Press F11 to accept the End User Licence Agreement (EULA) and continue j. The ESXi Installer scans for available devices k. It locates all Storage Drives. Select the drive on which you want to install ESXi and press Enter Page 14 of 127 l. Select the appropriate keyboard layout and press Enter to continue m. Create a root password and click Enter n. ESXi Installer scans the system Page 15 of 127 o. Once it is satisfied, it will allow you to confirm the installation. Press F11 to confirm installation p. The installation proceeds q. Once complete, you must press Enter to reboot Page 16 of 127 r. ESXi restarts the computer s. Once fully loaded, the following screen appears. The IP address that appears is the IP address you use to connect to the ESXi Host through vSphere Client. You can press F2 to Customise the system and view logs t. You must enter the login name and password and then press Enter Page 17 of 127 u. Various configurations are accessible from here 2. Install vSphere Client. Then connect to and access the ESXi Host a. Double-click on the vSphere Client installation file b. The file has to be extracted (done automatically) Page 18 of 127 c. Select the appropriate language and click OK d. Allow vSphere Client to load the installation files e. Follow the installation wizard. Click Next Page 19 of 127 f. If satisfied, accept the terms in the licence agreement if satisfied and click Next g. Select the appropriate folder (if you want to customise where it saves the program) and click Next h. Once satisfied, click Install to proceed with the installation Page 20 of 127 i. The installation proceeds j. Once completed, click Finish k. Double-click on VMware vSphere Client. A shortcut is automatically added to the Desktop Page 21 of 127 l. Enter the IP address mentioned when installing the ESXi host, as well as ‘root’ as the username and the appropriate password. Then click Login m. Check the box beside Install this certificate and do not display any security warnings for 192.168.157.148 and then click Ignore (if you are happy with the security setup) Page 22 of 127 n. Click OK on the dialogue box that appears. This notifies you that the evaluation licence will expire in 60 days o. The Home Page of vSphere Client can be seen. Double click on Inventory p. The ESXi host can now be seen. You can install Virtual Machines on the host from here Page 23 of 127 Task A.2 - Creating Virtual Machines using VMware ESXi and vSphere Client Task Overview According to VMware, ‘VMware vCenter Server provides a centralized platform for managing your VMware vSphere environments.’15 It is essentially software that allows you to easily manage a VMware vSphere based virtualised environment. This could include anything from deploying a virtual machine to controlling what resources are available to a particular set of virtual machines. The vast majority of administration tasks relating to virtualisation can be completed using this software. As a result, it is an absolutely central to managing any environment virtualised using VMware vSphere, especially if it is being used within a large enterprise. It is basically a more powerful alternative to the basic vSphere Client interface. Now that we’ve connected to the ESXi host through vSphere Client, we can move on to setting up vCenter Server on machine 1. In order to do this, some pre-installation steps must be performed. Firstly Windows Server must be connected to a domain. Both versions of vCenter Server (Windows Server installable and the Virtual Appliance) can connect to an existing Active Directory if necessary.16 As well as this, the server should be assigned a static IP address and host name. This is to ensure that the IP address of the vCenter Server never changes. As both of these (connecting to a domain and assigning static IP addresses and host names) were documented in a previous assignment, we are going to skip these steps. However, they are essential steps when setting up a vSphere environment correctly. A vCenter Server database should then be setup, unless using the default database.17 Finally you must ensure that the vCenter Server hardware and software requirements are met. In this task, we are going to install the Windows installable version of vCenter Server. There are two different ways of installing vCenter Server on Windows. You can do a simple install, or a custom. The simple version install installs all of the software associated with vCenter Server. However, this is currently prone to errors (as VMware 5.5 has just been released). Hence we will do a Custom Install. The Custom Install gives you more configuration options and you install all of the different software components required separately. This involves 4 installations; vCenter Single Sign-On, vSphere Web Client, vCenter Inventory Service and finally vCenter Server. One of the reasons VMware offer the Custom Install is so that you can install the various components on different machines if you want. All of these components are required for vCenter Server to fully function. On machine 2, the Windows 7 operating system will be installed, along with vSphere Client as in the previous task. For further information relating to the task outlined, please see Scott Lowe’s Mastering VMware vSphere 5, Chapter 3. 18 The Differences between vCenter Server and vCenter Server Appliance There are two versions of vCenter Server. The vCenter Server that is installed on a guest Operating System and the vCenter Server Appliance (vCSA). There are advantages and disadvantages to both the OS-based and vCSA versions of vCenter Server. Firstly, I will discuss the advantages and disadvantages relating to the OS-based version of vCenter Server. Page 24 of 127 Firstly, vCenter Server must be installed on a supported Operating System, such as Windows Server 2008 R2. Windows Server must initially be installed, and then vCenter Server must be installed like an application. This can be quite time consuming for an administrator, especially if there are any problems. As well as this, the guest OS must be licenced. For example, if Windows Server 2008 R2 is being used, the associated licence must be bought. You also have the footprint of the Operating System. Many of the services offered by this OS may be of no use, yet you are still required to install them. These can use resources unnecessarily. Next I will compare this to vCSA. The advantages are that vCSA is very easy to deploy. You simply import the virtual machine and power it on. There are pre-installed features on this such as AHCP, Auto-Deploy TFTP and Syslog.19 As well as this, there are no licencing issues as there is no licence required. However, as it is Linux based, there may be a learning curve. The main issue is that it does not support Linked Mode. Linked Mode ‘enables a common inventory view across multiple instances of vCenter Server.’20 As a result, you can have 3000 hosts, 30000 powered‐on virtual machines and 50000 registered virtual machines in linked vCenter Servers. This compares to the maximum supported numbers for vCSA: 100 ESXi hosts and 3000 virtual machines.21 As well as this, it does not support IPv6, is not available for installation on a physical machine and some database programmes are not supported.22 The following table is taken from the VMware website.23 It directly compares vCenter Server and vCenter Server Appliance. Note that this relates to vCenter Server 5.1. Features vCenter Server vCenter Server Appliance Guest OS Any Supported Guest OS Preconfigured Linux-based virtual machine (64-bit SUSE Linux Enterprise Server 11) Database Supported Versions SQL Server and Oracle. PostgreSQL (built-in ) can have 5 hosts and 50 Virtual Machines.Supported External Oracle database. System Requirement 2 vCPU and 4 GB RAM 2 vCPU and 4 GB RAM Platform Physical or virtual machine Virtual Appliance Installation Using binary provided in .zip or .ISO Deploying OVF Update Manager Can be installed on same Separate install vCenter Server or on separate Guest OS. Single Sign On (SSO) Can be installed on same vCenter Server or separate Guest OS. Pre-installed. Networking IPv6 and IPv4 Support IPv4 Support Page 25 of 127 Linked Mode Supported Not Supported SRM (Site Recovery Manager) Compatible with SRM Compatible with SRM vSphere Web Client Can be installed on same vCenter server or separate machine. Pre-Installed. Syslog Server Can be installed on vCenter Server or separate server and configured using plug-in. Pre-installed and does not have plug-in. ESXi Dump collector Can be installed on vCenter Server or on a separate Guest OS. Pre-installed and does not have plug-in. Multi-site SSO Supported Not Supported. Basic SSO only. VSA (vSphere Storage Appliance Supported Not Supported VMware View Supported Not Supported In conclusion, the vCSA edition is often used for small scale implementations of the vSphere suite. However, as it does not support Linked Mode, it is not the obvious solution for large scale implementations. As a result, the vCenter Server is usually installed within a Windows Server. However, both versions have their advantages and both can be suitable depending on the environment being setup. Technical Issues The following system requirements for Windows Server 2008 are taken directly from the Microsoft website24: Component Requirement Processor • Minimum: 1 GHz (x86 processor) or 1.4 GHz (x64 processor) • Recommended: 2 GHz or faster Note: An Intel Itanium 2 processor is required for Windows Server 2008 for Itanium-Based Systems. Memory • Minimum: 512 MB RAM • Recommended: 2 GB RAM or greater • Maximum (32-bit systems): 4 GB (Standard) or 64 GB (Enterprise and Datacenter) • Maximum (64-bit systems): 32 GB (Standard) or 1 TB (Enterprise and Datacenter) or 2 TB (Itanium-Based Systems) Page 26 of 127 Component Requirement Available Disk Space • Minimum: 10 GB • Recommended: 40 GB or greater Note: Computers with more than 16 GB of RAM will require more disk space for paging, hibernation, and dump files. Drive DVD-ROM drive Display and Peripherals • Super VGA (800 x 600) or higher-resolution monitor • Keyboard • Microsoft Mouse or compatible pointing device The following are the minimum hardware requirements for vCenter Server 5.1 are taken directly from the VMware website25. For hardware requirements relating to specific components, please visit reference given. vCenter Server Hardware Requirement CPU Two 64-bit CPUs or one 64-bit dual-core processor. Processor 2.0GHz or faster Intel 64 or AMD 64 processor. The Itanium (IA64) processor is not supported. Processor requirements might be higher if the database runs on the same machine. Memory The amount of memory needed depends on your vCenter Server configuration. ■ If vCenter Server is installed on a different host machine than vCenter Single Sign On and vCenter Inventory Service, 4GB of RAM are required. ■ If vCenter Server, vCenter Single Sign On and vCenter Inventory Service are installed on the same host machine (as with vCenter Simple Install), 10GB of RAM are required. Memory requirements are higher if the vCenter Server database or vCenter Single Sign On database runs on the same machine as vCenter Server. vCenter Server includes several Java services: VMware VirtualCenter Management Webservices (tc Server), Inventory Service, and Profile-Driven Storage Service. When you install vCenter Server, you select the size of your vCenter Server inventory to allocate memory for Page 27 of 127 these services. The inventory size determines the maximum JVM heap settings for the services. You can adjust this setting after installation if the number of hosts in your environment changes. See the recommendations in JVM Heap Settings for vCenter Server. Disk storage The amount of disk storage needed for the vCenter Server installation depends on your vCenter Server configuration. ■ If vCenter Server is installed on a different host machine than vCenter Single Sign On and vCenter Inventory Service, 4GB are required. ■ If vCenter Server, vCenter Single Sign On and vCenter Inventory Service are installed on the same host machine (as with vCenter Simple Install), at least 40-60GB of free disk space are required after installation, depending on the size of your inventory. 100GB are recommended, to allow for future growth of your inventory. Disk storage requirements are higher if the vCenter Server database or vCenter Single Sign On database runs on the same machine as vCenter Server, depending on the size of those databases. In vCenter Server 5.x, the default size for vCenter Server logs is 450MB larger than in vCenter Server 4.x. Make sure the disk space allotted to the log folder is sufficient for this increase. Microsoft SQL Server 2008 R2 Express disk Up to 2GB free disk space to decompress the installation archive. Approximately 1.5GB of these files are deleted after the installation is complete. Network speed 1Gbps The following system requirements for Windows 7 are taken directly from the Microsoft website26: 1 gigahertz (GHz) or faster 32-bit (x86) or 64-bit (x64) processor 1 gigabyte (GB) RAM (32-bit) or 2 GB RAM (64-bit) 16 GB available hard disk space (32-bit) or 20 GB (64-bit) DirectX 9 graphics device with WDDM 1.0 or higher driver Page 28 of 127 The software and hardware requirements relating to vSphere Client were detailed in the previous Technical Issues section of Task A.1. Task Guide 1. Upload both Operating System ISO image files as well as the vCenter Server ISO image file to the Datastore a. Within vSphere Client, Select the Summary tab b. Right-click on the Datastore and select Browse Datastore… Page 29 of 127 c. Create a folder for the ISO’s by clicking the create folder button d. Name it ISO’s e. Click the ISO’s folder on the right and click the Upload to Datastore button Page 30 of 127 f. Select the appropriate ISO image file from your local hard drive g. A warning appears stating that if a file or folder in the target location has the same name as the one being copied, it will be replace. Note this and click Yes h. The ISO image file will upload to the Datastore. This can take some time Page 31 of 127 i. The ISO image file now appears within the ISO’s folder in the Datastore 2. Create a New Virtual Machine a. Within vSphere Client, click on the Getting Started tab and click Create a new virtual machine b. Select Typical as the configuration and click Next > Page 32 of 127 c. Name the virtual machine appropriately and click Next > d. Select the storage location for the virtual machine files and click Next > e. Select the appropriate Operating System and click Next > Page 33 of 127 f. Create Network Connections as necessary and click Next > g. Select the required virtual disk space and click Thin Provision. Then click Next > h. Confirm the virtual machine settings, click Edit the virtual machine settings before completion, and click Continue Page 34 of 127 i. Within the Hardware tab, click New CD/DVD (adding). Select Datastore ISO File as the Device Type and click Browse… j. Open the appropriate Datastore k. Select the appropriate ISO image file and click Open Page 35 of 127 l. The location of the selected ISO image file will now show up so you can now click Finish 3. Install Windows Server 2008 R2 Operating System a. Click on the virtual machine that you just created b. Click Power on the virtual machine Page 36 of 127 c. Select the appropriate settings and click Next d. Click the button to the right of Install Now e. Select the version of Windows Server 2008 R2 that you want to install and click Next Page 37 of 127 f. Click I accept the licence terms and click Next g. Select Custom (advanced) when asked which type of installation you want h. Select the hard disk drive that you want to install the Operating System on. If you want to first partition the drive, click Drive Options (advanced) Page 38 of 127 i. Create the partitions as appropriate. Then click on the partition that you want to install the Operating System on and click Next j. Windows begins the installation k. A number of screens are iterated through Page 39 of 127 l. You are then prompted to change your password. Click OK m. Enter an appropriate password and press Enter n. Windows confirms that your password has been changed. When you press OK, the Windows Server 2008 R2 home screen opens Page 40 of 127 4. Change the ISO to vCenter Server a. Click on the virtual machine that you want to install vCenter Server on b. Click Edit virtual machine settings Page 41 of 127 c. Click on CD/DVD drive I. On the right, click Datastore ISO File, then click Browse… d. Browse to the appropriate ISO and click OK e. Make sure that the appropriate ISO file has been selected and click OK Page 42 of 127 5. Install vCenter Single Sign-On a. Click on the Start Menu and click Computer b. Right click on the disk drive and click Install or run program from your media c. Click Yes when asked if you want this program to make changes to this computer Page 43 of 127 d. Click vCenter Single Sign-On and click Install e. Windows Installer starts f. The welcome screen opens. Click Next Page 44 of 127 g. Click I accept the terms of the Licence Agreement and click Next h. A number of warnings appear. Note that it is not required to be part of a domain to use vCenter Single Sign-On i. Click vCenter Single Sign-On for you first vCenter Server and then click Next Page 45 of 127 j. Enter an appropriate password and click Next k. Enter an appropriate Site name and click Next l. If you want to configure the HTTPs port, modify it here and click Next Page 46 of 127 m. Select the appropriate installation folder and click Next n. Confirm the configurations and click Install o. vCenter Single Sign-On then installs Page 47 of 127 p. A screen appears on successful completion. Click Finish 6. Install vSphere Web Client a. Click vSphere Web Client and then click Install b. Select the appropriate language and click OK Page 48 of 127 c. The installer then loads d. A welcome screen appears. Click Next > e. Click I accept the terms in the licence agreement and then click Next > Page 49 of 127 f. Confirm the installation folder and click Next > g. If you want to configure the ports used, change them here, and then click Next > h. Enter an appropriate password and Next > Page 50 of 127 i. Click Yes to accept the SSL SHA1 fingerprint of the SSO Lookup Service leaf certificate j. Install the necessary certificates by clicking Install certificates k. To proceed with the vSphere Web Client installation, click Install Page 51 of 127 l. When the installation completes, click Finish m. When you click Finish, a dialogue box appears notifying you that it will take some time for the services to start before you can use vSphere Web Client 7. Install vCenter Inventory Service a. Click vCenter Inventory Service and then click Install Page 52 of 127 b. Select the appropriate language and click OK c. The installer then loads d. A welcome screen appears. Click Next > Page 53 of 127 e. Click I accept the terms of the licence agreement and click Next > f. Select the appropriate installation folder and click Next > g. Enter the appropriate domain name, or leave it as default, and click Next > Page 54 of 127 h. If you do not enter a suitable domain name, you will get a warning message. Click OK i. If you need to configure the ports that are used by vCenter Inventory Service, change them here and then click Next > j. Select Small (less than 100 hosts or 1000 virtual machines) as the Inventory Size and click Next > Page 55 of 127 k. Enter the appropriate SSO administrator password and click Next > l. Click Yes to accept the SSL SHA1 fingerprint of the SSO Lookup Service leaf certificate m. Click Install to begin the installation of vCenter Inventory Service Page 56 of 127 n. Once it completes successfully, click Finish 8. Install vCenter Server a. Click vCenter Server and then click Install b. Select the appropriate language and click OK Page 57 of 127 c. The installer then loads d. A welcome screen appears, click Next > e. Click I accept the terms in the licence agreement and click Next > Page 58 of 127 f. Enter a licence key if you have one, or leave it blank to use evaluation mode. Then click Next > g. Click Install a Microsoft SQL Server 2008 Express instance and click Next > h. Make sure the Use Windows Local System Account it box checked and click Next > Page 59 of 127 i. If you do not enter a suitable domain name, you will get a warning message. Click OK j. Select Create a standalone VMware vCenter instance and click Next > k. If you want to configure specific ports to be used, change them here. Then click Next > Page 60 of 127 l. Select Small (less than 100 hosts or 1000 virtual machines) as the Inventory Size and click Next > m. Enter the appropriate SSO administrator password and click Next > n. Click Yes to accept the SSL SHA1 fingerprint of the SSO Lookup Service leaf certificate Page 61 of 127 o. If you want to modify what the vCenter Server administrator is recognised by, change it here. Then click Next > p. Enter the vCenter Inventory Service URL if necessary. Then click Next > q. Select the installation folder, if necessary, and then click Next > Page 62 of 127 r. Click Install to proceed with the installation s. A Microsoft SQL Server 2008 Express instance is installed t. VMware vCenter Server installation continues Page 63 of 127 u. On successful completion, click Finish 9. Install vSphere Client on this Windows Server 2008 R2 machine a. Please see task A.1.2 for details 10. Start all VMware services from the Task Manager a. Right-click on the taskbar and click Start Task Manager b. Open the Services tab and Order by Description by clicking on Description Page 64 of 127 c. Scroll down to v, and make sure that all VMware services are Running d. If not, right-click on them and click Start Service. It may take some time until it is in a Running state e. When they are all Running, complete the next task 11. Login to vCenter Server a. Open vSphere Client and login using 127.0.0.1 (loopback address) as the IP address, [email protected] as the username and the appropriate password Page 65 of 127 b. The home screen of vCenter Server will appear 12. Install Microsoft Windows 7 Operating System a. Create a new virtual machine, as in task A.2.2 b. Select the appropriate virtual machine within vSphere Client and click Power on the virtual machine c. Configure appropriately and click Next Page 66 of 127 d. Click Install now e. You must tick the box beside I accept the licence terms, and then Next f. Select Custom (advanced) installation Page 67 of 127 g. Select the drive that you want to install Windows on. Then click Next h. Name the computer and username appropriately and click Next i. Enter the password to be associated with this account, as well as a password hint, and then Next Page 68 of 127 j. Enter the Windows licence key, or press Skip to enter it later or use the trial version k. Click Use recommended settings so Windows updates are installed automatically l. Select the appropriate time zone, then click Next Page 69 of 127 m. Click on the network type that you are joined to n. The Windows home screen then appears o. Install vSphere Client as in Task A.1.2 Page 70 of 127 Task A.3 - Creating a Typical Organisation Environment Task Overview As your environment gets bigger, you will want to keep it organised so that it is not cluttered and difficult to administer, In order to keep your environment organised, you can create folders. You can use these folders to mimic a typical organisational environment. In the following task, datacenters will be added to these folders. Within each datacentre, hosts will then be added. Within vCenter Server, you can then easily manage your environment as all of your datacenters, hosts, clusters and virtual machines can easily be seen and recognised. This is essential for effective management as you need to know where everything is located. Task Guide 1. Create Folders for the various locations where the organisation is based a. Click File - New - Folder b. Name appropriately, either by location, or another suitable factor Page 71 of 127 c. Create a folder within this folder, if necessary in order to organise the structure more suitably. Right click on the folder, and then click New Folder 2. Add Datacenters to the appropriate location folder a. Add a New Datacenter by right clicking on the folder and clicking New Datacenter b. Do this for all of the appropriate Datacenters Page 72 of 127 3. Add the appropriate Hosts to the Datacenters a. Right click on the Datacenter that you want to add the host to, and click Add Host… b. Enter the Host address, as well the username and password associated with it and click Next > c. Click Yes to proceed, despite the fact that it is unable to verify the authenticity of the specified host Page 73 of 127 d. Verify that the correct host is selected and click Next > e. If you have a licence key, enter it here. Otherwise continue with Evaluation Mode and click Next > f. You can enable or disable Lockdown Mode here. Select as appropriate and click Next > g. Select the location for the host’s virtual machines as appropriate and click Next > Page 74 of 127 h. Verify all of the configurations and click Finish i. You can see the status of the task in the Recent Tasks tab at the bottom of the screen 4. Create virtual machines within these Hosts a. Click on the host that you want to create a virtual machine in. then click Create a new virtual machine Page 75 of 127 b. Select Typical as the configuration type and click Next > c. Enter the name of the virtual machine that you want to create, as well as the inventory location and click Next > d. Select the location where you want to store the virtual machine files and click Next > Page 76 of 127 e. Specify the guest operating system to use with this virtual machine and click Next > f. Configure the network connections as necessary and click Next > g. Select the virtual disk size that you want to create, select Thin Provision and click Next > Page 77 of 127 h. Verify all configurations and click Finish i. You can then see the virtual within the previously specified host 5. Organise as appropriate a. The organisation structure should look something like this when you are finished - Multiple folders, multiple Datacenters, multiple hosts and multiple virtual machines all organised suitably Page 78 of 127 Task A.4 - Creating, Managing and Reverting to a Snapshot Task Overview Within this task, a snapshot will be created, managed and reverted to. ‘A snapshot is a picture of your system at the time the snapshot is taken.’27 A snapshot contains the entire state of the virtual machine; memory, settings and disk state. ‘The snapshot files that are created contain only the changes that have occurred to the virtual machine since the snapshot was taken.’28 The snapshot files grow as the virtual machine is used. Hence, it is not recommended to create more than three snapshots. You can manage (delete and revert to) snapshots via the Snapshot Manager. You can take a snapshot when a VM is running, powered off or suspended. Although you can take a snapshot while a VM is running, it is a lot quicker if you take one when the VM is powered off. Snapshot Example In the task below, I created a snapshot when I initially installed Windows Server. Then I installed all of the Windows Updates. When I was confident that there were no issues with these Updates, I created a new snapshot. I then installed vCenter Server. Initially I encountered a problem installing this. Hence, I reverted to the snapshot in order to return the OS to its original state (after the updates were installed). I could then start out a fresh, and try to install vCenter Server again. If I had not taken a snapshot, I may have had to install the whole OS again. This is the kind of situation where snapshots are typically used and can be invaluable. Task Guide 1. Create snapshot of running Virtual Machine a. Within the Console View, click the Take a snapshot of this virtual machine button Page 79 of 127 b. Name and describe the snapshot appropriately and click OK c. View the progress of this process in the bottom tab within vSphere Client Page 80 of 127 2. Create snapshot of Virtual Machine that is not running a. Right-click on the VM that you want to take a snapshot of, scroll over Snapshot and click Take Snapshot… b. Name and describe the snapshot appropriately and click OK Page 81 of 127 3. Open the Virtual Machine Snapshot Manager a. Within vSphere Client, click on the Snapshot Manager button b. View all the snapshots that have been taken of that VM Page 82 of 127 4. Delete a snapshot a. Click on the snapshot that you want to delete and click Delete b. Click Yes when asked if you are sure Page 83 of 127 5. Revert to a snapshot a. Click on the snapshot that you want to revert too and click Go to b. Click Yes when prompted. Note that this will delete the current state of the machine Page 84 of 127 c. Note the progress in the tab at the bottom of vSphere Client d. Once completed, simply power on the virtual machine and it will return to the snapshot Page 85 of 127 Task A.5 - Creating a Gold Image (Template) Task Overview A ‘Gold Image’, or ‘Master Image’, is a template of a virtual machine in a pristine state. ‘Templates are a reservoir of specifically configured virtual machines ready to be deployed to a host within vCenter.’29 An administrator first creates a virtual machine and installs an Operating System. Updates are applied to this OS and any necessary applications are installed. Any specific configurations are applied to the operating system and applications. An image of this virtual machine can then be taken and converted to a template. A template is a virtual machine in a ‘non-powerable’ state. This means that the template cannot be changed without converting it back to a virtual machine. Templates can then be deployed as necessary. When deployed, a copy of the template is made, but is in the format of a virtual machine and can be powered on. ‘The use of golden images can save time and ensure consistency by eliminating the need for repetitive configuration changes and performance tweaks.’30 A template can be deployed to any host in the vCenter Server environment. As OS and application installations, updates and configurations only have to be completed once, much time can be saved. For further information relating to the task outlined, please see Scott Lowe’s Mastering VMware vSphere 5, Chapter 10.31 Technical Issues Templates take up space, so the appropriate disk space must be available. vCenter Server is also required. Task Guide 1. Update Operating System and Applications appropriately a. Within the Initial Configuration Tasks view that appears when you initially turn on Windows Server 2008 R2, click Download and install updates Page 86 of 127 b. Click Turn on automatic updates c. Allow Windows Update check for updates d. When updates are found, click Install now Page 87 of 127 e. Click I accept the licence terms and click Finish f. Continue to download and install updates g. When the follow screen appears, then all of the updates have been installed. It says Windows is up to date Page 88 of 127 2. Convert or Clone the virtual machine to a template a. Right-click on the virtual machine that you want to clone and click Template Convert to Template b. The virtual machine disappears from the Hosts and Clusters view c. In order to view the virtual machine, you must go to the VMs and Templates view. Click on the Inventory at the top of the page, scroll over Inventory and click VMs and Templates Page 89 of 127 d. You can now see the created template within the specified host. It has a different icon beside it indicating that it is a template and is ready for deployment Page 90 of 127 Task A.6 - Deploying a Virtual Machine using a Gold Image Task Overview An issue that arises from using Templates is that any deployed virtual machines are exact replicas of the template, and therefore are not unique. This can lead to issues such as naming and network conflicts, as well as licencing issues. Tools like sysprep can be used to ensure uniqueness on deployment (for Windows). Sysprep ensures that all unique information relating to a particular system is fully unique. With VMware, you can use the Customisation Specification Manager within vCenter Server to aid this process. ‘vCenter Server’s Customization Specification works hand-in-hand with the tools for customizing VM clones (Sysprep for VMs with a Windows-based guest OS, open source tools for a VM with a Linuxbased guest OS)…This includes information such as the IP address, passwords, computer name, and licensing information. A customization specification allows an administrator to provide all the information only once and then apply it as needed when cloning a VM.’32 You can create multiple Customization Specifications for various systems using the Customization Specifications Manager. Customization Specification allows you to customize what sysprep does. For example, you can define a Computer Name and tell it to iterate the numbers to ensure uniqueness. This ensures that you can deploy the template without having to change these unique identifiers every time you deploy it, as this is done automatically. In this task, we will deploy a virtual machine from the template created in the previous task (Task A.5). In order to ensure the uniqueness of each deployed system, we are going to first configure a Customization Specification. We will then deploy the virtual machine using the appropriate configurations and turn it on. For further information relating to the task outlined, please see Scott Lowe’s Mastering VMware vSphere 5, Chapter 10.33 Task Guide 1. Create a Customization Specification using the Customization Specification Manager a. Within vCenter Server, open the Customization Specification Manager by pressing Ctrl+Shift+U. Then click New b. Name the Customization Specification and write a description of what it will be used for and what it does and click Next > Page 91 of 127 c. Type in your name and the organizations name and click Next > d. Type the name that you want to give to the computer. Also select whether you want the numeric values within this name to iterate. Then press Next > e. Put in a product key for the OS, select the maximum number of connections that can be active at one time and click Next > f. Insert an administrators password and click Next > Page 92 of 127 g. Select the appropriate Time Zone and click Next > h. If you want to run a script, add It here or enter commands. Then click Next > i. Select Typical settings if you want to use DHCP or use Custom settings for static IP assignment. The click Next > j. Connect the computer to the appropriate Workgroup or Domain and click Next > Page 93 of 127 k. Make sure the box is ticked beside Generate Security ID (SID) and click Next > l. Finally, confirm all of the settings that you have configured. Once you are happy with them click Finish 2. Deploy a Virtual Machine from a Template a. Right-click on the template, and click Deploy Virtual Machine from this Template… Page 94 of 127 b. Name the virtual machine that you wish to deploy and select the Datacenter that you want it in. Then click Next > c. Select the host or cluster in which you want to run the virtual machine. Then click Next > d. Select the destination storage for the virtual machine files and click Next > Page 95 of 127 e. Select the Guest Customisation configured earlier and click Next > f. Verify all defined configurations and click Finish g. The deployed template now shows up in the location that you specified Page 96 of 127 3. Turn on the virtual machine a. As with any virtual machine, power it on. As Configuration Specification was selected when deploying the template, the registry settings update b. The virtual machine then starts up services, etc. Page 97 of 127 c. It also installs any necessary devices d. Configure the country/region, Time and currency and Keyboard layout as necessary and click Next e. Click I accept the licence terms and click Start Page 98 of 127 f. Windows finalises the specified settings g. The login screen then appears. Press Ctrl, Alt and Delete to log on as usual Page 99 of 127 Task A.7 - Converting a Physical Computer to a Virtual Computer Task Overview Physical to Virtual (P2V) conversions can be very useful when converting to a virtualised environment. P2V software has the ability to convert a physical machine into virtual machine files. This includes everything - OS, configuration, data files, etc. If you have multiple servers already in place, you could do a P2V conversion and then all that is required is to import the virtual machine into the VMM. This would save you from fully configuring every server again, although you would still have some changes to make. In this task, we will be doing a P2V conversion within VMware Workstation. In order to do this, you have to install additional software - VMware vCenter Converter. Technical Issues VMware Workstation is required. VMware vCenter Converter is also necessary. This can be installed as demonstrated below. You need enough disk space to save the virtualised physical machine file onto as well. You also need to have a screen resolution of at least 1024x768 pixels. For a full list of system requirements, please see VMware’s website.34 Task Guide 1. Install VMware vCenter Converter a. Click File - Virtualize a Physical Machine… Page 100 of 127 b. A notification appear saying that vCenter Converter must be installed. Click OK c. Select the appropriate language and click OK d. The VMware vCenter Converter installation initialises. Wait for it to load Page 101 of 127 e. The VMware vCenter Converter installation continues to initialise. Wait for it to load f. Note that no verification that the installation has completes shows up 2. Virtualise the appropriate virtual machine a. Click File - Virtualize a Physical Machine… again Page 102 of 127 b. Click Next > c. You must login to the physical machine and get its IP address d. Click on the start menu and search for cmd. Once it appears, press Enter Page 103 of 127 e. Within cmd, type ipconfig. Note the IP address of the computer f. Enter the appropriate details of the physical machine that you want virtualised and click Next > g. Enter an appropriate name for the VM and select the folder where you want its files stored in. Then click Next > Page 104 of 127 h. Enter the user name and password for the Windows account on the machine and click Finish i. The virtualisation of the physical machine begins j. The disk data of the physical machine is converted into virtual disk files Page 105 of 127 k. The virtualised machine now appears. This is a replica of the physical machine you selected. This now acts like any virtual machine and has all the typical files associated with same Page 106 of 127 Task A.8 - Installing Debian Linux Task Overview This task demonstrates how to install Debian Linux. Debian Linux is a free operating system and has many free applications available to it. ‘Debian is especially popular among advanced users because of its technical excellence and its deep commitment to the needs and expectations of the Linux community.’35 The Software Center can be used to download and install applications for free of charge as you wish. It is very useful if you do not want to pay for an Operating System and applications and if you want easier access to more advanced features. However, there is a learning curve involved, as is the case with any new Operating System. Please note that the following screenshots were taken from a previous assignment (COMP41140 - Computer Systems). The difference in screenshot style is as a result of this. Technical Issues The following hardware requirements are taken directly from the Debian website.36 Depending on your needs, you might manage with less than some of the recommended hardware listed in the table below. However, most users risk being frustrated if they ignore these suggestions. A Pentium 4, 1GHz system is the minimum recommended for a desktop system. Table 3.2. Recommended Minimum System Requirements Install Type RAM (minimal) RAM (recommended) Hard Drive No desktop 64 megabytes With Desktop 128 megabytes 256 megabytes 1 gigabyte 512 megabytes 5 gigabytes Page 107 of 127 Task Guide 1. Create a New Virtual Machine a. Within VMware Workstation, click File - New Virtual Machine… b. Select Typical and click Next > Page 108 of 127 c. Browse to the location of the Debian ISO image file, select it and click Next > d. Name the Virtual Machine appropriately and select a folder where you want to save its files. It is good practice to keep the files of VMs in individual folders Page 109 of 127 e. Select the amount of space you want to assign to this VM, click Split virtual disk into multiple files and click Next > f. If you want to modify virtual hardware, click Customize Hardware… Then tick the box beside Power on this virtual machines after creation, and click Finish Page 110 of 127 2. Install Linux Debian a. Press Enter on Graphical install b. Select the appropriate language and press Enter on the keyboard Page 111 of 127 c. Select the appropriate location and click Continue d. Select the appropriate keyboard configuration and click Continue Page 112 of 127 e. The software then loads the appropriate installer components based on your selections f. Type in the appropriate Hostname and click Continue Page 113 of 127 g. Type in an appropriate domain name and click Continue h. Type in the root account password that you will use for administrative purposes and click Continue Page 114 of 127 i. Type in the name for the first user that you want to create and click Continue j. Type in the username for this account and click Continue Page 115 of 127 k. Type in the appropriate for the same account and click Continue l. If you want to partition the Hard Disk Drive (HDD), it is done here. If not select Guided - use entire disk and click Continue Page 116 of 127 m. If partitioning, click on the appropriate disk that you want to partition and click Continue n. Partition as you wish and click Continue Page 117 of 127 o. Confirm the partitioning that you have selected, select Finish partitioning and write changes to disk, and click Continue p. The base system is installed Page 118 of 127 q. Select the appropriate archive mirror country and click Continue r. Select the appropriate archive mirror and click Continue Page 119 of 127 s. If you want to configure the HTTP proxy information, enter it here. Otherwise leave it blank and click Continue t. Debian continues its install Page 120 of 127 u. If you want to participate in the package usage survey, click Yes. Otherwise select No and click Continue v. Select the software that you want to install and click Continue Page 121 of 127 w. Debian continues to install this x. Select whether you want to install the GRUB boot loader to the master boot record or not and click Continue Page 122 of 127 y. The installation is now complete. Click Continue to proceed to the Debian OS Home Page z. You can then use Root Terminal for the majority of tasks if you know the commands Page 123 of 127 aa. You can then use the Software Center to download and install any applications you want Page 124 of 127 Endnotes 1 Dan Kusnetzky (2007). Virtualization is More than Virtual Machine Software. Kusnetzky Group. Retrieved 15th December 2013 from http://www.kusnetzky.net/publications/ImpactPapers/20070829_Virtualization_is_more_than _VM.pdf. p. 1. 2 VMware (2013). Start with a Robust and Reliable Foundation. Retrieved 17th December 2013 from http://www.vmware.com/advantages/robust/scalability.html. 3 VMware (2013). Start with a Robust and Reliable Foundation. Retrieved 17th December 2013 from http://www.vmware.com/advantages/robust/scalability.html. 4 VMware (2011). Linked Clones Part 1 - Fast Provisioning in vCloud Director 1.5. Retrieved 17th December 2013 from http://blogs.vmware.com/vsphere/2011/11/linkedclones-part-1-fast-provisioning-in-vcloud-director-15.html. 5 Kevin Fogarty (2009). Server Virtualization: Top Five Security Concerns. Retrieved 15th December 2013 from http://www.cio.com/article/492605/Server_Virtualization_Top_Five_Security_Concerns. 6 Scott Lowe (2011). Mastering VMware vSphere 5. Indianapolis: Wiley Publishing, p. 16. 7 VMware (2011). ESXi 5.1 Hardware Requirements. Retrieved 15th December 2013 from http://pubs.vmware.com/vsphere51/index.jsp?topic=%2Fcom.vmware.vsphere.upgrade.doc%2FGUID-DEB8086A-306B4239-BF76-E354679202FC.html. 8 VMware (2011). vCenter Server and vSphere Client Hardware Requirements. Retrieved 15th December 2013 from https://pubs.vmware.com/vsphere50/index.jsp?topic=%2Fcom.vmware.vsphere.install.doc_50%2FGUID-67C4D2A0-10F74158-A249-D1B7D7B3BC99.html. 9 Dan Kusnetzky (2007). Virtualization is More than Virtual Machine Software. Kusnetzky Group. Retrieved 15th December 2013 from http://www.kusnetzky.net/publications/ImpactPapers/20070829_Virtualization_is_more_than _VM.pdf. p. 1. 10 Margaret Rouse (2013). VMware ESXi Definition. Retrieved 15th December 2013 from http://searchvmware.techtarget.com/definition/VMware-ESXi. 11 Scott Lowe (2011). Mastering VMware vSphere 5. Indianapolis: Wiley Publishing, pp. 23-54. 12 VMware (2011). Minimum system requirements for installing ESXi/ESX (1003661). Retrieved 15th December 2013 from http://kb.vmware.com/selfservice/microsites/search.do?language=en_US&cmd=displayKC& externalId=1003661. 13 Tom Brett (2013). Installation of the vSphere Client Version 5. Retrieved 15th December 2013 from http://moodle.ipa.ie/course/view.php?id=283. p. 5. Page 125 of 127 14 VMware (2013). VMware Compatibility Guide. Retrieved 15th December 2013 from http://www.vmware.com/resources/compatibility/search.php. 15 VMware (2013). vCenter Server. Retrieved October 11th, 2013, from http://www.vmware.com/products/vcenter-server/#sthash.dCuHcwGt.dpuf. 16 Scott Lowe (2011). Mastering VMware vSphere 5. Indianapolis: Wiley Publishing, pp. 58. 17 Tom Brett (2013). vCenter Server. Retrieved 15th December 2013 from http://moodle.ipa.ie/course/view.php?id=283. p. 11. 18 Scott Lowe (2011). Mastering VMware vSphere 5. Indianapolis: Wiley Publishing, pp. 55-120. 19 Tom Brett (2013). vCenter Server. Retrieved 15th December 2013 from http://moodle.ipa.ie/course/view.php?id=283. p. 3. 20 VMware (2013). vSphere Pricing. Retrieved December 15th, 2013, from http://www.vmware.com/files/pdf/vsphere_pricing.pdf. 21 User: Fgrehl (2013). VMware vCenter Server Appliance 5.5 (vCSA) Limitations. Retrieved 15th December 2013 from http://www.virten.net/2013/09/vmware-vcenter-serverappliance-5-5-vcsa-limitations/. 22 Tom Brett (2013). vCenter Server. Retrieved 15th December 2013 from http://moodle.ipa.ie/course/view.php?id=283. pp. 3-4. 23 VMware (2013). Physical or Appliance - Upgrading to vCenter Server 5.1. Retrieved 15th December 2013 from http://blogs.vmware.com/kb/2013/05/physical-or-appliance-upgradingto-vcenter-server-5-1.html. 24 Microsoft (2008). Windows Server 2008 R2 System Requirements. Retrieved 15th December 2013 from http://technet.microsoft.com/en-us/windowsserver/bb414778.aspx. 25 VMware (2013). Hardware Requirements for vCenter Server, vCenter Single Sign On, vSphere Client, and vSphere Web Client. Retrieved 15th December 2013 from http://pubs.vmware.com/vsphere51/index.jsp?topic=%2Fcom.vmware.vsphere.install.doc%2FGUID-67C4D2A0-10F7-4158A249-D1B7D7B3BC99.html. 26 Microsoft (2008). Windows 7 System Requirements. Retrieved 15th December 2013 from http://windows.microsoft.com/en-IE/windows7/products/system-requirements 27 Tom Brett (2013). VM Snapshots, Importing and Exporting VMs. Retrieved 15th December 2013 from http://moodle.ipa.ie/course/view.php?id=283. p. 9. 28 Tom Brett (2013). VM Snapshots, Importing and Exporting VMs. Retrieved 15th December 2013 from http://moodle.ipa.ie/course/view.php?id=283. p. 9. 29 Tom Brett (2013). Using Templates with vCenter Server. Retrieved 15th December 2013 from http://moodle.ipa.ie/course/view.php?id=283. p. 9. Page 126 of 127 30 Margaret Rouse (2012). Golden Image Definition. Retrieved 15th December 2013 from http://searchservervirtualization.techtarget.com/definition/golden-image. 31 Scott Lowe (2011). Mastering VMware vSphere 5. Indianapolis: Wiley Publishing, pp. 505-536. 32 Scott Lowe (2011). Mastering VMware vSphere 5. Indianapolis: Wiley Publishing, p. 507. 33 Scott Lowe (2011). Mastering VMware vSphere 5. Indianapolis: Wiley Publishing, pp. 505-536. 34 VMware (2008). VMware vCenter Converter Standalone User's Guide. Retrieved 15th December 2013 from http://www.vmware.com/pdf/convsa_50_guide.pdf. 35 Debian (2010). What is Debian GNU/Linux? Retrieved 15th December 2013 from http://www.debian.org/releases/stable/i386/ch01s03.html.en. 36 Debian (2010). Meeting Minimum Hardware Requirements. Retrieved 15th December 2013 from http://www.debian.org/releases/stable/i386/ch03s04.html.en. Page 127 of 127