1
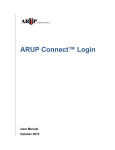
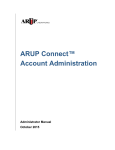
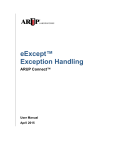
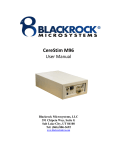
ARUP Connect™ ARUPLab.com User Manual December 2015 ARUP Connect™ Table of Contents ARUP Connect™ Introduction ........................................................................... 1 Menu Options ........................................................................................................................................... 2 Visual Notifications ............................................................................................................................. 3 Log In ....................................................................................................................................................... 4 Log Out .................................................................................................................................................... 4 Feedback .................................................................................................................................................. 4 Help .......................................................................................................................................................... 5 My Account Management ................................................................................... 7 Profile Information ................................................................................................................................... 7 Permissions .............................................................................................................................................. 7 Password Information .............................................................................................................................. 9 Security Information .............................................................................................................................. 11 Contact My Administrator...................................................................................................................... 11 Email Preferences ................................................................................................................................... 12 To receive email notifications: ........................................................................................................ 12 Notification Frequency.................................................................................................................... 12 Administrator Contacts .................................................................................... 13 Filtering the Administrator Contact(s) List ............................................................................................ 14 Secure File Transfer ......................................................................................... 15 Download (Retrieve) Files ..................................................................................................................... 15 Upload (Send) File ................................................................................................................................. 16 Critical Call Notification Log ............................................................................ 18 Reflex Test Billing Notification ........................................................................ 19 Retrieve Report Files .............................................................................................................................. 20 File List ........................................................................................................................................... 20 Log Out ........................................................................................................................................... 20 Third Party Billing ............................................................................................. 21 Viewing Third Party Billing Information ............................................................................................... 21 Test Delay Notification ..................................................................................... 22 Training .............................................................................................................. 25 Flash Player ............................................................................................................................................ 25 ii ARUP Connect™ ARUP Connect™ - Client User’s Manual Rev. December 2015 ARUP Connect version 7.5 Copyright 2003 ARUP Laboratories, 500 Chipeta Way, Salt Lake City, Utah 84108 ALL RIGHTS RESERVED iii ARUP Connect™ ARUP Connect™ Introduction ARUP Connect provides a range of online services using secure internet technology which allows for safe viewing of protected health information (PHI) online. Some of the Connect services available to ARUP clients include Order Status and Results for viewing patient orders and results and Secure File Transfer for receiving Reflex Test Billing Notification, and other services. Other ARUP applications available here include Pathologist On Call, eExcept Exception Handling, Gateway Client LTD, Business Reports, Test Delay Notification, training modules, and more. Non-clients, such as couriers, may enroll in the online training courses. Clients who subscribe to Connect will designate one or more administrators and subadministrators who are responsible for setting up individual user accounts and managing the services available to users. Individual users may change their own passwords and security questions. Administrators and sub- administrators manage all other aspects of user accounts. If you need assistance with your user name and password, or if you would like to request access to specific services, contact your system administrator for assistance. 1 ARUP Connect™ Click to return to the Connect Home page. Click to access all Account Administration applications, including: My Account, and Email Preferences. Click to access all Order Management applications, including: Order Inquiry, Order Entry, eExcept, and Order Status and Results. Click to open the ARUP Laboratory Test Directory. Click to access the Business Reports application. Click to access the online Help system for the selected Connect application or Administrator(s) Contacts. Note: Visual cues display in the Header and Menu items to alert you that new information is available. Click to access all Services, including: Secure File Transfer, eSupply, All Client Training, Specimen Shipping Training, and ARUP Gateway. Click to access all Billing applications, including: Reflex Test Billing Notification, eInvoice, and Pay Bills Online. Log out when leaving your computer, even for just a few minutes. Click to submit a complaint, compliment, or request to the ARUP development team. Menu Options Services available to you are found by selecting from the menu bar at the top of the screen. Click on one of the menu options—Order Management, Reports, Services, Billing, or Account Administration—and then select from the dropdown menu for the desired service. If the service you need is not found, contact your ARUP Connect administrator to request access to that service. You can also click Test Directory to open the ARUP Laboratory Test Directory. 2 ARUP Connect™ Click the Home menu to return to the Connect main page. Visual Notifications Visual cues display in the Header and Menu items to alert you that new information is available. In the example below, a new Report is available for Business Reports. Visual cues will display for: • • • • • Order Status & Results eExcept Business Reports eInvoice Secure File Transfer 3 ARUP Connect™ Log In To log in to ARUP Connect, you must be a subscribed user with a valid username and password. Access ARUP Connect in one of the following ways and then enter your username and password: • Select ARUP Connect Login from ARUP’s home page. • Click the link in an e-mail notification you receive informing you that files are available for you to view. At the login window, enter your user name and password and press Enter or click Login. When you successfully log in, the ARUP Connect home page is displayed. Here you can select from the menu bar to access the services available to you. Should you need assistance in using this site, or if you need to request access to other services, contact your system administrator. Log Out Click the Logout link in the upper right corner of the window to log out of ARUP Connect™. IMPORTANT! Be sure to log out when leaving your computer, even for just a few minutes. This will prevent unauthorized individuals from viewing patient PHI on ARUP Connect. If you are logged in but, but no activity has occurred for a period of time, you will be logged out automatically by the ARUP Connect system, and it will be necessary for you to log in again in order to access these services. Feedback The Feedback link, located under the Logout link, allows you to submit a complaint, compliment, or request to the ARUP development team. Complete the form as follows. Fields marked with a red asterisk (*) are required. 4 ARUP Connect™ 1. I want to submit a: Select the nature of your request from the drop-down list. 2. I want to provide feedback regarding: Select the topic of your feedback from the drop-down list. 3. Comment: Enter the feedback you wish to send. 4. Enter your first and last name, email address, and phone number in the designated fields. These are not required fields, but the information is helpful if the development team has any questions about your comments. Once you have filled out the form, click Send Feedback. You will receive a confirmation message when the message has successfully been sent. To cancel your request, click the Cancel button. Help The Help menu contains a link to the Connect Help Topic and a link to Administrator Contacts. 5 ARUP Connect™ Click Connect Help Topic to see the Connect User’s Manual, and then select from the available topics. Click Administrator Contacts to view your administrator(s) and contact information. For more information, see the Administrator Contacts section. 6 ARUP Connect™ My Account Management Under the Account Administration tab, you may update your profile information, change your password, change your security questions, and unsubscribe from permissions. Select My Account from the Account Administration menu. Profile Information The Profile tab displays your full name, phone number, and email address. Your supervisor, facility, and location description may be shown, but are not required. You can update your profile information, if needed. Permissions Permissions are assigned to you by your administrator. However, you may remove permissions that you do not want. Click the Permissions tab to display your current permissions. You can hover over the icon for a brief description of a service. 7 ARUP Connect™ To remove permissions, click the Off radio button next to the permission(s) you want to remove service from and then click Unsubscribe. (You may also click the Unsubscribe from all Services button to unsubscribe from all services.) A message displays asking you to confirm that you wish to remove the services you have chosen. 8 ARUP Connect™ Click No, Cancel if you do not wish to make any changes. Click Yes, Unsubscribe to confirm that you want to remove the services you selected. A message informs you that the services were removed, and will no longer be accessible in your list of permissions. If you remove a service that you need, call your administrator to have the permission added back to your list. Password Information Select the Password and Security Questions tab to change your password. All users can change their own passwords at any time. Passwords are changed in the following events, but may also be changed at any time a user determines it to be necessary. • All new users must log in with a temporary password and then enter and confirm a password of their own choosing. • The system will require you to change your password every 90 days. A few days before a password expires, you will be reminded to change it. If you do not do so, on the day the password expires you will be unable to log in to ARUP Connect until you complete the task of changing your password. • If you forget your password, you can answer your security questions to obtain a temporary one-time password which will allow you to log in and change your password. 9 ARUP Connect™ To change your password: 1. In the Current Password field, enter your current password. If you were given a temporary password (for first-time users or forgotten password), enter the temporary password. 2. In the New Password field, enter the new password. Passwords must meet the requirements that display in the Password Requirements area. As you meet the requirements, the updates to . 3. In the Confirm Password field, enter the new password again. You must enter the password exactly the same. 4. Click Update Password. Note: You cannot reuse the same password within eight password changes. If you attempt to do so, the system will prompt you to choose a different password. 10 ARUP Connect™ Security Information The first time you log in to ARUP Connect, you will be required to set up security questions. Then, if you forget your password in the future, you will be able to reset your password by correctly entering answers to security questions you set up here. Select the security questions you wish to use and enter your personal responses to each. Select questions to which only you would be likely to know the answers but which will be easy for you to answer when needed. Select the Password and Security Questions tab to manage your security questions. To change your security questions: 1. In the Security Question 1 field, select your first security question from the drop-down list. 2. In the Security Answer 1 field, enter your answer to the first security question. 3. In the Security Question 2 field, select your second security question from the drop-down list. 4. In the Security Answer 2 field, enter your answer to the second security question. 5. Click Update Questions. Contact My Administrator Click the Contact My Administrator link in the event that you are locked out of your account, forget your user name, password, security questions, need to have your password reset, or need any other assistance with the login process of your account. 11 ARUP Connect™ Email Preferences Go to Account Administration > Email Preferences to modify your Email notification preferences. • • • • • • General notifications regarding application downtimes. Notifications for Business Reports. Notifications for eExcept. Notifications for e-Invoice. Notifications for Order Status and Results. Notifications for Secure File Transfer Email notifications are sent to the Email Address listed under My Account, Profile Information. To receive email notifications: 1. Activate the checkbox next to the notification type. 2. Click <Save>. Notification Frequency Use the drop-down menus to modify the frequency of the notifications. 12 ARUP Connect™ Administrator Contacts Your system administrator can help you when you are locked out of your account, need to add permissions, change your personal information, or need help with resetting your password. The Administrator Contacts page provides email and phone contact information for your administrator(s). You access the Administrator Contact list either of the following ways. • From the Help menu on the toolbar, choose Administrator Contact(s). • Click the Administrator Contact(s) link located on the home page and elsewhere in Connect. 13 ARUP Connect™ Filtering the Administrator Contact(s) List You can use the following tools to manage the Administrator Contact(s) list and locate specific administrators: • Filter. To find a specific administrator, type any portion of the administrator’s first or last name, user name, or email address into the Filter field. As you type, the list becomes limited to just records matching the filter text you enter. To return to the full list, clear the text from the Filter field. • Sort By. To sort Administrator Contact(s) by Username, First Name, Last Name, or Email, select the desired term from the Sort By drop-down menu. The application will filter the Administrator Contact(s) alphabetically, based on your selection. • Direction. To update the direction of how items display in the Administrator Contact(s) list, select a direction from the Direction dropdown list. You can select Normal (A-Z) to have the list display alphabetically or Reversed (Z-A) to have the list display alphabetically in reverse order. • Users Per Page. To update the amount of users that display in the Administrator Contact(s) list, select the desired amount from the Users Per Page drop-down list. You can select from 10, 20, 50, or All. • Refine By. To refine the Administrator Contact(s) list by specific clients, select the desired Clients check boxes in the Refine By area. You can make single or multiple selections. The Administrator Contact(s) list will display only administrators that match your selection(s). 14 ARUP Connect™ Secure File Transfer Under HIPAA rules, documents containing protected health information (PHI) must be sent securely. This site uses advanced technology to provide the best security possible for transfer of patient PHI. A number of ARUP Connect services post files to Secure File Transfer; including, Critical Call Log Reports, Test Delay Notifications, and others. For individuals who require the ability to send PHI documents to ARUP, Secure File Transfer also offers an upload feature. To take advantage of the upload feature, you must contact ARUP and make specific arrangements for this access. Select the Services menu option and choose Secure File Transfer to see the list of files available for you to retrieve. Instructions for retrieving or sending files are provided below. Download (Retrieve) Files The following are the steps for retrieving files using Secure File Transfer. 1. You will receive an e-mail message notifying you a file containing PHI is waiting for you to download. The e-mail message will contain a link to ARUP Connect. 2. Click on the email link or go to www.ARUPLab.com and log in to ARUP Connect™. 3. Enter your user name and password. 4. Select Services > Secure File Transfer. You will see a list of files ready for viewing. Click on a file name to open it. You may then print the file and/or save it. 15 ARUP Connect™ The list includes all new files as well as all files you have viewed in the past 14 days. Files remain on the list for 14 days. 5. Log out once you are finished. Upload (Send) File If you need to send files containing PHI to ARUP, you can use the file upload feature of Secure File Transfer. Before using this feature, contact the person at ARUP who will be the recipient of the file. That person can initiate the setup procedure that is necessary for the feature to be activated for you. Once the setup is completed, you may upload files as described below. Note: The file you upload may not exceed 1 GB total size and cannot be an executable (.exe) file. 1. Log in to ARUP Connect and select Secure File Transfer. 2. Select Services > Secure File Transfer. 3. At the Secure File Transfer screen, select the Upload tab that is now an available option. 4. In the Send To drop-down field, select the desired recipient for the file. 5. In the File field, click the Choose File button. 16 ARUP Connect™ 6. Navigate to the desired file you want to upload and click Open. 7. Click Send. A confirmation message displays to confirm the file was uploaded. If you have additional files to upload, repeat the above steps. 17 ARUP Connect™ Critical Call Notification Log Clients who sign up to receive the Critical Call Notification Log report will automatically receive this report once each month through Secure File Transfer (see Secure File Transfer on page 15 for instructions on retrieving these files). The report includes all critical calls from the most recently-ended month. The file is in PDF format which requires Adobe Reader for viewing and printing. The following is an example of the Critical Call Notification Log report. 18 ARUP Connect™ Reflex Test Billing Notification This client-specific service allows clients to receive notification within 24 hours when a reflex test is performed based upon results of an initial test. This allows the client to bill for the reflex test without delay. From the Billing menu select Reflex Test Billing Notification. The following is an example of a Reflex Test Billing Notification report. The report shows the patient name and medical record number as well as the reflex test name. This report does not provide the actual test results. 19 ARUP Connect™ Retrieve Report Files The following are the basic steps for retrieving Reflex Test Billing Notification reports (note that the procedure is identical to the Secure File Transfer section). 1. You will receive an e-mail message notifying you a file containing PHI is waiting for you to download. The e-mail message will contain a link to ARUP Connect. 2. Click on the e-mail link or go to www.ARUPLab.com and log in to ARUP Connect™. 3. Enter your user name and password. 4. Select menu option Billing. Choose Reflex Test Billing Notification. 5. You will see a list of files ready for viewing. Click on a file name to open it. You may then print the file and/or save it to your computer. 6. Log out when finished. File List The following is an example of the file retrieval list. The list includes all new files directed to you as well as all files you have viewed in the past 14 days (when applicable). Files remain on this list for 14 days. Log Out When you are finished viewing files, click Log Out on the menu. This ends your session and prevents secure files from being viewed by other individuals using your computer who may not have appropriate authority to do so. 20 ARUP Connect™ Third Party Billing The Third Party Billing application allows you to view a summary of all third party billing orders that have missing information required to complete the billing process. Connect visual notifications also display when new third party billing information is available and you can set up email notifications through your Account Administration > Email Preferences. Note: Your administrator will need to set up the required permissions in order to access the Third Party Billing application. Viewing Third Party Billing Information 1. From the Connect menu, select Billing > Third Party Billing. 2. In the ARUP Client List drop-down menu, select the desired client(s) for which you want to view third party billing information. The related third party billing information displays. 3. If you want to download an Excel spreadsheet that highlights the fields that are missing information, click the Download Spreadsheet button. 21 ARUP Connect™ Test Delay Notification Clients who sign up to receive Test Delay Notifications will receive these reports through Secure File Transfer (see page 15). To retrieve a report, log in to ARUP Connect, select menu option Services and choose Secure File Transfer, and click on the link for the current day's report. Reports remain available for 14 days. For clients who have delayed tests, one report is generated each day listing all orders that are not complete and known to be late. If a detail test is part of a panel test, the panel in which the test is found is also listed. The first page of the report is a cover/disclaimer page. Subsequent pages contain accession-specific information. The report presents accession information twice; first grouped by patient, and then grouped by test. The following is an example of the cover/disclaimer page: 22 ARUP Connect™ The following is an example of the report grouped by patient showing the three sections New, Revised, and Repeat: 23 ARUP Connect™ The following is an example of the section of the report grouped by test and showing tests that are part of panels. 24 ARUP Connect™ Training To access the training modules, log in to ARUP Connect click the Services menu and select either All Client Training or Specimen Shipment Training depending on your training needs. The selected Training page opens and displays the training programs that are currently offered. Select the desired training area to navigate to a training module. Once you open a training module, follow the instructions on-screen for completing the selection and any accompanying tests. Flash Player You will need Adobe Flash Player to run the training modules on your computer. If you don’t have Flash Player, click on the link provided and follow the instructions to download a free copy of the player. 25