1
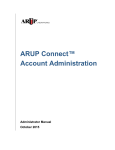
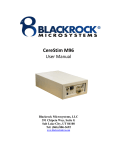
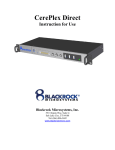
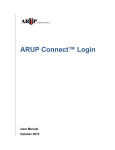
Business Reports ARUP Connect® User Manual November 2015 Business Analytics and Reporting Table of Contents Business Reports ............................................................................................... 4 Quick Reference ....................................................................................................................................... 4 View Reports ....................................................................................................... 5 My Reports Tab ........................................................................................................................................ 5 Open a Report ................................................................................................................................... 5 Save a Report .................................................................................................................................... 5 Modify My Reports Screen ...................................................................................................................... 6 Make Reports ...................................................................................................... 7 Make Report Tab Overview ..................................................................................................................... 7 Run Report Side Tab ................................................................................................................................ 8 Run a Report ..................................................................................................................................... 8 Run Report Parameters ..................................................................................................................... 9 Report Name Dialog ....................................................................................................................... 10 Schedule Report Side Tab ...................................................................................................................... 10 Schedule a Recurring Report........................................................................................................... 10 Schedule Report Parameters............................................................................................................ 11 Find a Scheduled Report ................................................................................................................. 12 Edit Schedule Report Screen ........................................................................................................... 13 Available Reports.............................................................................................. 14 Client Test Order Summary ................................................................................................................... 14 Custom Hot Line Index .......................................................................................................................... 15 Exception Handling Report .................................................................................................................... 16 Public Health Reporting ......................................................................................................................... 17 Quality Assurance Report ...................................................................................................................... 17 Turnaround Time Report ........................................................................................................................ 19 Critical Call Log Report ......................................................................................................................... 19 Manage Groups ................................................................................................. 21 Modify Manage Groups Screen.............................................................................................................. 21 Setup a New Group ................................................................................................................................ 22 New Group Parameters ................................................................................................................... 23 Find a Group .......................................................................................................................................... 24 ii Business Analytics and Reporting Email Notifications............................................................................................ 25 Visual Notifications........................................................................................... 26 Business Analytics and Reporting on ARUP Connect - User Manual Copyright 2010 ARUP Laboratories 500 Chipeta Way, Salt Lake City, Utah 84108 November 2015 Ver. 2.6 ALL RIGHTS RESERVED iii Business Analytics and Reporting Business Reports Business Reports is a web-based application that makes multiple business reports directly available to ARUP clients. Clients may create instant reports and set up scheduled reports using the options available here. To access this report function, a client must have an account set up for ARUP Connect and must be assigned access to the Business Reports application. 1. Log in to ARUP Connect using your user name and password. Note that ARUP Connect login/logout and inactivity timeout rules all apply to this application. 2. At the main screen select menu option Business Reports. The My Report page is displayed. Click on tabs to perform the desired functions: My Reports: View reports. Make Report: Set up instant and scheduled reports. Manage Groups: Set up client groupings for purposes of combining clients within a report. Quick Reference Click this link to print a one-page Quick Reference Guide: Quick Reference Guide 4 Business Analytics and Reporting View Reports My Reports Tab The default tab is the My Reports tab. After a report has generated, the report is posted to the list in the My Reports tab. Reports that have not yet been viewed display in bold. After 30 days, you will receive an Email notifying you that a report in the My Reports tab is scheduled for deletion. After 60 days, the report will be deleted. Open a Report 1. Click the report link when a report shows a status of Ready. The File Download dialog appears. 2. Click Open. Save a Report 1. Click the report link when a report shows a status of Ready. The File Download dialog appears. 5 Business Analytics and Reporting 2. Click Save to save the file. Modify My Reports Screen Refresh. If a report shows a status of Pending, click the button to refresh the display. Use the drop-down list to select the number of reports to display. You can filter the list to display a shorter list of reports. Enter all or part of a run date, status, or file name in the box. Status PENDING. Report has not been run yet. Click to refresh the display. If the status remains Pending, wait a few minutes and try the refresh again. Data updates occur every few minutes. READY. If the report is ready for download, its status will change to Ready and the report name will become a link. Reports that have not yet been viewed display in bold. Use to delete reports from the list. Activate the check box for that report under the column and then click Delete Selected. Sorting To sort the list, click on a column heading. An arrow in the sorted column will indicate whether the list is sorted in ascending or descending order. Click on the column heading again to reverse the sort order. 6 Business Analytics and Reporting Make Reports Make Report Tab Overview Use the drop-down arrow to select the report you want to run. Click here for additional information on the available reports. After selecting a report, you will see two tabs. • Choose the Run Report tab to generate reports immediately. • Choose the Schedule Report tab to setup and schedule reports. 7 Business Analytics and Reporting Run Report Side Tab Select the Run Report side tab to generate a report immediately. Run a Report 1. Activate Client or Group, if applicable, then select a client or group from the drop-down list. 2. Select the report date range. OR Select the Month (for Hot Line Index only) 3. Select sort order (for Client Test Order Summary only). 4. Select the format for your report. 5. Click Generate Report or Generate & Create New Report. The Report Name dialog is displayed. Use the default or change the name of the report, as needed. 6. Click OK. 8 Business Analytics and Reporting Example: Run Report Parameters Select Client or Group Client. The drop-down list will show only your Clients. Select Report Content Start Month/Year. The starting month/year to be included in the report. The report will include the history between and including the months you select. Group. The drop-down list will show only your Groups. Applicable for Client Test Order Summary only. End Month/Year. The ending month/year to be included in the report. The report will include the history between and including the months you select. Not applicable for Exception Handling Report. Note: When including both starting and ending dates in the report, the report will include the history between and including the months you select. For example, if October 2010 is selected for the starting date and December 2010 is selected for the ending date, the report will include three months of history for October through December 2010. 9 Business Analytics and Reporting Daily/Weekly/Monthly. Select Daily, Weekly, or Monthly for the amount of time to be included in the report. The corresponding date fields open to set up the appropriate start and/or end dates. Report Type. Select Brief or Detailed depending on the amount of content you want included in the report. Select Report Format (Not all formats are available for all reports) PDF. The Report will be in a PDF format. Excel. The report will be in an Excel format. Word. The report will be in a Microsoft Word format. The report will be generated and saved to the My Reports tab. The My Reports tab will open. The report will be generated and then saved to the My Reports tab for retrieval later. The Make Report tab will remain open. Report Name Dialog A default name is entered for the report name. You can keep the default name or delete it and enter a new name. The Maximum length of the report name is 50 characters. Click OK to run the report. Schedule Report Side Tab Select the Schedule Report side tab to set up a recurring report or view/edit reports scheduled to run at a later date. Schedule a Recurring Report 1. Click Create New Schedule. 2. Activate Client or Group, if applicable, then select a client or group from the drop-down list. 10 Business Analytics and Reporting 3. Select the number of months to include in the report (not applicable for Exception Handling Report). 4. Select the sort order (for Client Test Order Summary only). 5. Enter the name of the report. 6. Activate the check box if you want to receive an email when the report is ready in My Reports. 7. Select the frequency the report runs (monthly, for example). 8. Select the day of the month the report will run on. Note that the date report data is available for a given month varies based on the report. 9. Select the starting date for the schedule. 10. Select the ending date for the schedule or leave this field blank to allow the report to run indefinitely. 11. Select the format for your report. 12. Click Save. The new scheduled report will appear in the list. Example: Schedule Report Parameters Client or Group Client. The drop-down list will show only your Clients. 11 Business Analytics and Reporting Group. The drop-down list will show only your Groups. Applicable for Client Test Order Summary only. Report Name A default name is entered for the report name. You can keep the default name or delete it and enter a new name. Maximum length of the report name is 50 characters. Set Schedule Starts. Select the starting date for the schedule. Ends. Select the ending date for the schedule, or leave this field blank to allow the report to run indefinitely. Report runs __. Select the frequency of the report and the date for the report to run. Cannot be changed for Exception Handling Report. Select Report Format (Not all formats are available for all reports) PDF. The Report will be in a PDF format. Contains __ month(s) of information Select a number from the drop-down list to select the number of months to include in the report. Not applicable for Quality Assurance Report. Sorted by Select the data to sort by from the drop-down list. Applicable for Client Test Order Summary only. Excel. The report will be in an Excel format. Word. The report will be in an Microsoft Word format. Click to save the report. Click to cancel and return to the Schedule Report tab. Find a Scheduled Report When you select the Schedule Report tab, existing reports you have created are displayed. • Active status indicates the report has run or will run until the next run date. • Pending status indicates the report has not run yet. • Expired status indicates the report will no longer run (the scheduled ending date has been reached). 12 Business Analytics and Reporting Edit Schedule Report Screen At this tab you will also see any previously-scheduled reports. Action Click to edit an existing report. Click to delete an existing report. Sorting To sort the list, click on a column heading. An arrow in the sorted column will indicate whether the list is sorted in ascending or descending order. Click on the column heading again to reverse the sort order. For long lists, click on the page symbols at the bottom of the list to scroll through the list. 13 Business Analytics and Reporting Available Reports Client Test Order Summary The Client Test Ordering Summary report provides test ordering information for a single client or a group of clients for a specified date range. The report shows monthly test volumes for each test and also aggregate volumes for the date range specified. You may sort the report by test name, test number, or volume. Example report: 14 Business Analytics and Reporting Custom Hot Line Index The Custom Hot Line Index report contains a customized report that applies to a specific client. The report contains the following information for Quarterly Hot Lines for the specified period (one or two years): • All the changed tests that the client has ordered previously. • New tests and tests that have been made inactive. • A matrix that clearly details tests that had a change in name, methodology, scheduling, specimen requirements, reference interval, interpretive data, note, CPT code, component change, interface. Go to the ARUP website to get more detailed information on the test changes. Note: Information for Immediate Hot Line changes are not contained in this report. 15 Business Analytics and Reporting Exception Handling Report ARUP Exception Reports lists orders and specimens held by ARUP during the previous month for issues including (but not limited to): • Specimen identification • Test cancellations for insufficient volume, inappropriate sample type, stability or temperature violations • Approval for testing with the use of a disclaimer • Clarification of specimen type, media, collection duration, etc. • Alternative testing • Missing required information Example report: 16 Business Analytics and Reporting Public Health Reporting The Public Health Reporting report provides an excel spreadsheet of all public health reporting information for a selected date range. The report can be generated in Basic or Detailed, depending on the amount of information you want to display. Example Basic Report: Quality Assurance Report Monthly quality assurance reports provide a resource for clients to monitor laboratory reference services. ARUP Client QA Reports document occurrences reported during the previous month and include patient information, processes involved, and ARUP's responses to: • Tests not performed due to ARUP error • Testing/reporting delayed due to ARUP error • Result reports corrected due to ARUP error • Any client concerns Note: The layout for the QA Reports is different for single month and multi-month reports. Example report: 17 Business Analytics and Reporting 18 Business Analytics and Reporting Turnaround Time Report ARUP Turnaround Time Report provides a list of Turnaround times (TAT) for all tests ordered in a specific month. The report is available the second day of the month and can be generated for any month in the current or past calendar year. The report contains the following information for the selected month: • Total percent summary of all tests ordered that met the published ARUP Turnaround time • The number, name and published ARUP Turnaround time for each test ordered • Volume of the specific test ordered • Average Turnaround time of specific test • Number and percent of the specific test ordered that met the published ARUP Turnaround time Example report: Critical Call Log Report The ARUP Critical Call Log Report provides clients with information on all Critical Calls (up to three years of data is available). • ARUP Accession and Collection Date, Patient Name, and the Ordered Test • Result and Critical Notification information 19 Business Analytics and Reporting Example report: 20 Business Analytics and Reporting Manage Groups The Manage Groups option allows you to create a group that contains multiple clients. You can then use the group(s) to get a single report with multiple clients included. Modify Manage Groups Screen Use the drop-down list to select the number of groups to display. Action Click to edit an existing group. Group Name Click to delete an existing group. If you delete a group in error, this cannot be undone. However, the group can be set up again as a new group. Displays the name of the group. Created When Displays when the report was last created/edited. Sorting To sort the list, click on a column heading. An arrow in the sorted column will indicate whether the list is sorted in ascending or descending order. Click on the column heading again to reverse the sort order. For long lists, click on the page symbols at the bottom of the list to scroll through the list. 21 Business Analytics and Reporting Setup a New Group 1. Click on the Manage Groups tab. 2. Click Create New Group. The following screen is displayed. 3. Enter a Group Name. 4. Enter a Description (optional). 5. In Available Clients, click next to the name of the client you want to add to the group. The group is added to the Group Members list. 6. Repeat step 5 until all of the desired clients are in the Group Members list. 22 Business Analytics and Reporting New Group Parameters Group Name Description Enter the name of the group. Use only alpha and numeric characters in the name; do not use symbols. Note that the group name can be changed at a later time using . Enter a brief description to further identify this group. Not required. Click the icon next to the client ID in the Available Clients list to add it to the Group Members list. Click the icon next to the client ID to remove it from the Group Members list. The client is removed from Group Members and added to the Available Clients list. For long lists, click on the page symbols at the bottom of the list to scroll through the list. Click to save your changes. Click if you do not want to make changes. Sorting To sort the list, click on a column heading. An arrow in the sorted column will indicate whether the list is sorted in ascending or descending order. Click on the column heading again to reverse the sort order. 23 Business Analytics and Reporting Find a Group When you select the Manage Groups tab, existing groups you have created are displayed. Example Group: 24 Business Analytics and Reporting Email Notifications To receive email notifications for Business Reports you will need to set this up under Email Preferences. 1. Go to Account Administration > Email Preferences. 2. Scroll down to Business Reports. 3. Activate the checkbox next to the notification you want to receive. 4. Use the drop-down menu to modify the frequency, if desired. 5. Click Save. 25 Business Analytics and Reporting Visual Notifications Visual cues display in the Header and Menu items to alert you that new information is available. 26