1
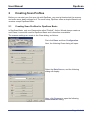
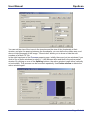
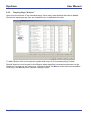
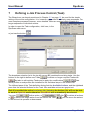
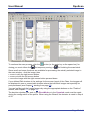
DpuScan
3
User Manual
Configuration for Screen Layout
With DpuScan it is easy to set the screen layout individually for the relative profile. This way,
you can foresee different contents in the sub-windows, and those can also be set and sized
individually.
You can reach the corresponding dialog via Class | Configuration | General | Screen
Layout. There, you define the setup on four property pages.
In the Class configuration, you may choose different screen layouts for the scan process and
for interactive (post-) processing. So it is most probably not necessary to have the images
displayed as thumbnails while they are scanned. Similarly, a sub-window for indexing makes
sense only while you work interactively, in Pause mode.
The screen layout can freely be defined. This is done, separately for Process and
Interactive, on the relative property pages. The Process page offers a tick box to apply the
layout as set for Process to be the same as Interactive.
Only the General page can be reached in the Pause mode, using the button,
in order to temporarily change the number of scan windows for example,.
The Treeview page determines the look of the window, for example which images are to be
displayed. So you can either display or hide specially marked images directly when you
change to the Pause mode, or automatically hide all images with a red mark.
If you allow Drag&Drop, images may be moved within the batch.
Allow Multiselection enables you to select several images in the batch at one time and to
process them. Keep your Control key pressed down and click to the desired images in the
thumbnails window, or in the batch structure.
Page 14 of 44