1
Web Server Lite
Web Server Lite
Web Server Software User’s Manual
This software is only loaded to 7188E modules acted as Server. This
solution was general in our products. The Serial devices installed on the
7188E could be accessed by the applications of any PCs connected to
Ethernet. The applications communicating with 7188E through Ethernet
must support the TCP/IP socket protocol.
Warranty
All products manufactured by ICP DAS are warranted against defective
materials for a period of one year from the date of delivery to the original
purchaser.
Warning
ICP DAS assumes no liability for damages consequent to the use of this
product. ICP DAS reserves the right to change this manual at any time
without notice. The information furnished by ICP DAS is believed to be
accurate and reliable. However, no responsibility is assumed by ICP
DAS for its use, nor for any infringements of patents or other rights of
third parties resulting from its use.
Copyright
Copyright 2003 by ICP DAS. All rights are reserved.
Trademark
The names used for identification only may be registered trademarks of
their respective companies.
Web Server Lite Software User’s Manual, 2003, v2.0
1
Web Server Lite
Table of Contents
1.
2.
3.
Introduction............................................................................................................................................3
1.1
Typical application.................................................................................................................5
1.2
Directory tree of software and literature................................................................................6
1.3
Structure of Web Server.........................................................................................................7
Web Server application........................................................................................................................11
2.1
Development environment configuration ............................................................................11
2.2
Homepage development ......................................................................................................12
2.3
How to build the Web Server...............................................................................................14
2.4
How to download application to target system....................................................................17
2.5
How to test the project by Browser .....................................................................................25
2.6
Default Web Server..............................................................................................................27
Demo Programs for Web Server ..........................................................................................................28
3.1
WLDemo01: The basic setting and default Web page.........................................................28
3.2
WLDemo02: Customize Web Page .....................................................................................31
3.3
WLDemo03: 'Form Action' application...............................................................................35
3.4
WLDemo04: Application with DCON module’s I/O. .........................................................40
3.5
WLDemo05: Refresh the Web Page in the specific cycle time. ..........................................52
3.6
WLDemo06: X board digital in/out.....................................................................................59
3.7
WLDemo07: X board analog in/out ....................................................................................64
Web Server Lite Software User’s Manual, 2003, v2.0
2
Web Server Lite
1. Introduction
The Web service on 7188EN
In these years, the working area has to extend all over the world. When users want to monitor or control the system
in the remote side, the only way is using the network to transfer the information.
Therefore, we have developed the Web server based on embedded system of 7188EN. Users can establish the
network control system via this service.
Most importantly, we can use the popular tools (such as IE or Netscape) to control the system via Ethernet/Internet.
We also provide some easy functions and tools to help the user to customize his/her own web page and provide the
toolkits to design program of the system connecting to Internet/Ethernet.
In conclusion, there are many advantages in the ICP DAS Web Server of Embedded system.
The advantages are as follows:
Easy to set up: Only download the design program and autoexec batch file to the embedded controller.
Easy to design: Built-in the html decodes function. Users need only know basic coding skill of html for
designation.
Supports object: Basic HTML language and pictures (Support format: Gif, Jpg and Bmp)
Multiple purposes: Not only provide the service of HTTP (Port 80), but also support the information exchange
of Com port in 7188EN.
However, regarding the series communication, users need to involve different Libraries to different purposes
application.
Web Server Lite Software User’s Manual, 2003, v2.0
3
Web Server Lite
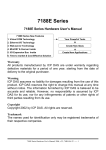
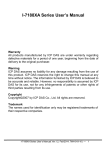
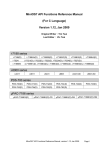
About the 7188EN series
I-7188E series controller is equipped with one RJ-45 connector, one I/O expansion bus and several serial COM
ports. The 7188E is an embedded controller which, with aid of C language, can be applied the user application on it.
We provide many demo programs and library functions for users reference to easily integrate his own design onto
the application and applied on 7188E embedded controller. It allows users to design programs to access devices via
Ethernet or RS-232/485/422. In addition, the controller hardware also offers an I/O expansion bus interface to allow
user to plug-in OEM/ODM special function daughter board or X board. Our expansion boards can be mounted
quickly and easily to implement various I/O functions, such as D/I, D/O, A/D, D/A, Timer/Counter, Flash memory and
battery backup SRAM.
Ethernet Architecture
7188EN
Server
Client
Hub
COM1
Client
COM2
Client
Router
.
.
.
.
Router
7000 #01 8000 #02
7188EN
Hub
Server
COM1
COM2
7000 #01 8000 #02
I/O Expansion board
Web Server Lite Software User’s Manual, 2003, v2.0
4
Web Server Lite
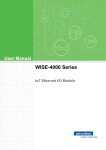
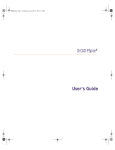
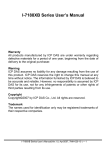
1.1 Typical application
With the help of Web Server, users are able to use standard browsers (such as IE or Netscape) to access these I/Os
of the expansion boards or devices connected to any of the 7188E’s COM port.
Support IE
Support Netscape
Application
RS-232
Browser
(IE,Netscape)
Client
Web server
RS-485
I/O Control
I/O Expansion
Hub
7188E series
Ethernet
RS-232
RS-485
Device
I/O Expansion Bus
Web Server Lite
User.c
I/O expansion
Board
HTML
Web Lib
Web Server Lite Software User’s Manual, 2003, v2.0
5
Web Server Lite
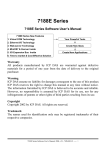
1.2 Directory tree of software and literature
To reduce developing system time, we support many software resources, including documents, drivers, libraries,
diagnostic programs, client programs and many demos for users. You can quickly find specific resources you need
by using the directory tree.
Files location of shipped CD:
NAPDOS
Web_Server
WebLite
7188E
Demo
BC
WLDemo01
WLDemo02
WLDemo03
WLDemo04
WLDemo05
WLDemo06
WLDemo07
Documents
And users can find the exactly library files in the directory of Lib (\Web_Server\WebLite\7188E\Demo\BC\Lib).
Note: The software & manual are updated frequently, so the content of the companion CD is also updated frequently.
The best way to know what is the latest information is to read every README.TXT located in every directory. All
updated information is given in these files.
Web Server Lite Software User’s Manual, 2003, v2.0
6
Web Server Lite
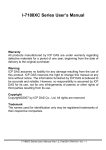
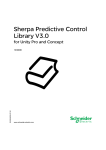
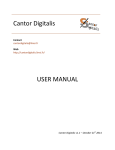
1.3 Structure of Web Server
Block 1
Block 2
Block 3
Block 4
Block 5
Block 6
Block 7
Web Server Lite Software User’s Manual, 2003, v2.0
7
Web Server Lite
Regarding the flow char had shown as previous page, following is the description:
Block 1: Web Initialize, it will initial all the regular variables in the server including the socket and the environment
of network.
Block 2: In this block, which is contains 2 functions.
Web_Init() users can place the code for initialize the customize variables by user and the command only run
once after the server has started (Such as InstallCom()).
Web_Loop() users can place the code for running in every scan time (Such as scan the Com Port).
Block 3: Check whether the TCP Ports contains data or not. If the data exist go to Block 5 else go to Block 4.
Block 4: Update the LEDs and check the WDT. If the time out of WDT is actives, the server will reset itself (Block 1).
Otherwise, go to the Web_Loop() of Block 2.
Block 5: According to the port number and the program will do the proper response.
Port 80: If the request is CGI functions, and go to Block 6. If the request is not CGI function, go to Block 7.
Block 6: User can call the different function for the specific purpose.
We provide several functions:
CGI_DPAGE()
CGI_USER()
CGI_WEB()
PRINT_PAGE()
The detail will be descripting later.
Block 7: Send the data to the browser of the client. When finished, the routine will back to the Web_Loop() of Block
2.
Web Server Lite Software User’s Manual, 2003, v2.0
8
Web Server Lite
It is very difficult to develop an embedded controller program with Ethernet/Internet communication. But by using the
ICP DAS Web Server Lite, users can do that quickly and easily. Users need only modify 4 functions in User.c to
setup a web-based system. Users build their own code in these 4 functions to make the Web Server work as they
desire. The features of the 4 functions are listed as below:
void Web_Init (void):
Web Server executes this function once as soon as the 7188EN is powered on. Therefore all variables of initial
values or initial status must be set in this function.
void Web_Loop (void):
Web Server executes this function during every scan loop. One Web Server scan loop completes in a short time, so
real time work should be executed by this function.
void GetDataFromForm (void):
This function will be triggered when the browser send data via 'Form' object. In this function you will receive the
specific variables, all the value of variables will be saved in the buffer Argu_St[i] , the name of variables will be
saved in Argu_Name[i] and the 'i' stands as the sequence of the variables. The total amount of the variables will be
saved in Argu_Num.
Note 1: The 'i' is started from 0 and the maximum value of 'i' is 9.
Note 2: The Argu_Num is started from 0 and the maximum value is 9.
Note 3: Please do not misunderstanding we only support 10 variables in a web page, we only limit the number of
variables in each line of html page.
void GetDataFromWeb (void):
When the decode function have found the key string in the web page, Web Server will trigger the decode function.
Users can response the property result to replace the key word and the key word is between the special characters
'~' of string.
Note: All the response values should be the type of character.
Web Server Lite Software User’s Manual, 2003, v2.0
9
Web Server Lite
Previous section is the user’s customizing functions that we provide for the User.c files. And the functions in this
section are only called; users cannot add or modify them.
void CGI_DPAGE(void)
This function shows only the copyright declare and provides a hyperlink for visiting the Network parameters setting
page. Users can place the hyperlink as follow in the page for supporting change configuration of network. For the
security reason, we do not allow access this page by input location from address line.
<a href="/cgi-bin/CGI_DPAGE ">
void CGI_USER(void)
Users can use this function to decode the HTML file that users assign to the function. This function will decode the
HTML command and send to the browser of the client.
<a href="/cgi-bin/cgi_user?Page=Refresh.htm">
void CGI_GET(void)
Users can use this function to send the parameters and the function GetDataFromForm (void) will accept the
related variables name and values.
<a href="/cgi-bin/cgi_get?Page=Refresh.htm&Light=ON">
void CGI_WEB(void)
Users can set the parameters regarding the network of 7188EN via this function. When this function has called, it
wills response a page which contains the setting items and default values. Users can change the related items in
this page. Once the change have completed, 7188EN will be restarted to apply the new setting.
Note: This function effective only cooperates with the function CGI_DPAGE().
void PRINT_PAGE(char *HtmlFileName):
Users can call this function to response the specific web page which is exist in the EEPROM 7188EN to the browser
of the client side.
Note: In User.c, users can use this function as follow:
PRINT_PAGE(“index.htm”);
And the Web Server will respond the 'index.htm' to the browser of the client.
Web Server Lite Software User’s Manual, 2003, v2.0
10
Web Server Lite
2. Web Server application
2.1
Development environment configuration
Programming of Web Server
To develop the Web Server, you must have the 6 files listed below:
Item
Files
Location
Head file
Web.h,7188e.h
Same with User.c
Library
7188EL.Lib, TCPIPL.Lib,
WEBL200.LIB
Web_Server\WebLite\7188E\Demo\BC\ Lib
User’s file
User.c
Web_Server\WebLite\7188E\Demo\BC
To develop programs for 7188/7188X/7188E/8000 series, you can use the compilers below:
1.
BC++ 3.1~5.02
2.
MSC
3.
MSVC (before version 1.52)
4.
TC 2.01
5.
TC++ 1.01
From the web site of Borland, you can download the free TC 2.01 and TC++ 1.01 compilers.
Web site: http://community.borland.com/museum/.
Regarding how to use BC++ 3.1’s IDE to compile projects, please refer to section 2.3.
Web Server Lite Software User’s Manual, 2003, v2.0
11
Web Server Lite
2.2
Homepage development
Users can use the popular HTML edit program (such as FRONTPAGE or composer of Netscape) to create your own
web page.
Following we will demonstrate how to create a page by FRONTPAGE.
Step 1: Launch the FRONTPAGE.
Step 2: After completed. You can edit your page as using a Text editor.
Step 3: If you are not in Page View, click the Page button on the Views bar.
The page button on the views bar.
Step 4: Click the Normal tab at the bottom of the page.
Click the Normal tab.
Web Server Lite Software User’s Manual, 2003, v2.0
12
Web Server Lite
Step 5: Insert the cursor into the blank page and place your element.
Edit area.
Step 6: If your page needs to communicate with your server, please place the key string '~' as
follow.
When decode this line, the decode function
CGI_USER () will replace the value that you
dedicate. Users can refer to readmem.htm of
WLDEMO02
Step 7: Save this page.
Web Server Lite Software User’s Manual, 2003, v2.0
13
Web Server Lite
2.3
How to build the Web Server
Step 1: Create a new project. (In here, we use BC 3.1 to compiler.)
1.1
Enter the name of project. (After compiler, the file name will use project name.)
1.2
Step 2: Add all necessary files into the project.
2.1
Add the related files had shown as follow:
Web Server Lite Software User’s Manual, 2003, v2.0
14
Web Server Lite
Users need to add at least 3 files of Library and one 'User.c'.
1. 7188EL.Lb
2. TCPIPL.Lib
3. WEBL200.Lib
4. User.c
Note: User can copy the User.c from the Demo and modify it to fit the user needed.
Step 3: Set Code generation options.
3.1
3.2
Web Server Lite Software User’s Manual, 2003, v2.0
15
Web Server Lite
Step 4: Set Advanced code generation options.
4.1
4.4
4.2
4.3
Step 5: Set Debugger options.
5.1
5.2
Step 6: Make the project.
6
Note: Please refer to 7188e\Document\TCPLib.pdf to get more information about settings of other compilers.
Web Server Lite Software User’s Manual, 2003, v2.0
16
Web Server Lite
2.4
How to download application to target system
We provide the easy way for user to download program into the 7188EN series. Users can obtain this tool from the web site
(ftp://ftp.icpdas.com/pub/cd/8000cd/napdos/minios7/utility/MiniOS7
HTU
utility)
UTH
or
from
the
shipped
CD.
( CD:\NAPDOS\MINIOS7\UTILITY)
Software Installation
Installation Steps
The installation steps are given as follows:
Step 1: Run Setup.exe from the NAPDOS\MINIOS7\UTILITY\ directory.
Step 2: After complete the installation, users can find the group of MiniOS7_utility had added into
'Program files' and it creates 4 items in this group.
Figure as follow:
Note: Please download related files from our FTP site
ftp://ftp.icpdas.com/pub/cd/8000cd/napdos/minios7/utility/MiniOS7 utility
HTU
UTH
Web Server Lite Software User’s Manual, 2003, v2.0
17
Web Server Lite
MiniOS7 Utility for Host-PC
The MiniOS7 Utility is used for the essential configuration and download of programs to the products embedded in
the ICPDAS MiniOS7.
The utility is similar to the 7188xw.exe (Windows console for Win32), and the 7188x.exe (windows console for
Win98), however it can be used in the Microsoft Windows environment, rather than a window console environment.
The means of communication used in the MiniOS7 utility is the same as in 7188xw.exe and uses the RS232 port
(including USB-RS232 or PCMCIA-RS232 ports) of the PC to link to the products embedded in the ICPDAS
MiniOS7.
Note: About the 7188xw.exe and 7188x.exe, please refer to the section 1.4 Software Utilities of Manual 'I-7188E
Software'.
The program, MiniOS7 Utility, can be used as follows:
z
Update MiniOS7 image
z
Load programs to Flash
z
Configure Ethernet and COM port settings for 7188E/8000E
PC system Requirements:
IBM compatible PC
Windows 95/98/NT/2000/XP
For further information please refer to the on-line help of MiniOS7 Utility.
MiniOS7 Utility Operation Method
Before using this utility, please connect wires from PC to 7188EN as follow:
Web Server Lite Software User’s Manual, 2003, v2.0
18
Web Server Lite
Build a connection between PC and 7188EN
Step 1: Choose 'MiniOS7 utility' of group 'MiniOS7_utility'.
Step 2: Select ComPort and Baudrate as follow.
Note: These items that you have selected are all depends on your hardware connection method.
Web Server Lite Software User’s Manual, 2003, v2.0
19
Web Server Lite
Step 3: After you click on 'OK', the screen displays some explaining of icons. Please read this
information and click 'Next'.
Note: Every time when you start this program, this screen will be shown. If you hope it does not bother you again,
please click the check box 'Don’t show this dialog next time'.
Web Server Lite Software User’s Manual, 2003, v2.0
20
Web Server Lite
Step 4: When the screen display as follow, it means that you had built a connection between
7188EN with PC.
Web Server Lite Software User’s Manual, 2003, v2.0
21
Web Server Lite
Download programs into 7188EN
Step 1: Change the directory into the located of the files of left window.
Step 2: Select the file that you want to download into 7188EN and click
Note: You can also hold the CTRL or SHIFT to select multiple files and click
After you click
or
.
and the program will start to download file(s) into 7188EN.
Web Server Lite Software User’s Manual, 2003, v2.0
22
.
Web Server Lite
After download complete, users just need to turn the power of 7188EN OFF and ON and the program will start
to run this program that you have downloaded inside. Users also can click the
button and all files which
are existing in the I-7188EN series will be deleted.
Delete Program in 7188EN
Users can just click on the button
for deleting files. Following dialog window will be shown.
After click the 'Yes' button and all the files (In 7188EN) will be deleted.
Web Server Lite Software User’s Manual, 2003, v2.0
23
Web Server Lite
Web Server Lite Software User’s Manual, 2003, v2.0
24
Web Server Lite
2.5
How to test the project by Browser
When the web server is actives and user can browse this web by IE or Netscape. Before connecting to this web site,
please make sure you already know the actually IP address of this web.
Visit the Web Server
Step 1: Launch the browser.
Step 2: Enter the IP address of Web Server in address box.
Please enter the IP address
of Web Server.
Web Server Lite Software User’s Manual, 2003, v2.0
25
Web Server Lite
Step 3: The client had connected with the Web Server.
Web Server Lite Software User’s Manual, 2003, v2.0
26
Web Server Lite
2.6
Default Web Server
When user connects the 7188EN with the device, users no need to add any code and the web service can be
available immediately.
Users only download the basic needed files as the table list had shown as follow:
1.
WLDemo01.exe (This file is created by WEBL200.LIB and User.c)
2.
Autoexec.bat
Users can use this default web server for testing your network status is working well or not.
Program Body:
#include "web.h"
void Web_Init(void)
{
/*
In this function, user can:
1. Initialize user's program.
2. Initial value of I/O or variables for Web_Loop ().
*/
}
void Web_Loop(void)
{
/*
1. Main loop will call this function every scan time
2. You can place the code that you want Main route to do
*/
}
void GetDataFromWeb (void)
{
/*
1. Users web page’s command interpreter
2. User can Fill the value (Type is character) of SendDataToWeb
3. This interpreter will use SendDataToWeb to replace the keyword ~xxxx=xxxx~. (Include the '~')
*/
}
void GetDataFromForm(void)
{
/*
This function will receive the values that sending from the 'Form object' of the Web page.
According to the value(s), users can response the proper Web page by PRINT_PAGE().
*/
}
Users can leave the blank in all functions and the 'Web Server Lite' still can work. The default page will be replaced
as 'index.htm' even if the file does not exist.
Web Server Lite Software User’s Manual, 2003, v2.0
27
Web Server Lite
3. Demo Programs for Web Server
3.1 WLDemo01: The basic setting and default Web page
In this Demo, you need to do nothing but only download the WLDemo01.exe and Autoexec.bat to 7188EN.
Please download following files (\WLDemo01\) into 7188EN.
3.
WLDemo01.exe (This file is created by WEBL200.LIB and User.c)
4.
Autoexec.bat
Descript these files in detail.
WLDemo01.exe
The execute file is the main program of Web Server Lite. All default functions and services are provided by this file.
Users can start the basic service with this.
Note: Use the different project name and the execute file name will become the same with project name.
Autoexec.bat
(Users can place the file name in which is started while the 7188EN has reset or power on.)
The specific program can be automatically executed via the autoexec.bat when the 7188EN has reset or power on.
When users visit this IP of 7188EN via browser, it shows the default web page(Copyright Declared)as follow.
Web Server Lite Software User’s Manual, 2003, v2.0
28
Web Server Lite
Users can click on the hyperlink Setting WEB to change the network parameters of 7188EN. There are three
U
U
parameters can be changed by users.
IP: IP address assigned to this 7188EN.
Mask: The part of the IP address (the subnet mask) that distinguishes other machines on the same LAN from
machines in other departments or elsewhere in the world (which are sent to a router machine).
GateWay: The IP address of the router machine that connects this LAN to the rest of the world.
The figure had shown as follow.
After changing the related parameters by press 'MODIFY_SETTING' button, Web Server would create a new page
which contains a hyperlink for new IP. Users can visit the new location to confirm whether the setting is correct or
not.
The figure had shown as follow.
Web Server Lite Software User’s Manual, 2003, v2.0
29
Web Server Lite
Note: If users download the 'index.htm' into 7188EN and visit the default page of the Web Server. It will display the
'index.htm' as default page of 7188EN. If users do not execute this step, Web Server will show the page of
'Copyright Declared' as default page.
When user need to show this setting page for setting the parameters of network, please place a hyperlink in page as
'<a href="/cgi-bin/cgi_dpage">' offer the client for this goal.
It is not allow user visit this page directly via input '<a href="/cgi-bin/cgi_dpage">' in the Address line.
Users also can modify related configuration via 'MINIOS7 UTILITY', but this way provider user can change it from
the remote.
Web Server Lite Software User’s Manual, 2003, v2.0
30
Web Server Lite
3.2 WLDemo02: Customize Web Page
This Demo would show the user how to read data from Com Port of 7188EN via HTML file.
Please download following files (\WLDemo02\) into 7188EN.
1.
WLDemo02.exe (This file is created by WEBL200.LIB and User.c)
2.
Index.htm
3.
ReadMem.htm
4.
Autoexec.bat
Note1: Users can edit these files by MS-FrontPage, Notepad or the other tools.
Note2: When users modify the functions of User.c, please use Borland C or the compilers listed in section 2.1 to
rebuild the WLDemo02.exe.
Describe these files in detail.
WLDemo02.exe
Please refer to WLDemo01.
Index.htm
Index.htm is default page of the Web Server. When the users visit this Web Server, the Web Server would respond
this file to client (browsers). In the Demo, it would provide a hyperlink to decode ReadMem.htm via CGI_User().
ReadMem.htm
Users can modify this file by FrontPage or Notepad. In order to interactive with the Web Server, users must place the
key word '~'.
~Para1=0&Para2=1~
Each parameter which is contains in the string must separate by '&'.
Note: The format of the key string must tally with the expression as above.
Autoexec.bat
Please refer to WLDemo01.
Web Server Lite Software User’s Manual, 2003, v2.0
31
Web Server Lite
The following describes the code:
Index.htm
<html>
<head>
<title>Link To Output Page</title>
</head>
<body bgcolor="#FF99FF">
<! Following hyperlink will call CGI function (CGI_User) to decode the ReadMem.htm
After decode completed, it will response the Web Page to the browser of client. >
<p><a href="/CGI-BIN/CGI_User?Page=ReadMem.htm">Link To Output Index Page</a></p>
</body>
</html>
ReadMem.htm
<!
<!
<!
<!
<!
<!
<!
<!
<!
<!
<!
The decoding function (CGI_User) will send the keyword between the key string '~' >
Into another function (GetDataFromWeb) and the parameters will be saved in >
Argu_Name[0]:Name of Parameter 1, Argu_St[0]:Value of Parameter 1 >
Argu_Name[1]:Name of Parameter 2, Argu_St[1]:Value of Parameter 2 >
.>
.>
.>
Argu_Name[9]:Name of Parameter 10, Argu_St[0]:Value of Parameter 10 >
And the number of total parameter will be saved in Argu_Num >
Before response the Web page, CGI_User will use the return value (From GetDataFromWeb) >
to replace it. >
<html>
<head>
<title>ShowMem</title>
</head>
<body bgcolor="#FFFF00">
<p align="center"><font face="Academy Engraved LET" size="7" color="#FF0000">Well
Done</font></p>
<p align="center">This Data Locate 5 is ~Mem=2&Mem=9~</p>
<p align="center">This Data Locate 7 is ~Mem=7&Mem=9~</p>
<p align="center"><img border="0" src="icpdas.gif" width="120" height="60"></p>
<p align="center"><img border="0" src="icpdas.jpg" width="182" height="136"></p>
</body>
</html>
Part of the program body:
User.c
In the beginning of Web_Init(), we fill the data into the array of iMem. The data that we fill refer to the remark of
Web_Init() as follow:
void Web_Init(void)
{
/*
Following will declare a array and the data inported is:
iMem[0][0]=0 ~ iMem[0][9]= 0
iMem[1][0]=0 ~ iMem[1][9]= 1
.
.
iMem[4][0]=0 ~ iMem[4][9]= 4
iMem[5][0]=0 ~ iMem[5][9]=-5
.
Web Server Lite Software User’s Manual, 2003, v2.0
32
Web Server Lite
.
iMem[9][0]=0 ~ iMem[9][9]=-9
*/
int i,j;
for (i=0;i<10;i++)
for(j=0;j<10;j++)
if (i<5)
iMem[i][j]=i;
else
iMem[i][j]=i*-1;
}
In the function of GetDataFromWeb(), users need to decide what value will be sent for replacement the key string
which is located in ReadMem.htm.
void GetDataFromWeb(void)
{
/*
According to the parameters have received (Argu_St[0] and Argu_St[1]).
Users can decide what value can be returned.
In this Demo, we return the iMem[2][9] (First call)
iMem[7][9] (Second call)
Attention!! The return value must be the character type and saved in SendDataToWeb.
*/
itoa(iMem[atoi(Argu_St[0])][atoi(Argu_St[1])],SendDataToWeb,10);
}
When visit the index.htm, the figure is shown as follow.
Web Server Lite Software User’s Manual, 2003, v2.0
33
Web Server Lite
When visit the hyperlink inside of index.htm, the screen is shown as follow.
Web Server Lite Software User’s Manual, 2003, v2.0
34
Web Server Lite
3.3 WLDemo03: 'Form Action' application
Users can send data(s) to the 7188EN via 'Form Action'. It is the standard object of HTML. In this demo we will
show you how to send information to 7188EN and get response from it. Please download the following files into
7188EN:
1. WLDemo03.exe (This file is created by WEBL200.LIB and User.c)
2. Index.htm
3. SendForm.htm
4. Response.htm
5. Autoexec.bat
Descript these files in detail.
WLDemo03.exe
Please refer to WLDemo01.
Index.htm
Index.htm is default page of the Web Server. When the users visit this Web Server, it would respond the web page to
client (browser). In this Demo, the Server will respond a page (index.htm) which contains a hyperlink to
'SendForm.htm'.
SendForm.htm
The HTML file can be edited by users. Users can modify this file by FrontPage or Notepad. In order to interactive
with the Web Server, users must add the 'Form Action' object in this page.
<form method="GET" action="/cgi-bin/CGI_GET">
<p align="center"><input type="text" name="Para1" size="20">
<input type="text" name="Para1" size="20">
<input type="submit" value="Send">
<input type="reset" value="Reset" name="B2"></p>
</form>
Autoexec.bat
Please refer to WLDemo01.
The following describes the code:
Index.htm
<html>
<head>
<title>Send data via Form</title>
</head>
Web Server Lite Software User’s Manual, 2003, v2.0
35
Web Server Lite
<body bgcolor="#FF99FF">
<! This HTML file just simply provide a hyperlink to SendForm.htm. >
<p align="center"><font size="5" color="#008080">Please click the following Hyperlink</font></p>
<p align="center"><font size="5" color="#008080">for</font></p>
<p align="center"><font size="5" color="#008080">Send data to 7188EN via 'Form' object </font></p>
<p align="center"><a href="/sendform.htm">Connect to the page with 'Form' object</a></p>
</body>
</html>
SendForm.htm
<html>
<head>
<title>Send Data By Form</title>
</head>
<! The page only provide a method to fill data and send to the CGI function ->
<p align="center"><b><font size="6" color="#FF0000">Please input the data that you want to send.</font></b></p>
<body bgcolor="#FFFF00">
<! Please pay attention to following line.->
<! Make sure you fill the correct path and the name of CGI function in the method and action command. >
<form method="GET" action="/cgi-bin/CGI_GET">
<p align="center"><input type="text" name="Para1" size="20">
<input type="text" name="Para2" size="20">
<input type="submit" value="Send">
<input type="reset" value="Reset" name="B2"></p>
</form>
<p align="center"><b><font size="6" color="#FF0000">
<a href="/cgi-bin/CGI_GET?var1=100&var2=200">Send data to GetDataFromForm by hyperlink</a>
</font></b></p>
</body>
</html>
Response.htm
<html>
<head>
<title>Response data of sum</title>
</head>
<p align="center"><b><font size="7" color="#0000FF">The Sum of Para1 and Para2</font></b></p>
<p align="center"><b><font size="7" color="#0000FF">is</font></b></p>
<! The decode function will replace ~Para1=0&Para2=0~ with iMem[0][0] ->
<p align="center"><b><font size="7" color="#0000FF"></font>
<font size="7" color="#FF0000">~Para1=0&Para2=0~</font></b></p>
</body>
</html>
Part of the program body:
User.c
void GetDataFromForm(void)
{
/*
According to the parameters have received (Argu_St[0] and Argu_St[1]).
Users can decide what value will be returned.
In this Demo, we return Argu_St[0]+Argu_St[1] and save this value into iMem[0][0].
Therefore, your response page need to dedicate the index number of array iMem[0][0] as follow:
~Para1=0&Para2=0~
The decode function will replaces '~Para1=0&Para2=0~' with the value of iMem[0][0].
*/
Web Server Lite Software User’s Manual, 2003, v2.0
36
Web Server Lite
int total;
total=atoi(Argu_St[0])+atoi(Argu_St[1]);
iMem[0][0]=total;
itoa(iMem[0][0],SendDataToWeb,10);
PRINT_PAGE("Response.htm");
}
When visit the 'index.htm', the screen is shown as follow.
After visiting the hyperlink inside (Connect to the page with 'Form' object) of 'index.htm',
the result is shown as follow.
Web Server Lite Software User’s Manual, 2003, v2.0
37
Web Server Lite
Please input 2 integer values (100 and 200), and press 'Send ' button.
When the data has received by GetDataFromForm(), it will responses the page is assigned by PRINT_PAGE().
In the meantime, the PRINT_PAGE () also decodes the key string as the CGI_User() do.
The figure is shown as follow. Users also can find that this page still contains a hyperlink. This method not only can
send data via 'Form', but also can send via hyperlink.
The format of hyperlink as follow:
<a href="/cgi-bin/CGI_GET?var1=100&var2=200">
Web Server Lite Software User’s Manual, 2003, v2.0
38
Web Server Lite
Web Server Lite Software User’s Manual, 2003, v2.0
39
Web Server Lite
3.4 WLDemo04: Application with DCON module’s I/O.
Users can exchange information between the web page and RS-485 network via Web Server. The proper
commands must be used in the function Web_Loop().
Note: About the detail of this function, please refer to section 1.3.
Attention!!! This demo need the module which has SRAM 512K or above. If your SRAM is not enough, this
demo will can not be run. Users can install the X6xx I/O expansion board to solve this problem.
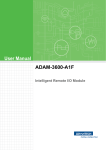
We provide the Demo, which would show you how to apply the web service with the DCON modules. All the
modules must be connected to the RS-485 network of 7188EN. The required hardware is:
1. 7188EX*1 (Belong to the 7188EN Series.)
2. I-7012D*1
3. I-7021*1
4. I-7050D*1
The figure is shown as follow:
Web Server Lite Software User’s Manual, 2003, v2.0
40
Web Server Lite
Please connect these modules had shown as previous page. Before test the demo, please download them into
7188EN. Especially, you need to connect the wires between the analog out of 7021 and analog in of 7012D and
connect the DI0~DI6 to the DO0~DO6 of 7050D.
1.
WLDemo04.exe (This file is created by WEBL200.LIB and User.c)
2.
Autoexec.bat
3.
Show.htm
4.
Index.htm
5.
Dot.gif
6.
0.gif~9.gif
7.
On.gif
8.
Off.gif
Descript these files in detail.
WLDemo04.exe
Please refer to WLDemo01.
Index.htm
In this Demo, the index.htm will respond a page that contains a hyperlink for 'Show.htm'. The link is
'/cgi-bin/cgi_user?Page=show.htm'.
Show.htm
Users can edit or modify this file by FrontPage or Notepad. In order to interactive with the Web Server, users must
add the key string '~'. In this Demo, the decode function would replace '~Digital=1' with the '<img border=\"0\"
src=\"0.gif\">' ~ '<img border=\"0\" src=\"9.gif\">'.
~ Digital=1 ~
Attention: The format of the key string must tally with the expression as above.
Web Server Lite Software User’s Manual, 2003, v2.0
41
Web Server Lite
Autoexec.bat
Please refer to WLDemo01.
On.gif、Off.gif
These two pictures will show the status of analog out value.
Dot.gif,0.gif ~ 9.gif
These files will show the analog in value in 7-seg pictures.
Following descript the code:
Index.htm
<html>
<head>
<title>Control DCON module's I/O</title>
</head>
<body bgcolor="#FF99FF">
<!This HTML file just simply provide a hyperlink to SendForm.htm. >
<p align="center"><font size="5" color="#008080">Please click the following Hyperlink</font></p>
<p align="center"><font size="5" color="#008080">for</font></p>
<p align="center"><font size="5" color="#008080">Change the status of the light</font></p>
<p align="center"><a href="/cgi-bin/cgi_user?Page=show.htm">Monitor/Control the DCON modules</a></p>
</body>
</html>
Show.htm
<html>
<head><title>Web Service With DCON Modules</title></head>
<! The page only provide a method to fill parameter(s) and send to the CGI function ->
<p align="center"><font size="6" color="#FF0000">Now the voltage of 7012D is</font></p>
<p align="center">
~Digital=1~
~Digital=2~
~Digital=3~
Part A
~Digital=4~
~Digital=5~
~Digital=6~
</p>
<!Build 1st Form for increase the Analog output of I-7021>
<form method="Get" action="/cgi-bin/cgi_get">
<p align="center">
<b>Decrease Voltage</b>
<input type="hidden" name="Page" value="show.htm">
From 1
<input type="hidden" name="State" value="INC">
<input type="submit" value="Increase"></p>
</form>
<!Build 2nd Form for decrease the Analog output of I-7021>
<form method="Get" action="/cgi-bin/cgi_get">
<p align="center">
<b>Decrease Voltage</b>
From 2
<input type="hidden" name="Page" value="show.htm">
<input type="hidden" name="State" value="DEC">
<input type="submit" value="Decrease"></p>
</form>
Web Server Lite Software User’s Manual, 2003, v2.0
42
Web Server Lite
<p align="center"></p>
<p align="center"></p>
<p align="center"></p>
<hr>
<p align="center"><font size="6" color="#FF0000">The status of 7050 is</font></p>
<!Build 3rd Form for change the Digital out of I-7050D>
<form method="Get" action="/cgi-bin/cgi_get">
<center>
<table border="1">
<tr>
<td align="center" colspan="7" height="16"><font color="#FF0000"><b>Digital In</b></font></td>
<td align="center" rowspan="4" height="50">
<input type="hidden" name="Page" value="show.htm">
<input type="hidden" name="State" value="DIO">
<input type="submit" value="Send"></td>
</tr>
<tr>
<td align="center" height="16">~Led=6~</td>
<td align="center" height="16">~Led=5~</td>
<td align="center" height="16">~Led=4~</td>
<td align="center" height="16">~Led=3~</td>
From 3
<td align="center" height="16">~Led=2~</td>
<td align="center" height="16">~Led=1~</td>
<td align="center" height="16">~Led=0~</td>
</tr>
<tr>
<td align="center" colspan="7" height="16"><b><font color="#FF0000">Digital Out</font></b></td>
</tr>
<tr>
<td align="center" height="20"><b>DO6<input type="checkbox" name="D6" value="ON"></b></td>
<td align="center" height="20"><b>DO5<input type="checkbox" name="D5" value="ON"></b></td>
<td align="center" height="20"><b>DO4<input type="checkbox" name="D4" value="ON"></b></td>
<td align="center" height="20"><b>DO3<input type="checkbox" name="D3" value="ON"></b></td>
<td align="center" height="20"><b>DO2<input type="checkbox" name="D2" value="ON"></b></td>
<td align="center" height="20"><b>DO1<input type="checkbox" name="D1" value="ON"></b></td>
<td align="center" height="20"><b>DO0<input type="checkbox" name="D0" value="ON"></b></td>
</tr>
</table>
</center>
</form>
<p align="center"></p>
<hr>
<p align="center"></p>
<p align="center"><font size="4"><a href="/index.htm">Back to Main</a></font></p>
<body bgcolor="#FFFFFF">
</body>
</html>
Part of the program body:
When decode function Cgi_User() start to decode this page, it will replace all the string which is located between two
'~', and send the variables to the GetDataFromWeb().
Users can decide what values will be returned in GetDataFromWeb().
In Part A, we just reserve the location for place the digital out value. Where Digital=1~Digital=6 mean the analog in
values of 7012.
Web Server Lite Software User’s Manual, 2003, v2.0
43
Web Server Lite
For Example:
Analog in of 7012 is 01.2345 and the Digital=1 will replace by 0,Digital=2 will replace by 1,Digital=3 will
replace by dot etc.
Therefore, when the page had response to the client. The page that users saw will be filled the correctly value of
analog in of 7012.
In Form 1, the main purpose is to increase 1V for the analog out of 7021. For reaching this goal, we need to send
the following information to Web Server:
1. The Page name, when the data or command have executed; We need to dedicate the response page for client.
2. The state, Web Server does the proper response for the input command string. Such as Argu_St[1]= 'INT' and
the analog out of 7021 will increase 1V.
But these information, we only need to let the server knows, the client does not need to see these information. So
we place a special object '<input type="hidden" name="Page" value="show.htm">' here.
This object can bring the information that browser need to send to the server but without display the object in the
browser while the user browse this page.
In Form 2, the main purpose is to decrease 1V for the analog out of 7021 and the others are the same with Form 1.
In Form 3, we place the status of digital in and digital out. Users can click the checkbox to decide the digital out
value.
After click the submit button, the form will send the required information (such as response page, the change method
of the voltage.) to the Web Server and the server will do the proper response.
User.c
void Web_Init(void)
{
/*
Before send Command to DCON, we need to initial the COM Port parameters.
In this Demo, we use following data:
ComPort=2
Baudrate=9600
Data bit=8
Parity=0(none)
*/
InstallCom2(9600L,8,0);
}
Before we want to communicate with the modules, we need to initial the COM Port of 7188EN.
There are several parameters needed to set. The details as follow:
1.
COM Port:
2.
Baudrate:
3.
Checksum:
4.
Data bit:
Note: This command needs be executed only one time, so we place the code in Web_Init().
void GetDataFromWeb(void)
{
Web Server Lite Software User’s Manual, 2003, v2.0
44
Web Server Lite
/*
According to the parameter has received.
Users can decide what value can be returned.
In this Demo, we return picture to show the related information about the modules.
Therefore, your response page need to dedicate the location of picture such as ~Digital=1~
and ~Led=1~.
The decode function will replaces them with the image location.
*/
int i,DI;
char cStr1[20];
//Receive data from DCON's module
char buffer[80],buffer1[3];
if (strcmp(Argu_Name[0],"Digital")==0)
//Check the key string
{
SendCmdTo7000(2,"#01",0);
//Read AI
ReceiveResponseFrom7000(2,cStr1,500,0);
strcpy(sMinfo[0],cStr1+1);
//Save the analog in value of address 1 into sMinfo
switch (Argu_St[0][0])
//Display the analog in value in 7-seg images.
{
case '1':
sprintf(buffer,"<img border=\"0\" src=\"%c.gif\">",sMinfo[0][1]);
DelayMs(10);
strcpy(SendDataToWeb,buffer);
break;
case '2':
sprintf(buffer,"<img border=\"0\" src=\"%c.gif\">",sMinfo[0][2]);
DelayMs(10);
strcpy(SendDataToWeb,buffer);
break;
case '3':
strcpy(SendDataToWeb,"<img border=\"0\" src=\"dot.gif\">");
break;
case '4':
sprintf(buffer,"<img border=\"0\" src=\"%c.gif\">",sMinfo[0][4]);
DelayMs(10);
strcpy(SendDataToWeb,buffer);
break;
case '5':
sprintf(buffer,"<img border=\"0\" src=\"%c.gif\">",sMinfo[0][5]);
DelayMs(10);
strcpy(SendDataToWeb,buffer);
break;
case '6':
sprintf(buffer,"<img border=\"0\" src=\"%c.gif\">",sMinfo[0][6]);
DelayMs(10);
strcpy(SendDataToWeb,buffer);
break;
default:
strcpy(SendDataToWeb,"");
}
}
if (strcmp(Argu_Name[0],"Led")==0) //Display the status of Led with the image LedOn.gif and LedOff.gif
{
SendCmdTo7000(2,"@04",0);
//Read DI
ReceiveResponseFrom7000(2,cStr1,500,0);
buffer1[0]=cStr1[3];
//Only read the DI , the detail
buffer1[1]=cStr1[4];
// please refer to the manual of the 7000 DIO
buffer1[2]=0;
DI=(buffer1[0]-48)*16;
if (buffer1[1]>'9')
Web Server Lite Software User’s Manual, 2003, v2.0
45
Web Server Lite
DI=DI+(buffer1[1]-55);
else
DI=DI+(buffer1[1]-48);
for(i=0;i<7;i++)
{
sMinfo[1][i]=(DI & 0x01)?1:0;
DI >>=1;
}
if (sMinfo[1][atoi(Argu_St[0])])
strcpy(SendDataToWeb,"<img border=\"0\" src=\"ledon.gif\">");
else
strcpy(SendDataToWeb,"<img border=\"0\" src=\"ledoff.gif\">");
}
}
When decode the 'show.htm' via 'Cgi_User()', the 'Cgi_User()' has found the key string '~' and the function would
send this parameter to 'GetDataFromWeb()'. Users can assign the value that users want to replace the key string.
void GetDataFromForm(void)
{
/*
According to the parameters have received
(Argu_St[0] dedicate name of the page and Argu_St[1] dedicate the information belong to
Digital or Analog).
In this Demo, we can increase or decrease the voltage by pressing the command button
"Increase" or "Decrease".
We also can dedicate the digital output value via clicking the checkbox.
*/
char cStr[20],cStr1[20];
//Receive data from DCON's module
float sum;
//Save the output of analog
int do_val=0;
//Save the output of digital
int i=0;
if (strcmp(Argu_St[1],"DIO")==0)
//Check the parameter is digital or analog
{
for (i=0;i<Argu_Num-1;i++)
//Convert the character into value
{
if (strcmp(Argu_Name[i+2],"D0")==0) do_val=(do_val | 0x01);
if (strcmp(Argu_Name[i+2],"D1")==0) do_val=(do_val | 0x02);
if (strcmp(Argu_Name[i+2],"D2")==0) do_val=(do_val | 0x04);
if (strcmp(Argu_Name[i+2],"D3")==0) do_val=(do_val | 0x08);
if (strcmp(Argu_Name[i+2],"D4")==0) do_val=(do_val | 0x10);
if (strcmp(Argu_Name[i+2],"D5")==0) do_val=(do_val | 0x20);
if (strcmp(Argu_Name[i+2],"D6")==0) do_val=(do_val | 0x40);
}
if (do_val>15)
sprintf(cStr,"@04%X",do_val);
//Create the outout command in specific format
else
sprintf(cStr,"@040%X",do_val);
SendCmdTo7000(2,cStr,0);
//Send 7050 DO
DelayMs(10);
ReceiveResponseFrom7000(2,cStr,1000,0);
PRINT_PAGE(Argu_St[0]);
//Response the page to client.
}
else
{
if (strcmp(Argu_St[1],"INC")==0)
//Check the command is increase or decrease voltage
{
sum=1.0+atof(sMinfo[0]);
//Increase the voltage
if (sum>=10) sum=10;
Web Server Lite Software User’s Manual, 2003, v2.0
46
Web Server Lite
}
if (strcmp(Argu_St[1],"DEC")==0)
{
sum=atof(sMinfo[0])-1;
if (sum<=0) sum=0;
}
if (sum<10)
sprintf(cStr,"#020%2.3f",sum);
else
sprintf(cStr,"#02%2.3f",sum);
SendCmdTo7000(2,cStr,0);
//Decrease the voltage
//If the voltage less than 0V and the voltage equal to 0V
//Send 7021 AO
DelayMs(500);
SendCmdTo7000(2,"#01",0);
//Read AI
ReceiveResponseFrom7000(2,cStr,1000,0);
strcpy(sMinfo[0],cStr+1);
PRINT_PAGE(Argu_St[0]);
//Save the analog in value of address 1 into sMinfo
//Response the page to client.
}
}
When we accept the parameter have sent from the hyperlink, we need to do some property respond.
The parameters that we accept will be read in function 'GetDataFromForm'. All the parameters will be separated
into 2 parts, one is the name (Argu_Name[0]) and the other is value (Argu_St[0]) of parameter.
According to these two parameters, users can send the proper analog out value for it.
When visit the index.htm, the figure is shown as follow.
Web Server Lite Software User’s Manual, 2003, v2.0
47
Web Server Lite
After visit the hyperlink inside of 'Monitor/Control the DCON modules', the figure is shown
as follow.
And now the status of 7021’s analog out is 0V, users can click the hyperlink to 'Increase' the voltage. Please click on
the 'Increase', and the result as the follow:
Web Server Lite Software User’s Manual, 2003, v2.0
48
Web Server Lite
Web Server Lite Software User’s Manual, 2003, v2.0
49
Web Server Lite
Every time when the user clicks 'Increase' and the analog out of 7021 and analog in of 7012D will increase 1V.
And when the user clicks 'Decrease' and the analog out of 7021 and analog in of 7012D will decrease 1V.
In the page, users also can change the digital out value of 7050D. Users can click the check box to dedicate which
bit will change to the 'High'. Only click the check box and press 'Send' button.
The screen had shown as follow.
Web Server Lite Software User’s Manual, 2003, v2.0
50
Web Server Lite
Because the 'analog in' and 'analog out' of 7050D are connected. User can easily read the information of analog in
via the response page 'Show.htm'.
The screen had shown as follow.
Web Server Lite Software User’s Manual, 2003, v2.0
51
Web Server Lite
3.5 WLDemo05: Refresh the Web Page in the specific cycle time.
Sometime, users like to build a web page that can refresh data in the specific cycle time from the module. We would
show you a Demo about this issue.
In WLDemo05, the hardware and wires connection are the same with WLDemo04. But we add one more module
(I-7018) in RS-485 network. And the required hardware as follow:
1. 7188E2D*1
2. I-7012D*1
3. I-7021*1
4. I-7018*1
The figure of wires connection:
Web Server Lite Software User’s Manual, 2003, v2.0
52
Web Server Lite
Please connect these wires as figure had shown as above. Before test this demo, we need the following files, please
download them into 7188EN.
1.
WLDemo05.exe (This file is created by WEBL200.LIB and User.c)
2.
Autoexec.bat
3.
Refresh.htm
4.
Index.htm
Descript these files in detail.
Autoexec.bat
Please refer to WLDemo01.
WLDemo05.exe
Please refer to WLDemo01.
Index.htm
In this Demo, the index.htm would respond a page which contains a hyperlink for 'Refresh.htm'.
The link is <a href="/cgi-bin/cgi_user?Page=refresh.htm">.
Refresh.htm
This HTML file is almost the same with WLDemo04. The only different is that users need to add following codes
between <head> and </head> in 'refresh.htm':
<META HTTP-EQUIV="Refresh"CONTENT="10);url=/cgi-bin/cgi_user?Page=Refresh.htm">
Note 1: The format of the code please obeys the rules of HTML.
Note 2: If not necessary, we recommend that users set up the interval time of refresh are large than 60(60
Seconds) to prevent the network from busy.
The codes mean that this page reloads itself in every 10 seconds. Please be ware of the format of the codes, you
can easy to change the refresh time by alternate the value of 'CONTENT'. If users change the value into 60 and this
page would reload itself in every minute.
Web Server Lite Software User’s Manual, 2003, v2.0
53
Web Server Lite
Following descript the code:
Index.htm
<html>
<head>
<title>Refresh the Web Page in the specific cycle time</title>
</head>
<body bgcolor="#FF99FF">
<!This HTML file just simply provide a hyperlink to Refresh.htm. >
<p align="center"><font size="5" color="#008080">Please click the following Hyperlink</font></p>
<p align="center"><font size="5" color="#008080">for</font></p>
<p align="center"><font size="5" color="#008080">Read Modules' Information</font></p>
<p align="center"><a href="/cgi-bin/cgi_user?Page=Refresh.htm">Show the Information of modules which is
connected in RS-485 </a></p>
</body>
</html>
Refresh.htm
<html>
<head>
<meta http-equiv="content-type" content="text/html; charset=Big5">
<meta name="author" content="ICPDAS">
<title>Refresh Data</title>
<META HTTP-EQUIV="Refresh" CONTENT="10;url=/cgi-bin/cgi_user?Page=Refresh.htm">
</head>
<body bgcolor="#008080">
<p align="center">
<font size="4" color="#FFFFFF">The page will update the analog value of module I-7012D and I-7018</font></p>
<p align="center"><font size="4" color="#FFFFFF">Scan Times: ~Scan485=tc~</font></p>
<p align="center"><font size="4" color="#FFFFFF">Refresh Page Times: ~Conn_Server=rc~</font></p>
<div align="center">
<center>
<table
border="1"
cellpadding="0"
cellspacing="0"
style="border-collapse:
collapse"
width="25%"
id="AutoNumber1">
<tr>
<td width="100%" align="center">
<font color="#00FF00">I-7012D Address=1</font>
</td>
</tr>
<tr>
<td width="100%" align="center">
<font color="#FFFFFF">~Ad=1&Ch=0~V</font></td>
</tr>
</table>
</center>
<br>
<table border="1" cellpadding="0" cellspacing="0" style="border-collapse: collapse" bordercolor="#111111"
width="100%" id="AutoNumber2">
<tr>
<td width="100%" align="center" colspan="2"><font color="#00FF00">I-7018 Address=3</font></td>
</tr>
<tr>
<td width="50%" align="center"><font color="#00FF00">Channels</font></td>
<td width="50%" align="center"><font color="#00FF00">Value</font></td>
</tr>
<tr>
<td width="50%" align="center"><font color="#00FF00">0</font></td>
<td width="50%" align="center"><font color="#FFFFFF">~Ad=3&Ch=0~V</font></td>
</tr>
Web Server Lite Software User’s Manual, 2003, v2.0
54
Web Server Lite
<tr>
<td width="50%" align="center"><font color="#00FF00">1</font></td>
<td width="50%" align="center"><font color="#FFFFFF">~Ad=3&Ch=1~V</font></td>
</tr>
<tr>
<td width="50%" align="center"><font color="#00FF00">2</font></td>
<td width="50%" align="center"><font color="#FFFFFF">~Ad=3&Ch=2~V</font></td>
</tr>
<tr>
<td width="50%" align="center"><font color="#00FF00">3</font></td>
<td width="50%" align="center"><font color="#FFFFFF">~Ad=3&Ch=3~V</font></td>
</tr>
<tr>
<td width="50%" align="center"><font color="#00FF00">4</font></td>
<td width="50%" align="center"><font color="#FFFFFF">~Ad=3&Ch=4~V</font></td>
</tr>
<tr>
<td width="50%" align="center"><font color="#00FF00">5</font></td>
<td width="50%" align="center"><font color="#FFFFFF">~Ad=3&Ch=5~V</font></td>
</tr>
<tr>
<td width="50%" align="center"><font color="#00FF00">6</font></td>
<td width="50%" align="center"><font color="#FFFFFF">~Ad=3&Ch=6~V</font></td>
</tr>
<tr>
<td width="50%" align="center"><font color="#00FF00">7</font></td>
<td width="50%" align="center"><font color="#FFFFFF">~Ad=3&Ch=7~V</font></td>
</tr>
</table>
</div>
</body>
</html>
Part of the program body:
User.c
Following will initial the times of scan RS-485 and HTTP request.
unsigned long rc,tc;
//
tc is the timer of scan RS-485
//
rc is the timer of http request
void Web_Init(void)
{
/*
Before send Command to DCON, we need to initial the COM Port parameters.
In this Demo, we use following data:
ComPort=2
Baudrate=9600
Data bit=8
Parity=0(none)
*/
InstallCom2(9600L,8,0);
}
void Web_Loop(void)
{
Web Server Lite Software User’s Manual, 2003, v2.0
55
Web Server Lite
char cStr[20];
//Receive data from DCON's module
int i;
char *cCmd="#03";
char *cCmdSend;
char string[1];
tc=tc+1;
/*
We have 3 modules which is connected in RS-485 network.
In this loop, we keep to send the command of DCON for acquiring the information of modules.
*/
SendCmdTo7000(2,"#01",0);
//Read input value of I-7012D
ReceiveResponseFrom7000(2,cStr,500,0);
strcpy(sMinfo[0],cStr+1);
//Assign the Input Value of I-7012D into sMinfo[0]
for (i=0;i<8;i++)
//Read input value (all channels) of I-7018
{
strcpy(cCmdSend,cCmd);
itoa(i,string,10);
strcat(cCmdSend,string);
SendCmdTo7000(2,cCmdSend,0);
ReceiveResponseFrom7000(2,cStr,500,0);
strcpy(sMinfo[i+1],cStr+1);
//Assign the Input Value of I-7018 into sMinfo[]
}
}
We can use the 'SendCmdTo7000()' and 'ReceiveRespondFrom7000()' function to acquire the information from
modules and the method of this command. Please refer to the manual of 7188EN.
According to the codes are shown as above, we know the array of sMinfo is assigned to the input value of I-7012D
and I-7018.
sMinfo[0]
Assign the input value of I-7012D.
sMinfo[1]~ sMinfo[9]
Assign the input value of I-7018.
void GetDataFromWeb(void)
{
/*
According to the parameter have received (In this Demo is Argu_Name[ ] & Argu_St[ ]).
Users can decide what value can be returned.
In this Demo, we receive Argu_St[ ] to decide what value will be returned.
The decode function will replaces '~Ad=1&Ch=0~' or '~Para=TC~' with the value of sMinfo[ ].
*/
int i;
if (strcmp(Argu_Name[0],"Ad")==0 && atoi(Argu_St[0])==1 ){
if (strcmp(Argu_Name[1],"Ch")==0 && atoi(Argu_St[1])==0 )
strcpy(SendDataToWeb,sMinfo[0]); //Returns the Input value of I-7012D to Web Page
}
if (strcmp(Argu_Name[0],"Ad")==0 && atoi(Argu_St[0])==3 )
{
for (i=0;i<8;i++)
{
if (strcmp(Argu_Name[1],"Ch")==0 && atoi(Argu_St[1])==i)
{
strcpy(SendDataToWeb,sMinfo[i+1]); //Returns the Input Value of I-7018 to Web Page
i=9;
}
}
}
if (strcmp(Argu_Name[0],"Scan485")==0 && strcmp(Argu_St[0],"tc")==0)
{
Web Server Lite Software User’s Manual, 2003, v2.0
56
Web Server Lite
ltoa(tc,SendDataToWeb,10);
//Returns the refresh counter-7018 to Web Page
}
if (strcmp(Argu_Name[0],"Conn_Server")==0 | strcmp(Argu_St[0],"rc")==0)
{
rc++;
if (rc==900000000) rc=0;
//When reach the limit of variable, we reset this variable.
ltoa(rc,SendDataToWeb,10);
}
}
Web Server Lite Software User’s Manual, 2003, v2.0
57
Web Server Lite
When visit the index.htm, the figure is shown as follow.
After visit the hyperlink inside of 'index.htm', the figure had shown as follow.
Web Server Lite Software User’s Manual, 2003, v2.0
58
Web Server Lite
3.6 WLDemo06: X board digital in/out
Before testing, please connect the digital in to digital out of X107 had shown as follow:
DI0-----------------DO0
DI1-----------------DO1
DI2-----------------DO2
DI3-----------------DO3
DI4-----------------DO4
DI5-----------------DO5
In this demo we will show how to read or send digital in/out via X-board.
Firstly, we need to install the X107 in the 7188EXD and download these files had shown as follow:
Note: Regarding how to install the X-Board, please refer to the manual of 'I/O Expansion Bus'.
1.
WLDemo06.exe (This file is created by WEBL200.LIB and User.c)
2.
Autoexec.bat
3.
Index.htm
4.
Send.htm
5.
Read.htm
Descript these files in detail.
WLDemo06.exe
Please refer to WLDemo01.
Autoexec.bat
Please refer to WLDemo01.
Index.htm
In this Demo, the index.htm would respond a page which contains a hyperlink for 'Send.htm'. The link is
'<a href="/send.htm">'.
Send.htm
This HTML file is containing a 'Form' Object for sending the digital out value.
Read.htm
When visit this web page, the page will respond a page which contains the digital in of X107.
Web Server Lite Software User’s Manual, 2003, v2.0
59
Web Server Lite
Following descript the code:
Index.htm
<html>
<head>
<title>Refresh the Web Page in the specific cycle time</title>
</head>
<body bgcolor="#FF99FF">
<!This HTML file just simply provide a hyperlink to Refresh.htm. >
<p align="center"><font size="5" color="#008080">Please click the following Hyperlink</font></p>
<p align="center"></p>
<p align="center"><a href="/send.htm">Send digital out value for X107</a></p>
</body>
</html>
Send.htm
<html>
<head>
<meta http-equiv="Content-Language" content="zh-tw">
<meta name="GENERATOR" content="Microsoft FrontPage 5.0">
<meta name="ProgId" content="FrontPage.Editor.Document">
<meta http-equiv="Content-Type" content="text/html; charset=big5">
<title>Send Data For X107</title>
</head>
<body bgcolor="#008080">
<p align="center"><font size="5" color="#FFFFFF">Please enter the digital </font></p>
<p align="center"><font size="5" color="#FFFFFF">value that you want to send</font></p>
<p align="center"><font size="5" color="#FFFFFF">For X107</font></p>
<form method="GET" action="/cgi-bin/CGI_GET">
<p align="center">
<input type="text" name="Para1" size="20">
<input type="submit" value="Send" name="B1">
<input type="reset" value="Reset" name="B2"></p>
</form>
</body>
</html>
In Send.htm, it will send the digital out value for X107 and the value will be receive in GetDataFromForm().
Users can easily to read this value by *Argu_St[0] and do the proper respond.
Read.htm
<html>
<head>
<meta http-equiv="Content-Language" content="zh-tw">
<meta name="GENERATOR" content="Microsoft FrontPage 5.0">
<meta name="ProgId" content="FrontPage.Editor.Document">
<meta http-equiv="Content-Type" content="text/html; charset=big5">
<title>The digital in values of X107 is</title>
</head>
<body bgcolor="#FF99FF">
<p align="center"><font size="5">The digital values of X107 is</font></p>
<p align="center"><font size="5">Digital In ~Para1=DIVAL~</font></p>
<p align="center"><font size="5">Digital Out ~Para1=DOVAL~</font></p>
</body>
</html>
Web Server Lite Software User’s Manual, 2003, v2.0
60
Web Server Lite
When users visit the web page by the decode function 'User_Cgi', the decode function will replace the key string
before the page has responded to the browser of the client.
Regarding the detail information, please refer to the WLDemo02.
Part of the program body:
User.c
Define the initial value of DiVal and DoVal.
unsigned char DoVal=0x00,DiVal=0x00;
void GetDataFromForm(void)
{
//Following will convert the character code into integer
if (*Argu_St[0]>0x60)
*Argu_St[0]=*Argu_St[0]-0x57;
else
*Argu_St[0]=*Argu_St[0]-0x30;
if (*(Argu_St[0]+1)>0x60)
*(Argu_St[0]+1)=*(Argu_St[0]+1)-0x57;
else
*(Argu_St[0]+1)=*(Argu_St[0]+1)-0x30;
// end of convert
DoVal=((*Argu_St[0])*16+*(Argu_St[0]+1))&0x7f;
outportb(0,DoVal);
DelayMs(10);
DiVal=inportb(1)&0x3f;
PRINT_PAGE("read.htm");
// Write DoVal
// Read DiVal
// Send the page (read.htm) to client.
}
Once the client has received the data via 'Form' object, users can place the proper codes in this function to process.
In this demo, the parameter had sent via 'Form' had saved in the array of Argu_St[ ] and we send the value as
digital out.
Finally, we respond a page (read.htm) to the client.
Web Server Lite Software User’s Manual, 2003, v2.0
61
Web Server Lite
When visit the index.htm, the figure is shown as follow.
After visit the hyperlink inside of 'index.htm', the figure had shown as follow.
Web Server Lite Software User’s Manual, 2003, v2.0
62
Web Server Lite
We input the digital value '02' and Send. Once the value is sent, the digital out value of
X107 will become '3d'.The digital out figure had shown as follow.
May be users wonder why the digital out value is not the same with the digital in value. Regarding the specifications
of X107 we know the DI & DO number is not equal, the detail as follow:
Digital Input
Channel: 6
Digital Output
Channel: 7
And when the DI value is high, the bit that we get by inportb() will be the 0.
Note: Regarding the X board, please refer to the manual of 'I/O Expansion Bus I-7188X/I-7188E Series'.
Web Server Lite Software User’s Manual, 2003, v2.0
63
Web Server Lite
3.7 WLDemo07: X board analog in/out
Before testing, please connect the analog in to analog out of X303 had shown as follow:
AD0-----------------DA0
In this demo we will show how to read or send analog in/out via X-board. Firstly, we need to install the X303 in the
7188EXD. And download the files had shown as follow:
1.
WLDemo07.exe (This file is created by WEBL200.LIB and User.c)
2.
Autoexec.bat
3.
Index.htm
4.
Send.htm
5.
Read.htm
Descript these files in detail.
WLDemo07.exe
Please refer to WLDemo01.
Autoexec.bat
Please refer to WLDemo01.
Index.htm
In this Demo, the index.htm would respond a page which contains a hyperlink for 'Send.htm'. The link is
'href="/send.htm"'.
Send.htm
This HTML file is containing a Form Object for sending the analog out value.
Read.htm
When visit this web page, the page will respond a page that contains the analog in of X303.
Web Server Lite Software User’s Manual, 2003, v2.0
64
Web Server Lite
Following descript the code:
Index.htm
<html>
<head>
<title>Refresh the Web Page in the specific cycle time</title>
</head>
<body bgcolor="#FF99FF">
<!This HTML file just simply provide a hyperlink to Refresh.htm. >
<p align="center"><font size="5" color="#008080">Please click the following Hyperlink</font></p>
<p align="center"></p>
<p align="center"><a href="/send.htm">Send analog out value for X303</a></p>
</body>
</html>
Send.htm
<head>
<meta http-equiv="Content-Language" content="zh-tw">
<meta name="GENERATOR" content="Microsoft FrontPage 5.0">
<meta name="ProgId" content="FrontPage.Editor.Document">
<meta http-equiv="Content-Type" content="text/html; charset=big5">
<title>Send Data For X107</title>
</head>
<body bgcolor="#008080">
<p align="center"><font size="5" color="#FFFFFF">Please enter the analog out </font></p>
<p align="center"><font size="5" color="#FFFFFF">value that you
want to send</font></p>
<p align="center"><font size="5" color="#FFFFFF">For X303</font></p>
<form method="GET" action="/cgi-bin/CGI_GET">
<p align="center">
<input type="text" name="Para1" size="20">
<input type="submit" value="Send" name="B1">
<input type="reset" value="Reset" name="B2"></p>
</form>
</body>
</html>
In send.htm, it just offers a way to communicate with the Web Server via 'Form' object.
Read.htm
<html>
<head>
<meta http-equiv="Content-Language" content="zh-tw">
<meta name="GENERATOR" content="Microsoft FrontPage 5.0">
<meta name="ProgId" content="FrontPage.Editor.Document">
<meta http-equiv="Content-Type" content="text/html; charset=big5">
<title>The digital out value of X303 is</title>
</head>
<body bgcolor="#FF99FF">
<p align="center"><font size="5">The digital out value of X303 is</font></p>
<p align="center"><font size="5">Analog In ~Para1=AIVAL~</font></p>
<p align="center"><font size="5">Analog Out ~Para1=AOVAL~</font></p>
</body>
</html>
After process the request of send.htm, users can respond this page by 'PRINT_PAGE()' just as WLDemo06.
Web Server Lite Software User’s Manual, 2003, v2.0
65
Web Server Lite
Part of the program body:
User.c
void GetDataFromWeb(void)
{
/*
According to the parameter have received (In this Demo is Argu_St[0]).
Users can decide what value can be returned.
In this Demo, we receive Argu_St[0] to decide what value will be returned.
The decode function will replaces '~Para1=DIVAL~' or '~Para1=DOVAL~'
with the value of DiVal or DoVal~.
*/
if (strcmp(Argu_St[0],"DOVAL")==0)
itoa(DoVal,SendDataToWeb,16);
//Returns the Digital Out Value of I-7188 to Web Page
if (strcmp(Argu_St[0],"DIVAL")==0)
itoa(DiVal,SendDataToWeb,16);
//Returns the Digital In Value of I-7188 to Web Pag
}
void GetDataFromForm(void)
{
//Following will convert the character code into integer
//Check the first character
if (*Argu_St[0]>0x60)
//Check the character is '0'~'9' or 'a'~'f'
*Argu_St[0]=*Argu_St[0]-0x57;
//If the character is 'a'~'f'
else
*Argu_St[0]=*Argu_St[0]-0x30;
//If the character is '0'~'9'
//Check the second character
if (*(Argu_St[0]+1)>0x60)
*(Argu_St[0]+1)=*(Argu_St[0]+1)-0x57;
else
*(Argu_St[0]+1)=*(Argu_St[0]+1)-0x30;
// end of convert
DoVal=((*Argu_St[0])*16+*(Argu_St[0]+1))&0x7f;
outportb(0,DoVal);
//Write DoVal
DelayMs(10);
DiVal=inportb(1)&0x3f;
//Read DiVal
PRINT_PAGE("read.htm");
//Response page "read.htm" to the client
}
Web Server Lite Software User’s Manual, 2003, v2.0
66
Web Server Lite
When visit the index.htm, the figure is shown as follow.
After visit the hyperlink inside of 'index.htm', the figure had shown as follow.
Web Server Lite Software User’s Manual, 2003, v2.0
67
Web Server Lite
Please input the analog out value that you desire and press the 'Send' button. User can
read the analog out value via read.htm. In this Demo we input the value '2'. And the analog
out value will be read via '/cgi-bin/user_cgi?read.htm' as follow:
Web Server Lite Software User’s Manual, 2003, v2.0
68