1
7 Inch Digital Photo Frame
with Weather Station and16MB Built-in Memory
MPF701
User Manual
(Aug.2007 Ver 1.0) (Please read this User Manual carefully)before use.)
CONTENT
5.5.2.2 Music .........................................................................8
5.5.2.3 Movie ......................................................................... 8
1 Safety precaution ............................................... 3
5.5.3 Display Setup .................................................................. 9
1.1 Warning ............................................................. 3
5.5.3.1 Display Type ................................................................ 9
1.2 Caution .............................................................. 3
5.5.3.2 TV Standard ................................................................ 9
5.5.3.3 TFT Brightness ............................................................. 9
2 DIGITAL PHOTO FRAME Feature ....................................................... 4
3 Hardware information ........................................ 4
5.5.3.4 TFT Contrast ................................................................ 9
5.5.3.5 TFT Saturation ............................................................. 9
5.5.4 Custom Setup .................................................................. 9
3.1 Equipment power supply ...................................... 4
5.5.4.1 OSD Language ............................................................. 9
3.2 Power and A/V connection ................................... 4
5.5.4.2 Repeat Mode ............................................................... 10
3.2.1 Power connection ............................................................ 4
3.3 Panel illustration .......... ...................................... 5
3.4 Remote control keystroke collocation .......... ........ 5
5.5.4.3 Default ....................................................................... 10
5.5.4.4 Clock Time .................................................................. 10
5.5.4.5 Alarm Enable ............................................................... 10
5.5.4.6 Alarm Time .................................................................. 10
5.5.4.7 Power On Enable .......................................................... 10
4 First use ............................................................ 5
5.5.4.8 Power Off Enable .......................................................... 10
5.5.4.9 Set Time ..................................................................... 11
5 Function introductions......................................... 6
5.1 PHOTO ................................................................ 6
5.5.5 Exit ................................................................................ 11
5.2 MUSIC ................................................................ 6
5.6 CALENDAR .......................................................... 11
5.6.1 Display ........................................................................... 11
5.3 PHOTO+MUSIC ................................................... 6
5.6.2 Set Date .......................................................................... 11
5.4 MOVIE ............................................................... 7
5.6.3 Exit ................................................................................ 11
5.5 SETUP ................................................................ 7
5.5.1 Photo Setting .................................................................. 7
5.7 CLOCK ................................................................ 11
5.8 Copy/Del ............................................................ 12
5.5.1.1 Interval Time ............................................................... 7
5.8.1 Copy ............................................................................... 12
5.5.1.2 Transition Effect ........................................................... 7
5.8.2 Delete ............................................................................. 12
5.5.2 Auto-play ....................................................................... 8
5.5.2.1 Photo ......................................................................... 8
5.8.3 Exit ................................................................................. 12
5.9 FAVORITE ........................................................... 12
6 Basic operation .................................................. 13
6.1 Form explanation ............................................... 13
The lightning flash with arrow head symbol’s intended to alert the user the
6.2 Basic play ........................................................... 13
presence of uninsulated dangerous voltage.
6.2.1 Stop playing .................................................................... 13
6.2.2 Pause ..............................................................................
13
6.2.3 Short cut keys .................................................................. 13
The exclamation point is intended to alert the user to the presence of important operating
and maintenance instructions in this owner manual.
6.2.4 Enter the screen savers .................................................... 13
6.2.5 Fast forward or backward ................................................. 13
6.2.6 Skip to next or previous file ............................................. 14
6.2.7 Repeat play ..................................................................... 14
6.2.8 Volume control ................................................................. 14
6.2.9 Mute ............................................................................
14
6.2.10 Rotate photo .............................................................. 15
6.2.11 Photo thumbnail mode ................................................... 15
6.2.15 Media Manager .............................................................. 16
7 Trouble shooting ................................................ 17
8 Specifications .................................................... 17
1.1 Warning
To prevent the electric shock, do not expose the unit to rain or moisture. Never attempt to
open the cabinet, dangerous high voltages are presented in the unit. Refer servicing to
qualified service personnel.
1.2 Caution
■ Do not place this product in damp or dusty locations.
■ Do not place this product in a location affected by oil fumes or stream. such as near a
cooking stove or humidifier. This may cause a fire or an electrical shock.
■ Do not leave this product in a location subject to extremely high
temperatures, such as in a sealed vehicle or in direct sunlight.
■ Exposure to high temperatures may adversely affect the product case and internal
components and may cause a fire.
9 Weather Station settings ………………….. 18--20
■ Do not cover or wrap the product or the AC power adapter with a cloth or quilt. This may
■ Before using your Digital Photo Frame, read this manual carefully to ensure correct use.
■ Always use the product and its accessories in well ventilated locations.
■ Please observe the safety precautions at the next page.
■ Handle the product carefully and do not bump it in to any hard object.
■ The images of the TFT screen and illustrations of the Digital Photo Frame used in this
■ Handing the product roughly may cause a malfunction.
manual may differ from the actual product.
■ Do not move the product while it is switched on..
1 Safety precaution
cause heat to build up and distort the case and cause a fire.
■ Failure to do so may damage the cords or cables and cause a fire or an electrical
shock.
■ When handing the product, always unplug it from the power source (AC power
adapter) for safety.
■ When leaving the product unused for long periods, such as during a vacation, always
unplug it from the power source (AC power adapter) for safety.
■ Failure to do so could result in a fire.
2 DIGITAL PHOTO FRAME Feature
Show digital photograph in the high luminance TFT-LCD without the support of computer or
digital camera.
■ Support XD,MS,SD, MMC memory card .
■ Support auto slide show and normal display, you can change slide show stylus
3 Hardware information
3.1 Equipment power supply
Input:
Output:
100-240V
AC:50/60Hz
5V 1500mA
and speed.
■ User may rotate of picture.
■ Save your favorite picture into internal flash (Nor type).
3.2 Power and A/V connection
3.2.1 Power connection
■ Real time clock and calendar, alarm and auto on/off function.
■ The function of preview all the pictures when enter the photo menu, you can choose
and show any picture by move the cursor when previewing.
■ Multi languages OSD interfaces (ENGLISH, GERMAN, SPANISH, FRENCH,
ITALIAN, DUTCH, POLISH, PORTUGUESE , etc.).
■ Support file format MPEG1, MPEG2, MPEG3, MPEG4, AVI, DAT,
Note: This product support software update.
AC socket
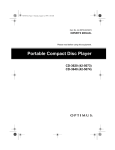
3.3 Panel illustration
Front view
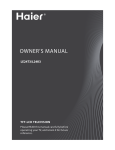
3.4 Remote control keystroke collocation
The reference chart for remote controller
"MUTE" key "REPEAT"
key "STANDBY" key
Short cut keys "PHOTO" "MUSIC" and "MOVIE"
"PLAY/PAUSE" key
"MENU" key
"ENTER" key
"UP, DOWN, LEFT, RIGHT" keys
"SETUP" key Short cut key
"PHOTO+MUSIC" "VOLUME CONTROL"
keys
Fast "FORWARD" and "BACKWARD" keys "NEXT"
and "PREVIOUS" keys
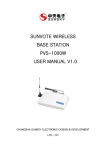
Back view
4 First use
When the system is opened first time, the
screen can display the menu, and you can
choose the function to enter in.
DIGITAL PHOTO FRAME701 can support the MEMORY CARDS.
The related operation of "Media manager", please check "6.2.15 Media manager for
your reference.
The system reads the MEMORY CARD.
Under mode "PHOTO", system support playing picture, the format is JPG.
The formats of multimedia players for DIGITAL PHOTO FRAME701 are under
below:
If you open the automatic play function of "PHOTO" ("5.5 2.1 PHOTO")
After entering into mode "PHOTO", it will play automatically.
CONTENT
FORMAT
PHOTO
JPG
MUSIC
MP3
MOVIE
DAT/MPG/VOB/MP4
5 Function introductions
5.1 PHOTO
After the main menu choose "PHOTO", press the "ENTER" or "PLAY" key, it will
automatically check whether it links to the save media (MEMORY CARD) or not.
5.2 MUSIC
After choosing the main menu "MUSIC", press the "ENTER" or "PLAY" key, it will
automatically check whether it links to the save media (MEMORY CARD)or not.
If it doesn’t link to save media, it will skip to the main menu.
After linking to the save media and
making reading affirmance, it will enter
into "MEDIA MANAGER" to manage
If it doesn't link to save media, it
playing, such as the picture on the right.
will skip to the main menu.
After linking to the save media and
making reading affirmance, it will enter
into "Thumbnail Mode" to manage
The related operation of "Media manager",
please check "6.2.15 Media manager" for your
reference.
playing, such as the picture on the right.
Under mode "MUSIC", system support playing music, the formats are
MP3
The related operation of "Thumbnail Mode",
please check "6.2.14 Photo thumbnail
mode" for your reference.
If you use "MEDIA MANAGER" to manage
playing, such as the picture on the right.
If you open the automatic play function of "MUSIC" ( "5.5.2.2 MUSIC"), after entering
into mode "MUSIC", it will play automatically.
5.3 PHOTO+MUSIC
After choosing the main menu "PHOTO+MUSIC", press the "ENTER" or "PLAY"
If you open the automatic playing function of "MOVIE" ( "5.5.2.3 MOVIE" for your setting up
reference) .
If it doesn’t link to the save media, it will skip to the main menu.
After linking to the save media and making reading affirmance, it will play photo files with
background music automatically.
If it only has photo files in the save media, it will play photo files only.
5.5 SETUP
Choose "SETUP" in the main menu, press the "ENTER" or "PLAY" key, you can get into the
set mode.
Except that, under other functions, the button SETUP can also enter into set mode.
If it only has music files in the save media, it will switch to music auto play mode.
The picture on the right is the original
surface, the next are the introduction for
each function.
5.4 MOVIE
After choosing the main menu "MOVIE", press the "ENTER" or "PLAY" key, it will
automatically check whether it links to the save media (MEMORY CARD)or not.
If it doesn’t 'link to the save media, it will skip to the main menu.
After linking to the save media and
making reading affirmance, it will enter
into "MEDIA MANAGER" to manage
playing, such as the picture on the right .
5.5.1 Photo Setting
5.5.1.1 Interval Time
This choice is used for setting up the
interval time of the picture playing. It has six
options: 5seconds, 10seconds, 15seconds,
30seconds, 1minute, 3 minutes.
The related operation of "Media manager",
please check "6.2.15 Media manager " for your
reference.
Under mode "MOVIE", system support playing movie, the formats are
DAT/MPG/VOB/MP4.
5.5.1.2 Transition Effect
This option is a playing mode which used for browsing pictures circularly,
Including the following modes: (Descriptions see the next page)
MODE
No Effect
Cover Up
Cover Down
Cover Left
Cover Right
Uncover Up
Uncover Down
Uncover Left
Uncover Right
Wipe Up
Wipe Down
Wipe Left
Wipe Right
Push Up
Push Down
Push Left
Push Right
Random
DESCRIPTION
Playing one by one.
The second picture moves upwards and totally covered the
first one.
The second picture moves downwards and totally covered
the first one.
The second picture moves from right to left and totally
5.5.2 Auto-play
5.5.2.1 Photo
This option lets you use the Auto-play On or
Off function. When the Auto-play function
open and you choose "PHOTO" function, It
will enter into "slide show mode" automatically
or else when the Auto-play function off,
cover the first one.
The second picture moves from left to right and totally
It will enter into MEDIA MANAGER or Photo
covered the first one.
thumb nail mode and let you browse photos.
The first picture moves upward automatically, and the
second one will appear gradually.
The first picture moves downward automatically, and the
second one will appear gradually.
5.5.2.1 Music
The first picture moves from right to left, and the second
This option lets you use the Auto-play
one will appear gradually.
On or Off function. -
The first picture moves from left to right, and the second
one will appear gradually.
The first picture doesn't move, but it be wiped up by the
second picture from up to below.
The first picture doesn't move, but it be wiped up by the
If you turn on the Auto play, after entering
into the "MEDIA MANAGER", it can auto play
the music, if turn off the Auto play, then you
- yourself, and
must choose the playing file by
press the "ENTER" key and play the music.
second picture from below to up.
The first picture doesn't move, but it be wiped up by the
second picture from right to left.
The first picture doesn't move, but it be wiped up by the
second picture from left to right.
The second picture links to the first one, it pushes from
to .below up
The second picture links to the first one, it pushes from
to .up below
The second picture links to the first one, it pushes from
5.5.2.2 Movie This option lets you use the
Auto-play on or off function. If you turn on
automatic play, when you choose the function
of "MOVIE", it will automatically play the
movies, if turn off the automatic play, it will
enter into
right to left.
The second picture links to the first one, it pushes from left
"MEDIA MANAGER", and then let you
to right.
browse the pictures.
Choose the play mode randomly.
5.5.3.1 TV Standard
You can choose according to the TV
systems. There are three options: NTSC,
5.5.3.3 TFT Contrast
This choice lets you set up the contrast of the
TFT surface. It has 15 choices from-7to+7for
your option. Default value is 0.
PAL and AUTO.
5.5.3.4 TFT Saturation
This choice lets you set up the saturation of
the TFT surface.
It has 15 choices from -7 to+7 for your option.
Default value is 0.
5.5.4 Custom Setup
5.5.3.2 TFT Brightness
5.5.4.1 OSD Language
This choice lets you set up the brightness of the
This choice lets you set up the OSD
TFT surface. It has 15 choices from-7 to+ 7 for
language. It has several choices for your
your option.
option. Some language may not be
Default value is 0.
shown in the list.
5.5.4.2 Repeat Mode
5.5.4.5 Alarm Enable
This choice lets you set up repeat-play mode.
There are Off, One, Folder and All for your
option.
This function provides you turn on or
off the Alarm function
5.5.4.6 Alarm Time
OPTION
DESCRIPTION
This choice lets you set up the alarm
Off
Cancel repeat mode.
One
Repeat the playing file.
time.
The time is displayed in the 24-hour
Repeat play the media files in the current folder.
format.
Folder
All
Repeat plays all the media files in the saved media.
5.5.4.3 Default
This choice lets you return to the
saved function.
After setting this choice, all the
sets will be returned to the station
saved.
5.5.4.7 Power On Enable
This function provides you turn
On or off the model automatically
power on function.
5.5.4.4 Set Time.
5.5.4.8 Power off Enable
This choice you set up the time .
The time is the displayed in
The 24h-our format.
This function provides you turn
On or off the model automatically
power on function.
5.6.2 Set Date
5.5.4.9 Set Time
This choice lets you set up the date.
This choice lets you set up the Auto
Press the "UP" or "DOWN" key to select the
Power on and off time.
value.
The time is displayed in the 24-hour
Press the "LEFT" or "RIGHT" key to change
format.
the items.
Press the "ENTER" or "PLAY" key to save
the date.
5.5.5 Exit
Exit the "SETUP" menu, return to the main menu.
5.6.3 Exit
Exit the "CALENDAR" menu, return to the main menu.
5.6 CALENDAR
After the main menu choosing
"CALENDAR", press the "ENTER"
or "PLAY" key, then it enters into
calendar submenu, such as the
picture.
5.7 CLOCK
After the main menu choosing "CLOCK",
press the "ENTER" or "PLAY" key, then it
enters into clock interface.
19:25:43
5.6.1 Display
This choice lets you view the calendar of
current month. Press the "UP" or "DOWN"
key to change the month. Press The "LEFT"
or "RIGHT" key to change the year.
(Clock style)
5.8 Edit (Copy/Del)
After the main menu choosing "Copy/Del"
press the "ENTER" or "PLAY" key, then it
enters into “Edit Dialog", such as the
picture.
Select "Delete All" to delete all the photo files.
Select "Sort" to switch to the "Sort Mode" menu.
In the "Sort Mode": Select "Return" to switch to the "Delete
Mode" menu.
Select "Slide Show" to play the photo files in the internal
memory.
Press the "MENU" key to return to the main
5.8.1 Copy
menu.
This choice lets you copy photo files into
internal memory. In the "MEDIA MANAGER",
Press the "UP", "DOWN", "LEFT", "RIGHT"
If the internal memory is empty, it would not display the "Delete" option on the "Edit Dialog".
key to change the cursor. Press the "ENTER"
key to confirm your selection. Select "Save"
Important:
to processing copy. Select "Exit" return to the
"Delete" operation is non-reversible and the deleted files can not be recover. Ensure your
main menu.
operation first when you delete files.
5.8.3 Exit
Note: The internal memory can save only 80 photo files.
Important:
You can not copy photo files from internal memory into external save media or your
computer. Please backup your important photo files by the other way.
Exit the "Edit Dialog", return to the main menu.
5.9 FAVORITE
After the main menu choosing "FAVORITE", press the "ENTER" or "PLAY" key, then it will
play the photo files in the internal memory automatically even the automatic play function of
"PHOTO" (”5.5.2.1 PHOTO") was turn off.
5.8.2 Delete
This choice lets you delete and change the
play sequence of photo files in the internal
memory. In the "Delete Mode", Press the
"UP", "DOWN", "LEFT", "RIGHT" key to
change the cursor. Press the "ENTER" or
"PLAY" key to confirm your selection.
If the internal memory is empty, it will display "No playable file" on the
top-left corner of screen.
Press the "MENU" key to break from playing and return to the main menu.
You can doing some operation as "PHOTO" when the photo is playing, such
as "rotate", "skip", "zoom", etc.
6 Basic operation
6.2.3 Short cut keys
6.1 Form explanation
Under other operation, press the short cut keys "PHOTO" "MUSIC" or "MOVIE" ,it will
The next function shows whether the mode support the format. When it is with "√ ", it means
it support. If it is "X ", it means it can't support. For example: the next form refers to music
files and movie files, It supports this function but photo files can't support.
direct switch to photo, music or movie play mode.
In case of "PHOTO" please check "5.1 PHOTO" for your reference. In case of "MUSIC"
please check "5.2 MUSIC" for your reference.
In case of "PHOTO+MUSIC" please check "5.3 PHOTO+MUSIC" for your reference.
In case of "MOVIE" please check "5.4 MOVIE" for your reference.
PHOTO
X
MUSIC
MOVIE
√
√
Note: Some remote controller did not design the short cut keys.
6.2.4 Enter the screen savers
When it is in the next special situation, it won't enter into screen saver: -It is in any of
"PHOTO", "MUSIC", "PHOTO+MUSIC", "MOVIE" modes. -It shows "TIME" or "TIME &
CALENDER".
Normally, if there isn't any material to play continuously and the user hasn't touch it for more
than3minutes, the model will enter screen saver to protect your screen until the user press any
key.
6.2 Basic play
6.2.1 Stop playing
When it is playing, if you want to stop, please press the "MENU" key to stop.
When the model enter screen saver, it will play the photo files in the internal
memory automatically.
If the internal memory is empty, it will not enter into screen saver.
Note: Some remote controller did not have the "STOP" key, you can press the "MENU" key to
6.2.5 Fast forward or backward
return to the main menu.
Press fast "FORWARD" or "BACKWARD" keys, it will be faster and searching forward (or
backward) . The turns are as the following according to the times you pressed: from fast
6.2.2 Pause
If you want to pause when you are playing, you can press the "PLAY/PAUSE" key. And you
can press the "PLAY/PAUSE" key to continue play. If it is browsing JPG, please press the
"PLAY/PAUSE" key to pause, so the picture will be motionless.
forward (or backward) x2 ,x4, x8,x16, x32 and return to normal speed . If it is in any speed of
fast forward (or backward) searching while you want it to return normal, please press the
"PLAY/PAUSE" key to return normal.
PHOTO
X
MUSIC
MOVIE
√
√
6.2.6Skip to next or previous file
6.2.8 Volume control
Press the "VOLUME CONTROL" keys to adjust the volume. The
When it is playing or pausing, press the "NEXT" or
minimum valueis0, the maximum value is 16.
"PREVIOUS" keys it will jump to the next or
previous file and play.
PHOTO
PHOTO
√
MUSIC
MOVIE
√
√
X
MUSIC
MOVIE
√
√
6.2.9 Mute
6.2.7 Repeat play
Press the "MUTE" key, it will be mute, and it will
When you press the "REPEAT" key, the turns are as the following according to the
have volume when you press the "MUTE" key
times you pressed: "REPEAT ONE", it will repeat the playing file. "REPEAT
again.
FOLDER", it will repeat the media files in the current folder. "REPEATALL", it will
repeat all the media files in the saved media. "REPEATOFF", it will cancel the mode
of repeat.
PHOTO
√
PHOTO
MUSIC
MOVIE
√
√
X
MUSIC
MOVIE
√
√
6.2.10 Rotate photo
Press the "UP", "DOWN", "LEFT", "RIGHT" key to change the
When you are browsing photos.
cursor. Press the "ENTER" or "PLAY" key to confirm your
selection. Press the "NEXT” or “PREVIOUS" key to turn pages.
Press the "LEFT" key, the photo can be rotate anti-clockwise 90 .° It
will rotate again when you press the "LEFT" key again.
PHOTO
√
MUSIC
MOVIE
X
X
Press the "RIGHT" key, the photo can be rotated clockwise90°. It will rotate
again when you press the "RIGHT" key again.
Press the "UP" key, the photo can be flip horizontally. It will flip horizontally
again when you press the "UP" key again.
When the user choose the photo which you want to enjoy,
please Browse photos: press the "ENTER" or "PLAY" key enter into "
Press the "DOWN" key, the photo can be flip vertically. It will flip vertically again
Photo Slide Show Mode".
when you press the "DOWN" key again.
Select "Rotate" to switch to the "Rotate Mode" menu.
Select "Slide Show" enter into "Photo Slide Show Mode".
6.2.11 Photo thumbnail mode
After you choose "PHOTO" from the main menu and
the Auto-play function is off
In the "Rotate Mode": Press the "UP", "DOWN", "LEFT",
PHOTO
√
MUSIC
MOVIE
X
X
"RIGHT" key to change the cursor. Press the "ENTER"
or "PLAY" key to rotate the photo clockwise 90° that
you selected. Press the "NEXT” or “PREVIOUS" key
to turn pages. Select "Reset" to recover all the changes. Select
("5.5.2.1 Photo" for your setting up reference), or press the "RETURN" key when you playing
photo, the system will enter into photo thumb nail mode. When the system enters into
browse mode, the screen will show 15 pcs small picture, so that you can browse these
photos more convenient in catalogue.
"Return" to switch to the "Thumbnail Mode" menu.
Press the "MENU" key to return
to the main menu.
Note: Some remote controller
did not design the "RETURN” key.
6.2.12 Media Manager
Music play: When you choose to play
and the file format are MP2/MP3, the black
square in the left bottom corner of Media
When put inside save media and system
Manager will show the music's spectrum and
analyze media file format, you can playing
some information of this music (the sample
manage by Media Manager. Media Manager
PHOTO
can recognize these media formats:
√
JPEG/MP2/ MP3/WMA/DAT/MPG/VOB/MP4.
MUSIC
MOVIE
√
√
rate and the time of this music).
The left form of Media Manager can manage
the folders in the save media. And the right
form will show the name of media files.
Press the "UP", "DOWN", "LEFT", "RIGHT" key to change the cursor. Press the
"ENTER" or "PLAY" key to confirm your selection.
Movie play: When you choose to play and the
file format are DAT/MPG/VOB/MP4, select the
file in Media Manager and press the "ENTER"
or" PLAY" key.
Browse photos:
When you choose a photo file, the
Black square in the left bottom corner of
Media Manager will show the preview image
of photo file including some information of the
photo (size and date).
Note: Some remote controller design can't let you enter Media Manger browse photo.
8 Specifications
7 Trouble shooting
SYMPTOM
DISPLAY
CAUSE AND/OR CORRECTIVE ACTIONS
■
■
No start-up menu
inserted.
Active Area (mm):
154.08 x 86.58
Pixel Pitch (mm):
0.107 x 0.370
Make sure you connect the AC adapter to the unit
When you connect the AC adapter to the unit and
power up the unit, even without a memory card, you
should see a start-up menu screen.
■
■
POWER
attached.
:Adapter
The save media (memory card) is not inserted
■
No photo, music, or movie file on the save media.
■
Incompatible file format. Verify if the way you inserted
the slot.
■
Make sure there is at least one supported photo,
Music or movie files on the memory card.
■
Compatible Photo format: JPG
■
Compatible Music format: MP3
■
Compatible Movie format: DAT/MPG/VOB/MP4
■
This is normal since different digital cameras take
pictures in varieties of resolutions (or pixels) and
aspect ratios.
Photo does not
appear in full
■
screen mode
Make sure the screen display mode was setto16:9 in
the SETUP menu.
■
Use a photo editing software to resize the picture's
ratio to 16:9.
Small or
■
distorted
Ratio.
movie size on
the screen
No sound
■
Contrast Ratio:
Back Light Source:
is connected to the unit and make sure it is securely
the card is correct, do not force the save media into
play
View Angle:
Brightness (nits):
480 x 234 (RGB) 16:9
55-60°
250
300:1
LED
If you don't see the menu screen, check if the power
correctly.
The unit does not
TFT7"SmartPanel
Resolution (pixel):
properly.
■
Size:
The POWER connector to the unit is not securely
Low movie resolution or incorrect movie's aspect
The movie file must be in16:9 aspect ratio
(Approximate resolution of 480x234).
■
Mute or the volume is min.
■
Increase the volume.
■
Make sure there is at least one supported music or
movie file on the save media.
AC 100–240 Volts (50–60 Hz), DC 5V/1.5A
Power Consumption
Standby:
Playing photo :
Playing Music or Movie:
300mA
800 900mA1200–1400mA
BUTTONS AND CONTROLS
Buttons:
Controller:
6 buttons
IR Remote Controller
INTERFACE
Audio/Video out:
NTSC/PAL/AUTO
:
Memory Card Reader:
SD/MMC/MS/XD
OTHER
Speaker:
Internal memory:
2 internal speaker (8 2W)Ω
16 Mb
9 Accessories
AV cable, AC/DC adapter, Remote Controller, User Manual
9 Weather station
1.1. Function:
(1). Calendar ranged from the year of 2003 to 2052 and Normal Time Display
(2). Alarm and SNOOZE function and Integer Hourly Sound
(3). Maximum and Minimum value of temperature and humidity record.
(4). Weather Station status according to the current humidity
(5). 12/24 hours optional
1.2. Technical Specification
(1). Power Supply: DC 1.5V
(2). Temperature sampling period is 20 seconds and range from -30℃~+70℃
(3). Humidity sampling period is 20 seconds and range from 20% - 90%
1.3. Design methodology
(1). 4 Press Key: [MODE], [SET], [ADJ], [SNOOZE]
(2). One Buzzer output port, low level voltage (Logic level 0) when no output
signal
(3). Full LCD Diagram:
1.4. Reset Operation
(1). Operation when install battery
Take out the battery from the back and put it in again, LCD full display for 2
seconds with “Beep” sound and then enter the time setting mode.
The setting item is Hour.
(2). Reset setting.
Time: 12:00:00 Am, 1/1/2003
12 Hour display
Alarm off
Alarm Time: 12:00 AM
Integer Hourly Sound off
Temperature Display Unit: Celsius
No Record for the Max & Min Value of Temperature & Humidity
1.5. Operation Instruction
1.5.1. Mode interchange
Time Display Mode, Alarm Mode, Calendar Mode.
Press [MODE] key to change the mode display in sequence with loop.
1.5.2. Time Display Mode
(1). Press [SET] key for 2 seconds to enter the setting mode and it is a “Hourly
Display mode” setting under non-setting mode.
(2). Press [SET] key to interchange the setting item values, its sequence as
follow:
“Hourly Display Mode”, “Hour”, Minutes” under the setting mode.
(3). Press [MODE] to quit the setting under the setting mode.
(4). Press [ADJ] key for 2 seconds to clear the maximum, minimum value of
temperature and humidity and set its the current measure value under
non-setting mode.
(5). Press [ADJ] key to check the maximum, minimum value of temperature
and humidity record in loop under non-setting mode.
(6). Press [SET] key to interchange the temperature display in Fahrenheit/
Celsius degree.
(7). Press [MODE] to enter the Alarm Mode under the non-setting mode.
1.6. Alarm Mode
(1). Press [SET] key for 2 seconds to enter the setting mode, the setting item
value is “HOUR” under the non-setting mode.
(2). Press [SET] key to interchange the setting item value “HOUR” and
MINUTE” under the setting mode.
(3). Press [MODE] key to quit the setting under the setting mode.
(4). Press [ADJ] key to interchange the Alarm, Integer Hourly Sound On/Off
under the non-setting mode. Here is the sequence: Alarm Off, Integer Hourly
Sound Off; Alarm On, Integer Hourly Sound off; Alarm Off, Integer Hourly
Sound On; Alarm On, Integer Hourly Sound On.
(5). Press [MODE] key to enter the Calendar setting under the non-setting
mode.
1.7. Calendar Mode
(1). Press [SET] key for 2 seconds to enter the setting mode, the setting item
value is “YEAR” under the non-setting mode.
(2). Press [SET] key to interchange the setting item value, “YEAR”, “MONTH”,
“DAY”
(3). Press [MODE] key to quit this setting mode under the setting mode
condition. At this time, check the “DAY” value whether is reasonable or not. If
not reasonable, then adjust the maximum value of the “DAY” for current month
automatically.
(4). Press [MODE] key to enter the time setting mode under the non-setting
mode.
1.8. Setting Mode
(1). the blinking frequency is 1Hz for the blinking of setting item under the setting
mode.
(2). Press [ADJUST] key to increase the item value and it will be add 1. The
setting item will be not blinking if press [ADJUST] key for more than 2 seconds
and the value increase rate is 8 Hz except the “Hourly Display Mode” setting.
(3). Press [ADJUST] key to exchange 12 Hour/24 Hour display format under the
“Hourly Display Mode” setting.
(4). The “SECOND” will be set to 00 when adjust the value of “MINUTE” under
the time setting mode.
(5). It will be accepted the new setting value under the value adjustment of
setting mode.
1.9. Alarm & Snooze
(1). The Alarm process will be started when the alarm time arrives under the
Alarm on condition.
The sound wave is as follow and Alarm on symbol will be flashed at the
same time.
(2). The Alarm Time is about 1 minute. Press [SNOOZE] key to stop the alarm
and to enter the snooze mode. Press any key to stop the alarm but not enter the
snooze mode. After 1 minute it will be enter the snooze mode automatically if not
press any key.
(3). The Snooze symbol will be flashed under the snooze mode. After 5
minutes starting the alarm process, the alarm process will be started again and
the Snooze symbol will be flashed.
(4). the snooze process can be repeated for maximum 5 times.
(5). the snooze process will be cancel if any setting operation during the
process.
2. Integer Hourly Sound
(1). It will alarm for 1 second under the Integer Hourly Sound setting on and the
setting time is arrived
(2). The Integer Hourly Sound will be no function under the Alarm processing.
2.1. Backlight
Press [SNOOZE] key at any time, backlight will be turned on for 10
seconds.
2.2. Return Automatically
It will be return to the Time non-setting mode if not pressing any key for
more than 20 seconds.
2.3. Temperature, Humidity and Weather Station
(1). It will be compared with the current Maximum and Minimum value for each
measuring the value. The current value will be replaced by the maximum value
under higher than the maximum value or its value is not available. The current
value will be replace by the minimum value under lower than minimum value or
its value is not available.
(2). When temperature measurement is fail, it is regards as invalid. The relative
humidity is also invalid due to the relative humidity calculation is according to
the temperature.
It will be no weather station under the relative humidity is invalid.
(3). The weather station is according to the humidity easement.
It will show “SUN” symbol and weather station is sunny when the relative
humidity is less than 45%.
It will show “SUN” and “CLOUD” symbol and weather station is can when
the relative humidity is between 45% and 55%.
It will be show “CLOUD” and “RAIN” symbol and weather station is rainy
when the relative humidity is higher than 55%.
It will be no weather station under the relative humidity is invalid.