1
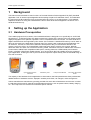
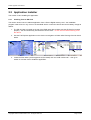
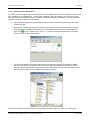
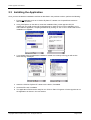
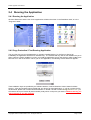
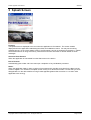
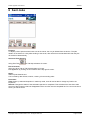
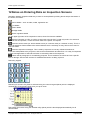
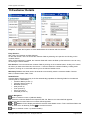
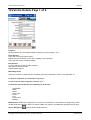
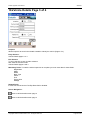
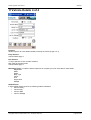
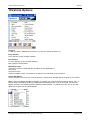
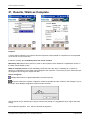
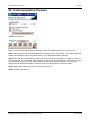
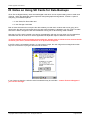
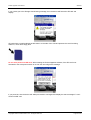
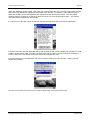
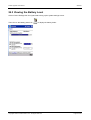
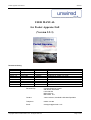
Pocket Appraise User Manual
05/05/04
Wireless Networks, Pocket PC, Software Development & Consultancy
USER MANUAL
for Pocket Appraise Full
(Version 2.2.3)
Document History
Version
Version 1.0
Version 1.1
Version 1.2
Version 1.3
Version 1.3.1
Version 1.3.1
Version 2.0.1
Version 2.0.2
Version 2.2.3
Updated Date
18 Sept 2003
20 Sept 2003
3 Oct 2003
4 Oct 2003
11 Nov 2003
11 Dec 2003
26 Jan 2004
3 Feb 2004
5 May 2004
Updated By
J. Jackson
A.Diaz
J. Jackson
J. Jackson
A.Diaz/J.Jackson
A.Diaz
J Jackson
J Jackson
J Jackson
Details
New document.
Updates for SD card etc.
Review and changes for 1.2 of s/w
Changes for version 1.3 of s/w
Changes for version 1.3.1 of s/w
Changes for version 2.0.0 of s/w
Added new camera preview screen
Latest screenshots
Updates in-line with the latest version of S/W
Document By:
Unwired Solutions Limited
Oak House, Breckland
Linford Wood
Milton Keynes
MK14 6EY U.K.
Contact:
Jason Jackson, Handheld & Wireless Specialist
Telephone:
08700 110 880
Email:
[email protected]
Copyright© 2004 Unwired Solutions Ltd – All Rights Reserved
Page 1 of 46
Pocket Appraise User Manual
05/05/04
Table of Contents
1
2
3
4
5
6
7
8
9
10
11
12
13
14
15
16
17
18
19
20
21
22
23
24
25
26
Background ........................................................................................................................................ 3
Setting up the Application ................................................................................................................... 3
2.1 Hardware Prerequisites ............................................................................................................... 3
2.2 Application Installer ..................................................................................................................... 4
2.3 Installing the Application .............................................................................................................. 6
2.4 Running the Application............................................................................................................... 7
2.4.1 Running the Application ....................................................................................................... 7
2.4.2 Copy Protection / First Running Application.......................................................................... 7
Splash Screen .................................................................................................................................... 9
New Jobs ......................................................................................................................................... 10
Completed Jobs................................................................................................................................ 11
Sent Jobs ......................................................................................................................................... 13
Cancelled and Reallocated Jobs ....................................................................................................... 14
Send & Receive................................................................................................................................ 15
Configure Communications ............................................................................................................... 16
New Communication Connection ...................................................................................................... 18
Re-Inspections.................................................................................................................................. 19
Notes on Entering Data on Inspection Screens ................................................................................. 20
Customer Details .............................................................................................................................. 22
Vehicle Details Page 1 of 4 ............................................................................................................... 23
Vehicle Details Page 2 of 4 ............................................................................................................... 24
Vehicle Details Page 3 of 4 ............................................................................................................... 25
Vehicle Details 4 of 4 ........................................................................................................................ 26
Tyres ................................................................................................................................................ 28
Vehicle Options ................................................................................................................................ 29
Damage / Parts Assessment............................................................................................................. 30
20.1 Taking Pictures.......................................................................................................................... 33
Results / Mark as Complete .............................................................................................................. 36
Communications Process ................................................................................................................. 37
22.1 Data Exchange Process Details................................................................................................. 38
Notes on Using SD Cards for Data Backups ..................................................................................... 39
Batteries & Power ............................................................................................................................. 42
24.1 Changing / Installing the Removable Battery.............................................................................. 42
24.2 Charging the Device .................................................................................................................. 42
24.3 Viewing the Battery Level .......................................................................................................... 43
Other Useful Pocket PC Functions.................................................................................................... 44
25.1 Closing All Running Applications ............................................................................................... 44
Appendix A ....................................................................................................................................... 45
Copyright© 2004 Unwired Solutions Ltd – All Rights Reserved
Page 2 of 46
Pocket Appraise User Manual
1
05/05/04
Background
This manual covers the basic screen functions of Unwired Solutions Pocket Appraise Full (PAF) handheld
application. PAF is used to inspect/appraise vehicles taking the place of handwritten forms. This eliminates
the need to physically submit the forms to the head office and re-key or encode the data. This handbook
explains the basics for using the handheld device and is aimed at the Pocket Appraise Full version of the
handheld software only.
2
Setting up the Application
2.1 Hardware Prerequisites
The installer program for this version of the handheld software is designed to run specifically on a HP iPAQ
2210 devices. A LifeView FlyCam-CF digital camera for the Pocket PC is required if the user wishes to take
digital photographs but is optional, inspections can be completed without the camera. No other handheld or
digital camera devices are supported by this version of the software. A standard SD memory card of 32mb or
above is also used by the application to backup data. The memory card is optional and the application can
run without it, however, the user will be warned to backup data if they run the software without an SD
memory card in the device. A CompactFlash modem may also used to connect to the server, although
advanced users can either use a Pocket PC docking cradle, a Wireless LAN card or a BlueTooth connection
to send data to a BlueTooth compatible mobile phone, sending data over a GSM mobile phone network.
Finally, Infra-Red or BlueTooth capable printers, such as the Canon BJC-55 portable printer are supported
by the application, enabling the user to print off vehicle inspection reports directly from the handheld using an
infra-red connection.
HP iPAQ 2201
FlyCam Digital Camera
with Flash
SD Memory Card
Compact Flash Modem
Canon BJC-55 Portable
Printer
The majority of the hardware for this application is shown above, but field operatives are often provided with
additional items of hardware such as “Aquapac” weather proof cases, car chargers, mains chargers etc.
Various manufacturers manuals are generally provided with each device listed above and the user is invited
to read these device specific manuals for details about that device, such as power buttons, battery charging
etc. Such topics are not covered in this software specific manual.
Copyright© 2004 Unwired Solutions Ltd – All Rights Reserved
Page 3 of 46
Pocket Appraise User Manual
05/05/04
2.2 Application Installer
This section covers installing the application.
2.2.1
Installing from an SD Card
This section shows how to install the application from a Secure Digital memory card – the installation
program needs to be run only once on the handheld device or when the device has lost it’s battery charge as
follows:
1. The SD card slot is located on the top of the iPAQ 2210 device. Make sure the SD Card is inserted
properly – the card inserts fully into the device until it clicks – do not use force when entering it into
the device.
2. Use the File Explorer application on the device to navigate to a folder called \Storage Card as shown
below:
3. Locate the files called “pocket appraise full (full install).cab” and “eVB runtime.cab” – then go to
section 2.3 to learn how to install the application.
Copyright© 2004 Unwired Solutions Ltd – All Rights Reserved
Page 4 of 46
Pocket Appraise User Manual
2.2.2
05/05/04
Installing from a Desktop PC
If an SD card is not supplied, ask your administrator for the installer file. This can be e-mailed to you so it can
be accessed from your desktop PC. You will need a desktop cradle connected to your PC and a copy of
Microsoft ActiveSync provided with your Pocket PC to perform this type of installation. See your Pocket PC
user guide manual for details on this software.
1. Using Windows Explorer on your desktop, locate the “pocket appraise full (full install).cab” “eVB
runtime.cab”files
2. Make sure the Pocket PC cradle is connected to your desktop and you have ActiveSync and any
necessary drivers installed. Dock the device and ActiveSync should connect, as denoted by the
green icon
on your system tray on your PC. If you do not see the window below then double
click on this icon to show this window:
3. You should be able to see the device directories from Windows Explorer as denoted by \Mobile
Device or else click the “Explore”button in the Active Sync window above to browse the device.
Copy the “pocket appraise full (full install).cab” and “eVB runtime.cab”files from the desktop into a
directory on the device, such as \Mobile Device\My Documents:
Now use File Explorer to locate the files on the handheld device as shown in section 2.2.1 previously.
Copyright© 2004 Unwired Solutions Ltd – All Rights Reserved
Page 5 of 46
Pocket Appraise User Manual
05/05/04
2.3 Installing the Application
Once you have located the installation cab files as described in the previous sections, perform the following:
1. Ensure no hardware such as a LifeView FlyCam-CF camera or a CompactFlash modem is
attached to the device.
2. Using File Explorer on the device, locate the installation files “pocket appraise full (full
install).cab” and “eVB runtime.cab” and double-tap on each file icon on the handheld to run it
and install the application, accepting all defaults by clicking on Yes or Yes to All and wait for the
installation to complete:
3. If you already have the application installed or indeed it is currently running you will receive
these warning messages:
4. Attach the LifeView FlyCam-CF camera to the device, if available.
5. Insert the SD card, if available.
6. The application should now be ready for use. Click on Start->Programs->Pocket Appraise to run
the application as shown in the next section.
Copyright© 2004 Unwired Solutions Ltd – All Rights Reserved
Page 6 of 46
Pocket Appraise User Manual
05/05/04
2.4 Running the Application
2.4.1 Running the Application
Click the Start menu and the icon for the application will either be shown in the Start Menu itself, or in the
“Programs”folder:
2.4.2 Copy Protection / First Running Application
The very first time you use the application on a freshly installed device (i.e. the first run after a full
installation) the application will ask for a validation key. The software will only ask for this validation key once
when a device is freshly installed i.e. when you install the application onto a new device or after a battery has
been left to run flat on the device. When you run the application, the following window below will appear:
These validation keys are provided by the software authors, Unwired Solutions Limited, based in Milton
Keynes. A key should have been provided with your device as described below – if you do not have the file
as described, please call or email Unwired Solutions on 08700 110 880 or email [email protected] – you
will need to have your Device ID (serial number) ready which is unique to your device. Without this key you
will not be able to use this software.
Copyright© 2004 Unwired Solutions Ltd – All Rights Reserved
Page 7 of 46
Pocket Appraise User Manual
05/05/04
Most users will be given their device validation key as part of the set-up files used to install the application. A
text file will have been placed on the device in the “Program Files\Pocket Appraise\Device Keys.txt”(or other
similar filename). Locate this file using file explorer, and tap the Device Keys.txt file to open it.
The file will contain text similar to this:
ID:
4G22DW34G00K
PAF:
2B52DD98BF51FD3F62A7A07BF4ECF8A7
Locate a Device ID in this file which is the same as that shown on the copy protection screen shown earlier.
If you do not use a matching Device ID as displayed by the copy protection screen previously, then the key
will not work for your device and you will not be able to run the application.
Copy the long 32 character text string after the Device ID (by double taping to highlight just the key text with
the pointer).
Now you need to copy this key to the clip-board, either tap and hold the pointer on the highlighted text and
choose “Copy” from a pop-up menu, or bring up the on-screen keypad by clicking the keyboard icon in the
bottom right-hand corner of the screen and tap CTRL followed by C on the keypad. Make sure you do not
copy any space or hard returns before or after the text as this will not work – just the text to the last character
needs to be copied.
Now click the OK in the top right-hand corner to close Pocket Word and then close File Explorer and the
application should be the topmost screen, otherwise locate the icon and run the application again.
Tap in the validation key field and paste the text into it (do this by keying in CTRL followed by V on the
on-screen keypad). The key text you copied, e.g. 2B52DD98BF53FD3F62A7A07BF4ECF8A7 should
appear in the field. Make sure there is no spare space character at the end of the text you pasted, or even
before the beginning, just the actual characters, otherwise the key will be invalid.
Hide the on-screen keyboard by clicking the icon in the bottom right-hand corner, then click the grey OK
button on the screen and the application should be ready for use. You should not be asked to key in the
validation key again unless there is a need to reinstall the application. If the key you enter is not valid you
will get an error message – make sure there is no space following the key text – if you have any difficultly,
telephone Unwired on +44 (0) 8700 110 880 or e-mail [email protected].
The next section describes each screen within the application and its use.
Copyright© 2004 Unwired Solutions Ltd – All Rights Reserved
Page 8 of 46
Pocket Appraise User Manual
05/05/04
3 Splash Screen
Purpose:
The splash screen is displayed to the user when the application is first started. The screen remains
displayed while the application loads background files and initialises screens. You may see a warning
message pop-up, on top of this splash screen if the SD memory card is not inserted into the device – please
see the later section on using SD memory cards at the end of this document for further details on these
messages.
Accessed from Screens:
When the application is first started from the Start menu on the device.
Exit to Screens:
Automatically goes to New Job List screen upon completion of any initialisation processes.
Notes:
When the application loads, it does a number of processes and it may take some time for the New Job List
screen to appear. It is normal for the splash screen to stay on for about 30 seconds. It is best that you close
all applications on the device before running Pocket Appraise (please refer to section 24.1 to see if other
applications are running).
Copyright© 2004 Unwired Solutions Ltd – All Rights Reserved
Page 9 of 46
Pocket Appraise User Manual
05/05/04
4 New Jobs
Purpose:
This screen displays a list of current (new or amended) jobs. These jobs have either been created by the
user on the device, or were booked jobs (partially completed) sent to the device from a server. The tabs
along the bottom of this screen represent jobs lists of inspections at different status’.
Accessed from Screens:
Splash Screen
Using the New Tab
on Tab Strip at the bottom of the screen.
Exit to Screens:
Using any other Tab on Tab Strip at bottom of screen.
Exit application by clicking on the ok button at the top right of screen.
Notes:
Status of jobs listed in this screen is new, amended inspections are denoted by * before the date
List is sorted by location, date & time and customer number in ascending order.
Processes:
Inspect: Opens the selected inspection ready for editing.
Customer: Opens the selected inspection’s customer details ready for editing.
New: Creates a new inspection and opens the new inspection’s customer details in edit mode.
Delete: After confirmation, permanently removes the inspection file, and all associated files (including
pictures and signatures)
Copyright© 2004 Unwired Solutions Ltd – All Rights Reserved
Page 10 of 46
Pocket Appraise User Manual
05/05/04
5 Completed Jobs
Purpose:
To display a list of completed and re-inspection jobs. These jobs have either been marked as completed by
the user, or are re-inspection files sent to the device from the server.
Accessed from Screens:
Using Completed Tab
on Tab Strip at bottom of screen.
Exit to Screens:
Using any other Tab on Tab Strip at bottom of screen.
Exit application by clicking on the ok button at the top right of screen.
Notes:
Status of jobs listed is completed or re-inspect denoted by * at the start
List is sorted by date & time, location, contract_id in ascending order
Processes:
View/Edit: User is asked whether to view or edit the inspection. View opens the selected inspection in readonly mode, meaning the user would not be able to change any field in the inspection. Opening in edit mode
deletes all signatures associated with the completed inspection. But the user will be asked to confirm and
warned that signatures will be deleted. Actual signature files and reference to them in the inspection file are
removed.
Print Job: Prints the currently selected single inspection. The inspection can be printed with or without
costs. See Appendix A for a sample printed report.
Print Summary: Prints summary report, listing any inspections that match the currently selected inspection
details with same date, contract, and location (town).
Copy: User will be asked if they want to copy basic details, or full details for re-inspection. Creates a new
inspection file which will appear in the new job screen:
Basic Detail File copy: Just basic vehicle data, i.e. copies only these details: make, model, derivitive,
body type, transmission, fuel, engine size, seats.
Copyright© 2004 Unwired Solutions Ltd – All Rights Reserved
Page 11 of 46
Pocket Appraise User Manual
05/05/04
Re-inspect Copy details: Copies all details except: Result, all signatures, customer address (lines 1-4
and postcode)
Assigns customers signature of the selected inspection to all inspections done on that day under
the same contract at the same location (address 3 – town). Then reports how many inspections have
been affected.
Copyright© 2004 Unwired Solutions Ltd – All Rights Reserved
Page 12 of 46
Pocket Appraise User Manual
05/05/04
6 Sent Jobs
Purpose:
To display a list of jobs that have been sent to the server, but not yet deleted from the device. The jobs
remain on the device for 1 day after sending to the server, after which time the handheld will clear the jobs
off the device automatically.
Accessed from Screens:
Using Sent Tab
on Tab Strip at bottom of screen.
Exit to Screens:
Using any other Tab on Tab Strip at bottom of screen.
Exit application by clicking on the ok button at the top right of screen.
Notes:
Status of jobs listed is sent
List is sorted by date & time, location, contract_id in ascending order.
Processes:
View: Opens up selected inspection in read only mode, user will not be able to change any field in the
inspection.
Resend: Changes the status of the selected inspection to completed. This will refresh the sent list to take
account of the inspection that has disappeared off the sent list onto the completed list. On next connection to
server, job will be resent.
Copyright© 2004 Unwired Solutions Ltd – All Rights Reserved
Page 13 of 46
Pocket Appraise User Manual
05/05/04
7 Cancelled and Reallocated Jobs
Purpose:
To display a list of jobs that have been cancelled or reallocated to a different inspector by the server, but not
yet deleted from the device. After being cancelled, the jobs remain on the device for 1 day, after which time
the handheld will clear the jobs off the device automatically.
Accessed from Screens:
Using Cancelled Tab
on Tab Strip at bottom of screen.
Exit to Screens:
Using any other Tab on Tab Strip at bottom of screen.
Exit application by clicking on the ok button at the top right of screen.
Notes:
Status of Jobs listed is cancelled, reallocated inspection is denoted by * at the start
List is sorted by date & time, location, contract_id in ascending order
Processes:
View: Opens up selected inspection in read only mode. User will not be able to edit any field in the
inspection.
Copyright© 2004 Unwired Solutions Ltd – All Rights Reserved
Page 14 of 46
Pocket Appraise User Manual
05/05/04
8 Send & Receive
Purpose:
To allow the user to specify what data is to be transferred to and from the server, to start the data transfer
process, and to launch the configuration screen.
Accessed from Screens:
Using Send & Receive Tab
on Tab Strip at bottom of screen.
Exit to Screens:
Using any other Tab on Tab Strip at bottom of screen.
Configure Screen accessed via the Configure button
Exit application by clicking on the ok button at the top right of screen.
Notes:
Displays copyright in left lower corner, version number in right lower corner.
Re-inspections: These are always uploaded/downloaded regardless of the setting in the tick boxes. See
Communication section for further information.
Connect Using: Selecting telephone or mobile then uses a RAS dialup connection. Cradle simply assumes
a connection (ActiveSync). Selecting telephone or cradle ticks all of the 3 boxes below it. Selecting mobile, it
unticks the download templates option, as this could take a while. The user can override these settings.
Selecting “mobile” uses a RAS dial-up connection called “mobile” which must exist.
Selecting “telephone” uses the RAS dial-up connection as specified in the configure screen.
Submit Completed Inspections: Ensures that completed inspections are sent to the server.
Download Jobs: Ensures that new jobs are downloaded from server.
Download Templates: Ensures that templates (lookup lists) that have changed (later version) are
downloaded from server.
Start Download/Uploading: Connects to the server and downloads/uploads data. Please make sure that
the device has some way of connecting to the server (i.e. ActiveSync or modem or mobile phone) and that
there is a backend setup. See communication process section.
Configure: Displays the configure screen.
Copyright© 2004 Unwired Solutions Ltd – All Rights Reserved
Page 15 of 46
Pocket Appraise User Manual
05/05/04
9 Configure Communications
Purpose:
To allow user to specify inspector, connection, and server settings for data transfer.
Accessed from Screens:
Send & Receive screen
Exit to Screens:
Send & Receive screen by clicking on OK or Cancel buttons
Set a new connection, by specifying in connection field.
Notes:
InspectorID: Used to prefix inspection filenames to ensure uniqueness and identifies the inspector by a
unique ID. If unknown, please ask for your unique Inspector number from Technical Support.
Inspector Name: The inspector name is printed on reports.
Connection: The connection name to use when dialling the server. To create a new connection select “New
Connection… ”, this will display the new connection screen.
?There must be a connection called “mobile”present in order to use “mobile”as the method of connection
in the Send & Receive screen. The system automatically selects the “mobile”connection when the
connection method is set to mobile.
Telephone No: Allows the default telephone number associated with the current connection to be modified
Server Name: (Mandatory): Specify the IP address of the FTP server e.g. 192.168.0.170. If unknown,
please ask for your Server IP number from Technical Support.
Dir 1 (IN): Name of the FTP directory on the server where files are placed by the device. If unknown, please
ask for the FTP IN directory from Technical Support.
Dir 2 (OUT): Name of the FTP directory on the server where files are downloaded from to the device. If
unknown, please ask for the FTP IN directory from Technical Support.
Copyright© 2004 Unwired Solutions Ltd – All Rights Reserved
Page 16 of 46
Pocket Appraise User Manual
05/05/04
Processes:
OK: Saves the configuration settings immediately to submit.xml file. Returns to the Send & Receive screen.
Cancel: Leaves the configuration settings unchanged. Returns to the Send & Receive screen.
Repair: Only use this button if instructed to do so by Technical Support. This button will scan the
device for actual inspection files and regenerates all the job lists for each of the job screens. This may take
some time if there are lots of inspection files on the device as the process has to open each file to work out
the current inspection status and assign it to the correct job list screen.
Copyright© 2004 Unwired Solutions Ltd – All Rights Reserved
Page 17 of 46
Pocket Appraise User Manual
05/05/04
10 New Communication Connection
Purpose:
To allow user to set-up new dialup connections for use in the configure screen.
Accessed from Screens:
Configure
Exit to Screens:
Configure screen by clicking on OK or Cancel buttons
Notes:
Connection Name (Mandatory): As appears in configure screen
Device (Mandatory): Modem to use selected from list
Tel No (Mandatory): Full number (inc STD code) to dial in order to connect to server.
Saving: Connection details are saved by the Operating System in the registry, rather than in a configuration
file.
Processes:
OK: Creates a new connection
Cancel: Returns to the Configure screen without creating a new connection
Copyright© 2004 Unwired Solutions Ltd – All Rights Reserved
Page 18 of 46
Pocket Appraise User Manual
05/05/04
11 Re-Inspections
Purpose:
To allow the inspector to enter a list of registration numbers of vehicles that have previously been inspected
and are stored on the server. During the Send & Receive data process, these inspections are downloaded to
the device in order that the vehicle may quickly be re-inspected without starting a fresh inspection.
Accessed from Screens:
Using Re-inspection Tab on Tab Strip at bottom of screen.
Exit to Screens:
Using any other Tab on Tab Strip at bottom of screen.
Exit application by clicking on the ok button at the top right of screen.
Processes:
Add (bottom left): Makes the registration box and further add button appear. Will allow user to enter the
registration details.
Delete: Deletes the selected registration from the list.
Clear All: Clears the registrations from the list. User will be asked to confirm this request.
Add (top right): Adds the registration entered (mandatory) to the end of the list. The button and the
registration text box and label then disappear.
Copyright© 2004 Unwired Solutions Ltd – All Rights Reserved
Page 19 of 46
Pocket Appraise User Manual
05/05/04
12 Notes on Entering Data on Inspection Screens
Navigation between inspection data entry screens is accomplished by utilising the tab strip at the bottom of
the screen, as follows:
Vehicle details – such as make, model, registration etc.
Tyre details
Option details
Damage details
Result / signature details
On the upper right hand of the inspection screens, these functions are available:
Save the inspection to a file, or exit the screen back to the job list if in read-only mode. Can save and
continue with an inspection, or save and return back to the job list, as required.
Enter/view vehicle notes (on vehicle details screen) or customer notes (on customer screen). This is a
catch all and allows further details to be entered where there is not already an entry field on the screen for
that information
Enter/view inspection messages. This is used by inspectors to note any software/ hardware or
inspection data problems they may have, and can be monitored back at head office. It is a way for inspectors
to pass messages back to head office that don’t necessarily relate to the inspection.
Take a vehicle photograph for re-marketing purposes. This is related to the vehicle and not a specific
item of damage. See the later sections for a detailed discussion on taking a picture.
Data entry keypad:
Data entry for numeric obly fields is achieved using the numeric keypad (above) which is displayed
automatically for all relevant fields when you tap on them.
Date values are entered using the calendar utility (above) whish is also displayed automatically for all
relevant fields.
Copyright© 2004 Unwired Solutions Ltd – All Rights Reserved
Page 20 of 46
Pocket Appraise User Manual
05/05/04
Alphanumeric data is entered using the usual PocketPC input methods such as pop-up QUERTY keyboard
and transcriber handwriting recognition. See the Pocket PC user guide for more details on data entry and
other basic Pocket PC functions.
Copyright© 2004 Unwired Solutions Ltd – All Rights Reserved
Page 21 of 46
Pocket Appraise User Manual
05/05/04
13 Customer Details
Purpose: To allow the inspector to enter details about the customer and the contract.
Entry Screens:
New Jobs List (Customer and New buttons)
On the main screen, user can access the customer fields by selecting an inspection and clicking on the
customer button.
When a new inspection is created, the customer fields will need to be filled up first before the user can carry
on entering the vehicle details.
Exit Screens: If user accessed the customer fields by clicking on the customer button, clicking ok or cancel
will return you back to the New Jobs List screen. If user accessed the customer fields by creating anew
inspection, clicking ok or cancel will redirect you to the Vehicle Details screen.
Mandatory fields: these fields need to be entered to successfully save the customer details: Contract
Name, Customer Name, Date, Town
Related fields:
Contract Name: Selecting an entry in the list automatically populates the following fields for the selected
contract (that is, if data exists):
?
Customer Name (screen 1)
?
Company Name (screen 1)
?
No/Street (screen 2)
?
Area (screen 2)
?
Town (screen 2)
?
County (screen 2)
?
Postcode (screen 2)
Screen Navigation:
Move to customer screen 2 (address details)
OK: Saves the customer details to the inspection XML file. Returns to screens defined opposite.
Cancel: No data is saved. Returns to screens defined opposite.
or
button: Click to display and edit full customer notes details screen. This is a different field to the
vehicle notes which is edited by clicking
on the vehicle screen.
Move to customer screen 1 (customer details)
Copyright© 2004 Unwired Solutions Ltd – All Rights Reserved
Page 22 of 46
Pocket Appraise User Manual
05/05/04
14 Vehicle Details Page 1 of 4
Purpose:
Allows inspector to enter details needed to identify the vehicle (Page 1 of 4).
Entry Screens:
From main screen via inspect button.
Redirected from Customer screen when creating a new inspection.
Any inspection screen via tabs at bottom
Exit Screens:
To any inspection screen via tabs at bottom
New Jobs list via save button
Vehicle Details page 2
Mandatory fields:
There are a number of fields that are mandatory (must be completed) in order for the application to:
To save an inspection you must enter: Registration
To exit screen to other inspection screens: None
To mark the whole inspection as complete you must enter:
Registration
Make
Model
Body Type
Colour
Fuel
Engine Size
Mileage
Related fields: Model list: is dependent on the value in the Make list. The model list is initially empty when
no Make has been selected. When you select a Make, the values in the Model list changes/clears as well.
Screen Navigation:
Move to vehicle details screen 2
Copyright© 2004 Unwired Solutions Ltd – All Rights Reserved
Page 23 of 46
Pocket Appraise User Manual
05/05/04
15 Vehicle Details Page 2 of 4
Purpose:
Allows inspector to enter details needed to identify the vehicle (Page 2 of 4).
Entry Screens:
Vehicle Details pages 1 or 3
Exit Screens:
To any inspection screen via tabs at bottom
New Jobs list via save button
Vehicle Details pages 1 & 3
Mandatory fields: To mark the whole inspection as complete you must enter data for these fields:
Registration
Make
Model
Body Type
Colour
Fuel
Engine Size
Mileage
Screen Navigation:
convert the value entered in mileage field (assumed to be kilometres) to miles by dividing by 1.6. User will
be asked to confirm if he really wants to convert data from kilometer to miles.
Move to vehicle details screen page 1
Move to vehicle details screen page 3
Copyright© 2004 Unwired Solutions Ltd – All Rights Reserved
Page 24 of 46
Pocket Appraise User Manual
05/05/04
16 Vehicle Details Page 3 of 4
Purpose:
Allows inspector to enter further details needed to identify the vehicle (Page 3 of 4).
Entry Screens:
Vehicle Details pages 2 or 4
Exit Screens:
To any inspection screen via tabs at bottom
New Jobs list via save button
Vehicle Details pages 2 and 4
Mandatory fields: To mark the whole inspection as complete you must enter data for these fields:
Registration
Make
Model
Body Type
Colour
Fuel
Engine Size
Mileage
Related fields:
If Road Tax field is No then Tax Exp Date field is disabled.
Screen Navigation:
Move to vehicle details screen page 2
Move to vehicle details screen page 4
Copyright© 2004 Unwired Solutions Ltd – All Rights Reserved
Page 25 of 46
Pocket Appraise User Manual
05/05/04
17 Vehicle Details 4 of 4
Purpose:
Allows inspector to enter details needed to identify the vehicle (Page 4 of 4).
Entry Screens:
Vehicle Details page 3
Exit Screens:
To any inspection screen via tabs at bottom
New Jobs list via save button
Vehicle Details page 3
Mandatory fields: To mark the whole inspection as complete you must enter data for these fields:
Registration
Make
Model
Body Type
Colour
Fuel
Engine Size
Mileage
Related fields:
If Service Book field is No then the following fields are disabled:
?
Service History
?
Last Srvd By
?
Last Srv Date
?
Last Srv Mileage
Copyright© 2004 Unwired Solutions Ltd – All Rights Reserved
Page 26 of 46
Pocket Appraise User Manual
05/05/04
Screen Navigation:
Displays an aide memoir screen which displays notes about missed service costs relating to that
contract. This is designed to help the inspector remember the costs (varies by contract) to charge the
customer for missed services. As shown below:
This data is for reference only, it does not form part of the inspection data.
Move to vehicle details screen page 3
Copyright© 2004 Unwired Solutions Ltd – All Rights Reserved
Page 27 of 46
Pocket Appraise User Manual
05/05/04
18 Tyres
Purpose:
In addition to the vehicle details, tyre details are also needed for a complete assessment of the vehicle.
Entry Screens:
Any inspection screen via tabs at bottom
Exit Screens:
To any inspection screen via tabs at bottom
New Jobs list via save button
Mandatory fields:
There are a number of fields that are mandatory for the application to
Save: None.
Exit screen to other inspection screens: None
Mark as complete: All fields apart from the “Spare Type” drop-down
Related fields:
When selecting the NSF (top) tyre manufacturer the following 4 (NSR, OSR, OSF, Spare) manufacturers are
automatically set to the same as NSF, regardless of their current value. But each one of these can be
changed to other values. So if you have different manufacturers on each tyre, you should set the NSF
manufacturer first before moving on to the other tyres. Tyre depth fields are automatically converted to one
decimal place after exiting the numeric keypad for that field.
Copyright© 2004 Unwired Solutions Ltd – All Rights Reserved
Page 28 of 46
Pocket Appraise User Manual
05/05/04
19 Vehicle Options
Purpose:
To add any options available in the vehicle, e.g. sunroof, electric windows, etc.
Entry Screens:
Any inspection screen via tabs at bottom
Exit Screens:
To any inspection screen via tabs at bottom
New Jobs list via save button
Mandatory fields:
There are a number of fields that are mandatory for the application to
save: None
exit screen: None
mark as complete: None – the presence of options is not mandatory on an inspection
Screen Navigation:
Click on an item in the list to tick or untick that item – ticked items, indicate that as an option on the vehicle.
Note: If there are additional details to the item you clicked (e.g. sunroof can be manual or electric, etc.), a
pop-up sub-list will appear containing details about the selected option. Click on the detail. The item will
appear checked in the list along with any detail you have selected. To deselect an item, click on the item
again and the green tick should disappear.
Copyright© 2004 Unwired Solutions Ltd – All Rights Reserved
Page 29 of 46
Pocket Appraise User Manual
05/05/04
20 Damage / Parts Assessment
Purpose:
Any damage assessment or parts required for the vehicle can be specified on this screen. Where possible,
digital photographs can be taken as evidence and attached to each damage / part item entered. You can
enter as many damage spots as required and take one digital photo and enter manual notes for each
damage item. The inspector determines what action is needed to rectify each item and a cost can be entered
for each item accordingly.
Entry Screens:
Any inspection screen via tabs at bottom
Exit Screens:
To any inspection screen via tabs at bottom
Mandatory fields:
There are a number of fields that are mandatory for the application to
save: None
exit screen: None
mark as complete: None – the presence of damage is not mandatory on an inspection
Screen navigation:
To add damage, tap on an area in the flat car where the damage is.
If there exists a sub-location, a list will appear, tap on the sub-location in the list.
Otherwise, a fault list pop’s up, as below. Tap on the fault from the list.
Lastly, an action list will appear specifying the cost of each action as well. Select an action.
Copyright© 2004 Unwired Solutions Ltd – All Rights Reserved
Page 30 of 46
Pocket Appraise User Manual
05/05/04
Notice that on the topmost part of the screen, with each selection you made, the text you selected appears
so you can keep track of the damage that you have just entered. The cost of repairing the damage appears
as well.
You can choose to add one picture to each damage item (click on
details on taking digital photos. You can add a note (click on
) , see the next section for more
) at this point. see below, or you can
choose to save the damage by clicking on
. When you save the damage, a red dot ? will appear on the
area and the damage details on the top of the screen as well as the cost field will be cleared.
Damage marker (red dot ?): Displays the description of the damage clicked at the top of the screen,
including price in the text box.
On the left hand side of the screen, these functionalities are available:
Save the current damage item. Existing damage will still be shown (-red dots not be cleared), but the
top line text (Bonnet: Dent: Paint) will be cleared. Update the running total.
View damage entered: displays a pop-up list of damage as below:
Select
(cancel)
Bonnet: Scratch: Paint
Tyre: Flat: Replace
Headlight: Cracked: Replace
Selecting an item will display the following pop-up:
Edit/View/Delete?
(cancel)
Pictures
Notes
Delete
Selecting “pictures” displays the picture full screen with 3 buttons “Retake”, “Keep”, “Delete” (only visible if
not in read-only mode) deletes this item of damage (including pictures, notes etc) after confirmation.
Selecting “notes” display the notes screen and allows changes (if not read-only mode).
Copyright© 2004 Unwired Solutions Ltd – All Rights Reserved
Page 31 of 46
Pocket Appraise User Manual
05/05/04
Running total: When clicked, displays a message box showing the running total:
Add/edit note for current damage item. Displays a note box where you can enter notes for the particular
damage (each damage item has an individual note).
Add new picture to current damage item: displays a take picture screen and will attach the picture to
the current damage item. See the later section on digital photography.
Change Interior Flat Car: the application can specify the damage locations using a number of different
vehicles flat car images (kipper views). Use this button to change to the interior flat car image to find the one
that best describes the vehicle (e.g. estate car, van). However, you may have only been provided with one
flat car image for your application, in which case you will be unable to change the image.
Change Exterior Flat Car: the application can specify the damage locations using a number of different
vehicles flat car images (kipper views). Use this button to change to the exterior flat car image to find the
one that best describes the vehicle (e.g. estate car, van). However, you may have only been provided with
one flat car image for your application, in which case you will be unable to change the image.
Once you have entered damage items
onto a flat car image and when you
click the
or
to switch flat car
views, the flat car that you have
entered damage onto it will show a *
next to the flat car name as shown on
the left. The * indicates the flat car
you have entered damage on. If you
choose a different flat car image to the
one you have begun to enter damage
then a warning message will be
displayed as shown on the right.
Copyright© 2004 Unwired Solutions Ltd – All Rights Reserved
Page 32 of 46
Pocket Appraise User Manual
05/05/04
20.1 Taking Pictures
The camera is inserted into the top of the iPAQ 2210 unit with the
graph label facing towards you as shown on the left. Push the
camera gentle into the device until it clicks into place. The camera
lens can then be swivelled around to face away from you. Do not
force the camera into the slot, it will only fit in the device in one
way around as shown on the left.
1. Insert the camera with
the label facing you.
2. The camera lens can be
swivelled around to face
away from you
3. Take pictures in
portrait (upright)
The camera buttons
are used throughout the application to take pictures of specific damages and/or
pictures of the vehicle for remarketing or evidence purposes or to show specific faults/damage to a vehicle.
The camera is accessed on both the main vehicle details screen or through the damage/parts assessment
screen. One single image can be taken for the whole vehicle on the vehicle details screen and an unlimited
number of damage items / photographs may be entered on the damage/part screen.
When the camera button is pressed and no picture has already been attached, the preview screen is
displayed immediately:
This gives a live video feed from the camera.
Copyright© 2004 Unwired Solutions Ltd – All Rights Reserved
Page 33 of 46
Pocket Appraise User Manual
05/05/04
The user can adjust the focus ring on the camera lens if needed:
Select the captured image size you need by clicking on the options menu. By default, the picture will have a
resolution of 640x480:
If you need to use the built-in flash, you can set the flash to on using the options menu:
If you are using the flash, please make sure that you set the correct distance. Use the Set Flash Distance
Option, and this could be set to 300cm, 150cm, 100cm, 50cm to indicate how far away you are from the
objects being taken. When taking a photo with a flash, the light on the left hand side on the rear of the
camera turns to red. This indicates that the Pocket PC is charging the flash discharge unit. Wait for this light
to turn back to green before clicking on Capture. Please note that use of flash drains the battery.
There is also an option for night capture, set this to on if needed. This option will only work if the flash is set
to on.
The reverse option reverses (flips) the image currently displayed on screen, this is for when the lens is
rotated towards the front on the Pocket PC.
To take a photo, click the Capture item on the menu. This captures the image on screen at the resolution you
previously specified. When a photo is successfully taken, the preview screen closes and after a few seconds,
displays a preview of the captured image:
Copyright© 2004 Unwired Solutions Ltd – All Rights Reserved
Page 34 of 46
Pocket Appraise User Manual
05/05/04
The user can now choose to keep the image by clicking on close, or delete the image and choose not to
attach any picture by clicking on delete, or discard the image and retake picture by clicking on retake.
You are free to insert and remove the Camera in and out of the device while running the application.
However, do not try and remove the camera out of the device while attempting to take a photograph
(using the live video preview) as this may result in damage to the camera unit.
If no camera is inserted into the Pocket PC and the camera button is pressed, the user will receive this error
message:
Check to make sure the camera is inserted the right way around in the Pocket PC and it is pushed fully down
into the device. Do not use excessive force when inserting the camera into the slot, it will only fit in
the device in one way around and should slide into the slot quite easily.
Copyright© 2004 Unwired Solutions Ltd – All Rights Reserved
Page 35 of 46
Pocket Appraise User Manual
05/05/04
21 Results / Mark as Complete
Purpose:
A vehicle will be graded by the inspector and the inspection will be marked as complete so it can be passed
on the server on next connection
If result is “missing” then mandatory items will not be checked.
Mandatory items that must be present in order for the inspection to be marked as completed are shown on
the basic vehicle details screen.
Mark as complete process checks mandatory items and warns the user if no damage or no options is
defined. It is optional to include options and damages to the inspection. The warning is just to make sure that
the inspector did not forget to capture the data.
Screen navigation:
Displays aide-memoir for grade explanations (contract specific)
Allows the inspector to capture a signature of both the operator and the customer / site manager. Tap on
this button and it displays a signature capture window as below :
Use the pointer as you would a pen to sign across the line (though it is suggested that you sign a little more
slowly).
OK: accepts the signature and Cancel: discards the signature
Copyright© 2004 Unwired Solutions Ltd – All Rights Reserved
Page 36 of 46
Pocket Appraise User Manual
05/05/04
22 Communications Process
When you click the “Start Downloading / Uploading”button, the following sequence of events occurs:
Step 1. Dial-up Server. The handheld establishes a connection to the central server. The number dialled and
modem used depends on the configuration settings (e.g. cradle/mobile/landline selection).
Step 2. Once the device has dialled and signed into the central server it then opens up a data connection to
the central server. The configuration options allow the server name, file directories and user names to be set.
These should be set-up for you and there should be no need to change these settings. You may be is
prompted for password before dialling commences, ask your support liaison for this information.
Step 3. Data transfer between the device and server then occurs.
Step 4. Shutdown the data link.
Copyright© 2004 Unwired Solutions Ltd – All Rights Reserved
Page 37 of 46
Pocket Appraise User Manual
05/05/04
22.1 Data Exchange Process Details
Data file transfers with the central server occurs is in the order below. Each stage will display various status
messages in the Status field of the screen above:
?
Re-Inspections: if there are vehicles to be re-inspected, a request is sent to the server.
?
Delete Files: On connection to the server, the device will check which files are to be deleted and
attempt to delete them. All jobs that have been sent or reallocated or cancelled and have been on
the device for more than one whole day will be permanently deleted. All files associated with these
jobs are also permanently deleted.
?
Upload files: All completed jobs and files associated with them, like signatures and pictures are sent
to the central server. A copy remains on the device for one day.
?
Download jobs from server: Download new jobs from the server.
?
Send a confirmation summary to server: Device will send a confirmation to the server upon
completion to inform the server what files the device has received.
?
Download templates from server: Download templates from the server – templated are useful
information such as Make and Model drop-down items and other useful information. Only template
items which are different from the central server are passed to the device to save connection times.
?
Provide a report to the user: A message window will show a summary of the files sent and
received to/from server.
Copyright© 2004 Unwired Solutions Ltd – All Rights Reserved
Page 38 of 46
Pocket Appraise User Manual
05/05/04
23 Notes on Using SD Cards for Data Backups
SD or Secure Digital memory cards are small digital cards which do not require battery power to retain their
contents. When the application saves inspection data, photographs and signatures, it saves 2 copies of
everything, it two different places:
1. In the \iPAQ File Store folder and
2. In the \Storage Card folder
Both of these directories do not require the device battery to retain their contents and are not going to be
wiped when the device is hard resets (as is the case when the battery is allowed to run flat). This is to make
sure that no data or images are lost due to batteries running low or device being made unusable.
Note that if no SD card is inserted in the device, the application will warn the user when it is first started but
still enable the user to continue to use the application but duplicate copies of data will not be stored.
To ensure all data is kept consistent across these two storage areas it is best to never remove the SD
card from your device, unless directed to do so by technical support.
If the SD card is not formatted correctly i.e. has become corrupt, the user will get the message below when
they turn on the device or plug the SD card into the device:
If you choose no then the card will not be formatted but may be unusable – contact Technical Support if
you see this message.
Copyright© 2004 Unwired Solutions Ltd – All Rights Reserved
Page 39 of 46
Pocket Appraise User Manual
05/05/04
If you choose yes to the Storage Card Warning message, then the device will format the SD card and
display:
SD cards have a small read/write enable switch on the side of the card and protects the card from being
written to, much like a floppy disk:
Do not write protect the SD card. When starting the Pocket Appraise software, if the SD card is not
formatted or the write-protect switch is on then the user will get this message:
If you press No, then the device will attempt to read the card again and display the same message if it can’t
access the SD card.
Copyright© 2004 Unwired Solutions Ltd – All Rights Reserved
Page 40 of 46
Pocket Appraise User Manual
05/05/04
When the application is first started, it will check the contents of the SD card. If the SD card is blank then the
device will copy all data files, signatures and photos to the SD card. Conversely, if the iPAQ File Store is
blank then all data, photos and signatures are copied off the SD card onto the device. This automated
measure ensures consistency of data in the event of loss of one of the file storage locations. This should
offer fault tolerance against any loss of data.
If no SD card is in the device then the user will see this message when they first start the application:
If the user clicks No, then the application will try and re-detect an SD card and display the message if it is still
unable to locate and SD card. The user can either check the SD card is correctly inserted in the device or
insert a card if one is not already present and press No to redetect the card.
If the user presses Yes, the application will carry on without backing up to the SD card. Clicking Yes will
display this message:
The user can click the OK circle to carry on without performing a backup to the SD card.
Copyright© 2004 Unwired Solutions Ltd – All Rights Reserved
Page 41 of 46
Pocket Appraise User Manual
05/05/04
24 Batteries & Power
24.1 Changing / Installing the Removable Battery
To change the battery on the iPAQ 2210 device
follow these step:
Step 1 -Opening the latch
Step 2 -Swinging the door open
Step 3 -Removing the door
Step 4 – Remove battery using the tabs
Insert the replacement battery into the device as soon as is possible. The battery will only fit in the device
one way around with the pins aligned to the device. Careful not to short or fuse the power connector pins on
either the battery or the device.
Note that when you remove the main battery from the unit, the device has 10-15 minutes on an
internal backup battery before all program and set-up information on the device will be lost (hard
reset) and the application will need to be reinstalled and the software key reapplied – no data, photos
or signatures will be lost however if the SD memory card has been used while running the software.
24.2 Charging the Device
Charge the device using a docking cradle / mains adapter or you can connect the device straight to the AC
Adapter or a Car Charger using a special connector.
NOTE: Do not attempt to charge the device with a different charger such as a mobile phone charger
as this may damage or destroy the device.
Copyright© 2004 Unwired Solutions Ltd – All Rights Reserved
Page 42 of 46
Pocket Appraise User Manual
05/05/04
24.3 Viewing the Battery Level
Click on Start->Settings then the System tab to bring up the system settings screen.
Then click on the battery power icon
to display the battery levels:
Copyright© 2004 Unwired Solutions Ltd – All Rights Reserved
Page 43 of 46
Pocket Appraise User Manual
05/05/04
25 Other Useful Pocket PC Functions
25.1 Closing All Running Applications
It is best that you close all running applications prior to running pocket appraise for optimum performance.
There are a number of ways to do this, the best are discussed below:
Click on Start->Settings then the system tab to bring up this screen
and click on the Memory icon
Click on the “Running Programs” tab along the bottom of the screen to bring up this screen:
This lists all the currently running programs you have in memory. It is ok to leave just ActiveSync (if the
device is docked) and File Explorer running. And you can close all the other applications. To close an
application, you may highlight it from the list and click on Stop button. Or you can choose to Stop All
applications. If you are synced to the desktop, this might stop the ActiveSync as well.
For other useful information about using Pocket PC’s see the device user guide or find on-line help which
may be provided by a device manufacturer’s web site.
Copyright© 2004 Unwired Solutions Ltd – All Rights Reserved
Page 44 of 46
Pocket Appraise User Manual
05/05/04
26 Appendix A
This section shows page 1 of 2 giving an example of a report printed locally from the handheld device.
Copyright© 2004 Unwired Solutions Ltd – All Rights Reserved
Page 45 of 46
Pocket Appraise User Manual
05/05/04
This section shows page 2 of 2 giving an example of a report printed locally from the handheld device.
Copyright© 2004 Unwired Solutions Ltd – All Rights Reserved
Page 46 of 46