1
OPCODE
PUBLICATION
PatchTalk Guide
1950906
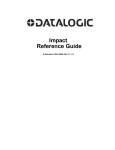
Overview
The Galaxy package contains modules that enable it to work with a
wide variety of synthesizers and MIDI devices by describing how
Galaxy needs to interact with a given synthesizer. Galaxy also allows
you to create modules for other synthesizers or MIDI devices that
either didn’t exist at the time this version of Galaxy was created or
that we didn’t know about.
PatchTalk Basics
Before you attempt to create your own custom modules, you should be
familiar with:
•
•
•
•
Hexadecimal numbers.
The MIDI specification, particularly the format of system-exclusive messages.
How to read the section of MIDI device manufacturers’ manuals
dealing with system-exclusive messages.
The basic concepts and principles involved in programming. If
you've never done any programming, you might want to try learning HyperTalk (the language built into Apple's HyperCard) before
trying to learn PatchTalk; the languages are similar, and there are
many books and HyperCard stacks that you can learn from.
To create your own custom (or user-defined) module:
•
•
•
Opcode Publication 1950906
Define the patch types that the device supports.
Create a new device that uses these patch types.
Write the scripts for each patch type.
-1-
PatchTalk Guide
PatchTalk is the language for describing how Galaxy should work
with a given MIDI device. To create a Galaxy module for a new MIDI
device, you write several small texts, called scripts, to describe the
ways your MIDI device works for each patch type in the device.
Scripts written in PatchTalk describe:
•
•
•
•
Loading and sending a patch from a MIDI device.
(Get Patch and Send Patch scripts)
Loading and sending an entire bank of patches from a MIDI
device.
(Get Bank and Send Bank scripts)
Translating the patch name in a patch to and from ASCII.
(To Display Name and To Device Name scripts)
The numbering of the MIDI device’s patches.
(Patch Number script)
When Galaxy performs an operation with your MIDI device, it follows
the instructions in one or more scripts that you have written to find
out how to interact with the MIDI device. This is called “running” a
script.
The descriptions that follow provide information about Galaxy and
PatchTalk that are necessary in order to write scripts and create
custom modules. However, you also need information about your particular MIDI device and how it talks to computers over MIDI (often
referred to as its “system exclusive implementation”). This information may be in the manuals that came with your device, or you may
have to request it from the company. In either case, be prepared to
spend some time reading the documentation and experimenting with
your MIDI device to understand how it really works.
Skim the examples of custom modules in this section and on the
Galaxy disks. You should find a device similar to yours that already
has a custom module written for it. Look at the scripts and the information entered in dialog boxes to get ideas for creating your own
custom modules. Learning from examples is probably the clearest way
to find out how to program your own modules.
NOTE: Many of the modules included with Galaxy were not created in the
manner described in this section (many modules were written in C). As a
result, the Define Custom Patch Type and Define Custom Device dialog
boxes for these patch types won't be accessible, and there are no
PatchTalk scripts to read.
Opcode Publication 1950906
-2-
PatchTalk Guide
Defining Patch Types
To create a custom module for Galaxy you create a custom device and
one or more custom patch types. This is done by filling out dialog
boxes accessed from the Galaxy Configuration dialog box. Patch types
are created first, followed by the custom device. The following discussion details these two steps.
Each MIDI device can have one or more patch types. For example, a
synthesizer might have voices and set-ups; a drum machine might
have tone parameters, patterns, and songs. Almost every device has a
system setup area that can be implemented as a single patch type. For
each type of information your MIDI device has you’ll need to create a
new custom patch type.
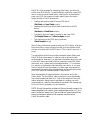
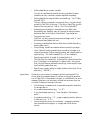
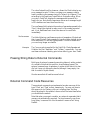
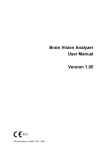
To create a new custom patch type:
a
Choose Setups>Galaxy Configuration.
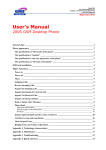
b Check Programming Mode in the lower left of the dialog box.
Figure 1.1: Check Programming Mode; select Patch Types
c
Click the Patch Types radio button in the upper right of the
dialog box.
d Click the New Custom button to open the Define Custom Patch
Type dialog box.
Opcode Publication 1950906
-3-
PatchTalk Guide
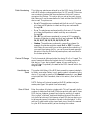
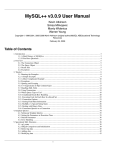
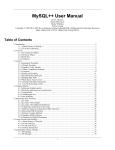
To make changes to an existing patch type:
a
Click the Patch Types button in the Galaxy Configuration dialog
box.
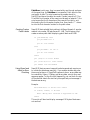
b Select the patch type and click the Edit button to open the Define
Custom Patch Type dialog box.
Alternately, you could simply double-click the patch type.
Figure 2: Define Custom Patch Type Dialog Box
Fill in the fields of the Define Custom Patch Type dialog box as
follows:
Name
Enter the name of the patch type. This must be unique among all
patch types in your system. Therefore, put the device model number
in the name, for example, “DX7 Voices” or “MultiVerb Patches.”
Patches in Bank
Enter the number of patches that the MIDI device stores of this type in
its memory. Some devices can store more than one bank For example,
there might be an internal bank and a bank stored in a card. In that
case, enter the number of patches stored in one of those banks.
Rows/Columns in
Bank
These let you set the number of rows (count down the screen) and columns (count across the screen) in a bank window. Setting either
number will set the other number to a useful value given the number
of patches in a bank.
Opcode Publication 1950906
-4-
PatchTalk Guide
Patch Numbering
This is the way patches are referred to on the MIDI device. Note that
while MIDI always numbers patches from 0 to 127, most MIDI devices
use a numbering system that the manufacturer thinks will be more
convenient for the user. This option lets you set up the patch type so
that Galaxy will use the same method in bank windows that the MIDI
device uses. The options are:
•
•
•
•
0…n-1: The patches are numbered and the first one is 0. For example, there are 100 patches in a bank and they are numbered 0
through 99.
1…n: The patches are numbered and the first one is 1. For example, there are 64 patches in a bank and they are numbered 1
through 64.
11…88: The patches are numbered in groups of 8. For example,
there are 16 patches in a bank and they are numbered: 11, 12, 13,
14, 15, 16, 17, 18, 21, 22, 23, 24, 25, 26, 27, 28.
Custom: The patches are numbered in some other scheme. For
example, the patches might be named IA-6, or P22. This option
tells Galaxy to use a script you write to generate the numbering. If
you want to get going quickly, you can choose the most appropriate option from one of the three preset options, and come back to
the custom option later.
Device ID Range
The first numerical defines whether the device ID is 0 or 1 based. The
second numerical defines the highest device ID number possible for
that device. If your device doesn’t appear to have a setting for a
device ID then it’s probably the same as the MIDI channel within the
range 1 to 16.
Handshake on
Send
This option tells Galaxy if the MIDI device needs to communicate back
to Galaxy even when Galaxy is only sending patch information to the
device. If you need to use any of the Receive commands in your Send
scripts (see PatchTalk Commands, later in this section), then set this to
yes.
NOTE: Galaxy will not work properly with MIDI patchers and your
custom patch type if this option is not set correctly.
Size of Patch
Opcode Publication 1950906
Enter the number of bytes in a single patch. This will generally be the
number of data bytes that the MIDI device sends for each patch. Some
MIDI devices, however, transmit two bytes for each byte in a patch
(this is called “nibblized” data) and therefore the size of the patch is
only half of what is sent. Furthermore, a few MIDI devices require you
to get several pieces of information for each individual patch. In this
case you’ll need to add up the sizes of each piece. Consult the manual
for your MIDI device carefully when choosing this number.
-5-
PatchTalk Guide
Some patch types don’t have a standard size. Examples are sequence
and/or pattern data in most drum machines. For these types, set this
value to bulk (by typing 0 into the numerical or sliding it all the way
down). Then your patch type will operate like the other bulk patch
types of Galaxy.
NOTE: When writing scripts for bulk patch types, you must use the
SendBulk and ReceiveBulk PatchTalk commands, instead of the other
MIDI transfer commands.
Name Conversion
This tells Galaxy how to display the name for each patch. Galaxy
needs to have access to an ASCII representation of the name for each
patch, which is the standard way computers store letters. Although,
many MIDI devices use this code, some use other codes, and some
don’t even have names in their patches at all. There are four settings
to let Galaxy know how to handle the names for the patch type:
•
•
•
•
None: There is no conversion necessary. The name is contained in
the patch data transmitted by the MIDI device (after denibblizing
the data, if necessary) as standard ASCII symbols. This is the most
common option to choose.
Table: The name is in the patch, but uses a different code
(although still one letter per byte). You will have to write a script
that converts from one letter in the patch’s name into ASCII and
vice versa. Often you can tell this because the documentation with
the MIDI device will have a table in it showing which code values
correspond to which letters and symbols.
Script: The name is some special format. You will need to write a
script that decodes the format into a full name and vice versa. The
documentation for the MIDI device should contain the complete
details of how to convert the name information in the patch.
Not In Patch: There is no name information in the patch. This is
common with many effects units. In this case, Galaxy will keep
track of a name for each patch to display in the bank window, but
this information is neither transmitted to, nor received from the
MIDI device.
Name Offset in
Patch
The number of bytes into the patch data that the name (in any format)
starts. If it starts at the first byte in the patch, then the offset is 0. This
value is not used (and you can’t set it) if there is no name in the patch
data (Not In Patch selected for name conversion).
Name Length
The number of bytes for the name in the patch data. This is generally
the number of characters in a patch name (None or Table selected for
name conversion) but may be different if the name is in some special
format (Script selected). This value is not used (and you can’t set it) if
there is no name in the patch data (Not In Patch selected).
Opcode Publication 1950906
-6-
PatchTalk Guide
Display Name
Length
If the number of characters used for a name by Galaxy is different
than the number of bytes stored in the patch data (if Script is selected
for name conversion) or there is no name in the patch data at all (Not In
Patch selected), then this is the number of characters Galaxy should
use to display the patch name.
Total Patch Size
This value is cannot be set. It simply reports the total number of bytes
Galaxy will be using to save each patch.
Has Edit Buffer
This indicates whether the MIDI device has an edit buffer for the
patch type. An edit buffer is a separate area from the bank of patches
in which many MIDI devices store the current patch being played and
edited. If your device has one, and you set this to yes, then when you
send an individual patch from Galaxy, the edit buffer will be used (the
Send Patch script will create the UseEditBuffer variable and set it to
true). Otherwise, Galaxy will use the last patch location, which will
overwrite that patch.
Defining Custom Devices
After you have created a new patch type for each of the MIDI device’s
patch types, you will need to create a new device type that uses them.
A device type defines the device’s name, which patch types occur in a
device, and in what banks the patch types occur.
To define a custom device:
a
Choose Setups>Galaxy Configuration.
b Click the Devices button in the Galaxy Configuration Dialog Box.
c Click New Custom to open the Define Custom Device dialog box.
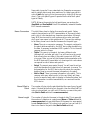
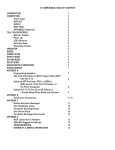
To make changes to an existing device type:
a
Opcode Publication 1950906
Click the Devices button in the Galaxy Configuration dialog box.
-7-
PatchTalk Guide
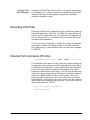
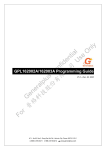
b
Select the device type and click the Edit button to open the Define
Custom Device dialog box.
Alternately, you could simply double-click the device type.
Figure 3: Define Custom Device Dialog Box
c
Fill in the Manufacturer and Model fields with the appropriate
names.
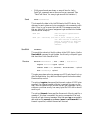
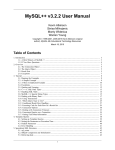
d Click Add to add banks.
You will see a dialog box of patch types to choose from.
Figure 4: Banks to Add Dialog Box
Opcode Publication 1950906
-8-
PatchTalk Guide
New banks are added after the selected bank, or at the beginning
when no existing bank is selected. You can click on any entry in the
bank list and change its name by typing in the lower text box labeled
Selected bank’s title. This will change only the way the label appears
in bundles, where it is convenient not to have the model number
repeated again (since the model number is usually part of the patch
type name, as described in the “Define Custom Patch Type” section).
Furthermore, some MIDI devices have several banks of the same patch
type. In this case, you can add the same patch type two or more times
(once for each bank), as long as you change each name. For example a
synthesizer may have an internal bank and a card bank of voices. First
add the patch type for voices to the device, rename it to “internal
voices,” then add the patch type again and rename the second one to
“card voices.”
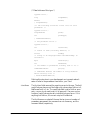
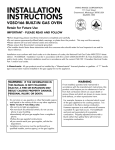
PatchTalk Scripts
After you have created a device and its patch types, you’ll need to
create a set of scripts for each patch type:
•
•
Create a new bank for the new patch type by choosing File>New
Bank.
The Custom menu appears next to the Load/Send menu. It contains a command for each script.
Choose an item from the Custom menu to edit the script for it.
A text editing window containing that script opens so you can
enter and edit the script.
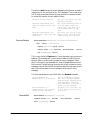
Figure 5: Script Editing Window
Get Patch and Send
Patch
Opcode Publication 1950906
You write these scripts to describe how to transfer a single patch to or
from the MIDI device. They usually instruct Galaxy to send system
exclusive data to the MIDI device and, in the case of Get Patch, to
receive it as well. There might also be PatchTalk instructions for
decoding or encoding the data before and after transmission over
MIDI.
-9-
PatchTalk Guide
Typical format for a Get Patch script:
a
Send a System Exclusive request to the MIDI device.
b Receive the patch data using Receive or ReceivePackets.
c Process the data received if necessary.
d Store the received data into the variable Patch.
Typical format for a Send Patch script:
a
Process the patch data if necessary.
b Send the data out in the format that the MIDI device expects.
The types of processing that may be necessary include bit conversions
or rearranging the data into an easily usable format. It is recommended that you use ReceivePackets when receiving data from the
device because this command can automatically strip off header and
trailer bytes from the system exclusive data. Galaxy patches usually
do not contain header/trailer bytes or checksum. When sending data
to the device you may have to “checksum” the data sent. PatchTalk
has commands that handle a wide variety of checksum methods.
Opcode Publication 1950906
- 10 -
PatchTalk Guide
Get Bank and Send
Bank
These scripts are similar to the Get and Send Patch scripts, except they
describe how to transfer a whole bank of patches at a time. They are
optional—if you leave them blank then the patch scripts will be called
repeatedly for each patch in the bank, although this will be somewhat
slower.
To Display Name
and To Device
Name
Some MIDI devices do not store the name of a patch in a way the
Galaxy can read (which is a standard code called ASCII). In these
cases, you write these scripts to describe how to convert to and from
the particular code the MIDI device uses. Because of the special nature
of this script, saving this script can take a long time.
Patch Number
Many MIDI devices do not number their patches in one of the
common numbering schemes that Galaxy knows (1—n, 0—n-1, or
11—88). For example, some use a scheme that runs A1, A2, A8, B1,
etc. In these cases, you can write this script to instruct Galaxy how to
number the patches the way your MIDI device does. Because of the
special nature of this script, saving this script can take a long time.
Saving and Exporting PatchTalk Modules
The patch and device types you create with Galaxy are stored in a file
called Galaxy Librarian Modules. Scripts are treated as parts of a patch
type. For safe backup of your work, and to be able to share it with
others, you’ll probably want to make copies of your custom patches
and devices.
To save a copy of a custom device and the patch types it contains:
a
b
c
d
e
Open the Galaxy Configuration dialog by choosing
Setups>Galaxy Configuration.
Click the Devices button, if it’s not already the current choice.
Select the device you want to export.
Only custom devices, marked by asterisks, are exportable.
Click the Export button.
Name the file in the standard way, and click the Export button in
the standard “Save As” dialog box to save the module.
Modules that you create in this way will always contain one device
and all of the patch types contained in it. You (or a friend) can reinstall these modules into Galaxy in the same manner that you
installed the modules that came with Galaxy.
Opcode Publication 1950906
- 11 -
PatchTalk Guide
Send Opcode Your
Modules!
Opcode will periodically release additional Galaxy modules. We hope
that eventually MIDI manufacturers will write them before they
release new devices but, in the meantime, if you want to share your
work with other Galaxy users, send us your modules. We’ll be collecting them for possible inclusion with future versions of Galaxy.
PatchTalk Help
A summary of PatchTalk is available as on-line help. To open a help
window, choose PatchTalk from the System 7 Help menu.
(
Figure 6: System 7 help menu icon appears on upper right of Macintosh
screen.
PatchTalk Commands
Commands are the instructions you write in PatchTalk scripts. They
instruct Galaxy to perform very specific functions. When a script is
run, each command in the script is executed in sequence. Remember
that while Galaxy tries to do as much for you as possible, when it’s
running a script, it can only do exactly what is stated.
The following list of commands describes both how to use them in a
script and what they do when run by Galaxy. The format of the command is given first, then a description of what the command does,
followed by some examples. Keep these points in mind when looking
at the format lines:
•
•
•
•
•
•
Opcode Publication 1950906
Words in boldface, such as Receive, are typed just as they appear.
Words in italics are replaced by one or more words that are appropriate, for example ListOfValues may be replaced by 3 + 4.
Groups of words in braces, such as {into | after} are choices separated by the vertical bar. You can choose one of the options.
Any text after two dashes (‘- - ’) is a comment. Galaxy will ignore
whatever is there through the end of the line. A long dash will also
work (“—”, typed as Option-Shift-dash).
Some parts of a command are optional. This is noted in a comment.
Note that if you include optional parts you must write them in the
order they appear in the format line.
Upper and lower case letters make no difference: put, Put, and
PUT are all the same.
- 12 -
PatchTalk Guide
•
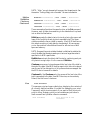
Send
While some formats are shown on several lines for clarity,
PatchTalk commands are written one line per command. (See
“PatchTalk Notes” for a way to get around this limitation.)
Send ListOfValues
This transmits the data in the ListOfValues to the MIDI device. Any
data may be sent: system exclusive commands, note commands, patch
data. It’s up to you to ensure that valid MIDI messages are sent and
that any device IDs or channel assignments get encoded into the data
(see the second example).
Send $F7
send an end-of-system-exclusive message
Send ($C : DeviceID) $7F send a patch change to patch
127. Note the use of adding the
Device ID variable to send the
program change on the right
channel.
SendBulk
SendBulk
This sends the contents of a bulk window to the MIDI device. Use the
ReceiveBulk command to get the data. Use this only with patch types
that have their Patch Size set to Bulk.
Receive
Receive MaximumSize { into | after } Destination
require ExactSize bytes --optional
timeout after Time {seconds | milliseconds } --optional
wait UserMessage --optional
This gets one system exclusive message over MIDI and places it into or
after the Destination. Any additional data beyond the number stated,
MaximumSize, are lost.
The optional require clause specifies the exact number of MIDI bytes
required. If a different number of bytes is received (too many or too
few), then the operation fails and the user will get a message. Use this
whenever you know exactly how many bytes the MIDI device should
send to you.
The optional timeout clause specifies the amount of time to wait for a
message. If this time is exceeded, the receive command will fail and
the user will get a time out message. Note that s and sec are acceptable
abbreviations for seconds, as are ms and msec for milliseconds. If no
timeout is specified, a default timeout will be used.
Opcode Publication 1950906
- 13 -
PatchTalk Guide
The optional wait clause puts a text message up for the user and waits
indefinitely for the first byte of any MIDI message. This is used when
a MIDI device requires the user to press a button on the device itself
to initiate the transfer of patch data to Galaxy.
Receive 68 into TheData
Receive 8+PatchSize into
TheData timeout after 500
msec
Receive 8+PatchSize into
TheData wait “Now Push the
Send Key”
ReceivePackets
get up to 68 bytes into the
variable theData
get a sys-ex message that is
8 bytes larger than the
patch size, but wait up to
500 milliseconds for the
data
get data, but put up a message for the user and wait
indefinitely for the data
ReceivePackets HeaderSize TrailerSize MaximumSize
{ into | after } Destination
require ExactSize bytes --optional
timeout after Time {seconds | milliseconds } --optional
wait UserMessage --optional
This is very similar to Receive only it provides some very convenient
features. This message will receive as much data as the MIDI device
sends to Galaxy, across several system exclusive messages if necessary. Furthermore, the command will strip off HeaderSize bytes from
the front and TrailerSize bytes from the end of each system exclusive
message received. Note that MaximumSize refers the maximum size of
each individual system exclusive message, not the whole set of
messages.
The other parameters are just like those in the Receive command.
ReceivePackets 6 2
BankSize+6+2 into theData
ReceivePackets 6 2
BankSize+6+2 into theData
timeout after 250 msec
ReceiveBulk
get up to BankSize bytes
into the variable theData
from multiple system exclusive messages, throwing
away the first 6 and last 2
bytes of each message
as above, but only wait up
to 1/4 second for the data
to arrive
ReceiveBulk MaximumSize --optional
timeout after Time {seconds | milliseconds } --optional
wait UserMessage --optional
Opcode Publication 1950906
- 14 -
PatchTalk Guide
Like ReceivePackets, this command gathers all data the MIDI device
has to send. However, it takes the data exactly as received and places
it into the bulk window. Use this only with patch types that have
their Patch Size set to Bulk. Setting Maximum Size to 0 will tell
Galaxy to allocate half of the available memory for bulk operations.
ReceiveBulk, unlike ReceivePackets, will accept non-system exclusive data.
The other options are just like the Receive command.
Delay
Delay Time {seconds | milliseconds }
This causes Galaxy to wait the specified time before doing anything
else. Some devices require short pauses before sending or receiving
MIDI data. Consult the MIDI device’s manual for its requirements.
Delay 50 msec
Delay 2*60*60 seconds
Abort
wait 1/20 of a second
wait 2 hours while you go eat
dinner
Abort ErrorMessage
This stops Galaxy from running the script any further, and displays
an optional error message for the user. You might use this command
when you detect the MIDI device is sending bad MIDI information.
Abort
cancel operation of the
script
Abort “The MIDI data was
tell the user of a problem
bad! Check the device.”
with the device
Abort “Bad data received
tell the user to turn off
make sure AppleTalk is OFF” AppleTalk
Put
Put ListOfValues { into | after } Destination
This command puts the result of the ListOfValues into the Destination.
The ListOfValues may be either a number, a string, or a list of arithmetic expressions and strings separated by spaces. The Destination can
be an existing or a new variable.
Put 9 into x
Put x*3 into y
Put “Hello” into x
Put “World” after x
Put temp[23,10] into
Patch[0,10]
Put $C:DeviceNumber y
into z
Opcode Publication 1950906
- 15 -
x now has 9 in it
y now has 27 in it
x now has “Hello” in it
x now has “Hello World” in it
replace 10 bytes of Patch
starting at offset 0 with 10
bytes of temp at offset 23
z has a program change 27
message in it
PatchTalk Guide
NOTE: “After” can only be used with an array that already exists. See
the section “Putting Empty into a Variable” for more information.
Nibblize
DeNibblize
Checksum
Checksum0
Nibblize ListOfValues { into | after } Destination
DeNibblize ListOfValues { into | after } Destination
Checksum ListOfValues { into | after } Destination
Checksum0 ListOfValues { into | after } Destination
These commands all perform the same function as the Put command.
However, each of them does something to the data before it is placed
into or after the Destination.
Nibblize expands the data to twice its size by placing the upper and
lower 4 bits (a nibble) of each byte into separate bytes. The upper
nibble precedes the lower nibble in memory. Many MIDI devices use
this simple encoding of patch data for transmission. We encourage
you to store patches in denibblized format for efficient use of disk
space and memory.
NOTE: One good clue as to whether the data is nibblized is whether the
size of the data that the device sends you is twice as large than what is
specified in its MIDI specification.
DeNibblize contracts the data to half its size by combining each pair
of bytes into a single byte. It is the reverse of Nibblize.
Checksum sums every byte and appends the low-byte of the total to
the end of the data. Some MIDI devices require this value to be placed
near the end of the data portion of all system exclusive messages. See
the MIDI device’s manual for details.
Checksum0 is like Checksum only the reverse of the low-byte of the
total is appended to the data. Some MIDI devices, such as some by
Roland, use this form of checksum.
View
View Variables
This pauses a script and opens a dialog box displaying the contents of
all currently defined variables. It is useful for debugging your script.
Temporarily add it at various points if you want to check what your
script is doing. Strategic points to view variables are just before a
Send command and just after a Receive command.
View Variables
Opcode Publication 1950906
- 16 -
stop and look at the
variables
PatchTalk Guide
PatchTalk Control Structures
Control Structures are PatchTalk commands that direct Galaxy how to
interpret other PatchTalk statements. They allow you to choose
among two or more groups of statements and/or repeatedly execute a
group of statements. Since they contain other commands, these statements may take up several lines in a script.
If
If Condition Then
Commands
Else --optional
Commands
EndIf
If the test indicated by Condition is true, then the first set of Commands is run by Galaxy. Otherwise the second set of Commands is run.
Note that the second set of commands is optional and, if not provided,
no commands will be run if the condition is false.
Note that the word then is optional.
If PatchNumber < 64
Put “A” into BankLetter
Else
Put “B” into BankLetter
EndIf
If x=16; put 0 into x;
EndIf
Opcode Publication 1950906
- 17 -
check if the number is less
than 64
if so, then we’re in bank A
else the number is greater
than or equal to 64
and then we’re in bank B
finish the If
one line version of “if x
is 16 then set it to zero”
PatchTalk Guide
Repeat
Repeat
Commands
Until Condition
The group of Commands is executed repeatedly until the test specified
in Condition is no longer true. The Commands are executed at least
once.
Put 0 into PatchNum
Repeat
Send SysExHeader PatchNum Patch F7
Put PatchNum+1 into PatchNum
Until PatchNum is PatchesInBank
Put "" into Alphabet
Put 0 into HowMany
Repeat
Put 'A' + HowMany after Alphabet
Put 1 + HowMany into HowMany
Until howMany = 26
PatchTalk Variables
A variable is a named place where a value can be stored. It is like a
mailbox with an address where the address is the variable’s name.
While Galaxy is running a script, a variable may hold different values
at different times. You can change the value stored in a variable with
the Put statement. You can use the value stored in a variable in any
expression by typing the variable’s name. See the Put statement (in
the previous section) for an example of what happens to a few
variables.
Many variables already exist in PatchTalk. These are special places
that Galaxy will put important information and expect information
when running your scripts. Below is a list of all these variables and
what information you will find in them. Many of the descriptions
refer to “the patch type” or “the device” or “the bank.” Remember
that each script is written for a specific patch type for a specific MIDI
device. When Galaxy runs the script, it is because you’re working
with a bank of information for that MIDI device.
Opcode Publication 1950906
- 18 -
PatchTalk Guide
All values are zero based. This means that, for example, the sixteen
channels of MIDI are numbered 0 through 15 in PatchTalk scripts.
Another example is that the one hundred and twenty eight patches
are numbered 0 to 127. Please note that this is true in a script no
matter what options have been checked in the Define Patch Type
dialog.
Different variables are available in different scripts. Be sure to use
only the variables available in a given script or you will get an error
message. Following the description of each variable is its data (number
or string) and if it can not be changed (fixed).
Variables for All
Scripts
DeviceID
The device ID of the MIDI device being talked to, which is displayed
in the bank and bundle windows (number, fixed).
PatchSize
The size, in bytes, of a single patch. This does not include any additional information that Galaxy needs for each patch (if total patch
size differs from patch size in the Custom Patch Type dialog box).
That information is maintained separately and you don’t ever see it
(number, fixed).
BankSize
The size in bytes of a bank of patches (number, fixed).
PatchesInBank
BankTitle
The number of patches in a bank of the patch type (number, fixed).
The name of the bank as it appears in a bundle window. If you have
the same patch type added to a device several times with different
names (for example, you might have card voices and internal
voices), then this is the name of the bank you’re working with. If the
bank is not part of a bundle, then this variable is the empty string.
Get Bank and Send
Bank Scripts
Bank
The collection of all the patches being edited. Contains the patch data
for all the patches in the bank. Cannot be changed in the Send Bank
script (string). When writing a Get Bank script, you will load data into
Bank. Similarly, when writing a Send Bank script, you will send data
that is contained in Bank.
Patch
This is the patch data in Bank for the patch whose number is PatchNum. Changes to this variable change the appropriate data in Bank
also (string).
Opcode Publication 1950906
- 19 -
PatchTalk Guide
PatchNum
The number of the patch whose data is in the variable Patch (number). Changing the value stored in PatchNum will also change the data
that Patch contains.
Get Patch and Send
Patch Scripts
Patch
The patch data to be sent to or received from the MIDI device. When
writing a Get Patch script, you will load data into Patch. Similarly,
when writing a Send Patch script, you will send data that is contained
in Patch. Note that the variable Patch does not work with the variable
PatchNum as it does in the Get Bank and Send Bank scripts (string).
DevicePatchNum
The number of the patch in the MIDI device to get from or send to. Be
sure to check the UseEditBuffer variable first, because if it’s set to
true DevicePatchNum does not exist (number, fixed). If UseEditBuffer is set to false, and DevicePatchNum is examined in the Get
Patch script, DevicePatchNum will contain the location of the currently selected patch in Galaxy’s bank window. In the Send Patch
script, DevicePatchNum will contain the last patch location if UseEditBuffer is set to false.
UseEditBuffer
Is set to true if the script should get from or send to the edit buffer on
the MIDI device. If your device doesn’t have an edit buffer, this variable should always be set to false. When this is false, you should get
from or send to location DevicePatchNum (condition, fixed).
To Device Name
and To Display
Name
The following apply when Name Conversion in the Define Custom
Patch Type dialog is set to Script:
DeviceNameLength
The number of bytes used for the name in the patch (number, fixed).
DisplayNameLength
The number of bytes used for displaying the name (number, fixed).
DevicePatchName
The name of a patch in the MIDI device’s format. The To Display
Name script converts from this to the variable DisplayPatchName
(string).
DisplayPatchName
The name of a patch as displayed by Galaxy. The To Device Name
script converts from this to the variable DevicePatchName (string).
Opcode Publication 1950906
- 20 -
PatchTalk Guide
The following occurs when Name Conversion in the Define Custom
Patch Type dialog is set to Table:
NameChar
Set to a value ranging from 0-127. The script should convert this value
(to display or device format) and store it back into NameChar
(number).
Patch Label Script
PatchLabel
Set this variable to the label to be displayed for the patch number in
PatchNum (string).
PatchNum
The number to be converted to a custom patch label (number, fixed)
User-defined
Variables
Your own variables may have names that are up to thirty-one characters in length. They must begin with a letter. To create a variable,
simply use the Put command to store some value in it. Such as:
Put 67 into MyHeightInInches
Put “Frederick” into MouseName
PatchTalk Notes
Commands
Commands are written one to a line. If you’d like to write one command across several lines (for clarity), then you can hold down the
Option key when you press return. This will insert a “¬ ” character
that tells Galaxy that the command continues on the next line. You
can also put more than one command on a single line by separating
them with a semicolon. Here are some examples:
Receive 1024 into midiBytes¬
timeout after 2 seconds
this command takes two
lines
Put 5 into x; Put x*x into y two commands on a line
If x = 0 then; Put 1 into x; a one line If command
EndIf
If x > 0; Put x into
AbsoluteX
Else Put 0-x into AbsoluteX; a two line If command
EndIf
Opcode Publication 1950906
- 21 -
PatchTalk Guide
Numbers
Anywhere a numeric value is needed you can enter any of the following: a decimal number, a hexadecimal number, a variable, or a
numeric expression. Numeric expressions can use any of the standard
math operations. Some examples are:
123
$F0
.C0
Size+10
a decimal number
a hexadecimal number
another hexadecimal number
the contents of the variable Size plus 10
a mathematical expression
the ASCII numeric value for
the character A (65)
negative 5 (you can’t type
in negative numbers
directly).
2*(X+5)
‘A’
0-5
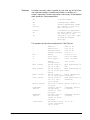
The operators and functions understood in PatchTalk are:
+
*
/
mod
<<
>>
:
Byte (value)
Word (value)
Byte3 (value)
Long (value)
Sizeof (value)
To7BitHex
(value)
To8BitHex
(value)
‘characters’
Opcode Publication 1950906
- 22 -
Addition
Subtraction
Multiplication
Integer Division
Modulo
Shift Left
Shift Right
Nibble
concatenation
Forces value to
fit in a byte
Forces value to
fit in a word (two
bytes)
Forces value to
fit in three bytes
Forces value to
fit in a long
(four bytes)
The size of value
in bytes
Converts from 8bit-per-byte
format to 7-bitper-byte
Converts from 7bit-per-byte
format to 8-bitper-byte
The numeric value
of the characters
(up to four)
15+4 is 19
15-4 is 11
15*4 is 60
15/4 is 3
15 mod 4 is 3
15<<4 is $00F0
15>>4 is $0000
15:4 is $F4
Byte ($f0f1f2f3) is
$F3
Word ($f0f1f2f3) is
$f2f3
Byte3 ($f0f1f2f3)
is $f1f2f3
Long ($f0f1f2f3) is
$f0f1f2f3
Sizeof (“abc”) is
3.
To7BitHex ($f123)
is $36223
To8BitHex ($f123)
is $38a3
‘A’ is 65
PatchTalk Guide
Strings/Arrays
You can refer to a portion of a variable’s contents by typing a range.
The range is specified by two numbers in square brackets separated
by a comma (“[offset, length]”) after the variable’s name. The first
value is the offset in bytes into the variable. The second is the number
of bytes to use. You can omit length and it will default to one byte.
You can also replace length with “to end” or “end” and the rest of the
variable will be used.
Some examples of Strings and Arrays include:
Put “Johnson” into FullName
Put FullName[0,4] into
ShortName
Put FullName[0] into Initial
Put FullName[4,3] into AWord
Put FullName[4,to end] into
AWord
Put “woo” into AWord[1]
Put “ed” after AWord
Put “ny” into FullName[4,to
end]
Put FullName “ ” AWord into
Text
Put empty into AnEmptyArray
put a string into a new
variable
put “John” into another
new variable
just the first character:
‘J’
put “son” into another new
variable
same thing
change middle character
to “woo”
add “ed”
change ending; now is
“Johnny”
“Johnny Swooned”
now you can “put...after”
with this array
Strings are characters enclosed in double quotes, such as “Johnson”
above. The following characters have special meaning in an ASCII
string:
¬ (Option-L)
\ (backslash)
r or n
(Return)
t (Tab)
“ (double quote)
Opcode Publication 1950906
Continues the string on the next line
(all characters to the end of the line
including the next Return are ignored).
Note that typing Option-Return will
enter this character.
The escape character. It removes special
meaning from some characters and adds
meaning to others. The following characters are given special meaning when
following the escape character. Any
characters not listed here are inserted
literally (are given no special meaning)
when following the backslash.
Inserts a Return character into the text
Same as r or n, but also inserts a new
line in the script
Inserts a Tab character into the string
(the Tab key may also be pressed)
Terminates the string
- 23 -
PatchTalk Guide
Lists of Values
Some commands, notably Put, allow you to work with a list of values
at once. These lists can be made by simply typing one or more
numeric expressions and strings separated by spaces. Some examples
are:
42
list of only one number
20 + 2 * 16 >> 1 another list of a single number (36)
“Hello”
list of the bytes $48, $65, $6C,
$6C, $6F
$C0 $34
a list of two bytes
14-4 4*5
the list of two bytes, 10 and 20
.F0 “Moo” 4*5
a list of the several bytes $F0,
$4D, $6F, $6F, 20
X Y
a list of whatever is in X followed
by whatever is in Y
Conditions
A condition is used in the conditional commands, If and Repeat, to
decide which commands to run. Conditions are just a form of expression using special test operators. Some examples are:
DeviceId > 16
PatchNum = Data
(X > 5) And (X < 15)
list of only one number
are the two things equal
are the two things equal
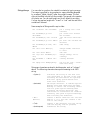
The full list of conditional operators is:
= or is
<
equality
less than
<= or ≤
less than or
equal
greater than
>
>= or ≥
greater than or
equal
<> or ≠ not equal
condA
And
condB
condA
Or
condB
Not
cond
Opcode Publication 1950906
3 = 3 is true 3 = 4 is false
3 < 3 is
3 < 4 is true
false
3 ≤ 3 is true 3 ≤ 4 is true
3 > 3 is
3 > 4 is false
false
3 ≥ 3 is true 3 ≥ 4 is false
3 ≠ 3 is
false
3 ≠ 4 is true
true if both
conditions are
true
true if either
condition is
true
true if the condition is false
and vice versa
- 24 -
PatchTalk Guide
Operator
Precedence
In the absence of parentheses, the following order of precedence is
used for numeric expressions. The operators within the same row
have equal precedence. Those with highest precedence are listed on
the first row. Sub-expressions are evaluated from right to left.
Not
:
*
+
<<
<
And
Or
Messages
/
>>
<=
÷
≤
=
is
≥
>=
>
<>
≠
A few commands use messages. These are pieces of text that are displayed for you under various circumstances. Messages are simply text
between double quotes:
Abort “The device sent bad MIDI”
Receive .100 wait “Hit send on the MIDI Device”
Custom Menu
Figure 7: Custom Menu
NOTE: To access the Custom menu, you need to have Programming
Mode checked in the Define Device dialog box, and have a bank or a
bundle window active.
Opcode Publication 1950906
- 25 -
PatchTalk Guide
Define Custom
Patch Type
Opens the Define Custom Patch Type dialog for the patch type contained in the active bank or library window.
Edit Help Message
Opens a dialog where you can enter a short message, which the user
will see if she chooses Help when a bank of this type of patches is
active.
Scripts:
Get Patch, Send
Patch, Get Bank,
Send Bank, To
Display Name,
To Device Name,
Patch Label
Opens a text editing window for the specified script. Choose
File>Save to save the edited script. If you have unsaved changes
when you close a script editing window, you’ll be asked if you want
to save them. The Custom menu remains available while the script
window is active.
About Patch Type
Here’s where you, the author of the custom librarian module, get to
tell us about yourself and your endeavor. Put whatever you like here.
Open Other Type’s
Script
Opens a dialog box where you can select a script from a different
patch type (even one that isn’t currently installed into Galaxy!) to
read.
Figure 8: View Script Dialog Box
Opcode Publication 1950906
- 26 -
PatchTalk Guide
Click Installed in Galaxy to choose among patch types currently
installed in Galaxy. Click In other module to choose a module document from which you want to select a patch type. The patch types
installed in Galaxy, or in the selected module document, appear in the
scrolling list. Select a patch type in the list, and select a script from the
pop-up menu at the bottom of the window, then click OK to open a
script editing window. You won’t be able to make changes to scripts
opened in this way, but it can be very useful for basing a new script
on an existing one.
Execute Current
Script
Runs the script in the active script editing window, operating on the
topmost bank window of the proper patch type.
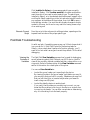
Patchtalk Troubleshooting
As with any task, if something goes wrong you’d like to know what it
is so you can fix it. PatchTalk is a tool for performing tasks for
Galaxy—when a task doesn’t perform its function properly, you’ll
want to find out what’s wrong and correct the problem. This is called
debugging.
Viewing the
Contents of
Variables
The PatchTalk View Variables command can be used for debugging,
as well as learning about PatchTalk and your MIDI device. Use it to
view all the currently-defined variables and their values within a running script. Refer to the description of the View Variables command
earlier in this section for a description of its syntax.
You can use View Variables to:
•
•
Opcode Publication 1950906
Look at the sys-ex header you’re sending to the device.
By viewing the data in the sys-ex header right before you send it,
you can verify that you built it correctly. Sometimes you may find
that you left out a byte, or inserted a byte when you meant to
insert a long word (4 bytes).
Look at the data the device is sending back.
If you verify that the data you are receiving is correct, you can
know that the problem is not a bug in the device or a result of an
incorrect sys-ex header. You can then concentrate on determining
why it’s not making it into the bank properly.
- 27 -
PatchTalk Guide
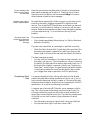
•
•
•
Examine the contents of bank or patch as they are changed.
By viewing variables immediately before and after a command that
changes the contents of bank, patch, or any other important variable, you can determine whether the change is taking effect
properly.
If not, many times you may find that the wrong part of the variable is being changed, or that the patch size or name offset defined
for this patch type is incorrect.
If so, you can concentrate on the commands after this one in the
script since you have determined that it’s correct up to this point.
View the patch data dumped from the device using its front panel.
This is useful both to check the sys-ex header of the data it sends
(to make sure you found it correctly in the device’s manual) and to
make sure you’re getting the same thing when you ask for it over
MIDI (as opposed to using the device’s front panel).
Decipher the encoding scheme of a patch when the device’s User
Manual is unclear. See “Deciphering Patch Data,” which follows
shortly.
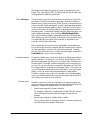
Common Problems
The device does not
respond to my MIDI
messages
The MIDI cables are not connected from the interface to the device
properly.
The computer is not connected to the MIDI interface properly.
•
•
•
You are not sending a
proper system
exclusive message
Ask yourself the following:
•
•
•
•
•
•
•
•
Opcode Publication 1950906
Is OMS MIDI Setup in the Setups menu notified of the proper
port (printer or modem)?
If you’re using the MIDI Manager: Is the port you’re using turned
on and is Galaxy connected to the OMS MIDI Manager driver in
PatchBay?
The interface does not have power.
Does the message begin with F0?
Does the message end with F7?
Does the sys-ex data match the specification in the device’s User’s
Manual?
Is the deviceID variable (if used), set to the correct value?
Is the size of the sys-ex message correct?
If a checksum is included, is it correct?
Have you checksummed the proper data?
Do any of the values in the data exceed $7F?
- 28 -
PatchTalk Guide
You are sending to the
device too soon after it
has sent data
The device has a bug in
its MIDI implementation.
The patch name is set
incorrectly (or becomes
garbage) when
receiving
Some devices require a time delay after it has sent or received data
before another message can be sent to it. Check the device’s User’s
Manual to see if this applies. Use the command Delay to introduce
delays between system exclusive messages.
Be careful about assuming this. Make sure your current setup works
with other devices by plugging the same MIDI cables into other
devices. Then check the MIDI specification and all data you sent and
received. If you still believe it is a bug in your device, call the manufacturer. Be aware that some devices may not be changed just because
you have reported a bug. Try to work around the bug if at all
possible.
The received data is incorrect.
•
View the data immediately before placing it in Patch or Bank and
determine its validity.
The patch size, name offset, or name length is specified incorrectly.
•
Check the Define Custom Patch Type dialog. Make sure that if the
device does not support a name for this patch type that you add
Name Length to the size of the raw patch (as stored in the device).
The data is somehow encoded.
•
Deciphering Patch
Data
You may find this information in the device’s User's manual—and
then again, you may not. If the information isn’t there, try altering
the patch in the device and then sending back what it sent you. If
this works (the old patch is received correctly) see “Deciphering
Patch Data,” which follows. One good clue as to whether the data
is nibblized is whether the size of the data that the device sends
you is bigger than what is specified in its MIDI specification.
You may not be able to tell by looking at the device’s User Manual
whether the patch data is being encoded as it’s sent or not. If you’re
having trouble displaying the patch’s name, or if the size of the data
the device sends is larger or smaller than the size specified in the MIDI
specification, all or part of the data may be encoded.
A common way of encoding MIDI data in sys-ex messages is nibblizing. This is the process of converting one byte into two bytes. The
first byte contains the upper four bits of the original byte and the
second byte contains the lower four bits. There are two consequences
of this that you can look for when trying to determine if data is
nibblized:
•
•
Opcode Publication 1950906
The data is twice as large as it would be if it were not nibblized.
No bytes have their high bit set (have values ≥ $80).
- 29 -
PatchTalk Guide
Also beware of strange things like only part of the patch being nibblized. This is the case for MKS-70 Patches and the User Manual says
nothing about the data being nibblized.
Error Messages
There are many types of errors that can occur while a script is being
processed. These include: memory shortages, constraint violations,
semantic errors, and syntax errors. When an error is encountered, the
script is aborted. Sometimes a patch or bank has already been altered,
in which case the changes remain in effect. If the bank is not correct, it
is set to the correct size, and any partial or missing patches are set to
the empty patch. You define the empty patch by selecting a patch you
want considered as empty, then choosing Edit>Set Empty Patch.
Although the data is probably meaningless when a script terminates
after reading only part of the bank, this should not be a problem since
it is expected that the script will be fixed and re-executed to overwrite any invalid data in the bank.
When a fatal error occurs (one which immediately terminates execution of the script) the script is opened and the insertion point is placed
as close as possible to the end of the offending command. You may
then fix the problem and click on a bank window to gain access to the
Load/Send menu and run the script again.
Constraint Violations
Constraint violation errors occur as a result of violating some range or
length constraint. For instance, if you specify a byte range for a variable that extends past the data, or if you use too many characters in a
variable name. The length violations are merely an inconvenience to
you, but let you know when you exceed the limitations of PatchTalk.
The range violations, however, are extremely helpful. They save you
hours of frustration because they point out flaws in your logic immediately, since you should never access data that is meaningless.
Therefore, examine your script with care after one of these messages
until you understand what you are doing wrong and can decide on a
correct way to accomplish your purpose.
Semantic Errors
Semantic errors occur when the command is understood (parsed correctly) but does not make sense under the rules imposed by PatchTalk
semantics. Examples of semantic errors in PatchTalk are:
•
•
Opcode Publication 1950906
Specifying a range for a numeric variable.
For example, number[1], is meaningless in PatchTalk and is therefore not allowed. Note that neither a length nor a position is
allowed.
Specifying a range for a variable with no value.
This is a special kind of constraint violation, since any range specified falls outside the range of data bytes.
- 30 -
PatchTalk Guide
•
•
•
•
•
•
•
•
Syntax Errors
Syntax errors occur when a command cannot be interpreted. This
occurs when the command does not conform to the syntax specification of PatchTalk. If the problem is known, it is identified by an error
message. Otherwise, you are simply notified that a syntax error has
occurred. Examples of a syntax errors are:
•
•
•
•
•
Opcode Publication 1950906
Putting data after a numeric variable.
You can only add data to the end of a string variable. Numeric
variables can only have their contents replaced completely.
Putting data after a range of data in a variable (e.g., “Put F7 after
Packet[1, 50]”).
There is nothing conceptually wrong with this—it is just not supported by PatchTalk in this way. To do this in PatchTalk, put the
data into the next position. That is, “Put F7 into Packet[51]”.
Attempting to use the bulk commands on a non-bulk bank.
ReceiveBulk and SendBulk may only be used on bank windows
defined as Bulk in the Define Custom Patch Type dialog box.
Using unknown units.
PatchTalk currently supports seconds (must begin with “s”) and
milliseconds (must begin with ms).
Accessing a variable that does not exist (has not been defined by
putting data into it).
Using a string variable as a number without specifying a range.
Up to 4 bytes of a string variable may be used as a number (in a
numeric expression). Both a starting position and a length must be
specified (e.g., “Put SysExHeader[8, 4] << 2 into Address”).
Specifying a position or length of a range less than 1.
The first byte of a variable is 1, so the position cannot be less than
this. If the length is not specified, it is taken to be 1, but no less
than 1 byte of data can be used for anything, so the length (if specified) must be greater than zero.
Specifying a numeric string (in single quotes) of more than 4 characters (e.g., “'ABCDE'”).
Not following a command with a command terminator (semicolon
or carriage return).
An unmatched parenthesis (e.g., “3 + 4)”)
A non-terminated quote (e.g., “View Variables “Sending the
bank”)
A negative number (e.g., “-2”—to get a negative number, subtract
it from zero, e.g., “0 - 2”)
Using a single minus sign for a comment—comments are either
two consecutive minus signs, or a single dash (Shift-Optionminus).
- 31 -
PatchTalk Guide
PatchTalk Tips
Putting Empty into a
Variable
If you have a succession of statements that put a value after a variable,
the empty command may help you. Putting empty into a variable creates the variable but does not put a value into it. Because PatchTalk
does not let you put a value after a variable unless the variable already
contains a value, empty is a convenient way around this.
put empty into Abank
put 0 into i
repeat
send .f0 .43 .00 .07 .f7
receivePackets 4 2 100 after Abank
put i + 1 into i
until i = 10
In the above example, empty was used to create a variable Abank. As
i is incremented, receivePackets puts the data after Abank. By putting empty into Abank, an initial receivePackets 4 2 100 into Abank
line is not needed.
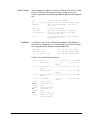
Using PatchNum in
Get and Send Bank
Scripts
Some PatchTalk scripts may require additional processing of bank
data received on a patch by patch basis. Take for example a script that
examines a parameter in each patch and alters the data in the patch
accordingly. The following script examines parameter 32 and based on
the result, prefixes an asterisk to the beginning of the patch name
which starts at offset 33.
repeat
put 0 into PatchNum
put Patch[32] into mode
if ( ((mode = 2) or ( mode = 7 ) or ( mode = 9 ) or
( mode = 10 )) and Patch[33] <> '*') ) then
put Patch[33,9] into Patch[34,9]
put '*' into Patch[33]
endif
put PatchNum + 1 into PatchNum
until PatchNum = 64
Opcode Publication 1950906
- 32 -
PatchTalk Guide
PatchNum is set to zero, then incremented by one through each pass
of the repeat loop. As PatchNum is incremented, Patch points to the
next patch of data. The script examines the number stored in
Patch[32] and stores the value into mode. If mode is equal to 2,7,9 or
10 and the first character of the name is not already an asterisk (*), the
script moves the first 9 characters of the name to the right by one,
thus making the first character location free, then places a ‘ * ’ character into the first character location for the patch name.
Creating Custom
Patch Labels
Some MIDI devices label their patches in different formats. A popular
method is to number 128 patches as a11 - b88. The following script
creates a custom patch label displaying patch labels as a11-b88.
if (patchNum<64) then
put patchNum into x
put “a” into PLabel
else
put patchNum - 64 into x
put “b” into PLabel
endif
put (x/8)+1+'0' after PLabel
put (x mod 8)+1+'0' after PLabel
put PLabel into PatchLabel
Using Sizeof and
Abort for Error
Checking
Some MIDI devices cannot respond to a data request and require you
to initiate the data dump manually. If you make a mistake and press
the wrong buttons or if AppleTalk happens to be on, wrong data may
be received by Galaxy. If Galaxy gets wrong data, a script error message may appear. To stop this from happening, you can check the size
of the received data to the size that you expect and post a message if
the data was wrong.
Example:
ReceivePackets 4 2 80+4+2 into inData
if sizeof( inData) <> 80 then
Abort “Wrong data received or AppleTalk is ON”
endif
This script will abort and display a message if 80 bytes of data were
not received.
Opcode Publication 1950906
- 33 -
PatchTalk Guide
Sending Other
MIDI Messages
Remember that PatchTalk does not limit you to sending system exclusive messages only. The Send command can transmit any type of MIDI
message. Feel free to utilize program changes when a parameter
change is unavailable, as well.
Extending PatchTalk
Extending the PatchTalk commands will give you additional power to
manipulate data within PatchTalk. The PCmd is the simplest external
function both to create and to use. It is used exactly the same way as
the Put command and is, in fact, how the Checksum and Checksum0
commands are implemented.
The *Cmd is much more general. It accepts any number of parameters
consisting of numbers and handles to data. In the event that something goes wrong, it is also allowed to return a custom error message
to PatchTalk.
External Put Commands (PCmds)
CommandName ListOfValues { into | after } Destination
This command has the same form as Put and may therefore create new
variables and modify existing ones (if the same variable is specified for
ListOfValues and Destination). It is provided to allow new transformations to be written similar to Nibblize and Denibblize. Put merely
transfers the data without modification. Your PCmd can therefore simulate Put by simply doing nothing. Nibblize and Denibblize happen to
expand or collapse the data, but this is not necessary. Checksum
merely appends a single byte—which turns out to be a very helpful
transformation. You may write your own PCmd if you have a development system that can generate code resources. This is how you would
define the procedure in THINK C.
pascal void myProc (dataHandle)
Handle dataHandle;
{
....
}
Opcode Publication 1950906
- 34 -
PatchTalk Guide
It is defined as a Pascal procedure to allow Pascal programmers to
write PCmds. The handle dataHandle consists of the data specified by
ListOfValues. It is modified directly by the procedure to return the
result. When it returns, the data in the handle is placed in the variable
specified by Destination. Note that dataHandle is not locked.
The C code for Checksum and Checksum0 is supplied in the files
“Checksum.c” and “Checksum0.c” respectively. Feel free to use these
functions as starting points for your own PCmds. If you don't have a
development system and you really need a custom function, get a
friend to do it for you in exchange for the module you're writing
(assuming she owns Galaxy).
The code resource must have type ‘PCmd’ and the same name as specified by CommandName.
General External Commands (*Cmds)
When a PCmd is not powerful enough to accomplish the task at hand,
consider writing a more general external command, a *Cmd. *Cmds
allow an arbitrary number of numeric and variable parameters to be
passed to them. They perform a task by altering memory, just like a
PCmd, but they are more powerful, since they accept more input. In
addition, they allow a more specific error message to be given in case
they don’t succeed.
Their PatchTalk syntax is:
CommandName arg1, arg2, arg3, …, argN
As with PCmds, *Cmds are code resources that are called according to
Pascal calling conventions. They also take a single argument. But this
is where they differ. The argument is a parameter block—a structure
containing all the parameters. The following is a list of constant values
followed by the basic structure of the parameter block.
The args (the arguments) are numeric expressions and string variables
separated by commas.
/** Error Types (for resultCode)*/
enum { NoError, BadParamCount, NeedMemoryError, GeneralFailure, CustomErrorMsg };
/** Parameter Types (for paramType) */
enum { NumericType = 1, StringType = 2 };
Opcode Publication 1950906
- 35 -
PatchTalk Guide
/** Data fields are of this type: */
typedef union {
long
longNumber;
Handle
handle;
} LongOrHandle;
/** The following structure occurs once for each
parameter: */
typedef struct {
LongOrHandle
param;
int
paramType;
} CommandParameter;
/* The parameter block */
typedef struct {
int
resultCode;
/* result of *Cmd (initially NoError) */
Str255
errMsg;
/* string to be displayed when CustomErrorMsg' is
returned */
Byte
reserved[6];
int
numParams;
/* the number of parameters actually sent to us */
CommandParameter
par[10];
/* numParams defines the number of array elements
which actually occur */
} GeneralCmdParamBlock;
Defining this structure in your development environment makes it
easier to refer to the parameters from within your *Cmd.
*Cmd Errors
The first two fields are used for reporting errors to the user. The field
resultCode may have one of the listed error values where NoError is 0,
BadParamCount is 1, etc. The resultCode field is set to NoError upon
entry, so you do not need to set it if all goes well. If an error occurs,
however, resultCode may be set to indicate the type of error. If it is
anything but NoError, the current script will be aborted.
The first three error codes tell the user that an incorrect number of
parameters was passed, the command ran out of memory, and the
command failed, respectively.
Opcode Publication 1950906
- 36 -
PatchTalk Guide
The value CustomErrorMsg, however, allows the *Cmd to display any
error message it wants. To return a custom error message, create a
handle containing the message (using PtrToHand, for instance). Then
set errMsg to this handle and resultCode to CustomErrorMsg. When
you return, PatchTalk displays the message and disposes of this
handle for you. Note that the maximum custom error message length
is 255 characters and must be a Pascal string.
The numParams field contains the number of parameters passed to the
*Cmd. It should be checked to make sure it is the number expected
and, if not, BadParamCount should be returned in resultCode
immediately.
The Parameters
The fields following numParams are pairs of parameters (4 bytes) and
their types (2 bytes). Each parameter’s type should be checked and an
error returned if it is not the type expected. It could be disastrous if
you use a long integer as a handle.
Examples
The C source code is supplied for the PatchTalk *Cmds Separate and
Collate in the files “Separate.c” and “Collate.c” respectively. You may
use these routines as a starting point when defining your own *Cmds.
Passing String Data to External Commands
Both types of external commands pass string data only as the contents
of a variable. Note that this results in a handle being passed. The
external command may do whatever it wishes to the data in this handle, but it may not dispose the handle (although it may empty it so
that it contains 0 bytes of data).
Also be aware that all handles are not locked.
External Command Code Resources
These external commands are implemented as code resources of the
type ‘PCmd’ and ‘*Cmd’ as their names imply. You may put them in
the resource fork of Galaxy while you’re testing them, but they
should be placed in the module’s resource fork that uses them before
you distribute the module.
Note that when you export a module, any external commands that it
uses are not automatically exported. You must manually copy them
from Galaxy’s resource fork into the module’s resource fork using
ResEdit.
Opcode Publication 1950906
- 37 -
PatchTalk Guide