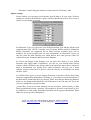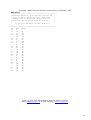
1
Fermentor Control Program, manual version released 15 February, 2005
Fermentor Control Program
BioStat A, B, C, D, CT, MD, DCU, and Micro-DCU (200, 300) Systems
BioFlo III, 2000, 3000, 4000 and 110 Systems
See www.foxylogic.com for other systems
Version 4.3
February 2005
FoxyLogic, PhD, MSc Mikkel Holmen Andersen, Aarhus, Denmark
Email: [email protected]. Program homepage: www.FoxyLogic.com
1
Fermentor Control Program, manual version released 15 February, 2005
Table of contents
Introduction ..............................................................................................................................5
System requirements................................................................................................................5
Access Database Version ......................................................................................................5
Installing the Fermentor Control Program ...........................................................................5
Un-installing the Fermentor Control Program .....................................................................6
About time and time resolution in windows systems ............................................................6
IMPORTANT: ......................................................................................................................6
About decimal symbol in windows systems ...........................................................................6
Fermentor settings....................................................................................................................6
BioStat Fermentor ................................................................................................................6
Pump setting .........................................................................................................................7
Communication port setting ...............................................................................................7
Communication test tool......................................................................................................7
BioFlo Fermentor..................................................................................................................8
Loop and pump settings for BioFlo....................................................................................9
The main control window ......................................................................................................10
Control window...................................................................................................................10
Time panel ...........................................................................................................................11
Status bar.............................................................................................................................11
The database system...............................................................................................................12
Database Tools ....................................................................................................................14
Administrator Tool .............................................................................................................15
Historian Database Layout ................................................................................................16
The graph window..................................................................................................................17
Synoptic process data window ..............................................................................................18
Profiles module .......................................................................................................................19
Profile editor........................................................................................................................19
Fuzzy logic control module....................................................................................................20
Fuzzy logic rule matrix.......................................................................................................20
Running the fuzzy logic module.........................................................................................23
The software substrate sensor...............................................................................................24
FoxyLogic, PhD, MSc Mikkel Holmen Andersen, Aarhus, Denmark
Email: [email protected]. Program homepage: www.FoxyLogic.com
2
Fermentor Control Program, manual version released 15 February, 2005
Sampling Training Data ....................................................................................................25
How much data are needed ? ............................................................................................25
The sensor training tool......................................................................................................26
Using the substrate sensor.................................................................................................27
Current Input Parameters ................................................................................................28
pH Stat.....................................................................................................................................28
Probing Feeding Control .......................................................................................................29
Scripting Module ....................................................................................................................30
Alarm Module.........................................................................................................................31
Option settings ........................................................................................................................33
data sampling rate...............................................................................................................33
TCP/IP client control .............................................................................................................34
Host setup ............................................................................................................................34
Firewall issues......................................................................................................................34
Client setup ..........................................................................................................................35
Saving Collected Data to file .................................................................................................35
Log files ...................................................................................................................................36
Further information...............................................................................................................36
Appendix .................................................................................................................................37
Rule Matrix Sheet ...............................................................................................................37
Profile Editor file layout.....................................................................................................38
Fuzzy logic control file layout ............................................................................................38
RuleSub2.fuz.......................................................................................................................38
RuledpO2.fuz......................................................................................................................39
RuleSoftSub.fuz..................................................................................................................40
RulepH.fuz ..........................................................................................................................41
pO2.mf.................................................................................................................................42
dpO2.mf ..............................................................................................................................42
Sub.mf .................................................................................................................................43
dSub.mf ...............................................................................................................................43
SoftSub.mf ..........................................................................................................................44
pH.mf...................................................................................................................................44
dpH.mf ................................................................................................................................45
Software Sensor control file layout ...................................................................................46
Example.nnf........................................................................................................................46
FoxyLogic, PhD, MSc Mikkel Holmen Andersen, Aarhus, Denmark
Email: [email protected]. Program homepage: www.FoxyLogic.com
3
Fermentor Control Program, manual version released 15 February, 2005
Sensor.nnf ...........................................................................................................................47
Training data input file .....................................................................................................48
Training data output file ...................................................................................................48
Standard Script.txt .............................................................................................................49
Wiring between RS-422 converter and BioStat fermentor .............................................51
Wiring between PC and BioFlo fermentor.......................................................................52
FoxyLogic, PhD, MSc Mikkel Holmen Andersen, Aarhus, Denmark
Email: [email protected]. Program homepage: www.FoxyLogic.com
4
Fermentor Control Program, manual version released 15 February, 2005
Introduction
The control and collection software for the research bench top fermentors was made
to facilitate and automate some general and time consuming tasks. Initially, the
program was made to collect the process data during fermentation and save these for
further evaluation in other programs. Soon however, there was also a need for a more
user friendly program compared to the on-board fermentor control, and the possibility
of a TCP/IP client connection that significantly reduced the on site time, a factor not
to be overlooked in a research laboratory. Finally, intelligent control over set points
seemed an obvious thing to implement. Together, these goals merged to the
development of the current program.
To make the program as simple and logical as possible, the amount of choices and
possibilities are kept at a minimum. Tool tip texts tell you how to manipulate controls
etc. when the mouse pointer is over a given control for more than a second. The final
goal is of course to make the present manual useless.
Computer system requirements
Windows 95/98/NT/2000/XP, min. Pentium processor 333 MHz (more processor
power needed for fuzzy logic and neural network modules), min. 64 Mb ram, min.
200 Mb hard disk space, standard PC serial port (RS-232C), converter for BioStat
fermentors (RS-232C to RS-422). Serial cable. On Windows 95/98 DCOM95/98
needs to be installed (free from Microsoft).
Access Database Version
Microsoft Access database program (Access 2000 or newer) is needed to manipulate
the process database, if you want to generate batch reports or print data. The database
that ships with the Fermentor Control Program is in Access 2000 format. If you want
to migrate to Access 2000 or higher, open the BioStatDB.mdb file in Access 2000 and
you will be prompted to save in the new database format. Answer Yes to upgrade
database. The Fermentor Control Program will recognise both types of format.
However, you cannot make a replica of the database with Access 2000 as this is not
compatible with the Fermentor Control Program. This is due to a Microsoft backward
compatibility policy.
Installing the Fermentor Control Program
The program is delivered with an Installation and Setup Wizard . To start the wizard
run the file called SETUP.exe. After you have downloaded the program unzip the file
in a temporary directory before running the SETUP.exe file. If you use a NT, 2000, or
XP system be sure to login as administrator before running the SETUP.exe. The
installation wizard prompts for an installation directory, and it is recommended that
you use the default setting. When the installation is finished, you can be asked to
restart your computer. Although annoying, this is normal Windows behaviour. In
FoxyLogic, PhD, MSc Mikkel Holmen Andersen, Aarhus, Denmark
Email: [email protected]. Program homepage: www.FoxyLogic.com
5
Fermentor Control Program, manual version released 15 February, 2005
some cases, if you have an old Windows 95/98 version, the wizard needs to update
your system and restart your computer to continue the installation. This will not affect
anything else.
A file called St6unst is left in the Fermentor Control Program folder. Do not delete
this since the un-installer program uses this file if you wish to remove the program.
Un-installing the Fermentor Control Program
To un-install the program, use the Add/Remove option found in the windows control
panel. Press the Add/Remove button and browse to the Fermentor Control Program
entry. Finally, click remove. You may be asked if you want to remove shared files. If
so answer NO when prompted. These files are Visual Basic runtime files, which may
be used by other Visual Basic encoded programs.
About time and time resolution in windows systems
Available timer interfaces in Windows have very poor time resolution. This means
that the time points are not precisely spaced with the given sample rate (30 sec.), and
is partly an effect of event based programming. Nevertheless, to communicate with
the fermentor a millisecond resolution is necessary and therefore a special function is
used to give this resolution.
IMPORTANT: One drawback is that you have to restart your computer every 23
days to reset the function counter. The best thing to do is to restart the computer
before every new fermentation run, but that will probably be the normal case anyway.
About decimal symbol in windows systems
Due to a bug in Microsoft Visual Studio the handling of the decimal symbol is not
easily accomplished. The Fermentor Control Program will try to follow the
international setting on your computer. To know which decimal symbol to use in files
used by the program, have a look at the output files generated by the program and use
the same in your own input files (*.MF fuzzy logic, profile, and neural network
training files). Also have a look at the text in input boxes, the correct decimal symbols
for your system is given there.
If you see incorrect data being sampled, try to set your international settings to
English. You can do this by going into Control Panel, and then click on International.
In the first panel select English, then restart the computer.
Fermentor settings
BioStat Fermentor
Before you start the Fermentor Control host program the fermentor has to be set up
for host connection. To do this, go into the MAINTENANCE menu on the fermentor
FoxyLogic, PhD, MSc Mikkel Holmen Andersen, Aarhus, Denmark
Email: [email protected]. Program homepage: www.FoxyLogic.com
6
Fermentor Control Program, manual version released 15 February, 2005
and step down to the HOST setup. To alter the settings enter the 2-digit password to
access the interface parameters. Then set these as indicated below.
ADR:
SPEED:
DATA:
STOP:
PARTY:
1
9600
7
1
EVEN
Finally, press the remote button to ON. The fermentor is now ready to communicate
with the host computer.
During the fermentation run you can manually manipulate the settings on the
fermentor by setting the remote button to OFF. While doing this you are unable to use
the computer as controller and the host program will prompt you to set it to ON again.
However, data collection will continue, and the Fermentor Control Program will
update its controls to match the manually entered changes.
Pump setting
The current version of the Fermentor Control Program only supports anti-foam for
substrate pump 1 and substrate addition for substrate pump 2. Therefore, pumps have
to be set to apply with this before the control program is started. Please consult with
the operating manual for the fermentor
Communication port setting
The connection between the BioStat fermentor and the host computer goes trough the
standard PC serial port and an RS-232C to RS-422 signal converter. The converter
can be bought in most PC or electronic stores for approximately 100$. Please refer to
fermentor hardware user manual and the Fermentor Control Program homepage for
instructions on wiring or see appendix. When the control program is started, it looks
for the serial communication port to which the fermentor is attached. The default port
number is 2, as Comm port 1 is usually used for the mouse. If Comm port 2 is not
available you will be prompted for another port number (1 to 8). If the given port is
free then program continues to search for the fermentor and you can see in the status
bar when the host program found it (See also: Status bar). If the status bar continues
to display the fermentor is OFF then check that the remote button is ON, the cable is
plugged to the right Comm port, and that the converter is working. Restart the
program to alter the Comm port number if necessary.
Communication test tool
If you are experiencing problems in connecting the fermentor to the PC, then you can
use the TestComm test tool to check the connection. Download the tool from
FoxyLogic.com, place it in the Fermentor Control Program folder, and run the
program with the fermentor. First the tool looks for available and free serial ports on
FoxyLogic, PhD, MSc Mikkel Holmen Andersen, Aarhus, Denmark
Email: [email protected]. Program homepage: www.FoxyLogic.com
7
Fermentor Control Program, manual version released 15 February, 2005
your computer. Then you select the port, which the converter is attached to, and press
the Test Connection button. Every 2 seconds the program sends a telegram to the
fermentor and checks the returned telegram. If the fermentor is correctly setup, a text
message will tell you so. If no connection is detected then check you cabling and
converter. As a last resort you can contact me by Email: [email protected], but
only if you attach the Run.log and Error.log generated by the TestComm tool.
BioFlo Fermentors
To setup the communication between a computer and the fermentor a protocol has to
be used.
BioFlo III, 2000, and 3000 fermentors: To enable the right type of protocol you
need to open the back of your fermentor and change the settings of the micro-switch
S1 as follows (Consult you instrument manual to locate the switch):
Settings of switch 1 (S1) on the fermentor control board
1. S1-1 and S1-2 are used for setting the baud rate:
Baud Rate
S1-1 S1-2
9600
OFF OFF (factory setting)
2. S1-3 is used for setting the parity check:
Parity
S1-3
Even
ON
3. S1-4 is used for setting mode:
Mode
S1-4
non-multidrop OFF
4. S1-5, S1-6, S1-7, S1-8 are used for setting unit number:
Unit #
S1-5 S1-6 S1-7 S1-8
0
ON
ON
ON
ON
(factory setting)
Settings of the micro-switch S2 as follows (Consult you instrument manual to locate
the switch):
1.
S2-1 S2-2 S2-3 S2-4
ON
ON
ON
ON
(factory setting)
BioFlo 110 Fermentor:
For the BioFlo 110 fermentor you need a cable like shown below:
DB9 (PC)
DB25(BioFlo 110)
2 ---------------- 2
3 ---------------- 3
5 ---------------- 7
On the BioFlo 110 box set the Base Address to "Zero" on the fermentor (see Manual
page 70; 5.3.3) and select AFS mode as protocol. Set the subunit addresses to unit 1
FoxyLogic, PhD, MSc Mikkel Holmen Andersen, Aarhus, Denmark
Email: [email protected]. Program homepage: www.FoxyLogic.com
8
Fermentor Control Program, manual version released 15 February, 2005
Loop and pump settings for BioFlo 2000/3000/4000 and
Before you start the Fermentor Control Program you may need to manually setup the
use of pumps on the BioFlo fermentor in the right order. Thus, Acid, Base, Antifoam,
and Substrate needs to use the indicated pumps as shown below. If not, the values and
setpoint on the fermentor are not recognised properly by the Fermentor Control
Program:
Feed 1 for Acid
Feed 2 for Base
Feed 3 for Antifoam
Feed 4 for Substrate
Finally, when you start the Fermentor Control Program for the first time you need to
change the fermentor type from the default BioStat fermentor to a BioFlo fermentor
type. This is done in the Options menu.
FoxyLogic, PhD, MSc Mikkel Holmen Andersen, Aarhus, Denmark
Email: [email protected]. Program homepage: www.FoxyLogic.com
9
Fermentor Control Program, manual version released 15 February, 2005
The main control window
The main control window allows you to control and set up the fermentor before and
during a run. The menu bar contains the functions and setup programs needed to start,
stop, save data, enable TCP/IP remote connection to the client program, edit profiles,
and to control the fuzzy logic and software sensor modules. Some of these menus are
only available during time when a batch is running. All batch and process data is
stored in a Access database also.
Control window
The control panel is
where
you
can
manipulate set points on
the fermentor. As shown
in the figure, using the
graphical sliders and
ON/OFF buttons above
them does this. For
example, to set agitation
to ON click the OFF
button, which then shifts
to AUTO. A tool tip text
also tells you how to
change it. The slider
below is enabled and with the mouse or keyboard (page up/page down/arrows) you
can set the new set point. Below the slider there is a numerical display that indicates
the current set point. When you change to the given set point, the number turns red.
Once accepted by the fermentor it turns green again. Be aware that this can take up to
30 seconds. The value is set immediately, but the program only checks all actual set
points every 30 seconds.
A special case is when the pO2 level is set. The host program uses agitation to control
FoxyLogic, PhD, MSc Mikkel Holmen Andersen, Aarhus, Denmark
Email: [email protected]. Program homepage: www.FoxyLogic.com
10
Fermentor Control Program, manual version released 15 February, 2005
the level of dissolved oxygen in the fermentation tank. When you click the pO2'
button the stirr-slider is disabled and the stirr-button displays the text pO2 Casc ,
meaning that oxygen cascade controls the agitation. When you turn off the pO2 again,
the stirr control is enabled and left at the last setpoint given by the pO2 cascade
control.
The current version of the Fermentor Control Program only supports addition of antifoam by the substrate pump 1. Therefore no slider control is available for this pump.
It has to be setup manually on the fermentor prior to a run. The actions of the pump
are being logged during the run and are stored in the collection data file.
Time panel
This is an information only panel. When the program is started
only the current date and time are shown. Once you initiate the
fermentation run, the start date and time is registered. These are
saved in the log files and the collection data file together with the
user name. At the top a timer is started displaying the elapsed
fermentation time. The profile module as reference timer uses this
counter.
Status bar
The status bar gives you an up-to-date view of the state of several interfaces. First, it
tells you whether the TCP/IP is open, closed, or listening (See TCP/IP client control).
It also tells you what IP-number the host computer has. And it shows you if the
connection to the fermentor is on or off, and finally, you can see the current user
logged in and the name of the batch owner. Holding the mouse pointer over each box
in the status bar a tool tip texts will be displayed to tell you which is what.
FoxyLogic, PhD, MSc Mikkel Holmen Andersen, Aarhus, Denmark
Email: [email protected]. Program homepage: www.FoxyLogic.com
11
Fermentor Control Program, manual version released 15 February, 2005
The database system
Starting from version 4.0 a new database system has been introduced. The program
utilises the widely used Microsoft Access database for the storage of user, batch, and
process data. This data is then available for historical investigation using up to date
database technology. Furthermore, all data are easily available for the software
substrate sensor during training (a future automatic feature).
The database is built up of three sub-databases: a user,
batch, and a process database. These are linked
together by unique UserIDs and RunIDs to form what
is called a relational database system.
When the program is started you will have to login to
the database. This is done by selecting the
User/Batch menu and selecting User LogOn . A
window as below will be shown. You can create a
new user profile by clicking Create New User or
simply log in as default user (Password: 111). New
users are by default set to have Batch Owner access
rights.
FoxyLogic, PhD, MSc Mikkel Holmen Andersen, Aarhus, Denmark
Email: [email protected]. Program homepage: www.FoxyLogic.com
12
Fermentor Control Program, manual version released 15 February, 2005
Once a user is logged in to the database, the menus Batch Start/Stop and View
Batch Data becomes available. To start a batch select the Batch Start/Stop submenu
Start Batch Run . Likewise, stopping of a batch is done by selecting End Batch
Run . In the View Batch Data menu you can choose to display the currently running
batch data as well as old batch data. You are only allowed to see and edit data for
which you are logged in. The window shown below allows you to display and edit
batch information such as stain, media, and product information. Only the specific
Batch Owner can stop and edit the batch data. In this window the Run log is also
shown.
You have the possibility to synchronize your fermentations to a certain time point for
example at inoculation or when induction of recombinant protein is induced. Press the
synchronize button and the Batch Age counter in the Batch information window with
reset and count from that moment. You are only allowed to set the synchronization
time once during a batch.
By clicking the View Process Data button you can see the batch specific process
data in table format as shown in the figure below. Both collected, derived, and offline
data can be edited for the current and finished batches.
FoxyLogic, PhD, MSc Mikkel Holmen Andersen, Aarhus, Denmark
Email: [email protected]. Program homepage: www.FoxyLogic.com
13
Fermentor Control Program, manual version released 15 February, 2005
Three offline data sets are currently available named: OFF-LINE DATA1, OFF-LINE
DATA2, OFF-LINE DATA3. In the Options menu you can change these names by
names that reflect better the data type you are entering (See Option Menu below).
To enter or edit offline data, click on the Edit Off-line Data button. This will disable
the updating of the process data table to give time to edit the data points. Once you are
done, click on the same button and the data will be updated to the database and data
collected meanwhile will be displayed.
At any time you can export processes data to a file in XML file format. This format is
widely accepted by other software.
Database Tools
In the File menu several database tools are found. The other 3 are all for maintaining
the database. These functions are only available when the program has just been
started, and for users with Administrator access rights.
Extract Training Data will be discussed below in the software sensor section.
Compact Database will clean up the database and results in a small and faster
database file. You should perform this operation every five fermentation runs.
Backup Database simply takes a hard copy of the BioStatDB.mdb file and stores it
at the place you select.
New Database is the most time consuming tasks and is only recommended when
the database is getting very large. The Access database has an upper size limit of 2Gb.
Therefore you need to export process data out of the database and store this in another
FoxyLogic, PhD, MSc Mikkel Holmen Andersen, Aarhus, Denmark
Email: [email protected]. Program homepage: www.FoxyLogic.com
14
Fermentor Control Program, manual version released 15 February, 2005
database. The New Database performs this task. It accumulates new user, batch, and
process data in the BioStatDBBackup.mdb files and deletes process data from the
BioStatDB.mdb file. This process is time-consuming and could be left to run during
the night. For example, it takes 20 minutes to move data from four 5-day
fermentations. In the Main Control Window , a progress bar will show you how
much data have been moved (0 100%).
When the BioStatDBBackup.mdb gets near the 2 Gb size limit, this in turn is backedup automatically and given a date extension to the file name (ddmmyy, e.g.
BioStatDBBackup010102.mdb). A new accumulative BioStatDBBackup.mdb file is
then created. A copy of the old User and Batch information is kept in the
BioStatDB.mdb file to provide data consistency (unique User and Run ID s). This
means that you can later combine all BioStatDBBackupddmmyy.mdb database files
into one big historian database, if you have access to MS/SQL Server, MySQL, or
similar programs that can handle very big databases.
Administrator Tool
Like the database tools, this function is only available when the program has just been
started. After the first log in access is disabled. The tool is used to control user access
rights to the program.
There are 3 levels of user-rights, each with different access rights associated with
them.
Program Functions
Start/Stop Batch
View Batch/Process Data
Edit Batch/Process Data
Changes Process Setpoints
Profile Editor Settings
Fuzzy Logic Settings
Substrate Sensor Settings
Internet server Settings
Change Options
Database Tools
Edit User Rights
Batch Observer
Batch Owner
Administrator
Selecting the Administrator Tool menu will result in a prompt for a password. This
password can only be obtained from me by sending a request by Email. Passwords
will only be given to persons who have registered with a valid Email address, when
downloading the Fermentor Control Program.
After entering the password you will be shown a window in which all users in the
database are listed. A selection panel with Batch Observer , Batch Owner , and
Administrator options are shown to the right. Select the user then the access rights
FoxyLogic, PhD, MSc Mikkel Holmen Andersen, Aarhus, Denmark
Email: [email protected]. Program homepage: www.FoxyLogic.com
15
Fermentor Control Program, manual version released 15 February, 2005
and click Set User Rights .
Historian Database Layout
New Database
BioStatDB.mdb
Copy User, Batch
and Process Data
Delete Process Data
If size ~2 Gb
Copy Database
BioStatDBBackup.mdb
New Database
BioStatDB.mdb
BioStatDBBackup010102.mdb
BioStatDBBackup.mdb
BioStatDBBackup.mdb
FoxyLogic, PhD, MSc Mikkel Holmen Andersen, Aarhus, Denmark
Email: [email protected]. Program homepage: www.FoxyLogic.com
16
Fermentor Control Program, manual version released 15 February, 2005
The graph window
In this window the collected data are shown in a simple XY-scatter plot. Checking the
corresponding check box beside the graph display chooses the different graphs of
process data. All graphs are shown as default. On the other side the graph scale is
shown. For simplicity it is divided into two different scales and you can change
between them by clicking on the scale. A tool tip text also tells you how to change it.
Below the graph selection box there is a window which shows the position of the
mouse pointer when this over the graph area. If the pointer is over a data point the
value of that point is shown together with the time of it.
In the menu of the graph control, you can change the layout of the graph window. The
scaling of the volume and the time axis can be changed. Furthermore, you set how
many of the obtained data point you wish to see. Finally, you can chose to print the
displayed graph at any point during the fermentation run. Only the curves shown in
the graph will be printed on the default Windows printer. The resolution is not terrific
and the option is only intended for preliminary analyses and simple data inspection,
whereas the saved data file can be used in any spreadsheet program most of which
have excellent graph options.
From version 3.0 of the program, an extra graph has been added. This graph shows
the predicted substrate concentration. By using the software substrate sensor module,
current process values are used to predict the substrate concentration in the fermentor
broth (See Software Substrate Sensor). If the module is in use, you can enable the
graph. The data are shown in an insert graph with a time window of 60 minutes. The
FoxyLogic, PhD, MSc Mikkel Holmen Andersen, Aarhus, Denmark
Email: [email protected]. Program homepage: www.FoxyLogic.com
17
Fermentor Control Program, manual version released 15 February, 2005
graph is self-scaling. Use this graph to inspect the correctness of the software
substrate sensor. If you see large differences sample more training data for this
fermentation phase.
Synoptic process data window
A window showing all recent process data in a synoptic display as shown below has
been added. The latter window is for information only. The status of the pumps and
volume levels are shown. The predicted substrate concentration is only shown when
the software sensor is turned ON.
The levels of liquid in the fermentor tank and supply tanks are changing to reflect the
process data sampled. For this to work best, you have to enter data for your specific
fermentor setup. This only has to be done once in the Vessel and Supply Tank
settings found in the Set Options menu.
FoxyLogic, PhD, MSc Mikkel Holmen Andersen, Aarhus, Denmark
Email: [email protected]. Program homepage: www.FoxyLogic.com
18
Fermentor Control Program, manual version released 15 February, 2005
Profiles module
The profile module is a significant improvement of the Fermentor Control Program.
With this control you can design timed programs, by which the fermentor should
follow. Since you are not around 24 hours a day, this control will let you change
setting points at any time during a fermentation run. The elapsed fermentation time is
used as reference time. Profiles are turned on by selecting the profile enabled entry
point in the Profiles menu.
Profile editor
Profiles can be created when the fermentor is running. By selecting the Edit Profile
menu point a window as seen below is opened. Here you select, the time when you
want the change to take place, the control you want to change, and finally you set the
set point. When this is done, click the Add Entry button and the new entry will
appear on the list. In the file menu you can both save profiles and load old once. If a
wrong action is in the list, you simply click on the entry in the list and then press the
Delete Entry button.
Entries that have been executed are shown in green, pending once are red. If you load
a profile during a run, actions with time points less that the current elapsed
fermentation time will be ignored and shown in green. All actions made by the profile
control are logged in the batch database and the RUN.log file.
FoxyLogic, PhD, MSc Mikkel Holmen Andersen, Aarhus, Denmark
Email: [email protected]. Program homepage: www.FoxyLogic.com
19
Fermentor Control Program, manual version released 15 February, 2005
Fuzzy logic control module
Fuzzy logic control is equivalent to have computers reason like humans do, just much
faster. Normally, when we think of computers making decisions, the output would be
true or false. However, fuzzy logic is a way of letting the computer say little, big,
bigger, not so big, and so forth, and have an output decided upon from these vague
inputs.
Fuzzy logic has some strength over conventional control algorithms like for example
Proportional-Integral-Derivative (PID) control. Often biological systems are nonlinear, difficult, or impossible to model mathematically. However, fuzzy logic is
empirically based and model-free thus opens doors for control systems that would
normally be deemed unfeasible for automation. Furthermore, fuzzy logic is very
robust and does not need precise and noise-free inputs to generate usable outputs.
Finally, fuzzy logic is not conceptionaly difficult to understand, and it can easily be
modified and fine-tuned during operation.
Essentially, fuzzy logic revolves around a rule base made of simple, plain-language if
X is A and Y is B then Z is C rules. The rules describes the response to a number of
inputs (X and Y), which could be pO2, pH etc., and A and B are linguistic variables
representing the input values. Although words like large negative, small, and hot are
imprecise, they are descriptive of what must actually happen. So instead of making
ridged control algorithm, a small number of rules offer a much more flexible control
without any mathematical model of the system. This is what experts do when they
assist in controlling ill-described systems; by reasoning from prior experience and act
accordingly to it.
There are several very good tutorials and bibliographies on the Internet, if you are
interested in learning more about fuzzy logic. See the program homepage for more
information (www.FoxyLogic.com).
Fuzzy logic rule matrix
So what to do to get the fuzzy logic controller running? First of all, it has to be
decided, which parameters can be used for control. For the lab bench fermentors there
is little to decide however, since the only thing you have direct control over is
addition of substrate. The other parameters are in the hands of the hardware embedded
PID control, which does a good job of it. But the collected data can be used as input
for the controller that is pO2, dpO2, and substrate set point. In the future other
parameters may be added, as they are demanded.
Thus, to setup the fuzzy logic control, a rule database made of if X is A and Y is B then
Z is C rules is needed (A: pO2, B: dpO2 or substrate setpoint, C: substrate setpoint
output). To gather and organise knowledge about the relationship between these
FoxyLogic, PhD, MSc Mikkel Holmen Andersen, Aarhus, Denmark
Email: [email protected]. Program homepage: www.FoxyLogic.com
20
Fermentor Control Program, manual version released 15 February, 2005
inputs and corresponding output linguistic values, a rule matrix is usually used. By
filling in control words like: Positive Large (PL), Negative Medium (NM), and Zero
(ZE) the controller knows what to do when a rule is applicable.
A rule matrix is organised as follows:
If X is A and Y is B then Z is C
Y
X
B
Z(C)
A
Substrate Feed Rate
pO2
Very Low
Low
Ok
High
Very High
Very Low
NS
NM
NM
NL
NL
Low
NS
NS
NS
NS
NM
Ok
PM
PS
PS
ZE
NS
High
PM
PM
PS
ZE
NM
Very High
PL
PL
PM
NS
NL
Very Low (VL), Low (L), Ok, High (H), Very High (VH) and Negative Large (NL), Negative Medium (NM),
Zero (ZE), Positive Small (PS), Positive Medium (PM), Positive Large (PL).
Take RULE 3 from the figure found on next page: If pO2 is Low and Substrate Feed
Rate is High then Substrate Feed Rate is Negative Small. Or in short: If pO2 is L
and Substrate is H then Substrate Feed Rate is NS.
As you can see it is easy to use the rule matrix to make the rulebase file for the
controller program. The above matrix will yield 25 rules, which should be entered
into the RuleSub.fuz file. Likewise, the rules for the RuledpO2.Fuz and
RuleSoftSub.Fuz files can be created by filling in a rule matrix for each case. The
change in Substrate Feed Rate is determined by the values given in the dSub.MF file.
Some work must be put into adjusting the values given in controller files, however
only the rule files need essential editing to fit your expression system:
Sub.MF
pO2.MF
dpO2.MF
Substrate Member Function, converts substrate setpoint to
fuzzy value.
pO2 Member Function, converts pOxygen setpoint to fuzzy
value.
dpO2 Member Function, converts dpOxygen setpoint to fuzzy
FoxyLogic, PhD, MSc Mikkel Holmen Andersen, Aarhus, Denmark
Email: [email protected]. Program homepage: www.FoxyLogic.com
21
Fermentor Control Program, manual version released 15 February, 2005
value.
pH.MF
pH Member Function, converts pH setpoint to fuzzy value.
dpH.MF
dpH Member Function, converts dpH setpoint to fuzzy value.
SoftSub.MF
Member Function, converts predicted substrate concentration to
fuzzy value.
dSub.MF
RuleSub.FUZ
dSub Member Function, converts fuzzy value to substrate
setpoint.
Rules for pO2 and dSub substrate control(DO-stat).
RuledpO2.FUZ
Rules for pO2 and dpO2 substrate control (DO-stat).
RulepH.FUZ
Rules for pH and dpH substrate control (pH-stat).
RuleSoftSub.FUZ
Rules for [Sub] and Sub substrate control.
FoxyLogic, PhD, MSc Mikkel Holmen Andersen, Aarhus, Denmark
Email: [email protected]. Program homepage: www.FoxyLogic.com
22
Fermentor Control Program, manual version released 15 February, 2005
A schematic drawing of how the controller is working is shown above.
The file layout is tabulated and every line starting with an asterisk (*) is ignored.
More information about values and file layout is given in the legend of the above files
(see Appendix).
Running the fuzzy logic module
When you turn on the fuzzy logic control a green ON will show in the
Fuzzy Control window between the pO2 and substrate slider controls.
You can follow the input data (pO2, current feed rate, and dpO2) and
the output (change in feed rate). All input and output data, and actions
made by the control is logged in the fuzzy.log file (see log files).
In the submenu of the under the Fuzzy Logic menu you can decide
how often the controller should run. Furthermore, you can turn on and
off the different types of fuzzy logic control to run your fermentor in
DO-stat mode or in pH-stat mode.
FoxyLogic, PhD, MSc Mikkel Holmen Andersen, Aarhus, Denmark
Email: [email protected]. Program homepage: www.FoxyLogic.com
23
Fermentor Control Program, manual version released 15 February, 2005
Under the Fuzzy Logic menu you can select which functions should be running and
how often. You can also start a test run where the fuzzy logic controller just saves
data in the fuzzy.log file. Turning on the test run, no changes to the substrate feed rate
is done, so you can see and adjust the performance for the controller without losing
your fermentation. If you make changes to the control files (dpO2.mf, dSub.mf etc) or
the rule files, you can reset and reload the control with the new settings by selecting
the menu Reset/Reload .
The software substrate sensor
Biological systems are difficult to model largely due to the inherent non-linearity of
such systems. However, neural networks can help users to describe and model
phenomena that are too complex for analytical methods or empirical rules. Neural
networks can efficiently be used to forecast process values in fermentation processes,
since they are able to map/describe non-linear functions. In the case of fermentation
processes, neural networks are for instance able to forecast the substrate concentration
on the basis of inputs such as culture volume, pH, pO2, and current substrate feed rate.
Neural networks are used in large-scale fermentation systems to aid the supervisor in
keeping the batch in good shape thus maximising the product output. Since this is also
the main goal in the research laboratories, a neural network software sensor module
has been incorporated into the Fermentor Control Program. The idea behind this
addition is to enable researcher to predict the available substrate concentration and
also to have a tool to validate off-line substrate concentration measurements. As many
expression systems are using the fed substrate to either induce or control the
expression of recombinant protein or product, it is of importance to know the free
concentration of the substrate. Too low a substrate concentration leads to low
expression, and when high overflow metabolism can inhibit cell growth and thus
product production. The output from the software sensor can be used as input for the
fuzzy logic control module such that the optimum substrate concentration in the
fermentation tank is maintained.
One of the initial steps towards a successfully working neural network software
sensor is to decide on the network layout. On the basis of information from many
different sources, a two layered fully connected backpropagation network was chosen:
besides input units, one hidden layer and an output layer are forming the sensor
network. A sigmoid activation function is used and a threshold term is added to the
neuron output function preventing the network to be trapped in a local minimum.
Input data are rescaled to values within a range of -1 to 1 and output data between 0.1
and 0.9. Currently 7 inputs are being used as input for the software sensor as these
parameters can be derived from data collected by the main fermentor control program.
The single output from the net is giving the estimated substrate concentration.
FoxyLogic, PhD, MSc Mikkel Holmen Andersen, Aarhus, Denmark
Email: [email protected]. Program homepage: www.FoxyLogic.com
24
Fermentor Control Program, manual version released 15 February, 2005
Sampling Training Data
To successfully implement the neural network software substrate sensor several things
will have to be done. Firstly, before a neural network can be used in process control,
the network needs to be trained with historical process data obtained from previous
fermentation runs. Thus data from previous fermentation or new data has to be
prepared in files to be used for neural network training. From the Fermentor Control
Program, it is possible to collect the training data automatically. Firstly, under the
Software Sensor menu, there is an entry called Sample Training Data . Using this
function, you are prompted to enter the off-line measured substrate concentration
corresponding to the time point the sample was taken. Off-line measurements could
easily been made with on of the many kits available for determine e.g. glucose
concentration. This information is together with seven other parameters added to two
training data files (See appendix) and to the process database.
After the collection of enough data has been completed (see below), you can extract
and save the training data sets automatically. In the File menu under Database
Tools there is a menu called Extract Training Data . A window will be shown with
all extracted data. Select Save Training Data and you will be prompted twice to give
file names for the two training files (Input and Output data). These two files are then
ready for the Sensor Training tool. Furthermore, a representative data set can be
removed from the sampled data from above, which will be put into two validation
files (See below). Every ~10th sampled datapoint is selected for validation during
neural network training.
You can also use the backup files called TrainingDataIn.log and TrainingDataOut.log.
You need to edit these files in a text editor and add a line to the top. This line is telling
the training tool how many data points and input/output data there are in the file (See
appendix for file layout). The file layout of these files should be identical to the
training data files saved by the Extract Training Data program discussed above.
How much data is needed?
There is no easy way to answer this question. But to train a neural network for use in
process value forecasting, as a rule of thumb you need at least 5 times the number of
weights in the net (Number of inputs * number of hidden units + number of hidden
units * number of outputs). To calculate the number of hidden units use a general rule
of: (Number of inputs + outputs) * (2/3). This should give: 7 inputs, 6 hidden units,
and 1 output unit. Therefore, for training you need at least 250 data points containing
process values and measured substrate concentration. It is advisable to try different
numbers of hidden units to obtain the best results.
Besides the training data set you need to have a smaller validation data set which
represents the training data set. This set is not used for training but to check the
network during training. A central goal during network training is not to memorise the
training data, but rather to model the underlying generator of the data (the
FoxyLogic, PhD, MSc Mikkel Holmen Andersen, Aarhus, Denmark
Email: [email protected]. Program homepage: www.FoxyLogic.com
25
Fermentor Control Program, manual version released 15 February, 2005
fermentation process). A problem with neural nets is that they will fit almost any data
set giving enough training. Therefore, noise and errors in the data set are fitted as well
if training is prolonged. To avoid overfitting , the validation set is used to check
whether the network is overtrained or needs more training cycles.
The sensor training tool
The training tool is installed together with the Fermentor Control Program and is
found in the program folder. To begin with you chose to create a new neural network
by selecting the New Network in the File menu. In the Initialise Neural Network
window you chose the number of hidden neurons and press Initialise Network . You
can now see the network by selecting the View Network in the View menu. After
this enter the Training menu and select the Load Training Data menu to tell the
program where to find the four training file created above (input training data, output
training data, input validation data, output validation data). Finally, select the Train
Neural Network to begin training.
The window that pops up is the Neural Network Training Control and in this
window you can set the various training parameters as well as test the network
performance with data you enter. Once you click the Start Training button, a graph
FoxyLogic, PhD, MSc Mikkel Holmen Andersen, Aarhus, Denmark
Email: [email protected]. Program homepage: www.FoxyLogic.com
26
Fermentor Control Program, manual version released 15 February, 2005
plotting the error of the training network in predicting the output of the training data
and the validation data is depicted. It is important to follow these curves as they tell
you when to stop training.
Validation is done by following the root-mean-square (RMS) error on the substrate
concentration predictions (Subpredicted - Subreal). Thus, the trained network tries to
predict the substrate concentration from new data in the validation data set, and the
output value is compared to the real value in the same data set. Once the sum of RMS
errors on the validation data set starts to increase during training, the network is
sufficiently trained and the program will save that network for later evaluation. In the
sensor training tool that follows the fermentor program, a graph shows the RMS
errors of the training data and the validation data set. On the graph, F1 ..Fn shows the
points during training where the network has been saved. Stop training when the RMS
error on the validation data set increases slowly.
Using the substrate sensor
The trained neural network file sensor.nnf will have to be placed in the Fermentor
Control Program folder. Once a fermentation run has been started you can turn on the
sensor and watch the displayed results in the fermentation tank and the graph
windows. Possible uses of the predicted substrate concentration are to validate other
sensor readings such as off-line substrate measurements.
If you decide that the performance of the software sensor is good, you can use the
fuzzy logic control module to adjust the substrate feed rate to optimise product
formation. The neural network output must be integrated with the rule-based fuzzy
logic module, since, as stated above, no liable model exists by which the predicted
substrate concentration can be used to reach the desired concentration.
Alternatively, you can use the software sensor to help identifying different phases of
the fermentation process. Instead of collecting substrate concentration data point you
can enter an unique integer for each phase and train the neural network with that. The
network will predict the current phase the fermentation is in.
FoxyLogic, PhD, MSc Mikkel Holmen Andersen, Aarhus, Denmark
Email: [email protected]. Program homepage: www.FoxyLogic.com
27
Fermentor Control Program, manual version released 15 February, 2005
Current Input Parameters
The currently supported inputs for the software substrate sensor are:
Feed Rate (% pump action) (time = t)
Volume Substrate feed (mL)
Total culture volume (mL)
Offset pO2 (pO2 setpoint - pO2 current)
pO2 (last 5 min.)
Offset pH (pHsetpoint - pHcurrent)
Previous substrate concentration (t-1)
For training the measured substrate concentration at time = t is needed. The file layout
of the training data files is tabulated and lines starting with an asterisk are ignored.
These files can be generated automatically by the Fermentor Control Program. More
information about values and file layout is given in the legend of the above files (see
manual Appendix).
pH Stat
The pH-Stat is a powerful tool to control a simple fed-batch feeding strategy. When
cells are consuming a substrate by-products are produced, and these will affect the pH
in the fermentation tank, which normally will decrease. By adding new substrate
mixed with e.g. NH4OH pH will change.
To start the pH-Stat tick the ON field in the low part of the window. If you the pH
Trigger Value to the pH you want in the culture, and turn of the normal pH control,
the substrate pump will run for a certain time, pulse interval, with a certain speed,
Substrate Setpoint. Select whether you need substrate added when the pH is below or
above the trigger value (this depends on the acid or base in the substrate mixture).
You can control the growth rate of the culture by correctly setting the setpoints.
FoxyLogic, PhD, MSc Mikkel Holmen Andersen, Aarhus, Denmark
Email: [email protected]. Program homepage: www.FoxyLogic.com
28
Fermentor Control Program, manual version released 15 February, 2005
Probing Feeding Control Module
Feed Rate
The probing feeding controller is an extreme controller . It will try to push the
maximum out of the fermentor by maximising the feeding rate. The rationale behind
the probing feeding controller is to take advantage of the characteristic saturation in
the respiratory system, which occurs when overflow metabolism is present.
Time
pO2 %
DO Setpoint
Response
Threshold
Time
As shown in the above figure the feed rate is increased at timed intervals and the
effect on the dissolved oxygen (DO) is followed. If the culture can utilise the
additional substrate aerobically, a drop in the DO is seen. On the other hand if the
respiratory system is saturated, the addition of more substrate will not result in a
decrease in the DO, but instead by-product metabolites are formed that can inhibited
product formation and cell growth.
During the feeding pulse the probing controller turns off the dissolved oxygen
controller so that the stirrer speed is kept constant. This will allow the detection of the
DO drop. Once the pulse interval has ended the DO is again controlled using the
agitation speed. This guarantees aerobic conditions and ensures that the oxygen level
has the same value at every pulse start.
For a further detailed look for the work of Mats Åkesson et al.:
M. Åkesson et al., On-Line Detection of Acetate Formation in Escherichia coli
Cultures Using Dissolved Oxygen Responses to Feed Transients , Biotechnology and
Bioengineering, vol. 64, September 5, 1999.
M. Åkesson, Probing Control of Glucose Feeding in Escherichia coli Cultivations ,
PhD thesis, 1999.
M. Åkesson and P. Hagander, A simplified probing controller for glucose feeding in
FoxyLogic, PhD, MSc Mikkel Holmen Andersen, Aarhus, Denmark
Email: [email protected]. Program homepage: www.FoxyLogic.com
29
Fermentor Control Program, manual version released 15 February, 2005
escherichia coli cultivations , In IEEE Conference on Decision and Control, Sydney,
Australia, 2000.
M. Åkesson, P. Hagander, and J. P. Axelsson, An improved probing controller for
substrate feeding in fedbatch cultures of e. coli: simulations and experiments , In
Computer Applications in Biotechnology, Quebec, Canada, 2001.
Scripting Module
Adding a scripting feature to the Fermentor Control Program greatly increases your
possibilities when adapting the program to your needs. You have full control over all
setpoints and you can make calculations that are then passed back to the Fermentor
Control Program as a new setpoint or an off-line value. The below table shows you
which values you can use in the script and which you can return to the Fermentor
Control Program.
Variable
Time (EFT)
Temperature
Agitation
pH
pO2
Substrate
Foam
Acid
Base
Predicted [Sub]
dpO2
OffLine1, OffLine2, OffLine3
Read
Variable
Yes
Yes
Yes
Yes
Yes
Yes
Yes
Yes
Yes
Yes
Yes
No
Write to
Variable
No
No
No
No
No
No
No
No
No
No
No
Yes
Control
Variable Type
No
On/Off/Setpoint
On/Off/Setpoint
On/Off/Setpoint
On/Off/Setpoint
On/Off/Setpoint
On/Off
No
No
No
No
No
Value (minutes)
Value (0 or 1, 0-150C)
Value (0 or 1, 0 -1500 rpm)
Value (0 or 1, 2 - 12)
Value (0 or 1, 0-100%)
Value (0 or 1, 0-100%)
Value (0 or 1)
Value (0-10000 mL)
Value (0-10000 mL)
Value
Value
Value
FoxyLogic, PhD, MSc Mikkel Holmen Andersen, Aarhus, Denmark
Email: [email protected]. Program homepage: www.FoxyLogic.com
30
Fermentor Control Program, manual version released 15 February, 2005
The scripting language is Visual Basic for Applications (VBA) and is used in all
Microsoft products. For further information on the scripting language look at the vast
amount of tutorial on the internet.
To run a script, you need to load it first and then enable scripting in the Main window.
There is a button for error checking the script before you enable it. Any error in the
script will be highlighted in red. Only one error at a time can be detected, thus if you
have an error in your script the correct it and do error checking again before you
enable the script
Alarm module
The alarm module can be used to control the way you log messages and to raise
alarms during a fermentation run. If you need to know when the maximum agitation
speed is reached you can set a maximum speed and get the exact time logged in the
Batch Log for you. Or if oxygen is dropping below a certain setpoint due to over
feeding or foaming, you can get an Email send to your normal Email account or to
your mobile phone, if you have an Email server that will send SMS messages.
FoxyLogic, PhD, MSc Mikkel Holmen Andersen, Aarhus, Denmark
Email: [email protected]. Program homepage: www.FoxyLogic.com
31
Fermentor Control Program, manual version released 15 February, 2005
You can change the default alarm limits by entering new limits in the text boxes for
low and high alarms. These values are stored in a file, and will be loaded when you
restart the Fermentor Control Program again. For the Alarm module to work as an
Email server you need to enter your Email address and also the Email server name
that you use for your normal Email on your network. You can find the server name by
looking under Email accounts in your favourite Email client. Use the Test Email
Communication button to check that it is working. The Email address and server
name are stored in a file, and will be loaded when you restart the Fermentor Control
Program again.
FoxyLogic, PhD, MSc Mikkel Holmen Andersen, Aarhus, Denmark
Email: [email protected]. Program homepage: www.FoxyLogic.com
32
Fermentor Control Program, manual version released 15 February, 2005
Option settings
In this window you can enter your fermentor specific data to fit your setup. All these
settings are saved in the Windows registry and thus should only need to be set once or
when ever you change you setup.
In Fermentor Type you can select your default fermentor type and the default serial
communication port. NOTE: Currently, only B. Braun BioStat and New Brunswick
BioFlo fermentors are supported, but as others become available these will be
included. See www.foxylogic.com for more information. In Fermentor Type you
can also select the data sampling rate which defines how often process values are
collected from the fermentor and stored in the database.
In Vessel and Supply Tank Settings you can enter the volumes of your default
fermentor and supply tanks. Furthermore, you can set your default batch start-up
volume, which will then be the default value in the input box that is shown when you
begin a fermentation run. Setting these values accurately will give you a better
synoptic window where the live process values are shown, as calculations are based
on these values.
In Off-line Data Types you can change the names of the three off-line data fields,
which are supported by the database. By doing so, you can have a better description of
the data and its format that has to be entered. Please note that the underlying database
fields are not changed and should like all field names be left like they are if you use
Access to manipulate your process data.
License Key is not in use at the moment, but may become a future feature , if false
Email registrations become a problem. The program is freeware to the benefit of all. I
use addresses to send update information but also ask for support information. Email
addresses are not given to third parties.
FoxyLogic, PhD, MSc Mikkel Holmen Andersen, Aarhus, Denmark
Email: [email protected]. Program homepage: www.FoxyLogic.com
33
Fermentor Control Program, manual version released 15 February, 2005
TCP/IP client control
This control is the major force of the Fermentor Control Program package. It gives
you the ability to sit at you favourite spot on the planet and perform small (or big)
changes in fermentation conditions without the irking trip to the laboratory. The client
program only differs from the host program in a few points: You cannot control the
profile, fuzzy logic module, or software substrate sensor, and you cannot start or stop
data acquisition. Else it has the same layout as the main control program.
Host setup
You need to enable the server built into the main Fermentor Control Program to allow
client computers to access the fermentor. Go into the Remote Setup menu, and chose
whether you want a free of secure connection with the client. In secure server mode,
you specify the IP number by which the client uses to connect to the Internet.
Be aware though, that this will not work if your Internet service provider gives the IP
address dynamically to you as it is in most cases. In this case use the free connection
instead; it is not insecure as only the client program can communicate with the host
program.
When you setup the host computer to enable client control, the IP-address of the
host is given (Local IP number). Remember to write this number down and take
it with you, since you will need it to hook up to the host program.
Once a fermentation run is started, the first field in the status bar should display the
text Listening . If this is the case, you can now connect via a client to the host
control program.
Firewall issues
The server has not been tested for use when it is situated behind a firewall, so I m
keen to know of success or type of problems from users. You will need to get the
firewall administrator to setup a static TCP/IP port mapping for the Fermentor Control
Program embedded server. The port that the server is listening on has number: 345. If
you are using a personal firewall like ZoneAlarm you have to enable the Fermentor
Control Program as safe for Internet communication. Contact me for further
information if needed: [email protected].
FoxyLogic, PhD, MSc Mikkel Holmen Andersen, Aarhus, Denmark
Email: [email protected]. Program homepage: www.FoxyLogic.com
34
Fermentor Control Program, manual version released 15 February, 2005
Client setup
Once the client program has been installed on the remote computer and it is connected
to the Internet, the first thing to do is to enter the host computer IP number. Do this by
selecting the Remote Host menu entry. When you have entered the host computer
IP-address, a network ping is sent to the host computer. If there is a connection, all
you have to do is to select the Get Data menu entry under File to download
sampled data from the fermentor host computer. The response time is dependent on
the traffic on the Internet and speed of you Internet connection. After a 74-hour
fermentation run, getting data from the host computer can take over one minute over a
modem connection. During the data download, a progress bar is shown in the status
bar that is running from 0 to 100% completed. Furthermore, the mouse pointer icon is
showing a time glass. When all data are received the controls and graphs are updated
in the main control window. Graphing is working like on the host computer and
downloaded data can be saved at anytime.
Importantly, when you use the controls to adjust set points, these they will not change
on the fermentor before you select the Send Data menu entry. Thus, you can make
all changes and then send them to the fermentor. It is a good idea to check the settings
you made by getting all data again. Be aware that you cannot make changes to
agitation while the pO2 cascade is running. If you want to set the agitation to a
constant speed then turn off the pO2 cascade, send this instruction to the fermentor,
before setting the stirring set point and sending this to the fermentor.
Saving Collected Data to file
After finishing a fermentation run the user is prompted to save the collected data. A
file dialogue box is used to select the target where to store the data file. The file
format is a tabulated ASCII-text and the decimal separator is a , . This format is
readable for most spreadsheet programs. Below is an example of a data file:
User:MHA
Start date and time:26-09-98 14:54:06
Total Fermentation time:000:01:10
TIME
TEMP pH
pO2
STIRR
MIN
0
0,3
1
RPM
765
745
650
C
30
30
30,2
6,5
6,4
6,6
%
20
20
21
SUBSTRATE ACID BASE FOAM Predicted
Subs. Conc.
mL
mL
mL
mL
any
2
4
5
0
111
4
5
5
0
109
6
5
6
1
109
You can only save data in an ASCII formatted file after stopping data collection, after
which the Save menu is enabled. If you need a data file to process before that, make
a copy of the BackupData.log file found in the Fermentor Control Program folder.
At any time you can export processes data to a file in XML file format. This format is
widely accepted by other software.
FoxyLogic, PhD, MSc Mikkel Holmen Andersen, Aarhus, Denmark
Email: [email protected]. Program homepage: www.FoxyLogic.com
35
Fermentor Control Program, manual version released 15 February, 2005
Log files
A set of log files is generated in the directory where you chose to install the
Fermentor Control Program. There are four different log files:
User.log file contains data about each user s fermentation runs with accompanying date
and time entries. When you start a fermentation run, you will be prompted to enter
your user name. Your user log file will then be appended with data about the new run.
If you are new to the program a new log file will be made automatically.
RUN.log file contains all information about executed profiles, TCP/IP activity, user,
runtime etc. A new Run.log file is generated each time the program is started erasing
the old one. A Run.log is also created by the Client software, but only communication
errors etc. are logged.
Fuzzy.log file contains all data and outputs from the fuzzy logic control module. This
file can be used as information if you wish to modify the control files. E.g. look for
situations, where your logic in the rule files is not complying with the sampled data to
reach the intended state.
BackupData.log file contains all sampled data from a fermentation run and the file is
continuously updated. This file can be used in the event of a power out or hardware
breakdown and the file layout is identical to the file format of the data file you save
from the Save menu. The old BackupData.log is deleted whenever you start a new
fermentation run.
Further information
If you have any suggestions for improvements or identified bugs in the Fermentor
Control Program please contact me by Email: [email protected] For information
about upgrades, FAQ, and for updated fuzzy logic information, please consult the
Fermentor Control Program home page at: www.FoxyLogic.com
FoxyLogic, PhD, MSc Mikkel Holmen Andersen, Aarhus, Denmark
Email: [email protected]. Program homepage: www.FoxyLogic.com
36
Fermentor Control Program, manual version released 15 February, 2005
Appendix
Rule Matrix Sheet
FoxyLogic, PhD, MSc Mikkel Holmen Andersen, Aarhus, Denmark
Email: [email protected]. Program homepage: www.FoxyLogic.com
37
Fermentor Control Program, manual version released 15 February, 2005
Profile Editor file layout
0%Temp% 30% False
0%Subs2% .7% False
1000%pH% 5% False
3000%Temp% 37% False
23000%Temp% 42% False
24000%Temp% 37% False
24000%Subs2% .2% False
Fuzzy logic control file layout
RuleSub2.fuz
*************************************************
* Rulebase Function. This function defines the *
* rules by which the Fuzzy Logic Controller
*
* decides how to change the output (new Sub
*
* SetPoint). The rules are read as follows:
*
*
*
*
If pO2 is A and Sub is B then dSub is C
*
*
*
*************************************************
*pO2 Sub dSub
*A
B
C
VL
L
NM
L
L
NS
OK
L
PS
H
L
PM
VH
L
PL
VL
OK
NM
L
OK
NS
OK
OK
PS
H
OK
PM
VH
OK
PL
VL
H
NL
L
H
NM
OK
H
NS
H
H
NS
VH
H
NM
FoxyLogic, PhD, MSc Mikkel Holmen Andersen, Aarhus, Denmark
Email: [email protected]. Program homepage: www.FoxyLogic.com
38
Fermentor Control Program, manual version released 15 February, 2005
RuledpO2.fuz
************************************************
* Rulebase Function. This function defines the *
* rules by which the Fuzzy Logic Controller
*
* decides how to change the output (new Sub
*
* SetPoint). The rules are read as follows:
*
*
*
*
If pO2 is A and dPO2 is B then dSub is C *
*
*
************************************************
*pO2 dPO2 dSub
*A
B
C
VL
VL
NL
L
VL
NL
OK
VL
NM
H
VL
NS
VH
VL
NS
VL
L
NL
L
L
NM
OK
L
NS
H
L
ZE
VH
L
PS
VL
OK
NM
L
OK
NS
OK
OK
ZE
H
OK
PS
VH
OK
PM
VL
H
NS
L
H
ZE
OK
H
PS
H
H
PM
VH
H
PL
VL
VH
PS
L
VH
PS
OK
VH
PM
H
VH
PL
VH
VH
PL
FoxyLogic, PhD, MSc Mikkel Holmen Andersen, Aarhus, Denmark
Email: [email protected]. Program homepage: www.FoxyLogic.com
39
Fermentor Control Program, manual version released 15 February, 2005
RuleSoftSub.fuz
*************************************************
* Rulebase Function. This function defines the *
* rules by which the Fuzzy Logic Controller
*
* decides how to change the output (new Sub
*
* SetPoint). The rules are read as follows:
*
*
*
* If SubConc is A and Sub is B then dSub is C
*
*
*
*************************************************
*SubConc Sub
dSub
*A
B
C
VL
L
PM
L
L
PM
OK
L
PS
H
L
ZE
VH
L
NS
VL
OK
PM
L
OK
PS
OK
OK
PS
H
OK
ZE
VH
OK
NS
VL
H
PM
L
H
PS
OK
H
ZE
H
H
NS
VH
H
NM
FoxyLogic, PhD, MSc Mikkel Holmen Andersen, Aarhus, Denmark
Email: [email protected]. Program homepage: www.FoxyLogic.com
40
Fermentor Control Program, manual version released 15 February, 2005
RulepH.fuz
*************************************************
* Rulebase Function. This function defines the *
* rules by which the Fuzzy Logic Controller
*
* decides how to change the output (new Sub
*
* SetPoint. The rules are read as follows:
*
*
*
*
If pH is A and dpH is B then dSub is C
*
*
*
*************************************************
*pH
dpH
dSub
*A
B
C
VL
VL
NL
L
VL
NL
OK
VL
NM
H
VL
NS
VH
VL
NS
VL
L
NL
L
L
NM
OK
L
NS
H
L
ZE
VH
L
PS
VL
OK
NM
L
OK
NS
OK
OK
ZE
H
OK
PS
VH
OK
PM
VL
H
NS
L
H
ZE
OK
H
PS
H
H
PM
VH
H
PL
VL
VH
PS
L
VH
PS
OK
VH
PM
H
VH
PL
VH
VH
PL
FoxyLogic, PhD, MSc Mikkel Holmen Andersen, Aarhus, Denmark
Email: [email protected]. Program homepage: www.FoxyLogic.com
41
Fermentor Control Program, manual version released 15 February, 2005
pO2.mf
*pO2, Oxygen Member Function
*******************************************
* Values in this function are the offset *
* from the substrate SetPoint. For example*
* with Setpoint to 20% the function look *
* like this:
*
*
VL
14
16
16
18
*
*
L
16
18
18
20
*
*
OK
18
20
20
22
*
*
H
20
22
22
24
*
*
VH
22
24
24
26
*
* VL:
pOxygen Very Below SetPoint
*
* L:
pOxygen Low Below SetPoint
*
* OK:
pOxygen Close to SetPoint *
* H:
pOxygen High Above SetPoint
*
* VH:
pOxygen Very High Below SetPoint*
*******************************************
VL
-6
-4
-4
-2
L
-4
-2
-2
0
OK
-2
0
0
2
H
0
2
2
4
VH
2
4
4
6
dpO2.mf
*dPO2, Change in pO2 Member Function
*******************************************
* Values in this function are the change *
* in pO2 over the last 5 min (10 data
*
* points).
*
*
*
* VL:
Change in pO2 Very Low
*
* L:
Change in pO2 Low
*
* OK:
Change in pO2 Zero
*
* H:
Change in pO2 High
*
* VH:
Change in pO2 Very High
*
*******************************************
VL
-3
-2
-2
-1
L
-2
-1
-1
0
OK
-1
0
0
1
H
0
1
1
2
VH
1
2
2
3
FoxyLogic, PhD, MSc Mikkel Holmen Andersen, Aarhus, Denmark
Email: [email protected]. Program homepage: www.FoxyLogic.com
42
Fermentor Control Program, manual version released 15 February, 2005
Sub.mf
*Sub, Substrate Member Function
*******************************************
* Values in this function are the offset *
* from the substrate SetPoint. For example*
* with Setpoint to 2% pump action the
*
* function look like this:
*
*
L
1
1.5 1.5 2
*
*
OK
1.5 2
2
2,5
*
*
H
2
2,5 2,5 3
*
* L: Substrate Below SetPoint
*
* OK: Substrate Close to SetPoint
*
* H: Substrate Above SetPoint
*
*******************************************
L
-1
-0.5 -0.5 0
OK
-0.5 0
0
0.5
H
0
0.5 0.5 1
dSub.mf
*dSub, Change in Substrate output Member Function
*******************************************
* This member function gives the +/*
* change in SetPoint for the substrate
*
* pumpe.
*
* NL:
Negativ Large
*
* NM:
Negativ Medium
*
* NS:
Negativ Small
*
* ZE:
Zero Change
*
* PS:
Positiv Small
*
* PM:
Positiv Medium
*
* PL:
Positiv Large
*
*******************************************
NL
-0.3
-0.225
-0.225
-0.15
NM
-0.225
-0.15
-0.15
-0.075
NS
-0.15
-0.075
-0.075
0
ZE
-0.075
0
0
0.075
PS
0
0.075
0.075
0.15
PM
0.075
0.15
0.15
0.225
PL
0.15
0.225
0.225
0.3
FoxyLogic, PhD, MSc Mikkel Holmen Andersen, Aarhus, Denmark
Email: [email protected]. Program homepage: www.FoxyLogic.com
43
Fermentor Control Program, manual version released 15 February, 2005
SoftSub.mf
*SoftSub, Soft Substrate Member Function
***********************************************
* Values in this function are the offset *
* from the desired substrate concentration
*
* Setpoint.
*
*
*
* VL:
Substrate Conc. Very Below SetPoint *
* L: Substrate Conc. Below SetPoint
*
* OK: Substrate Conc. Close to SetPoint
*
* H: Substrate Conc. Above SetPoint
*
* VH:
Substrate Conc. Very Above SetPoint *
***********************************************
VL
-6
-4
-4
-2
L
-4
-2
-2
0
OK
-2
0
0
2
H
0
2
2
4
VH
2
4
4
6
pH.mf
*pH, pH Member Function
*******************************************
* Values in this function are the offset *
* from the pH SetPoint. For example
*
* with Setpoint to 6.8 the function looks *
* like this:
*
*
VL
6.3
6.55 6.55 6.7
*
*
L
6.55 6.7
6.7
6.8
*
*
OK
6.7
6.8
6.8
6.9
*
*
H
6.8
6.9
6.9
7.05
*
*
VH
6.9
7.05 7.05 7.3
*
* VL: pH Very Below SetPoint
*
* L: pH Low Below SetPoint
*
* OK: pH Close to SetPoint
*
* H: pH High Above SetPoint
*
* VH: pH Very High Below SetPoint
*
*******************************************
VL
-0,5 -0,25 -0,25 -0,1
L
-0,25 -0,1 -0,1 0
OK
-0,1 0
0
0,1
H
0
0,1
0,1
0,25
VH
0,1
0,25 0,25 0,5
FoxyLogic, PhD, MSc Mikkel Holmen Andersen, Aarhus, Denmark
Email: [email protected]. Program homepage: www.FoxyLogic.com
44
dpH.mf
Fermentor Control Program, manual version released 15 February, 2005
*dpH, Change in pH Member Function
*******************************************
* Values in this function are the change *
* in pH over the last 5 min (10 data
*
* points).
*
*
*
* VL: Change in pH Very Low
*
* L: Change in pH Low
*
* OK: Change in pH Zero
*
* H: Change in pH High
*
* VH: Change in pH Very High
*
*******************************************
VL
-0,03 -0,02 -0,02 -0,01
L
-0,02 -0,01 -0,01 0
OK
-0,01 0
0
0,01
H
0
0,01 0,01 0,02
VH
0,01 0,02 0,02 0,03
FoxyLogic, PhD, MSc Mikkel Holmen Andersen, Aarhus, Denmark
Email: [email protected]. Program homepage: www.FoxyLogic.com
45
Fermentor Control Program, manual version released 15 February, 2005
Software Sensor control file layout
Example.nnf
#
1
3
0
<- Layer 1, 3 input neurons, 0 above
#
2
3
3
<- Layer 2, 3 hidden neurons, 3 above
#
3
1
3
<- Layer 3, 1 output neurons, 3 above
@
@
Range#1 max#1 min#1
<- Data for normalizing input #1
@
Range#2 max#2 min#2
<- Data for normalizing input #2
@
Range#3 max#3 min#3
<- Data for normalizing input #3
@
Range#1 max#1 min#1
<- Data for normalizing output #1
¤ <- Marker, below neuron weighs and thresholds are given
Layer#2Neuron#1Weight#1 Layer#2Neuron#1Weight#2 Layer#2Neuron#1Weight#3
Layer#2Neuron#1Treshold
Layer#2Neuron#2Weight#1 Layer#2Neuron#2Weight#2 Layer#2Neuron#2Weight#3
Layer#2Neuron#2Treshold
Layer#2Neuron#3Weight#1 Layer#2Neuron#3Weight#2 Layer#2Neuron#3Weight#3
Layer#2Neuron#3Treshold
Layer#3Neuron#1Weight#1 Layer#3Neuron#1Weight#2 Layer#3Neuron#1Weight#3
Layer#3Neuron#1Treshold
FoxyLogic, PhD, MSc Mikkel Holmen Andersen, Aarhus, Denmark
Email: [email protected]. Program homepage: www.FoxyLogic.com
46
Fermentor Control Program, manual version released 15 February, 2005
Sensor.nnf
#
1
7
0
<- Layer 1, 7 input neurons, 0 above
#
2
10
7
<- Layer 2, 10 hidden neurons, 7 above
#
3
1
10
<- Layer 3, 1 output neurons, 10 above
@
@
6.75 6.75 0
<- Data for normalizing input #1
@
500
500
0
<- Data for normalizing input #2
@
561
1561 1000
<- Data for normalizing input #3
@
5.9
1.3 -4.6
<- Data for normalizing input #4
@
.14
.1
-.04
<- Data for normalizing input #5
@
1.16 1.1 -.06
<- Data for normalizing input #6
@
111
111
0
<- Data for normalizing input #7
@
111
111
0
<- Data for normalizing output #1
¤
3.75971694937615 4.07726719544041 4.690852724783
1.80911790847808
2.00296094186734 -2.61862385034799 -6.55511445324077
.377159557450939
-4.76992159623709 -4.47678086519426 -4.33279807975446 -5.14461334762
4.50154060592303 -4.89244243765186 -5.76790615316649
2.20397470747529E-03
-5.61447788129139 -4.74065055034103 -4.62716938875695 -5.47022078826548 4.20382532575943 -5.44396819603226 -5.70851685138183
-.320312337113613
-4.88720637047502 -5.62109124202305 -4.81530304552233 -4.9332829367535 5.01611692828678 -5.16288281421997 -5.5995947894898
.252562096981901
-5.85182486128104 -5.78181110953004 -5.07018053152791 -5.20751871486971 5.48794084622698 -5.39671696089882 -5.83893895019787
1.31704114401821
-6.58589330859152 -6.00672917026126 -5.64046452277924 -6.51055109425313 6.14373079522539 -6.72524523699054 -5.7156447001138
.862045554242181
-6.05080369541756 -6.83353179971728 -6.1447226361594 -6.69934179131986 6.68183040672656 -5.89377109576784 -6.55428566971051
.881741732913483
-6.79689200943925 -6.48903361213386 -6.37339583572718 -6.49377125642577 5.71646575314079 -5.76345170922498 -6.53391862540241
1.05396959398222
-6.6408101149373 -6.77572340921539 -6.76129192600924 -6.18318606970833 6.4611797591754
-6.51309051786101 -6.20420568026137
.9676087450954
-6.63938795227694 -6.26645007661729 -6.76739950388887 -6.77483369274218 6.28712647986319 -6.9047299117058 -6.46606857496196
.893013309514196
-3.46269380877619 -1.24797688068116 -.775868607126456 -.846169386530807 .289020065767987
.142435148016983 -.116109640507782 1.59577601775878E-02
-.294935149743334 -.714685982976691
.772507148584088
FoxyLogic, PhD, MSc Mikkel Holmen Andersen, Aarhus, Denmark
Email: [email protected]. Program homepage: www.FoxyLogic.com
47
Fermentor Control Program, manual version released 15 February, 2005
Training data input file
*Feed Rate (% pump action); Vol Sub(mL); Total Culture Vol
(mL); offset pO2; dpO2 (5 min; Offset pH; Substrate conc.(t-1)
(any)
#
17
#
7
<- 17 data point, 7 inputs
0
0
1100
1.3
0
1.1
111
0
0
1100
-0.1
0.004
1.0
111
0.6 2
1112
0.2
-0.012
0.32
11
0.6 6
1116
0
0.008
0.37
0
0.9 11
1122
-0.2
-0.004
0.18
0
1.7 23
1134
0.9
0.052
-0.04
0
1.8 110 1214
-0.1
0.018
-0.04
10
1.8 121 1224
-0.1
0.006
-0.06
0
1.8 239 1360
-0.1
0.01
-0.05
0
0
0
1000
0
0
1.1 75
2
34
1044
-4.6
-0.07
-0.05
75
2
48
1060
0
0.01
-0.05
11
2.5 74
1088
0
0.01
-0.04
0
2.5 82
1097
0.1
0.04
-0.05
1
2.5 191 1216
0
0.1
-0.06
0
2.5 338 1378
-0.1
0
-0.05
0
2.5 500 1561
-0.1
-0.04
-0.04
1
Training data output file
*substrate concentration(t) (mmol/L or any other)
#
17
#
1 <- 17 data points, 1 output
111
11
0
0
0
10
0
0
0
75
11
0
1
0
0
1
10
FoxyLogic, PhD, MSc Mikkel Holmen Andersen, Aarhus, Denmark
Email: [email protected]. Program homepage: www.FoxyLogic.com
48
Fermentor Control Program, manual version released 15 February, 2005
Standard Script.txt
'Do not delete
Private TEMP_OnOff, STIR_OnOff, pH_OnOff, pO2_OnOff, SUB2_OnOff, FOAM_OnOff
Private TEMP_sp, STIR_sp, pH_sp, pO2_sp, SUB2_sp
Private EFT_pv, TEMP_pv, STIR_pv, pH_pv, pO2_pv, SUB2_pv, ACID_pv, BASE_pv, FOAM_pv
Private SOFTSUB_pv, dpO2_pv
Private OffLine_1, OffLine_2, OffLine_3
Private ReturnVal(13)
'Do Not Delete or change Above lines
'Do Not Delete or change below lines
Function ReturnValues()
'returning values to fermentor program
ReturnVal(0)= TEMP_OnOff
ReturnVal(1)= STIR_OnOff
ReturnVal(2)= pH_OnOff
ReturnVal(3)= pO2_OnOff
ReturnVal(4) = FOAM_OnOff
ReturnVal(5)= SUB2_OnOff
ReturnVal(6) = TEMP_sp
ReturnVal(7) = STIR_sp
ReturnVal(8) = pH_sp
ReturnVal(9) = pO2_sp
ReturnVal(10) = SUB2_sp
ReturnVal(11) = OffLine_1
ReturnVal(12) = OffLine_2
ReturnVal(13) = OffLine_3
ReturnValues = ReturnVal
End Function
'Do Not Delete or change Above lines
'Do Not Delete or change below lines
Sub Main (a,b,c,d,e,f,g,h,i,j,k,l,m,n,o,p,q,r,s,t,u,v)
'--Values Coming from fermentor program
'---ON/OFF--------------TEMP_OnOff = a '1 if on, 0 if off
STIR_OnOff = b
pH_OnOff = c
pO2_OnOff = d
SUB2_OnOff = e
FOAM_OnOff = f
'---SetPoints-----------TEMP_sp = g '10 - 42
STIR_sp = h '0 - 1200
pH_sp = i '2 - 12
pO2_sp = j '0 - 100
SUB2_sp = k '0 - 100
'---Process Values------EFT_pv = l ' minuttes
TEMP_pv = m
STIR_pv = n
FoxyLogic, PhD, MSc Mikkel Holmen Andersen, Aarhus, Denmark
Email: [email protected]. Program homepage: www.FoxyLogic.com
49
Fermentor Control Program, manual version released 15 February, 2005
pH_pv = o
pO2_pv = p
SUB2_pv = q
ACID_pv = r
BASE_pv = s
FOAM_pv = t
SOFTSUB_pv = u
dpO2_pv = v
End Sub
'Do Not Delete or change Above lines
Function YourScript()
Put your code here
End Function
FoxyLogic, PhD, MSc Mikkel Holmen Andersen, Aarhus, Denmark
Email: [email protected]. Program homepage: www.FoxyLogic.com
50
Fermentor Control Program, manual version released 15 February, 2005
Wiring between RS-422 converter and BioStat fermentor
Warning: Do NOT connect the BioStat fermentor and computer directly, you
most insert a RS-232C to RS-422 converter between. For long distances the
converter should be as the computer and may require additional power supply.
Cable between the RS-232C to RS-422 converter and the computer
-------------------------------------------------------------This is a standard serial cable
PIN out on 9 and 25 RS-232C serial ports on computer.
DB-9 Corresponding
Pin
DB-25 Pin
Signal Function
----------------------------------------------2
3
RD
Received data
3
2
TD
Transmitted data
8
4
RTS Request to send
7
5
CTS Clear to send
6
6
DSR Data set ready
5
7
SG
Signal ground
4
8
DCD Data carrier detect
1
20
DTR Data terminal ready
Cable between the RS-232C to RS-422 converter and the fermentor
--------------------------------------------------------------This is a non-standard serial cable, which you have to provide yourself.
RS-422 on fermentor (HOST)
PIN SIGNAL CONNECT TO ON CONVERTER 422/485
1
2 GND
GND
3 DO B (TxD -)
Rx4 RI B (RxD -)
Tx5 RGND
6
7 GND
GND
8 DO A (TxD +)
Rx+
9 RI A (RxD +)
Tx+
No PIN numbers have been assigned to the converter 422 side as these vary
between different vendors.
Use at own risk,
Mikkel H. Andersen
August 2000
FoxyLogic, PhD, MSc Mikkel Holmen Andersen, Aarhus, Denmark
Email: [email protected]. Program homepage: www.FoxyLogic.com
51
Fermentor Control Program, manual version released 15 February, 2005
Wiring between PC and BioFlo fermentors
If you want to use the Fermentor Control Program with your BioFlo 110, BioFlo III or BioFlo 3000
fermentor, you do NOT need a RS-232 to RS-422 converter. All you need to do are a few things:
A: Get a 3-wire cable with the following specified connections:
It is a standard serial cable (RS-232C to RS-232C).
Female at PC end
DB-25 at fermentor end
(DB-25) DB-9 Pin#
Pin#
Receive
(3)2 <---------> 2 Transmit
Transmit
(2)3 <---------> 3 Receive
Ground
(7)5 <---------> 7 Ground
NOT CONNECTED
21 must not be connected !!
NOTE: Make sure that pin 21 on the fermentor is not connected with a wire to the PC, this can switch
the serial mode from RS-232 to RS-422
B1: For BioFlo III, 3000, and 4000 open the back of your fermentor and change the settings of the
micro-switch S1 as follows (Consult you instrument manual to locate the switch):
Settings of switch 1 (S1) on the fermentor control board
1. S1-1 and S1-2 are used for setting the baud rate:
Baud Rate
9600
S1-1
OFF
S1-2
OFF
2. S1-3 is used for setting the parity check:
Parity
Even
S1-3
ON
3. S1-4 is used for setting mode:
Mode
S1-4
non-multidrop OFF
4. S1-5, S1-6, S1-7, S1-8 are used for setting unit number:
Unit #
0
S1-5
ON
S1-6
ON
S1-7
ON
S1-8
ON
B2: For BioFlo 110, set the base address to zero and select the AFS mode. Then set the unit number
to 1 (micro switches on the back of each module).
C: Install the program and you are done.
Use at own risk,
FoxyLogic, PhD, MSc Mikkel Holmen Andersen, Aarhus, Denmark
Email: [email protected]. Program homepage: www.FoxyLogic.com
52
Fermentor Control Program, manual version released 15 February, 2005
Mikkel H. Andersen
March 2002
FoxyLogic, PhD, MSc Mikkel Holmen Andersen, Aarhus, Denmark
Email: [email protected]. Program homepage: www.FoxyLogic.com
53