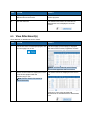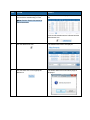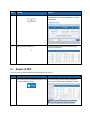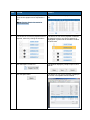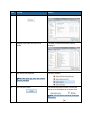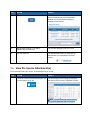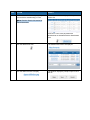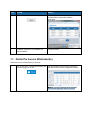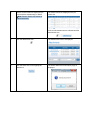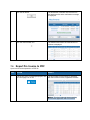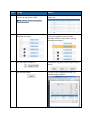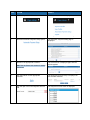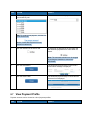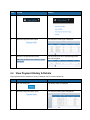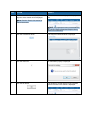
1
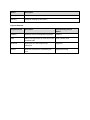
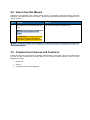
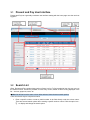
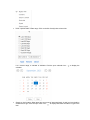
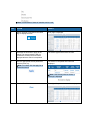
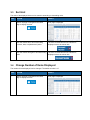
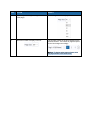
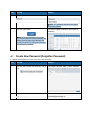
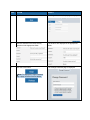
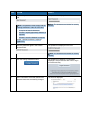
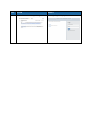
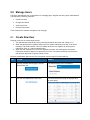
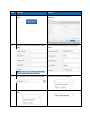
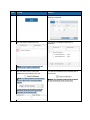
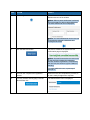
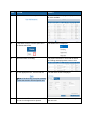
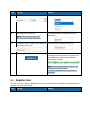
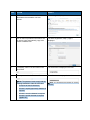
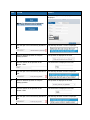
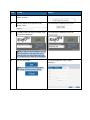
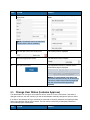
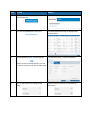
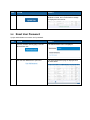
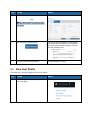
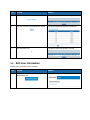
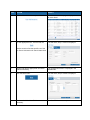
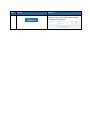
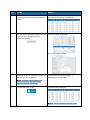
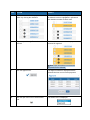
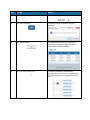
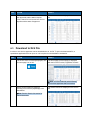
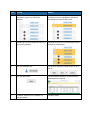
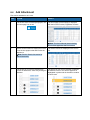
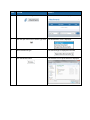
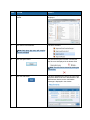
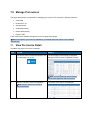
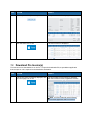
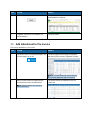
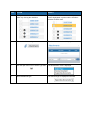
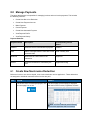
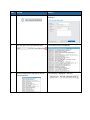
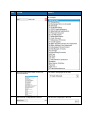
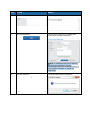
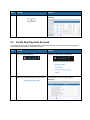
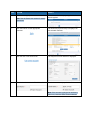
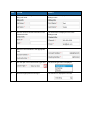
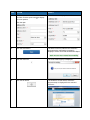
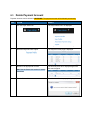
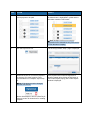
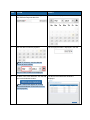
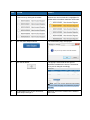
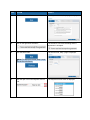
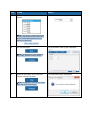
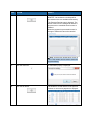
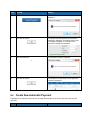
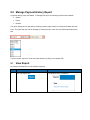
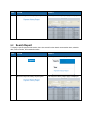
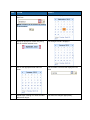
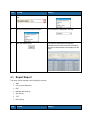
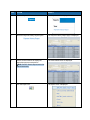
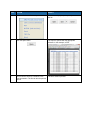
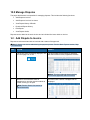
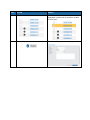
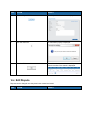
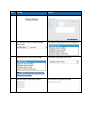
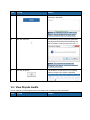
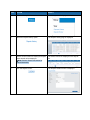
Present and Pay User Manual – Payer Administrator Table of Contents 1.0 Glossary of Terms .............................................................................................. 1 2.0 How to Use this Manual ..................................................................................... 3 3.0 Common User Features and Functions ............................................................ 3 3.1 Present and Pay User Interface ............................................................................... 4 3.2 Search List ................................................................................................................ 4 3.3 Sort List ..................................................................................................................... 7 3.4 Change Number of Items Displayed ........................................................................ 7 4.0 4.1 5.0 Log in to Present and Pay.................................................................................. 9 Create New Password (Forgotten Password) ........................................................10 Manage Users ................................................................................................... 14 5.1 Create New User ......................................................................................................14 5.2 Register User ...........................................................................................................19 5.3 Change User Status (Includes Approve)................................................................23 5.4 Reset User Password ..............................................................................................25 5.5 View User Profile .....................................................................................................26 5.6 Edit User Information ..............................................................................................27 6.0 Manage Invoices & Non-Invoice Payments .................................................... 30 6.1 View Detail ...............................................................................................................30 6.2 Approve ....................................................................................................................32 6.3 Download to XLS File ..............................................................................................36 6.4 Add Attachment .......................................................................................................38 6.5 View Attachment(s) .................................................................................................41 6.6 Delete Attachment(s) ...............................................................................................42 6.7 Export to PDF...........................................................................................................44 7.0 Manage Pre Invoices ........................................................................................ 47 7.1 View Pre Invoice Detail ............................................................................................47 7.2 Download Pre Invoice(s) .........................................................................................48 7.3 Add Attachment to Pre Invoice ...............................................................................50 7.4 View Pre Invoice Attachment(s)..............................................................................53 7.5 Delete Pre Invoice Attachment(s) ...........................................................................55 7.6 8.0 Export Pre Invoice to PDF .......................................................................................57 Manage Payments ............................................................................................ 60 8.1 Create New Non-Invoice Deduction .......................................................................60 8.2 Create New Payment Account ................................................................................64 8.3 Delete Payment Account .........................................................................................68 8.4 Make Payment..........................................................................................................69 8.5 Cancel Payment .......................................................................................................76 8.6 Create New Automatic Payment .............................................................................77 8.7 View Payment Profile ..............................................................................................79 8.8 View Payment History & Details .............................................................................80 9.0 Manage Payment History Report .................................................................... 82 9.1 View Report ..............................................................................................................82 9.2 Search Report ..........................................................................................................83 9.3 Export Report...........................................................................................................85 10.0 Manage Disputes .............................................................................................. 88 10.1 Add Dispute to Invoice ............................................................................................88 10.2 Add Dispute to Invoice Line Item ...........................................................................91 10.3 View Dispute History & Details ...............................................................................95 10.4 Edit Dispute .............................................................................................................96 10.5 View Dispute Audits ................................................................................................99 1.0 Glossary of Terms Term Definition Attachment A file that is associated with any type of invoice. Only .jpeg, .jpg, .png. .pdf, .msg file formats are accepted. Dispute A disagreement with an invoice or non-invoice payment that results in an under payment or an over payment. A dispute is associated with a specific invoice and be created during the payment process. Entitlement Allows access to specific features in the system. Also describes the invoices and payments of a particular customer or Access to the invoices and payments of a particular customer or groups of customers. Non-Invoice payment A payment made to a customer that does not have a formal invoice associated with it. Non-Invoice Deduction An existing deduction to an invoice. Non-invoice deductions are associated with a particular customer and are created in advance before being applied during the payment process. Pre Invoice An invoice that has not been formally submitted for approval and payment. Once created by the biller, the pre invoice expires in after 10 business days and is not accessible past the expiration date. Invoice and Non-Invoice Payment Statuses: Status Description Unapproved Assigned as soon invoice or non-invoice payment is loaded. Approved The payer analyst or administrator reviews the invoice and approves it if it is valid. Once approved, a payment can be initiated. There are also invoices that are automatically approved. When a payment is returned, the invoice or non-invoice payment is given this status for review and repayment. Initiated Assigned by system as soon as payment is scheduled. The payment can be cancelled up to 3:00PM on the day it is scheduled to be paid. Partially Paid Assigned by system when the partial amount is paid and past the cutoff time on the scheduled date. Paid Assigned by system when the payment is past the cutoff time on the scheduled date. Status Description Paid by other Assigned manually by biller admin Pending Assigned manually by biller admin Payment Statuses: Payment Status Description Corresponding Invoice Status Initiated When the invoice is scheduled for payment. Initiated Paid Status Is changed after the cutoff time on the scheduled date Paid / Partially Paid Returned When there is a ACH return for the transaction Approved Cancel When the transaction is cancelled by the user. Approved/Pending 2.0 How to Use this Manual Instructions are presented in the “Action, Result” format. To complete a particular function, follow the instruction in the particular step of the “Action”. The expected result will be described and displayed in the “Result” column. STEP ACTION RESULT # Instruction to be completed by the end user. The result of the step is displayed here. Note: Any information important to a particular step is presented in this format. WARNING! If an action might cause data loss or cannot be undone, the information is presented in this format. Note: It is assumed that the user is logged into Present and Pay before completing any function, not including the logging in. 3.0 Common User Features and Functions Present and Pay has a consistent user interface starting with the home page (once the user has logged in).There are also common user functions when a list of items (Invoices, Disputes, Users, etc.) are displayed on a page: Search List Sort List Change Number of Items Displayed 3.1 Present and Pay User Interface Present and Pay has a generally consistent user interface starting with the home page once the user has logged in. 3.2 Search List Often, Present and Pay contains large number of items in a list. To find a particular item, the user can use the search function. A search is possible on most every column, based on what is being displayed in the list – invoices, payments, users, etc. Note: Not all lists have the same column titles and won’t have the same search options. There are several ways to complete a search: Enter a specific number or enter a partial number in the field directly under the column name. There are several search options when entering a specific number or word. Click the option icon - to display and change the search option. Enter a specific date or date range. Click on the link directly below column title For a custom range, a calendar is available. Click the open calendar icon calendar. - to display the Search an item’s status. Most items have some sort of status assigned. As well, an item might be classified as a type. Click the open menu icon - to display and select the status or type of the item. Note: A combination of these of searches can be used. STEP ACTION RESULT 1. Open a list page or navigate to the Home page to display invoices. A list page is displayed. 2. Determine the best filter to apply to the search. The more precise the filter (or combination of filters) the fewer items displayed after the search is completed. The search approach has been decided. 3. Enter the appropriate search parameters press the Enter key. The search is completed and results are displayed. Note: For a date, click the apply link to perform the search. Note: If the search yields no results, a message is displayed. 4. Click the Clear link. The original list prior to the search is displayed. 3.3 Sort List The order of the displayed items can be sorted in ascending or descending order. STEP ACTION RESULT 1. Open a list page or navigate to the Home page to display invoices. A list page is displayed. 2. Click the column title to sort in ascending (numeric, date, or alphanumeric) order. The list is re-sorted and the sort indicator is displayed next to the column title. 3. Click the column title again to sort descending order. The list is re-sorted and the sort indicator is displayed next to the column title. 3.4 Change Number of Items Displayed The number of items displayed can be changed. The default number is 15. STEP ACTION RESULT 1. Open a list page or navigate to the Home page to display invoices. A list page is displayed. STEP ACTION RESULT 2. Click the open icon of the page). 3. Select the number to display in the list. (Lower right-hand side The list length menu is displayed. The number of items in the list is changed to the selected number. The number of pages required for the list changes accordingly. Note: To display other pages of items, click the page number or the arrow icons. 4.0 Log in to Present and Pay A user must log in to Present and Pay with a valid and active user account. A system administrator validates and approves those accounts and the user then completes the registration process. STEP ACTION RESULT 1. Open an Internet browser. The home page of the browser is displayed. In this example, the browser is Microsoft Internet Explorer. Note: The application can be used with the following Internet browsers: 2. Microsoft Internet Explorer (Version 9 and above is the preferred browser) Mozilla Firefox (Version 3 and above) Google Chrome (Version 28 and above) Apple Safari Open the Present and Pay website. The Present and Pay login page is displayed. Note: It is strongly recommended to add this address to the favorites list (bookmarking). 3. Enter the user name (email address) in the User ID/Email Address field. The user name is displayed in the field. STEP ACTION RESULT 4. Enter the password in the Password field. The password is displayed in the field. Note: The password characters are hidden for security reasons. 5. Click the Login button. The user is logged in and the Invoices page is displayed. Note: If the user attempts to log in more than six times with an incorrect password, the system prevents further login attempts and the user is locked. The user can be unlocked by resetting the password. 4.1 Create New Password (Forgotten Password) If a password is forgotten, the user can create a new password. STEP ACTION RESULT 1. Click the “Can’t access your account?” Link or icon. The Forgot Password, Step 1 page is displayed. 2. Enter User ID in the User ID field. The user ID is displayed in the field. STEP ACTION RESULT 3. Click the Next button. The Forgot Password, Step 2 page is displayed. 4. Enter the answers to the three security questions in the appropriate fields. The answers are displayed in the appropriate fields. 5. Click the Finish button. The Change Password page is displayed. Note: To display the Forgot Password, Step 1 page, click the Previous button. STEP ACTION RESULT 6. Enter a new password in the New Password field. The password is displayed in the field. Note: The password must comply with the following conditions in order for it be valid: It requires at least 6 characters. At least 1 capital (uppercase) character is required. At least 1 numeric character is required. Note: The characters are hidden for security reasons. At least 1 special character is required (!@#$%^&*). 7. Enter the password again in the Confirm Password field. The password is displayed in the field. Note: The characters are hidden for security reasons. 8. Click the Change Password button. The password is changed, a confirmation message is sent to the user with a link to log in to Present and Pay. 9. Open confirmation email that indicates the password has been successfully changed. The email is displayed. STEP ACTION RESULT 10. Click the link in the message. Change name The Login Page is displayed. 5.0 Manage Users The payer administrator role is responsible for managing payer analysts and other payer administrators. This includes the following functions: Create New User Change User Status View User Profile Edit User Information These functions are available through the user list page. 5.1 Create New User Creating a new user is a three stage process: 1. The administrator starts the process by entering information about the user. (Steps 1-11) 2. When the administrator completes that process, the system notifies the new user via an email message. That email contains a link to a website where the user registers by entering more information. (Step 12 - further explained later) 3. When the user completes his or her own registration process, the administrator reviews the information and either approves or rejects the new user. The system notifies the user that he or she has been approved or rejected. (Steps 13-22) Once the administrator approves the user, that person can then log into Present and Pay. STEP ACTION RESULT 1. From any Present and Pay page, click the Administration link. The Administration menu is displayed. . 2. Click the User Maintenance option link. The User Maintenance page is displayed with all users listed. STEP ACTION RESULT 3. Click the New User button (bottom right of page). The Add User, Step 1, User details window is displayed. 4. Enter the new user information in the empty fields. The information is displayed in the appropriate fields. Note: The asterisk next to the field name indicates that the field is mandatory. 5. Click the open icon in the User Group field. The User Group menu is displayed. 6. Select the appropriate user group for the new user. The selected user group is displayed in the field. STEP ACTION RESULT 7. Click the Next button. The Add User, Step 2, User Entitlements window is displayed. 8. Click the expand entitlements icon. The full list of available entitlements is displayed. Note: The icon also indicates that the entitlement is a “parent” entitlement. 9. Click the check box for each of the entitlements to be added for the user. The selected entitlements are indicated with a check mark. Note: To display additional entitlements, click the right arrow in the page display controls. Note: The available entitlements are based on the entitlements of the current user. It is also possible to search for a specific entitlement by entering the appropriate information in the search fields. STEP ACTION RESULT 10. Click the right arrow. The entitlements are moved to the Selected Entitlements area of the window. Note: When a parent entitlement is selected, it’s not necessary to add its child entitlements. The child entitlements are not displayed. Note: The user entitlements can be removed by clicking the selected entitlements and clicking the left arrow. 11. Click the New User button. The user is created in the system and the confirmation page is displayed. Note: An email is sent to the new user so he or she can fully complete the registration process. Until the registration is completed by the new user, the account is given a status of Pending. To create additional users, repeat steps 3 through 11. 12. The new user completes the registration process. When that user has completed the process, he or she is ready for approval or rejection. 13. From any Present and Pay page, click the Administration link. The Administration menu is displayed. . STEP ACTION RESULT 14. Click the User Maintenance option link. The User Maintenance page is displayed with all users available. 15. In the Status column, Click the open icon in the Status search field. The Status menu is displayed. 16. Select the status of Pending. The system searches for users with the status of Pending and displays those users in a list. 17. For the appropriate user, click the Edit link. The Edit User window is displayed. Note: If the list is long, it may be necessary to refine the search to find the specific user. 18. Review the user information to determine if the user is to be approved or rejected. A decision is made to either approve or reject the new user. STEP ACTION RESULT 19. Click the open icon in the User Status field. The User Status menu is displayed. 20. Select Approved or Rejected. The selected status is displayed in the User Status field. Note: Other changes to the user’s information can be made at this point. 21. If necessary, enter a reason for the change in the Change Reason field. The information is displayed in the field. 22. Click the Update User button. The user information is updated and the status is changed to either Approved or Rejected. The User Maintenance page is displayed with a confirmation message. Note: An email message is sent to the user indicated the change in status. To approve additional users, repeat steps 16 through 22 5.2 Register User The new user must complete registration process. Once this process is completed, the administrator then approves or rejects that new user. STEP ACTION RESULT STEP ACTION RESULT 1. Open confirmation email that indicates the administrator has created a new user account. The message is displayed. 2. Click on the link provided in the email. If the link doesn’t open automatically, copy it the browser’s address field. The User Registration, Step 1 page is displayed. 3. If necessary, enter a Tax ID number in the Tax ID field The information is displayed in the field. 4. Enter a password in the Password field. The information is displayed in the field. Note: The password must comply with the following conditions in order for it be valid: It requires at least 6 characters. At least 1 capital (uppercase) character is required. At least 1 numeric character is required. At least 1 special character is required (!@#$%^&*). Note: The characters are hidden for security reasons. STEP ACTION RESULT 5. Click the Next button. The User Registration, Step 2 page is displayed. Note: To display the User Registration, Step 1 page, click the Previous button. 6. Click the open icon in the Security Question 1 field: The Security Question 1 menu is displayed. 7. Select an alternate question or keep the existing question. The question is displayed in the field. 8. Enter the answer to the question in the Answer 1 field. The information is displayed in the field. 9. Click the open icon in the Security Question 2 field: The Security Question 2 menu is displayed. 10. Select an alternate question or keep the existing question. The question is displayed in the field. 11. Enter the answer to the question in the Answer 2 field. The information is displayed in the field. 12. Click the open icon in the Security Question 3 field: The Security Question 3 menu is displayed. STEP ACTION RESULT 13. Select an alternate question or keep the existing question. The question is displayed in the field. 14. Enter the answer to the question in the Answer 3 field. The information is displayed in the field. 15. In available field in the Security Image, enter the characters displayed. The information is displayed in the field. Note: A space is required between the two sets of characters. If the characters are not legible enough, click the Reload CAPTCHA link. A different set of characters is displayed. 16. Click the Next button. Note: To display the User Registration, Step 2 page, click the Previous button. The User Registration, Step 3 page is displayed. STEP ACTION RESULT 17. Enter the new user contact information in the empty fields. The information is displayed in the appropriate fields. Note: The asterisk next to the field name indicates that the field is mandatory. 18. Click the open icon in the Country field. The country menu is displayed. 19. Select the appropriate country. The selected country is display. 20. Click the Finish button. The registration process is finalized and the confirmation page is displayed. Note: The administrator must approve the user before Present and Pay can be accessed. The user is notified via an email message that the user account has been approved (or rejected). 5.3 Change User Status (Includes Approve) The administrator can change a user’s status to Active, Inactive, Locked, or Unlocked. If the status is changed to Inactive, the user cannot log in until the administrator manually changes the status to Active. If an Active user attempts to log in more than six times with an incorrect password, the system prevents further login attempts and the user is locked. The user can be unlocked by resetting the password or done manually by the administrator. STEP ACTION RESULT STEP ACTION RESULT 1. From any Present and Pay page, click the Administration link. The Administration menu is displayed. . 2. Click the User Maintenance option link. The User Maintenance page is displayed with all users listed. 3. For the appropriate user, click the Edit link. The Edit User, Step 1 window is displayed. Use the search to find the specific user. See the Search List section for search instructions 4. Click on the checkbox to change a user status. When a status is selected, it is indicated by a check box. STEP ACTION RESULT 5. Click the Update User button. The user information is updated, the Edit User window is closed, and a confirmation message is displayed in the user list. 5.4 Reset User Password A payer administrator can reset a user’s password. STEP ACTION RESULT 1. From any Present and Pay page, click the Administration link. The Administration menu is displayed. . 2. Click the User Maintenance option link. The User Maintenance page is displayed with all users listed. STEP ACTION RESULT 3. For the appropriate user, click the Edit link. The Edit User window is displayed. Note: Use the search to find the specific user. See the Search List section for search instructions. 4. Click the Reset Password button. The user is sent a message via email stating that the password is forgotten. The email also has a link to the password change in Present and Pay. Change name 5. The user creates a new password. A new password is created. 5.5 View User Profile The profile of the currently logged in user can be viewed. STEP ACTION RESULT 1. Click the Payer Admin link (upper right-hand side of the page). The Payer Admin menu is displayed. . STEP ACTION RESULT 2. Click the User Profile link. The profile of the current user is displayed. 3. Click the View link in the Entitlement column. The User Entitlements Window is displayed. 4. Click the Close icon. The User Entitlements window is closed. 5.6 Edit User Information Existing user information can be changed. STEP ACTION RESULT 1. From any Present and Pay page, click the Administration link. The Administration menu is displayed. . STEP ACTION RESULT 2. Click the User Maintenance option link. The User Maintenance page is displayed with all users listed. 3. For the appropriate user, click the Edit link. The Edit User, Step 1 window is displayed. Use the search to find the specific user. See the Search List section for search instructions 4. Review and edit the appropriate user detail fields as necessary. The updated information is displayed in the edited fields. 5. Click the Next button. The Edit User, Step 2 window is displayed. 6. Review and edit the User Entitlements as necessary. The User Entitlements are updated. STEP ACTION RESULT 7. Click the Update User button. The user information is updated, the Edit User window is closed, and a confirmation message is displayed in the user list. 6.0 Manage Invoices & Non-Invoice Payments The payer administrator is responsible for managing invoices and non-invoice payments. This includes the following functions: View Detail Approve Add Non-Invoice Deduction Download to .xls Add Attachment View Attachment(s) Export to PDF These functions are available through the invoice list page (home page). Invoice and Non-Invoice Payment Statuses: Status Description Unapproved Assigned as soon as invoice or non-invoice payment is loaded. Approved The payer analyst or administrator reviews the invoice and approves it if it is valid. Once approved, a payment can be initiated. There are also invoices that are automatically approved. When a payment is returned, the invoice or non-invoice payment is given this status for review and repayment. Initiated Assigned by system as soon as payment is scheduled. The payment can be cancelled up to 3:00PM on the day it is scheduled to be paid. Partially Paid Assigned by system when the partial amount is paid and past the cutoff time on the scheduled date. Paid Assigned by system when the payment is past the cutoff time on the scheduled date. Paid by other Assigned manually by biller admin Pending Assigned manually by biller admin 6.1 View Detail A detailed view of the invoice or non-invoice payment is available. STEP ACTION RESULT STEP ACTION RESULT 1. If the invoice list is not already displayed, click the Home page icon or link. The home page (Invoices page) is displayed with the list of all invoices, regardless of status. Note: This list includes all items including Non-invoice payments and Pre Invoices. 2. Search for the invoice or non-invoice payment to be displayed. The results of the search are displayed. Note: See the Search List section for search instructions. 3. Click the invoice (document) number link. The invoice detail is displayed. Non-Invoice Payment detail. STEP ACTION RESULT 4. Click the Home icon or link. The list of invoices or non-invoice payment is displayed. 6.2 Approve This is the process of reviewing and approving invoices or non-invoice payments. STEP ACTION RESULT 1. If the invoice list is not already displayed, click the Home page icon or link. The home page (Invoices page) is displayed with the list of all invoices, regardless of status. Note: This list includes all items including Non Invoices payments and Pre Invoices. 2. Search for invoices or non-invoice payments with a status of Unapproved. Note: See the Search List section for search instructions. All invoices or non-invoice payments with a status of Unapproved are displayed. STEP ACTION RESULT 3. If necessary, search for the list of invoices or non-invoice payments to be approved in this session. The list of specific invoices or non-invoice payments to be approved is displayed. 4. Click the Document Number of the individual invoice or non-invoice payment to be reviewed for approval. The invoice detail is displayed. Non-Invoice Payment detail. 5. Review the invoice or non-invoice payment to determine if it can be approved. The invoice or non-invoice payment is determined to be approvable. Note: A dispute can be added to the invoice if necessary. See the Manage Disputes section for instructions. 6. Click the Home icon or link. The invoice list is displayed. Note: The list maintains its search results. STEP ACTION RESULT 7. If the invoice or non-invoice payment is valid, select it by clicking the checkbox. The invoice or non-invoice payment is selected. A selected invoice is highlighted in yellow and the checkbox contains a check mark. 8. Repeat steps 4 through 7 to review additional invoices. Additional invoices or non-invoice payments are selected for approval. Note: Up to 10 invoices or non-invoice payments can be selected. 9. Click the Approve icon. The Approve window is displayed with the selected invoices or non-invoice payments. 10. Click the open menu icon in Select Status field. The Status menu is displayed. STEP ACTION RESULT 11. Select the Approved status. The status is displayed in the field. 12. Click the Save button. The status change confirmation popup is displayed. 13. Click the OK button. The status of the invoice(s) or non-invoice payment(s) is changed to Approved and a confirmation window is displayed. 14 Close the close window icon. The Approve window is closed and the approved invoices or non-invoice payments are no longer displayed in the unapproved invoice list. STEP ACTION RESULT 15. When all the invoices in the session have been approved and the status requires review, search for invoices and non-invoice payments with a status of approved. The search results are displayed in the invoice list. 6.3 Download to XLS File Invoices or non-invoice payments can be downloaded to an .xls file. To open the downloaded file, a spreadsheet application that can open an .xls is required on the destination workstation. STEP ACTION RESULT 1. If the invoice list is not already displayed, click the Home page icon or link. The home page (Invoices page) is displayed with the list of all invoices, regardless of status. Note: This list includes all items including Non Invoices payments and Pre Invoices. 2. Use the search function to display to invoice(s) or non-invoice payment(s) to be downloaded. Note: See the Search List section for search instructions. The search results are displayed in the invoice list. STEP ACTION RESULT 3. If the invoice or non-invoice payments is to be downloaded, select it by clicking the checkbox. The invoice or non-invoice payment is selected. A selected invoice is highlighted in yellow and the checkbox contains a check mark. 4. Repeat Step 3 to select additional invoices or non-invoice payments. Additional invoices or non-invoice payments are selected for downloading. 3. Click the Download icon. The browser displays a prompt to open or save the file. 4. Click the Open button The spreadsheet application is started and the downloaded file is opened. 5. If required, save the file to a network or a local workstation. The file is saved. 6.4 Add Attachment Files can be attached to an invoice. STEP ACTION RESULT 1. If the invoice list is not already displayed, click the Home page icon or link. The home page (Invoices page) is displayed with the list of all invoices, regardless of status. Note: This list includes all items including Non Invoices payments and Pre Invoices. 2. Use the search function to display the invoice or non-invoice payment that will receive the attachment. The search results are displayed in the invoice list. Note: See the Search List section for search instructions. 3. If the invoice or non-invoice payment is to receive an attachment, select it by clicking the checkbox. The invoice or non-invoice payment is selected. A selected invoice or non-invoice payment is highlighted in yellow and the checkbox contains a check mark. STEP ACTION RESULT 4. Click the Attachments logo. The Attachments window is displayed. 5. Click the open menu icon in Select Type field. The attachments menu is displayed. 6. Select attachment type. The selected type is displayed in the field. 7. Click the Browse button. The Choose File to Upload window is displayed. STEP ACTION RESULT 8. Navigate to the folder where the file is located. The folder is opened and the list of files is displayed. 9. Click the file to be attached. The file is selected. Note: Only .jpeg, .jpg, .png. .pdf, .msg file types are accepted. 10. Click the Open button. The Windows Explorer window is closed and the file name is displayed in the browse field. Note: The field can be cleared by clicking the cancel icon. 11. Click the Add button. The file is attached to the invoice or non-invoice payment, added to the list of attachments in the Attachments window, and a confirmation message is displayed in the window. STEP ACTION RESULT 12. Repeat steps 5 through 11 to attach additional files to the Invoice. The files are attached to the invoice or noninvoice payment. 13. Click the close icon The Attachments window is closed and an Attachments icon is displayed next to the invoice. 6.5 View Attachment(s) Once attached, an attachment can be viewed. STEP ACTION RESULT 1. If the invoice list is not already displayed, click the Home page icon or link. The home page (Invoices page) is displayed with the list of all invoices, regardless of status. Note: This list includes all items including Non Invoices payments and Pre Invoices. 2. Use the search function to display the invoice or non-invoice payment with the attachment(s) to view. The search results are displayed in the invoice list. Note: See the Search List section for search instructions. Invoices or non-invoice payment with attachments are indicated with the Attachments icon. STEP ACTION RESULT 3. Click the Attachments icon. The Attachments window is displayed. 4. Click the attachment link to display. The browser displays a prompt to open or save the file. 5. Click the Open button Depending on the file format, the attachment is opened with the appropriate software application. 6. If required, save the file to a network or a local workstation. The file is saved. 6.6 Delete Attachment(s) Attachments can be deleted from invoices and non-invoice payments. STEP ACTION RESULT 1. If the invoice list is not already displayed, click the Home page icon or link. The home page (Invoices page) is displayed with the list of all invoices, regardless of status. Note: This list includes all items including Non Invoices payments and Pre Invoices. STEP ACTION RESULT 2. Use the search function to display the pre invoice with the attachment(s) to view. The search results are displayed in the invoice list. Note: See the Search List section for search instructions. Invoices with attachments are indicated with the Attachments icon. 3. Click the Attachments icon. The Attachments window is displayed. 4. Click the Delete link for the appropriate attachment. The delete attachment confirmation popup is displayed. STEP ACTION RESULT 5. Click the OK button. The attachment is deleted and removed from the attachment list and a confirmation message is displayed. 6. Click the close window icon. The Attachments window is closed and list of invoices is displayed. 6.7 Export to PDF An invoice or non-invoice payment can be exported to a PDF file. STEP ACTION RESULT 1. If the invoice list is not already displayed, click the Home page icon or link. The home page (Invoices page) is displayed with the list of all invoices, regardless of status. Note: This list includes all items including Non Invoices payments and Pre Invoices. STEP ACTION RESULT 2. Use the search function to display the invoice or non-invoice payment to be exported to a PDF. The search results are displayed in the invoice list. Note: See the Search List section for search instructions. 3. If the invoice or non-invoice payment is to be exported, select it by clicking the checkbox. The invoice or non-invoice payment is selected. A selected invoice or non-invoice payment is highlighted in yellow and the checkbox contains a check mark. 4. Click the Export To PDF icon. The browser displays a prompt to open or save the file. 5. Click the Open button The invoice or non-invoice payment is displayed as a PDF in a separate browser window. STEP ACTION RESULT 6. If required, save the file to a network or a local workstation. The file is saved. 7.0 Manage Pre Invoices The payer administrator is responsible for managing pre invoices. This includes the following functions: View Detail Download to .xls Add Attachment View Attachment(s) Delete Attachment(s) Export to PDF These functions are available through the invoice list page (home page). Note: Once loaded, a pre invoice is available for 14 calendar days and expires on the following business day. 7.1 View Pre Invoice Detail A detailed view of the pre invoice is available. STEP ACTION RESULT 1. If the invoice list is not already displayed, click the Home page icon or link. The home page (Invoices page) is displayed with the list of all invoices, regardless of status. Note: This list includes all items including Non Invoices payments and Pre Invoices. 2. Search for the pre invoice to be displayed. Note: See the Search List section for search instructions. The results of the search are displayed. STEP ACTION RESULT 3. Click the pre invoice (document) number link. The pre invoice detail is displayed. 4. Click the Home icon or link. The list of invoices is displayed. 7.2 Download Pre Invoice(s) Pre invoices can be downloaded to an .xls file. To open the downloaded file, a spreadsheet application that can open an .xls is required on the destination workstation. STEP ACTION RESULT 1. If the invoice list is not already displayed, click the Home page icon or link. The home page (Invoices page) is displayed with the list of all invoices, regardless of status. Note: This list includes all items including Non Invoices payments and Pre Invoices. STEP ACTION RESULT 2. Use the search function to display to pre invoice(s) to be downloaded. The search results are displayed in the invoice list. Note: See the Search List section for search instructions. 3. If the pre invoice is to be downloaded, select it by clicking the checkbox. The pre invoice is selected. A selected pre invoice is highlighted in yellow and the checkbox contains a check mark. 4. Repeat Step 3 to select additional pre invoices payments. Additional pre invoices are selected for downloading. 3. Click the Download icon. The browser displays a prompt to open or save the file. STEP ACTION RESULT 4. Click the Open button The spreadsheet application is started and the downloaded file is opened. 5. If required, save the file to a network or a local workstation. The file is saved. 7.3 Add Attachment to Pre Invoice Files can be attached to a pre invoice. STEP ACTION RESULT 1. If the invoice list is not already displayed, click the Home page icon or link. The home page (Invoices page) is displayed with the list of all invoices, regardless of status. Note: This list includes all items including Non Invoices payments and Pre Invoices. 2. Use the search function to display the pre invoice that will receive the attachment. Note: See the Search List section for search instructions. The search results are displayed in the pre invoice list. STEP ACTION RESULT 3. If the pre invoice is to receive an attachment, select it by clicking the checkbox. The pre invoice is selected. A selected pre invoice highlighted in yellow and the checkbox contains a check mark. 4. Click the Attachments logo. The Attachments window is displayed. 5. Click the open menu icon in Select Type field. The attachments menu is displayed. 6. Select attachment type. The selected type is displayed in the field. STEP ACTION RESULT 7. Click the Browse button. The Choose File to Upload window is displayed. 8. Navigate to the folder where the file is located. The folder is opened and the list of files is displayed. 9. Click the file to be attached. The file is selected. Note: Only .jpeg, .jpg, .png. .pdf, .msg file types are accepted. 10. Click the Open button. The Windows Explorer window is closed and the file name is displayed in the browse field. Note: The field can be cleared by clicking the cancel icon. STEP ACTION RESULT 11. Click the Add button. The file is attached to the pre invoice, added to the list of attachments in the Attachments window, and a confirmation message is displayed in the window. 12. Repeat steps 5 through 11 to attach additional files to the Invoice. The files are attached to the pre invoice. 13. Click the close icon The Attachments window is closed and an Attachments icon is displayed next to the invoice. 7.4 View Pre Invoice Attachment(s) Once associated with a pre invoice, an attachment can be viewed. STEP ACTION RESULT 1. If the invoice list is not already displayed, click the Home page icon or link. The home page (Invoices page) is displayed with the list of all invoices, regardless of status. Note: This list includes all items including Non Invoices payments and Pre Invoices. STEP ACTION RESULT 2. Use the search function to display the pre invoice with the attachment(s) to view. The search results are displayed in the pre invoice list. Note: See the Search List section for search instructions. Invoices or non-invoice payments with attachments are indicated with the Attachments icon. 3. Click the Attachments icon. The Attachments window is displayed. 4. Click the attachment link to display. The browser displays a prompt to open or save the file. STEP ACTION RESULT 5. Click the Open button Depending on the file format, the attachment is opened with the appropriate software application. 6. If required, save the file to a network or a local workstation. The file is saved. 7.5 Delete Pre Invoice Attachment(s) Attachments can be deleted from pre invoices. 1. If the invoice list is not already displayed, click the Home page icon or link. The home page (Invoices page) is displayed with the list of all invoices, regardless of status. Note: This list includes all items including Non Invoices payments and Pre Invoices. 2. Use the search function to display the pre invoice with the attachment(s) to delete. The search results are displayed in the pre invoice list. Note: See the Search List section for search instructions. Invoices with attachments are indicated with the Attachments icon. 3. Click the Attachments icon. The Attachments window is displayed. 4. Click the Delete link for the appropriate attachment. The delete attachment confirmation popup is displayed. 5. Click the OK button. The attachment is deleted and removed from the attachment list and a confirmation message is displayed. 6. Click the close window icon. The Attachments window is closed and list of invoices is displayed. 7.6 Export Pre Invoice to PDF A pre invoice can be exported to a PDF file. STEP ACTION RESULT 1. If the invoice list is not already displayed, click the Home page icon or link. The home page (Invoices page) is displayed with the list of all invoices, regardless of status. Note: This list includes all items including Non Invoices payments and Pre Invoices. STEP ACTION RESULT 2. Use the search function to display the pre invoice to be exported to a PDF. The search results are displayed in the pre invoice list. Note: See the Search List section for search instructions. 3. If the pre invoice is to be exported, select it by clicking the checkbox. The pre invoice is selected. A selected pre invoice is highlighted in yellow and the checkbox contains a check mark. (Can you select/export multiple?) 4. Click the Export To PDF icon. The browser displays a prompt to open or save the file. 5. Click the Open button The pre invoice is displayed as a PDF in a separate browser window. STEP ACTION RESULT 6. If required, save the file to a network or a local workstation. The file is saved. 8.0 Manage Payments The payer administrator is responsible for managing invoices and non-invoice payments. This includes the following functions: Create New Non-voice Deduction Create New Payment Account Make Payment Cancel Payment Create New Automatic Payment View Payment Profile View Payment History Payment Statuses: Payment Status Description Corresponding Invoice Status Initiated When the invoice is scheduled for payment. Initiated Paid Status is changed after the cutoff time on the scheduled date Paid / Partially Paid Returned When there is a ACH return for the transaction Approved Cancel When the transaction is cancelled by the user. Approved/Pending 8.1 Create New Non-Invoice Deduction Before an invoice or non-invoice is paid, a non-invoice deduction can be applied to it. These deductions are assigned to individual customers before invoices are paid. STEP ACTION RESULT 1. If the invoice list is not already displayed, click the Home page icon or link. The home page (Invoices page) is displayed with the list of all invoices, regardless of status. Note: This list includes all items including Non Invoices payments and Pre Invoices. STEP ACTION RESULT 2. Click the Non-Invoice Deduction icon. The Non-Invoice Deduction window is displayed. 3. Click the open icon in the Customer field. The Customer menu is displayed. 4. Select the appropriate customer for the noninvoice deduction. The customer is displayed in the field. STEP ACTION RESULT 5. Click the open icon in the Reason field. The Reason menu is displayed. The list below is an example. 6. Select the appropriate reason for the noninvoice deduction. The reason is displayed in the field. 7. Enter amount in Disputed Amount field. The amount is displayed in the field. STEP ACTION RESULT 8. Enter a description in the Description field. The description is displayed in the field. 9. Click the Save button. The non-invoice deduction is created and a confirmation message is displayed. Note: An attachment can now be added to the non-invoice deduction. Click the Attachments button. See the Add Attachment to Invoice (Steps 4 through 11) section for instructions. 10. Click the close icon. The close window popup is displayed. STEP ACTION RESULT 11. Click the OK button. The window is closed and the home page is displayed. 8.2 Create New Payment Account A new payment accounts can be created prior to paying an invoice or non-invoice payment. The payment account is associated with an individual customer. STEP ACTION RESULT 1. Click the Payer Admin link. The Payer Admin menu is displayed. 2. Select the Automatic Payment Setup option. The Automatic Payment Setup page is displayed. STEP ACTION RESULT 3. Search for the appropriate customer. The customer list is displayed again with the search applied. Note: See the Search List section for search instructions. 4. Click the Edit link for the appropriate customer. The automatic payment setup is displayed for the selected customer. 5. Click the Use a new account link. The Payment Account window is displayed. 6. Enter the bank name in the Bank Name field. The bank name is displayed in the field. Note: If the account is going to be used more than once, leave the Save Account selected. STEP ACTION RESULT 7. Enter the account billing information in the Billing Info fields. The information is displayed in the fields. Change name 8. Enter the account contact information in the Contact Info field. The information is displayed in the fields. Change email 9. Enter account information in the appropriate fields. 10. Click the open icon in the Account Type field. The account type menu is displayed. 11. Select the appropriate account type. The selection is displayed in the field. STEP ACTION RESULT 12. Enter the address information in the Address Info field. Click the open icons to display the menu options. The information is displayed in the fields. Click the open 13. Click the Save button. The bank account is added to the customer’s accounts and a confirmation message is displayed. Phone and email should match Step8 14 Click the close icon. The close window popup is displayed. 15. Click the OK button. The window is closed and the automatic payment setup is displayed for the selected customer. 8.3 Delete Payment Account Payment accounts can be deleted. WARNING! The payment account will be deleted permanently. STEP ACTION RESULT 1. Click the Payer Admin link. The Payer Admin menu is displayed. 2. Select the Payment Profile option. The Payment Profile page is displayed. 3. Search for the appropriate account. The account profile list is displayed again with the search applied. Note: See the Search List section for search instructions. 4. Click the Delete link. The delete confirmation popup is displayed. STEP ACTION RESULT 5. Click the OK button. The payment account profile is deleted and a confirmation message is displayed. 8.4 Make Payment Only invoices and non-invoice payments with a status of approved can be paid. STEP ACTION RESULT 1. If the invoice list is not already displayed, click the Home page icon or link. The home page (Invoices page) is displayed with the list of all invoices, regardless of status. Note: This list includes all items including Non Invoices payments and Pre Invoices. 2. Search for invoices or non-invoice payments with a status of approved or use other search methods to find the invoice(s) to be paid. Note: See the Search List section for search instructions. All invoices or non-invoice payments with a status of Approved are displayed. STEP ACTION RESULT 3. Click the checkbox of the invoice or noninvoice payment to be paid. The invoice or non-invoice payment is selected. A selected item is highlighted in yellow and the checkbox contains a check mark. Note: Multiple invoices or non-invoice payments can be selected but only if the invoice is from the same company. 4. Click the Pay Invoice icon. The invoice(s) Details, Step 1 page is displayed. 5. Review the invoice or non-invoice payment for accuracy. If it doesn’t require a noninvoice deduction or a dispute, skip to Step 13. If the payment amount was changed and a dispute created (after clicking the OK button in the Create Dispute popup), the Create Dispute window is displayed. Note: If the amount must be changed, enter the new amount. See the Add Dispute to Invoice (Short Pay & Overpay) section for instructions on creating a dispute. STEP ACTION RESULT 6. If the payment date needs to be changed, click inside the Payment date field. The calendar is displayed. 7. Click the date to make the payment. The new payment date is displayed in the field. Note: If necessary, use the calendar controls to future months. Only one future month can be displayed. 8. To add a non-invoice deduction, click the Add non-invoice deductions button. Note: This function applies an existing non-invoice deduction to the invoice or noninvoice payment. The Non-Invoice Deductions window is displayed. STEP ACTION RESULT 9. Select the non-invoice deduction to be added to the invoice by clicking the checkbox. The non-invoice deduction is selected. A selected non-invoice deduction is highlighted in yellow and the checkbox contains a check mark. 10. Click the Select Disputes button The confirmation popup is displayed. 11. Click the OK button. The popup is closed and the non-invoice deduction is added to the invoice. The amount to be paid is changed accordingly. Note: If the non-invoice deduction was added in error. Close the page and restart the payment process. 12. To add additional non-invoice deductions, repeat steps 9 through 11. Additional non-invoice deductions are added to the invoice. STEP ACTION RESULT 13. Click the Next button. The Payment Method, Step 2 page is displayed. 14. Click on the agreement checkbox The checkbox is checked indicating that the agreement is accepted. 15. Click the Next button. The Account Info, Step 3 page is displayed. Note: To display the Details, Step 1 page, click the Previous button. 16. Click the open icon in the Payment Account field. The Payment Account menu is displayed. STEP ACTION RESULT 17. Select the appropriate account for the payment. The selected account is displayed in the field. Note: To make the payment with a new account, click the Use a new account link. See the Create New Payment Account section for instructions. 18. Click the Next button. The Confirmation, Step 4 page is displayed. Note: To display the Payment Method, Step 2 page, click the Previous button. 19. Review the information. If the payment is accurate, click the Pay button. Note: To display the Account Info, Step 3 page, click the Previous button. The confirmation popup is displayed. STEP ACTION RESULT 20. Click the OK button. The payment is scheduled to be made after 3PM EST. On weekends or holidays will be processed on the next available business day. The Payment Receipt page is displayed. The status of the invoice is changed to Initiated. A payment can be cancelled when its status is Initiated. When the payment is processed its status is change to Paid and it cannot be cancelled. Note: A transaction identification number is issue. This number can be used to search the payment history. 21. Click the close icon. A confirmation popup is displayed. 22. Click the OK button. The window is closed and the list of approved invoices or non-invoice payments is displayed. 8.5 Cancel Payment A payment can only be cancelled when its status is Initiated. STEP ACTION RESULT 1. Click the History link. The History menu is displayed. 2. Select the Payment History option. The Payment History page is displayed. 3. Use the search function to display the payment to be cancelled. The search results are displayed in the payment list. Note: See the Search List section for search instructions. 4. Click the Transaction ID link for the payment. The payment detail window is displayed. STEP ACTION RESULT 5. Click the Cancel Payment button. The cancel payment confirmation popup is displayed. 6. Click the OK button. The payment is cancelled and a confirmation message is displayed. The status of the invoice is changed to Approved. The status of the payment is changed to Cancelled. 7. Click the close icon. A confirmation popup is displayed. 8. Click the OK button. The window is closed and the list of approved invoices is displayed. 8.6 Create New Automatic Payment Payments for an individual customer can be made automatically on the invoice due date once they are approved. STEP ACTION RESULT STEP ACTION RESULT 1. Click the Payer Admin link. The Payer Admin menu is displayed. 2. Select the Automatic Payment Setup option. The Automatic Payment Setup page is displayed. 3. Search for the appropriate customer. The customer list is displayed again with the search applied. Note: See the Search List section for search instructions. 4. Click the Edit link for the appropriate customer. The automatic payment setup is displayed for the selected customer. 5. Click the open icon in the Payment Account field. The Payment Account menu is displayed. STEP ACTION RESULT 6. Select the payment account from which the invoices will be paid. The account number is displayed in the field. Note: To create a new payment, click the Use a new account link. See the Create New Payment Account section for instructions. 7. Click the checkbox in the Active field. A checkmark is displayed in the checkbox and the automatic payment will be active when it’s saved. Note: The automatic schedule can be stopped by clicking the checkbox to remove the checkmark. 8. Click the Save button. The automatic payment setup is saved and a confirmation message is displayed. 9. Click the Close button. The automatic payment setup is closed and the customer list is displayed. 8.7 View Payment Profile Payment accounts can be viewed as a list of payment profiles. STEP ACTION RESULT STEP ACTION RESULT 1. Click the Payer Admin link. The Payer Admin menu is displayed. 2. Select the Payment Profile option. The Payment Profile page is displayed. 3. Search for the appropriate account. The account profile list is displayed again with the search applied. Note: See the Search List section for search instructions. 8.8 View Payment History & Details Past payments can be viewed as a list and a detailed view of individual payments. STEP ACTION RESULT 1. Click the History link. The History menu is displayed. 2. Select the Payment History option. The Payment History page is displayed. STEP ACTION RESULT 3. Use the search function to display the payment whose details will be displayed. The search results are displayed in the payment list. Note: See the Search List section for search instructions. Note: The payment list can be downloaded to an .xls file. See the Download Dispute History section for instructions. 4. Click the Transaction ID link. The Payment Details window is displayed. 5. Click the close icon. A confirmation popup is displayed. 6. Click the OK button. The window is closed and the list of payments from the results of the search is displayed. 9.0 Manage Payment History Report A payment history report is available. To manage this report, the following functions are available: Search Export Refresh The report display can be changed by entering a specific page number or clicking the forward and back icons. The report text size can be changed by clicking the open menu icon and selecting a different text size. To print a report, export it to a file format that allows for printing, for example, PDF. 9.1 View Report Six months of transactions is automatically displayed. STEP ACTION RESULT 1. Click the Reports link. The Reports menu is displayed. STEP ACTION RESULT 2. Select the Payment History Report option. The Payment History Report page is displayed. 9.2 Search Report To display a specific payment transaction, there is a search function based on transaction date, schedule date, invoice number, and transaction status. STEP ACTION RESULT 1. Click the Reports link. The Reports menu is displayed. 2. Select the Payment History Report option. The Payment History Report page is displayed. STEP ACTION RESULT 3. Click the calendar icon in the Transaction Date From The calendar is displayed. Note: All dates can be selected by clicking the All checkbox. 4. Display the appropriate month and year by click the forward and back icons. The changed month is displayed. 5. Click on the appropriate date within the month. The new date is selected and displayed in the field. 6. Repeat steps 3 through 5 to enter the other date search ranges. The fields are changed appropriately. STEP ACTION RESULT 7. Click the open icon in the Transaction Status field. The search payment status menu is displayed. 8. Select the appropriate payment status. The new status is displayed in the field. 9. Click the Search button. The report is searched for the payment transactions that match the search information and the found transactions are displayed on the page. 9.3 Export Report The report can be exported to the following file formats: XML CSV (comma delimited) PDF MHTML (web archive) XLS (Excel) TIFF DOC (Word) STEP ACTION RESULT STEP ACTION RESULT 1. Click the Reports link. The Reports menu is displayed. 2. Select the Payment History Report option. The Payment History Report page is displayed. 3. Use the search functions to display the appropriate payment transactions. The found transactions are displayed. Note: See the Search Report section for search instructions. 4. Click the Export icon. The export menu is displayed. STEP ACTION RESULT 5. Select the file format for the export. The browser displays a prompt to open or save the file. 6. Click the Open button The report is opened with the appropriate software. In this example, a PDF. 7. The file can be saved on a network or the local workstation. The file can also be printed, as well. The file is saved or printed. 10.0 Manage Disputes The payer administrator is responsible for managing disputes. This includes the following functions. Add Dispute to Invoice Add Dispute to Invoice Line Items View Dispute History & Details Download Dispute History Edit Dispute View Dispute Audits Disputes can be added to the entire invoice and to individual line items within an invoice. 10.1 Add Dispute to Invoice Disputes must be associated with an invoiced with a status of Unapproved. Note: A dispute can also be added during the payment process. See the Make Payment section, Step 5, for instructions. STEP ACTION RESULT 1. If the invoice list is not already displayed, click the Home page icon or link. The home page (Invoices page) is displayed with the list of all invoices, regardless of status. Note: This list includes all items including Non Invoices payments and Pre Invoices. 2. Search for Invoices with a status of Unapproved or use other search methods to find the invoice(s) to be paid. Note: See the Search List section for search instructions. All invoices with a status of Unapproved are displayed. STEP ACTION RESULT 3. Click the checkbox of the invoice to be paid. The invoice is selected. A selected invoice is highlighted in yellow and the checkbox contains a check mark. 4. Click the Dispute icon. The Create Dispute window is displayed. STEP ACTION RESULT 5. Click the open icon in the Reason field. The Reason menu is displayed. This menu is an example. 6. Select the appropriate reason for the noninvoice deduction. The reason is displayed in the field. 7. Enter amount in Disputed Amount field. The amount is displayed in the field. STEP ACTION RESULT 8. Enter a description in the Description field. The description is displayed in the field. 9. Click the Submit button. The dispute is created and a confirmation message is displayed. Note: An attachment can be added to the dispute. See the Add Attachment to Invoice section, starting at Step 4, for instructions. 10. Click the close icon. The close window popup is displayed. 11. Click the OK button. The window is closed and the list of invoices is displayed. 10.2 Add Dispute to Invoice Line Item A dispute can be applied to a specific line item within an invoice. STEP ACTION RESULT 1. If the invoice list is not already displayed, click the Home page icon or link. The home page (Invoices page) is displayed with the list of all invoices, regardless of status. Note: This list includes all items including Non Invoices payments and Pre Invoices. 2. Search for Invoices with a status of Approved or use other search methods to find the invoice(s) where a line item dispute is to be added. All invoices with a status of Approved are displayed. Note: See the Search List section for search instructions. 3. Click the invoice (document) number link. The invoice detail is displayed. 4. Click on the line item where the dispute is to be added. The selected line item is highlighted in yellow. STEP ACTION RESULT 5. Click the Dispute icon. The Create Dispute window is displayed. 6. Click the open icon in the Reason field. The Reason menu is displayed. STEP ACTION RESULT 7. Select the appropriate reason for the noninvoice deduction. The reason is displayed in the field. 8. Enter amount in Disputed Amount field. The amount is displayed in the field. 9. Enter a description in the Description field. The description is displayed in the field. 10. Click the Submit button. The dispute is created and a confirmation message is displayed. Note: An attachment can be added to the dispute. See the Add Attachment to Invoice section, starting at Step 4, for instructions. 11. Click the close icon. The close window popup is displayed. STEP ACTION RESULT 12. Click the OK button. The window is closed and the invoice is displayed with the dispute icon in the Flags column for that line item. 10.3 View Dispute History & Details Disputes can be viewed as a list and a detailed view of individual disputes. STEP ACTION RESULT 1. Click the History link. The History menu is displayed. 2. Select the Dispute History option. The Dispute History page is displayed. 3. Use the search function to display the dispute whose details will be displayed. The search results are displayed in the dispute list. Note: See the Search List section for search instructions. STEP ACTION RESULT 4. Click the Dispute ID link. The Dispute Details window is displayed. 5. Click the close icon. A confirmation popup is displayed. 6. Click the OK button. The window is closed and the list of disputes from the results of the search is displayed. 10.4 Edit Dispute Disputes can be changed once they have been created and saved. STEP ACTION RESULT STEP ACTION RESULT 1. Click the History link. The History menu is displayed. 2. Select the Dispute History option. The Dispute History page is displayed. 3. Use the search function to display the dispute whose details will be displayed. The search results are displayed in the dispute list. Note: See the Search List section for search instructions. 4. Click the Dispute ID link. The Dispute Details window is displayed. STEP ACTION RESULT 5. Click the Change Dispute link. The Change Dispute window is displayed. 6. Click the open icon in the Status Change Reason field. The Status Change Reason menu is displayed. 7. Select the reason for the status change. The reason is displayed in the field. Note: The New Status and Priority fields only have one option and those options are displayed automatically. 8. Enter the notes for the status change. The notes are displayed in the field. STEP ACTION RESULT 9. Click the Update button. The dispute is changed and a confirmation message is displayed. Note: An attachment can be added to the dispute. See the Add Attachment to Invoice section, starting at Step 4, for instructions. 10. Click the close icon. A confirmation popup is displayed. (Add Note: the payment has already been scheduled, this will not cancel or make you lose your work…) Note: The payment has already been scheduled. This will not cancel the transaction or lead to loss of work. 11. Click the OK button. The window is closed and the list of disputes from the results of the search is displayed. 10.5 View Dispute Audits A list of changes (in chronological order) to the dispute can be displayed and downloaded. STEP ACTION RESULT STEP ACTION RESULT 1. Click the History link. The History menu is displayed. 2. Select the Dispute History option. The Dispute History page is displayed. 3. Use the search function to display the dispute whose details will be displayed. The search results are displayed in the dispute list. Note: See the Search List section for search instructions. 4. Click the Dispute ID link. The Dispute Details window is displayed. STEP ACTION RESULT 5. Click the Dispute Audits link. The Dispute Audits window is displayed. 6. Click the Download button. The browser displays a prompt to open or save the file. 7. Click the Open button The spreadsheet application is started and the downloaded file is opened. 8. If required, save the file to a network or a local workstation. The file is saved. 9. Click the close icon. The close window popup is displayed. 10. Click the OK button. The window is closed and the list of disputes from the results of the search.