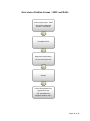
1
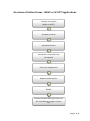
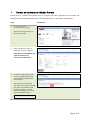
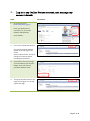
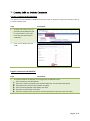
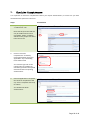
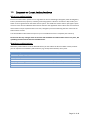
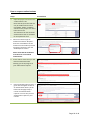
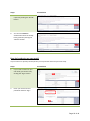
Online Forms
User Manual
0800 4 ETHICS
0800 634 758 (or +64 4 974 7675)
[email protected]
Version 1.0
October 2012
Page 1 of 46
1.
Create an account in Online Forms ..................................................................................... 4
2.
Log in to my Online Forms account, and manage my account details................................ 5
3.
Create, Edit or Delete Contacts ........................................................................................... 6
4.
Manage Project Categories ............................................................................................... 10
5.
Create a new project .......................................................................................................... 11
6.
Complete the form.............................................................................................................. 13
7.
Upload study documents ................................................................................................... 15
8.
Transfer a form to another user ......................................................................................... 17
9.
Check for Completeness .................................................................................................... 20
10.
Request or Grant Authorisations ....................................................................................... 21
11.
Submit a form ..................................................................................................................... 26
12.
Follow the progress of my submission and view correspondence from HDECs/SCOTT . 28
13.
Recall an application submitted for HDEC review ............................................................. 29
14.
Submit a response for a provisionally approved study ...................................................... 30
15.
Duplicate or Delete a Project ............................................................................................. 31
16.
Set up email notifications for a project ............................................................................... 32
17.
Create and submit a Minimal Dataset Form for a study approved before 1 July 2012 ..... 35
18.
Create and submit a Post Approval Form.......................................................................... 37
19.
Add a new locality .............................................................................................................. 40
Appendix ...................................................................................................................................... 42
Page 2 of 46
Overview of Online Forms – HDEC or SCOTT Applications
Create a new project
(HDEC or SCOTT)
Complete the form
Upload documents
Transfer form to another user
(if required)
Check for completeness
Request authorisations
Submit
Create and submit Post Approval Forms
(for amendments, progress reports,
etc.)
Page 3 of 46
1.
Online Forms is a website that enables users to complete and submit applications to the Health and
Disability Ethics Committees (HDECs) and the Standing Committee on Therapeutic Trials (SCOTT).
Steps
1.
Screenshots
Go to Online Forms
(www.ethicsform.org/nz).
Then click “Create Account” in
the main menu bar.
2.
Enter your details, choose a
password, and click “Register”.
Note that the email address you
enter here will be your
username in Online Forms.
3.
An email containing a web link
and an activation code will be
sent to the email address you
have entered.
Once you have received the
activation code, click on the web
link, enter the activation code,
and click “Submit”. The text
below should appear on screen.
Click as indicated to log in.
Page 4 of 46
2.
Steps
1.
Screenshots
Go to Online Forms
(www.ethicsform.org/nz).
Enter your Online Forms
username (i.e., your email
address) and password.
Click “Submit”.
2.
Your screen should look like this.
Your name and email address
appear at the top right of the
screen.
Click on “My Account” to view or
change your account details,
including your password.
3.
If you wish to save any changes
you have made to your account
details, enter your current
password and click “Save”.
4.
To log out of Online Forms at any
stage, click “Logout” on the top
right of the page.
Page 5 of 46
3.
Create a contact in the database
Your personal contact database is designed to help you if you are filling out many forms and often refer to
a contact multiple times.
Steps
1.
To add a new contact into your
personal contact database click
on “My Contacts” in the main
menu bar and choose option
“Add New”.
2.
Enter contact details and click
“Add”.
Screenshots
Import contacts from Outlook
Steps
1.
Screenshots
To import contacts from Outlook you must generate an Outlook.csv file:
Go to Contacts in your MS-Outlook.
Select File ->Import and Export from the Main Menu bar. A new window will appear.
Select Export to a File from that window. Click Next.
Select Comma Separated Values (DOS). Click Next.
Select the Contacts folder. Click Next.
Select the location where you wish to save the exported file. Click Next, then click Finish.
Page 6 of 46
Steps
2.
Screenshots
Click on “My Contacts” in the
main menu bar and choose
option “Import Contacts from
Outlook”.
Click the Browse button to find
and select the exported file from
MS-Outlook with contacts, click
Open and then click the Upload
File button
3.
To upload the entire list, click on
the “Select All” link to ensure
that all boxes are checked, and
click “Upload File”.
To upload selected contacts, use
the “Deselect All” link to uncheck
the boxes and check the boxes to
mark the contacts to save, then
click “Save selected contacts”.
Edit a contact
Steps
1.
Screenshots
To edit a contact click on “My
Contacts” in the main menu bar,
then click “View” on the contact
you wish to edit.
Page 7 of 46
Steps
2.
Screenshots
Click “Edit Details”.
Enter details and click “Update”
to save changes.
Delete a contact
Steps
Screenshots
To delete a contact click on “My
Contacts” in the main menu bar,
then click the “Delete” link by
the contact you wish to delete.
You will be asked to confirm the
deletion before the contact is
actually deleted from the
database. Select OK to continue.
Page 8 of 46
Populate contact details into a form
Steps
1.
Once a contact is in your contact
database you can quickly fill in
contact details in a form by
clicking on the “Add contact
details” icon in the form.
1.
This will open up your contacts
database.
Click on the contact you would
like to add into the form.
2.
This will open up the contact
details.
Screenshots
Click “Copy contact details into
the form”.
For instructions on how to
complete the form please refer
to section 6.
Page 9 of 46
4.
This section lists all the available categories you can store your projects in. This is similar to directories in a
computer filing system.
Steps
1.
Under “My Projects” click on
“Manage Categories”.
2.
You will see a default folder
called “New Projects” where
your projects will be stored.
Screenshots
To add a new folder, click on
“Add Category”.
3.
To name the new folder you
have added click “Edit”.
You can delete a folder by
clicking “Delete” but only if you
do not have any projects stored
in it.
4.
To move a project into a new
folder, expand the folder the
project is stored in, by clicking
“+” and tick the project(s) you
would like to move.
Then select the folder you want
to move the project into, from
the dropdown list at the bottom
of the screen, and click “Go”.
Page 10 of 46
5.
A project consists of:
one main form (which can be an HDEC form, a SCOTT form, or a Minimal Dataset Form), and
any number of post-approval forms.
Steps
1.
Screenshots
Go to “My Projects” in the main
menu, and select “Create New
Project”.
Or, if you are already in the My
Projects screen, simply click the
“Create New Project” button.
2.
A new project titled “Not named
yet” will appear.
3.
A project has two levels of tabs –
the project-level tabs and the
form-level tabs.
The four project-level tabs allow
you to control the project as a
whole and will only be visible
when “My Project” is selected in
the project tree at the left of the
screen.
The “Project Filter”
determines the type of form
(HDEC, SCOTT or MDF).
The “Transfer” tab is used to
permanently transfer a
project to another user
(refer to section 8).
In the “Manage” tab you can duplicate or delete
a project (refer to section 15).
In “Email Notifications” you can nominate who
you wish to be included in email notifications
from HDECs or SCOTT (refer to section 16).
Page 11 of 46
Steps
4.
Screenshots
The six form-level tabs relate just
to the main form, not to the
project as a whole and will only
be visible when the form type
(i.e. HDEC, SCOTT or MDF) is
selected in the project tree at
the left of the screen.
The “Navigate” tab contains
the form (refer to section 6).
The “Documents” tab allows
you to attach relevant
documents to your form
(refer to section 7).
The “Transfer” tab is used to
temporarily transfer the
form to another user (refer
to section 8).
In the “Authorisation” tab
you can request electronic
signatures from the CI,
sponsor etc. (refer to
section 10).
In the “e-submission tab” you can check your
application is complete prior to submission (refer
to section 9), submit for review (refer to section
11) and monitor the progress of your submission
(refer to section 12).
The “Post-approval” tab allows you to create Post
approval forms to submit amendments, progress
reports etc. (refer to section 18).
Page 12 of 46
6.
How to complete a form
The “Navigate” tab is available on all forms (HDEC, SCOTT, MDF and PAF). It allows you to navigate
through the form either by question number or page number. Inactive questions are shaded blue and
cannot be clicked on. Active questions have a white background and clicking on them will take you
directly to those questions in the form. Certain questions are activated or deactivated depending on your
answers to the questions in the form, so not all 88 pages of the form will be active. The form does not
need to be completed in one session, as the system will save your progress every time you finish a page.
For guidance on the HDEC form screening questions please refer to the Appendix (on page 42).
Steps
1.
Screenshots
To fill out the form – open the
project and go to the “Navigate”
tab.
Click here to begin
completing/reviewing the form
or click on the question number
for a specific section.
2.
This will open up the form.
To return to the view above click
on the “Navigate” icon.
To move through the form, click
on the previous and next arrows,
or on the page numbers in the
centre of the screen.
To print a PDF copy of your form,
click “Print Draft”.
To mark a page as incomplete,
click “Incomplete”.
Page 13 of 46
Full vs. Expedited Review
The one HDEC form is used for all applications, regardless of review type (full/expedited). The answers
you provide in the screening questions will determine whether the application will be reviewed via the full
or expedited pathway. Page 10 of the form states the review pathway your application will be assigned to.
An application assigned to the full review pathway is reviewed at an HDEC committee meeting. The
committee has 35 calendar days from the close of agenda to review the application and make a final
decision. This timeframe may be suspended once for up to 90 calendar days when the committee requires
additional information in order to make a final decision.
An application assigned to the expedited review pathway is reviewed by a subcommittee comprised of
the Chair and up to two other members. This does not involve a physical meeting of the committee. A
final decision must be made within 15 calendar days. This timeframe may be suspended once for up to 90
calendar days when additional information is required in order to make a final decision.
My application is out of scope
If, after answering the screening questions, you are confident that your study does not require HDEC
review then please approach the research office at your university or DHB to discuss your study and the
internal ethical review process.
If you are unsure of why your study is out of the scope of HDEC review, or if you require formal
acknowledgment of this, then you are welcome to continue completing the questions in the form, by
clicking “Next”, and then submit your application.
Page 14 of 46
7.
How to upload study documents
Online Forms allows you to attach study documents (such as protocols, investigator’s brochures, and
participant information sheets) to your application for HDEC or SCOTT review. Mandatory documents
must be uploaded before you can submit the form to the review body.
Steps
1.
Screenshots
Open the project and click on the
“Documents” tab.
Note that this form-level tab will
only be visible when the form
type (HDEC, SCOTT, or MDF) is
selected in the project tree at the
left of the screen.
Two sub-tabs –“List” and
“Upload” – will be visible.
2.
In the “Upload” sub-tab, select
the document type you wish to
upload from the drop-down list.
Enter a version number, date and
description for the document.
The details you enter here will
appear in the letters you receive
from HDECs/SCOTT.
Click “browse” to find the
document on your local drive,
then click “Upload File”.
3.
This will take you back to the
“List” sub-tab, which will now
display the document you have
just uploaded.
Return to step 2 to upload
another document.
Click “View / Manage” to view or
delete the document, or to
replace it with an updated
version.
Page 15 of 46
Steps
4.
Screenshots
Note that if you upload a new
version of the same document,
the old version remains in the
Online Forms system (unless you
delete it yourself).
However, only the most recent
version will be submitted with
your application.
Mandatory Documents
Documents such as the protocol and CV for Co-ordinating Investigator must be uploaded with every
application, while other documents become mandatory depending on the answers you give in the form.
Document type
Protocol
CV for Co-ordinating Investigator (CI)
CVs for other Investigators
Evidence of favourable peer review
Investigator’s Brochure
Participant Information Sheet/Consent Form (PIS/CF)
PIS/CF for persons interested in welfare of non-consenting
participants
Surveys/questionnaires
Evidence of sponsor insurance
Evidence of CI indemnity
“Declined” letter for previous application in respect of the same (or
substantially similar) study
Covering letter
GMP certification for manufacturer
GMP certification for packer
Sample labels
Site (re)certification(s)
Other
Mandatory for
HDEC?
Yes
Yes
No
Yes (if “no” at
a.8.1)
Yes (if “yes” at
a.8.1)
Yes (if p.3 enabled)
Yes (if “yes” at
p.1.5)
Yes (if “yes” at
r.2.3.1)
Yes (if “yes” at
r.1.7.1.2)
Yes (if “yes” at
r.1.7.1.2)
Yes (if “yes” at
a.7.2)
Yes (if “yes” at
a.7.2)
No
Mandatory for
SCOTT?
Yes
Yes
Yes
Yes
Yes (if “yes” at
1.7.2)
Yes (if “yes” at
1.7.2)
Yes
Yes
Yes
No
No
Are there any restrictions on the type or size of study documents I can upload?
Only files smaller than 32MB can be uploaded.
You can upload any file type you wish into Online Forms – but if we can’t open it, we can’t review it. For
this reason you should only upload common file types such as PDF and MS Office formats.
Page 16 of 46
8.
Transfer a form temporarily
You can transfer a form temporarily if you would like another Online Forms user to review and make
changes to your form. Only one person can edit a form at a given time.
Do not transfer a form if you are only seeking authorisations, for this please refer to section 10.
Steps
1.
Screenshots
Open the project and click on
the “Transfer” tab. Please make
sure the form is selected on the
left of the screen.
Enter the recipient’s email and
click “Transfer to User”.
Please note that the recipient of
a transferred form must have an
account with Online Forms first.
Automated emails are generated
advising the recipient and owner
of the actions taken at various
stages of the transfer.
2.
You will have access to a readonly version of the form while it
is in the control of another user.
You can retrieve the transferred
form at any time by clicking on
the “Retrieve Form” button.
The transfer actions are listed in
the transfer history.
Page 17 of 46
Transfer a project permanently
You can transfer a project permanently if you would like to give somebody else full and permanent
control of the project.
Steps
1.
Screenshots
Open the project and click on the
“Transfer” tab.
Note that this project-level tab
will only be visible when “My
Project” is selected in the project
tree at left of the screen.
Please note that this transfer
tab is different to the one shown
in the previous page.
2.
Enter the recipient’s email and
click “Transfer to User”.
Automated emails are generated
advising the recipient and owner
of the actions taken at various
stages of the transfer.
Please note that the recipient of
a transferred form must have an
account with Online Forms first.
3.
Once the recipient has accepted
the form, click on “Permanently
transfer this form”.
4.
Click OK.
Please note that this will
permanently transfer the project
and you will not be able to
retrieve it.
Once transferred the project will
disappear from your existing
projects.
Page 18 of 46
Find forms that I have transferred to other users or that others have transferred
to me
Steps
1.
Screenshots
Go to “My Projects” in the main
menu, and select “Transfer
Requests”.
Or, if you are already in the My
Projects screen, simply click the
“Transfer Requests” tab.
Two sub-tabs – “Recipient” and
“Owner” – will be visible.
2.
The “Owner” tab keeps a history
of all forms that you have either
temporarily or permanently
transferred to other users.
3.
The “Recipient” tab displays
forms transferred to you by
other users.
To accept a pending transfer click on “Accept Application”.
4.
To return a form to its owner go
into the form and click the
“Transfer” tab.
Then click the “Send back”
button.
Once returned the project will
disappear from your existing
projects.
Page 19 of 46
9.
It is important to check for completeness before you request authorisations, to make sure you have
answered all the questions in the form.
Steps
1.
Screenshots
Open the project and click on the
“e-Submission” tab.
Note that this form-level tab will
only be visible when the form
type (HDEC, SCOTT, or MDF) is
selected in the project tree at the
left of the screen.
2.
Click on “Check for
Completeness” to identify
missing information from your
application. Any outstanding
items will be listed.
You must then go back to the
relevant tabs to complete all
mandatory questions and upload
documents before requesting
authorisations.
3.
Once the application is complete,
the check for completeness will
say “Form is complete and ready
to submit”.
You should now obtain
authorisations.
Page 20 of 46
10.
What is an authorisation?
Electronic authorisation replaces an 'ink' signature for the Co-ordinating Investigator, Other Investigators,
Primary Contact Person, Sponsor, 3rd Party performing sponsor’s duties or functions in NZ, Locality and
Other on forms generated on the Online Forms system. This avoids the need to take or post paper copies
of forms to the various individuals who need to authorise the application forms. More than one electronic
authorisation may be requested at the one time, though the persons authorising the form must have an
Online Forms account.
You should obtain authorisations only once you are confident the form is complete (see section 9).
Please note that any changes made to the form will invalidate the authorisations that are in place, but
uploading extra documents will not invalidate these.
Mandatory authorisations
Mandatory authorisations must be obtained before you can submit the form for HDEC review; however
you can request non-mandatory authorisations (e.g. locality authorisations) at any time.
Authorisation type
Co-ordinating Investigator (CI)
Other Investigator
Primary contact person
Sponsor
Third party performing sponsor’s duties or functions in NZ
Localities
Other
Mandatory prior to submission?
Yes
No
Yes
Yes (unless “no sponsor” at a.5.1)
Yes (if “yes” at a.5.3)
No
No
Page 21 of 46
How to request authorisations
Steps
1.
Screenshots
Open the project and click on the
“Authorisation” tab.
Note that this form-level tab will
only be visible when the form
type (HDEC, SCOTT, or MDF) is
selected in the project tree at the
left of the screen.
This tab will list all the electronic
authorisations that are available
for that particular form.
2. Select the relevant type of
authoriser and click “Request”.
Enter the email address of the
authoriser and include a personal
message if necessary. Click the
“Send Request” button.
Please note that the authoriser
must have an account with
Online Forms.
3. As the author of the form you will
receive automated emails
advising you of the progress of
your authorisation request.
4.
Once the authorisation is given, a
green tick will appear next to it.
An authorisation history at the
bottom of the page keeps a
record of all authorisation
requests. You can also print an
authorisation report for your
records.
Page 22 of 46
Steps
5.
You can recall an authorisation
request by clicking the “Recall”
button.
6.
You can also revoke an
authorisation that has already
been granted by clicking the
“Revoke” button.
Screenshots
How do I authorise my own study?
If you are the CI or primary contact person you may need to authorise your own study.
Steps
1.
If you need to authorise your
own study you can do so by
clicking the “Sign” button.
2.
Enter your username and
password and click “Sign”.
Screenshots
Page 23 of 46
I’ve been asked to authorise a study – what do I do?
If you receive a request for electronic authorisation with an incorrect research personnel title
(authorisation type), reject the form and immediately notify the owner of the request.
Steps
1.
If you have been asked to
authorise a study, you will
receive an email with a link to log
in to Online Forms.
2.
Once you log into Online Forms,
in the main “My Projects” page
click into the “Requests for
Authorisation” tab.
Any outstanding requests for
authorisation will be displayed
under the “Requests” tab.
Click “Open Request” to review
and sign the form.
3.
Click the “Review Requested
Form” button to check the
information in the form in a
read-only format.
4.
Navigate through the form by
clicking the Next and Previous
arrow buttons.
Screenshots
After reviewing the form, click
the “Navigate” icon and then
click into the “Authorisation” tab
again.
Page 24 of 46
Steps
5.
In the “Authorisation” tab - Click
the “Authorise Form” button to
generate an electronic signature.
(Alternatively, click the “Reject
Request” button if for some
reason you cannot sign the
form).
6.
Enter your username and
password. Also enter the
Authoriser (this may be the
Organisation Name or
Individual's Name) and the
names of the Lead Investigator(s)
at the Locality (this field is for
Locality Authorisation only) - this
information appears when you
generate an authorisation report.
Screenshots
Then click the “Sign” button.
7.
A history of all electronic
authorisations you have
previously granted/not granted
will appear under the “Signed”
tab.
Page 25 of 46
11.
Once you have completed the form, uploaded the relevant documents and obtained all mandatory
authorisations you must submit your application to HDEC or SCOTT.
Steps
1.
Screenshots
Open the project and click on the
“e-Submission” tab.
Note that this form-level tab will
only be visible when the form
type (HDEC, SCOTT, or MDF) is
selected in the project tree at the
left of the screen.
2.
Click “Check for Completeness”.
Once the application is complete,
the check for completeness will
say “Form is complete and ready
to submit”.
3.
Click “Proceed to
Submission/History”, and then
click on the “Submit to HDEC”
button that appears below.
Page 26 of 46
Steps
4.
Screenshots
Once submitted a submission
code will be generated and you
will be able to track the progress
of your application (refer to
section 12).
Can I change my form after submitting?
No, you may not make changes to an application between submission and approval; however you may
recall or withdraw your study if you would like to make substantial amendments to your application (see
section 13).
To what committee has my application been submitted to?
For HDEC applications submitted for full review you will have the option to have your application
reviewed ‘as soon as possible’ or ‘as near as possible’.
As soon as possible - will be assigned to the next available HDEC meeting regardless of location.
As near as possible - will be assigned by the secretariat to the HDEC that meets nearest to the CI.
HDEC applications submitted for expedited review will be assigned by the secretariat to the HDEC nearest
to the CI.
Page 27 of 46
12.
In the e-submission tab you can monitor the progress of your application through the key stages in the
review process and view correspondence from HDECs and SCOTT.
Steps
Screenshots
1. Open the project and click on the
“e-Submission” tab.
Under the section titled “Proceed
to Submission/History” - Click on
the “+” to expand the history.
To view correspondence for a
Post Approval Form you must go
into the e-submission tab of the
Post Approval Form itself (not in
the HDEC, SCOTT or MDF parent
form).
2.
The submission history table will
allow you to monitor the
progress of your application.
3.
Letters from the HDECs can be
downloaded from the documents
table.
Page 28 of 46
13.
Please note the recall option is only enabled if the application is pending registration by the review body
(i.e. the submission is awaiting the committee secretariat to upload the application). If your application
has been successfully recalled you may amend the form, upload/amend your supporting documents and
request authorisations prior to re-submitting the application.
If you are not able to recall your application and would like to withdraw your application at any time,
please contact the secretariat at [email protected] or on 0800 4 ETHICS.
Steps
1.
Open the project and click on the
“e-Submission” tab.
Note that this form-level tab will
only be visible when the form
type (HDEC, SCOTT, or MDF) is
selected in the project tree at the
left of the screen.
2.
Once in the e-submission tab
click the “Recall Submission”
button at the bottom of the
page.
Screenshots
Page 29 of 46
14.
If your study has been provisionally approved please send your response to [email protected], as we
currently cannot receive responses via Online Forms.
Once your study has been fully approved this will be reflected in the status of your project in Online
Forms, and you will be able to submit Post Approval Items (see section 18).
Page 30 of 46
15.
The Manage tab allows you to duplicate the information in an application into a new project or to delete
an entire project.
Steps
1.
Screenshots
Open the project and click on the
“Manage” tab.
Note that this project-level tab
will only be visible when “My
Project” is selected in the project
tree at the left of the screen.
2.
To delete the project, click
“Delete Project”.
A pop-up window will appear.
Click “OK” to delete the project
permanently.
Once the project has been
deleted you will not be able to
retrieve it.
3.
To duplicate the project, click
“Duplicate Project”.
If the project includes postapproval forms, and you’d like to
duplicate these too, make sure
that the check box is ticked
beforehand. Otherwise, leave it
unchecked.
A pop-up window will appear.
Click “OK” to duplicate the
project.
4.
Click on “Existing Projects” in the
“My Projects” menu. A duplicate
project will appear in your list of
projects. Note that documents
and authorisations associated
with the original project are not
duplicated, and will need to be
added in the normal way.
Why can’t I delete a project?
Once a project has been submitted for review, it can’t be deleted unless you recall it first. For instructions
on how to recall a project please refer to section 13.
Page 31 of 46
16.
Online Forms will notify you – the “form owner” – by email when a letter from the HDECs or SCOTT is
available about your project.
You can decide who else will be copied into email notifications by following the steps below.
Steps
1.
Screenshots
Open the project and click on the
“Email Notifications” tab.
Note that this project-level tab
will only be visible when “My
Project” is selected in the project
tree at the left of the screen.
2.
Enter the email address of the
person who you wish to receive
email notifications.
Click “Add recipient”.
3.
You can add as many recipients
as you like by repeating step 2
above.
You can remove a recipient by
selecting their email address and
clicking “Remove”.
Page 32 of 46
Can recipients of email notifications access the project in Online Forms?
Not necessarily. For others to have read-only access to the project in Online Forms you must request
authorisation from them.
Do users who have authorised the main form automatically receive email notifications?
No. Apart from the form owner, only email addresses entered in the “Email notifications” tab will receive
email notifications.
I’ve not received email notifications, but should have. What has gone wrong?
Check your spam folder for emails from [email protected].
Page 33 of 46
Overview of Online Forms – MDF and PAFs
Create new project - MDF
(for studies approved
before 1 July 2012)
Complete Form
Request Authorisation
(if you are not the CI)
Submit
Create and submit Post
Approval Forms
(for amendments,
progress reports, etc.)
Page 34 of 46
17.
If your study was approved before 1 July 2012 you need to register your study in the new system by
creating a Minimal Dataset Form or MDF. To submit post approval items (amendments, progress reports,
etc.) you must create a Post Approval Form – you will be unable to do so unless you have first created and
submitted an MDF. You only need to submit an MDF once per study.
If your study has been approved by an HDEC and by SCOTT you will need to submit two MDFs – one for
HDEC and one for SCOTT.
Steps
1.
Screenshots
Log in to your Online Forms
account at
(www.ethicsform.org/nz).
If you haven’t already created an
account, you will need to do this
before you can log in (see section
1).
2.
Once you have logged in, go to
“My Projects” in the main menu,
and click “Create New Project”.
3.
Select “Minimal Dataset Form” in
the Project Filter tab.
Then click on the “MDF" icon to
the left of the page to open the
form.
Page 35 of 46
4.
Complete the MDF by answering
the questions in the “Navigate”
tab. Click on MDF1-MDF8 to
answer.
Please note that if the
information you enter in the
form is different to what we
have on file you may be asked to
recall your MDF, correct the
information and re-submit. The
format of the reference number
must be identical to what we
have on file (e.g.
MEC/01/01/01).
5.
If you are not the Co-ordinating
Investigator (CI) for the study,
the CI will need to authorise the
MDF before it can be submitted.
You can request authorisation
from the CI through the
“Authorisation” tab (refer to
section 10). Please note the CI
must have an account in Online
Forms to do this.
6.
In the “e-Submission” tab, click
“Check For Completeness”.
If your form is complete, you can
submit it by clicking “Proceed to
Submission/History”, and then
click the “Submit” button that
appears below.
A message confirming
submission of your MDF should
appear.
7.
You will receive an automatic
email once your MDF has been
registered in the system.
You can view correspondence
from HDECs and SCOTT in the
MDF’s e-submission tab by
clicking on the “+” icon in the
submission history (see section
12).
As soon as the MDF is submitted,
you can submit post-approval
items, such as annual progress
reports and amendments.
Page 36 of 46
18.
What is a Post Approval Item?
A “post-approval item” is an item submitted for HDEC review after a study has been approved.
Examples of post-approval items include:
substantial amendments
annual progress reports
protocol deviations or violations
notifications of conclusion of study
final reports.
Substantial vs. Minor Amendments
As per the HDEC Standard Operating Procedures, an amendment to an approved study only requires
HDEC review if it is substantial. Applicants may make minor amendments to an approved study at any
time without approval from or notification to the HDEC.
SUBSTANTIAL AMENDMENTS
MINOR AMENDMENTS
Significant amendments are required to be
submitted for HDEC review.
Examples of these include:
Minor amendments are not required to be
submitted for HDEC review.
Examples of these include:
-
-
-
-
-
-
Significant changes to the
design/methodology of the study.
Significant changes to the type and/or
number of procedures undertaken by
participants.
Changes relating to the safety of physical
or mental integrity of participants, or to
the risk/benefit assessment for the study.
Significant changes to study
documentation (such as participant
information sheets).
The appointment of a new CI.
Any significant change to the study
protocol or the information provided in
the application for approval.
Notification of urgent safety measures
taken to protect participants from a
significant, immediate hazard to their
health and safety.
Temporary halts to the study due to safety
concerns.
Substantial protocol deviations.
Early termination of a study.
-
-
-
-
-
-
Minor or administrative changes to study
documentation.
Updated versions of the Investigator’s
Brochure (where the study involves a new
medicine).
Changes to the research team (including
lead/principal investigators at particular
localities) other than the appointment of a
new Co-ordinating Investigator.
Changes in funding arrangements, except
where these may alter the ability of
participants to access publicly-funded
compensation in the event of injury.
Changes in arrangements for recording or
analysing study data, or for storing or
transporting samples.
The extension of the study beyond the
expected end date given in the application
form, except where this is related to other
changes that are substantial.
Routine closure of a site.
Addition of a new site.
Page 37 of 46
How to create and submit a Post Approval Form?
Steps
1.
Log in to your Online Forms
account at
(www.ethicsform.org/nz).
2.
Once logged in, go to “My
Projects” in the main menu, then
click “Existing Projects” and
choose the appropriate study.
3.
Six project-level tabs will be
visible.
Note that the form type (HDEC,
SCOTT, or MDF) must be selected
in the project tree at the left of
the screen.
Go to the “Post Approval” tab
and click “Create a new Post
Approval Form”.
You can create as many post
approval forms as needed.
4.
Click on the title of the Post
Approval Form to open it – You
can do this in either of the two
ways indicated on the
screenshot.
Screenshots
Page 38 of 46
5.
In the “Navigate” tab click on
“Filter” to begin completing the
Post Approval Form.
6.
Indicate which type of postapproval item you wish to submit
(e.g. progress report), then
answer the remaining questions
in the form.
Please note that all 7 pages
won’t be active, only those
relevant to the post-approval
item you have chosen.
Once you have completed all
questions, click the “Navigate”
icon to go back to the form tabs
(as shown above).
7.
Upload any documents
associated with your postapproval item in the
“Documents” tab.
For instructions on how to
upload documents please refer
to section 7.
8.
In the “e-Submission” tab, click
“Check For Completeness”.
If your form is complete, you can
submit it by clicking “Proceed to
Submission/History”, and then
click “Submit”.
You will receive an automatic
email once your PAF has been
registered in the system.
You can view correspondence
form the HDEC in the PAF’s esubmission tab by clicking on the
“+” icon in the submission history
(see section 12).
Page 39 of 46
19.
Before a study commences at a given locality in New Zealand, it must be authorised by that locality in
Online Forms. Locality authorisation confirms that the locality is suitable for the safe and effective
conduct of the study, and that local research governance issues have been addressed.
Locality authorisations are not mandatory prior to submission - You may add a new locality at any time.
You do not need to submit a Post Approval Form advising HDECs of the addition of a new locality.
Steps
1.
Once logged in to Online Forms,
go to “My Projects” in the main
menu, then click “Existing
Projects” and choose the
appropriate study.
2.
Once in the project - go to the
“Authorisation” tab.
Screenshots
Note that this form-level tab will
only be visible when the form
type (HDEC, SCOTT, or MDF) is
selected in the project tree at the
left of the screen.
3.
Select Locality and click
“Request”.
Enter the email address of the
authoriser and include a personal
message if necessary. Click the
“Send Request” button.
Please note that the authoriser
must have an account with
Online Forms.
You can request authorisation
from as many localities as
necessary.
Page 40 of 46
Steps
4.
Screenshots
Once the authorisation is given a
green tick will appear next to it.
An authorisation history at the
bottom of the page keeps a
record of all authorisation
requests.
You can also print an
authorisation report for your
records.
Go to http://ethics.health.govt.nz/applying-review/research-contacts to find contact details for district
health boards, and some other organisations.
Page 41 of 46
Screening questions - HDEC Form
The screening questions will help determine whether HDEC review is required for your study. They are
based on the rules contained in section three of the Standard Operating Procedures for Health and
Disability Ethics Committees.
Please note that not all the screening questions will be enabled as dependency rules apply to these
questions (e.g. F will only be enabled if you answer yes in E).
Screening Question
Details
A
Health and disability research
Will your study aim to improve health and independence
outcomes?
yes
no
Answering no in this question will
mean this study does not need to be
submitted for HDEC review and the
rest of the form will be disabled.
B
Human reproductive research
Will your study involve the creation or use of a human gamete, a
human embryo or a hybrid embryo?
yes
no
Answering yes in this question will
mean your study must be reviewed
by the Ethics Committee on Assisted
Reproductive Technology (ECART),
rather than by an HDEC, and the rest
of the form will be disabled.
C
Type of study
Is your study:
an intervention study? (An intervention study is a
study in which the investigator controls and studies
the intervention(s) provided to participants for the
purpose of adding to knowledge of the health
effects of the intervention(s). The term
“intervention study” is often used interchangeably
with the terms “experimental study” and “clinical
trial”.)
an observational study? (In observational studies
the researcher has no control over study variables
and merely observes outcomes.)
D
Will your study involve human participants recruited in their
capacity as:
consumers of health or disability support services, or
relatives and/or caregivers of consumers of health or
disability support services, or
volunteers in early-phase clinical trials (including
bioequivalence and bioavailability studies)?
yes
no
E
Will your study involve the use, collection or storage of human
tissue (as defined by the Human Tissue Act 2008)?
yes
no
Examples of human tissue include
the following:
all or any part of a body
whole human organs (for
example, hearts, kidneys,
livers, and lungs) or parts of
them (for example, heart
valves)
Page 42 of 46
human stem cells or other
human cells
human blood
human bone marrow
human hair, nails, and skin
human mucus, sputum, or
urine
F
HDEC review is not usually required for studies in which human
tissue is to be used, collected or stored where:
informed consent (which may including informed
consent to future unspecified research) has been
obtained for such use, and tissue will not be made
available to researchers in a form that could reasonably
be expected to identify the individual(s) concerned, or
one or more statutory exceptions to the need to gain
informed consent set out at section 20(f) of the Human
Tissue Act 2008 and Right 7(10)(c) of the Code of Health
and Disability Services Consumer’ Rights 1996.
Does one or both of these exceptions apply to your study?
yes
no
Answer yes to this question if:
You have informed consent
to use the tissue and the
tissue is de-identified
OR
one or more statutory
exceptions apply to the
need to gain informed
consent
G
Will your study involve the use or disclosure of health
information (as defined by the Health Information Privacy Code
1996)?
yes
no
Health information is:
information about the
health of an individual,
including his or her medical
history
information about any
disabilities that individual
has, or has had
information about any
health services or disability
services that are being
provided, or have been
provided, to that individual
information in connection
with the donation, by that
individual, of any body part
or any bodily substance
information derived from
the testing or examination
of any body part, or any
bodily substance of that
individual
information about the
individual which is collected
before or in the course of,
and incidental to, the
provision of any health
service or disability service
to that individual
H
HDEC review is not usually required for studies that involve the
use or disclosure of health information where:
this use or disclosure has been authorised by the
individual(s) concerned, or
Answer yes to this question if:
You have informed consent
to use this health
information
Page 43 of 46
health information will not be disclosed to researchers in
a form that:
could identify, or could reasonably be expected to
identify, the individual(s) concerned, or
could allow for the information to be matched with
other data sets (for example, through the use of
non-encrypted identifiers such as NHI numbers).
Does one or both of these exceptions apply to your study?
yes
no
I
Exemption for low risk medical devices
Studies on low-risk (class I) medical devices (as defined from page
77 of the Australian Therapeutic Goods Administration’s
Australian Regulatory Guidelines for Medical Devices) are usually
exempt from HDEC review.
Does this exemption apply to your study?
yes
no
J
Exemption for audits and related activities
Audits and related activities (as defined in the Ethical Guidelines
for Observational Studies) are usually exempt from HDEC review.
i.
Is your observational study an audit or related activity?
yes
no
ii. Does your audit or related activity involve the use,
collection or storage of human tissue without consent?
yes
no
iii. Will the use, collection or storage of human tissue without
consent in your audit or related activity be entirely in
accordance with one or more of the statutory exceptions to
the need to gain informed consent set out at section 20(f)
of the Human Tissue Act 2008 and Right 7(10)(c) of the
Code of Health and Disability Services Consumer’ Rights
1996?
yes
no
K
Exemption for minimal risk observational studies
Does your observational study involve more than minimal risk?
yes
no
A study involves more than minimal risk if potential participants
could reasonably be expected to regard the probability and
magnitude of possible harms resulting from their participation to
be greater than those encountered in those aspects of their
everyday life that relate to the study.
For the avoidance of doubt, an observational study always
involves more than minimal risk if it involves one or more of the
following:
one or more participants who will not have given
informed consent to participate
one or more participants who are vulnerable (that is,
who have restricted capability to make independent
OR
the information cannot be
linked back to the
individual(s) (i.e. This
information is deidentified)
Only answer yes in this question if
the purpose of your study is to test a
low-risk (class I) medical device.
Page 44 of 46
decisions about their participation in the study)
standard treatment being withheld from one or more
participants
the storage, preservation or use of human tissue
without consent
the disclosure of health information without
authorisation.
Kb
Please briefly explain why you consider that your observational
study involves more-than-minimal risk.
[<200 words]
Refer to the definition of minimal
risk above.
L
Exemption for some student research
Is your study to be conducted wholly or principally for the
purposes of an education qualification at or below Masters level?
yes
no
From 1 January 2013 a study
conducted wholly or principally for
the purposes of an education
qualification will only require HDEC
review if:
It is an intervention study
OR
Is above Master’s level
Ma
Guthrie cards
Will your study involve the use of human tissue samples (known
as Guthrie cards) taken as part of New Zealand’s Newborn
Metabolic Screening Programme?
yes
no
Mb
HRC-funded research
Is your study both:
funded by the Health Research Council of New Zealand
(HRC), and
not able to be reviewed by the HRC Ethics Committee,
or an Institutional Ethics Committee approved by the
HRC Ethics Committee?
yes
no
Contact details for some
Institutional Ethics Committees are
available here.
Mc
Tissue banks
Does your application involve the establishment or maintenance
of a tissue bank?
yes
no
A tissue bank is a collection of
human tissue samples stored for
potential use in research beyond the
life of a specific research project.
O
Your study requires HDEC review.
The question below will determine the review pathway
appropriate to your study.
Does your study involve any of the following? (select all that
apply)
a new medicine
an approved medicine being used for a new
indication or through a new mode of administration
a medical device that is or would be classified as a
class IIb, class III, or active implantable medical
device by the Therapeutic Goods Administration
IEC contacts.doc
Page 45 of 46
(TGA)
a new surgical intervention
one or more participants who will not have given
informed consent to participate
one or more participants who are vulnerable (that
is, who have a restricted ability to make
independent decisions about their participation)
standard treatment being withheld from one or
more participants
the storage, preservation or use of human tissue
without consent
none
Ob
Please briefly explain why you believe that one or more
participants in your study are vulnerable.
[<200 words]
Participants who are vulnerable are
those who have restricted capability
to make independent decisions
about their participation in the study
Examples of these include:
children and young people
people with mental illness
people with serious
intellectual disability
people with English as a
second language and/or a
different cultural
background to the
investigators (for studies
whose details are primarily,
or only, stated in English)
people whose freedom to
make independent choices
is restricted (e.g., prisoners,
employees of a sponsoring
company or students)
people with serious illness
for which the study
treatment offers potential
benefits that substantially
exceed those of any other
available treatment.
Page 46 of 46