1
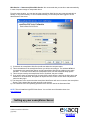
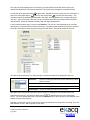
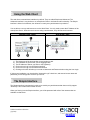
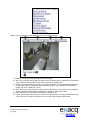
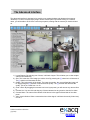
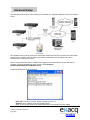
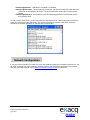
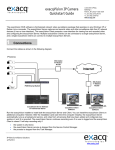
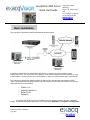
exacqVision Web Server Quick start Guide 1 11955 Exit 5 Pkwy Building 3 Fishers, IN 46037-7939 USA +1.317.845.5710 phone +1.317.845.5720 fax www.exacq.com Basic Installation The exacqVision Web Server works with browsers as shown below. In the basic configuration, the exacqVision Web Server is running on the same machine as the exacqVision Server. As can be seen in the diagram, video may be viewed on the local network by using a web browser, over the internet using a web browser, or using a cell phone with a built in web browser. The exacqVision Web Server Simple Interface is usable on any web browser that supports a JPEG image. The exacqVision Advanced Interface has been tested on a wide variety of browsers and devices, which includes but is not limited to: Firefox 1.5+ Internet Explorer 6+ Safari 2.0.2+ Opera 9+ The exacqVision Web Server is pre-installed on all exacqVision systems, though it is disabled initially. To start the exacqVision Web Server, go to Access the Start Menu ► Programs ►exacqVision IP Video Surveillance Solutions 3/6/2009 www.exacq.com Web Service ► Start exacqVision Web Service. We recommend that you set this to start automatically, in case of a power outage or unexpected reboot. From this same location, you can also have the exacqVision Web Service stop, start automatically on startup, or only start manually. If it is not installed already, run the setup file while logged in as the administrator of the server. 1) If checked, the exacqVision Web Service will start when the computer starts. 2) This is the address of the exacqVision Server you will be connecting to. The address 127.0.0.1 corresponds to the exacqVision Server and the exacqVision Web Server residing on the same machine. To connect to more than one exacqVision server, see the Advanced setup options. 3) This is the port used by the exacqVision Server. By default, the port is 22609. 4) If you wish to have an automatic login for web clients, check this box, and fill in the User name and Password. If left unchecked, the system will require the user to enter a user name and password each time they log in. 5) The Username is the account that the exacqVision Web Server will use to connect to the exacqVision Server. This is treated like any other account on the system. 6) The Password is the corresponding password of the account used in the Username field. NOTE: This will install the LightTPD Web Server. You can find more information about it at www.lighttpd.net. 2 Setting up your exacqVision Server IP Video Surveillance Solutions 3/6/2009 www.exacq.com The next step will be adding a user account(s) to your exacqVision Server that will be used by the exacqVision Web Server to access the cameras. This must be done through the exacqVision Client. toolbar button. Expand the server’s setup menu by clicking the “+” To add new users, press the Setup next to the exacqVision Server in the tree, then select Users . Click the New User button. The Username field is automatically populated with “New User” and highlighted in blue to begin adding the new user. Type in the name of the new user you are adding then tab to the Password field and enter a new password. Select the Password Confirm field and retype the password. In the screenshot below, there is a user called webuser. This user is in the Restricted group, and they have access to cameras with the checks in the boxes. If an administrator wanted to remove the access to one of the cameras from those using the exacqVision Web Server, they would modify this account. Click the Group drop down box to select the type of assess level that will be assigned to this user. Restricted: Access to viewing live video only on the cameras you allow them to access. User Admin: Access to viewing live video on all cameras Power User: Access to viewing live video on all cameras Administrator: Access to viewing live video on all cameras Designate which cameras the user will be able to access for viewing live and recorded video in the to add the new user to the exacqVision Authorized Sources tree, and click the Apply button Server. For more detailed instructions, see the User Setup section of the exacqVision User Manual or the context sensitive online help file. Now that you have the system up and running, open a web browser and verify that it is working. Go to the web address 127.0.0.1 and verify that you can log in. IP Video Surveillance Solutions 3/6/2009 www.exacq.com 3 Using the Web Client The web client comes with two interfaces by default. They are called Simple and Advanced. The Advanced interface is very similar to our exacqVision Client in its features and functionality. The Simple interface is limited in its features, but will work on nearly every web browser in production. You are able to use any web browser to run the Web Client. You only need to enter the IP Address of the exacqVision Server. Once the users connect using a web browser, they will first see this screen. Without Auto Login 1) 2) 3) 4) 5) 6) With Auto Login The Username of the account that you are logging in with. The Password for the account you are logging in with The IP Address of Server you wish to view (Optional) Click on this to Log In to the Simple Interface Click on this to Log In to the Advanced Interface Clicking on this link will allow you to enter a Username and Password when using the Auto Login If during your installation, you checked the “Automatic Login” check box, and entered a user name and password, you will simply have to select your server 4 The Simple Interface The Simple interface is designed to be able to be used by any web browser that does not fully support JavaScript. This includes most cellular devices. When you first log in to the Simple Interface, you will be presented with a list of the cameras that are available on that server. IP Video Surveillance Solutions 3/6/2009 www.exacq.com Simply click on a link and you will be taken to a live view of that camera. 1) Refresh: This forces a manual refresh the current image 2) Size: This is the size of the image you wish to view. By pressing the [+] selection it will increase it. The [-] selection will decrease the size. The lowest size is 128x96 pixels. 3) Quality: This is the quality of the image. The lower the number, the more pixilated the image will be . By pressing the [+] selection it will increase the quality. The [-] selection will decrease the quality. This is on a scale from 1 to 10. 4) Rate: This is how many seconds you want to wait until receiving a new image. If your cell phone is having problems displaying the image before it refreshes, increase this value. 5) Back: This will return you to the list of Cameras available to you. 6) Logout: (Optional) This will log you out of the current account you are using, and allow you to log in as a new user. This will only be shown if you are not using the Auto Login feature. IP Video Surveillance Solutions 3/6/2009 www.exacq.com 5 The Advanced Interface The advanced interface is designed to be used by most modern desktop web browsers that support JavaScript. To view a camera, simply drag it into the desired panel. By double-clicking on a camera name, you will be able to fill all of the current layout panels, starting with the camera you double-clicked on. 1) Layout Buttons: By selecting one of these, it will load a layout. This will allow you to view multiple cameras simultaneously. 2) Size: This is the size of the image you wish to view. By pressing the [+] selection it will increase it. The [-] selection will decrease the size. 3) Quality: This is the quality of the image. The lower the number, the more pixilated the image will be. By pressing the [+] selection it will increase the quality. The [-] selection will decrease the quality. This is on a scale from 1 to 10. 4) Clear a Pane: By dragging this camera icon into a layout panel, you will remove any camera from it. 5) Camera List: You can click and drag any of these cameras into any panel to view the live video. 6) Camera Name: The name of the camera will be shown in the upper left hand side of the video panel. 7) Video Loss Indication: When a camera has lost a video signal, it will have the words (Video Loss) next to it. IP Video Surveillance Solutions 3/6/2009 www.exacq.com 6 Advanced Setup The exacqVision Web server has the ability to be installed on a separate computer from the exacqVision Server. This separate server must be running the exacqVision Web Server and have access to the exacqVision Server over the network. It will have the same network requirements and is subject to the same restrictions of an exacqVision Client. Run the exacqVision Web Service installer while logged on as an administrator on the Web Server computer. Once the Installation is done, open the file C:\Program Files\exaqVision\WebServce\Webservice.ini. A standard Webservice.ini looks like this: [ServerX] : This server number, where X ranges from 0 to 15. Address: The IP Address of the exacqVision Server Port : This is the port used by the exacqVision Server. By default, the port is 22609. IP Video Surveillance Solutions 3/6/2009 www.exacq.com PassthroughEnabled : 1 indicated it is enabled, 0 is disabled PassthroughUsername : The Username is the account you wish the exacqVision Web Server to connect to the exacqVision Server as. This will be treated like all the other accounts on the system. PassthroughPassword : The Password is the corresponding password of the account used in the Username field. To add a second, third server, or more, copy the text, and paste it below. Then change the information to match the connection for the new server. You need to increment the number of the server as well. A second server with the IP address of 192.168.100.1 looks like this: 7 Network Configuration If you plan to have clients from outside your local area network access your exacqVision Web Server, you will need to change your router settings to forward port 80 to the exacqVision Web Server’s IP address. See your router user manual or go to www.portforward.com/routers.htm for instructions. IP Video Surveillance Solutions 3/6/2009 www.exacq.com