1
INTRODUCTION
1
INTRODUCTION
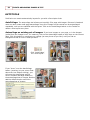
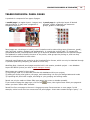
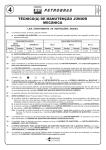
WELCOME TO FOTOFUSION!
This manual provides an overview of the main features of FotoFusion. The software itself includes other
tutorial materials:
Tutorial videos are found in the bottom right corner of the Create screen from the
icon. Review
these videos to see how various tools and techniques are applied to projects. InfoTips will appear when
you hover over most controls in the software. These helpful hints explain how to use the tool.
We hope you enjoy using FotoFusion!
LumaPix Inc
www.LumaPix.com
support(@)lumapix.com
1877LUMAPIX
INSTALLATION & ACTIVATION
System Requirements
PC: • Pentium 4 or faster • Operating Systems: Windows 8, Windows 7, Windows Vista, Windows XP SP3
Mac (v5 only): • Intel CPU required - 450 MHz or faster • X11 Required • Operating Systems: Apple
OSX 10.8 (Mountain Lion), 10.7 (Lion), 10.6 (Snow Leopard), 10.5 (Leopard)
All: • Display resolution: Minimum 1024x768 • Free disk space: 100MB free disk space required, more
recommended (downloaded content from the online marketplace / remote storage can consume a lot of
space) • A working e-mail account for licensing information • Memory (minimum): Less than 100 page
project: 1.5GB RAM, more than 100 page project: 2GB RAM, more than 200 page project: 3GB RAM. The
more memory, the better! • Mouse: three buttons recommended • Internet access: Required for
activation, recommended for use. Activation is easiest when online, although offline activation is
available. Once activated, the software can run offline. High-speed internet access is strongly
recommended. Online users have access to: Templates and other graphical content; Email and web
2
INSTALLATION & ACTIVATION
output; Help file; Instructional videos; Updates and upgrades.
Notes for IT Administrators: Firewall Configuration: FotoFusion communicates with *.lumapix.com, *.
amazonaws.com and *.fotoscraps.com
• Port 80: For Marketplace Content • Port 21: For FTP upload to Publishers • Port 443: For Remote
Storage • Binary transfer should be enabled
• Soap headers should not be filtered
Complete read/write permissions should be allowed to the following: • Windows Vista, 7,8: ‘C:/
ProgramData/LumaPix’ • Windows XP: ‘C:/Documents and Settings/All Users/Application Data/LumaPix’
Requires Microsoft .NET Framework 2.0.
Network Administrators not using Remote Storage: FotoFusion does not embed images in a project. As
such, for collaborative working we advise storing project files and all related images in a shared network
location. The following is an example setup which can be used for schools or adapted for studios running
FotoFusion::Extreme.
• Create an area on your network to store candid images, imported PSPA photos and project files. •
Create an Active Directory group, for example Yearbook Users, which have read/write access to this
folder. • Map this folder to a standard network drive, Y:/Yearbook. • Using a batch script, or otherwise,
set this drive to be mapped at logon for Yearbook Users. • Advise your Yearbook committee that all
project files, images and imported PSPA photos should be saved to this folder
Installing FotoFusion:
FotoFusion Enhanced and Extreme users can install the software from
the LumaPix website (both Mac & PC from the same link). Yearbook customers will receive a special link
from their yearbook company to download the installer. Click on the installation file after it has
downloaded to start the installer, and follow the instructions.
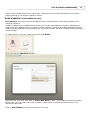
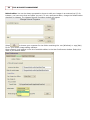
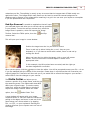
Activating FotoFusion:
Activating your software will take the software out of trial mode. A
user id (activation code) is provided to Enhanced & Extreme users after purchase; Yearbook users will
receive a code from their publishers by email. Activation removes watermarks, gives you access to
graphic resources associated with your license type, and allows users to share projects. In the case of
YearbookFusion users, projects can now be saved and transferred from one machine to another. To
activate FotoFusion, Select HELP -> Activate FotoFusion -> Activate Online Enter your UserID and create
a password. FotoFusion will now restart to complete the activation.
Enhanced and Extreme licenses, as per the End User Agreement, are sold as "one user, one
license," meaning the owner of the license can activate the software on a computer intended for their
personal use. eg. a laptop and a desktop. Licenses do not expire, and can be reinstalled for maintenance
or new computers as required.
YearbookFusion licenses can be installed on up to 40 computers simultaneously. YearbookFusion
licenses are 1-year expiring licenses, with the expiration countdown started when the license was
allocated by your yearbook publishing company.
GETTING STARTED
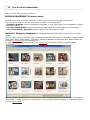
The Start tab is a portal to starting new projects, accessing saved work, information about FotoFusion,
and accessing templates.
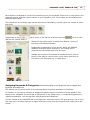
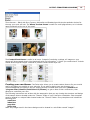
NEW PROJECT: Choose New to start a fresh project from scratch. Depending on your license type, the
list of options will change.
· Click on Blank to select a page size for a new empty project
· Click on AutoCollage to open the AutoCollage wizard, which will allow to you make automatic layouts of
GETTING STARTED
3
your selected images.
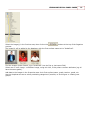
· Click on Templates to view premade layouts on the LumaPix Marketplace.
Regardless of the option selected, you have the ability to alter page sizes and frame positions to suit your
needs. YearbookFusion users will often be limited to the preset album sizes provided by their Yearbook
publisher; Enhanced and Extreme users will select a custom size, or pick a preset size.Page sizes and
product types can be changed from the Canvas Setting window; the entire project will resize
automatically.
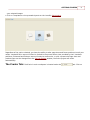
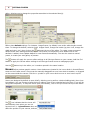
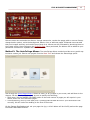
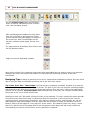
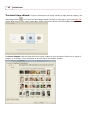
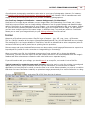
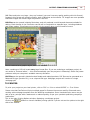
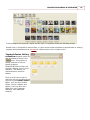
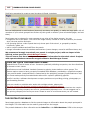
The Create Tab:
FotoFusion's main workspace is located under the
tab. Click on
4
GETTING STARTED
the image below to explore FotoFusion's interface.
Tabs run across the top the screen. Click on one to toggle between functions.
launches a new project, loads an existing project, shows templates and accesses
learning info.
is the editing screen, where you work on your projects.
previews, searches, sorts, and keywords your images and projects, and, for
YearbookFusion users, manages your PSPA database images.
renders your project to file (eg. jpg), uploads your projects to your website or as a
web album, emails it, or prints it on a local printer. Some YearbookFusion users may not have this
feature.
launches an internet browser window, giving you access to galleries, support, and
other LumaPix-related websites. Some YearbookFusion users may not have this feature.
The Menu Bar
contains every feature available in FotoFusion. Almost all controls available in the
Menu are available by directly selecting (left and right-mouse click) items on your canvas or by using
keyboard shortcuts.
GETTING STARTED
5
In general:
· File includes options to save, load, close and output your file. Mac users will use the FotoFusion menu
item to quit the software.
· Edit allows you to copy/cut/paste/duplicate/delete selected items, undo/redo, and set up user
preferences.
· View lets you control the way your screen will look (zooming, panning, grid lines, etc.)
· Insert contains options to add items to your project (image frame, text frame, new page, etc.)
· Selection pertains to the selection of items on your canvas, and the order they are stacked on the
canvas.
· Tools offers the entire set of AutoTools (autocollage, autopopulate...) and actions that can be applied
to particular types of items on your canvas, such as the canvas background, the frame properties, and
text items.
· Help links to you the User's manual, and learning preferences, and licensing information. Mac users will
use the FotoFusion menu item to access licensing information
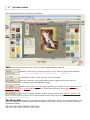
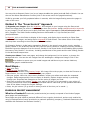
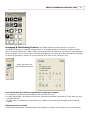
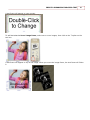
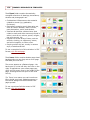
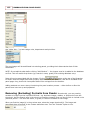
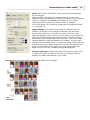
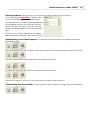
The Tool Box appears whenever you click on text and image frames (including the
canvas background).
Toolboxes are interactive. Click on the top icon and drag your mouse to change frame
properties, border width, and image brightness/contrast. Click down on any icon to
access editors, which will display a full range of controls. Hover over individual icons to
see an info-tip explaining what editor will be launched.
If you do not wish to use the tool box, click on
with the currently selected item.
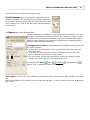
Editors
to see all editors associated
assign attributes to your frames. Clicking on parts of the toolbox will open the associated
6
GETTING STARTED
editor, allowing you to change the properties associate to the selected item(s).
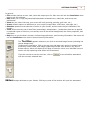
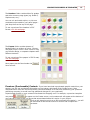
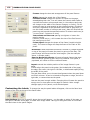
Editors have default settings. For instance, image frames, by default, have a thin white border around
them. To change the default, select a single images frame, change the border (eg turn it off, change the
width and color, etc.) then click on the
button at the top of the editor. To create a new permanent
default chose Save settings as default for all new frames; to temporarily set a default until a new
attribute is added, chose Update default for new frames automatically. You can also create a named
preset, to create your own gallery of presets.
The
button will apply the current editor settings to all like-type frames on your canvas; hold the Ctrlbutton to apply the current editor settings to all like-type frames across a multipage project.
Use the
button to pin the editor, so it remains opened in the same location.
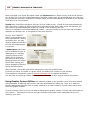
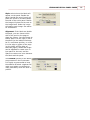
Hovers
allow preview graphic content. Hover buttons are located in the hover docks in three different
zones on the Create screen. Hovers can be manually dragged from one hover dock to another, or dropped
on the area outside the canvas. Click the + symbol on your hover dock to move or turn hovers on/off.
Hovers are designed by default to open briefly, allowing you to perform a desired editing task, then close
immediately. You can choose to keep the hover editors open for an extended period of time, if you will be
using them frequently. To keep the hover open permanently, click on the pin icon at the top of the editor.
The
icon indicates that the hover will
automatically close when you are not
hovered over it. A pinned hover does not
affect the position of your canvas, and can
GETTING STARTED
7
overlap onto the canvas workspace.
The
icon indicates that the hover will
remain opened on your canvas - it docks
the hover. A docked hover will reposition
the canvas alongside the open hover.
Switch the hover back to "automatically close" to return it to a single button, or click
to close.
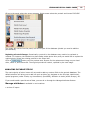
Resizing thumbnail images within a hover: Hovers display graphic content in a mini-view, called a
thumbnail view. The thumbnails within the hover can be made larger or smaller. Click on the interior
portion of an opened hover (try a few pixels off the scroll bar); hold Ctrl (or Cmd on a Mac) on your
keyboard, and use your mouse wheel (or use the up/down arrows on your keyboard) to increase or
decrease the size of the thumbnail view.
8
GETTING STARTED
FILE & PROJECT MANAGEMENT
This section will teach you how to save your projects, save work as a template, and open a saved
project or template.
Learn how to archive project to transfer them to another computer and to delete projects.
You should learn how your photos work in FotoFusion differently than in digital photo editing software,
and how to avoid missing images warnings (and how to fix them if they happen). Last, password
protection is detailed below.
If you are an inexperienced computer user, please consult the next section to learn more about basic
file management on your computer. An understanding of how your computer works with files will save
you hours of frustration and let you focus on the creative aspects of your projects.
To learn how to send completed projects outside of FotoFusion, consult The Output Tab section.
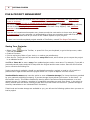
Saving Your Projects:
· Select "Save"
from the Tool Bar, or press Ctrl-S on your keyboard, or go to the top menu, under
FILE and select SAVE.
· Create a file name.
· Point to a directory folder of your choice, or make a new subdirectory.
· Save the file. The project will be saved as a .scrap file format, which allows you to reopen the project
in an editable format.
Use File > 'Save As' to save a copy of an updated project under a new name. For example, if you edit a
previously-saved project and wish to keep both the original and the new version. Save As will not allow
you to overwrite an existing file.
Project versioning is available, should you accidentally overwrite a project or need to roll in back to a
previous save. Right-mouse select the project within File > Open to Open a Previous Version.
YearbookFusion users may have the option to save to Remote storage (if a license has been provided
by your yearbook publishing company). A remote storage license allows you to save "to the cloud" - to
the LumaPix server. This feature enables file sharing within FotoFusion without dependence on a local
network storage. For instance, members of a yearbook committee can work from home, in the school or
at any location with wifi access, sharing project files from their folder on the server. (Remote storage is
currently unavailable to non-YearbookFusion licensees.)
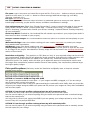
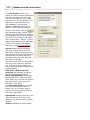
If both local and remote storage are available to you, you will see the following options when you save or
load a project:
FILE & PROJECT MANAGEMENT
9
To save to your local drive, a local network or an external
storage device, choose Locally.
To save to a shared space on the LumaPix network storage
server, choose Remote Storage. Anyone activated with
your YearbookFusion user id will be able to see the project
(and your yearbook printing company as well). No other
user group or users on unactivated software cannot access
your files.
You can make subfolders (right-mouse select inside the
preview area) to organize your project into sections.
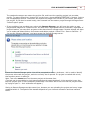
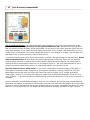
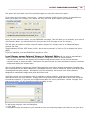
Save as a Template: FotoFusion allows you to save projects as a template, to re-use with new
images. If you have completed a project you wish to reuse later, then choose Save as Template.
FotoFusion will prompt you with the following question:
Choose Yes to strip out the photos from your project - this includes background images. Clipart (eg. png
files) will be retained. Choose No to save the project as it. Tip: If you have used a lot of paper-type
textures, remove your candid (custom) images manually from the image frames, then save the project
without removing the images. Templates can also be made from a single page within a multipage project,
by right-mouse selecting the image within the Pages hover.
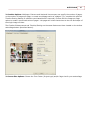
Opening a Saved Project or Template: To load an existing project, click on the
tab to Open existing projects; OR click on FILE on the menu bar and select OPEN; OR p
ress Ctrl-O on your keyboard. You can also click on File on the menu to see a list of recently opened
projects at the bottom of the menu list.
Your computer's folder system is located to the left; you can navigate to any subdirectory on your system
to locate .scrap or .collage files on your system. The Sort and View options allow you to customize the
preview display.
10
FILE & PROJECT MANAGEMENT
FotoFusion files are, by default, saved under My Projects (or My Collages); templates are under the
Template folder.
Note: Two people cannot work on the same file at the same time. Individual projects can be
combined via the Pages hover. If another user is working on a project, the project will show that it has
been locked for editing. (Exception: two projects both containing yearbook panel databases.)
On rare occasion, the lock may be present even if the project is not opened. This is
usually the result of the project improperly shutting down on the last session - for
example, the computer or the software shut down unexpectedly (eg. power outage),
or your network server didn't pass the signal to unlock the project correctly.
If you are 100% positive no one has the project open, you can remove the lock.
Never unlock a project that is in active use by another user, as you risk data
loss to your project. If you are sure that the project is not being worked on by
another user, the lock can be removed by simply right-clicking the project and
selecting Unlock Project.
FILE & PROJECT MANAGEMENT
11
Archiving to Transfer Projects to Another Computer: A .scrap project file is a
"composition" - a recipe used to recreate your layout. Your images are not attached or embedded into the
project, but linked to the project from the local folder where they are stored. If you try to open a .scrap
file that has been moved from one machine to another, the new computer will not "see" the images in the
project, and report the images missing (see below for details). An archive bundles the project and the
source images into one file, so it can be transferred to another computer. This is useful if you don't have
remote store or a shared network to store your work on.
To archive, click on FILE on the menu then choose ARCHIVE/RESTORE, then Archive the file. This will
create a much larger file, called a .scrappackage, on your system. Make a note of the directory where
the .scrappackage file is saved, so you can move the file to an external memory device to transfer it.
Move the file to the new computer, then from a blank project choose FILE > ARCHIVE/RESTORE >
Restore. Point to the .scrappackage file. The project will then reopen, prompting you to save the project
and the source images onto the new machine.
Deleting Projects: Projects saved locally (your hard drive, an external drive, a local network drive)
can be deleted. In File > Open, right-mouse select any project thumbnail, to SEND TO RECYCLE BIN. As
described, the projects are now in your system Recycle/Trash bin. If you made a mistake and need to
restore them, you can do so from the Recycle/Trash bin itself, if you haven't emptied it yet.
Remote storage projects (YearbookFusion only) can be recycled from File > Open in the same manner,
but are sent to the Remote storage trash bin. If you accidentally deleted a project, contact support(a)
lumapix.com to request that the project be restored. Provide your user id (or school name), your
yearbook publishing company's name, the name of the project(s) and the approximate date/time they
were deleted.
How Images Work in FotoFusion (linking vs embedding): FotoFusion is layout software - not
graphic editing software. As such, it does not embed your images directly into your project. When you
drop an image onto your FotoFusion canvas, you are looking at an enhanced thumbnail version of the
image, which is linked to the original image file. Because of this feature, it also allows you to change the
resolution of the finished project at will (eg. make a low-resolution proof and a high-resolution final
render), and is non-destructive to your source images. Keep in mind that your images need to stay in the
same place, with the same name, for the duration of the project. If you rename or move your images
after they have been dropped, or relaunch a project with images pointing to an external memory device
that is not available, your project will report them as missing.
Missing Images: If FotoFusion opens a project and reports that images are missing, you will see
one of these error messages:
Common causes for the Missing Images Warning are...
• The image files being renamed, moved or deleted.
12
FILE & PROJECT MANAGEMENT
• The folders containing the source images were renamed or moved.
• The external memory device (USB key, cd/dvd) was removed from the computer.
· The project file (.scrap) was created on one computer, which accessed images on the local drive of that
computer, but you are opening the .scrap file on a new computer that does not have access to the
images in the same location.
If your project is saved on remote storage (YearbookFusion only), the missing image warning may caused
by images still in the process of downloading to your local system. Click on the Output tab to trigger a
download progress bar to see if there are still images that need to load on your machine.
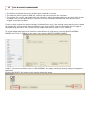
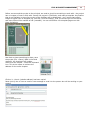
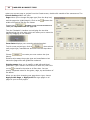
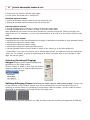
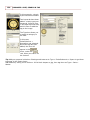
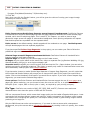
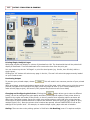
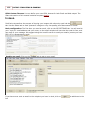
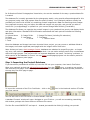
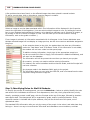
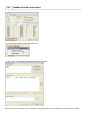
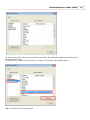
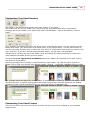
To relink images that have been moved or renamed from a local source, use the LOCATE MISSING
IMAGES tool. Click on TOOLS on the menu, then choose LOCATE MISSING IMAGES.
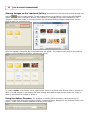
Under 1. Choose the method, click on FIND MISSING. Any page containing missing images will appear in
thumbnail.
Click on the SELECT ALL button to the right to select the pages.
FILE & PROJECT MANAGEMENT
13
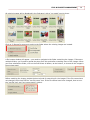
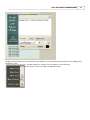
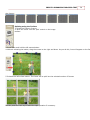
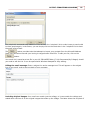
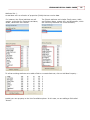
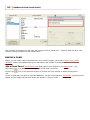
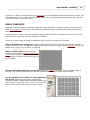
All missing images will be displayed in the 2nd panel, with a "no match" next to them.
Click on 2. Browse for sources to point to the folder where the missing images are located.
A file browse window will appear - you need to navigate to the folder containing the images. If there are
multiple folders, you'll need to repeat the steps from this point after matching some of the images. When
you have selected the folder, click on the 2nd Select all button, at the bottom, to choose all the images in
the preview panel.
Before matching the images, decide the best criteria for searching for the images. If the file names have
not changed, then check off the "use file name" box. If the file names have been changed, then turn on
the "use file size" and "use image match" options.
14
FILE & PROJECT MANAGEMENT
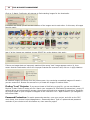
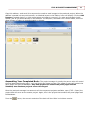
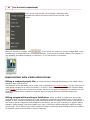
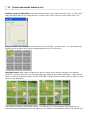
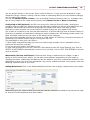
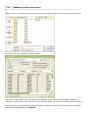
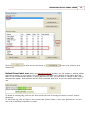
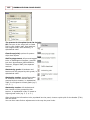
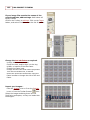
Click on 3. Match. FotoFusion will attempt to find matching images for the thumbnails.
If matches are found, you will see two versions of the images next to each other. In this case, all images
found a match.
Last, if all the images are matched, choose SELECT ALL at the bottom right again..
If there are images that are improperly matched (the wrong "twin" image appears next to it), then
ensure that the checkmarks next to the improper matches are removed. Last, click on 4. Apply Matches.
All matched images will vanish from the preview pane. Any remaining unmatched images will remain you can restart at 2. Browse for sources to try to locate the images in another folder.
Finding "Lost" Projects: If you cannot locate a FotoFusion project file, you can use Windows
Explorer or Mac Finder to locate your file. Search your computer for FotoFusion file extensions (.scrap). If
external drives are being used for storage, the process will need to be repeated for each drive. Generally,
all projects made on your computer will appear in the FotoFusion File > Open window if you navigate to
the correct folder.
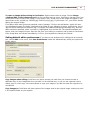
Password Protection: To enable password protection, open your project, and click on the FILE
menu items, then choose Project Management > Password protect. Type in a password and password
reminder of your choice to turn this feature on, then save the project.
FILE & PROJECT MANAGEMENT
15
BASIC FILE MANAGEMENT
Every computer has an operating system installed on your computer -- be it Windows or Mac OS X. An
operating system is the master program on your computer that tells the computer what to do with the
other files installed on your computer. Some files on your computer will launch software; other files will
help software perform particular tasks; other files will store data, such as your projects.
Your operating system is essentially a very smart filing cabinet. However, like any filing cabinet, you need
to make sure to keep it organized tools. Files don't automatically save to your computer in an organized
manner. You choose to save them to particular locations, either by deliberately creating and selecting
folders, or by allowing your installed software to suggest a location, such as a default folder, or the last
visited folder. Allowing a program to save to a default folder is a decision you can make, but always be
aware of where your files are being saved, or you will quickly lose track of your important projects.
One common mistake is to use the computer's desktop or a single folder as a catch-all for all your files.
This can lead to confusion very quickly - it's as if you have one folder in your entire filing cabinet that
holds every document you own. To keep things organized, use folders to help you find projects and
images in easy-to-find locations with a clear naming structure.
Another mistake is to reuse the same file names repeatedly.
· Save As vs Save: If you are simply updating a project file, choose "Save" from the file menu. "Save
as" is intended to be use to make a new copy while retaining the original file. FotoFusion has disabled
the ability to overwrite files with "Save As..." for this reason. Having multiple copies of a project often
leads to version control problems, meaning you will have problems finding the most up-to-date version
of the file.
· Version control: Don't keep multiple versions of the same file in different locations. Work off one main
file, and keep a backup if needed that can be updated separately.
· Distinctive names: Don't rename your image files with duplicate names, eg: renaming images files
starting at 001.jpg every time you clear your camera's memory card. Most digital cameras have a
setting that never resets the file name after each time the camera card it cleared. Multiple files with the
same name will be very difficult to manage. You can accidentally overwrite files, and searching for the
images becomes confusing. If you choose to rename your image files when you download, name the
files in a manner that distinguish them from one another, such as using the date the images were
taken and/or a brief description of the event eg. 2011-05-08 Grandma's bday (01).jpg or Smith-Jones
wedding 001.jpg. There will be no confusion which images are which if each set have their own distinct
name.
Here are two suggested methods to ensure your computer filing system is easy to use:
A) Use Default folders
· all photos are kept in one location (eg. My Photos). You can sort the images by date to quickly find
images.
· all FotoFusion project files (.scrap) and ONLY this type of file are kept in the FotoFusion My Collages/My
Projects folder. You will know exactly where all your projects are by following this practice.
· all exported (rendered) projects (eg. rendered to .jpg or other file types) are kept in My Pictures\My
Exported Collages. This will avoid confusion with the FotoFusion .scrap project files, so you don't
accidentally try to send a .scrap file to a friend or a printing service.
or B) Use Project-based folders
Create folders for each specific event or project. For instance, create a folder named "Smith-Jones
Wedding." Into this folder, place all the source images (.jpgs), the FotoFusion project files (.scrap), and
the exported project pages. Ideally, these should not have the same name as the FotoFusion .scrap file,
to avoid confusion
If you want to back up your images and projects, then make a copy of the folder where the files are
16
FILE & PROJECT MANAGEMENT
stored onto an external memory device.
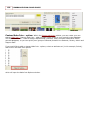
ALBUM MANAGEMENT (Extreme users)
FotoFusion can shave off hours and hours of work hours to produce top quality pro-albums.
There are three ways you can use FotoFusion to create a multi-page album.
1. Design by template: use the Marketplace templates, or your own custom set of templates to quickly
populate an album.
2. The Autocollage Album: create a sorted multi-page album in seconds, ready for customization.
3. The "From Scratch" Approach: Design original albums one page at a time.
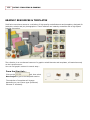
Method 1: Design by template: The dotScrap Marketplace provides a resource for pro-album
designs.
Extreme users receive a collection of six designed albums with their license. Free albums include Tuxedo
Black, Basic Black, Classic White, Embroidery, Signature Magazine and Dreamy Blue. Other albums are
available for purchase from the Marketplace.
To view the available album collection, go to Start Zone, choose New Project, and select ALBUM
TEMPLATES.
When an album is launched on the Create screen, the first page displayed is a cover sheet. This page is
not editable - it is the "wrapper" for the album, to show you the component pages. You can delete this
from the Pages hover.
FILE & PROJECT MANAGEMENT
17
Extreme users can customize the albums: change canvas size, reorder the pages, add or remove frames,
change border options, retint the background, delete, clone or add new pages. Enhanced users can add
their own images and text, and render the projects as is. Albums can be purchased by launching them on
the Create screen, then clicking on the Shopping Cart. Once purchased, the albums will be added to your
permanent collection for repeated use.
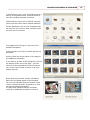
Method 2: The AutoCollage Album: The AutoCollage Album method provides a very quick way
to start a custom job. Start a new project from the Start Zone and choose the Autocollage option.
Run through the AutoCollage Wizard. Select as many (or all) images in your event, and add them to the
dropper. On the Creative Options tab, be sure to specify the following:
• Multi-page: Set the IMAGES PER PAGE option to the total number of pages you will require in your
album, minus the front and back pages.
• Timeline/Sorting: Sort by EXIF Date/Time. Providing that the date & time on your cameras are set
correctly, this will order the wedding to the flow of the event.
On the Canvas Size Options tab, set your page size (eg. a 10x10 album will be 10x20) and set the page
to ALBUM TWO-PAGE SPREAD.
18
FILE & PROJECT MANAGEMENT
You may wish to Respect Center Line (so no image straddles the gutter) and add Safe or Bleeds. You can
also use the Album Manufacturer Presets (click on the arrow next to the page dimensions).
Hit OK to generate your fully populated album in seconds, with the images flowing across the pages in
order of the event.
Method 3: The "From Scratch" Approach
1) Organize your images Open the organizer, and navigate to your images using the Source tab.
Select the images that you wish to use, and assign them into buckets. Assign categories and/or keywords
to your images. This will allow you to easily find them again if you need to edit your album at a later
time. Example: The Smith-Brown wedding has been downloaded to C:\My Pictures\June 2007
jobs\SmithBrown.
In Organize, click on this folder to display all the images, and display them according to Photo Date.
Select ALL of the images, and assign them a keyword of Smith Brown. Then select some of the images
and drop them according to the event/theme into the buckets.
For Example: Bucket 1: bridal party preparation; Bucket 2: the groom's men at the church, greeting
guests; Bucket 3: the bride's arrival and entry into the church; Bucket 4: wedding ceremony; Bucket 5:
the bride & groom's departure from the church; Bucket 6: the formal shots of the wedding party outside
the country club; Bucket 7: the dinner, including candid shots of the guests and the cake cutting; Bucket
8: the dance and bouquet toss..
Create your album: Create new pages, and change the background, be it a texture, or change the
background color. You can also use images from the wedding as a background image. Click on the
hover button to access your pre-sorted images and add them to your canvas. Add text,
downloaded graphic embellishments.
Next Steps...
· Save your work.
· Create a proof for the client.
You may wish to consider using Overlay Image Info image info to the project, to show the file name or
frame number. You may also wish to watermark your project.
· Edit your project. When the client returns feedback, reopen your album and make the requested
changes. Swap images quickly from one frame to another. Replace images entirely by searching
through your keywords and categories to find the series of images you need.
· Send your project to the printers. Render your work at 300 dpi (or as instructed by your printer of
choice) and send the files to them in their prescribed manner. Note that you can produce alternative
sizes of the album through the Project Settings.
· Relax, the job is done! (or go shoot an extra job with all the time you've saved...)
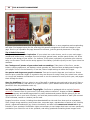
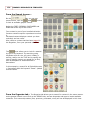
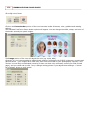
YEARBOOK PROJECT MANAGEMENT
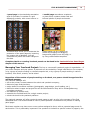
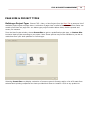
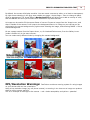
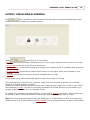
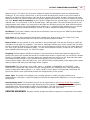
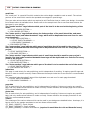
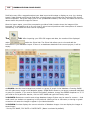
What is a Yearbook? Yearbooks (and directories) are usually composed of two kinds of pages:
panel pages and candid pages.
Panel pages are what makes a yearbook different from a regular photo book, and are only enabled by
using a YearbookFusion license provided by a yearbook publishing company. (Yearbook features are not
available with Enhanced and Extreme licenses.)
FILE & PROJECT MANAGEMENT
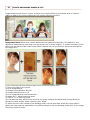
A panel page is the standard presentation
style for portraits. It consists of a grid
displaying portraits, with names next to or
under the photos.
A candid page resembles a scrapbook
or photo book, contains custom text and
informal photos of people and events.
YearbookFusion allows you to automate the
production of the panel pages by importing
the images with a database. You can
customize the panels and make changes to
the data.
Candid pages can be created from
scratch by dropping and dragging
images and graphics onto the page, or
by using customizable templates.
19
Complete details on creating Yearbook panels can be found in the YearbookFusion: Panel Pages
chapter of this manual.
Managing Your Yearbook Project: The key to a successful yearbook project is organization - of
your team members and your photos. A yearbook can be created by a single individual on one computer,
or by a group of people working in a shared computer lab, or by a group of people working in various
locations, from home, at work, and at school.
Regardless of the number of people working on the book, one person should be appointed the
yearbook manager.
The yearbook manager will:
· act as the primary contact between the school and yearbook company;
· determine page order/sections;
· assign tasks to committee members (photography, page design, proof-reading, etc.);
· determine where images and project files will be saved and how they will be exchanged among
committee members;
· set deadlines to submit work;
· assemble the finished book into a single master project;
· submit the book to the yearbook publisher.
The yearbook manager will often create the panel pages as well, as s/he is the manager of the final
assembled book. It is recommended to have a "panel specialist" to streamline the process of making
panel pages.
Each team member may have one or more sections assigned to them, with an expected page count for
each section. This is particularly important if the yearbook is limited to a specific number of pages by the
20
FILE & PROJECT MANAGEMENT
publisher. Note: if the publisher has set a target page count, you will see it displayed in the bottom of the
Create screen, warning if you are over or under your page count limit.
The members of the committee can all work on separate mini-projects, saved under separate file names.
These projects can be sent to the yearbook manager. The yearbook manager will be able to insert the
smaller projects into the final project (the one containing the panel pages), and order the pages
accordingly.
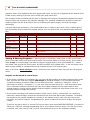
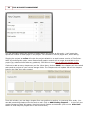
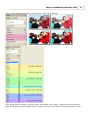
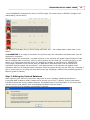
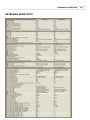
A project map helps immensely - your book needs a plan in order to get it done. Here is sample grid of
how a yearbook project might be managed. Design your own grid to suit your yearbook team and work
flow.
Chapter
Panels (master project)
Page count
Assigned to
to be
Pam
determined
Admin greeting (principal,
2
Jess
vp, etc)
Sports (football, baseball,
6
Nicole
track, cheer, other)
Lunch/Cafeteria
1
Jesse
Fundraisers (book fair,
2
Jesse
bake sale)
Performances (fall prod,
4
Katarina
winter, glee, jazz band)
Halloween
1
Mario
Prom
Ad pages
2
6
Mario
Pam
PSPA cd
Image source:
Due by
Feb 15/10
Rec'd/Ap'd
Pam
D:\Lincoln Net\Ybk\Candids\Staff
Feb 15/10
Pam
Gallery > Sports
Apr 4/10
D:\Lincoln Net\Ybk\Candids\candids gen\school life
D:\Lincoln Net\Ybk\Candids\candids gen
Apr 4/10
Apr 4/10
Gallery > Dropbox > From Kat
Apr 4/10
D:\Lincoln Net\Ybk\Candids\candids gen and
Gallery>Halloween
Gallery > Dropbox > Prom
D:\Lincoln Net\Ybk\Candids\ads and logos
Feb 15/10
Pam
May 1/10
May 1/10
Saving & Sharing Projects: To save a project in FotoFusion, simply click on FILE on the menu,
point to the folder where you want to save the file, then choose SAVE (or choose Ctrl-S). If you need to
make a copy of a revised page, but want to keep the original project, then choose SAVE AS... choose
your folder, and give the file a new name. Do NOT use SAVE AS to update a file - it will only allow you to
make a copy, leading to a cluttered drive with multiple versions of a single project.
Note: if you have a Book manager license, consult the next section to learn how you can edit projects
online.
Projects can be shared in several ways:
· If your team is working in a computer lab, you may find that working off a shared network drive works
best. All users will save their projects and images to a shared directory. It is important that every
computer accessing a common folder see the same drive letter - meaning, if Computer 1 sees a
network drive called Y:, Computer 2, 3, 4 etc. also sees this same drive as Y:, and not another letter.
This is important because FotoFusion will trace the images dropped into the project back to their
original location, and the project needs to find the images in exactly the same place all the time, or it
will report that the images are missing.
· If your team is working from various locations (home, school, library, internet cafe, etc.) without a
network or remote storage, projects will be saved to the local hard disk of each computer. To transfer
the projects to the project manager for inclusion in the master project, each user can archive their
project(s). An archive creates a .scrappackage file, which contains all the source images and project
"recipe."
To archive a project, launch it, choose FILE on the menu, then choose ARCHIVE/RESTORE > Archive for
Public Use. Copy the resulting scrappackage file to your external memory device. This file can be sent
to another user via a usb key, dvd, or other memory device to give to the yearbook manager.
FILE & PROJECT MANAGEMENT
21
The yearbook manager can restore the archive file, and insert the resulting project into a master
project. To restore an archive, choose FILE on the menu, choose ARCHIVE/RESTORE > Restore. Point to
the .scrappackage archive. FotoFusion will deposit the images into a folder of your choice, and reopen
the project. It can then be saved locally, then inserted into the master project through the Pages hover
"Insert Project" option.
· If your publisher has provided your school with Remote Storage, you will have the option to save
projects and images to a LumaPix server. All users with a high speed internet connection, regardless of
physical location, can save their projects to this shared server storage space. Remote storage will allow
you to make and delete folders, and rename and delete projects. Choose File > Save or Save As... If
you see the following dialogue, you have access the Remote Storage server.
Choose the Remote Storage option. You will be prompted to create a nickname - this is used to identify
the person who made the project, and who currently has it opened. If a project is marked with a lock,
then another person is editing it.
Note: Two users cannot work on the same project at the same time.
(The lock can be overridden by right-mouse selecting the page thumbnail, in the case that a user has
kept the project open on their computer accidentally. You will be able to see who has the project locked
by trying to open it -- their nickname will appear.)
Saving to Remote Storage can take some time, because you are uploading the project and every image
contained within it. The speed of the transfer depends on your internet connection and local network
traffic.
22
FILE & PROJECT MANAGEMENT
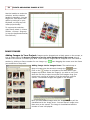
Sharing Images on the Yearbook Gallery: YearbookFusion licenses with remote storage may
use the
hover to share images. To add images directly to the Gallery, click on the ADD IMAGES
button. This will open a standard "browse" type window, to navigate to any folder available to your
computer. Select one image, or hold the Control key and select multiple images. When done, choose
OPEN to start the upload process.
When the upload is complete, the image thumbnail will appear. The image is now ready to be used in a
project, and is available for all other users at your school.
To create a folder in the Gallery hover, right-mouse select in the blank area. Double-click on a folder to
open it, to add images or use images that have already been added. Right-mouse-select any image or
folder in the Gallery to rename or delete it.
Using the Gallery Dropbox: The Dropbox is a folder within the Gallery which allows you to
receive images from people not working directly in YearbookFusion. Navigate to the Dropbox folder in the
Gallery - you'll notice a website address at the top of the hover.
FILE & PROJECT MANAGEMENT
23
Copy this address - and email it to anyone who needs to send images to the yearbook project. When the
address is pasted into any web browser, an identical layout to the Gallery hover will display. Click on Add
Images to upload photos, or right-mouse select an image to rename it, or make and navigate inside
folders, just as you would directly in the software. The Dropbox, accessed from a web browser, does not
allow images or folders to be downloaded or deleted.
Assembling Your Completed Book: The project manager is usually the person who will control
the final assembled book project - we'll call it this the master project. The master project will contain the
panel pages and portrait database. Only ONE project can contain the panel pages and the
database; two database projects cannot be merged.
Once the yearbook manager has access to all the component projects available, open (FILE > Open) the
project that will serve as the master project. Again, this is the project that contains the panel pages and
the database.
From the
hover, the current contents of the book will be visible in miniature version.
24
FILE & PROJECT MANAGEMENT
Use the Insert Project option on the Pages
hover to add the individual projects, one at a
time, into the Master Project.
After candid pages are added into the project,
they can be moved up and down the project
(and in-between the panel pages) by means of
the arrow keys. Note: Candid pages can be
moved in-between panel pages, but not viceversa.
If a page needs to be deleted, then select it and
use the deletion button.
Pages can also be duplicated (copied).
When all the pieces of the yearbook project have been assembled into the master project, the yearbook
manager can review the project then submit it to the yearbook publishing company as per their
instructions.
Designing Tips: Creating a yearbook can be a fun, creative and collaborative process. Here are a few
tips to help you make a memorable book that will be the talk of the school.
Tip 1: Plan, Plan, Plan - Then Design: The first secret to creating a successful yearbook is to map the
project out before you put a single image to canvas. The bulk of your time will be spent collecting images
and determining the flow of your book into pages and sections. Once this work is done, the page design
process will be a breeze. Very important: Start planning early in the year, not a couple of weeks before
the project is due. Don't stress yourself out!
Dividing the book into "bite-sized" pieces will make it less daunting. To begin, consult the school calendar
from the previous and current year, to determine what the big events in your school will be. Look for
recurring events: performances, fundraisers, fairs, dances, sporting events, club activities, etc. Do any
staff members need special pages, such as a note from the principal or a page for awards of merit for
faculty? Reserve a few pages for "every day life" at the school - the cafeteria, study hall, library, recess,
and so on. Also be sure to few pages free for the unexpected. Both happy and sad events need to be
chronicled at your school, and not every event is planned or expected.
FILE & PROJECT MANAGEMENT
25
Once you have mapped out your sections, make empty placeholder projects or pages and save these. If
you are working together as a team, open a blank project, type in large text the theme of the page, then
save it. If you are assigning sections of the book to members of a committee, you might want to make a
sub-folder for each person and add their placeholder project into the folder.
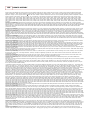
If you alone are making the project, create a base master yearbook project, then fill it with empty pages
and a text frames to indicate what section will fill the page. For example, here is a view of a Pages hover
that shows a book mapped out into sections.
Once this work is done, you only need to choose the photos to fill the pages.
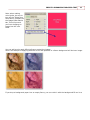
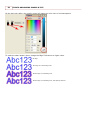
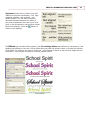
Tip 2: Consistent Styling: Well-desinged yearbooks use color, font and style to create a "look," just
like a magazine. A book can carry a consistent look across the entirety of its pages (preferable for small
books) or across sections within the book.
Define sections with a common background texture and color. Use one common background across
all panel pages, or at least across each grade. The color will distinguish the sections from one another.
Also, use a consistent border size/color across sections. Avoid making your book a rainbow of colors on
each page - this distracts from the photos and most people will not find it appealing. Pick three colors
and reuse this across the book, along with neutrals (white, black, grey, beige/tan). Pick one font for all
titles/headers, and another font for body text (meaning, paragraphs of text). Don't leave your text
in standard Arial - it looks unfinished. You can use other font and text styles to punctuate the book (eg.
quotations, slogans, word art) but keep the bulk of the text consistent. Your book will be unified, and the
images will be the focus, not the decorations. You might even design a palette page - copy this page into
your project to have the colors, textures and fonts at hand.
26
FILE & PROJECT MANAGEMENT
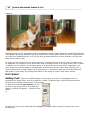
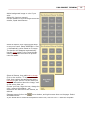
Tip 3: Avoid the Clutter: The #1 problem with most yearbooks is using too many images per page.
Your yearbook is not the repository of every photo taken that year. Be selective! You may think
that you need to include as many photos as possible, so everyone in the school gets their photo into the
book. Unfortunately, if you overcrowd your pages with dozens of tiny images, then essentially no one is
visible in any of the photos. Don't auto-collage two dozen or more images on a page - pick the best 6-10,
and feature one or two prominently, framing them nicely.
A yearbook should tell the story of your school year, so select a few good images to tell that story. Select
well-composed shots that show faces and people participating in activities. Don't use non-descript
shots of group activities, or photos with random people's backs facing the camera. Far-away shots of
sporting events or performances won't let you see what is going on - tell your photographers to get in
close to the action. Show faces, zoom in on meaningful objects, just like the pros do.
Don't be afraid to leave "blank areas" in your book - particularly around the edges of the page. A
blank space around the photos frames them, giving them importance. Pushing images too close the
pages edge risks having them cut off as well, when the book is printed. A 1/2" margin around the
"meaningful" content on your page will make your pages look professionally designed. Think of it as a
"rule of thumb" - if you were holding a printed book up, would your thumb be on top of text or photos on
the page?
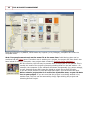
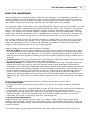
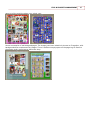
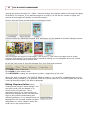
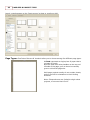
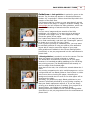
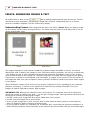
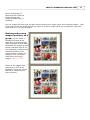
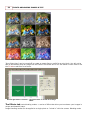
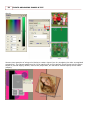
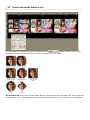
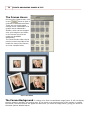
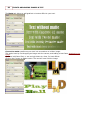
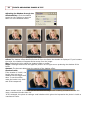
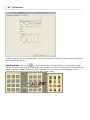
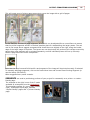
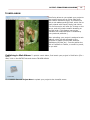
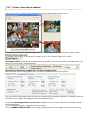
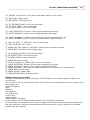
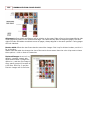
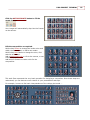
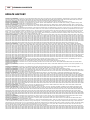
Here are examples of badly designed pages. They are very cluttered. On the first page, the background
fights with the images; on the second, the borders are more prominent than the images. No one will take
the time to look at the photos on these page because they are too small, completely overwhelm the page,
and there is no story being told. The pages are being used as a dumping ground for images, not as a
FILE & PROJECT MANAGEMENT
27
page to tell the anything about your school year.
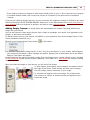
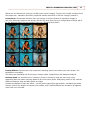
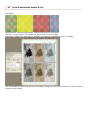
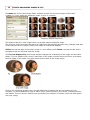
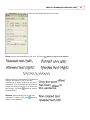
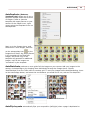
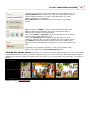
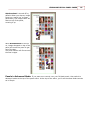
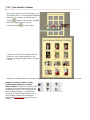
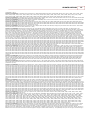
Here are examples of well-designed pages. The images have been selectively chosen to fit together, with
backgrounds that complement the images. There is sufficient empty space on the page to give focus to
the photos, and a some text to define the story.
28
FILE & PROJECT MANAGEMENT
If you are not confident about your design abilities, find inspiration in news magazines and scrapbooking
web sites. Find a page layout you like, and copy the general arrangement of text and images on your
page. Don't try to reproduce the page element-for-element, just the general placement on the page.
Tip 4: Make It Personal
Use your school colors for inspiration. If your school has a color theme, use it on your main pages outside and inside covers, messages from the principal, general news, and the panel section, etc. Or be
inspired by the design of your school - for instance, if the school is painted in a particular color scheme,
carry it to the book. Check out the varsity papers in the Gallery (LumaPix clip art) to see if your colors are
available.
Use "background" photos of your school and surroundings. Take photos of the floors, murals,
lockers, sporting equipment, art displays, school grounds, etc, and use these as background images for
your pages. Zoom in on the textures, or use blur, b&w or sepia settings to soften the images.
Use quotes and slogans as graphic elements. Text can be used to decorate your book too. Does a
teacher have a particular slogan or expression they are famous for using? Does your school have a cheer
or a song? Ask students and teachers for one-word or one-line sentence to sum up their year, and pepper
these through the book.
Scan the headlines. Did your school or any of the staff or students get mentioned in the news? Scan or
photograph the headline, and add it as a "ripped" banner. (Don't add the whole article unless you have
permission from the publication to do so).
An Important Notice about Copyright: FotoFusion is packaged with a myriad of graphic
resources. These are free for you to use in your book without restriction. Images provided by your
yearbook company and candid images taken by staff, students and parents that are given to you are
appropriate for use in your book. Similarly, art work and photos made by students or staff (with consent
of the individual, teacher or student) can be used.
Images from other sources, including those downloaded from the web from sites such as newspapers,
Flickr, Google image searches, stock photo sites, corporate logos, reproductions of works of art, celebrity
photos, registered trademarks (eg. cartoon characters) and other sites cannot and should not to be
included in your yearbook. Distribution rights are necessary to use images that have not been specifically
provided to your school for use in the yearbook, and selling yearbooks containing these images could
FILE & PROJECT MANAGEMENT
29
result in serious legal problems for your school. Yearbooks are a commercial production and require
special licensing to use images created by others.
BOOK MANAGER (YearbookFusion only)
Book Manager is an add-on license available for some YearbookFusion users (as provided by your
yearbook company).
It adds a module to your software which allows you to create new chapters (projects), designate the
chapters as being editable online, to render multiple chapters (including those with databases) without
merging project separately via the Pages hover. All projects used in the book manager must be stored on
remote storage.
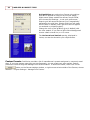
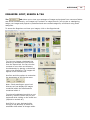
To create a book, go to File > New Project and select BOOK.
which will open the New Book window....
Type a title for your book, then click on Create New Book to start... the Chapters window will appear.
At this point, you can create new blank chapters, or add chapters (projects) already saved to your
Remote Storage folder.
Click on New Chapters to add new sections to your book.
30
FILE & PROJECT MANAGEMENT
You can optionally specify the number of pages within the chapter at this point - it will create the
equivalent number of blank pages in the project. You can add or remove pages later, when editing.
Flagging the project as online will make the project editable in an web browser version of FotoFusion.
Note: by choosing this option, some features and graphic content will no longer be available to this
project (eg. advanced text features, gradients). See below to learn how to edit your project online.
Continue to add as many chapters as you like. When done, click on DONE. Your chapters will be created
and saved as projects to your remote storage folder. The Chapters tab will update with all the chapters
listed in the order they were created.
From this window, you can drag a chapter from one position to another, to rearrange their order. You
can add preexisting chapters into the book as well. Click on Add Existing Chapters ... A list of all your
remote storage projects will appear. Used projects will feature a checkmark (click on the Hide Used
button to show only the projects not in the current book).
FILE & PROJECT MANAGEMENT
31
To add a project, select it from the preview pane or the list, then click DONE. (Hold Ctrl to add multiple
projects.)
The selected project(s) are now added to the book. To move the project to a new position, click and drag
it to a new location.
In the image above, notice how the chapter "Halo race" is selected - and a small toolbox as appeared.
Click on
to open the project in FotoFusion, to edit it. Click on
to clone (make a copy of) the
project. Click on
to delete the project from the book manager. Note: this doesn't delete the project,
just removes it from the manager. You can also flag the status of each chapter by clicking on the color
bar below the preview.
Once you have set up a book, you can continue to work on the chapters (projects) via the manager, or by
32
FILE & PROJECT MANAGEMENT
opening the projects through File > Open > Remote storage. Any changes made to the project will apply
to the Book. For instance, if you add extra pages to a project, you will see the number of pages and
preview of those pages will update in the book manager.
Here we have two blank projects and one single page project.
If these projects are edited and resaved, their appearance will be updated in the Book Manager preview.
The first project has grown to three pages - click on the +/- sign next to the page could to reveal
previews of the pages. The second project is opened for editing, so a lock appears at the top. Locked
projects cannot be opened by another user.
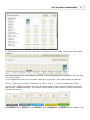
On the top right corner of the book manager tool, you'll find several options:
Click NEW to start a new book.
Click LOAD to open another book.
Click SETTINGS to change the form factor (product + page sizes) of the book.
When your book is complete, click OUTPUT BOOK to render it - to a local file, uploaded directly to your
yearbook printing company, or to generate a text list of all the sections in your book (paste the text into
a word processing program, like Word or Notepad).
Editing Chapters Online: When
creating a new project in Book Manager, you
can specify that it will be editable in an
online version of FotoFusion. This is
particularly useful if you need someone to
customize a template, but do not want them
to go to the trouble of downloading and
activating software. In our example book, the
Message from the Principal chapter has been
assigned as an "online" chapter. Notice the
cloud icon on the project preview.
FILE & PROJECT MANAGEMENT
33
Before we can send the project to the principal, we need to give him something to work with - the project
has no images or fonts to work with. Launch the project in FotoFusion, and make a template. Any feature
that is not available in the online version of the software will be disallowed - you'll notice that certain
image file types can't be dropped (eg. emf files, from the Gallery), that you cannot type on the canvas,
and some fonts will be marked as red (unusable). You can still build a nice template page even with
these limitations.
Now that we have something to share, save
the project (File > Save). Back in the Book
manager, the thumbnail will update.
Hover over the chapter - notice the clipboard
icon. This is the means to retrieve the
address for the online chapter.
Click on it - the url (website address) has been copied.
Paste (ctrl-V) the url into an email or text message to send it to the person who will be working on your
project.
34
FILE & PROJECT MANAGEMENT
Copying this url into a web browser will launch your project in an online version of FotoFusion...
The project can now be edited online.
Click
to browse for images to add to your project.
Your image(s) will appear above the project, ready to add to the project. Choose FILL BOOK to add
images to empty frames on the template, or drag one image into an empty frame.
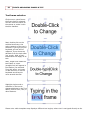
Double-click on text frames, to open the simplified text editor. Any fonts included in the template will be
available from the font dropdown.
FILE & PROJECT MANAGEMENT
35
Image and text frames can be resized via the handles, or removed and reordered from the editing and
navigation tools.
To reorder frames on canvas, use the toolbar on the left side
of the screen. Click X to delete unwanted frames.
36
FILE & PROJECT MANAGEMENT
Zoom in/out of the project, save changes, undo/redo edits,
and add new frames from the toolbox on the left side of the
screen.
When the project is complete, click
. It will unlock the project on remote storage. Back in the
installed copy of YearbookFusion, in the Book Manager, you'll see the thumbnail update. Your chapter is
now available for additional editing in FotoFusion, or you can mark it as complete.
IMAGE EDITING WITH OTHER APPLICATIONS
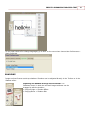
Editing a rendered project file: All users can export flattened files directly to an image editing
software (such as Photoshop).
The Output to a File tab allows you to render your composition to an external editor. This will allow you to
make global changes to an entire composition, or work on spot editing. Note: FotoFusion Extreme allows
you to render your files into a layered psd format, which you can open in Photoshop. All elements on your
FotoFusion collage will be rendered to separate layers in the psd, allow for individual image color
correction.
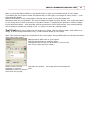
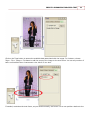
Editing images while working in FotoFusion: When you drop an image onto the canvas,
FotoFusion does not open the image up in full resolution.It creates a low-resolution copy of the original.
Because of this, FotoFusion allows you to add dozens and dozens of images at one time to your canvas. If
you need to edit an image you have dropped on the canvas, you can open it directly in a graphic editing
software, make changes, then auto-update your copy in FotoFusion without having to rebuild a collage
from scratch. This is useful if you need to affect the image in some way that FotoFusion does not support,
for example, paint out some dust or remove blemishes.
FILE & PROJECT MANAGEMENT
37
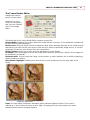
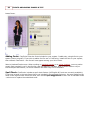
To open an image while working in FotoFusion: Right-mouse select an image. Choose Image
>External Edit > Edit in External tool from the resulting pop-up menu. FotoFusion may ask you if you
would like to make a copy of the image. If you choose "yes", a new copy of the image will appear in the
same folder as the original (eg. D03043.jpg, D03043 (copy).jpg). If you choose "no", you will be directly
editing the original image.
If no editors have been previously selected, select "manage". Click on the Add button, which will open
your Windows Program File folder. Navigate to the folder of your software of choice, and find the .exe or
.app file which launches the software (eg. C:\Program Files\Adobe\Photoshop\Photoshop.exe). Once an
editor has been specified, select it so that it is highlighted, then choose OK. The specified software will
launch, and your image will open. Save the file once your editing is complete, and go back to FotoFusion.
If the image does not refresh immediately, hit F5 on your keyboard to redraw your canvas.
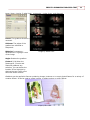
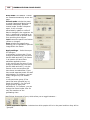
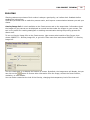
Setting default editor preferences: If you want to set preference for editing with an external
tool, choose Edit on the menu, then User Preferences. Under the Advanced tab, select your options for
Image editing.
Copy Images when editing: FotoFusion can either prompt you each time you choose to make a
duplicate copy of your image each time you edit it in an external tool, or you can set a general rule to
always copy or never copy. You would choose to copy your images if you did not want the original to be
overwritten.
Copy Images to: FotoFusion will place copies of the images next to the original image, unless you point
it to a specific folder on your system.
38
FILE & PROJECT MANAGEMENT
Default editor: You can be always prompted to choose to edit your images in an external tool (if, for
instance, you have more than one editor you use). To set a permanent editor, change the Default editor
dropdown to Manage. The Manage External Programs window will appear:
Select
to browse your computer for the folder containing the .exe (Windows) or .app (Mac)
file for your chosen image editing software.
Once selected, it will appear in the list of available editors in the User Preferences window. Select it to
make it your default editor.
FILE & PROJECT MANAGEMENT
39
PAGE SIZE & PROJECT TYPES
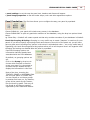
Defining a Project Type: Choose FILE > New, or New Project from the Start Tab to access a list of
available project types and page sizes. A collection of page sizes is called a form factor. A form factor can
contain more than one page size - an album-type project contains album sides, double-spreads and
covers, for instance.
From the New Project window, choose Preset Size to get to a predefined project type, or Custom Size
to start a blank project according to your specs. Note: Some options may not be available to you due to
restrictions from your book publisher or license type.
Selecting Preset Size may display a selection of common generic formats, and/or a list of formats from
selected book printing companies who have provided their sizes to LumaPix. Click on any product to
40
PAGE SIZE & PROJECT TYPES
launch a starting page on the Create screen (a sheet or an album side).
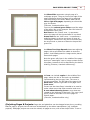
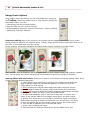
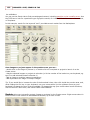
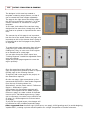
Page Types: FotoFusion Extreme & Yearbook allow you to choose among four different page types.
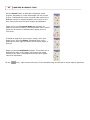
A Sheet represents a single piece of paper that is
not part of a book.
Note the little blue resize handles on the top and
left-side of the page; pull on these to manually
grow or shrink the page size.
Multi-page projects usually do not contain sheets,
as they provide to orientation to their binding
direction.
Note: Enhanced users are limited to single-sheet
projects, of no more that 13x19"
PAGE SIZE & PROJECT TYPES
41
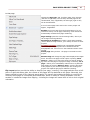
An Album Side represents a single page of a
multipage project. The grey line on the edge of the
page represents where the page will be attached
into the binding of the book. Album sides can be
left or right side pages, depending on where this
grey line shows.
(Extreme, Yearbook edition only)
You may see red and green lines around the edge
of the page, like in this example. See info below on
Guidelines to learn more
Red lines are the "bleed" zone - it represents
where the page will be trimmed after it is printed.
Green lines are the "safe" zone - it represents a
guideline/margin to show you where to keep all
"meaningful" content so it will not be trimmed out;
do not put text or pictures of faces too beyond the
green line.
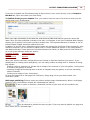
An Album Two-Page Spread shows two adjoining
pages, with a split down the middle to show the
gutter. A solid background or image can be placed
across both pages.
Note the green safe lines in the middle of the page don't put "meaningful" text or image content across
this space, because it will be distorted by the book's
binding. (Extreme, Yearbook edition only)
A Cover can include a spine in the middle of the
page, where the title of the book can be added represented by the two grey lines. The cover is
shown opened flat. The left side of the page is the
back cover, and the right side of the page is the
front cover.
Covers can also have flaps, intended to be used to
make a dust-cover that raps around a hard cover.
A note about choosing covers: cover sizes are
related to the thickness of the book. The cover (and
spine) needs to be wider to fit more pages or
thicker paper.
(Extreme, Yearbook edition only)
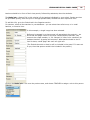
(Re)sizing Pages & Projects: Page size and guidelines can be changed at any time, providing
that the page or project size has not been locked down by the album manufacturer (eg. Yearbook
projects). Multipage projects can even be resized, all pages at once, with a few simple clicks. To set or
42
PAGE SIZE & PROJECT TYPES
resize your current page or project from the Create screen, double-click outside of the canvas area. The
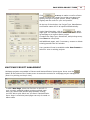
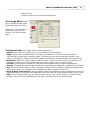
Canvas Settings editor will open.
Page allows you to change the page type (from the drop box)
and the page size (width/height). Click on the
width and height to flip the two values.
between the
Ensure that
checkbox is on if you want FotoFusion to
resize your composition to the new page size.
Turn the "Resizable" checkbox on to display the two blue
handles along the ruler edge, which will allow you to resize the
page by dragging on the handles.
Form factor displays your currently selected product.
To pick a new project type, click on
, then select a
new project type, manufacturer and size from the drop-down
lists.
Choose
to create your own custom size (see
below).
Remove strips away the project type and manufacturer but
leaves the page sizes and guidelines unaltered.
Printing zones allow you to modify or add safe and bleed
guidelines. Type a value in the first box of each row, then click
on the
to transfer the value to all four sizes. You can
specify a separate value for the gutter, edge, top and bottom of
the album.
When you are done changing your page size or type, choose
Apply to this Page, or Apply to All like-type pages or all
pages in your current project.
PAGE SIZE & PROJECT TYPES
43
Guidelines: A Safe guideline is marked in green on the
canvas. The line does not appear on finished printouts or
renders. All "meaningful" content should be kept within the
margins of the Safe area.
This ensures that the content on your page doesn't get cut
off too close to the edge, or caught in a book's binding. The
Autocollage tool will respect the Safe guidelines, which has
the effect of creating an attractive border around your
images.
You can move images and text outside of the Safe
guidelines - for instance, if you were trying to achieve a
"jumbled off the page" look, or have applied an image
across the gutter of two pages.
Don't place text frames over the safe, if you want the text
to be read comfortably, and don't put "meaningful" parts of
an image on or over the line (eg. a face).
Even if you are printing on a desktop print, you may want
to add Safe guideline to help you make a more attractive
layout with a margin around the edges of your page.
Safe guidelines are added via the Canvas Settings editor
(see below) or are pre-programmed into the manufacturer's
preset sizes.
A Bleed guideline is marked in red on the canvas. The line
does not appear on finished printouts or renders.
The bleed value increases the overall size of your page,
because it is intended as adding padding to trim off during
the printing process. The Bleed guideline falls exactly on
the trim-edge of the finished page.
Note that on the ruler, the canvas size extends below the 0
mark.
Pro-printing companies who print multiple pages on a roll or
a large sheet will use Bleed guides to ensure there is a little
extra room when trimming the pages, extending the
background outside the trim area so no white paper will be
showing at the edge.
Generally, you would only apply Bleed guidelines to your
canvas if specifically directed by a pro-printing company or
that your studio equipment requires it. If you are simply
printing on a desktop printer or sending your projects to a
photo-finisher, you should not include a Bleed.
Bleed guidelines are added via the Canvas Settings editor
(see below) or are pre-programmed into the manufacturer's
preset sizes.
44
PAGE SIZE & PROJECT TYPES
Grid guidelines are optional on-Canvas-only settings
that can be applied to help you lay out your pages.
Right-mouse select outside the canvas, choose VIEW,
then choose Grid Settings... to set your preferences.
Snap to grid will cause the frames to be "magnetically"
attracted to the grid lines. Display Grid Lines will make
them visible on canvas (note: grid lines will not appear
on rendered or printed projects).
Change the color of the gridlines (grey is default) with
the color swatch. If you have a light colored background
choose a dark colored line, or vice versa.
The Horizontal and Vertical spacing, displayed in
inches, can also be altered to your requirements.
Custom Presets: FotoFusion provides a list of manufacturer's presets and generic, commonly-used
sizes. If you have custom page sizes you use frequently, you can create your own presets. Custom
presets are made through the Manage Form Factors feature. To access the editor, either click on the
button on the Canvas settings window, or right-mouse select outside of the Canvas, choose
PROJECT > Project Settings > Manage Form Factors.
PAGE SIZE & PROJECT TYPES
45
Click
at the top to make a new form factor
preset. Products can contain more than one page type.
Specify the type of project (Album, Sheet, Specialty,
Digital) and the name for your new product.
At the top of the window, the Project Type, Manufacturer
and Product name will be all specified automatically.
Under Page Descriptor, click on
to add a
page type. For example add an album side and a double
spread page to a custom album project.
Complete the Page Type, dimensions, and printing zones,
then Save the new preset.
Add additional pages, and, if necessary, rename or delete
existing presets from this window.
Your presets will now be available under User Presets to
select for new or existing projects.
MULTIPAGE PROJECT MANAGEMENT
Multipage projects are enabled in Extreme and YearbookFusion license types. Hover over the
button at the bottom of the Create screen to access the controls for multipage project management.
(Dock it by clicking on the pin icon.)
To add a New Page, select the first icon on the left. If
your currently selected product contains multiple page
sizes (eg. album sides, double-page spreads, covers),
you'll be able to pick which one you want. YearbookFusion
users: Keep in mind that panel pages can only be made on
Album sides.
46
PAGE SIZE & PROJECT TYPES
Use the Insert button to add other separately saved
projects, templates or a new autocollage into the current
project. YearbookFusion users: projects each containing a
database cannot be merged together, so be sure to only
have one project with the panel images and database.
Pages can be moved up and down the sequence by
means of the arrow buttons. YearbookFusion users: candid
pages can be moved in-between panel pages, but not
vice-versa.
To delete a page from your project, select it from your
Pages Hover and click delete. YearbookFusion users:
deleting one panel page will delete all the panel pages in
that set.
Pages can also be duplicated (copied). This allows you to
duplicate the style of one page, and change the image
content if you want. YearbookFusion users: Panel pages
cannot be duplicated.
On the
hover, right-mouse select any of the individual page thumbnails to access options particular
PAGE SIZE & PROJECT TYPES
47
to that page.
Change the page type, and, for album sides, their direction
(left side or right side). The currently selected page will be
checkmarked, and, if applicable, the side type (right or left)
will be checkmarked.
A list of custom page sizes used in the current project will
appear, if applicable.
Exclude the current page from the finished project (eg. an
instruction sheet) or from page numbering. Cover sheets are
automatically excluded from page numbering.
Page settings opens the Canvas settings editor, where you
can change size and guidelines.
Save Page As Template will create a single page template
(with or without image content, your choice) for reuse in other
projects
AutoDuplicate Page transforms an unpopulated template
into a self-replicating template when combined with the
Autopopulate tool. Learn more in the Autotools section of this
manual.
Delete page does just that - the page is removed from the
project.
Rename Page will change the page name displayed the Pages
hover. This does not apply to final output or printing. Move
page to... allows you to move the page to a specific location,
eg. move the last page of a project to Page 3. Similarly, Go to
page... allows you to immediately switch focus to a particular
page within the project. Begin on page... sets the first page
of the project to your choice (useful if you are working on a
project with separate projects for different sections).
Flip Layout options provide the ability to AutoFlip your page - meaning, if the page switches from a leftside to a right-side album side, the content of the pages will flip relational to the gutter. Generally, this
feature should be kept off for yearbook panel pages. Flip Layout also includes the ability to reorient the
currently select page on a horizontal and vertical axis, which is useful for reusing templates. You can
exclude or include the images from flipping - including the images will cause them to mirror their original
orientation.
48
PAGE SIZE & PROJECT TYPES
CREATE: ARRANGING IMAGES & TEXT
All creative work is done on the
tab by adding images and text onto the canvas. Think of
the canvas as your workspace, representing a single piece of paper. Images and text live in frames,
which are resizable "windows" onto the content they display.
Understanding Frames: Each image and text item lives within a frame. When you drag an image
on the canvas, you are really moving the frame. The frame pulls the picture or text along with it, like an
object nested inside a box.
An empty image and text frame on a blank
canvas
A populated image and text frame on a
blank canvas
The images displayed on your canvas are not full-resolution image embedded on screen. You cannot
directly edit, alter or destroy the images on your FotoFusion canvas (exception: the red-eye removal tool)
. The images you see on your FotoFusion canvas are low-resolution (thumbnail) copies of your images,
which are linked back to the original file. Because FotoFusion is working with mini copies of your photos,
it allows your computer to use hundreds, even thousands, of images in your project. If the full version of
the image was used, then your computer's memory wouldn't be able to handle more than a dozen images
in one project.
When FotoFusion creates a final version of your project (rendering it to file, uploading to your yearbook
publisher, printing it), it returns to the original file to collect all the missing information from your
images, to make a high-quality output, page by page.
IMPORTANT TIP: Because the software works in this manner, it is important not to do the following
during the process of creating your book -- you will get "missing images" warning because FotoFusion will
not be able to link back to the original images:
· Do NOT rename your image files after you've added them into a project.
· Do NOT move the image files to a new folder.
· If your project images are on a cd, memory stick or other external memory device, ensure that this
device is plugged in before reopening a saved project.
· If your project is saved in on a network (eg. a computer lab), ensure that the photos are available in a
folder that any computer using FotoFusion on the network can see the folder with the name folder path.
CREATE: ARRANGING IMAGES & TEXT
49
If you make a project on Computer A with photos saved locally to your C: drive, then save your project
to a shared network folder, then reopen the project on Computer B, the photos will be marked as
"missing".
If you do get a Missing Images warning, you can reconnect the images by clicking on TOOLS on the menu
and then choosing LOCATE MISSING IMAGES. Read more in this manual about the correct procedures to
move projects from one computer to another, and how to repair missing images.
Adding Empty Frames: An image frame will automatically be created if you drag and drop an
image onto your canvas.
You can also choose to draw empty frames (text, image) to predesign your layout, then populate it with
images, or add colors and textures.
To add an empty frame to your canvas, hit INSERT on your keyboard, then choose Image Frame or Text
Frame (Windows computers only)
OR click on the Create Empty Frame button
on the toolbar
· or, hold the F key (for an Image frame) or the T key (for a text frame) on your canvas, while dragging
your mouse on the canvas. A blue rectangle will appear. Release your mouse button and a new empty
Image or Text frame will appear.
Image frames will be ready to accept an image (from the Images hover, bucket, Papers hover), and take
on new attributes (border options, mattes, gradients, color wash, etc.). Text frames are ready for editing
content and style.
When you select an image on your canvas, you will notice two things:
1) Blue handles, and possibly yellow handles, will appear around
the edge of the frame. These handles will allow you to change
the size, shape, position and zoom of your image.
2) A toolbox will appear next to the image. The toolbox gives
you access to a number of options that can be applied to your
frame and image.
50
CREATE: ARRANGING IMAGES & TEXT
Resizing & Repositioning with
Handles: To resize a frame (or multiple
frames at the same time), select the frame
(s), then move your cursor over a resize
handle. Press the left mouse button and drag
the mouse.
Corner handles will allow you to resize both
length and width; handles in the mid-points
of the frame will resize either the width or
the length of the frame.
Note: image frames (eg. jpg photos) will
display 8 handles. Scrap element frames (eg.
png embellishment graphics) will only
display 4 handles. The reason for this is that
embellishments will not resize outside of
their original proportions, so they will not be
cut off inside the frame.
Image by Kent Smith
To pan an image -- meaning to move the
image within the frame, move the cursor over
the pan handle
image.
in the center of the
Press and hold the left mouse button, then
drag the mouse around until the picture is
positioned as you like it. When you are
satisfied with the new position for the image,
release the left mouse button.
CREATE: ARRANGING IMAGES & TEXT
51
To rotate a frame, first, select it, then move
the cursor over the
rotate handle for that
frame.
Press and hold the left mouse button. Drag the
mouse. The frame will rotate as you move the
mouse.
When you are satisfied, release the left mouse
button. You can press the 'esc' key to abort the
drag if necessary.
You can rotate the frame 90 degrees by rightmouse selecting it, then choosing Image >
Rotate.
Hold the ALT key down while rotating the
frame - it will snap to 45 degree increments.
To spin the image WITHIN the frame, to
correct for a crooked camera angle or for an
effect, hold the Ctrl-key on the keyboard while
moving your mouse on the rotate handle of the
selected frame(s).
To crop (zoom in/out), drag on the little
yellow interior handles of the frame.
Note: these handles do not appear in
"element" type frames, such as clip art, where
you would not want part of the decoration to
be clipped off by zooming in on part of the
image.
Once on your canvas, frames can be duplicated (Ctrl-D), copied (Ctrl-C), pasted (Ctrl-V), cut (Ctrl-X)
and deleted (Delete key).
Frames can be moved on the canvas by selecting one or more frames, then dragging them to a new
position. A selected frame will also move if you tap on the arrow keys on your keyboard. For even finer
movement control, hold the Shift key on your keyboard while you move the frame(s) with your arrow
key.
52
CREATE: ARRANGING IMAGES & TEXT
Frames can be multi-selected, to let you make changes to several frames at once. You can:
· draw a marquee (lasso) a group of frames on your page
· click on one frame then choose Ctrl-A to select all like-type frames
· hold the Ctrl key and select individual frames to add into the selection
Whenever you move or resize a frame, it will try to align itself with the edges of nearby
frames; this helps you produce neatly-arranged collections of images. This magnetic effect
is felt anywhere a vertical or horizontal edge of a frame is shared with other frames. When
multiple images share an edge, then FotoFusion allows you to affect both images at the
same time by manipulating that shared edge; a 'Snap' (a small draggable control) is
placed on ruler at the position of the shared edge.
The frames on the canvas are stacked in the order they were dropped, like a cards laying on top of each
other on a tabletop. If two frames overlap, one will appear in front of the other. You can change the
stacking order. First, select one of more frames, the right-mouse-down on the selection. Choose to Bring
forward / Send backwards, or Bring to front / Send to back from the list of options. You can also use
keyboard shortcuts to change the order: Ctrl-U (Bring Forward 1 layer at a time); Ctrl-Shift-U (Bring To
Front); Alt-U (Send Backwards) and Alt-Shift-U (Send to Back).
Other options to change the order of the frames can be found on the Arrange toolbox item (see below) or
by clicking on the
button, to see the entire hierarchy of your project.
There are two types of frames - image frame and a embellishment-type frame. They behave sightly
differently in relation to the above-mentioned features.
An image frame
displays eight corner
handles, allowing you to
resize the image panning, zooming, and
repositioning it within
the frame. Standard
image types such as jpg,
tiff, etc. will by default
drop onto the canvas in
this mode. Another way
of describing this is that
the frame's aspect ratio
(length to width ratio) is
unlocked.
An embellishmenttype frame display only
four handles, and resize
proportionately. Png and
other formats commonly
used for clipart (with
transparency) will drop
onto the canvas in this
mode. FotoFusion
assumes that you don't
want to crop out part of
the clipart, so doesn't
display the corner
handles to reshape the
CREATE: ARRANGING IMAGES & TEXT
53
frame. Another way of
describing this is that the
frame's aspect ratio
(length to width ratio) is
unlocked.
You can change the frame type by right-mouse selecting your image frame, then selecting Image > Type.
If you want to lock the aspect ratio of any frame so it will no longer resize out of proportion, select the
frame and hit "A" on your keyboard.
Resizing and moving
images (and text) as a
group: You can resize a
selection of frames at the
same time, maintaining their
relative position to each other.
Multiselect any images on your
canvas, and then type "G" on
your keyboard (or right-mouse
select the selection, and
choose Position> Group. For
example, here is a canvas
filled with autocollaged
images.
Select all the images, then
group them (Hit G on the
keyboard). There will now be
ONE set of handles for the
entire selection.
54
CREATE: ARRANGING IMAGES & TEXT
Use the handles to resize the
selection, and the rotation
handle to reposition. You can
toggle the "lock aspect ratio"
option by hitting A on your
keyboard, so the group will
resize porportionally.
To ungroup the selection,
right-mouse select it, choose
Position > Group > Ungroup
(or use the keyboard shortcut,
Ctrl+Shift+G).
IMAGE FRAMES
Adding Images to Your Project: Images can be dropped onto a blank space on the canvas, or
into an empty frame. To drop an image to cover the entire background of the canvas, drop it
outside of the canvas in the dark grey area. Once dropped, images can be swapped from one frame to
another by clicking on frame number for one image. eg.:
you would like to swap with.
then dragging the mouse over the frame
Adding Image via the Images Hover: The easiest way to
drop an image onto the canvas is through the
hover.
Click on the
button to navigate to the folder where your
images are located. Select the image(s) you wish to use (hold
down the Ctrl key to select more than one imageor drag your
mouse over a group of images). Drag the selection onto the
canvas - the selected images will appear in the dropper.
Once you have added images onto the Image tab, they will be
checkmarked in the Image hover. You can drop an image more
than once on the canvas. The image is checkmarked and the
number of uses is displayed.
CREATE: ARRANGING IMAGES & TEXT
55
To bring images onto the canvas in a more organized manner, use the
tab then select the
Source tab to navigate to the folder(s) where your images are stored. Place a checkmark next to one or
more folders. Thumbnail versions of the images inside the selected folders will appear in the preview
area. You can use the Sort options and View options over the preview area to change their presentation
order and style.
Note: Checkmarking an upper level directory will not display the images contained within the
subdirectories contained within it.
To select all subdirectories within a root directory, hold the Control key on your keyboard while clicking on
the check box. (Repeat to uncheck all).
If you would like to increase the size of the preview thumbnail views, then click inside the preview area,
and, while holding the Ctrl key on your keyboard, use your mouse wheel (or the up/down arrows on your
keyboard) to change the size of the thumbnails.
(To change the way your mouse wheel scrolls functions, click on the EDIT menu item, and choose USER
PREFERENCES.)
From the preview area, you can now double-click on an image to preview it in a larger viewer; select a
group of images and then
them on your canvas; add keywords to an image or multiple images
from the Properties area, so you can search for the images on the Create tab's Search button; or drag
one or more images into the Buckets tabs (or type the corresponding bucket number), to triage your
photos into categories of your choice. Buckets are a particularly useful feature to pre-organize a
multipage project by dividing the project into separate sections (eg. a wedding, with sections for the
bride's prep, the wedding ceremony, portraits in the park, the dinner, the reception, etc.), or to make
separate chapters (eg. a yearbook, with sections for different clubs). Right-mouse select in the buckets
area of the organizer to add up to nine buckets. The contents of the buckets will be saved with your
locally-saved project.
56
CREATE: ARRANGING IMAGES & TEXT
Image Frame Options
Once images are on the canvas, you can manipulate their styling via
the Toolbox. Select any image frame on your canvas to access the
associated toolbox. You can:
· Interactively edit the selected element;
· Open an editor for more precise controls
· Access additional selections, such as frame order, rotation, splitting,
adding text, and other features.
Interactive editing: Many of the controls in the toolbox can be dragged interactively; doing so will
change a feature related to the selected object. To drag, simply press the left mouse button onto one of
the icons in the toolbox and move the mouse.
In this example, the mouse is dragging the frame border control, resulting in a wider border.
Some controls, such as Shadows, can be dragged both left/right (shadow offset) and up/down (shadow
blur). You can press 'esc' before releasing the mouse button to cancel the changes if necessary.
Opening Editors with the Toolbox: Clicking on a control in the toolbox will open a floating editor which
contains detailed editable parameters.
1. Image allows you to adjust the properties of the image. Mouse-down and
drag to change brightness, contrast and gamma; click down to open the
Image Editor for more options.
2. Border allows you to adjust frame shape and border properties. Mousedown and drag to change the border width; click to open the Frame Editor.
3. Shadow allows you to adjust the shadow properties. Mouse-down and drag
to change blur, offset, etc; click to open the Shadow Editor.
4. Arrange and Distribute: click to open the Arrange tool, to position your
frame on the canvas relative to the edges, center point, and other frames.
5. Splitter Tool: allows you to cut one frame into several equal-sized frames.
Mouse-down and drag to divide the frame into rows and columns; click down
to open the Splitter tool for finer control, and to turn on the mosaic option.
6. Text will add an attached text to the selected frame.
7. Orient: Spins and flips the frame.
8. Tools accesses the Red-Eye Removal tool and the Matte Cutter Tool
CREATE: ARRANGING IMAGES & TEXT
57
(Extreme only)
9. Delete: remove the currently selected frame.
The Image Editor enables
you to change the way image
itself looks within the frame.
Select one or more frames on
the canvas, and, from the
Toolbox, click on the Image
Editor.
The General tab of the Image Editor contains controls for:
· Opacity: Will make your images more or less transparent (see-through).
· Angle: Images can be rotated inside their frames, for example to correct for a tilted camera or
reorienting an image within a gradient matte. This effect can also be accomplished directly on the
frame by spinning the image via the frame rotation handles while simultaneously holding the Ctrl key.
· Brightness: Make your image brighter or darker overall - but be careful if you are not working on a
calibrated monitor as your finished printed image will not match your on-screen version!
· Contrast: Increasing the contrast will make the shadows darker and the bright points brighter.
· Gamma: Changing the gamma controls both the contrast and the brightness in relation to one another.
· Blur: Blurriness can be used to create a sensation of depth of field: making a background image blurry
will give the viewer the impression that a foreground image is floating in front of it.
· Black & White and Sepiatone: Move the Black & White and Sepiatone sliders to adjust the amount of
these two effects; your pictures will desaturate (and look older) as you bring these controls to the right.
· RGB: The R, G and B sliders give you direct control over the color of your image. For the technically
minded, these controls are offsetting the red, green and blue color curves for the image.
58
CREATE: ARRANGING IMAGES & TEXT
Photo by David Ziser
"Drop Photo Here" can be turned off to create an empty frame, useful for a color block. You will not be
able to accidentally drop an image into the frame if this check-box is off. See below to learn how to use
the Fill tab to add color to a frame.
Bottom right frame is selected - "drop photo here" is turned off in Image
editor.
The Effects tab hosts blending modes - a series of effect that allow you to enhance your images in
unique and beautiful ways.
Image blending modes can be applied to a single photo or “mixed in” with the canvas. Blending mode
CREATE: ARRANGING IMAGES & TEXT
59
effects are non-destructive (they do not affect your source images). They act as invisible overlays where
the image color, saturation and other properties interact with itself or with the image(s) behind it.
Preset Effects: Enhanced & Extreme users can employ a series of presets to transform images in
one-click. Select an image on the canvas, and use the drop down menu on Image Editor's Effects tab to
try out different effects on your images. Enjoy our "Blending Mode Café"!
Image by Kent Smith
Custom Effects: Extreme users can create their blending options and create your own recipes. The
possibilities are endless.
The effects are separated into three types: Unsharp Mask, Image Blend, and Background Blend.
Unsharp mask is a powerful tool to "sharpen" photos. Contrary to what the name may imply,
sharpening does not mean restoring details to an out-of-focus photo. Sharpening refers to the contrast
difference between light and dark within an image.
Increase the Radius to apply the effect - you will notice that brights get brighter, and darks get darker.
Amount controls the degree of intensity of the effect, and Threshold affects the interaction of adjacent
pixels with more contrast.
60
CREATE: ARRANGING IMAGES & TEXT
Image by Kent Smith
Note: If you plan to use FotoFusion's not-destructive sharpening effects, be careful not to pre-sharpen
your images (in your image editing software). Oversharpening will produce "artefacts" (stray pixel
effects) that are undesirable. Recommended settings: Radius between 100 and 300; Amount: between 1
and 5; Threshold: dependent on the image itself
A great use for Unsharp Mask is known as "defog" - set the Radius 200 and the Amount to 0.5. This will
increase contrast on edges to produce great contrasty looking images. The Defog technique is very
effective on black and white images in particular.
Note: Be sure to zoom in on your photos when applying Unsharp Mask as applying it on a thumbnail sized
image may lead you into overdoing the sharpening
Image blend will affect the selected image frame itself - some people refer to it as "blend with self"
mode, as if the image had been duplicated on top of itself. The effects will apply to the "top" copy of the
image. The Blend Amount slider will impact the Effect layer only - how it blends with the source image.
CREATE: ARRANGING IMAGES & TEXT
61
Note: to turn off Image Blend, be sure to set it to "Off" not to "Normal".
If the image frame is empty (no photo, just a "drop photo here" frame), Image blend can be used to
affect the image behind the empty frame. In earlier versions of the software, this was called the "Use
62
CREATE: ARRANGING IMAGES & TEXT
Image Background as Source" option. It allows you to apply effects on a particular area of a layout.
Adding a matte to the empty image frame will greatly enhance the effect.
Background blend effects how a frame blends with the background behind it. This method is very
efficient to blend textures with what is on the canvas (one or many images). To reduce the opacity of the
effect, use the opacity slider under Image Editor's General tab, as you won't be able to see through the
top image layer.
Try the following soft focus effect to learn how to use these custom tools:
1) Drop and image on the canvas
2) Go to Image/Effects
3) Change Image Blend to "Normal"
4) Change Blend Amount to 0.6
5) Go to Image/General and increase Blur...
6) Adjust Blur + Blend amount to taste!
7) Click on >> to save the preset
You can take this basic effect to the next level by simply changing the Blend Mode (Image Blend) to
Overlay to create another classic "glamour glow" effect.
To reduce the color shift caused by the Blending mode, use the b&w slider under the Image editor's
genera tab. Note that the desaturation only effects changes to the top blending mode layer, so the image
will not turn black & white.
CREATE: ARRANGING IMAGES & TEXT
63
Next, try using the Gamma Slider on the General tab, to open up the shadow areas of your image.
Try enabling the Invert option under the General tab, to really give your image an extra "punch" - it will
bring back the details.
Use the RGB values on the Image Editor's General tab to create a cross processed look.
Blending modes are very powerful. The source image will impact how they appear, so a recipe that works
on one image will not work on another in the same manner. Try applying the presets on various images
to see what they can do - then play/edit with the properties to learn what they do. Any custom settings
can be saved as a preset by clicking on the >> button, to save as a named preset.
The Fill tab allows you to add color and texture to a frame. Use this effect to add a color-wash to an
image, to fill an empty frames with color, or add a texture effect to your image
Note: This control will apply an overall cast to the entire image. Use the RGB sliders on the General tab to
color correct your image.
Background fill adds color to your frames.
Dial the opacity down to mute the effect.
Change the color via the R G B controls, or click on the
color chip to open the Color editor...
Select a color from the
Dial down the opacity - the image will show through the
spectrum, or use the
color.
eyedropper control to select a
color from your project
64
CREATE: ARRANGING IMAGES & TEXT
directly.
Here are two examples of using color blocks to create a layout (one is a template, the other a completed
composition). The canvas background is 100% opacity with a color applied. Some frames use the frame
border to provide edging. Others, such as the purple dots, are set with a reduced opacity and a matte
(ellipse).
CREATE: ARRANGING IMAGES & TEXT
65
Note: when making
color blocks, be sure to
turn off the "Show Drop
Photo Here" checkbox on
the Image Editor Basics
tab. This will prevent
you from dropping an
image into the color
block.
You can add a color wash effect to frames containing images.
Here is an example of applying different colors and opacities to a frame background will do to an image.
If you drop a background paper into an empty frame, you can retint it with the background fill tool to a
66
CREATE: ARRANGING IMAGES & TEXT
new shade.
Similarly, you can use the Tiles feature to add a texture to your image.
Checkmark SHOW TILE, then use the dropdown to access the preloaded tiles to your image.
You can increase or reduce the opacity of the effect, change the scale (size) of the tile, or blur the effect
to make it less intense.
CREATE: ARRANGING IMAGES & TEXT
67
The Frame Border Editor
changes the exterior
portion of your frame.
Select one or more
frames on the canvas,
and, from the Toolbox,
click on the Image
Editor.
The Border tab of the Frame Border Editor contains controls for:
Border Width: Dragging this control makes the border thicker or thinner. (Turn the Border checkbox off
to remove the border completely.)
Border Color: Drag the R/G/B controls to adjust the Red, Green and Blue channels of the image directly;
alternatively you can click the color chip to open the color editor to specifically target a color, or use the
eyedropper to select a color directly from your composition.
Border Opacity: Allows you to turn down the transparency of the border.
Fit Image: The entire image to fit into the border when checked. Unchecked, a portion of the image will
be obscured by the border.
Shadow Inside: This will cause the image, not the border, to cast a shadow; this is useful for attaining
'glassy' borders on frames.
Draw Border Highlight: Disabling this removes the 1 pixel contrast line on the outer edge of the
border.
Image by Kent Smith
Inset: The inset value provides an automatic spacer between adjacent frames. If the inset is
reduced to 0, then frames will touch at their edge. Increasing the inset will provide more space
between frames that are snapped together.
68
CREATE: ARRANGING IMAGES & TEXT
You can change the shape of the frame by clicking on the
button, and the corner angle.
Rounded and Angle variations allow you control the degree of corner effect.
The Gradient tab of the Frame Border Editor applies a special effect that will fades your image gradually
to transparency. Turn the gradient on by checkmarking the Enable box, then choose one of six gradient
CREATE: ARRANGING IMAGES & TEXT
69
types: linear, circular, 2 edge linear, rectangular, 4 edge linear, and diamond.
Invert: The gradient direction is
reversed.
Softness: The edges of the
gradient are softened or
sharpened.
Midpoint: Increases or
decreases the "highlight" zone
of the image
Image by David Ziser
Angle: Rotates the gradient.
Center X / Y: When the
Rectangular, Circular and
Diamond gradients are
selection, you can define the
location of the highlight by
altering the two center point
axes with these controls.
Gradients can be applied to frames containing images, textures or to empty tinted frames for a variety of
creative effects. It can be used to soften images, or apply texture or colour effects.
Images by Kent Smith
70
CREATE: ARRANGING IMAGES & TEXT
The Matte tab of the Frame Border Editor contains controls for the cut-out shape of the frame.
A matte is a "hole" which can display an image, a color or a texture.
Image by Stephen Eastwood
The default matte for a new image frame is a straight-edged rectangular shape.
The drop box under the matte selection area (alpha plus rgb/average rgb/alpha only) changes what part
of the matte shows the images (usually only useful for homemade mattes).
Soften controls the edge of the matte (crisper or more diffuse) while Invert reverses the part that is
transparent and the part that holds the image.
The Fit/Lock Aspect/Crop with Image dropbox changes the relationship of the image and the frame
shape. Fit is the default mode, where a maximum of the image is shown within the frame; lock-aspect
fixes the width of the matte; crop with image fits the matte to the image shape.
Click on the little down arrow to see a limited default set of mattes that are preinstalled on your
computer, or choose BROWSE to open a search hover containing many more styles, including textures
and shades. This will launch a Search hover pointed at your selection of mattes, which can be dropped
onto your image.
CREATE: ARRANGING IMAGES & TEXT
71
Arranging & Distributing Frames: The Image Toolbox provides access to a series of
arrangement options, to organize a single frame or a multiple selection of frames in relation to each
other. To quickly change the "stack" order of a selected frame or frames on your canvas, click and drag
on the "Arrange" icon on the tool box. The selected frame(s) will move up or down the stack accordingly.
To access more options, select one or more frames, then click on the "Arrange" icon:
which will launch the
list of available options...
First, decide how you will be using the tool to Align your images:
· to a page as a group: all selected frames will move as one item.*
· to page individually: all frames will follow the instructed alignment command as if they were the only
element selected.
· to each other: to distribute a multi-selection in relation to the total area occupied by the selected
frames.
Alignment options include:
· dead center positioning: selected frames will reposition in relation to the center point of the canvas;
72
CREATE: ARRANGING IMAGES & TEXT
· flush to the top, bottom, left and right edges;
· to the center horizontal line or vertical line.
Distribute options include:
· spacing all selected frames evenly across the horizontal axis;
· spacing all selected frames evenly across the vertical axis.
Ordering options include:
· moving selected items to the top or bottom of the frame order stack;
· moving selected items up or down one step in the frame order stack.
Note: Reordering your frames can be done interactively, directly through the Toolbox's Arrange icon.
Drag on the icon, up and down, to move your selected frame to the top or to the bottom of frame order
stack.
Resizing options include:
· applying the size of the last selected frame to apply its attributes as specified to other selected frames;
· matching the reference frame's width;
· matching the reference frame's height;
· matching the reference frames total dimensions;
· resizing selected frame to the full width or height of the canvas (or to the safe guidelines).
* Please note: if you have your canvas set to "double page spread", the alignment tools will respect the
center line. For instance, a group of images aligned to center will either align to the left page or right
page, but not the gutter.
Orienting (Rotating & Flipping)
Images: Images can be flipped left/right and
top/bottom via the Image toolbox.
Click on a frame to select it, then, from the toolbox,
select the rotate option to open the Orient tools to
rotate or flip your images.
Splitting & Merging Frames (Covered by U.S. Patent 7,403,211. Other patents pending.): Frames can
be split into two or more smaller frames. Any new or existing frame on your canvas into a grid, by
selecting an existing frame or by drawing an empty frame. With the splitter, you can create an evenly
space grid. In this example, we've split a frame into eight parts.
You can also several split operations one after the other to get an interesting arrangement of different-
CREATE: ARRANGING IMAGES & TEXT
73
size frames:
Splitting using the Toolbox
1. Select the frame or frames.
2. Move the cursor over the 'split' control on the image
toolbox:
3. Press down and hold the left mouse button.
4. Without releasing the button, drag the mouse to the right and down. As you do this, lines will appear on the fra
5. Release the left mouse button. The frame will be split into the selected number of frames:
You can press the 'esc' key to abort the split operation if necessary.
74
CREATE: ARRANGING IMAGES & TEXT
Splitting using the Split Editor: Select at least one frame, then either press the T key, or Click (don't
drag) the Split button in the image toolbox, or select 'Split Frame' from the Tools/Frame menu. The
following dialog will appear:
Select a number of horizontal and vertical splits, then click 'Okay' or press 'Enter'. You can uncheck the
MOSAIC box to create a grid, with the image appearing only in the first box.
Merging Frames: Multi-select all frames you wish to merge (either draw a marquee over adjacent
frames, or hold the Control key on they keyboard while selecting the frames individually. Right-mousedown on one of the selected frames. Choose POSITION > Merge from the resulting pop-up menu (or click
Alt-M on your keyboard).
The collage produced by subdividing frames is no different from one created by AutoCollaging or by
manually moving and sizing frames into alignment; the frames are independent and can be rotated and
CREATE: ARRANGING IMAGES & TEXT
75
resized as you like. The splitting is merely a way to ensure that the images start off tiled neatly one
against the other. The images within each frame can be inset to reveal the canvas background or
shadows cast by frames in the collage while remaining in a grid. You can save your layout as a template
if you are pleased with the composition.
Red-Eye Removal is an add-on application that will open
your selected photo and allow you to correct red-eye problems
in your photos. To use the red-eye removal tool, select the
image frame in question, which will expose the Image
Toolbox. Select the TOOL option, then the
removal tool.
Red-Eye
This will open your image in a new window.
Position the target over the iris you wish to correct.
Zoom in and out by either hitting the + and - keys on your
keyboard, or, if you have a mouse with a wheel, zoom in and out by
turning the wheel.
When you have the iris within the target, click on your left mouse
button. This will remove the red and replace it with a more
appropriate color.
In this example, the left eye has been corrected, and the right eye
has been targeted for correction.
When you are done, click the
button to close the editor. You will be prompted to save your file -- do so
if you are satisfied with the results of the correction. Please keep in mind this action will overwrite your
original image file. FotoFusion will then ask you if you would like to refresh the image on your canvas -select YES to view the changes on your canvas.
The Matte Cutter tool allows you to
contour a portion of an image frame, and blot out
the remaining areas. The matte cutter does NOT
affect your original image. To use the matte
cutter tool, select an image frame, which will
expose the Image Toolbox. Select the TOOL
option, then the
Matte Cutter Tool.
A new window will appear with your image
contained within it. You can resize the window by
pulling on its edges, and zoom in and out of the
photo using your mouse wheel or by tapping
Ctrl + or Ctrl - on your keyboard. Resizing the
window will allow you to expose more ore less of
the image.
76
CREATE: ARRANGING IMAGES & TEXT
In this example, we will be extracting the
bouquet from the rest of the image.
To draw the matte, simply click and draw
around the edge of the area you wish to
extract. A red line will follow the cursor. Do
not worry if it is not perfect, as you can go
back and fix it afterwards.
Please note, you are drawing freehand. The
line is not snapping to the image in any
manner.
To restart, hit the ESC key twice.
Image by David
Ziser
When you have finished outlining the whole area,
the image will look like this - the matted portion
is highlighted, and the background, to be hidden
by the matte, is grayed out.
To adjust the edges of the matte, simply click
and redraw near the matte.
· If you wish to extend the matte further than
the current edge, draw outside the matte to
add to the highlighted area.
· If you wish to reduce the matte back into the
image, click inside the matte and redraw the
contour, erasing the area you do not wish to
have covered.
When you are satisfied with the results, click on
FILE >> Exit to close the editor.
Your image will refresh to display the matted image on your canvas.
CREATE: ARRANGING IMAGES & TEXT
The frame can be resized -- note that the frame
borders are those of the entire unmatted image and
not cropped to the edge of the matte.
You cannot move the image with regards to the matte.
It is locked to prevent the image edges from moving
outside the contour of the matte's edge.
If you accidentally resize the frame and cut the image
off, then right-mouse-down on the frame and select
POSITION > Size > Resize frame to fit image. Then
entire image will be exposed.
After you have added your custom matte, Image Editor
attributes can be applied, eg. brightness, tinting, etc.
You can also soften the matte in the Frame Editor, to
soften the edges.
To turn off the matte, click on the frame, open the
Frame Editor and uncheck the matte.
77
78
CREATE: ARRANGING IMAGES & TEXT
The Frames Hover:
On the main Create screen, click
on the
hover to open a
collection of decorative borders.
These are not simple matte
cutouts, but a combination of a
graphic and a matte and a
shadow, which can be dropped
onto your images or as blanks
on the canvas (to which an
image can be added
afterwards).
The Frame border editor can be
used to control the width of the
border for many of the frames,
as in the example below.
Photo: Kent Smith
The Canvas Background
is nothing more that a locked down image frame. It will not display
the blue selection handles, only yellow ones. If you select on an empty portion of the canvas or outside
the canvas, the same toolbox will appear as does when you select an image frame, giving you access to
the same options detailed above.
CREATE: ARRANGING IMAGES & TEXT
79
By default, the canvas will display as white. You can resent a canvas to white, or to black or transparent,
by right-mouse selecting in the grey area outside your page - choose Page > Color to change to black,
white or transparent. The Image Editor's Background Fill tab will allow you to add an overlay of color,
and the Tile tab will allow you to select from a selection of preset textures.
An image can be used to fill the canvas frame of course. Choose an image from the Image hover, and
drop it outside of the canvas. It will snap to the background frame. An image on your canvas can be
converted to the canvas background by right-mouse selecting the image, and choosing IMAGE > Set as
Canvas Background.
Or use a paper texture from the Papers hover, or, for YearbookFusion users, from the Gallery hover
(under LumaPix Art) in the same manner.
You can create many different looks by changing the canvas background.
Plain white background
With a "paper"
With a photo
With paper and border
With background fill
With a tile
DPI/Resolution Warnings:
FotoFusion contains a warning system for using images
on your canvas with too low a resolution.
Using a low resolution image (eg. cell phone camera) or zooming in too close on an image can produce
either a mild or severe warning.
This is an example of warnings on the canvas -- red = below acceptable, and yellow = potential
80
CREATE: ARRANGING IMAGES & TEXT
problems.
Resolution warnings will also appear when you attempt to output images below the predefined thresholds
of acceptable dpi. Some publishers will set a default value to warn and to block the use of images that do
not meet their predefined limits, so if you are using a special build from a book publisher, you will have
these limits preset for you.
No image can be "upsized" from its native resolution (meaning the size at which it was recorded), since
no application can create any more information than is already present in an image at the time it is taken
or scanned. So, for instance, if you take a photo on a cell phone camera with only 2 megapixels, you
won't be able to use that image on a large poster, without noticing lots of dots. Also, zooming in on a
small element within a larger image (eg. a single person in a classroom portrait) will produce similarly
bad results. There simply isn't enough information in the image to make it clear when resized.
TEXT FRAMES
Adding Text:
Text can be added directly to the canvas, as a title or a paragraph of text, or
attached to an image frame, such as a caption or a label. (Yearbook users: panel text options will be
covered in the Yearbook panel section of this guide).
To add a text frame to your canvas, you can...
a) Click on any empty area on or outside the
canvas. A toolbox will appear -- select the Text
option.
or
b) Hold the T-key on your keyboard while dragging a marquee shape roughly the same size as your
finished text.
CREATE: ARRANGING IMAGES & TEXT
81
A text frame will appear on your canvas.
To add text attached to an image frame, select one or more images, then click on the T option on the
tool box.
A text frame will appear on top of the image. When you move the image frame, the text frame will follow
it.
82
CREATE: ARRANGING IMAGES & TEXT
Text frame selection
Click once on a text frame the frame itself is selected.
You can move the frame on
the canvas or resize it with
the blue handles.
Next, double-click on the
selected text frame: the
entire contents of the text is
selected. If you type on your
keyboard, all text will be
replaced. If you choose an
attribute from the text editor
(eg. a color, bold, a font),
the attribute will apply to all
text.
Next, single-click inside the
text frame: a cursor
(straight line) will appear in
the location you selected.
From this point, you insert
or edit the text, or use the
keyboard arrow keys to
move around the text.
Highlight single word or
character in the text to
change attributes in the Text
editor, such as color, font, or
other features.
Please note: older templates may display a different text engine, where text is not typed directly on the
CREATE: ARRANGING IMAGES & TEXT
83
canvas, but in a box inside the text editor itself.
Text Features: When a text frame is selected, the text
toolbox will appear. This toolbox will let you apply features to
all the text in your text frame (Ctrl-A to select the entire text)
or to a portion of it. Click on the T to begin adding attributes
to your text.
The
Basics tab will be displayed first.
Any pre-installed font available on your system will be displayed in the font
drop-box. FotoFusion only adds one font to your system, so if you are using
FotoFusion on more than one computer, you will see different font options
unless the two machines are completely identical (same operating system
version, exactly the same software).
Text appearance options: choose among the available fonts, the size, and
the resizing options.
· "Resize to fit" will dynamically resize your text size when you resize the
text frame itself
· "Lock and clip" will freeze the text size, allowing it to be cut off if the
frame is shrunk smaller than the text content;
· "Do not exceed" will allow the text size to shrink if the frame is made
smaller, but never grow past the indicated font size.
You can also add Bold
, Italic
Underline
options to all or selected portions of your text.
and Superscript
Color options: Click on the color swatches to change the interior color and the edge (border) color of the
text.
Use the eyedropper icon to select a color from the canvas itself, or click on either of the color gradients to
pick a color.
84
CREATE: ARRANGING IMAGES & TEXT
On the text color editor, the opacity control will make the color more or less transparent.
To make the edge (border) show, change the Edge Thickness to a higher value.
No edge.
Thin edge in a contrasting color.
Thicker edge in contrasting color.
Thicker edge in contrasting color, with opacity lowered.
CREATE: ARRANGING IMAGES & TEXT
85
Alignment allows you to position your text
relative to the frame horizontally - left, right,
centered, justified - and vertically - top,
middle, bottom. You can also increase or
decrease the space between the letters of
your text and between the rows of your text
(click on the R buttons to restore these values
back to the default). (Click the
button to
restore to the default.)
The Effects tab provides further options. The Fill and Edge Effects add reflections, transparency, and
shadow type effects to your text. Pick an effect then play with the amount value, to choose the intensity
of the effect. Fill refers to the interior of the text - and includes an option to blur the text. Edge refers to
the outline - and includes an option to create a dashed outline.
86
CREATE: ARRANGING IMAGES & TEXT
The Matte tab allows to add gradient or texture effect to your text.
Convert to matte transforms your text into a container to hold an image.
This works best by first dropping an image onto the canvas, and adding a text frame attached to the
image.
Choose a bold-faced font, or use a single letter at a time, for best effects.
Click on the Convert to Matte button. The text will now hold the image.
CREATE: ARRANGING IMAGES & TEXT
The Advanced tab provides controls for the shape and direction of text.
Skew controls will slant/distort your text. (Click the
Offset works on a selected set of characters
within a text frame. It will move the
selection up or down, relative to the other
characters. It is somewhat like Superscript,
except you control how far up or down the
text moves. (Click the
button to restore
to the default.)
Rotation controls allow you to spin the
characters in place. (Click the
button to
restore to the default.)
button to restore to the default.)
87
88
CREATE: ARRANGING IMAGES & TEXT
Area type can add a general shape to your
text (this works best for a longer
paragraph, not a title).
To use this feature, ensure that the "Resize
to fit" is NOT selected on the Basic tab.
Text direction can be changed as well
(eg. Chinese, Arabic, Hebrew, and other
languages where the text does not flow
right-to-left/top-to-bottom).
Text shaping (also known as ligature) is an option that will help users of non-Western languages. If a
font is selected that displays the non-Western characters, the text shaping options (specified by
language/region type) will shift the spacing of glyphs (characters) appropriately. Most users will not need
to touch this option as it is only exposed when the chosen font and language contain non-Western
characters. A selected few fonts will have ligature controls, to create new
The Tags tab enables your text frame to display information about the image within the frame.
Select one or more images on your canvas, then add a text frame attached to the image frame (click T on
the image toolbox).
Select the text frame(s), open the Text editor, and go to the Tags tab. By default, all tags features will be
off.
CREATE: ARRANGING IMAGES & TEXT
89
Click on the Tags button to access the available data associated with the image. For instance, choose
Tags > File > Image > File Name to add the name of the image to the text frame. You can any number of
tags, and highlight them (transparent color block) if you wish.
If needed, customize the text frame, as you would normally, and move it to a new position relative to the
90
CREATE: ARRANGING IMAGES & TEXT
image frame.
Adding Fonts: FotoFusion uses the fonts included on your system. It adds only a single font to your
system (Denis script.ttf). If you wish to add a font for use in FotoFusion, install the font on your system,
then relaunch FotoFusion - the font will now appear among your list of fonts.
Note to YearbookFusion users: When working on yearbook panels or on online chapters, you may notice
certain fonts marked in red in the font list, and less features available. Both of these features rely on
less-developed text editors, so certain features and fonts may not be available.
Spell Check: FotoFusion includes a spell check feature (US English & French are currently available).
If you type a word in the text frame that is not included in the selected dictionary, the word underline the
word in red. Right-mouse select the word, then choose Spell Suggestions to see a list of available words
- select one to replace the underlined word.
CREATE: ARRANGING IMAGES & TEXT
91
To turn spell check off or change languages, go to EDIT on the menu then choose User Preferences >
Spell Check tab.
SHADOWS
Image and text frames cast drop shadows. Shadows can be adjusted directly in the Toolbox or in the
Shadow editor.
Adjusting the Shadow through the Toolboxes: The
Shadows control in both the text and image toolboxes can be
dragged to edit the shadow:
· Drag left/right = Shadow Offset
· Drag up/down = Shadow Blur
92
CREATE: ARRANGING IMAGES & TEXT
Adjusting the Shadow through the
Shadow Editor: Click the shadow
control on the Toolbox to open the
Editor for more detailed control.
Image by Kent Smith
Offset: The shadow offset determines how far from the frame the shadow is displayed. If you increase
the value, the shadow will appear farther away from the image.
Blur: Changing the blur makes the shadow harder or softer.
Angle: The angle determines the apparent position of the light source producing the shadow of the
frame.
Amount: The Amount determines the opacity of the shadow effect.
Shadow Inside
If the shadow is 'inside', the
border does not cast a
shadow but the image itself
does. To see this effect,
make the border very wide
and 50% transparent.
When 'shadow inside' is checked, you will see that the image itself is casting a shadow but that the
large, translucent border does not.
In this example, the photo is casting a small shadow which gives the impression the photo is inside a
translucent frame.
CREATE: ARRANGING IMAGES & TEXT
Shadow Color: Clicking on
the color chip opens the
color editor; this allows you
to pick a new color for the
shadow. In this example,
the shadow has been used
to make the image and the
text appear to glow.
93
94
CREATE: ARRANGING IMAGES & TEXT
AUTOTOOLS
FotoFusion can create automatically layouts for you with a few simple clicks.
AutoCollage: The autocollage tool allows you to quickly fill a page with images. Extreme & Yearbook
users can also create multi-page autocollages. Any set of images on the canvas can be autocollaged
repeatedly, until you are satisfied with the layout. Click on the AutoCollage button on the Toolbar to
obtain a new layout every time.
Autocollage an existing set of images: If you have images on your page, or in the dropper
(pulled from the Images hover, for instance), click on the Autocollage button to drop them on the current
page. Click this button to rearrange your collage (as many times as you like!) until you find an
arrangement that is close to what you want.
Click 'AutoCollage'
for a new layout...
If you "hover" over the AutoCollage
button (meaning, let your cursor float
above the icon without clicking), you
will open the AutoCollage options
hover. Shadows add drop shadow to
the autocollaged set of images. Borders
add the default border around the
autocollaged set of images.
AUTOTOOLS
95
Jumble: Scatter the autocollage set of
images at an angle. The autojumble
button on the toolbar also enables this
feature.
Sparse leaves blank area around the
Backdrop adds one of the images to the background canvas.
images.
Preserve frame settings: Keep custom border and image effects when autocollage is selected.
Sorting options include the ability to make autocollages organized by file name or the time the image was
produced.
Maintain aspect ratio will not reframe the images from their full size.
Reverse changes the sorting order (eg. Z-to-A, or last-to-first).
Include Images in Bucket 1: Autocollages preorganized images
Respect Center Line: On double spreads, the gutter line is avoided (no images overlap it).
96
AUTOTOOLS
The AutoCollage Wizard: If you are focussed on an empty canvas (a page without images), the
autocollage button
will launch the autocollage wizard. Or start a new project - go to the Start Tab,
choose New Project, then select Autocollage. Either method will launch the AutoCollage wizard.
1. Choose Images: Use the Folder drop box to find images on your computer. Select one, a group of
images, or all images. They will appear to the left side in the smaller window.
AUTOTOOLS
97
2. Creative Options: Multipage: Extreme and Yearbook license users can specify the number of pages,
or the number of images per page, to create a multipage series of collages. (Tip: combine this with the
Timeline Sorting feature to make an event-based book in seconds). Choose the One Image per Page
option to create a proof-book series of pages - the pages will orient themselves to the size and shape of
the single image on them.
The Creative Enhancements and Timeline/Sorting are the same features as those located on the toolbar
autocollage button (described above).
3. Canvas Size Options: Choose the Form Factor (Project type) and/or Page size for your autocollage.
98
AUTOTOOLS
Hit OK to generate your autocollage pages - you can leave them as they are, reautocollage each page or
edit the frames as you like.
AutoPopulate: Click on the
icon on the Toolbar fills all empty frames in a collage with images
that are currently in the dropper or selected in the Images hover. This is a fast way to fill a template with
images - such as a contact sheet or an album template. Sorting options are also available. To use
autopopulate you need to have a project open with empty frames.
AUTOTOOLS
99
AutoDuplicate (Extreme,
Yearbook only) allows you to use a
template multiple times with a series
of images. Create or launch a
template with empty frames on your
canvas. On the Pages hover, rightmouse select the template to turn on
autoduplicate.
Next, go to the Images hover, and
select one or more images, and click
on the autopopulate icon
on the
Images hover itself. Any empty frames
in the template will be filled with
images, and a new copy of the
template will generate for additional
images, until all the images are
"consumed" by the template
AutoDistribute produces an even grid of all the images on your canvas. Add your images to the
canvas, via Autocollage or by dropping them individually through the Images hover. Choose
'AutoDistribute' from the Tools menu to create a grid. To sort your images before AutoDistributing, hover
on the AutoCollage button, and select the sort features you would like to use, such as File date/time".
before AutoDistribute
after AutoDistribute
AutoFlip Layouts automatically flips your composition (left/right) when a page is duplicated or
100
AUTOTOOLS
moved down the stack. This may be useful if you have made pages with titles oriented to the outer edge
of the page. If autoflip is not on, and the page moves from a right-side to a left-side page, the title will
stay in the same position.
To turn Autoflip on a single page, open the pages hover, and right-mouse select the page's thumbnail.
You'll see the autoflip option at the bottom of the list, along with the "Flip layout" options (useful for
repurposing empty templates by changing the direction of the page contents).
Autoflip can be turned on automatically: click on EDIT on the menu, then choose User Preferences. You'll
see a checkbox option in the bottom left.
AUTOTOOLS
101
ORGANIZE: SORT, SEARCH & TAG
The
tab allows you to view your catalogue of images and projects from numerous folders
and drives simultaneously, sort images into "buckets" to triage them for your project or cataloguing,
assign your images and projects to predefined and user-created categories, and search using these
categories.
To access the Organizer and view your images, click on the Organize tab.
To view your images, checkmark the
directory or directories of your choice
from the Source tab. You can view the
contents of more than one directory
simultaneously by placing a checkmark
next to the directories. The images will
appear in the Preview area.
Use Sort and View options to customize
the appearance of the Preview area.
Note: Check-marking an upper level
directory will not display the images
contained within the subdirectories
contained within it.
To select all subdirectories within a root
directory, hold the Control key on your
keyboard while clicking on the check box.
(Repeat to uncheck all).
Hold Ctrl-A on your keyboard while
clicking a root directory to select all
subfolders AND select all images within
102
ORGANIZE: SORT, SEARCH & TAG
the subfolders.
You can use the Search tab to find pre-catalogued content, including graphics on the LumaPix server. Use
the TYPE box to look for a particular type of graphic content, for instance, Embellishments + Decorations,
or Templates.
In this example, search for the keyword "swirl" provided several results from the Marketplace.
Once images or projects appear in the preview area, you can...
· double-click on an image to preview it, or double-click on a template or project to launch it on the
Create screen
· drag the selected images or projects to a bucket (or hit the number of the bucket on your keyboard, eg.
type 1 to add selected content to Bucket 1)
· add an image or multiple images to categories;
· add keywords to an image or multiple images.
Tip: If you would like to increase the size of the thumbnail views, then click inside the preview area, and,
while holding the Ctrl key on your keyboard, use your mouse wheel (or the up/down arrows on your
keyboard) to change the size of the thumbnails. To change the way your mouse wheel scrolls functions,
click on the EDIT menu item, and choose USER PREFERENCES.
Buckets allow you to transfer content (images or projects) to the Create screen. Right-mouse select in
the area next to the buckets to add additional buckets, up to nine in total.
ORGANIZE: SORT, SEARCH & TAG
103
Each bucket is associated to a one of the number keys on your keyboard. Select one or more items in the
Organize preview, and then type a number on your keyboard (1-9). The contents will be transferred to
the associated bucket.
The buckets can be renamed (right-mouse select them individually), and will report the number of items
they hold.
Toggle back to the
and use the content within it.
tab to return to the Canvas, and then open the
hover to view
Notice the drop-down option to switch from Bucket 1 to any of
the other nine available Buckets.
Images can be dragged on to the canvas. Notice the REMOVE
DROPPED checkbox: when checked on, the images will be
removed from the Bucket when they are used.
Manage the contents of the bucket as needed from the icons at
the top of the bucket: remove one or more items, drop them on
the canvas, pick them back up, or rotate them.
Assigning Keywords & Categories: Content displayed on the Organizer can be tagged with
keywords and categories.
This feature can be used to make your personal graphics collection searchable in FotoFusion.
For instance, if you have a collection of background papers that you would like to make appear in the
Papers hover, templates you would like to find quickly in the Search hover, or scrapbooking graphics to
organize thematically, you can tag them with keywords and categories.
Find the content on the SOURCES tab in the Organizer. Select the items in the preview area, one or more
at a time (Ctrl-A to select them all) to apply Keywords to then from the Properties tab (right-side of the
screen).
104
ORGANIZE: SORT, SEARCH & TAG
In this example, a single
clipart has been selected.
Two keywords have been
added - simply type your
keywords, one at a time,
in the New Keyword area,
and hit Enter to add the
tag to the image
The Type box allows you
to assign a category to
the item.
In this case,
Embellishment +
Decoration was selected.
Once this tag has been
added, the item will
appear in the
hover, under the
tab, when you search for
the content.
Tip: Add your personal collection of background textures to Type = Embellishments + Papers to get them
to appear in the Papers hover.
Add mattes by saving 100% white on 100% black shapes as jpg, then tag them as Type = Parts +
Mattes.
ORGANIZE: SORT, SEARCH & TAG
105
OUTPUT: FINALIZING & SHARING
The
tab is available to most Enhanced & Extreme users, and some YearbookFusion users.
Selecting the tab will display the available options:
Under
, you will find up to five options:
· to a file: choose this to create a flattened version of your project, which can then be sent to a printing
company.
· to a printer: choose this to print from a local printer.
· to a web album: choose this to upload your project to the LumaPix server in a sharable slide-show type
format.
· to your web site: choose this to create an html version of your pages, which can be posted on your
website.
· to email: choose this to send html previews embedded into an email.
Output allows you to send completed projects to others for printing or proofing.
You cannot transfer a FotoFusion file (saved as .scrap) from one computer to another, to a printing
facility or to another person's computer.
FotoFusion needs to maintain the links between your images and the project file in order to work. Using
the output tab to render your files to universally acceptable file formats will allow you to transfer your
finished products to others in an non-editable format.
To transfer your projects in an editable format, you will need to archive the projects. These archives can
be opened by other FotoFusion users with license types equivalent or greater than your own.
Note: Some book printing companies who offer FotoFusion or YearbookFusion to their clients may have
disabled some or all of these features, as direct upload to their printing facilities is enabled. If this feature
106
OUTPUT: FINALIZING & SHARING
is enabled, you will find an Upload to Publisher option:
Some publisher companies will allow output options with limitations, eg. watermarked or low resolution
(72 dpi) output, to allow you to create a proof file, but not create printable versions of your project.
Frequently asked questions
Can LumaPix print my work?
LumaPix Inc. is strictly a software development company. As such, we do not provide printing services.
You can, however, send your projects to any printing service of your choice that will serve your area.
Note: some licenses (YearbookFusion, some Extreme licenses) are distributed by a printing companies so
their customers can upload projects directly to them for printing. These versions may limit the ability to
print or render projects.
Which labs or photo development services will accept my FotoFusion projects?
Any lab or photo development service will be able to print your projects. Simply render them using the
Output to a File feature in FotoFusion. A jpg format is usually acceptable. Consult your lab of choice to
determine their size and output recommendations. Pro-photographers creating albums should ensure that
the recommended bleed and safe zones and resolution requirements are met.
How do I find a lab or photo development service?
Hundreds of companies exist world-wide to meet your printing needs, with all variety of formats, output
qualities and price points.
Home hobbyists can choose:
· local photo developers or copy centers: bring your rendered jpg files on a portable memory device to
your local retailer.
· big box chains, grocery stores or department stores: photo finishing services often include photo
books and novelty product services. Bring your rendered jpg files to the photo counter in-store on a
portable memory device, or check the retailer's website to see if online upload services are available.
Online orders can often can be picked up in-store, or shipped to you directly.
· online photo services and book publishers: search the Web for these services. Book-publishing
companies will most often provide a free book-making software that will include some template. To
use your FotoFusion output in their software and bypass their predesigned templates, select the
template page style that allows you to drop your rendered jpg file into a full page layout.
Pro-Photographers have dozens and dozens of choices of pro-labs and finishing services. In general,
these items are higher quality than the services provided to general consumers, but are priced much
higher as a result.
FotoFusion includes preset page sizes from several album manufactures, under the Canvas Settings
editor. These manufacturers have supplied their preset page sizes to be included in FotoFusion.
Manufacturers can consult the LumaPix website to learn how to have their presets included in FotoFusion.
If you are looking for a general list of pro-album manufacturers, we recommend consulting the web site
OUTPUT: FINALIZING & SHARING
107
of professional photography associations who cater to your type of photography interest. For instance,
the Wedding and Portrait Photographers International website will include a list of manufacturers who
supply printing and binding services to pro-portrait & wedding photographers.
Can I edit my images in FotoFusion - remove backgrounds, fix blemishes?
FotoFusion is an image layout software, not an image editor (like Photoshop, Corel Draw, etc.). Many
FotoFusion users will also have an image editing software to use for graphic design and detailed image
editing. FotoFusion is non-destructive to your images - you cannot accidentally edit your images. Images
on your canvas are actually detailed thumbnails referring to the original source image. For this reason,
you can have multiple copies of the same image, in different sizes, crop and pan positions. FotoFusion
allows you to send your images directly to your editing software from the canvas.
TO FILE
Output to a file allows you to create a 'flat file' type of output - .jpg, .tiff, .png, .bmp, .gif formats.
This is a 'flat file' because all the layers (frames/text/backgrounds, etc.) are all flattened into one image.
The resulting file is no longer editable in FotoFusion, but can be transferred to other computers (who do
not have FotoFusion) and to photo labs or printing service providers.
Extreme users and some YearbookFusion users can also create a multi-page pdf document or export to a
layered psd file (useful for color correction or image editing in Photoshop).
Once you render your file, the individual components of your project will no longer be editable.
(Technically, you can move the layers in the psd output, but this is not recommended since the image's
shadow and other elements are related to each other and are on separate layers.)
If you still need to edit your collage, you should save it as .scrap file, not render it into a flat file.
Typical reasons for rendering your work include to give the work to a lab for printing; to send good
quality files to clients, family or friends who do not own FotoFusion; to use the files in another
application; to burn the files to a dvd; to use the files in an online album uploader; to print on a machine
that does not have FotoFusion installed; to upload an image permanently to a social media site or a blog.
Click on the
tab, and select TO A FILE from the list of options.
108
OUTPUT: FINALIZING & SHARING
File name: type in any name you would like to give the file. Click on the ... button to select a previously
used file to over-write, or on the >> button to choose among predefined text tags (eg. exif data)
(Extreme, Yearbook only).
File type: see below for options.
File naming scheme: FotoFusion offers a number of predefined options to name your files. Options
include page numbering, project and file names, and album manufacturer's settings.
Crop options drop-box: Select from "Render Canvas Only" (crops to exact border edge of your canvas
area); Render Canvas + Bleed" (crops to bleed edge -- Extreme version only); or "Render Canvas +
Bleed + Overhang" (includes items outside your canvas, including "orphaned frames" floating completely
off your workspace).
Show Crop Marks: Checked on, the rendered files will include crop marks on your project (best used if a
bleed zone has been included on your project).
Sharpen reduced images: It is recommended to leave this option on to ensure the best quality for your
images.
Watermark Collage: Learn more about creating your own custom watermark, to protect your images
from unauthorized reproduction.
Add Banner: Learn more about creating your own custom banner, to better advertise your work.
Overlay Image Info: If you are sending a proof to a customer, turn on this option to show the file name
for all images in the project. More details on Overlay image info can be found in the Proofing documents
section of this manual.
Resolution and Quality: The resolution or DPI (dots per inch) of your exported collage can be set to fit
your requirements. Setting the DPI will adjust the image resolution, and setting the image resolution will
adjust the DPI (since both values are related to the canvas size). Enhanced users are limited to
3900x5700 pixels. The 'quality' slider will allow you to adjust the amount of compression used to save
the image. More compression produces smaller files at a lower quality; less compression produces larger
but higher-quality images.
Color profile options (Extreme): Under the Resolution and Quality area, a drop-box selection
provides three choices:
OPTION 1: Convert to sRGB and Tag with sRGB
This option is recommended for most users – if your images are sRGB, untagged, or if you are using a
mix of photos with various color spaces.
FotoFusion will convert each of the color spaces and tag the rendered file with sRGB. Most pro photo labs
will print your images using the sRGB color space and will process your images as if they were embedded
with this color space.
OPTION 2: Pass through profiles unchanged and tag with common profile
This option will only work if all of the photos/images are using the same color space.
You can use this option if you shoot everything using the same color space and want a rendered collage
that has the same profile.
You may wish to convert your layout into sRGB if your are getting your collages printed by a lab. Check
to see if they will only accept sRGB files.
OPTION 3: Pass through profiles unchanged and tag with selected profile
You can use this option if you shoot everything using the same color space and want to manually choose
the color space for your collage.
OUTPUT: FINALIZING & SHARING
109
This option will work best if all of the photos/images are using the same color space.
If you chose the third option, click on the ... button to add the profile of your choice, as viewed below.
When you export your collage, your output will carry the color profile options you selected.
Once you have set these values, you can PREVIEW your page. This will allow you to examine your work at
100% detail. (Note: you cannot zoom out, but you can scroll the page to see it in detail.)
PDF will show an option to choose Layers & Vectors (larger file, sharper text) or as Flattened Pages
(smaller file size).
Toggle between ACTUAL SIZE views (100%, which can be panned) or Zoom to Fit (to display the entire
page).
If you are satisfied, you can RENDER the project to a file.
Local Viewer versus External Viewer or External Editor: If you wish to automatically
open your output files into a photo editing software, change this option to External editor.
Local Viewer: FotoFusion will display the processed image directly below in the preview window.
External Viewer or External Editor: FotoFusion will open the tool you have selected to load the rendered
output and display the results there.
Why the split between viewing and editing? Most graphics users have multiple applications installed that
can be grouped into two basic categories - lightweight viewers, such as IrfanView, which boot quickly and
are designed to display images - and editors, such as Photoshop, which boot more slowly and are
designed to manipulate images with paint and other tools.
FotoFusion allows you to configure a set of programs in either category, and pick from among those
alternatives when you click 'Render'. Simply left-click the button to be asked which editor you would like
to send the output to; if you have not configured an editor for use by FotoFusion, choose 'manage' from
that pop-up menu. You will be asked to select an editor to use:
To add a new program, such as Photoshop,
1. Click 'Add.'
2. Navigate through the folders of your hard drive until you find the program you want to run (such as C:
110
OUTPUT: FINALIZING & SHARING
\Program Files\Adobe\Photoshop 7.0\Photoshop.exe).
3. Click 'OK'
Now, when you click the 'Render' button, you will be given the choice of routing your image through
Photoshop for further editing:
Entire Canvas versus Double Page Separate versus Respect Page Segments: FotoFusion Extreme
& YearbookFusion supports double page spreads and page segments. Albums can contain double-page
spreads, which show to adjoining pages. This is useful if, for instance, you wish to place a large
panoramic image across two pages or a decorative background. Some printing companies will request
that double-spread are separated into two separate sides.
Entire canvas is the default setting- double-spreads will be rendered as one page. Double Separate
will split double pages into two separate pages/files.
If you have specified Printer Page Segments in the project, you can render your files to follow the
predefined segments.
Selected Page versus All Pages versus Assemble Book: FotoFusion Extreme & YearbookFusion
licenses supports multi-page rendering.
Selected Page will render only the current page on the Create screen.
All Pages will your entire album at the same time, either as separate files (eg Sanchez Wedding 001.jpg,
Sanchez Wedding 002.jpg) or as a single multipage .pdf.
Assemble book disregards your current project, and launches the File > Open window. You can select
multiple projects for sequential rendering. This option is usually only useful for YearbookFusion users who
have accidentally made projects with multiple database.
If you have also chosen to render Double Page Separate or Respect Page Segments, you will notice that
the Preview and Render Buttons will prompt you to choose which part of the project you would like to
render. Click on the thumbnail of the section you would like to export. If you have chosen Respect Page
Segments, you must use the Selected Page option.
Cover options: FotoFusion Extreme and YearbookFusion licenses support the use of cover pages as a
page type. When rendering, you can choose to leave the cover as one file, or to split it on either side of
the spine (front + spine, back or front, spine + back), as required by your printing company.
File Type: FotoFusion can render to BMP, GIF, JPEG, PNG, and TIF; Extreme users and some
YearbookFusion users have the option of PSD and PDF formats.
JPG is a compressed format, which means that image quality can be traded off against disk space - lower
compression will produce sharper images and a big file, higher compression will produce noisier images
and smaller files. Increasing the quality on a JPG export usually results in good-looking images without
producing a too-large file.
Only the PNG format can write out transparency; if you want to have a canvas with a transparent
background, set up the canvas with a transparent background by creating it with a 0 opacity, then render
to png.
OUTPUT: FINALIZING & SHARING
111
BMP files tend to be very large - they are 'lossless' (you won't lose any quality working with this format).
Images in this format are typically used for work in Windows environments. TIF images are more portable
than BMP images but remain large compared to JPG files.
PSD files can be opened in Adobe Photoshop, and will produced a multi-layered document suitable for
editing. Each element in the FotoFusion canvas will be rendered to a separate layer, including shadows
and image mattes. This allows you to target only the specific layer you will need to correct.
Text is rendered as a graphic object, and is not editable.
Note: rendering to PSD will create very large format files. If you are rendering a multipage project, do
not render to "external editor" -- this will automatically open the projects in Photoshop, which may cause
problems with your computer's available memory allocation.
PDF files can be opened in Adobe Acrobat Reader and related products. PDF files can be generated as a
flattened file type (smaller file), or as a layered file type. Multipage projects will render to a single
multipage pdf.
TO PRINTER
To print your project on your local printer, click on FILE >> Print or select OUTPUT >> To a Printer.
Please note that FotoFusion will print multiple pages for Extreme license user and for Enhanced users
working with multipage templates from the dotScrap marketplace. Some YearbookFusion users may be
able to print, perhaps with a watermark or reduced quality, as per your yearbook publishing company's
preferences.
This is the main Printing Options window, displaying a multipage project.
Click on the
button to view all available printing options if you do not see the options to the right
side of the window.
112
OUTPUT: FINALIZING & SHARING
Printing Single, Multiple Pages
Multi-page projects will display in column of thumbnails to left. The thumbnails that will be printed will
display a checkmark. Turn the checkmark off to remove the item from the print job.
You can choose to print the "All Pages" or print like-size layouts (eg. 10x10s, then 20x10s) within a
single layout.
Clicking the "All" button will select every page in the list; "Current" will select the page currently loaded
on your Create screen.
Previewing Output
To preview your printed output, choose
. This will result in an onscreen preview of your printed
output.
While previewing, several new buttons appear at the top of the page, which allow you to print the current
preview; navigate to the next/previous page, show two pages at once (if your license enables you to
make a multi-page project), and zoom in/out (expand the preview to see more detail)
Changing and Configuring the Printer: Clicking the
button allows you to select a different
printer, as well as configure the print quality and other printer-specific options. Each printer driver is
specific to the make and model of the printer, so be very careful when selecting options as these will
affect your FotoFusion output. Be sure to check your printer setup to verify that your printer has the
correct type of paper selected and that no options will interfere with your print job (eg. quality of print,
multiple copies, etc.). Once the printer driver window has opened, choose PROPERTIES to look at the
settings for the printer itself - for example, to make multiple copies, paper size and orientation.
Scaling: There are two main printing options in FotoFusion. No Resizing (even if it requires multiple
OUTPUT: FINALIZING & SHARING
113
pages to print). This option will print your collage at exactly the dimensions that you selected when
creating it. If your layout is 6x6 inches, it will be printed at exactly 6x6 inches on an 8.5x11 sheet of
paper.If you layout is 36x24 inches, it will not fit on a single 8.5x11 sheet of paper. Extreme and some
Yearbook licenses can printed output across multiple pages.Enhanced can only print to exactly one sheet
at a time. Resize only if necessary: If your layout is bigger than the printed page, it will be printed at a
reduced size; if it is too small, it will be printed larger. Use this option if the precise dimensions of your
printed output don't matter: you just want to use paper as efficiently as you can. Note that the options
for Full Bleed and Crop are only available when printing at 1:1 (because these options are only relevant
when printing precisely-measured output, and the 'fit' option resizes the image to fit the page).
Full Bleed: If you have created a canvas with a bleed area, then turning on the "Add Full Bleed Region "
option will print that region.
Crop Lines: If you have created a canvas with a bleed area, then turning on the "Draw Crop Lines"
option will print crop marks where the canvas ends and the bleed area starts.
How to Print: You can choose to print centered on the printed page. You can also choose to match the
orientation of the page. For example, if you have a 'landscape' layout (say, 20x10 inches) and you want
to print it scaled to fit an 8.5x11 inch page, then you might want to print it with the 20" width along the
8.5" axis of the (portrait orientation) page... or have the orientations match, so that the 20" width has
been rotated to print along the 11" axis of the page.
Cropping: Include frames outside the canvas: If you have frames that extend past the edges of the
canvas, this option will expand the canvas to include those frames. A typical use is to correct for rotated
frames in a jumbled collage - with this option set, those frames will not be cut off. Note that this option
will change the dimensions of your printed canvas slightly if you are printing 1:1.
Crop to canvas edges: With this option set, your canvas will be printed exactly to the edge of the canvas
and any frames that hang over that edge will be cropped
Color Profile The 'Use printer color profile' option -- available in ENHANCED and EXTREME -- tells
FotoFusion to respect the color profile currently configured for the selected printer. Use the Windows
printer configuration dialog (Setup...) to select a profile. If this option is not selected, FotoFusion will
ignore the printer's color profile and process the collage directly to the printer.
Paper Type: This option will configure your printing options to rotate your page (based on its
designation as a left-side or right-side page) and provide the appropriate diagram to orient your paper in
your printer.
Overlay Image Info: This checkbox will turn on the options set in the Overlay Image Info settings,
displaying information about your image files directly of the canvas. Your images can include labels to
include file name, frame number or other exif information. This can serve the dual purpose of
watermarking your proofs and providing a communication tool with your client.
PRINTER SEGMENTS: Extreme licenses include the ability to segment a composition into smaller
114
OUTPUT: FINALIZING & SHARING
sections, allowing you to reassemble your composition in several ways.
A "printer page segment" is a resizable
translucent frame that floats over your canvas,
specifying how your larger canvas will be cut into
separate printable areas.
Note how this type of segment specifies the page
number of the segment.
This feature allows you to print layouts that are
larger than your printer is able to output directly,
as pieces which fit precisely together when
assembled on a suitable background medium.
A "segment" is also a resizable translucent frame
that floats over your canvas. It defines a smaller
area of the canvas that can be transposed onto
another area of your project.
It specifies a segment number.
This feature is useful for working with a template
page which can then be reassembled a printer
friendly-page, copied multiple times, or to assist
working with an awkward orientation.
Printer Page Segments: Suppose that we want to print a 16x12" collage but have a printer that
can print only print 8.5x11" paper.
To begin, click on VIEW on the menu, then select Show Printer Segments.
If no segments have been created, FotoFusion will offer to create segments to cover the page.
OUTPUT: FINALIZING & SHARING
115
This will create a set of printer page segments to cover the image with a grid of pages:
In this example, there are 6 page segments, all of which can be adjusted like a normal frame to assure
that the printer segments will fall in the best possible place for reassembling the larger puzzle. The red
oval in the image above suggest a segment that should be move slightly to the right, along the border
edge of the large image of the bride. The layout can now be printed; the portion of the collage covered by
each printer page segment will be printed separately, and the individual pieces will line up correctly.
Below is page one of the entire composition
Note that the crop lines and full bleed for each segment of the image will be printed correctly if selected.
To manually add page segments, click on the Insert Menu item and choose Insert Printing Segment (or
use the hotkey Ctrl-Shift-P).
Other suggested use: poster mosaics.
SEGMENTS are used to partitioning portions of your project for reassembly on a printer- or renderfriendly page.
The example to the right is one of the Z-cards
available as a template from the Marketplace.
This template consists of a cover page (shown,
right), a template layout page, and two
"export-friendly" pages and 1 "printer-friendly"
page.
116
OUTPUT: FINALIZING & SHARING
The designer in this case has created a
template containing empty frames, so that it
can be reused with new images repeatedly.
The page to the right shows the design page -this will not be printed or exported -- so it can
contain instruction or variations of a single
template.
In this case, both sides of the card are being
designed at the same time, though they will do
not need to be printed or exported at the same
time.
The canvas size of this page is not important,
but the size of the actual card on the page very
important as this is the element that is going to
be transferred to the final pages to be printed
or exported.
To create printer page segments, draw a frame
(drag with your mouse on the canvas) while
holding the S key, to cover one of the regions
to be transferred to a new page.
You can also choose the Insert menu item
"Printing Segment" to add the adjustable frame
over your canvas.
Adjust the printer page segment to cover the
region precisely.
Once the areas have been defined, you can
copy the segments to another printer or exportfriendly page in the following manner.
If required, add a new page to the project, at
the dimensions required.
On this new page, right-mouse-down on the
canvas and select ADD > New Render Segment
from the top of the drop-down list.
Alternatively, use the Insert menu's "Reference
Region > Destination" option.
A drop-down list of available segments will
appear. One segment can be added multiple
times on a page, to create a sheet of duplicate
items to print. Individual segments on a page
can be rearrange, to create a more efficient use
of paper (ie. rotate segment to fit them better
on a page).
If you edit the original layout, the changes will
be reflected on this printable/exportable page.
Other suggested uses: business card (multi-up on one page); bifold greeting card (to avoid designing
"upside-down"; creating a printer-efficient pattern for a larger composition of smaller elements.
OUTPUT: FINALIZING & SHARING
117
TO WEB ALBUM
FotoFusion allows to you upload your project to
the LumaPix server as an online slide-show
with custom transition styles. It provides you
with a web address and QR Code, which can be
easily shared with friends, family and clients.
This no-fee service will exist for 30 days on the
server, and will include LumaPix branding on
the final slide. (This feature may not be
available with YearbookFusion if disabled by
your yearbook publisher.)
After uploading, your project is assigned a web
address, which can be accessed on any
computer or tablet (iPhone/iPad /Android
/Blackberry/PC/Mac etc.). You can publish the
link to Facebook or Twitter, or send it by email,
as you wish.
Publishing to Web Album: To publish a web album, first launch your project in FotoFusion (File >
Open).
Next, click on the OUTPUT tab and choose TO WEB ALBUM.
Click Publish Current Project Now to upload your project to the LumaPix server.
118
OUTPUT: FINALIZING & SHARING
The project will upload, usually within a few seconds.
Once uploaded, the Web Album manager screen will appear.
Sharing and managing your Web Albums: The five letter code
and QR Code at the top of the Web Album manager is the unique
identifier for your project.
Note that is part of the URL where you album can be accessed.
Change the Title of the project, to more quickly identify it in the Web
Album manager.
OUTPUT: FINALIZING & SHARING
119
To make a copy of the ulr where your project has been published, click the
Copy to Clipboard option. Paste (ctrl-v) this url to transmit the album's
web site address manually to an online email application (eg. gmail,
hotmail, yahoo mail) or messenger.
View in Browser will immediately launch the album in your default
browser.
Share the album via EMAIL - clicking on the Email button launch your
default installed email application with a new message and the url
automatically inserted in the message body.
Click on the Twitter or Facebook links to post the link to your accounts -a browser login will be required to do so.
Click on the QR Code icon to generate a large preview of the code,
suitable for scanning with your phone, directly from your computer screen.
Click Delete to remove the album permanent from the LumaPix server.
Albums will expire automatically in 30 days, but you can repost them if you
wish.
To manage your work after uploading it, return to the Upload to Web
Album screen and choose the Previously Shared option.
Viewing the album online:
Follow the url (directly from the Web Album Manager, via a link sent by email
or posted on Facebook or Twitter) to launch a webpage with a set of basic instructions. Move from page to page by
swiping the screen left (or right, to go back) with your mouse, or, on a touch screen, with your finger, not unlike a eReader.
Images courtesy of Richard Esposito.|
120
OUTPUT: FINALIZING & SHARING
Options for sharing, transition style and slide show view are accessed by swiping down. Show guide returns you to
the instruction screen.
Swipe up to display thumbnail previews of all pages. Select one of the page thumbnails to zoom to the page.
TO YOUR WEBSITE
FotoFusion includes an integrated FTP client and allows you to publish your collage directly to a web site
as an online photo gallery.
Note: this does not enable you to upload to websites like Facebook or hosted blog sites.
OUTPUT: FINALIZING & SHARING
121
If you wish to publish the files without using an ftp to them to your server directly, click on Output to
the Web tab, which will render your files locally.
To Publish directly to your website: First, you need to have the name of a server to which you will
publish and a login ID/password.
Enter your login information for the web site, and choose a folder and name to store the remote file
under. Once you have published a collage to the web, it will appear in the list of Published Web Collages,
allowing you to quickly review work you have already done. The important decision of whether or not to
include original images should be made at this time.
In addition to the file name, published original images will contain the FotoFusion frame number for easy
reference purposes. You can choose to publish now, or choose additional options on the Image Quality
and Watermark tabs. These options are identical between the Publish (to Web) and the Email areas and
so we will cross-reference these two actions:
Including Original
Image Attributes
Images
Watermarking
Banners
When your options have been configured you can Preview or Send the results to your server. If you
already have an existing online web gallery, you can easily produce a collage from it. Reasons for doing
this include:
Sending emails to customers or friends with a collage of the contents of your web gallery, inviting them
to come to your gallery to browse.
Producing collages and exporting them to HTML to integrate with your gallery as a more interesting
'table of contents.'
Printing out a collage of your recent work.
To bring an image from a web page into FotoFusion, simply drag it from your web browser into
FotoFusion. Done!
Multi-page publishing: Extreme users can publish multiple pages simultaneously. When a multi-page
project is open, the Publisher window will include add two options:
If this is option is selected, a thumbnail preview of your work will be included in the
generate files.
can be selected to publish the entire project. If you only want to publish one page at a
time, switch this to "Selected Page."
122
OUTPUT: FINALIZING & SHARING
HTML Custom Themes: You can define your own HTML themes for both Email and Web output. The
Share tab section of this manual contains complete details.
TO EMAIL
FotoFusion streamlines the process of sharing your images with others by email via the
tab. Use the Share tab to send "postcard" collages or very low-quality proof documents to clients.
Basic configuration: The first time you send an email, click on the ISP SETTINGS tab. You will need to
your "reply to" email address and your name, so the email recipient will see who the email is from, and
can reply to your message. We suggest using the LumaPix server to send your emails (versus your own
ISP), as it is guaranteed to work.
Sending an email: Click on the
tab to set up your email.
If you have never sent an email to the recipient you have in mind, click on
list:
to add them to the
OUTPUT: FINALIZING & SHARING
123
The recipient's name and email address will be saved in the 'recipients' list to make it easy to send mails
to those people again; in the future, you can simply click on the check box in the 'recipients' list to have
the email sent to them.
The
button provides tools that attempt to import your contacts from the Microsoft Address
Book into FotoFusion to avoid your having to retype known Email IDs. To edit your list, click on the
button.
Your email list is saved as a text file in your MY COLLAGES folder (C:\My Documents\My Collages) should
you need to edit the list. It can be opened with Windows Notepad for easy editing.
Editing the email message: Enter a subject line and a message text. This will appear on the subject
line of your email, and as the text body of your message.
Including Original Images: Your email can contain just the collage, or it can contain the collage and
scaled-down versions of all the original images that make up the collage. The latter allows the recipient of
124
OUTPUT: FINALIZING & SHARING
your mail to click on images in the collage and see the original images on their own:
To enable the inclusion of original images, turn on the 'Include Scaled-Down Original Images' option:
To include the file name on the project's images, turn on the 'Overlay Image Info' option:
Multipage emails: Extreme and Yearbook users an specify if you want to send a multi-page email ("All
Pages) or a single page ("Selected Page").
Specifying compression, image sizes, and other image options
When you click on the Image Quality tab, you will be presented with several options.
You can set the image quality used for both the collage and the attached originals, or manually enter the
pixel size for the image. We suggest leaving the Default settings.
If you have set background to canvas color enabled, the color of your canvas will be used to set the
email background.
For your cropping options, change the drop-box option.
You can RENDER CANVAS ONLY will cut away anything outside of the edges of your canvas, leaving
OUTPUT: FINALIZING & SHARING
125
only the portion directly on the canvas. This is useful to keep on, in case you have dropped an image
outside the canvas. However, leaving it off can create an interesting effect if you have elements hanging
over the edge of the canvas.
You can also Render Canvas + Bleed, if one is specified (Enhanced, Extreme only) or, to display every
part of every image on the Create screen canvas, select Render Canvas + Bleed + Overhang.
Configuring an ISP (Optional): An ISP is an acronym for Internet Service Provider, meaning the
company which provides your internet access and often also provides you with an email address as well.
By default, mails send from FotoFusion go through the LumaPix mail server (the mails go from
FotoFusion to www.LumaPix.com to the recipient, instead of going via your regular email server).
This is done as a courtesy to our trial and paid customers, to ensure that they have as smooth a demo of
FotoFusion as possible; the alternative (having trial users configure their ISP settings) would result in far
fewer successful mails sent by trial users, as ISP setups can be confusing.
Once users have upgraded from the trial version to a paid version of FotoFusion, they have the option of
continuing to go via the LumaPix server or using their own ISP.
The advantages of using your own ISP are:
1. Much higher maximum message size (we limit mails through LumaPix.com to reasonable sizes to
protect the account from overuse).
2. You own the mail pipeline from start to end.
To send email through your own ISP, check the "Send Using My Own ISP E-Mail Settings" box. Click on
DETECT MY SETTINGS to automatically connect, and, if you wish, click on TEST THIS SETTING to send an
email to yourself.
Watermarks, Banners and Themes: FotoFusion also allows to watermark your images, or add a
banner to them to brand your emails. You can also choose different appearances for your email by
changing the theme. Watermarks and Banners can also added to your files, created from Output to a File.
Watermarks protect your work from reproduction (eg. proofs), and banners label your projects, much like
attaching a business card to your work.
Adding Watermarks: Click on the Watermark/Banners/Theme tab to apply a watermark to your output.
Watermarks give you a way to label your work such that the customer can decide if the pictures are right
for them but not be tempted to save them locally:
126
OUTPUT: FINALIZING & SHARING
If you are using graphic content that requires re-editing:
1. Use an image editing application such as Adobe® PhotoShop® to create an image with a transparent
background.
2. Save this image in the 'PNG' file format with transparency enabled into the Watermark.
3. Place the PNG file into the 'Watermarks' folder where FotoFusion was installed.
If you are only using text or pre-extracted graphics:
1. Open a new canvas in FotoFusion
2. Turn the canvas frame image opacity to 0, or delete the canvas frame.
3. Add text and graphics as required.
4. Render the file to png format, sending it to the 'Watermarks' folder where FotoFusion is installed.
To apply a watermark,
1. Browse for the file you wish to use as your watermark.
2. Turn on the checkbox next to Collage (to watermark the page) and/or Originals (to watermark
attached original images)
3. Select where you would like to place your watermark using the grid (top, side, bottom, etc.)
4. Select the opacity of your watermark using the slider bar.
Adding Banners
Just as with Watermarks, custom Banners can be created in FotoFusion or Photoshop, or similar programs
and overlaid over email or web output.A banner is an image with an embedded hyperlink; it is typically
opaque, as you WANT the user to see and click on it. An example use of a banner would be to have
recipients of your emails click on the banner to visit your site.
The 'Link' field allows you to specify the address that the banner should link to (e.g. http://www.
WEBADDRESS.com).
The 'Text' field contains the text that will be shown in a 'tooltip' when the recipient rolls their mouse over
the banner.
The 'Place Banner Outside Collage' checkbox allows you to control whether the banner will lie inside or
outside of the embedded collage.
Email & Publishing to Web Themes : FotoFusion allows you to modify the templates used by
Email and HTML publishing to get a look that matches your web site or personal preferences. FotoFusion
is bundled with several themes, which can be changed on the Watermark/Banner/Theme tab. The theme
will change the way your output is displayed, adding background color and borders around your images.
To change the theme, click on the combo-box in the Watermark/Banners/Theme tab under the Email or
Publishing tabs:
OUTPUT: FINALIZING & SHARING
127
Three themes -- Black with Grey Frames; Minimalist and Standard provide simple aesthetic choices for
the way your work will look. The Album Preview theme is useful for multi-page albums, as it includes
page thumbnails at the top of the email.
The Contact Sheet theme is useful to all users. Instead of rendering a collage, all images on your
canvas will be arranged cleanly into thumbnails with file information. ** Note: you need to have "Include
Scaled-down Original Images" checked to produce contact sheet-style info.
Creating your own theme: FotoFusion also allows you to create custom themes for your emails
and for the pages you publish to your web site. If you wish to design your own themes, it is
recommended that you examine the pre-existing themes included with FotoFusion (located in C:
\Program Files\LumaPix\FotoFusion V4\Themes), to get an idea of their construction, then
attempt to customize your own.
The following instructions are written with the assumption that you are viewing the structure and design
of the sample themes located under the "Themes" folder of your FotoFusion installation. Each template
must be located in a unique folder located under the "Themes" folder. Every template must include the
following files:
email.htm
index.htm
page.htm
photo.htm
Note: Any images used in the theme design must be located in a sub folder named "images."
128
OUTPUT: FINALIZING & SHARING
email.htm
The "email.htm" is a special file which contains the entire design needed to send an email. The various
portions of the email which need to be repeated are wrapped in special tags.
There are also various tokens which are required to tell FotoFusion how to render your design. A complete
list of these tokens is available below. Please refer to the sample html files to see how these tokens are
best used in your designs.
The "header section" tags indicate which part of the html is to be used at the beginning of the
email:
<!--START HEADER SECTION-->
<!--END HEADER SECTION-->
The "index section" tags indicate where the Index portion of the email should be, and must
contain the "start/end index thumbnail" tags, which will be duplicated over and over for each
page thumbnail.
<!--START INDEX SECTION-->
<!--START INDEX THUMBNAIL-->
<!--END INDEX THUMBNAIL-->
<!--END INDEX SECTION-->
The "page section" tags indicate which part of email.htm should be used for the pages. The
html code contained between these tags will be duplicated over and over for every page in the
project.
<!--START PAGE SECTION-->
<!--END PAGE SECTION-->
The "photo section" tags indicate which part of email.htm should be used for your project’s
images. The html code contained between these tags will be duplicated over and over for every
photo in the project.
<!--START PHOTO SECTION-->
<!--END PHOTO SECTION-->
The "footer section" tags indicate which part of the html is to be used at the end of the email:
<!--START FOOTER SECTION-->
<!--END FOOTER SECTION-->
index.htm
This page is used strictly for web publishing, and is independent of emailing. It requires specific tags and
tokens in order to render correctly. Please reference the sample index.htm to see this file's recommended
structure.
The “start/end index thumbnail" tags will be duplicated over and over for each page thumbnail.
<!--START INDEX THUMBNAIL-->
<!--END INDEX THUMBNAIL-->
page.htm
This is used strictly for web publishing, and is independent of emailing. It does not require any specific
tags, and only needs various tokens to render correctly. Please reference the sample page.htm to see this
file's recommended structure.
photo.htm
This is used strictly for web publishing, and is independent of emailing. It does not require any specific
tags, and only needs various tokens to render correctly. Please reference the sample photo.htm to see
this file's recommended structure.
Tokens
The meanings of the various tokens which can be used in your designs are detailed below. As always, it is
best to refer to the sample templates to see how these are best used.
{FF_EMAIL_SUBJECT}: Email subject
{FF_EMAIL_MESSAGE}: Email message
{FF_EMAIL_BANNER}: LumaPix email banner (required in email.htm for trial and Essential users)
OUTPUT: FINALIZING & SHARING
129
{FF_PROJECT_MAX_WIDTH}: The value of the widest element in the project
{FF_PAGE_NO}: Page number
{FF_NB_PAGES}: Total page count
{FF_TO_PREVIOUS_PAGE}: Link to previous page
{FF_TO_FIRST_PAGE}: Link to index page
{FF_TO_NEXT_PAGE}: Link to next page
{FF_PAGE_DIRECTORY}: Directory of the image representing the page
{FF_PAGE_FILENAME}: Filename of the image representing the page
{FF_PAGE_THUMBNAIL}: Filename of the thumbnail image representing the page
{FF_PAGE_THUMBNAIL_INFO}: Textual information about a page thumbnail
FF_LINK_TO_PAGE_{FF_PAGE_NO}: Link to current page
FF_LINK_TO_INDEX: Link to index
FF_PHOTO_MAP_FOR_PAGE{FF_PAGE_NO}: Unique photo map name per page
FF_PHOTO_MAP: The actual photo map per page
FF_TO_PREVIOUS_PHOTO: Link to previous photo
FF_TO_PARENT_PAGE: Link to parent page
FF_TO_NEXT_PHOTO: Link to next photo
FF_PHOTO_NO: Photo number
FF_LINK_TO_PHOTO_{FF_PHOTO_NO}: Link to current photo
FF_PHOTO_DIRECTORY: Directory of the image representing the photo
FF_PHOTO_FILENAME: Filename of the image representing the photo
FF_PHOTO_DOTSCRAP_LINK: Link to a dotScrap element (if an element is not a local photo)
FF_PHOTO_WIDTH: Photo width
FF_PHOTO_HEIGHT: Photo height
FF_PHOTO_DESCRIPTION: Photo description
Adding Custom Tags to Emails
FotoFusion Extreme allows you to use custom EXIF information in your source images to add to your
email themes.
You will need to edit the following information in the Email theme, substituting your custom tag for one of
the existing ones…
%name%.%type%
Date:
%date%
Photo Number:
{FF_PHOTO_NO}
Focal Length:
%focallength%
Shutter Speed: %shutter%
In this example, we will replace "Shutter Speed" with "Last Name" information.
Go to the folder you created for the theme (C:\Program Files\LumaPix\FotoFusionv4\Themes\ExifEmail )
and open email.htm in Windows Notepad (and not a Word document, as html coding will be included,
rendering the file unusable).
130
OUTPUT: FINALIZING & SHARING
In this case, search for “Shutter”. You will see something like this:
<td style="border:solid 0px #CCCCCC; background-color:#F2F2F2; font-family: Arial, Helvetica, sansserif; font-size: 10px; font-weight: bold; color: #000000;">Shutter Speed: %shutter%</td>
Most of this is a description of the table format – the relevant information is at the end -- Shutter Speed:
%shutter%
Replace that with the name and tag ID of choice, for example, Last Name: %studentLastName%
Save your work, and ensure that FF has ‘ExifEmail’ selected as a theme. Preview the email again. If all
has been entered correctly, you will see
Filename.jpg
Date: xx/xx/xx
Photo Number: y
Focal Length: z
Last Name: (Student's Last Name)
UPLOAD TO PUBLISHER
If FotoFusion has been provided to you by a book printing company, you most likely will be able to send
your completed projects directly to their server (eg. YearbookFusion users, some Extreme users). Most
Enhanced and most Extreme users will not find this option available - you can render your project
and send the files to any printing company of your choice.
Before submitting the project to your publisher, all pages of the project should be compiled into a single
complete project.
For YearbookFusion users, please consult the section Managing Your Yearbook for complete details.
Before uploading, FotoFusion will check your project for problems. You may get resolution warnings
(when an image is of insufficient quality or over-zoomed) and for red frame numbers (images that have
become disconnected from the original files). Files with red resolution warnings should be replaced, to
ensure that the project will print with sufficient quality as per your publisher's recommended values.
You do not need to configure anything to send the files to your printing company, other than to have an
active high speed internet connection available.
Under the File menu, or from the Output tab, choose the UPLOAD TO PUBLISHER option. One or more
choices may be available, depending on your publisher's preferences.
If you see only one option, then your publisher has chosen this method as the exclusive upload method.
If you have two options, ask your publisher which method they prefer. Flattened files will take less time
to upload, but the publisher will not be able to make any corrections to the project.
Upload as Flattened Images renders your project to a flattened file, and sends the resulting package to
your publisher directly.
Upload Complete Project sends your publisher an archive, which can be reopened and edited by the
publisher.
Upload File... allows you to send a single image or project to your publisher (eg. a logo). Do not send .
scrap files to your publisher - they will not be able to open them as there are no associated images tied
OUTPUT: FINALIZING & SHARING
131
to the project.
Uploading can take quite a bit of time (hours, in fact, if it is a large project), and is dependent on the
speed of your internet connection, your publisher's server, and the size of your project.
132
OUTPUT: FINALIZING & SHARING
GRAPHIC RESOURCES & TEMPLATES
FotoFusion users have access to a collection of high-quality embellishments and templates, designed for
hobbyists, schools and pro-photographers. These materials are instantly accessible with a high-speed
Internet connection.
The collection is an on-demand resource for graphic embellishments and templates, all located securely
on the LumaPix server.
You can find graphic content in several ways...
From the Start tab...
Click on the
tab, then select
New Project to get to the templates section.
The selection of templates will change
depending on your license type (Enhanced,
Extreme or Yearbook).
GRAPHIC RESOURCES & TEMPLATES
In this Extreme user's view, Templates shows a
variety of template themes. Select a theme to
view the available template collection.
YearbookFusion users will be offered Yearbook
theme sets and other school-related materials.
Choose Bundled to see only the templates that
are free with your license. Most Yearbook users
will only see free content.
The categories will bring to a preview of the
available templates.
In this example, the Senior Portrait layouts are
displayed.
Use the slider bar at the bottom of the page to
see additional templates.
If you wish to go back to the categories, click on
the buttons at the top of the page - you'll be
returned to the selected level of the hierarchy
(eg. click on New Project to return to all new
project options).
Notice that the previews contain information
about the purchased status of the template.
You own this indicates that the content is part
of your bundled collection of graphics (or that
you have already purchased it)
A credit value indicates that the template
requires an additional purchase to unlock it.
133
134
GRAPHIC RESOURCES & TEMPLATES
From the Search hovers...
On the
tab, you can use
preset hovers, such as
and
to look at available graphic content.
hovers
Notice the FREE, PREMIUM, PURCHASED and
MINE tabs at the top of the hovers.
Free content is part of your bundled collection.
Premium content requires a purchase to unlock
it.
Purchased content displays content you have
unlocked, and can reuse.
Mine refers to content that has been tagged in
the Organizer, from your personal collection.
The
hover allows you to look for material
by type or by keyword. Try searching using
keywords such as color, an event, holiday or
activity, and/or use the TYPE box to specify the
type of graphic content you would like to find,
such as templates or embellishments +
decorations.
In this example, a search for all Embellishments
+ Decorations with the keyword "flower" yielded
several results.
From the Organize tab... The Organize tab allows you to search for content in the same manner
as the general Search hover.Click on the SEARCH tab, and use keywords and type to locate available
materials. Their ownership status (free, premium, purchased, mine) will not be displayed in this view.
GRAPHIC RESOURCES & TEMPLATES
135
In this example, the Keyword = Sport and the Type = Templates shows the following results.
Double-click on Templates to launch them, or right-mouse select templates to append them to existing
projects.Add embellishments to a bucket to transport them to the Create screen.
YearbookFusion Gallery
collection:Yearbook users will
find thousands of items in the
hover. This contains a
special collection of schoolspecific graphics.
Enhanced & Extreme users will
not find a Gallery hover in their
software -- the Gallery is a
YearbookFusion-exclusive
feature.
Click on this hover to open it,
and then click on the down arrow
to point to the LumaPix Clipart
folder. You'll see four folders:
Clipart, Covers, Headers and
Papers. (You may also see a
folder from your yearbook
publisher, with additional
content.)
136
GRAPHIC RESOURCES & TEMPLATES
The Clipart folder contains thematicallyarranged collections of drawings, decorations,
stickers and photographic art.
· Celebrations & Observances has material
related to events (eg. graduation,
Christmas).
· Decorations contains purely decorative art,
such as cartoon bubbles, suns & moons,
party decoration, swirls, and stickers.
· Interests & Activities contains items that
relate to study and clubs commonly found in
school, such as art, science, sports, religion,
the environment, etc.
· Objects has a vast array of items, such as
animals, clothing, av equipment, nature,
and school supplies, to name a few.
· People provides clip art, mostly in cartoon
style, of adults and kids.
To see a complete list of this collection in PDF
format, visit this webpage.
The Covers folder contains double-page sized
backgrounds you can drop onto a cover page
then add your own text.
The covers appear as a flattened page - the
back cover is on the left side, the front on the
right. If applied to a cover sheet page type,
you'll see thin green lines in the middle of the
page, showing where the spine of the book
will lay.
Tip: There is no reason you can't use these
items inside your book, added as papers to
the canvas background across album twopage spreads.
To see a preview of all the covers in PDF
format, visit this webpage.
GRAPHIC RESOURCES & TEMPLATES
137
The Headers folder contains titles for grades
and other common page types (eg. Grade 5,
Sophomores, etc.).
You can mix and match styles, or pick one
consistent style to add to your panel pages just drop them at the top of the page.
To see a preview of the headers in PDF
format, visit this webpage.
The Papers folder contains dozens of
backgrounds in a rainbow of colors. Choose
one paper style in one or more colors to unify
your book's design, or separate chapters with
different textures.
To see a preview of the papers in PDF format,
visit this webpage.
More papers can be found under the
hover as well.
Premium (Purchasable) Content: If you have launched unpurchased graphic material on your
canvas, you will see purchasing information on the bottom right hand of the Create screen. Most
YearbookFusion users will not find premium content available, as it has been blocked by your yearbook
publishing company (to avoid incurring additional charges for your yearbook.)
Unpurchased content on your canvas will activate the shopping cart. For example, a premium template
may cause
to appear on the Create screen, and a watermark will appear at the bottom of
your canvas to ensure that you know that unpurchased material is active in your project.
Click on the shopping cart icon to BUY purchase the material -- you will
be redirected to the LumaPix store to confirm and complete the
purchase.
138
GRAPHIC RESOURCES & TEMPLATES
Once purchased, your items will appear under the Purchased tab in Search hovers, and will be marked
as You Own This in the Start Tab's templates or Bundled content area. All purchased items are now part
your permanent collection, available for multiple reuse, and will automatically be available if you reinstall
FotoFusion on a new computer.
Credits: New FotoFusion activations will have 20 free credits to use. 1 credit is worth approximately $1
USD. (We chose "credits" to reflect FotoFusion's international user base.) After these are depleted, you
can choose to purchase additional credits by clicking on the shopping cart icon.
There is no obligation to purchase additional credits -- you can continue to use the free and purchased
materials you already own, or use graphics from other sources.
Click on "BUY CREDITS"
option in the shopping cart,
to be redirected to a secure
purchasing site. You may
need to relaunch FotoFusion
to make the credits appear
in your cart.
A Subscription option will
also be available to you. A
subscription is a monthly
recurring charge of $15
(USD) will 20 credits to
your account each month.
Enhanced users will further
benefit from having your
license upgrade to Extreme
during the subscription.
After purchase, your credit card will be charged on a recurring monthly basis.
If you do not use all 20 credits in a given month, the balance will remain on your account.
If you decide to unsubscribe, write to support(a)lumapix.com to request cancellation.
You will keep all remaining credits. Enhanced users will return to their original license permissions.
Using Graphic Content Offline: All materials located on the LumaPix server must be accessed
(and purchased, if required) while online, and then downloaded for offline use. There is no means to
transfer Marketplace graphics from an online machine to an offline machine. LumaPix does not provide
cds of the graphic content.
If you are usually online, you will not need to download the graphic content. This will save disk space on
your system -- FotoFusion will call up the high-resolution information when required at the time of
rendering your work.
GRAPHIC RESOURCES & TEMPLATES
139
If you need to access graphic content while your computer is offline...
Click on the
tab.
At the top-left corner, click on the
SEARCH tab.
Locate the material you are looking
for.
OR
Click on the
hover and
locate the material via keyword
and/or type.
Once you have located the material
you are searching for, right-mousedown on the thumbnail.
From the list of options, select
"Download Store Content"
The material will download to your
local system. This may take a while
depending on your internet
connection and the size project you
have selected.
The next time you use FotoFusion -- online or offline -- the material you have downloaded will be
available for immediate use in high-resolution.
Note: This material cannot be transferred from an online machine to an offline machine, even if it is
archived.
Troubleshooting: If you are having trouble accessing graphic content, check the following:
· In the bottom right corner of the Create screen, do you see
or
?
The orange plug means your software is not or cannot connect to the internet.
To fix, check to ensure that a high-speed connection is available, then relaunch.
· Still no luck getting rid of
?
Internet security software might be blocking FotoFusion - check your firewall settings in this case.
Some internet security software may block FotoFusion from accessing your connection completely. If
you are at home, check into your firewall settings, or temporarily disable the security software (don't
access email or the Internet if you do this!), then relaunch FotoFusion. If it is now online, you've
determined what is blocking the connection in the software.
· If you are connected to the internet (
is showing), but still can't get the content, then do the
following:
- click on EDIT on the menu
- choose USER PREFERENCES
- choose the Network tab
- turn on the checkbox at the top of the editor to "detect Internet Explorer proxy settings"
- relaunch FotoFusion.
· If you are in a school, then show your IT professional the System Requirements info at the start of this
manual. They may need to open up access on the school network.
140
GRAPHIC RESOURCES & TEMPLATES
Using Your Own Graphics Collection: Any image file on your system saved in a standard
flattened file format (jpg, png, bmp, gif, wmf, tiff) can be used in FotoFusion. Enhanced & Extreme users
with large collections of graphic elements may wish to keyword and categorize their graphics to make
them easier to use in FotoFusion, to enable searching in the Create screen Search hovers and the
Organizer.
Learn more in this manual in the Organizer section.
If you would like to make your own graphics, save background textures as jpg files, and clipart requiring
transparency as a png file (with a transparent background).
GRAPHIC RESOURCES & TEMPLATES
141
YEARBOOKFUSION: PANEL PAGES
A yearbook is composed of two types of pages.
A candid page is a regular layout - images, text, A panel page is a grid-style layout of labeled
and decorations. It may have a magazine or
portraits, usually organized into classroom
scrapbook style to it.
groups, grades or staff pages.
Panel pages are a challenge to build by hand. Portraits must be ordered by groups (classroom, grade),
rank (principal, teacher, student) and alphabetically, in a particular sorting order. To manage this
complicated process, YearbookFusion allow you to import a database associated to the portrait images.
The database is used to identify the name of the person, what groups they belong to, and how they
should be ordered relative to each other.
Yearbook panel features are exclusive to the YearbookFusion license, which can only be obtained through
a yearbook publishing company (see below for more info).
Workflow Note: Yearbook panel pages must be built in the master yearbook project -- one database
import PER BOOK (unless you have a book manager license).
Panel pages are created in three steps:
1) Importing a pspa cd, to associate portraits with database within your project;
2) Adding an empty panel grid to your page, and customizing it to suit your design tastes and needs
3) Populating the panel with images, according to your grouping and sorting needs.
Panels can only be made on Album-Side type pages (not covers or double-spreads).
If you need to change the page type, click on the
ensure you have "album side" selected.
hover, then right-mouse select your page and
Panels flow from one page to the next. A large group may flow across two or more pages. In this
example, notice how a color bar runs across five panel pages - these were created a single "query" - ie.
142
YEARBOOKFUSION: PANEL PAGES
FotoFusion was asked to create a panel showing all Grade 4 students.
You can make panels in small sections (show only one class, one grade), or make one large panel with all
members of your school grouped into sections by their grade or teacher (show all student pages, and sort
them).
Panel pages can be changed in most respects at any point of the design process. You can:
· change the look of the panel - the size of the image frames, number of rows and columns, the border
style, the text position and style.
· the grouping options: make a panel that only shows part of the school, or grouped by teacher,
homeroom, grade, etc.
· add or remove students and staff from the panels
· change information about the students and teachers (name changes, moved to a different class, etc.)
We recommend strongly to make all your panels in a single project, with one import of the
PSPA cd, unless you have a Book Manager license.
This will ensure that there is only one master set of information for the whole school. Projects
with separate databases cannot be merged without a Book Manager license.
Where can I get a YearbookFusion license?
YearbookFusion is sold in blocks of ten+ licenses to yearbook publishing companies, who then distribute
the licenses to their clients.
LumaPix does not sell individual Yearbook licenses to schools, photo studios or other groups. The
software requires users to have a properly-formatted PSPA database, provided by a yearbook company
or pro-portrait studio. YearbookFusion is customized to the publishing company's specifications to help
their clients make perfectly formatted books tailored for a specific publishing pipeline.
LumaPix is strictly a software development company and does not providing printing, photography or
pspa-formatting services.
If you are a studio or publisher who works with multiple schools, please visit:
http://site.lumapix.com/business-solutions/yearbookfusion-yearbook-software
to learn more about YearbookFusion. Representatives from schools or other organizations who require
software and a printing company can write to yearbooksales(a)lumapix.com - we can suggest one or
more printing company who serve your area. Please be sure to let us know where you are located.
THE PORTRAIT DATABASE
Panel pages require a database to link the portrait images to information about the people portrayed in
the images. This information can be used to group and sort the images.
The portrait database is often referred to as the index file or the PSPA database. PSPA is the acronym
YEARBOOKFUSION: PANEL PAGES
143
for Professional School Photographers' Association, who set the standard for the way a yearbook data file
is created.
The database file is usually generated by the photography studio, using special software designed for this
very purpose (using a bar code system when the photo is taken). Your yearbook publisher usually has
provided your school with a PSPA cd, containing portrait images and a data file describing those images.
Your yearbook company may pre-import the data and images into a project, and provide you with an
archive file (a .scrappackage) or upload it to your remote storage folder directly (if available).
The database file allows you organize the portrait images in your yearbook into panels, and display labels
and other information. Standard PSPA information associated with each portrait includes the following
data fields:
A. Volume Name
B. Image Folder
C. Image File Name (including file extension)
D. Grade
E. Last Name
F. First Name
G. Home room
H. Period
I. Teacher Name
J. Track
Once the database and images have been imported into a project, you can correct or add data linked to
the images, and create organized panel pages with the images within FotoFusion.
Note: Unless you have a book manager license, databases are attached to a specific project - so import
only once, and make this project your master yearbook. You can make multiple panels from one database
within the single project. Two projects with two separate databases can cause "versioning" problems, ie.
which version of the database is correct. You can insert candid pages/projects into the master yearbook
and add pages between panel pages.
Step 1: Importing the Portrait Database
If you have been provided with a PSPA cd, insert the CD into your computer, then launch FotoFusion.
Open your yearbook project and add an album-side page from the
hover, or create a new project
with an album-side page. Panels can only be made on album-side pages, not double-spreads, because of
the way they flow from page to page.
To import the contents of the CD to FotoFusion - click on the
over your canvas.
] icon in the Yearbook section of Toolbar
You can also click on the File menu to choose IMPORT PSPA CD.
A standard "browse" window will open. Navigate to your CD drive - you will see something resembling
this window, perhaps with fewer folders or different file names.
Find the file named INDEX.TXT and open it - located just outside the folder(s) holding your portrait
144
YEARBOOKFUSION: PANEL PAGES
images. This is the data file that links information about the members of your school to their portraits.
FotoFusion will then display the Import window:
Your school/organization name will appear automatically if your software is activated. (Yearbook
Publishers must choose from a list of all their activated schools - be careful to select the correct school.)
Most of the time, no further action will be required to import your data. If you see properly formatted
columns and rows of data, click IMPORT.
YEARBOOKFUSION: PANEL PAGES
145
If your data does not appear as expected in the table of data, or if you are merging or replacing an
existing database, you can change the following options:
Delimiter refers to the way the index.txt file is set up.
Some index.txt files will use tabs to separate the data fields, others will use commas or a special
character. If your data appears correct in the table, as in the example above, do not change the currently
selected delimiter.
If there is no information showing or it is not organized into columns, change the delimiter from "tab" to
"comma".
That failing, open the index.txt file in a Notepad-type document, and see if there are any special
characters between the data fields.
If so, then type that character into the "Other" empty field and select it.
If your data is represented with single or double quotes around the text, type this character into the Text
Qualifier box. The quotes will be stripped from the data table.
Check this ONLY if you see any headers (titles) above the columns in the table of data.
The Duplicates section provides rules for subsequent PSPA CD imports.
If this is your first import, or you are changing data sets, leave it as "replace school in database."
If you are merging a second batch of portraits (eg. retakes or a 2nd set of images), then select "Integrate
with existing database", or "append" if the file numbers have been restarted (00001) .
Most users will only see "School" and "Church" as the default
attribute set choices. An attribute refers to a category that can contain information associated with the
image files. For instance, a school will have attributes such as grade, teacher, home room, first name and
last name, while a Church set will include contact info, family names, and personal information.
Other attribute set can be created for specialized use, such sports team directories. For instance, a sports
team will have team numbers, position played and stats.
allows you to add attributes or create a new attribute set. Attributes are data
fields or categories that can be linked to your image files. For example, you may wish to add "Clubs" as a
data field linked to your images, or create an entirely new attribute set, e.g. "Church". To learn more,
consult the next section.
If the data import appears to be correct, then click on IMPORT.
146
YEARBOOKFUSION: PANEL PAGES
FotoFusion may offer a suggestion about your data import at this stage or display an error (eg. missing
image). Data-related errors can be fixed later; missing image errors need to be fixed before the import
can be completed. Verify the index (open it in a spreadsheet software, like Excel) and make sure the file
names match the portrait image file names.
Once the import starts, you will be prompted to provide a folder location where the images will be
imported. It is preferable to do so on your local C: drive to avoid problems with interruptions of network
connectivity, or a USB drive which can be unplugged.
The
Tab: After importing your PSPA CD images and data, the results will be displayed
under
, under the School tab. The School tab allows you to view and edit the
information in your database import. If there is no database attached to the current project, it will be
empty.
1. SEARCH: Use this area to target one portrait or a group of people in the database. Choosing SHOW
ALL will make every image in the database appear. SHOW ONLY allows to you target a selected individual
or group.For instance, if you need to find all the Grade 3 students, change the GRADE dropdown to "3". If
you need to find a particular teacher, click on LAST NAME and type their family name.
2. BUCKETS: Buckets are used to auto-triage database images if there may be cause for concern -- that
could result in a student not appearing in the yearbook. Missing a first or last name, or having no grade
or teacher will cause the images to appear in pre-labeled buckets.
3. PREVIEW: Preview displays the current selection of database images. You can display the images in
several ways:
· Sort by FILE NAME, FILE DATE or PHOTO DATE. (Name is selected by default)
YEARBOOKFUSION: PANEL PAGES
147
· View THUMBNAILS (images & file name), TILES (images, file name & size) or DETAILS (images & all
related data) (shown below).
Add Student, Revalidate School, Relink Image and Make Into... will be described in detail later in this
section.
4. PROPERTIES: If an image is selected in the preview area, the information associated with it will be
displayed in Properties.
Multiple images can be selected - only data common to the selection will appear under Properties. Data
can be changed under Properties, either by typing directly into the field (eg. correcting a typo in a last
name) or by using the drop down boxes (eg. assigning a student to a preexisting 4. PROPERTIES
If an image is selected in the preview area, the data that is associated with it will be displayed in
Properties. Multiple images can be selected - only data common to the selection will appear under
Properties. Data can be changed under Properties, either by typing directly into the field (eg. correcting a
typo in a last name) or by using the drop down boxes (eg. assigning a student to a preexisting grade or
teacher).grade or teacher).
Step 2: Editing the Portrait Database
After importing your PSPA CD, FotoFusion may show an error message, indicating that there is
incomplete data related to certain images and to prompt you to fix it. Typically, missing information
includes first and last names, grades, teachers, and departments. If the information is not fixed, there
may be errors in your panels, such as excluding individuals from the panels.
Here is an example of a message received after importing.
148
YEARBOOKFUSION: PANEL PAGES
A few problems have been found, so the affected images have been placed in named buckets.
To add or correct data, click on a bucket to view the images it contains.
Select an image to see the data associated with it This information will be displayed in the Properties
area to the right side of the Organizer. (You can select multiple images at once, by holding the control
key on your keyboard and selecting the images, or by drawing a marquee over a selection of images, or
by clicking on Ctrl-A to select all images in a set. This will allow you to correct common missing
information, such as the grade or teacher.)
If one images is selected, all information associated with it will appear in the Custom Attributes area.
Multiple-selected images will not display an image preview, but will show common attributes assigned to
the group.
In the example shown to the right, the student does not have any information
under the "Last Name" and "First Name" fields. If this information is not added,
the student will not have a label on their panel page.
To add the missing information, simply type in the appropriate empty box.
You do not need to hit Enter or Apply; the information is added immediately, and
will save into the database.
The information will still be present the next time you launch your project.
On occasion, you may not need to add the missing information.
For instance, the school custodian would not have a Grade, and the Principal will
not have a teacher.
Any changes made in the database ONLY apply to the project.
The information does not over-write the PSPA CD, and is not transferred to other
computers using the same image set.
Step 3: Identifying Roles for Staff & Students
To simplify the process of creating panels, you use the Make into... button to quickly identify the roles
and ranks of the individuals at the school: their department, their title, their group and their priority.
Usually, yearbooks contain a staff page, with the Principal at the top of the page, followed by teachers
and support staff. The class panels will be organized by grade, and/or homeroom/teacher. If the
classroom teacher is included with his/her students, they will be at the front of the panel, out of
alphabetical order.
The standard PSPA information tells you only the name of the people in the school, and what class they
belong to - there is no way to know that the office staff and custodians are not teachers, and that
YEARBOOKFUSION: PANEL PAGES
149
teachers should be in front of their class panels, followed by assistants, then the students.
The Make into... feature fills in this missing info by tagging individuals in your school. Panels can then
be generated quickly, with everyone in the appropriate order, divided into their respective roles.
To add this info, go to the School tab in the Organize section.
For starters, select all the teachers in your database - you can select them all at once, or in small
batches, or one at a time.
In this example, a single image has been selected.
Before we've tagged it, we have some info associate to the portrait -- we
know that this photo refers to someone named Stephen Germain, who
seems to be a staff member, in "Mr. Germain's" class. Is he a teacher? An
assistant teacher? A special ed instructor? What panels should he be in?
Just his class, a staff page? We can't tell right now.
(The Exclude box tells us that he will be included in the panel. If it were set
to yes, then that person wouldn't be included in the panels.)
Click on the Make into... box over the preview area, and choose TEACHER to assign a role to this person.
150
YEARBOOKFUSION: PANEL PAGES
Now we have more complete information.
Stephen Germain is still a staff member, belonging to Mr. Germain's class
under the Teacher field.
But we also know he is in the Department of Faculty, with a Title of
Teacher, and has a Priority ranking of 3.
The Priority ranking will place this person's image in front of any one with a
lower priority.
The Priority ranking will put him in front of his students in the student
pages and in front of support staff, but behind administration on a staff
page.
He can appear on both StaffPages and StudentPages as he is assigned to
both Groups.
Every member of your school - teachers, students, administration and
support staff - should all be classified with the Make into... feature. You
can tweak information manually, such as changing titles for individuals, or
their relative ranking.
For example, you can manually assign the Principal a Priority of 1, to make
them appear at the top of any panel in which they appear, and give them a
title of "Principal."
Tip: It is a very good idea to assign teachers to the same grade and
teacher/homeroom as their students. This will ensure that they appear in
the panel with their students.
Note: you can create your own custom Make into... to quickly add attributes to multiple portraits in your
database - learn more in the next section.
Adding New People to the Database
... from a 2nd PSPA import: If you have received a second PSPA CD with retakes or portraits of
students missing from the original import, you can import the second CD in the same manner as the first
CD, but choose to append the records to the current database.
To import a second index, click on FILE on the menu and choose IMPORT PSPA from the top of the list.
Do *not* replace the current database - choose to integrate it (if the image file numbers are different)
or append it (if the image file numbers are reset to zero).
... from candid images: If you have taken photos of people who missed photo day, and want to include
them in the yearbook panels, you can add these photos into the database.
Open the
tab, and click on the
(s) on your local hard drive to include in the database.
tab. From the folder tree, locate the image
YEARBOOKFUSION: PANEL PAGES
151
Select the image(s) in the Preview area, then click on the
button at the top of the Organize
preview.
The image(s) will be added to the database, with the first and last name set to "Undefined".
Find the images (under Search, type "Undefined" into the first or last name field).
Select one or more image - multiselect image, using ctrl-click, if they share common attributes (eg. all
have the same grade).
Add data to the images in the Properties area: their first and last name, grade, teacher, grade, etc.
Use the dropdown arrows to select preexisting categories if possible, to avoid typos or creating new
groups.
152
YEARBOOKFUSION: PANEL PAGES
Use "Make Into..." to auto-assign roles, departments and priorities.
The new images will be autoflowed into existing panels, providing their data matches that of their
classmates.
NOTE: Do not add the data before clicking "Add Student" -- the images need to be added to the database
set first. This will enable drop-downs (eg. teacher's name, grade) from existing database entry.
Data will now be associated with the images. Click on
button at the top of the Organizer
to ensure that the images have been properly associated with the database, and will be included in the
panel pages. Any photo with incomplete data will be retriaged into the buckets.
Adding students can occur at any time during the panel creation process -- either before or after the
panels have been set up and populated.
Removing (Excluding) Portraits from Panels:
Occasionally, you may need to
exclude an image from the imported PSPA set - eg. duplicate images, retakes, or people who have left
the school. Use the Search area in the school to locate the image(s) that you do not wish to include in the
yearbook panels -- use their last name, or grade, or teacher to search for the image.
When you find the image(s) in the preview area, select the image thumbnail(s). The image and
associated data will appear in the Custom attributes area. Turn the "Exclude" option to Yes.
YEARBOOKFUSION: PANEL PAGES
153
OR go to the panel where the person appears. Right-mouse select the portrait and choose EXCLUDE.
The image will vanish from the panel, but still be part of the database (should you need to add the
portrait back).
Replacing a Portrait Image: Occasionally a portrait in the database may need to be replaced or
relinked. For instance, the student may have had a retake photo done, and you would like to replace the
original photo. Select the existing portrait in the School tab.
Click on
button over the preview area. Browse for the replacement image on your hard
drive, select it, and choose OK. The original portrait will vanish, replaced by the new image.
MANAGING DATABASE FIELDS
The vast majority of school users will not need to add any custom fields to the portrait database. The
default selection will allow you to add info such as titles (eg. Assistant to the Principal, Nutritionist),
special programs (under Tracks, eg. HomeSchool, SpecialEd), affiliation to clubs (under Groups), etc.
If you need to add a special sets of data, you can do so through the Manage Attributes feature.
Manage attributes is available in two locations:
· at time of import
154
YEARBOOKFUSION: PANEL PAGES
· on the Organize tab, under the School tab
In both cases, the Manage Attributes window will appear.
At the top of the window, you can select an existing attribute set or create a new set (click on New
YEARBOOKFUSION: PANEL PAGES
155
Attribute Set...).
An attribute set is a collection of properties (fields) that can receive data.
For instance, the School attribute set will
contain properties for First and Last Name,
Grade, Homeroom and Teacher.
The Church attribute set includes Family name, Adult
and Children Name, contact info, and Occupation, which
are commonly featured in a church directory.
To edit an existing attribute set or add a field to a new attribute set, click on Add New Property...
to add your new property to the list of available options. In this case, we are adding a field called
"House."
156
YEARBOOKFUSION: PANEL PAGES
Type the name of the new property. In this case, we are adding "House" as a propriety of the School
attribute set.
Under Type, define the features of the new property - "can delete" to remove it, "multiline" to allow for
more than one entry in the field, and "empty allowed" to allow for blank/no data.
Under Input type, choose the sort of data you expect to see: text, numbers or a list of choices. When you
click on Choices, a new box becomes available to add a list of choices. In this case, we will add choices,
because there are a limited number of options available.
When you have finished adding the information, click OK to save the new attribute. It will appear on the
list of Attribute Properties.
Use the arrows on the side to reorder where the attribute will appear on the list.
YEARBOOKFUSION: PANEL PAGES
Click on
Custom set.
to save the current layout, or
157
to save your selection as a
Default Panel label text: Within the Manage attributes window, you can change or add the default
label text to appear on your panels. The existing School Attribute set, a default of First Name and Last
Name is set to automatically appear on panel pages as the label. You may wish to change or add a tag to
automatically appear. New attribute sets will have no default label text, so you can specify what tags to
use.
To delete an existing tag, click into the white box at the end of the tag you want to remove, and hit
backspace.
To add a new tag, click on Tags>> then choose User Custom Tags >> then your attribute set. You will
see a list of available properties to include.
158
YEARBOOKFUSION: PANEL PAGES
Custom Make Into... option: Within the Manage attributes window, you can create your own
custom Make into... feature. Make into... adds multiple preset values to your portrait image database.
The default Make into... features assigns departments, priorities, titles, and other features to school
portrait databases, so you can quickly turn groups of selected portraits into Students, Faculty, Admin and
Support Staff.
If you would like to add or change Make Into.. options, select an attribute set (in this example, School),
and click on the Make Into options
which will open the Make Into Options window.
YEARBOOKFUSION: PANEL PAGES
To edit a current title, select it from the list on the right. The populated attribute properties will be
displayed on the right.
To edit a value or add new information to it, select it on the left, and click Edit Value.
Add your custom info then choose ok.
159
160
YEARBOOKFUSION: PANEL PAGES
The value will be updated. In this case, any portrait which is "Made into..." Support staff will have "Nonteaching faculty" assigned as their Department.
MAKING A PANEL
Before you can make a panel populated with your portrait images, you need to import your portrait
database. Panels are populated using the information and images in the database.
Add a Blank Panel: Add an album-side type page to your project via the Pages hover - you
can have a color or a paper on the background of this page if you wish.
Click on the
icon in the Yearbook section of Toolbar over your canvas to add an empty panel
grid.
If your project does not have an imported database, you will be prompted to import one. A blank grid will
appear on your page and the Panel Hover will appear in "Simple" mode.
YEARBOOKFUSION: PANEL PAGES
161
A panel consists of image frames arranged in a regular grid, labels, and a header (title) text. The Panel
hover controls what information appears in the panel, and the general look of the panel.
Panels in Simple Mode: Simple panel population allows you to pick from a set of
predefined options. In order to enable this, you will need to have done a few easy steps to your
imported database on the Organize tab, using the Make Into... feature.
Make Into... is described in detail in the previous "Your PSPA section" - but briefly, it allows you to assign
roles and hierarchies to the people at your school, which makes panel population easier and smarter.
Once everyone in your school has been assigned a role, you can use the presets in the first drop box to
pick the type of panel you want to make.
162
YEARBOOKFUSION: PANEL PAGES
The presets for Complete Panel Set include:
All: everyone in the school will be listed
first by rank (admin staff, then teachers,
then support staff, then students), in
alphabetical order
Class Comp(osite) options for posterstyle class layouts
Staff by department: All persons tagged
to be on StaffPages will appear, grouped
into their departments (Administration,
Teachers, Support Staff) into separate
sections.
Students by grade: All students and
teachers will be grouped by their grade, in
alphabetical order.
Student by teacher -decending grades:
All students and their teacher will be
grouped by their teacher, in alphabetical
order, from highest to lowest grade (eg. 5,
4, 3, 2...)
Student by teacher: All students and
their teacher will be grouped by their
teacher, in alphabetical order in lowest to
highest grade order (eg. 2, 3, 4, 5...)
After choosing the information to be populated into the panel, choose a quick pick for the Header (Title)
and the Labels.
You can then make further adjustments to the way the panel looks.
YEARBOOKFUSION: PANEL PAGES
163
Mode: Auto mode is the default. Frames are flowed automatically
across the page.
Manual breaking the panel into separate frames. You will need
password from your publisher to access this, because once in manual
mode, no changes to the database will update in your panels.
Locked protects the panel from further reflows or changes
Crop mode allows you to select an image within the panels to zoom
in or reposition it.
Apply settings... You can limit the scope for changes: a) to all
panels in the project. If you change an attribute (eg. the frame
border width and color), all frames in all panels will have these
attributes applied to them. b) to this set of groups, If you change an
attribute (eg. the frame border width and color), only the frames in
the current panel will have these new attributes. If you have made
separate panels for staff and students, for instance, you can make
changes only the student sets). c) to only one group. If the panel has
been grouped (eg. by grade, by teacher), you can pick ONE group to
apply new attributes to. For instance, you can change the frame
border color for only the members of the graduating class.
Columns and rows: Change the number of frames per page. If you
increase the number of columns and rows, you will get a greater
quantity of smaller-sized frames on your page.
Layout defines where the labels will be placed relative to their image.
164
YEARBOOKFUSION: PANEL PAGES
Alignment defines labels and frames will be relative to the page. Edge refers to the outward facing side
of the page and gutter to the inside bound edge. The labels will flip sides on adjacent pages. Left and
right will make the labels consistent across all pages, always aligned in the same position. Facing pages
will look identical.
Border width affects the size frame border around the images. Dial it up for thicker borders, set it to 0
for no borders.
Header size and label size change the size of the text to these areas. Note the color chips next to these
three options - click on them to customize.
Featured Images is set to 0 by
default - creating a panel with
equal-sized frames. Change this
option to 1, and the first image in
every panel group will increase to
a 2x2 size. Dial it to 2, and the
first two images will be 2x2 size.
YEARBOOKFUSION: PANEL PAGES
165
Autoknockout is turned off by
default. When you drop an image
frame on a panel (eg. a clipart
decoration), the image frame will
float on top of the panel,
covering it up.
When Autoknockout is turned
on, images dropped on top of the
panel will cause the panel to get
out of the way.
The panel frames will flow around
the new images.
Panels in Advanced Mode: If you want more control over your finished panels, then switch to
advanced mode at the top of the panel editor. At the top of the editor, you'll see the same Mode controls
as in Simple.
166
YEARBOOKFUSION: PANEL PAGES
Auto mode is the default. Frames
are flowed automatically across the
page.
Manual mode unlocks the panel,
so panel frames and labels can be
selected individually. Because
manual mode "breaks" the panel
apart, it will no longer
automatically update or reflow if
data is changed in the organizer. As
such, a password is required to go
into manual mode to protect users
from wrecking their layout.
Lock freezes the panel from further
reflows or changes.
Crop unlocks the image frame,
allowing you to reposition a portrait
image within the frame.
Apply settings... limits the scope
for changes:
to all panels in the project. If you
change an attribute (eg. the frame
border width and color), all frames
in all panels will have these
attributes applied to them.
to the current set of groups. If you
change an attribute (eg. the frame
border width and color), only the
frames in the current panel will
have these new attributes. If you
have made separate panels for staff
and students, for instance, you can
make changes only the student
sets).
to one particular group: If the
panel has been grouped (eg. by
grade, by teacher), you can pick
single group to apply new
attributes to. For instance, you can
change the frame border color for
only the members of the
graduating class.
Next follows three sets of icons, which allow you to toggle between...
· panel population options: to determine which people will be in the panel and how they will be
grouped.
YEARBOOKFUSION: PANEL PAGES
167
· panel settings: to set the way the panel text, headers and frames will appear
· panel image properties: to set the border shape, color and other appearance options.
Panel Population: The first icon allows you to configure the way your panel is populated.
Choose SHOW ALL, your panel will include every person in the database.
Choose SHOW ONLY to pick only particular members of the database, using the drop box options listed
below.
eg. Show Only > Grade 6 will create a panel set that only contains members of your database in Grade 6.
Panel Set Grouping & Sorting: Grouping is a very useful way to create "chapters" or sections for your
panels. If you do not specify a grouping criteria and choose to show ALL of the panel set, you will have
get one giant panel including every person in the school in alphabetical order -- not a very useful way of
organizing your book! Grouping and sorting options allow you to tell the panel how it will organize itself.
Grouping and sorting are enabled after the panel is populated.
Panel Set Grouping options use
information that has already been
associated with the PSPA database.
By default, no grouping options are
set.
Click on the Group by drop-box to
choose which field will be used to
group your panel. It is important to
consider that the Header text will
display the information in this field.
Most of the time, choosing the
TEACHER, GRADE or HOMEROOM field
will sort your panel in a useful way.
You can choose to sort these groups
by another field next, so, for instance,
group all the panels by the Teacher,
but sort them by grade. This way, all
the Grade 4s will appear together,
organized by their classroom teacher.
168
YEARBOOKFUSION: PANEL PAGES
Here is an example of a Panel
grouping. Notice how all the group's
associated labels appears below the
grouping options.
Click on one of the names in the
group list -- or hold the Ctrl key on
your keyboard, and select more than
one.
You will now be able to:
· use the up and down arrow keys, to
move one or more groups to a
different position in the panel set.
For instance, maybe the graduating
classes need to appear at the front
of the book - select their groups and
use the up arrow to advance them
past all the undergrad groups.
· turn off a group. Maybe your
graduating class shouldn't appear in
this panel set. In this example,
select these groups by their
teacher's name, and turn off the
Enable button. They will disappear
from the panel set.
· turn off Page Breaks between
panels. To save space, maybe you
would like all the Grade 4s to run
one after the other. Select their
teachers (say, Darroch, Germain
and Stalwick, in this case), and turn
off the Page Break button. Now,
the Germain class will start on the
same page as the last line of the
Darroch class, and the Stalwick
class will start right following the
Germain class.
Note: If you sort by Grade, you may need to move the groups around a bit. Computers are rather literal
about the way they understand ordering - they doesn't understand that a grade marked as "PreK" comes
before "Kindergarten" which comes before Grade 1, which is before Grade 10. Computers use strict
alphabetical ordering --numbers proceed letters, and numbers are read "alphabetically". As a result, you
may see a populate by grade that looks like this: 1, 10, 11, 12, 2, 3, 4, 5, 6, 7, 8, 9, K, PreK.
If this occurs, select one of more groups and bump them into the correct order with the side arrows next
to the list - PreK to the first position, then K, then move down 10-12 to the bottom. In a few clicks, all
will be as expected.
YEARBOOKFUSION: PANEL PAGES
169
Sorting options: Sorting allows you to organize the panels internal to the grouping.
If you have used the Make Into... feature, most
of your prioritization work will have been done.
Ensuring that every member of your database has
been assigned a priority will rank them with the
panels - teachers will appear at the front of their
classes, and the principal at the front of the staff
page.
If there are no priorities assigned to the images,
then alphabetical ordering by last name will apply.
Customizing Your Panel Layout: The second set of icons allows you to change the way the
panel looks overall.
You can reconfigure the way the grid of image frames appears by choosing the panel section of the icon,
change the panel label text by choosing the label portion of the icon,
or change the panel title bar options by choosing the header options,
A new set of "drawers" will open on the Panel hover for each of these selections.
Customizing the Panel Grid: Choose the grid to access options to change the grid's appearance
170
YEARBOOKFUSION: PANEL PAGES
Frames change the size and arrangement of the panel frames.
Width changes the actual size of the frames.
Columns & rows change the number of frames on the page,
autoadjusting their size. Free will cause the frames' width value to
override the number columns and rows (ie. the columns and rows
will change as the width of the frames changes, no limits); Fit will
cause the panel to snap exactly to the selected number of columns
and rows, regardless of the specified frame width or page size (ie.
use this exact number of columns and rows); Max will not allow the
panel to grow beyond the specified number of columns and rows (ie.
"no more than" x columns or rows).
Intercolumn and interrow spacing can tighten or loosen the
panel's spacing
Features, when set to 1, will increase the size of the first frame in
the panel group to 2x2.
Frame Aspect changes the shape of the frame (length to height
ratio). Fit Frame to image will snap the frame to the ratio of the
photo.
Knockouts: When Automatic knockout is turned on, images dropped
on top of the panel will cause the panel to get out of the way. The
panel frames will flow around the new images. (See the example
above, in Simple mode)
Remove Manual Knockouts will cause all panel frames that have
been turned off (shown as pale red) to be restored. Your panel, if
populated, will reflow to fill the restored frames.
Layout controls the relative position of the image frames in your
panel.
Frames aligns the panel to the gutter (the binded side of the page),
the edge, the centre, the right or left side, or distributed equally along
the width of the panel.
The Last Row allows you to choose the alignment when the panel does
not fill all columns. It can be oriented to the gutter or edge, the left or
right side, or centered across the panel.
Last are the panel margin widths. Changing this will cause the panel to
occupy more or less space on the page as a whole. Note: margin
changes apply to ALL panels, not a selected panel.
Customizing the Labels: To change the way the panel labels will appear, click on the Panel text
portion of the icon at the top of the Panel editor.
Label Settings allow you to specify where the text will appear -- on the edge or gutter of the page, on
the right or left side of the page, or under each image frame. Having the Snug box check on will make
the label closer to the panel images.
YEARBOOKFUSION: PANEL PAGES
Style: select where the labels will
appear on the panel. Beside the
panel, beside the panel (snug) will
place the names in a column down
the side of the entire panel. Beside
the image will show the lab next to
the image itself. Under the image
will caption each image. See above
for illustrations.
Alignment: if the labels are beside
the panel, you can choose which
side of the panel or the page to
place the column. You can choose to
always place it to the right or left of
the panel (so the labels will always
be in a consistent position, or orient
it to the edge or gutter of the page
(so the labels will flip sides on
alternate pages). Width and height
can be adjusted to create more or
less space for the text, and the
Space to create more room between
the labels and the panel.
The Shadow options for the labels
are presented in the first drawer.
It is highly recommended to keep
the shadow off labels -shadows will
make your labels very difficult to
read, particularly when the book is
printed.
171
172
YEARBOOKFUSION: PANEL PAGES
The Font drawer allows you to
specify the way the labels appearance
and what info appears in the label.
You will notice there is some "code"
that appears in the top window. This
refers to the info drawn from the
PSPA database, e.g firstname,
lastname. Additional tags can be
added - click inside this window to
position your cursor. Click on
then navigate to User Custom Tags >
School to find the fields associated to
your database that you wish to add to
your labels. For instance, add TAGS >
User Custom Tags > School > Title to
add job descriptions to the staff page.
(Learn how to change the default
label tags in the previous section.)
Layout shows general info about
your text- choose a font from the
drop-down, change the font size, etc.
The dropbox next to the font size tells
the label how to behave relative to
the space allowed for the label and
the length of the label.
"Do Not Exceed" tells the label that it
can go up to a maximum specified
size, and shrink labels that are too
long to be show at the maximum size
(recommended).
Bold, italic, superscript, and
underline are available as options,
followed by alignment options.
Show "Not Available" will display
placeholder text in labels that have
blank fields. Eg. if a person is missing
their last name, it will show "not
available" in the label.
The Allow Line Break box is useful
when you have labels under the
frames (eg. on the Admin page, a
persons name would be followed by
their title underneath).
Appearance contains controls for the
color and opacity of the text, and
allows you to add an outline (solid or
dashed).
(Matte is disabled for panel labels.)
YEARBOOKFUSION: PANEL PAGES
173
Customizing Your Panel Headers
The Header is the title bar that appears over each section of your panel.
The header text will only be visible if you choose to group your panels after they are populated.
Grouping will tell the header to use a particular field in the database - such as the teacher's name or
grade.
Type: Headers are always pulled from the Group that is organizing the panel. You can choose to use the
Group name alone, only at the start of the panel group. If you choose Group + Cont'd, panels that run
over the next page will start with a header and your choice of "continuation" text (type your choice in the
Con't Text box). If you don't want an autogenerated header, you can turn it off completely.
Change Size to increase the size of the header itself, and change the interline spacing to create more
room between the header and the previous section.
The general Layout, Appearance and Shadow options for Headers are identical to the Label options.
See above for more details.
Use the area under Font to change or add information to the header - eg: add the tag for Teacher or
Grade. Click on TAG, then choose User defined presets > School ... and select a database field to include.
This example shows the tag for the teacher name. If we add additional info and some custom words, we
can easily get this. The green highlighted section shows info that was manually typed into the window,
between the tags. Yellow highlighted items are being pulled from the database info.
Customizing Your Panel Frames
The third icon at the top of the panel hover provides the same set of tools available to your standard
image frames.
174
YEARBOOKFUSION: PANEL PAGES
YB config hover frame
Click on the Frame border portion of the icon to access border thickness, color, gradient and matting
options.
The standard FotoFusion frame border options will appear. You can change the width, shape, and color of
the border around your panel images.
The Image section of the icon will adjust the color (eg. sepia, b&w).
Generally it is not recommended to adjust these settings, particularly the R/G/B, brightness, contrast and
gamma values - your images have most likely been color-corrected by your photography company. Your
monitor is most likely uncalibrated (meaning it does not show color accurately versus your final printed
page), and you could end up with *very* strange looking photos if you adjust these settings - a school
full of ghosts, aliens or even worse!
YEARBOOKFUSION: PANEL PAGES
175
PRO-PROJECT TUTORIAL
All pros know -- time is money. Wouldn't you rather be shooting an extra job than spending hours in
front of a computer making layouts?
FotoFusion can help you streamline your studio's work flow, but still provide your customers with
beautiful output options. FotoFusion lets you decide how much time and customization you want to put
into your projects.
Multi-page albums can be created with great efficiency using FotoFusion. Extreme license holders can
choose to create full albums from scratch, or partially automate the design process, or use templates.
The editing process is also rendered more efficient using FotoFusion, allowing you to make multiple sizes
and quick on-demand changes to your work with minimal effort. Learn how to use the Page hover to work
quickly within your project.
Other routine jobs, such as creating contact sheets or sending proofs to clients, can be facilitated through
the use of FotoFusion.
Group layouts, such as class composites, can be done with greater ease. In general, FotoFusion provides
a unique set of tools to help you work more efficiently on your pro-projects.
Album Presets: Find page size presets, including covers, double-page spreads, and single pages, for
leading album manufactures in the Canvas Settings editor. Two quick clicks, and your page is ready for
composition, complete with bleed and safe zones specified to the manufacturer's recommendations. If
your album company isn't listed, feel free to refer them to the LumaPix website where they can fill out a
form to submit their product specs.
Composition tools: From the Canvas Settings editor, set bleed and safe zones to ensure a perfect print
every time. FotoFusion helps you with your page orientation by allowing you to select from among
several page type (album singe, single sheet, double spreads) options. Use the splitter tool to easy create
grids and mosaics.
Proofing tools: Use Overlay image info to add information about the images in your project (eg. file
name) to the Create screen view and to your output. Generate a list of used images to avoid duplicate
images and count the number of images in your project. Create low-resolution output in your choice of
formats to send to the client.
Organization tools: Use the organizer to view multiple folders simultaneously. Triage your images into
"buckets" to pre-sort your album pages. Assign keywords, themes and ratings to your images, then
search for them for quick and easy retrieval into your projects.
Templates: Search the Start Tab's Template area to find layouts for all your needs. Some materials are
included for free with your license type.
176
PRO-PROJECT TUTORIAL
CONTACT SHEET
Contact sheets can be as simple or customized as you like.
Option 1: Use templates. In the Start Tab > New projects > Templates, search the Contact Sheets
category,
OR on the Create Screen type "contact" in the
template to output your contact sheets.
hover. Follow the instructions provided with the
Option 2: Create your own template from scratch
Create a new blank canvas to your choice of size.
Add a large blank frame to your canvas.
PRO-PROJECT TUTORIAL
Add a background image or color if you
wish.
Add a title (text-on-canvas).
Use the splitter to slice the large frame into
smaller, equal-sized frames.
Select all frames, then right-mouse-down
on any one frame. Select POSITION > Size
> Automatically resize frame to fit image.
The border will disappear automatically.
Use the Inset option in the Frame border
editor to re-space the frames to provide
room for labels.
Select all frames, then add text-to-image.
Click on the toolbox "T" key to add a text
field, then replace the sample text with a
text tag of your choice. This will allow you
to insert information about the image, such
as file name, date, etc.
Choose your font, align the text, change the
color, remove the shadow... etc.
Reposition the text next to the frames, as
desired.
Extreme users: click on the
hover button, and right-mouse down on the page. Select
AUTODUPLICATE.
If you would like to retain the template for future use, click on FILE >> Save as Template
177
178
PRO-PROJECT TUTORIAL
Bring your image set into the dropper, via
the Images hover, or the Organizer/Buckets
feature, or by clicking on the Browse for
Images
button on the toolbar. DO NOT
drop the images onto the canvas.
Hit AutoPopulate
on the toolbar.
FotoFusion will fill your template with the
image set, and, if AutoDuplicate is set,
create new template pages until no images
remain.
Output the contact sheet(s) as desired. Render to pdf or other format, publish to web, print or email.
Option 3: Create an email or web
contact sheet using the "contact
sheet" theme: If you like to quickly email
or publish a contact sheet layout, use the
Contact sheet theme. This is useful if you
have created an album, or would like to
generate an instant contact sheet from a
set of images through an AutoCollage.
Consult the email themes section for more
details.
PRO-PROJECT TUTORIAL
179
PROOFING
Showing customers previews of their orders is always a good policy, as it allows their feedback before
sending the job to press.
FotoFusion provides tools to make this process easier, and improve communication between you and your
clients.
Overlay Image Info is a tool available on the Create screen and on the output tabs. Information about
the images on your canvas can be displayed as a small text box under the images on your canvas. This
tool is very useful for creating catalogues or assisting communication during the proofing process for
album work.
To turn on Overlay Image Info on the Create screen, right-mouse select outside of the Canvas, then
choose PROJECT >> Overlay image info, or go to the Tools menu item and choose PROJECT >> Overlay
image info.
Turn the checkmark on to display the feature on canvas. By default, the image name will display, but you
can click on the
button to choose other information from the image, such as the frame number,
resolution, or other details.
You can further customize the look of the Overlay, changing the transparency level of the text and
180
PRO-PROJECT TUTORIAL
surrounding background, and where the information appears on your image.
image by Stephen Eastwood
Used Image List, available to Extreme & Yearbook users, generates a text file list of the file names and
locations of every image used in a project. To generate a list, click on FILE on the menu, then select
PROJECT MANAGEMENT>> Export List of Used Images...
You will then be prompted to give a name to the text file, and to select a location where to save the file.
Once saved, you can open the file by double-clicking on it. The text can be cut-and-paste into any other
application of your choice.
Multi-page projects will be displayed by page for added convenience.
Creating a Proof Document: The Web Album feature is a great way to send a preview of your project
to the client.
Alternatively render your project as a multipage, low-resolution pdf. Turn on Overlay Image Info on the
Output to a File tab to provide information to your client about the images in the project, providing both
a means to discuss the project with the customer (eg. "Move Frame number 6 on page 1 to page 2
please!") and also subtly watermarks the project. Render your project to between 75 and 100 dpi,
creating a screen-resolution friendly version of the project, as a pdf. Don't split the double spreads - the
client will be able to view the album as it will appear to them when printed.
You can add Watermarks and/or Banners to further brand your proofing document, if you wish.
Send the project to your client as an email attachment, if it is not too large a file, or use a file transfer
mechanism (eg. yousendit.com, sendspace.com) to provide them with a download link, if you don't have
your own server and client download area.
If you have your own website, upload to your web gallery: click on Publish to send your pages (with or
without attached images), and change the theme to the Album Preview theme.
PRO-PROJECT TUTORIAL
181
Generally, we don't recommend using the Share tab to send multipage proofing documents to clients. The
Share tab creates a very small html embedded version of your project that usually doesn't give the client
a sufficiently clear view of your work.
GROUP COMPOSITE
FotoFusion makes creating a composite image for school yearbooks or group portraits a simple process.
Note: YearbookFusion users have a special set of automated tools to generate panel pages/composites
using their PSPA cd.
LumaPix will soon make a special composite-making service available to streamline this process. Check
our website for more info when the product is released.
Here are the basic steps to create a composite using FotoFusion Enhanced or Extreme.
Step 1: Organize your images: We suggest renaming your portrait image file names to the names of
the person in the photo. For example, rename a portrait to Nancy Carr.jpg. Use the Organizer to sort your
images into buckets (e.g. by class), if required
Step 2: Create a grid: Set your canvas
dimensions as required. Insert a single large
frame on the canvas, to cover the part of the
canvas that you want to have covered by the
panel images.
Change the frame properties as required. Change the border thickness or color, or add a matte, if
you wish. You can also wait until after you have added your images to make these changes.
Use the splitter tool to divide the one large frame
into a grid. Select the large frame, causing the
Toolbox to appear. Mouse-down and drag up/down and
side-to-side on the splitter icon to divide the one large
frame into as many smaller frames as you require.
,
182
PRO-PROJECT TUTORIAL
If your image files contain the names of the
portrait subjects, add text tags. Multi-select all
empty frames.
Click on the Toolbox to add text. Click on the Tags>
button, and select File Name from the list of options.
Change the text attributes as required.
Change the font and font size
Center the text, and/or align it to the top,
middle, or bottom of the text frame.
Change the frame inset.
Change the text color and outline properties.
Turn the text shadow off, if desired.
Resize the text frame as desired, using the
frame handles to change the size of the text
frame.
Import your images...
from the Images hover or from the Buckets
hover or from the Toolbar Browse
Icon....
Select the images and drag them into the
FotoFusion workspace, so they are loaded into
the dropper.
PRO-PROJECT TUTORIAL
Click the AUTOPOPULATE button to fill the
empty frames.
Your images will automatically drop into the frames
on the canvas.
Edit the composition as required.
Multi-select frames to change the border color and
width, the frame inset, or add a new matte.
Multi-select text frames to change the color, font
and size of the text.
Add a background color or tile to the canvas, or use
a textured paper.
Add text-on-canvas to create a title for the
composition.
This work flow represents the very basic operation for designing a composites. Once these steps are
understood, you can become more creative in your presentation and style.
For example, here are a few basic interpretations of the collage just made ...
183
184
PRO-PROJECT TUTORIAL
THE COMMUNITY TAB
The
tab is your gateway to exchanging ideas with other FotoFusion users.
FotoFusion is all about sharing with others: sending collages of travel shots to workmates, proof sheets to
the newlyweds, or postcards of your kids to the grandparents.
The Community Tab gives you quick access to:
· The FotoScraps Gallery, to view what other FotoFusion users have been creating.
· Upload, where you can send your work to the FotoScraps Gallery.
· The Forum, where you can chat and ask questions to expert users
· The FAQ, which brings you to the LumaPix Support website
· News, where LumaPix lets you know about developments for FotoFusion
· Other..., providing links to preferred sites.
There is also an active Yahoo! discussion group centered on the use of FotoFusion for scrapbooking. Drop
in!
If you have problems using FotoFusion, feel free to visit www.lumapix.com/support to view the
Frequently Asked Question database and to leave a support ticket.
KEYBOARD SHORTCUTS
KEYBOARD SHORTCUTS
185
186
KEYBOARD SHORTCUTS
UPDATE HISTORY
Version 5.4 (build 95840) - FotoFusion V5 and YearbookFusion MAC Freeze Hangs • RS & DS in HZ • Reconnect Persistence / PNG Rendering. Cases resolved: 36646 No
Fonts saved for Project. 36446 36655 36674 36648 36533 36641 35109 30526 36659 35858 32718 36693 36694 36654 36696 36227 36563 36569 36564 36570 36491
34971 36534 36703 36707 36537 36553 35439 35422 30708 34874 36618 34793 36676 36670 36605 (Released Oct 07 2013)
Version 5.4 (build 95686) - FotoFusion V5 and YearbookFusion Fix to UI Hovers on (clean) install Cases resolved: 36648 (released Oct 01, 2013)
Version 5.4 (build 95606) - FotoFusion V5, YearbookFusion and Publisher-Specific release PNG Mattes • MAC Freeze • PSPA Column Heading • Template Loading. Cases
resolved: 33492 31417 36594 36639 36651 (released Sep 27, 2013)
Version 5.4 (build 95552) - FotoFusion V5, YearbookFusion and Publisher-Specific release CR Loop • Missing Fonts • Buckets Persistence Gallery ‘Apply’. Cases resolved:
34137 34377 35910 35727 36582 34442 36521 36584 36593 36191 34877 36496 36542 36226 35866 32585 36428 35734 36429 36342 36602 36611 36597 36629 29853
36637 36638 (released Sept 25 2013)
Version 5.4 (build 95392) - YearbookFusion and FotoFusion V5 This will be ‘the baseline build’ of YearbookFusion for the 2013-14 school year. For non-yearbook users, this is
simply another update with more bug fixes and a few new features. What’s new? This release is mostly about stabilization of the software in preparation for the school year.
We had time to do a few things for Enhanced & Extreme users: • Mac users will notice a big improvement: this build is 30% faster than the last Mac release and much more
stable. • The German translation is back! • The next/prev arrows can be disabled (user preferences) … but really, this release was about nailing bugs so that school users
would have a smooth yearbook season. Click here to see what’s new for schools. We’ll be releasing more features for Enhanced & Extreme users as soon as the school year is
solidly underway. Cases resolved: 36560, 36551, 36556 (released Sep 19 2013)
Version 5.4 (build 95372) - YearbookFusion only Official YBF 2014 Release. Cases resolved: 34436 36451 36195 34144 33709 36368 33459 36416 36234 30387 33192
36384 33159 33160 33427 33285 33432 33451 33462 33481 33511 33206 33211 33528 33342 33356 33268 33271 33777 33783 33787 33564 33358 33374 33386 33390
33396 33591 33609 33611 33204 33209 33970 33906 33598 33686 33383 33411 33890 33978 33971 33687 33795 33263 33944 36381 36373 36376 36372 36377 36362
36378 36375 36380 36379 33264 36364 36358 35857 36382 36385 36390 36359 36284 36371 36357 36411 36309 33875 27331 35811 35106 35514 36414 35840 36404
36326 36302 36374 36363 36422 36401 30839 31789 36393 35950 35178 36438 36412 35509 35703 36297 33768 36431 36336 36328 36400 36334 36387 36392 36184
33931 36420 35337 34769 35402 33280 36439 29311 36425 34286 35907 36353 36179 35548 32285 35125 35445 35437 29107 34697 34699 29266 34186 31597 36397
36408 36407 36434 30188 34396 34408 35359 36006 34665 36106 34518 36450 36435 36443 36464 36237 36465 36476 36477 36478 34496 36470 36484 36475 36466
36395 36166 36499 36430 36504 36452 36453 36510 36514 36518 36522 36440 36530 36529 36528 36538 3653 36541 36259 36535 (released Sep 17 2013)
Version 5.4 (build 95079) - FotoFusion V5 and Publisher-Specific release Issues & features related to a particular publisher's build / Append / Stability, Book Manager
enhancements. Cases resolved: 30905 34891 34899 35268 35265 35785 35930 36294 36288 33021 36261 36335 36323 36333 35093 35108 36268 35394 35627 35434
35750 35766 35751 33076 35826 35896 35883 35871 32307 21336 35867 34972 33913 35593 35716 35338 32309 34425 35118 35830 34878 34879 34883 34052 34045
34048 34051 33846 34391 34432 33680 33312 30013 33760 35958 34013 34083 33938 33933 33926 33899 33734 33798 35993 35471 36000 33967 33961 35984 33770
33990 34009 35915 34077 35584 33830 18007 33912 33494 35729 33914 33779 28392 33989 34334 33909 36024 35876 35974 34080 35978 33918 33746 33807 35877
35878 13116 31744 33778 26568 31855 35913 35508 33803 35908 27941 36022 24122 35834 35995 35610 35122 35490 35533 35567 36096 36064 35902 34831 36110
36119 36122 36124 34500 35885 35458 35839 35650 35060 36069 36074 35695 35595 35592 35489 36076 36085 36075 36084 33685 36120 35649 35555 35285 36073
35143 35213 36117 36080 35162 35131 36067 36136 36135 36138 36182 36185 36181 35967 36180 35968 36056 36057 35977 35554 35547 35918 36061 34512 35833
35326 35165 35432 35712 35812 32873 36219 36186 36225 36217 35934 35513 35380 35631 36116 36223 36224 31227 36134 35997 36177 34854 35112 35279 33539
35435 35655 35682 36066 36111 36087 36078 36174 36218 35944 36267 36236 36230 36238 36263 35121 36262 36269 36264 33722 36165 36159 36113 36257 36254
35684 34976 36244 36161 36258 36255 36245 36272 36271 35795 36280 30355 34605 34770 34933 35370 35472 35081 35269 35329 36275 36279 36291 35739 34136
36187 36287 35911 36256 36281 34566 34970 35262 35175 35150 35726 36276 35658 35664 34984 35620 36216 34400 29113 35629 36153 36300=-098754236304
36306 36307 30401 30402 35575 36308 36298 36160 36316 36312 36109 36231 36324 36318 36329 36341 36320 36340 36317 36327 36338 36344 36346 36348 36350
36347 35787 35786 (Released Sep 05 2013)
Version 5.4 (build 93661/93685) - FotoFusion V5 only • Restored Save as template with images stripped • Issue with buckets resolved • Compatibility issue with V4
templates resolved Cases resolved: 35635 35921 35925 35926 35932 35933 35940 35945 (released July 8/9, 2013)
Version 5.4 (build 93352) - FotoFusion only •Frame border render issue resolved Case resolved: 35900 (released June 25, 2013)
Version 5.4 (build 93191) - YearbookFusion only •Project thumbnail generation when archived Cases resolved: 35879 35880 35884 35890 24079 35774 35845 35841
(released June 19, 2013)
Version 5.4 (build 93023) - FotoFusion v5 only •Crash running connection diagnostic when offline / Invalid JPGs validate Cases resolved: 35774 24079 (released June 12,
2013)
Version 5.4 (build 92895) - FotoFusion v5 only •Blending mode presets added for Enhanced users / Increased email capacity / Chinese Windows operating system
compatibility Cases resolved: 35814 35819 35823 35721 3589 28748 35824 35841 35845 35844 35570 (release June 6, 2013)
Version 5.4 (build 92555) - FotoFusion v5 only •Missing Images error on adding DS Content Case resolved: 35808 (released May 23, 2013)
Version 5.4 (build 92533) - FotoFusion v5 only •Blending modes added for Extreme Cases resolved: 11926 31040 32329 33759 34482 34484 34493 34938 35327 35441
35468 35481 35551 35564 35630 35632 35633 35634 35642 35669 35702 35718 35722 35730 35731 35733 35740 35741 35744 35748 35753 35755 35757 35759 35761
35773 35790 35791 35794 35797 35802 (released May 22, 2013)
Version 5.4 (build 92075) - YearbookFusion only •Assemble book added to book manager • new book manager ui • PDF render with flattened text, lingo fixes for
translation, cropping issues with dotScrap content, render to psd disk error resolved Cases resolved: 14015 19368 24079 24204 24627 2762129666 29672 29861 29987
30332 31517 31552 31578 32017 32455 32457 32589 32674 32675 33121 33124 33251 33252 33254 33282 33410 33426 33436 33456 33474 33477 33487 33489 33503
33506 33507 33508 33535 33634 33637 33638 33640 33641 33644 33645 33654 33672 33715 33716 33718 33720 33730 33732 33749 33751 33752 33753 3378533822
33842 33900 33901 33976 34033 34064 34069 34191 34199 34237 34283 34319 34326 34341 34342 3435034358 34359 34362 34363 34383 34387 34448 34461 34462
34464 34465 34466 34468 34507 34578 34618 34663 34681 34683 34684 34709 34722 34803 34915 34932 34944 34965 34974 34975 34977 34979 35002 35003 35006
35069 35077 35082 35087 35095 35133 35134 35135 35158 35160 35166 35177 35190 35223 35225 35228 35231 35242 35244 35274 35278 35280 35281 35282 35312
35368 35371 35378 35383 35398 35401 35403 35404 35413 35418 35426 35431 35444 35447 35452 35453 35454 35462 35464 35465 35466 3547435476 35478 35479
35484 35486 35488 35491 35493 3549435496 35498 35500 35501 35502 35503 35510 35515 35525 35528 35531 35532 35543 35546 35549 35552 35553 35560 35563
35568 35569 35572 35577 35587 35594 35598 35601 35602 35603 35604 35607 35612 35613 35615 35619 35623 35639 35640 35646 35657 35659 35665 35670 35686
3569135692 35701 (released May 3, 2013)
Version 5.4 (build 91500) - YearbookFusion only •Crash on load, flipping pages Cases resolved: 35382 35408 35411 35414 35416 35417 35419 35423 35424 35425
35427 35428 35382 35408 35411 35414 35416 35417 35419 (released Apr 9, 2013)
Version 5.4 (build 91455) - YearbookFusion only •Slow RS loads • various crash fixes: CR issues, networking instability • database custom attributes persistence Cases
resolved: 22385 29672 32917 34180 34329 34647 34724 35096 35258 35301 35340 35343 35345 35350 35358 35363 35364 35366 35367 35381 35382 35385 35386
35387 35388 35392 6071 16391 28325 29028 29691 29760 29765 29766 29767 29847 29995 30026 30035 30720 30815 30947 32140 32462 32685 32808 32838 34004
34068 34092 34127 34252 34467 34480 34673 34706 34708 34714 34783 34822 34941 34942 34964 35040 35045 35046 35058 35059 35070 35071 35076 35083
350853509535108 35120 35123 35124 35126 35132 35136 35139 35144 35148 35153 35155 35164 35167 35168 35170 35171 35172 35185 35189 35191 35198 35209
35212 35214 35220 35221 35222 35227 35229 35234 35241 35242 35243 35244 35246 35247 35248 35249 35251 35254 35257 35263 35267 35270 35272 35276 35283
35287 35288 35289 35298 35299 35302 35303 35313 35315 35316 35319 35321 35324 35328 35330 35336 35339 35341 35342 35346 35356 35357 35362 35372 35373
(released Apr 8, 2013)
Version 5.3 (build 90863) - YearbookFusion and FotoFusion V5 • Freeze on load (or archive restore), fix for remote storage projects with dotScrap frame Cases resolved:
32065 32612 33199 33319 33512 33694 34575 35065 35073 35085 35101 35107 35111 35127 35128 35138 35145 (released Mar 14, 2013)
Version 5.3 (build 90717) - YearbookFusion and FotoFusion • V5 Fixes to panel corruption after crash restore Cases resolved: 4124 32929 33339 34950 35036 35048
35074 35080 35092 35100 35103 (released Mar 8, 2013)
Version 5.3 (build 90636) - YearbookFusion and FotoFusion V5 • Cleanup of 'External Editing' feature-- When you right-click on an image and choose image > external edit
> edit in external tool. We remember your preference to copy the image first, or work directly on that image. By default, the duplicated & edited image is saved beside the
original. Where you save the image to is now a user preference. •Mac-specific: External drives are detected upon insertion, instead of requiring a restart, The file/open dialog
shows the Mac desktop, documents, and user folders, PSD Thumbnails are now rendered correctly. • Bug Fixes: Many crashes were found & fixed, The font list no longer
'jumps to the top' during scrolling, Preflight only interrupts rendering for errors, not warnings
[plus dozens of other fixes too tedious to list] Cases resolved: 31218 34754 34893 34936 35033 35034 35055 35061 35072 2563 29757 30959 31180 31550 32243 32337
32619 32893 32966 32996 33199 33366 33549 33886 34228 34345 34447 34479 34536 34561 34575 34576 34611 34632 34651 34655 34660 34738 34751 34766 34776
34821 34843 34845 34869 34873 34875 34876 34881 34892 34894 34903 34904 34911 34919 34920 34921 34923 34924 34934 34936 34937 34943 34945 34947 34951
34959 34960 34961 34962 34963 34969 34973 34978 34980 34982 34985 34987 34990 34991 35008 35010 35014 35016 35021 35023 35027 35032 35035 35039 35050
UPDATE HISTORY
187
(released Mar 4, 2013)
Version 5.3 (build 90176) - YearbookFusion and FotoFusion V5 • Append PSPA & RS Projects Cases resolved:28820, 29644, 34102, 34177, 34295, 34313, 34354, 34389,
34390, 34436, 34438, 34470, 34477, 34490, 34492, 34494, 34514, 34516, 34522, 34538, 34553, 34568, 34607, 34615, 34643, 34689, 34690, 34731, 34742, 34748,
34764, 34778, 34789, 34808, 34809, 34823, 34824, 34825, 34832, 34835,34837, 34838, 34847, 34849, 34850, 34866, 34872 (released Feb 13, 2013)
Version 5.3 (build 90115) - YearbookFusion only • Rounded Corners for YBF • Append Cases resolved: 34533 34725 34766 34767 34771 34777 34779 34784 34786 34790
34801 34804 34805 34810 34817 34818 34827 34828 34834 (released Feb 10, 2013)
Version 5.3 (build 90000) FotoFusion V5 only •Version 4 backwards compatibility issues • inset fix Cases resolved: 34728 34730 34733 34745 34747 34750 34752 34756
34757 34758 347593 4760 34761 34762 (released Feb 6, 2013)
Version 5.3 (build 89891) FotoFusion V5 only •Rounded Corners for FF Cases resolved: 681 2713 26531 29845 31253 33794 34133 34247 34262 34292 34367 34372
34401 34427 34439 34440 34441 34443 34444 34459 34471 34476 34489 34497 34499 34504 34505 34513 34521 34525 34526 34528 34530 34535 34539 34546 34556
34562 34565 34567 34588 34591 34594 34603 34609 34610 34613 34616 34619 34622 34624 34626 34633 34635 34636 34640 34645 34650 34656 34676 34678 34691
34692 34693 34695 34697 34700 34711 34712 (released Feb 1, 2013)
Version 5.2 (build 88552) YearbookFusion and FotoFusion V5 ‘• Chapters’ don’t load after name selected / Changes Lost; Saves after Undo Cases resolved: 34430 34446
34449 34450 34460 34473 34474 34475 (released Dec 7, 2012)
Version 5.2 (build 88405) YearbookFusion and FotoFusion V5 • Scannable QR codes for Web Albums: Now when you output a web album, we add QR codes in two
places:The output tab shows you a QR code for recently-published albums; The last page of published web albums include a QR code representing that album. This makes it
easier to share albums with friends – just point any HTML5-enabled smart phone at that code and you’ll see the album. • Preflight toolset: You’ll find a new “Preflight” hover
in the nest at the bottom of the create tab. This opens a new window which validates either the current page or your entire project. Clicking on a result in the list at the
bottom jumps to the page holding that frame and selects it. This makes it easier to detect and fix common problems, such as Too-low-resolution images, Empty frames,
Missing (e.g. renamed) images & fonts, Clipped text, etc, • YearbookFusion improvements: We have added a new mode for panels: cropping enabled. When in this mode,
users can select and crop panel images directly (one would do this in order to crop a late-added photo of a kid who missed picture day to match the rest of the panel). This is
a minor UI tweak but a huge improvement – in previous versions it was necessary to put the panel into manual mode to tune image cropping, which is serious overkill. • Mac
improvements: Older installation won't let users browse for output folder - fixed. Freezes when pulling images from networked drive - fixed. Cleaned-up export – FotoFusion
now exits cleanly. Cases resolved: 24008 24553 30162 30707 31741 31882 31886 32153 32384 32406 32527 32663 32677 32704 32891 33018 33059 33393 33488 33514
33543 33544 33547 33594 33595 33596 33682 33700 33705 33773 33811 33839 33884 33952 34032 34037 34047 34074 34090 34093 34095 34098 34099 34106 34155
34158 34163 34164 34167 34170 34173 34174 34179 34181 34182 34185 34189 34190 34192 34193 34194 34195 34197 34198 34200 34203 34205 34206 34209 34211
34212 34214 34215 34216 34217 34220 34221 34223 34224 34225 34232 34233 34234 34235 34240 34243 34248 34251 34253 34254 34255 34256 34257 34258 34259
34260 34266 34267 34268 34269 34272 34274 34275 34276 34277 34278 34279 34281 34282 34284 34288 34289 34302 34303 34304 34307 34310 34311 34312
3431634321 34323 34325 34332 34335 34336 34337 34340 34344 34346 34349 34351 34352 34356 34357 34360 34361 34364 34368 34371 34374 34375 34392 34393
34394 34395 34398 34399 34406 34407 34414 34421 34422 344263 4433 34434 34435 (released Dec 3, 2012)
Version 5.2 (build 87878) YearbookFusion, FotoFusion V5 and FullScale •MAC Exit Hang (WineLoaders) •ArcRest MAC ‘~’ Path • PC crash on exit • CR SaveAs persistence
Cases resolved: 29185 30517 30572 31680 31909 32932 32973 32999 33001 33003 33028 33060 33061 33075 33089 33094 33095 33096 33129 33147 3316233178
33181 33183 33205 33212 33216 33217 33236 33243 33255 33284 33303 33345 33346 33347 33361 33376 33380 33384 33388 33399 33464 33476 33526 33540 33610
33612 33619 33635 33649 33651 33659 33677 33684 33693 33699 33701 33703 33704 33708 33711 33724 33731 33735 33739 33769 33771 33772 33776 33782 33790
33793 33796 33804 33810 33821 33837 33845 33851 33853 33859 33872 33874 33876 33878 33881 33883 33885 33904 33907 33911 33923 33927 33934 33937 33939
33947 33953 33960 33968 33974 33979 33986 33995 33999 34000 34001 34002 34008 34015 34016 34017 34018 34019 34020 34021 34022 34023 34030 34031 34034
34035 34036 34038 34039 34040 34041 34042 34043 34046 34056 34057 34058 34060 34061 34067 34069 34070 34071 34072 34073 34074 34075 34079 34082 34085
34088 34089 34091 34095 34100 34104 34105 34107 34108 34109 34114 34119 34120 34125 34126 34130 34132 34135 34142 34143 34146 34147 34166 (released Nov
12, 2012)
Version 5.2 (build 87430) YearbookFusion, FotoFusion V5 and FullScale Form Factor updates for selected companies. Strengthened the automatic project backup feature.
Bug Fixes: Several stability and minor rendering issues fixed; Several issues with clipped text fixed; Rendering all pages to PDF on the Mac working correctly again Cases
resolved: 7052 27552 28336 28861 30808 31429 31560 31653 31759 31833 31834 31842 32023 32129 32556 32670 33615 33866 33891 33892 33893 33895 33896
33897 33917 33922 33924 33925 33929 33930 33943 33945 33946 33950 33957 33965 33966 33969 33972 33980 33981 33992 33994 33998 34003 34005 34006
(released Oct 22, 2012)
Version 5.2 (build 87204) YearbookFusion, FotoFusion V5 Clipped Text / OT > RT On Load Cases resolved: 17704 26067 31650 32505 33048 33218 33291 33292 33466
33510 33556 33565 33572 33579 33621 33627 33707 33802 33806 33818 33819 33820 33838 33848 33849 33855 33860 33861 33862 33865 33867 33868 33870 33873
(released Oct 12, 2012)
Version 5.2 (build 87059) YearbookFusion only Missing fonts / various crashes scenarios fixed Cases resolved: 7188 9201 13181 26330 26509 27099 27420 27521 27522
27768 27770 27771 27772 27773 27776 27777 27897 27901 27902 27903 27905 27908 27916 27918 27929 28098 28160 28270 28640 28729 28948 29402 29968 29990
30112 30122 30306 30324 30339 30377 30383 30384 30385 30564 30565 30566 30567 30699 30731 30732 30759 30760 30816 31039 31104 31237 31272 31321 31466
31467 31471 31477 31519 31687 31741 31812 31861 31870 31877 31953 32167 32235 32271 32368 32400 32404 32438 32441 32460 32522 32538 32545 32547 32554
32559 32563 32564 32565 32567 32575 32578 32587 32588 32593 32620 32653 32654 32655 32666 32667 32673 32678 32692 32699 32702 32703 32735 32745 32747
32764 32765 32767 32772 32797 32811 32830 32831 32846 32882 32898 32899 32900 32906 32921 32925 32936 32945 32953 32958 32967 32992 33008 33014 33020
33030 33050 33052 33054 33058 33062 33072 33086 33097 33099 33118 33122 33133 33143 33172 33182 33197 33202 33210 33240 33242 33256 33258 33262 33278
33295 33300 33308 33309 33323 33324 33334 33335 33338 33351 33359 33360 33371 33372 33379 33381 33385 33394 33397 33402 33403 33405 33406 33407 33408
33409 33415 33418 33428 33431 33439 33441 33444 33449 33468 33469 33470 33471 33480 33483 33493 33499 33500 33501 33515 33516 33518 33524 33525 33529
33530 33533 33534 33536 33537 33538 33539 33541 33552 33553 33554 33555 33557 33559 33560 33561 33563 33566 33567 33573 33574 33575 33576 33577 33578
33580 33583 33584 33585 33586 33587 33588 33589 33590 33593 33601 33602 33603 33604 33605 33606 33613 33614 33616 33618 33620 33622 33633 33642 33646
33647 33648 33650 33653 33655 33657 33658 33660 33661 33662 33663 33671 33673 33675 33676 33678 33679 33689 33692 33695 33696 33710 33713 33717 33721
33723 33725 33726 33727 33740 33741 33742 33743 33744 33745 33761 33762 33765 33766 33780 33781 33784 33786 33788 33814 33815 33816 (released Oct 8,
2012)
Version 5.2 (build 86567) YearbookFusion only The 2013 edition of YearbookFusion has been released to all yearbook customers! What’s New: • Book Management &
Remote Editing option: Online editing of candid pages by users who do not have YearbookFusion installed; Organization of books as collections of chapters – facilitating
collaboration between multiple users. • Spell Check: Red underlining on words that are not in the dictionary. Right-clicking on underlined words offers suggestions for correct
versions. • Much-improved Mac stability & performance • Remote Database option coming soon Cases resolved: 32960 32897 33069 31115 33235 32905 32968 32530 33157
30560 30059 30144 31242 31566 30087 30049 31499 31634 30345 31696 31915 32349 31150 29978 30125 31113 31369 33012 31350 32715 31079 31460 3125 31716
32570 32479 31983 33098 33114 33107 31283 33116 33106 33104 33120 33145 31470 31669 30949 32260 31848 32603 32275 33105 33136 31991 33153 31943 31462
32264 32331 33130 33163 33168 33137 33200 33171 33138 33189 33166 33169 33173 33175 32541 33146 33150 33152 32978 32979 33301 33306 28427 33101 33224
33241 33203 33229 33287 33226 33220 33330 33167 33349 33239 33352 33326 33307 33317 33325 33198 33294 33195 33149 33177 33265 33277 32834 33237 33238
33274 33304 33266 32961 32878 33232 33286 33321 33355 33305 33373 33425 32560 33100 32962 33400 33417 33154 33467 33141 32876 33113 33156 33228 32933
33365 33421 33367 33434 33460 33472 33473 3341233370 33502 33067 33071 32629 33249 33275 33316 32562 33231 33257 33270 33290 33354 33461 33465 33478
33245 33357 33221 33314 33329 33331 33350 33392 33413 33438 33442 33450 33454 33455 33479 33482 (released Sep 16, 2012)
Version 5.2 (build 86197) FotoFusion users only • Update counter, default output options Cases resolved: 33023, 33064, 33080, 33081, 33084, 33083, 31356, 33088,
33090, 32245, 33092 (released Aug 31/12)
Version 5.2 (build 86150) FotoFusion users only • Mac 10.8 and Window 8 compatibility •Start tab added Cases resolved: 32809, 32754, 32787 , 31760 , 32676 , 30452 ,
25940 , 32557 , 32158 , 31513 , 32824 , 32825 , 32298 , 32828 , 32780 , 31630 , 31773 , 32802 , 32634, 32690, 32790, 32855, 32553, 31942, 32274, 32694, 32658,
32246, 32695, 32738, 30849, 32062, 32160, 32799, 30005, 32783, 32826, 32817, 32818, 32814, 27474, 32839, 31956, 32782, 30970, 32821, 32706, 32147, 32822
32815, 28165, 32894, 32895, 31676, 32837, 1166, 2493, 5688, 8297, 13486, 14803, 32847, 30237, 29791, 30183, 31325, 32795, 32796, 32798, 32800,, 32816, 32861,
32169, 32829, 28358, 30478, 17259, 3629, 32643, 31119, 29944, 32854, 32552, 26024, 32786, 32785, 31918, 32840, 32904, 32901, 32909, 32888, 32650, 32834,
32792, 32879, 32881 32434,, 32892, 32931, 32935 32852, 32363, 32827, 32476, 32370, 32477, 32883, 32865, 32833, 32853, 32576, 32938, 32951, 32944, 32943,
32946, 32896, 32949, 32884, 32648, 32930, 32959, 32870, 32914, 32355, 32832 32607, 32984, 32987, 32995, 32942, 33005, 32941, 32998, 32948, 32975, 32871,
33010, 33011, 33017, 33015, 32976, 33013, 32928, 32988, 32989, 32993, 33002, 32991, 32997, 32992, 33007, 33032, 33040, 33041, 32947, 33024, 33027, 33039,
33031, 33006, 33019, 33042, 32794, 33043, 33049, 33046, 33044, 33053, 33047, 33037, 32793, 33025, 33022, 33051 (released Aug 29/12)
Version 5.2 (build 85432) FotoFusion users only FotoFusion v5.2 is all about compatibility. With this release, FotoFusion has been modified to be ready for use on MacOS
10.8 (Mountain Lion) and Windows 8 New Features • We have introduced a ‘Start tab’, which holds what used to be the Home Zone. • Easy-to-hit controls for Next / Prev
page are now overlaid on the canvas, speeding up page navigation. • Contextual (“right click”) menus now feature ‘recently used’ controls to accelerate access to
frequently-used tools • Optimizations - reduced memory use and optimization of uploads to remote storage • Improved support for French, Portuguese, German. Bug Fixes •
Enhanced users access to custom Form Factors restored • Support for images on external media cleaned up – now predictably asks if you want to copy or reference images •
188
UPDATE HISTORY
Series of issues with clipped text resolved • Drives are now displayed sorted by drive letter (instead of by drive name) • Series of issues with autorotated images edited
outside of FotoFusion - fixed Yearbook Publishers • Missing fonts not reported when rendering project – fixed • Control over watermark size and position now exposed in
RepAdmin • Images in school organize tab now labeled with names instead of GUIDs • Panel manual mode can now be optionally password-protected in RepAdmin • Panels
support occlusion modes (Square, Through, Full Line, etc) • Form Factors • The following form factors were updated: ACI, Finao Cases resolved: 32347, 31492, 32571,
31530, 32595, 31739, 31147, 29997, 32623, 32622, 31987, 21114, 32657, 32577, 32749, 19672, 32519, 32610, 31972, 32596, 21344, 30361, 29223, 32579, 32665,
32713, 19250, 32407, 32216, 32528, 32220, 32581, 7988, 32686, 32597, 32709, 32710, 32716, 32616, 32638, 32345, 32688, 32580, 28319, 27980, 32591, 32608,
32544, 32540, 32507, 32730, 32467, 32652, 32732, 32733, 32651, 31514, 31539, 32687, 32689, 32691, 32707,32708, 32731, 32729, 31485, 30371, 31686, 32487,
32617, 32736, 32737, 32739, 32483, 32590, 32734, 32743, 32748, 32746, 31969, 32751, 32755, 32756, 32757, 32758, 32759, 32761, 32762, 32760, 32768 (released July
30, 2012)
Version 5.1 (build 84132) YearbookFusion and FotoFusion v5 Features • Spell checking. Misspelled words are underlined in red. Suggestions for corrections provided.
Important Bug fixes • Occasionally text is clipped against top edge of text frame – fixed • User Preset form factors not saving correctly – fixed • Issue when bouncing projects
between Mac & PC - fixed Cases resolved: 32353 32486 32495 21555 32532 32491 32508 32466 32481 32482 32018 32155 30882 32511 32365 32510 32297 32362 32461
32485 32509 32520 32525 32526 32531 32478 30653 32420 32257 32294 32348 32360 32403 29588 1502 32207 32469 32472 32468 32417 32265 32546 32561
(released Jun 06 2012)
Version 5.0 (build 83607) YearbookFusion and FotoFusion v5 Bug Fixes • A few crashes have been isolated and fixed • Editing in an external tool saving correctly • Errors
in rendering in very-low-memory situations improved Cases resolved: 31864 32394 32288 32418 32444 28851 29340 32426 32440 32458 32464 (released May 15 2012)
Version 5.0 (build 83298) New Features • Frame region now visible when drawing frames over black canvas Fixed Bugs • Issues with project structure created when
appending a copy of a local project - fixed • Issue with disconnected database producing grey panel frames – fixed • Rendering manifest and output brought back into
alignment • Page thumbnails not updating after multi-page edits - fixed • Undo stops working after appending template – fixed Cases resolved: 15625 32283 32086 32392
32395 32052 32369 32234 32352 32364 32376 32378 32381 28281 32366 32195 31766 32191 32192 32136 32332 31802 32393 32388 32396 32398 32401 (released May
03 2012)
Version 5.0 (build 83000) FotoFusion and YearbookFusion Features: This build adds a password to get in to panel manual mode (to avoid panel reflow issues), and adds
the ability to create a PSPA-Style index from an existing database. Bug Fixes: Resolves issues with restoring archives, adding mattes to panel frames, and other instability
issues. Cases resolved: 31844 31890 32068 32099 32111 32118 32178 32221 32251 32325 32146 32181 32157 32179 32209 32237 32076 31904 31922 203 32328 32350
32351 31314 31893 32315 32354 (released Apr 20 2012)
Version 5.0 (build 82816) FotoFusion and YearbookFusion This build resolves issues with Yearbook panel sorting, archiving when projects are missing images and mattes.
Cases resolved: 32226 32267 32277 32280 32290 32043 32189 31905 32305 32304 32291 32303 32301 (released Apr 12 2012)
Version 5.0 (build 82622) FotoFusion and YearbookFusion This build resolves issues with Yearbook panel sorting, refresh issues in the Organizer and other issues. Cases
resolved: 32125 32176 32127 32183 32197 32236 32175 32061 32250 32088 32172 32114 32215 32242 32253 32148 28705 32258 32254 32268 (released Apr 04 2012)
Version 5.0 (build 82455) FotoFusion and YearbookFusion Bug Fixes • Yearbook Panels now handling blank priorities correctly • Ability to set mattes for yearbook panel
frames has been restored • Crash after changing languages twice fixed • Affected update channels Cases resolved: 32200 32193 32194 (released Mar 28 2012)
Version 5.0 (build 82432) FotoFusion and YearbookFusion New Features • Better support for proxy servers on Mac • Printing on Mac has been improved • Improved update
mechanism for Mac version
Bug Fixes • Web Album now works better for trial users • Sort orders in Yearbook panels caused by accents and hyphens - fixed Cases resolved: 31992 28661 32120 32184
32128 31528 29427 30945 31358 31361 (released Mar 27 2012)
Version 5.0 (build 82386) YearbookFusion and FotoFusion Features • Yearbook videos / quickstart featured in home zone Bug Fixes • Crash on startup - fixed • Keyboard
shortcuts fixed (insert frame / send image backward – forward) • Tooltips not appearing in photo lists –fixed Cases resolved: 32173 27745 32161 31826 32151 32171
(released Mar 26 2012)
Version 5.0 (build 82333) YearbookFusion and v5 [Mac] This was a 'bug fix' release - No features were added in this build. Cases resolved 31710 32123 32112 32132
31352 32152 31710 32123 32079 31352 32152 32126 32124 32121 31361 31358 32112 32132 (released Mar 23 2012)
Version 5.0 (build 82176) Official v5 Release for MAC & PC This represents three years of R&D poured into the YearbookFusion product, now made available to all
FotoFusion users.
More power, more speed, and some awesome new sharing technology. We’re very proud of V5 and hope you take advantage of our upgrade offer. Here’s a summary of what’s
new compared to v4.5:
• Web Album output: Create a project, click a button, and it’s visible to iPhone / iPad / Android / Blackberry / PC / Mac users; Flip from page to page with a variety of
user-selectable transitions; Publish links to the project to Facebook, Twitter and email; Instantly share your work with friends, customers, and prospects; No fee - Projects
live 30 days and include LumaPix branding.
• Completely Rewritten Text Engine: In-canvas WYSIWYG editing, Per-character attributes (bold/italic, font, skew, inter-character spacing, rotation, etc), Text effects (blur,
emboss, inner shade, etc), Text in shapes (diamond, circle, etc) • Support for text direction (Hebrew, Arabic, Chinese, etc).PDF export now supports layers and vector text. •
User Interface Improvements: Completely rebuilt Home Zone, Completely rebuilt Output tab, All dependencies on Flash (videos, gallery uploads), removed UI visuals
generally tuned • Editing Improvements: Layout Mirroring, Text Search - find text anywhere in the project, Rebuilt canvas contextual menus, 'Delete' exposed in the toolbox,
Page hover shows thumbnails in reading order regardless of window shape, Improved visual feedback identifying pages set to 'Exclude from Render' / 'Exclude from
Numbering' • Stability and Speed Improvements: Two years of polishing performance and stability from YearbookFusion now available in FotoFusion, Multi-core rendering now
supported, Undo now takes less resources; performance on slower machines improved, Crash restore (FotoFusion will attempt to restore your project after a crash) •
Improvements to Mac Support: FotoFusion runs on any Intel Mac running Leopard, Snow Leopard, or Lion, with feature parity with the PC version, • Speed improvements –
particularly to startup, Ctrl vs command key bindings cleaned up, Mac-friendly keyboard shortcuts for 'Insert Page' (ctrl-E) and 'Fit Image' (ctrl-I) added • Support: Remote
support integrated into FotoFusion UI, Improved debug info reported to server after crash • Data Management: Versioning now available. Right-click on a project in the
file/open dialog – you will be able to choose from previously-saved versions of the project, Option added to red eye tool: modify original / create corrected copy, Image
Locator shows more information when helping user locate missing images/fonts, Local projects can be manually unlocked in the file browser • Translations: German,
Portuguese, Mandarin • Form Factors: White House Custom Color, Blurb, Zookbinders, Millers/ Mpix, Bay Photo, Bridgeport, Finao, Leather Craftsmen, HP MagCloud Cases
resolved: 29689 29971 30043 30472 30486 30767 31048 31111 31407 31501 31505 31506 31540 31541 31545 31550 31698 31701 31731 31749 31755 31761 31763
31774 31777 31778 31785 31790 31791 31804 31805 31815 31866 31902 31903 31920 31923 31924 31925 31928 31931 31939 31940 31944 31950 31951 31955 31961
31963 31964 31965 31966 31967 31968 31973 31975 31977 31979 31980 31981 31986 31995 31997 3199 32000 32003 32005 32009 32012 32019 32020 32022 32024
32027 32030 32033 32034 32035 32036 32039 32041 32042 32047 32048 32051 32053 32054 32057 32058 32059 32063 32066 32069 32071 32072 32075 32078 32081
32089 32090 32097 32103 32110 (released Mar 19 2012)
Version 5.0 (build 81902) YearbookFusion and v5 [Mac] Bugs addressed A minor problem with mattes persistence and rendering was addressed. Cases resolved: 31926
31927 31925 31903 (released Mar 05 2012)
Version 5.0 (build 81886) YearbookFusion and v5 [Mac] New Features • Output tab UI rebuilt • UI Graphics generally revamped • 'Delete' exposed in the toolbox •
Mac-friendly keyboard shortcuts for 'Insert Page' (ctrl-E) and 'Fit Image' (ctrl-I) added Bug fixes • A problem with panel pages being reflowed in specific circumstances was
fixed. • Several crashes, particularly related to panel pages and when working with poor network connectivity, have been fixed • Freezes in a few circumstances on the Mac
have been addressed. Case resolved: 31733 31711 31783 31784 31838 31840 3182 31850 31895 31685 31678 31718 31851 31672 31692 31691 31694 31679 31675
31697 31703 31714 31695 31726 31724 31742 31713 31715 31730 31735 31734 31754 3175 31752 31747 31775 31780 31728 31721 31722 31719 31750 31745 31665
31666 31673 31674 31682 31709 31683 31800 31725 31670 31772 31664 31770 31788 31768 31681 31837 31829 31825 31859 31854 31865 31849 31843 3184 31839
31832 31830 31828 31824 31807 31806 31798 31797 31779 31792 31795 31740 31762 31847 31822 31743 31702 31699 31888 31823 31860 31880 31736 31717 31869
31867 31892 31889 31813 31896 31899 31900 31720 31871 31911 31887 31881 31729 31885 31913 (released Mar 04 2012)
Version 5.0 (build 81167) YearbookFusion and v5 [Mac] Features • At launch time, detect if another logged-on user has FotoFusion running at launch time • Panels: Fixes
to bugs causing empty frames after crash restore or PSPA database appending. • Mac: Several fixes for crashes and freezing. • Loading projects with PDF content, or dropping
PDF files on the canvas, works better now. • General: Fix for false positive virus detection by Sophos Cases resolved: 21167 24618 31564 31592 31648 31480 27781 31534
31628 31625 31637 31631 31644 31632 31629 31580 31618 31656 31657 31658 31660 31604 31582 31586 31607 31616 31617 31652 31659 31588 31646 31656
(released Feb 05 2012)
Version 5.0 (build 81093) YearbookFusion and v5 [Mac] Features • 28154 Form factors added for White House Custom Color • 22508 Page hover shows thumbnails in
reading order regardless of window shape • 31322 Option added to text tag editor: show 'not available' or leave blank • 31576 Remote support integrated into FotoFusion UI
Bug fixes • We concentrated on problems with projects in Remote Storage that do not load correctly on user machines, or projects on local machines that cannot be saved to
remote storage. We also worked on v4<->v5 compatibility in preparation for the rollout of V5. • 24025 "make all frames same size" now works correctly. • Mac: We fixed
various crashes and freezing scenarios. Cases resolved: 24076 26535 28154 31521 31455 31454 31049 24025 31523 31551 31518 31572 28376 30760 (released Jan 31
2012)
Version 5.0 (build 80722) YearbookFusion and v5 [Mac] Features • Undo now takes less resources; system performance on slower machines should improve Bugs
resolved • Page thumbnails now show up in sensible reading order • Changing panel grouping now resets all disabled groups • Accents now sorted correctly in panels and
UPDATE HISTORY
189
autopopulate ("Côté" now comes before "Cusson") • Color picker on Mac now working correctly • Other assorted stability issues were also resolved Cases resolved: 31378
22508 31309 31358 31361 31335 (released Jan 17 2012)
Version 5.0 (build 80124) YearbookFusion and v5 [Mac] This update fixes an important bug related to loading and saving projects, and introduces project versioning. New
Features • 31134 Versioning now available. Right-click on a project in the file/open dialog – you will be able to choose from previously-saved versions of the project. • 31127
2012 calendars made visible to YearbookFusion users • 30983 German translation file updated • 30906 Connection Checker updated to reflect new Remote Storage
Mac-specific Fixes • 31200/31145 Embedded Chromium build causes problems – reverting to previous build • 31245 Training videos open in separate window instead of
inside FotoFusion Gallery Bug Fixes • 31132 Uploaded Black&White JPGs go missing - fixed • 31143 Ampersands in filenames not handled gracefully - fixed • 31038
Drag/drop from the Gallery to the canvas produces grey frame - fixed • 31033 / 30763 / 30952 –Various Gallery issues - fixed Persistence Fixes • 31148 / 31149 / 30989 /
31097 / 31116 Errors caused by loading local project while remote content continues to download – fixed • 31041 / 31077 / 31080 Re-opened local project shows
checkerboard or 0” by 0” page - fixed • 30758 / 30760 Project corruption detected by Remote Storage validation - fixed • 31154 / 31159 Saving during crash restore =
project corruption – fixed • 31142 Validation by Remote Storage ignored by client – fixed • 31157 Potentially-missing Images in local project not reported to user – fixed •
31098 Local PSPA cache corruption - fixed • 31161 Lingering reference to network drive leads to corruption after crash restore - fixed • 31055 Saving project with PSPA
database to Remote Storage fails – fixed • 31214 Saves to a restored archive are lost – fixed • 31174 Crash restore not restoring clip art - fixed • 30419 Saved projects now
include all font information Yearbook fixes • 31302 / 31228 'Renumber Frames' option for Yearbook projects causes issues - fixed • 31204 Relinking multiple database image
to same image produces trouble. Fixed. • 31205 Adding an already-in-the-database image to the database produces odd results – fixed • 31217 Panel reports error after
crash restore – fixed • 31152 Mattes not available for panel pages - fixed • 31195 Changes to PSPA database not marking project as modified – fixed • 31257 Panel images
have improper aspect ratio after loading from RS on a mac - fixed • 31101 Fields from old database visible after new PSPA project started - fixed Stabilization – Fixes for
freezes and crashes when: • 31185 / 31155 Opening a project • 31173 Saving a project • 31251 Existing after editing a large project • 31203 Editing a panel • 31162
Launching FF by double-clicking on local project when crash restore present• 31197 Switching to manual mode on panels • 31194 Opening the gallery hover • 31090
Appending a project • 31256 Loading project from Remote Storage and changing panel row/column count • 31260 Populating panels • 31071 Loading from RS • 31273 Drop a
smart frame on a panel • 31306 Flipping between pages in large network-drive-based project • 31136 Adding a page then hitting undo General Bug Fixes • 31201 / 31202
MultiSelection in File > Open and File > Append now disabled • 30805 / 30961 Rendering prevented due to “clipped text” – fixed • 31181 Number of backup versions in
project files clamped to prevent bloat • 31326 Javascript error on Homezone startup with ctrl or shift key held down - fixed • 31093 “DoubleClick to change” appearing in
rendered output - fixed • 31151 Support-specific contextual menu not opening correctly – fixed • 31094 Updates occasionally downloaded twice and applied the second time fixed • 27587 A single frame can be grouped – fixed • 31262 Grouping disabled when less than 3 images are selected - fixed • 31212 ‘Change order' cando is ignored - fixed
• 31164 XML upload manifest shows pages appearing in cover PDFs – fixed • 31091 FullScale projects load as 'modified' by default – fixed (released Dec 23 2011)
Version 5.0 (build 79763) YearbookFusion and v5 [Mac] • New / Updated Form Factors: 30748 Blurb, 30749 Zookbinders, 30774 Hi tech Pro Labs Mac • 30969 Progress bar
added to startup to show progress when building font list • 30841 Freeze when editing legacy text – fixed • 30985 Font preview breaks when a non-readable font is
encountered - fixed • 30972 Exiting is very slow when a large number of fonts are installed – fixed • 30999 Big performance increase (align to 16-bit word boundaries) •
30953 / 30980 Mac installer shows FotoFusion icon in strange place - fixed • 30276 Remove frame highlighting on rollover for performance - fixed • 30958 FotoFusion will not
launch after clean install – fixed • 31057 Frequent crashing on mac when clicking on canvas – fixed • 31019 FotoFusion menu not visible after Crash – fixed Project storage
bugs • 30937 Data loss after save to Remote Storage - fixed • 28231 Error when saving Remote Storage project locally – fixed • 30926 Memory leaks – fixed • 30978
Database not saved correctly after very large PSPA import - fixed • 30760 Project not passing Remote Storage validation – fixed Yearbook Gallery • 29802 Double-click
selects folder behind upload window – fixed • 29804 Error message when uploading images with ‘gray’ color space to gallery - fixed • 30704 TIFs appear as blank thumbnails
in Gallery – fixed • 30935 Only publishers should be able to delete gallery content - fixed • 30934 Thumbnails not generating for just-uploaded images – fixed • 30827
Upload to gallery failing - fixed • 30867 Scalability of Gallery – handle large number of schools - fixed • 26038 Changing directory now disabled if Gallery upload is in
progress • 30479 Error message and empty frame after dragging a new image to Gallery and then to canvas – fixed Rendering • 30709 / 30955 Error about clipped text when
Rendering / Uploading to publisher - fixed • 30897 "Double-Click to Change" for non-edited text frames appears in rendered output – fixed • 30794 Drag PDF to canvas,
render = error about missing image – fixed • 30992 Text from Remote Storage projects not appearing in rendered output - fixed Adoption of HTML5 for internal dialogs •
30422 Names of large number of multi-selected files truncated by Chromium path - fixed • 29552 Upgrades page internals updated • 31018 Crash when playing Videos on
MAC – fixed Fixes for Crashes & Freezes when… • 30994 Opening a RS project • 30836 Migrating RS2011 Projects to RS2012 • 31005 Double-clicking on Tags • 30822
Working with corrupted PDF DLL • 30975 / 30951 / 30971 Working with large numbers of installed fonts • 30931 Dragging a local graphic from Organizer to Create tab •
23141 Importing a 4000 student PSPA database • 30940 Saving Project after Reconnecting images • 30941 Saving to Remote Storage • 30755 Loading and SaveAs back to
Remote Storage • 30907 Saving / loading project from Remote Storage on different machines • 30904 Opening a project from Remote Storage • 30852 Saving to Remote
Storage • 30830 Resizing text in resize-to-fit mode • 30888 Going from online to offline while downloading store content • 31028 Cancelling Windows shutdown • 31014
Reflowing panels Minor fixes • 29954 Form factors are locked when choosing 'custom' from HZ • 27990 List of pages about to be deleted presented in odd order – fixed •
31003 Preview of PSD & PDF output now shows bitmap at final resolution • 31000 Handles not appearing on multiple selection - fixed • 30930 Disabled Controls get
re-enabled without a reason - fixed • 23153 Importing PSPA does not create folder - fixed • 30209 Choosing unsupported font for panel header changes font for header and
label - fixed • 30782 / 31006 / 28944 Text tags appear empty instead of ‘not available’ - fixed 30967 / 29757 / 29499 Import PSPA (released Dec 07 2011)
Version 5.0 (build 79383) YearbookFusion and v5 [Mac] • New Form Factors: 30769 Millers/ Mpix, 30768 Bay Photo, 30813 Bridgeport, 30751 Finao Features • 29550 2012
calendars Bug Fixes • 6895 Stop Button on some progress bars doesn't work - fixed • 29581 Project saved in older build will not open in newer builds – fixed • 28230
Updating fails with notice about failed system requirements test – fixed • 30379 Panels with knocked-out images reflow differently after crash & restore – fixed • 30358
Empty pages created after crash & restore - fixed • 30354 Row/column count changes after crash & restore – fixed • 30346 New Student appearing in panel until priority set
– fixed • 30220 Installation occasionally fails on a mac – fixed • 30559 Form factors offered after reactivation don’t reflect new publisher association – fixed • 30824 Generic
form factors offered instead of correct publisher association – fixed • 30834 Locks on Remote Storage Projects not removed even after closing project - fixed • 29596 Warning
about clipped text – fixed • 30828 Image page file use optimized • 30650 Videos keep playing even if Home Zone is opened • 4249 Some images can be dragged off the
web, others cannot - fixed • 27025 Candos do not set ‘needs to be saved’ state for project - fixed • 30896 Fonts saved to a Remote Storage project do not load in build 79262
- fixed Freezes / crashes • 30899 Swapping windows user accounts without quitting FotoFusion produces instability – fixed • 29666 Command-Q / Quit from menu does not
quit - fixed • 30865 Crash when changing frame properties - fixed • 30581 Freeze when playing videos on Mac - fixed(released Nov 21 2011)
Version 5.0 (build 79116) YearbookFusion and v5 [Mac] Features • 29586 Ability to autopopulate by database fields added Bug fixes • 29591 Javascript error in Home Zone
if form factor list is empty - fixed • 30726 Mattes combo box refreshes repeatedly when editing text properties - fixed • 30783 Text properties not completely updated when
images swapped - fixed Freezes / crashes • 30701 While manipulating text box - fixed • 30797 When copy/pasting text frames - fixed • 14995 When activating (dialog box
opens off screen) – fixed (released Nov 10 2011)
Version 5.0 (build 79069) YearbookFusion and v5 [Mac] Features • 30627 Trial installations of YearbookFusion can now create (but not save) yearbook projects • 30229
Exclude-from-rendering Pages now indicated in page hover Bug Fixes • 29777 Gallery displays window showing “True or Flse” - fixed • 30645 Yearbook label in videos hover
is in wrong place – fixed • 29090 Javascript activation error - fixed • 30011 "Add Images" button in gallery not working - fixed • 29911 Home Zone: news link not configured
correctly - fixed • 30469 Forum link should point to forum at LumaPix.com - fixed • 29876 automatic refresh of gallery should happen only when gallery is in use – fixed •
14137 Homezone uses command routing – fixed • 30398 v4 text not updating interactively when edited - fixed • 30777 Spurious "image modified" popup messages after
loading – fixed • 27129 Picking up & redropping images into frames with child text holding text tags produces corrupted text – fixed • 30781 Tags not highlighted correctly in
editor - fixed • 30706 Edit in External Tool does not prompt to make a copy of the image - fixed • 30255 Edit in external tool doesn't remember list of managed editors fixed • 1512 PNGs are not editable in external tools - fixed • 30548 Extra process stays active after opening heavy Remote Storage project - fixed • 30778 Crash restore
goes into loop / project won't load - fixed Fixes for Hangs / Freezes when… • 30028 starting up • 30506 Updating • 30534 Reactivating • 30740 / 30741 / 29207 / 28616 /
30697 opening a project • 30001 general editing • 30481 changing border color • 30426 / 30260 Saving to Remote Storage • 28425 exiting after saving to Remote Storage
Mac • 30571 / 30511 Edit In External Tool now functional • 29879 Only some help videos play – fixed (released Nov 08 2011)
Version 5.0 (build 78934) YearbookFusion and v5 [Mac] This release fixes several more crashes and freezes. It should also provide a serious performance boost on the Mac,
particularly on 8- or 12-core Macs. Crash restore added (if FotoFusion crashes, projects reopen at relaunch). New Form Factors • 29872 Leather Craftsmen New Features •
30527 / 30545 / 30411 Improved debug info reported to server after crash • 30403 Dependencies on Flash removed - videos now HTML5 Mac Fixes • 30727 Performance
boost - Sleep() function replaced • 24493 Support for external editing (e.g. looping through photoshop.exe) restored • 29652 Menu items not working under Leopard : 10.5.8
- fixed • 30584 / 30562 ctrl-q does a sparse auto collage - fixed • 30090 Mixing local & remote saves on a mac produces 'Missing images' warnings - fixed Fixes for Crashes /
Freezes when... • 30614 / 30590 / 30537 Modifying text • 30580 / 30631 / 29953 Rendering • 30538 Starting multiple instances of FotoFusion • 30490 Launching after
Network error • 30428 Migrating projects from RS2010 to RS2011 • 30421 Migrating projects from v4 to v5 • 30578 Opening projects from Remote Storage • 30624 Exiting
Remote Storage Fixes • 30575 Occasional Invalid Hierarchy error - fixed • 30491 Occasional network errors when loading large projects - fixed • 30576 Occasional Upload
error - fixed • 30150 Occasional Error message when loading manually-unlocked project - fixed • 30489 Project listed with serial number instead of name after error - fixed •
30702 Image downscale failure goes undetected when saving General Bug Fixes • 30623 / 30629 / 30532 Improvement in memory usage after render • 30611 / 30591
News link in HomeZone not working - fixed • 30290 Copy/Pasted text is sometimes not the same size as original - fixed • 30435 Headers and Labels missing from earlier
panel projects - fixed • 30234 Ugly error message when editing image externally, if user account has limited privileges - fixed • 28848 "Exclude" not available from panel
context menu - fixed 30625 Corruption of panel project possible after crash happens - fixed • 30203 Crash Restore does not bring back panel population - fixed • 30446 Hard
to scroll file/open dialog - fixed • 30632 Frame number tooltips lost after aborted project load - fixed • 30722 Relinking PSPA image causes distortion and then missing image
190
UPDATE HISTORY
- fixed • 30723 Project corruption produces duplicate PSPA photos - fixed (released Nov 03 2011)
Version 5.0 (build 78569) YearbookFusion and v5 [Mac] Features & Enhancements • 28609 / 29763 / 30392 All dependencies on Flash (videos, gallery uploads) removed •
20965 Font size slider behaves better • 30257 Improved visual feedback identifying pages set to 'Exclude from Render' / 'Exclude from Numbering' • 30223 Vestiges of 'Y:\'
removed from browse windows on MAC • 30364 ?Edit in external tool? now working for images in Remote Storage projects Project Persistence • 30246 / 30115 Text in
2010-11 Remote Storage projects appear distorted - fixed • 30351 / 30199 'Modified outside of FF' shown for project restored after crash / saving to Remote Storage • 30140
Projects from 2010-11 Remote Storage load with "missing font" prompts - fixed
PSD rendering • 30009 / 19220 / 28368 / 30414 / 30370 issues with two-page-spreads rendered to PSD - fixed Freezes • 30430 Listing contents of RS folder • 30431 Saving
to RS • 29897 Acquiring content rights • 30447 Quickly flipping through pages of RS project • 30429 Closing HomeZone while Search continues in background • 30309
Choosing 'show in finder' in output tab • 30278 Quickly scrolling through Asian font in text editor Optimization for poor network connections • 30434 / 28631 / 28431 working
with Remote Storage • 28632 saving locally • 12196 general use • 30496 Flipping pages in Remote Storage projects quickly Mac • 29969 USB devices not shown on Leopard fixed • 30477 Edit in External Tool causes error - fixed • 30270 Rep-specific demo download link not working from a mac Bug Fixes • 30319 Two scrollbars when opening
from 2010-11 Remote Storage - fixed • 30285 Gallery's Add Images button non-functional on XP - fixed • 30268 Error reported when dropping image from gallery - fixed •
30311 Restoring archived project fails on Mac - fixed • 30301 Image flips when zooming into red eye removal - fixed • 30425 zoom/pan not working correctly in matte cutter
- fixed • 30214 Cancelling Save Page as template produces warning that save failed - fixed • 30201 Save page as template doesn't seem to save page - fixed • 29898 Save
large project as template with photos removed does not remove all photos - fixed • 29020 Startup fails with file permissions warnings - fixed • 30289 Page Numbering in
page thumbnails not correct - fixed • 30288 Page numbering not redrawn correctly after changing page type - fixed • 30314 Page numbering not redrawn correctly after
disabling / enabling - fixed • 30245 / 30294 Project remains modified after SaveAs - fixed • 30330 Text converted to matte not showing in the matte list - fixed • 30438
Matte list empty - fixed • 28873 Bad canvas refresh - fixed • 30356 Panels not selectable after crash restore - fixed (released Oct 18 2011)
Version 5.0 (build 78252) YearbookFusion and v5 [Mac] Mac-specific • 29613 / 30219 Confusing 'Y:\' drive no longer exposed to user • 30078 Help files now working
correctly on Mac • 27101 Re-enable External Editor - fixed • 24441 Re-enable Red eye removal - fixed • 25497 Re-enable Matte cutter - fixed • 25736 / 5503 / 16078
Support remote storage for External Editor, Red Eye Removal, and Matte cutter - fixed • 6473 / 11103 / 21025 / 7249 Option added to red eye tool: modify original / create
corrected copy • 28132 / 20162 / 25376 / 25498 / 25375 / 25038 / 6822 / 21812 / 21615 / 21617 Minor errors in Red Eye / Matte Cutter / External Editor revealed when
re-enabling them • 24463 Editing in external tool doesn't mark RS projects as modified - fixed • 28128 / 28129 Options to Always prompt / Always copy not working for RS
files edited in external tool - fixed • 25377 RS images become "blocky" after local editing - fixed • 30233 Icon for 'Edit in External tool' added to toolbox alongside 'RedEye' &
'MatteCutter' • 30235 / 30236 Page & project thumbnails not updated after Editing in External tool - fixed Fixes for Crashes • 30117 / 30227 / 30297 / 30323 Freeze when
opening 2011 RS project in v5 - fixed • 30277 Hidden dialog makes FotoFusion produce ding when clicked on - fixed • 28613 Crash when rendering - fixed • 30287 Freeze
while searching for PSPA files - fixed • 29790 Freeze when browsing Mac folder containing PSD & PDF files - fixed • 30204 Freeze after resaving images modified outside the
application - fixed • 30171 Freeze in crash restore - fixed • 29131 Freeze after trying to rename pages - fixed Automation 29404 Automation now supports rendering by
ObjectID 30248 Rendering under automation blocked by popup dialogs - fixed Project storage • 30226 Project corruption - fixed • 18177 Dotscrap content loads blurry fixed • 30217 Download current page from RS first to improve visual performance • 30016 Error saving to RS - fixed • 30283 Missing fonts after passing project through RS
-fixed • 30282 Missing text after passing project through RS - fixed • 30280 Recent edits not reflected in project loaded from RS - fixed • 30291 Can?t save to RS after
pasting copy of text frame - fixed • 30339 Project names displayed as serial numbers in RS - fixed • 30317 Missing images after crash restore - fixed • 30296 Page properties
(do not render) not surviving crash restore -fixed Bug Fixes • 30286 Cannot close gallery tab - fixed • 30242 Tapping F5 key causes missing image notices on current page fixed • 30292 UI blocks if fonts missing from project downloaded from RS - fixed • 30333 FF not restarting automatically after activation - fixed • 27924 Text clipped after
reloading from RS, even if set to resize to fit - fixed • 30182 Page numbering showing on Cover after crash restore - fixed • 30266 Extremely noisy fonts result in silent
failure when rendering to PDF - fixed • 30281 Memory usage rises when flipping through fonts in text editor - fixed • 30198 Background image moves when zooming - fixed •
28898 Text renders slightly differently in PDF than on-screen when interline spacing changed - fixed • 30279 Odd behavior when pressing undo after crash restore - fixed
Internal Tools • 30388 Improvements to Service Health monitoring (released Oct 05 2011)
Version 5.0 (build 78060) YearbookFusion and v5 [Mac] New Features • 24102 Image Locator shows more information when helping user locate missing images/fonts •
29584/30131/30145 Crash restore now restores PSPA database Bug fixes We have isolated the cause of unexpected failure of the software in several circumstances: • 30065
Crash when showing image hover containing multiple large PDF files - fixed • 30097 Crash while opening RS project - fixed • 30166 Crash when reloading project from RS
after crash - fixed • 30098 Crash when using "apply" or "append" from gallery scraps - fixed • 30099 Crash when resizing canvas to fit when canvas is empty - fixed • 30120
Crash when marquee selection attempted during project load from Remote Storage - fixed • 30124 Crash when previewing canvas images - fixed • 23739 Crash when
changing rows/columns number in all panels- fixed • 20165 Crash after undoing resizing, crop or move - fixed • 29684 Crash when restoring project after crash - fixed •
30164 Crash when loading from RS - fixed • 30178 Crash after restoring unsaved project - fixed Undo Several issues with the Undo mechanism have been fixed in this build:
• 20056 Undoing the deletion of a page produces overlapping panels - fixed • 30155 Undo duplicates or deletes project - fixed • 15121 Undoing autojumble leaves one
element behind - fixed • 16600 Undo doesn't preserve relative order of frames - fixed • 18398 Undo doesn't work on grouped copy/paste - fixed • 20061 Undo of paste
operation produces scrambled result - fixed • 4545 Undo of matte operation doesn't work - fixed • 27654 Undo loop after creating new project - fixed • 30114 Undo removes
canvas image after loading from remote storage - fixed • 30108 Undo produces missing images - fixed • 27695 Undo of template appending cannot be redone - fixed General
Bug Fixes The following bugs were fixed: • 27668 Restored archives appear empty - fixed • 29968 Font files renamed from TTF to DAT - fixed • 30070 JPEG images corrupted
during upload to Remote Storage - Fixed • 4626 'Used in canvas' checkbox not updating correctly - fixed • 30067 V5 YearbookFusion trial shows no templates available fixed • 30116 Numeric input into text box ignored - fixed • 30105 Permissions errors when uploading project after crash - fixed • 30115 Text drawn clipped / wrong aspect
ratio - fixed • 30170 Panel frames empty when looping from PC to Mac to PC - fixed • 30172 Image frames empty when looping from PC to Mac to PC - fixed • 30134 Missing
images when loading RS2011 projects into v5 - fixed • 30129/29010 Changing languages deactivates software - fixed • 29843 Frame rotates when trying to resize text using
ctrl-shift-, - fixed • 30154 Version number not relevant to YearbookFusion users - fixed • 29754 Improvements to Project repair mechanism • 29868 Text edit doesn't scroll if
you drag selection or roll mousewheel - fixed • 29986 Homezone reports error on some machines - fixed • 30069 Error when saving to RS after duplicating content - fixed •
30169 PSPA images showing up as page thumbnails - fixed • 29834 School database thumbnails appear in frames/papers hover - fixed • 30075 Mac installation requires
reactivation - fixed • 30184 Content sometimes blurry when loaded from Remote Storage for first time - fixed • 24444 Panel page converted from side to two-page spread fixed • 27160 Project password protection improved • 25858 Password protection not working for RS projects - fixed • 23260 Knockouts in panel pages not flipping correctly
when new pages are inserted - fixed • 23678 Merged pages not showing chapter indications correctly - fixed • 30168 Panel frames sometimes appear empty when loading
from RS - fixed • 4665 Conflicting Rep Preferences handled better • 30100 Improvements to logging • 29399 Server ping when rendering - fixed • 30154 Yearbook/Composite
licenses now correctly ignore version number for activation • 20323 Projects in Remote Storage remain locked after a crash - fixed • 30076 Error when saving to Remote
Storage - fixed Crash Restore • If FotoFusion should crash while you are working, ?crash restore? attempts to reload the project when FotoFusion restarts. (released Sept 27
2011)
Version 5.0 (build 78252) YearbookFusion and v5 [Mac] Mac • 29613 / 30219 Confusing 'Y:\' drive no longer exposed to user • 30078 Help files now working correctly on
Mac • The return of "edit in external tool" • 27101 Re-enable External Editor - fixed • 24441 Re-enable Red eye removal - fixed • 25497 Re-enable Matte cutter - fixed •
25736 / 5503 / 16078 Support remote storage for External Editor, Red Eye Removal, and Matte cutter - fixed • 6473 / 11103 / 21025 / 7249 Option added to red eye tool:
modify original / create corrected copy • 28132 / 20162 / 25376 / 25498 / 25375 / 25038 / 6822 / 21812 / 21615 / 21617 Minor errors in Red Eye / Matte Cutter / External
Editor revealed when re-enabling them • 24463 Editing in external tool doesn't mark RS projects as modified - fixed • 28128 / 28129 Options to Always prompt / Always copy
not working for RS files edited in external tool - fixed • 25377 RS images become ?blocky? after local editing - fixed • 30233 Icon for 'Edit in External tool' added to toolbox
alongside 'RedEye' & 'MatteCutter' • 30235 / 30236 Page & project thumbnails not updated after Editing in External tool - fixed
Fixes for Crashes • 30117 / 30227 / 30297 / 30323 Freeze when opening 2011 RS project in v5 - fixed • 30277 Hidden dialog makes FotoFusion produce ?ding? when clicked
on -fixed • 28613 Crash when rendering - fixed • 30287 Freeze while searching for PSPA files - fixed • 29790 Freeze when browsing Mac folder containing PSD & PDF files fixed • 30204 Freeze after resaving images modified outside the application - fixed • 30171 Freeze in crash restore - fixed • 29131 Freeze after trying to rename pages fixed Automation • 29404 Automation now supports rendering by ObjectID • 30248 Rendering under automation blocked by popup dialogs -fixed Project storage • 30226
Project corruption - fixed • 18177 Dotscrap content loads blurry - fixed • 30217 Download current page from RS first to improve visual performance • 30016 Error saving to
RS - fixed • 30283 Missing fonts after passing project through RS - fixed • 30282 Missing text after passing project through RS - fixed • 30280 Recent edits not reflected in
project loaded from RS - fixed • 30291 Can?t save to RS after pasting copy of text frame -fixed • 30339 Project names displayed as serial numbers in RS - fixed • 30317
Missing images after crash restore - fixed • 30296 Page properties (?do not render?) not surviving crash restore - fixed Bug Fixes • 30286 Cannot close gallery tab - fixed •
30242 Tapping F5 key causes missing image notices on current page - fixed • 30292 UI blocks if fonts missing from project downloaded from RS - f ixed • 30333 FF not
restarting automatically after activation - fixed • 27924 Text clipped after reloading from RS, even if set to resize to fit - fixed • 30182 Page numbering showing on Cover
after crash restore - fixed • 30266 Extremely noisy fonts result in silent failure when rendering to PDF - fixed • 30281 Memory usage rises when flipping through fonts in text
editor - fixed • 30198 Background image moves when zooming - fixed • 28898 Text renders slightly differently in PDF than on-screen when interline spacing changed - fixed
• 30279 Odd behavior when pressing undo after crash restore - fixed
Internal Tools • 30388 Improvements to Service Health monitoring • 30228 / 30092 Very short userIDs handled more gracefully (released Sept 21, 2011)
Version 5.0 (build 77770) YearbookFusion and v5 [Mac] The official build for the start of the school year for YearbookFusion. The most important thing about this build is
how it talks to Remote Storage: This is the day when Remote Storage users will get access to the newest version of RS: it's faster, working off caches. Improved Remote
Storage Performance • 30057 Go live with RS2011-12 • 29623/30017 Images not uploaded if already present in cloud • 29963 Amount of information sent to cloud reduced
UPDATE HISTORY
191
considerably Features • 29959 Form factor for HP MagCloud added • 29962, 29951, 29743 - Form factors updated for specific publishers Bug Fixes • 29937 Activation glitch
related to trial YearbookFusion installations • 30015 Occasional crash when inserting/appending project - fixed • 29948 Activity when FotoFusion is minimized has been
reduced • 30000 Issues with projects saved for crash restore - fixed • 29990 Corrupted project saved to Remote Storage - fixed Usability Enhancements • 29869 Better
status in progress bar when loading template •29715 Remember last-used folders for PSPA import and image save Mac-specific • 29761 Multiple internal drives not listed
under devices in file browser - fixed • 30010 Delay in showing images in Locate Missing Images UI - fixed • 29806 Dragging a font into the canvas sets the default font for
new text frames - fixed • 29866 The Image Hover now shows the desktop by default (not user\documents\my pictures) • 29864 Hard to pan canvas? pan handle appears and
disappears (Lion only) - fixed • 29317 Using '.' rotates text by 45 degrees when caps lock is on using external keyboard - fixed • 29829 Frames move when clicked on (Lion
only) - fixed • 29503 Devices not listing correctly in the Images Hover folder tree list - fixed • 29942 Menu items not working (OSX 10.5.8 & 10.6.8 only) - fixed (released
Sept 15 2011)
Version 5 Mac Beta (build 77558) YearbookFusion and v5 [Mac] Resolved Bugs • 29617 Restoring a PC archive on a Mac produces error messages – fixed • 29885 Saving
to Remote Storage disabled on Mac YearbookFusion build until RS2012 ships on Sept 15th • 29808 Images missing on Mac after loading from Remote storage – fixed • 29842
Text not editable if all text selected – fixed • 29792 Two clicks required to open image or frame editor - fixed • 29384 / 29413 / 29793 - Help videos not playing - fixed •
29929 Frames dropped onto images are not applied - fixed • 29828 Command-clicking on frames moves them slightly - fixed • 29771 Color picker not working on mac –
fixed • 29819 Delete key occasionally does not delete the selected item – fixed • 29865 Hit testing region on text is misaligned with visible text - fixed • 29858 del key not
removing image from dropper - fixed • 29797 Home Zone not closing after choosing a template – fixed • 29415 unhelpful contextual menu on videos turned back off again •
29860 Bad refresh when new pages added – fixed • 29389 / 29688 RepID=<rep> mechanism now associating rep IDs with installer on Mac DMG (released September 6,
2011)
Version 5 Mac Beta (build 77370) YearbookFusion and v5 [Mac] This is a minor stabilization release. This build fixes a bug in the installation process (one that prevented
update mechanism from working). Resolved Bugs • 29666 / 29877 Command-Q or Quit from menu does not quit FotoFusion [Mac only] - fixed • 29786 FotoFusion freezes on
exit [Mac only] - fixed • 29774 Looping update [Mac only] fixed •29801 Activating certain Mac build as v5 Extreme produces error - fixed (other internal testing issues
resolved) (released August 29, 2011)
Version 5 Mac Beta (build 76942) YearbookFusion and v5 [Mac] Resolved Bugs • 29654 Publish a tool that cleans the WINE bottle to streamline support • 29434 Mac crash
on hovering or hitting buttons to open smart frames, settings or papers • 29630 Cannot browse for images in autocollage wizard (released August 13, 2011)
Version 5 Mac Beta (build 76930) YearbookFusion and v5 [Mac] This is a stabilization release, which polishes the Mac integration and lays the framework for a composite
toolset.
Features • 29519 / 29539 Crash restore (FotoFusion will attempt to restore your project after a crash) • 27245 - 27790 - 27885 - 27871 - Improved PDF text rendering
(underline & superscript as vectors) • 26537 – Local projects can be manually unlocked in the file browser • 17998 / 28010 / 28848 / 29332 - Context menus & Tool menus
redone for consistency • 26209 / 26692 – Rich text can be converted to a matte / have matte applied • 29385 - Localization package for translators updated to v5 • 28448 Support for tabs / tab stops added to text Mac-Specific We focused on improving the Mac V5 Beta in this release. • 29622 / 20480 – Occasionally, very very slow startup –
fixed • 29129 - External drives not shown consistently - fixed • 28707 - ctrl-click should open context menu - fixed • 28894 - ctrl vs. command accelerator key cleanup –
brought into alignment with Mac expectations • 29343 – Very slow to open Images hover - fixed • 29459 – Image hover empty under Lion - fixed • 29483 – Crash when
clicking arrow in image hover under Lion - fixed • 29609 - Numeric control not catching '.' (can't enter 8.5 as canvas size) - fixed • 29610 - Text in numeric control getting
selected & deleted as you type - fixed • 29614 -.zip, .doc, .zip files treated as folders - fixed • 29136 - Show Mac-friendly file system for file/open & file/save • 24635 - PSPA
import file browser • 28675 - 'locate missing images' tree • 29612 - expose mac drives directly under ‘devices’, not under 'drives' - fixed • 29351 – Typing ‘enter’ closes
Slider but acts like cancel - fixed • 29366 – “Locate missing images” browser reveals only scrap files instead of images - fixed • 29422 – Projects sometimes invisible after
saving into My Collages - fixed • 29283 - Cannot import PSPA photos to default location - fixed • 29219 – Significant lag for text tag menu to appear - fixed • 29164 - Python
errors on application startup - fixed • 29123 - File/Save is not pointing at any folder - fixed • 29616 - a for aspect ratio not working on Mac - fixed • 29191 / 24629 - "ICC
Profile is not valid" error message when rendering to PSD - fixed • 29425 - Frame border color not refreshing in dialogs - fixed • 29445 – Dragging pages in page hover adds
new pages – fixed • 29448 – Page numbers not updating correctly when moving pages - fixed • 29462 – Font list shows black boxes for some fonts – fixed • 29595 – Focus
issue preventing editing text with double-click - fixed Support for tasks/Composite function This release includes building blocks that will support a future “school composite”
toolset: • 29393 / 29392 / 29395 / 29400 - Support for tasks added (“I am building a composite” vs “I am building a yearbook”) • 28325 / 28579 / 29522 / 29566– Cleaned
up support for custom database fields • 29399 / 29568 – Render counting • 29390 – YearbookFusion "runs on fuel" (needs active school or composite task to function) •
29029 - Expose project-level custom tags • 28203 - Support for Organization name as project-level attribute • 29497 / 29501 / 29536 / 29546 – other infrastructure Minor
usability tweaks • 5620 / 29523 - Recent Projects list tidied up in Home Zone & File Menu • 29354 - Double-clicking on an Index.txt file in PSPA import dialog now opens it •
29365 - Project name is now default archive name • 28835 – ctrl-del now deletes multiselection in pages hover • 28449 - Home / end / arrow keys now go to start/end of
text selection • 28488 – Improved message shown for the "missing font" dialog • 29034 – Occasional crash when loading project over existing project - fixed • 26664 Editors now close only when the selection changes to incompatible object Stabilization • 27882 – Improved validation when rendering to file • 29345 - Freeze / stuck
downloads when loading store templates - fixed • 29553 - Connectivity test incorrectly reports problems - fixed • 29619 - Crash on merge - fixed • 29642 - Looping crash on
a Mac - fixed • 29639 - Occasionally crash when right clicking on canvas background - fixed • 29086 – Occasional crash after creating & applying presets – fixed • 27356 Crash when rendering PDF to full hard drive – fixed • 29361 – Occasional crash when appending Remote Storage projects - fixed • 29382 – Occasional crash when opening a
kit - fixed • 29307 / 29322 - Crash while archiving a project - fixed Fixes to update mechanism • 29225 - No message shown when checking for a new version - fixed • 29280
- "Access is denied" while installing update - fixed • 29353 – User is now told when update download completes (if they manually checked for updates) • 29372 - Update
failure if new version is published while the app is running - fixed • 29375 - Collage.exe error on uninstall in windows - fixed • 29592 – Permissions error when taking new
build on Mac - fixed • 29408 - Panel button not added to UI when activating as YearbookFusion user – fixed Text • 29530 – Occasional crash when changing multi-font text
fill or outline color - fixed • 29537 - Blur effect on Text is not restored after a crash - fixed • 29585 - Swapping images doesn't refresh all tags in child text - fixed • 25719 – ‘
=’ command not working for text - fixed • 27284 - Cursor cannot be positioned between two consecutive tags - fixed • 27285 – Font used for tags lost after save / reload fixed • 27417 – ‘Highlight tags’ checkbox doesn't stay checked - fixed • 27477 / 27873 / 28155 – Customer-specific text issues - fixed • 29631 / 29636 - Changing text Fill
color occasionally changes outline color - fixed • 27547 / 28312 – Text incorrectly sized when ‘old’ templates loaded - fixed • 27981 – False positive warnings about ‘text
outside the frame’ when rendering to PDF – fixed • 27988 – Silent failure when loading project created with text frame created by dragging font into canvas - fixed • 28066 Line breaks after text contents not working correctly - fixed • 28261 – Text not appearing on canvas at load time - fixed • 28267 – Old projects claim that Arial is missing –
fixed • 28417 - Missing font reported, when it is not missing - fixed • 28530 – Issues with text presets / factory presets – fixes • 28541 - Last character in italic / bold text
sometimes cropped against text frame - fixed • 28591 - Setting text as bold produces odd black mark - fixed • 28625 – Dragging on ‘T’ in toolbox does not trigger resize to fit
- fixed • 28730 - Text not resizing correctly - fixed • 28918 - Text properties changed after copy/paste - fixed • 28744 - Text alignment reset after inter-line spacing is
modified - fixed • 29037 - Copy/paste affects inter-character spacing - fixed • 29078 - Center-aligned text is not center-aligned under certain circumstances - fixed • 29093 Text isn't correct size after undo - fixed • 29176 / 29268 - Fonts appear as arial - fixed • 29300 – Bad refresh after saving text presets - fixed • 29304 - Canvas text is drawn
without anti aliasing- fixed • 29330 - Kerning in PDF vector output improved • 29429 - Text on frame not resized correctly when using snappers in ruler - fixed • 29471 /
29409 - Some fonts do not work in panels – fixed • 29472 - Text does not resize to fit when canvas is resized - fixed • 29565 / 29573 - Text not updating in response to color
controls - fixed • 29596 – Odd warning when rendering about text not fitting within boundaries – fixed Rendering • 28278 – Rendering can now proceed if fonts are missing
for pages other than the one being rendered • 25148 – Rendering doubles separately fails occasionally – fixed • 26136 - Rendering to PDF when offline produces stuck 'items
pending' overlay - fixed • 26671 - PDF rendering error in Portuguese version – fixed • 26714 – Render over open PDF detected earlier • 26743 - Outline not drawn in PDF
when text fill is transparent - fixed • 27872 / 27972 – Text rendering issues - fixed Project storage • 28627 – Optimizations to persistence structure (“Raw Scraps” removed)
• 29580 - Unable to save to Remote Storage - fixed • 23632 – Appending projects with databases to projects with databases is now prevented • 29582 – Issues when opening
a project from Remote Storage and saving it locally - fixed • 29598 – Issues when restoring archive - fixed • 25858 - Password protection broken for RS projects - fixed •
27263 - Deleting local cache of Remote Storage folder produces blurry content - fixed • 27295 - ImageName Tag displays incorrect content after Archive & ReStore - fixed •
27659 – Performance improvements in Undo related to serialization • 9356 / 29363 – Occasional failure when archiving large RS projects - fixed Form Factor • 26592 - Form
factor definitions changing without publisher action - fixed • 28586 – Form Factor now conformed if Publisher disables customization • 29348 – Default form factor specified
by publisher working correctly• 29331 - User can't modify default 10x10 album in new/custom - fixed • 29337 - Pick template, pick form factor: form factor is not applied –
fixed Panels • 29641 - Panel hover "apply" is disabled after PSPA import - fixed • 29535 – Panel occlusion not working as expected - fixed • 19711 / 29521 - Mostly-empty
panel doesn't behave when choosing alignment = centered - fixed • 23093 - Changing panel frame alignment to 'center' should set last row alignment to center as well fixed General • 19819 – Composition now resizes to fit safe area when canvas resized • 29277 – Undo skips blur effect on text - fixed • 29513 – 29508 - Start Here Window
does not close after opening a project - fixed • 29518 - Javascript error message when cancelling Auto Collage project creation - fixed • 29526 - Undo occasionally does not
respond - fixed • 29548 - "Goto Page" key shortcut (Ctrl-Shift-N) opens Start Here window instead - fixed • 23286 - Export used images produces empty list - fixed • 25225 –
Share by email - attach original images not attaching them – fixed • 27990 – Warning about removing multiple pages not listing the pages in order – fixed • 29496 - Canvas
size dialog occasionally reports width and height of 0 – fixed • 28600 – Publisher rendering preferences now correctly reflected in client software • 28989 - Colors not
refreshing in color chips when color edited - fixed • 29541 - Copy Settings to All Frames fails occasionally – fixed • 10801 – Issues when reverting smart frame to regular
frame - fixed • 26842 - Custom mattes not showing in matte list - fixed • 29640 / 29646 - Can't set Canvas color to black - fixed • 28680 / 28384 - Page numbering custom
text is not updated if the Appearance is modified - fixed (released August 11, 2011)
Version 5.0 (build 76764) YearbookFusion and v5 [Mac] Minor stabilization release (released August 4, 2011)
192
UPDATE HISTORY
Version 5.0 (build 76407) YearbookFusion and v5 [Mac] This is the first release of FotoFusion v5. It's available only to Mac users; support for the Mac is one of the most
important features, which we want to support with additional new features before removing the Beta tag and making the software available on the PC side as well. New
features include: • Mac Support: FotoFusion now runs on any Intel Mac running Leopard, Snow Leopard, or Lion. • Text: In-canvas WYSIWYG editing / Per-character text
attributes / Text effects (blur, emboss, inner shade, etc) / Text in shapes (diamond, circle, etc) • Output: PDF export now supports layers and vector text • Editing: Layout
Mirroring / Text Search - find text anywhere in the project • User Interface: Completely rebuilt Home Zone / Rebuilt contextual menus • Stability and speed: Two years of
polishing performance and stability from YearbookFusion now available in the FotoFusion product. (released July 22, 2011)
PRE V5 UPDATES
Version 4.7 (build 74706) Bug fixes • Flattened projects uploaded ignoring publisher's "render double pages separate" preference. Fixed. [28563] • Rendered output
contains pages that do not conform to Form Factor. Fixed. [28491] • Appending projects with a different form factor now correctly conforms the appended project. [28573]
[28583][28564] • Some Page Descriptors not available to users under certain circumstances. Fixed. [28560] • Occasional blurry content in renders. Fixed [26355] [26651] •
Fonts refresh on canvas. Fixed [28582] • Preferences in RepAdmin occasionally not reflected in client software. Fixed [28588] (released May 11, 2011)
Version 4.7 (build 74560) Bug fixes • Under certain conditions, panel header shows “Con’t” in first panel. Fixed. [28498][28499] • Optimization of panel updates. [28503]
• Rendering project from Remote Storage produces incorrect warning about missing images. Fixed. [28525] • Publisher’s preference for crop marks in rendered output
ignored. Fixed. [25938] (released May 5, 2011)
Version 4.7 (build 74519) Bug fixes • “Invalid Hierarchy” or “Structural Error” reported to user when saving RS project. Fixed. [26784] [28516] [28520] (released May 3,
2011)
Version 4.7 (build 74417) Bug Fixes • Extremely slow loads from Remote Storage. Fixed. [28487] [2841] • Random crash. Fixed. [28483] • Text occasionally missing from
printed output. Fixed. [28411] • Cropping on externally-edited images lost upon returning to FotoFusion. Fixed. [28441] • Unnecessary panel error message removed
[28444] • "Missing font" dialog updated [28493] • Network drives considered local if not mapped to a drive letter. Fixed. [28515]
New Features • Recovery mechanism for corrupted projects added [28486] • Panel layout performance optimized [28446] • Online status validation improved [28433]
(released April 28, 2011)
Version 4.7 (build 74029) Features • Optimization of gallery – performs faster & doesn’t hang with very large galleries. [28317] • Missing fonts detected & reported to user
[28293] • Easier to control row/column count with new control in panel editor [28195 / 28022] Bug Fixes • Crashes fixed [28327/28321/28343/28337] • Occasional freeze at
startup. Fixed. [28298] • Crash when doing manual knockouts with specific page sizes. Fixed. [28235] • Occasional freeze at render time while waiting for download. Fixed.
[28300] • Fonts occasionally going missing when loading from RS and saving locally. Fixed. [28301] • Text not rendering correctly in PSD output. Fixed. [28339] •
Zero-width frames make renderer freeze at output time. Fixed. [28222] • Appended project occasionally appears blurry. Fixed. [28262] • Content from Remote Storage
appears blurry when loading after crash. Fixed. [28288] • Printing project from Remote Storage fails unless each page is visited first. Fixed. [28223] • "Waiting for items"
appears in rendered output under certain circumstances. Fixed. [28308] (released April 13, 2011)
Version 4.7 (build 73728) • Warning about low-res content when rendering right after loading from RS. Fixed. [28240] • Have unsaved project. Start loading a new one.
Cancel do you want to save. Choose save as. Result: potential corruption. Fixed. [28224] (released March 31, 2011)
Version 4.7 (build 73647) We found and fixed a fairly important bug related to memory usage; several seemingly unrelated problems should now be resolved at the same
time. This release fixes the following bugs:
• Double-clicking on local project while completing save to Remote Storage produces empty frames in local project. Fixed.28163 • Saving a local project on top of an existing
local project produces empty canvas and locked project. Fixed. 28169 / 28170 • Occasional issue with panels disappearing due to missing groups. Fixed. [28175] • Panel
labels sometimes show up as 'bold'. Fixed. [28181] • Removing all members from a group produces errors on reload. Fixed. [28174] • Freeze when opening project with
missing images. Fixed. [28180] • "Save As" over existing projects disabled (to avoid user error reported by many schools). [28183] • Central memory issue responsible for
project corruption / failed renders in high-volume workstations. [28194] (released March 28, 2011)
Version 4.7 (build 73528) FotoFusion can be executed from USB drives on systems with Admin restrictions • rendering to PDF gives errors (about disk failing?) [28134] •
png, gif, tiff saved to RS display transparency as black (some users only) [27145] • Scary error message when clicking on page thumbnails. [28135] • PDF renders with first
student after header (in z-order) missing. [28121] • Data Loss - BG and DS Content comes missing with Checkerboard after appending. [28151] • Projects with unpurchased
content cannot be render as PD.F [28150] (released March 23, 2011)
Version 4.7 (build 73317) Bugs fixed • Validation of the project at render time as been increased • A new error message alerts users with broken panels to the existence
and extent of the problem [28117] • Auto-Update now downloads the updater.exe into the app folder instead of the data folder [28115] • Hidden Panels cause errors at load
time [28053] • Cont'd in Header Text appended too many times [28062] • Pages not marked as 'dirty' after changes to panels [28092] New features • Dragging 'frame width'
control in panel editor now behaves more smoothly [28114] • Page breaks now offered as a global option in the simple panel editor [27553] • User warned that
manual-mode panels will be reflowed if automatic mode selected [28021] (released March 14, 2011)
Version 4.7 (build 73235) • Themida.exe - GDIPLUS.DLL not unpacking when installing on ‘clean machines’ hence FFProc.exe won’t execute. (released March 10, 2011)
Version 4.7 (build 73069) New Features • ‘Support’ button restored to more visible place in UI z Panels are now ‘un-selectable’ in manual mode unless selected via Tree
Hover. [27997] • Improved caching / performance for RS [27940] • Add 'show crop marks' option in RepAdmin upload preferences [24449] Bugs Fixed • 'FotoFusion can't
save to RS' error. Fixed. [27973] • FotoFusion stays stuck on "Opening Project - Loading page 1 of xxx". Fixed. [27970] • Inconsistencies noted in projects during validation
phase of save to Remote Storage. Fixed. [27933, 27932, 27931] • Auto-Flipped panel causes reversal of alphabetical order. Fixed. [27857] • Panels scrambled. Fixed.
[27951, 27993] • Panels shift when groups re-ordered. Fixed. [27955] • Message “Encountered unacceptable PicInfo type”. Fixed. [27774] • Freeze when browsing project or
adding new page. Fixed. [27987] • Top level gallery folder doesn't load. Fixed. [27977] • Crop marks are appearing on output from user. Fixed. [27892] (released March 3,
2011)
Version 4.7 (build 72828) • Autoflip pages no long back on automatically [27880] • FotoFusion refuses to start following update on XP machine because SP3 is not
installed [27938] (released Feb 21, 2011)
Version 4.7 (build 72732) Feature enhancements • Support for Undo has been re-enabled • Rich Text support Tags • Improved handling of unstable internet connections •
Improved scroll bars in hovers • Auto update now silent until update is fully ready for install • More contact info requested when starting Remote Storage sessions Bug Fixes
• Many fixes to improve stability and reliability. Cases resolved [165 1080 1407 1680 4138 7859 9677 13145 14705 15752 16225 17064 18027 20323 20333 20791 21049
21145 21239 21263 21370 21614 21763 21884 21885 21910 21915 21939 21953 22154 22159 22163 22199 22259 22272 22284 22288 22290 22305 22340 22366 22385
22402 22470 22497 22510 22526 22552 22593 22596 22603 22616 22619 22621 22643 22721 22911 22931 22953 23025 23028 23036 23041 23050 23067 23068 23085
23088 23102 23103 23110 23111 23162 23175 23185 23195 23205 23227 23245 23252 23263 23288 23293 23301 23315 23324 23327 23331 23339 23340 23364 23376
23391 23399 23400 23402 23405 23406 23410 23442 23466 23479 23520 23525 23526 23527 23529 23540 23547 23554 23561 23567 23604 23616 23620 23621 23624
23646 23648 23653 23655 23664 23668 23669 23680 23681 23682 23683 23689 23697 23699 23707 23714 23721 23729 23730 23751 23762 23783 23789 23802 23809
23810 23812 23821 23826 23831 23832 23833 23847 23868 23873 23884 23888 23897 23900 23902 23903 23925 23933 23941 23944 23964 23965 23976 23985 24024
24036 24039 24042 24053 24055 24062 24069 24080 24101 24107 24108 24112 24151 24153 24195 24209 24211 24230 24251 24274 24276 24279 24318 24368 24372
24381 24434 24462 24465 24568 24668 24669 24670 24674 24675 24714 24715 24731 24758 24770 24771 24775 24828 24856 24858 24878 24890 24891 24908 24934
24946 24954 24956 24960 24964 24969 24971 24979 24997 24999 25004 25005 25039 25047 25098 25107 25109 25177 25219 25222 25236 25238 25249 25252 25260
25264 25267 25270 25273 25280 25285 25288 25290 25299 25300 25305 25306 25311 25342 25343 25345 25348 25349 25350 25353 25369 25371 25400 25407 25410
25440 25442 25444 25447 25452 25455 25457 25462 25464 25477 25481 25483 25487 25492 25501 25519 25522 25527 25537 25545 25552 25562 25565 25572 25573
25581 25582 25583 25584 25590 25601 25610 25627 25628 25635 25649 25651 25652 25657 25667 25675 25685 25688 25689 25701 25704 25705 25707 25709 25717
25721 25722 25734 25735 25737 25741 25747 25753 25756 25760 25770 25775 25779 25830 25833 25834 25840 25842 25844 25866 25870 25889 25890 25895 25904
25914 25917 25925 25927 25928 25934 25935 25937 25938 25948 25949 25951 25957 25962 25971 25978 25986 25988 25997 26005 26006 26007 26010 26015 26039
26041 26046 26052 26072 26077 26082 26097 26109 26126 26140 26145 26159 26170 26172 26175 26182 26183 26194 26197 26198 26199 26202 26206 26208 26213
26217 26219 26223 26225 26227 26228 26230 26239 26241 26242 26247 26248 26258 26259 26260 26267 26269 26272 26273 26285 26313 26326 26327 26333 26335
26336 26337 26345 26347 26349 26355 26358 26361 26365 26366 26376 26377 26380 26381 26385 26389 26391 26394 26398 26400 26404 26405 26413 26415 26417
26421 26422 26423 26424 26430 26442 26445 26446 26448 26452 26455 26473 26485 26492 26493 26496 26497 26500 26504 26506 26508 26517 26521 26525 26531
26541 26543 26552 26554 26557 26559 26560 26569 26580 26583 26588 26590 26592 26596 26611 26614 26617 26619 26625 26632 26635 26636 26637 26644 26650
26652 26673 26674 26676 26705 26708 26716 26719 26722 26727 26728 26735 26739 26748 26753 26759 26768 26782 26783 26787 26789 26791 26800 26812 26816
26826 26830 26837 26839 26844 26860 26864 26870 26882 26883 26891 26897 26899 26906 26908 26911 26912 26915 26917 26918 26919 26921 26922 26923 26925
26927 26933 26936 26937 26939 26940 26942 26945 26955 26959 26960 26962 26966 26967 26968 26969 26970 26971 26976 26981 26985 26986 26988 26989 27002
27005 27007 27010 27011 27012 27016 27023 27032 27036 27038 27041 27044 27047 27048 27049 27050 27052 27056 27057 27059 27062 27065 27066 27067 27069
27072 27073 27074 27080 27085 27087 27092 27093 27094 27095 27097 27100 27102 27104 27105 27107 27109 27113 27114 27115 27116 27117 27119 27120 27122
27124 27125 27126 27127 27129 27130 27131 27133 27137 27138 27140 27141 27142 27143 27144 27152 27158 27159 27163 27166 27167 27168 27170 27174 27177
27180 27181 27184 27189 27191 27192 27193 27194 27195 27204 27209 27212 27213 27217 27218 27219 27220 27222 27223 27225 27226 27227 27230 27232 27233
UPDATE HISTORY
193
27246 27252 27253 27254 27255 27258 27259 27260 27261 27262 27264 27265 27266 27267 27272 27276 27280 27281 27283 27286 27288 27289 27291 27293 27294
27297 27302 27304 27308 27310 27313 27317 27318 27320 27325 27326 27330 27341 27344 27352 27354 27355 27358 27362 27364 27365 27366 27368 27374 27376
27379 27380 27381 27382 27383 27384 27385 27386 27387 27388 27390 27391 27392 27393 27395 27396 27397 27399 27401 27402 27403 27404 27405 27406 27412
27414 27420 27422 27424 27458 27460 27465 27466 27468 27470 27473 27478 27480 27487 27494 27495 27496 27497 27500 27501 27506 27507 27508 27509 27514
27516 27517 27519 27523 27531 27533 27545 27548 27549 27550 27551 27555 27560 27561 27563 27568 27571 27573 27580 27581 27582 27583 27584 27585 27590
27592 27593 27594 27595 27597 27599 27600 27601 27602 27603 27604 27605 27606 27611 27614 27619 27622 27623 27626 27627 27628 27629 27631 27634 27635
27638 27640 27641 27645 27648 27649 27651 27655 27656 27660 27661 27663 27671 27683 27690 27693 27694 27696 27698 27712 27715 27717 27720 27723 27724
27725 27728 27729 27738 27739 27740 27743 27748 27750 27751 27755 27757 27760 27761 27763 27769 27775 27778 27779 27782 27788 27793 27796 27799 27808
27812 27835 27856 27861 27862 27867 27869 27870 27874 27875 27877 27878 27879] (released Feb 18, 2011)
Version 4.7 (build 70837) • Crash when opening project using Windows Explorer resolved [27104] • Crash when navigating pages while images are down-scaling resolved
[27105] (released Dec 1, 2010)
Version 4.7 (build 70670) This release fixes many crashes and occasional data-loss issues, with other minor issues:
• Crashes fixed [26789, 27030, 26910, 26926, 27043, 27004, 26914, 26949, 26930, 26615, 26515, 26779, 26564, 26565] • PSPA database no longer displays 'missing not
available' after save /reload from Remote Storage [26920, 26905, 26621, 26616, 26822] • Data loss issues with remote storage fixed [26907, 26887, 26765, 26784] •
Memory leaks fixed [26995, 26160, 26841] • Adding multiple new images to photo database no longer introducing problems [27035, 26890] • Header & Labels font no
longer reverting back to default after local save/load [26938] • False positive detection by AVG fixed [26786] • Occasional loss of images after appending panel projects fixed
[26780] • Project reversion to pre-saved state fixed [26893] • Clip art copied into gallery [26494] • Occasional process remaining after exit now removed [27034] • Handles
no longer disappearing on rollover [27045] • Occasional failure while rendering double pages to PDF fixed [27019] • User's email watermarking preference no longer affecting
upload to publisher [26226] • Page numbering no longer being turned off after save/reload [26954] • Change to form factor after save/reload now fixed [25278] • Child text
correctly responding to clicks again [26897] • Clip Art now drawn correctly when changing pages quickly [26750] • Tiles no longer appearing under mattes list in border
editor [25916] (Released November 22, 2010)
Version 4.7 (build 70478) Minor QFE: Crashes on [==NULL] & Double-Clicking FF icon on top left while exiting application (Released November 15, 2010)
Version 4.7 (build 70380) This build addresses two minor issue: • A Crash on [NULL] when compresses session logs were being uploaded • Refresh issue on headers when
loading back from RS (Released November 11, 2010)
Version 4.7 (build 70334) This is a stabilization release, that restores a few features to text that were turned off in the initial release of the Rich Text functionality. • Rich
text now exported as vectors in PDF [25367] • Mattes now supported on Rich Text [26209] • Support for entering accented characters in Rich Text [26640] • Multi-core
rendering [21595] • Support for active & passive FTP in upload to publisher [26558] Mail to associated reps option added in Repadmin tool[26817] Bugs • PDF layers not
tagged with color profiles (produced color shift when viewed in Adobe Viewer, but not when printing) [24007 / 26689] • Improved CPU usage during PDF rendering 26661] •
Projects no longer remaining locked after use [26781] • Matte list now shows only Mattes (was showing textures too) [25192] • “Cont’d” added to text box for panel pages
when editing headers manually [23137] • Labels occasionally missing from student pages when rendered to PDF [15700] • Panel text occasionally appears in wrong place
fixed [26872] • Panel layout corruption after page break fixed [26884] • Errors in PDF positions of very small text fixed 25255] • Autorotated images now respond to spin
control [26757] • Occasional content reversions after save/load fixed [26886/26885/26889] • Issues with non-admin lightspeed users fixed [26880] • Issues with mixing
Remote Storage & archiving fixed [26402/26403/26736/26778] • Failures when rendering to PDF resolved [26392 26702 26760 26762 26652] • Issues with blurry content /
missing images fixed [25963/26651/26849/26373/26820/26829] • Issues with adding multiple students fixed [26776 26777 26874 26876 26877 26878 26879] • Issues
with appended projects fixed [26697/26721/26724/26725/26813/26798/26797] • Fixed crashes [26646 26647 26648 26649/ 6665 26675 26679 26695/26696/26733
26470 26479 26484 26511 26529 26542 26550 26551 26553 26618 26747/ 6768] (Released November 10, 2010)
Version 4.7 (build 69832) Features • 2011 Calendars published (all users) [26585] • Render quality improved [25403] }
Bug Fixes • ICM profiles now applied correctly [26522] • Crash when uploading large PDF fixed [26408] • Fixed naming issue with network shares [26503] • Better support
for saving large images [26520] • Intermittent issue with images on USB drives fixed [26526] • "Help / Support/ Request Remote Assistance" menu functioning again
[26523] • Looping update fixed [26468] • FF window positions resets when going from multimonitor to single monitor configuration [26527] • Remote storage issues fixed
[26482] • PDF rendering of v4.6 text corrected [26469] • Crash while rendering to PDF fixed [26491] • Edit>Paste turned back on for Rich Text [26487] • FTP Error
uploading project fixed [25219/26578] • Button to update v4.6 text to Rich Text added [26435] • Multi-res versions of images in non-sRGB color spaces now correctly
handled [26547] • Changes now applied to all text, not just last paragraph, when entire text frame is selected [26464] • Gallery thumbnails for headers recreated for
legibility [26598] • Panels respond better to page resizing [26200] • Blank frame no longer appearing after mixing RS & Archiving [26601] • Crash on print / crash on share
via email fixed [24217] • Several crashes fixed [26481/26489/26548/26563/26567/26510/26599/26600] (Released October 19, 2010)
Version 4.7 (build 69686) This minor update fixes issues reported in the past few days: • Crash when saving to Remote Storage [26482] • Issues when saving to \\nas1
network share [26503] • UNC paths are being interpreted as structured storage volumes [26514] • Issue when saving over older original file [26518] • Touching a candid
image on any YB project page causes the entire project to become dirty [26519] • Crash caused by very large image [26520] • ICM profile management updated [26522] •
"Help / Support/ Request Remote Assistance" menu reinstated [26523] • Don't show downgrade message [26525] • Improvements in handling of USB drives [26526] • Panel
style presets now loading correctly [26457] (Released October 13, 2010)
Version 4.7 (builds 69591, 69643) Features Bulletproofing: Considerable effort has gone into hardening the software to prevent bugs, and to provide diagnostic tools to
quickly track down problems if they should occur. • Log/report all transactions at the Amazon server to streamline debugging [22938] • Validate projects prior to upload
[25794] • Provide tools to validate network connectivity to diagnose virus/firewall issues [20477] Remote Storage Performance: Remote Storage is now considerably faster
and more stable. • Use compression in communications with Remote Storage [24650] • Use data aliases for project branches to load/save only what has changed [24652] •
Use multiple-resolution caches of images to download only what is required for display [23741] • Accelerate Save As by re-using images between projects [23463] • Support
asynchronous file/open so users can edit while the project is downloaded [22164] Text: Text frames now support exceptionally powerful layout and rendering effects. •
Per-character attributes (bold/italic, font, skew, inter-character spacing, rotation, etc) [1488] • Support for text direction (Hebrew, Arabic, Chinese, etc), into shapes
(circles), etc [2575] • PSPA databases: Support for the new PSPA 2011 guidelines is in place, streamlining panel creation by automatically tagging individuals based on their
department. • PSPA 2011 guideline (department field, column 11) now supported and validated at import time [24125] • Optional fields (salutation and title) supported
[25983] Yearbook Panels: Panels are both easier to work with and more flexible. • “Simple” mode introduced, with support for preset styles and queries [15838] • Populated
panels can be converted to regular frames for complete layout flexibility [16697] • Panels can be locked to prevent changes [25664] • New label mode added: Text Beside
Image [23309] • Panel labels automatically change to optimal size based on panel frame width [22528] • Panel population sort orders can be reversed [22397] Collaboration
: Individuals can contribute to the yearbook without having YearbookFusion installed, by opening a web page and uploading images directly to the yearbook staff. • 'Drop
box' functionality added to the Gallery [26017] Upload to publisher • Connectivity between the installed YearbookFusion and the publisher FTP site has been improved. • The
FTP upload mechanism now allows the user to select and upload any local file [24218] • Covers can now be uploaded separately from the rest of book (as Rep preference)
[19239] (Released October 11 & 12, 2010)
Version 4.6 (build 66120) New Feature • Users can now upload any file on their system to their publisher [24218]
Performance • Finalizing a PDF now takes a fraction of the time it previously took [24431] • Remote storage load time improved on underpowered machines [24458] •
Improved memory handling when rendering to PDF [24004]
Bugs Fixed • Label text occasionally missing from panels in rendered output [23889] • Increased logging during remote storage communications [24442] • Rare crash after
activation [24456/24471] • "Invalid Hierarchy Error" after inserting project from remote storage [24467] • Rare scaling issues in PDF rendering [24137] (Released May 18,
2010)
Version 4.6 (build 65873) Features • Improved image validation [24128] • Render output controls disabled if values are specified by Form Factor [24343]
Fixed Bugs • Individual frames no longer shifting on reload of local project [23733] • Canvas no longer shifts by bleed amount when rendering [24421] • Pages occasionally
rendered with “small contents” as part of Assemble Book batch process - fixed [23999] • Out of memory error / crash when rendering to PDF [24004/24333/24140] • Panel
labels now reliably flip when layout is flipped [24182] • Excluded pages now correctly excluded from rendering [24260] • Memory leaks during archive / restore cycle fixed
[24267] • Debug console now hidden in non-debug releases [24344] • FTP upload no longer terminating connection if timeout received in control channel [24345] • Page
segments now correctly removed after double-pages-separate render [24348] • File > Open / Remote Storage dialog occasionally empty - fixed [24349] • FF no longer
crashes when loading project with Invalid form factor [24395] (Released May 10, 2010)
Version 4.6 (build 65493) Features • “Locate missing images” now detects image files that are invalid but not missing [24127] • Images in project DB can be forcibly
changed via 'Re-Link' option in Organize [24090]
Bug Fixes • Crash on panel reflow fixed [23658] • Sequence of local save, remote save, local archive, local restore no longer produces checkerboard canvas [23892] • Empty
dialog shown in response to upload error fixed [24042] • Candid pages can now be dragged freely through panel set [24135] • Occasional PDF rendering error (large clip art /
shadows) fixed [24137] • Occasional Crash on start up fixed [24152] • PDF exporter support for large projects [19762] • Fonts not on system get replaced with 'Arial' loading
Remote Storage project [20832] • Unable to justify Hebrew/Arabic text [23225] • In case of a failed download project appears broken [23791] • Missing scraps warning in
restored projects [23798] • Empty 'Missing Image' prompt on Tools > Locate Images after restore [23828] • Missing images list reports images on wrong folders [23872] •
Panel label text not visible rendered when output to PDF and Printer [23889] • Occasionally Remote Storage locks on projects reported inaccurately [23904] • Non-Premium
content for publishers watermarked output [24066] • Occasional PDF render produces missing panel images and names [24082] • Stability when loading Remote Storage
194
UPDATE HISTORY
projects [24087] • Persistence in panels columns [24139 • Improved project consistency when loading from Remote Storage [24150] • Text attributes Bold / NonBold not
responding [24155] • Occasional error prompt saving restored archive locally [24169] • Label text with huge size appeared to be 'missing' [24171] • Improved group and
chapter organization [24178] • Missing font reports incorrect path [24188] • Communication errors when connection timeout [24199] • Re-archiving a project after restoring
unsuccessful [24213] • Occasional crash when opening specific projects [24106] (Released April 21, 2010)
Version 4.6 (build 65295) Features • Can now manually specify a new image for a panel frame [24053/24098/24100/24116/24117/24118]
Bugs fixed • Deleting a candid page within a panel set no longer deletes the entire panel set [23593/23856] • Crash when moving chapters inside of the projects fixed
[23641] • Crash when moving a candid page between panel pages fixed [23825] • Missing fonts no longer stop archiving process [23963] • Web access control application
(Lightspeed) no longer destroying projects [24079] • Moving a group to the top of a panel set no longer breaks chapter structure [24081] • Changing a header’s font no
longer risks having it disappear [23823] • Errors causes by fonts in archives fixed [23824/23963] • Crash when changing back to create tab after major database changes in
organizer fixed [24086] • Candids moved into panel set not longer become part of that chapter [24091] • Crash when closing project fixed [24092] • Images & Elements
from Gallery no longer go missing when dropped on to canvas [24094] • Deleted panel label text no longer reappears after save/reload [24096] • Organizer now refreshing
after [24098] • Add Student option back in organizer’s source tab [24099] • Communications Errors when loading from Remote Storage fixed [24103] • Missing Images after
archiving fixed [24105] • Problems setting text to bold or italic fixed [24111] (Released April 13, 2010)
Version 4.6 (build 65183) Features • First pass at image reconnection UI introduced • Added ability to reconnect images by display name instead of file name [24049]
Bugs Fixed • Gallery Clip art disconnection fixed [22751/23797] • Update no longer loops for some users [23186] • Candid pages locked to Chapters can now be moved
[23294/23295] • Crash when loading project referencing unavailable images fixed [23854] • Rare crash when moving pages fixed [23876] • Candid pages no longer moved
to end of panel pages during reflow [23899] • Duplicated marketplace content no longer appear blurry during output to PDF/JPG [23909/23992] • Errors when saving to RS
reduced [23953] • PDF preview no longer makes clip art disappear from canvas [23961] • Looping “page count exceeded” dialog when changing panel pages fixed [23978] •
Publisher build can open password-protected projects without password [23979] • Rare case of project creation with incorrect form factors fixed [24005] • Thumbnails in
reconnection UI no longer showing grey after successful match [24052] • Archives no longer restore with missing photo notifications [24060/24075] (Released April 9, 2010)
Version 4.6 (builds 64624/64635/64645/64672/64682/64719/64800/64913) QFE series for bugs related to • Project deletion when crash while saving • Crash
Local Save & Enhance Error Reporting • Healing and Disconnected images • RSData.db changed to Read-Only • Healing Broken Projects on Load • Missing Images Healing &
Reconnect • Disconnected Grey Images from RS • Disconnected Images loading from RS • Disconnected Images on Archive from RS (Released March 15-28, 2010)
Version 4.6 (build 64463) Features Added • Increased performance while editing 'All Panels' [23600] • Improved DB integrity testing during Load & Save [23618] • Saving
to Remote Storage now creates local backup before uploading [23635] • Performance of saves to network drives improved [23700]
Bugs Fixed • Fixed 'Missing Content' Error when saving to Remote Storage [23209] • Should not see 'Missing Image' warning when loading from Remote Storage [23559] •
Should not occasionally see blank frames instead of images when loading projects [23571] • Projects no longer occasionally opening as blank pages after improper shutdown
[23573] • When offline, files now reliably appear in the file-open dialog [23611] • Panel labels should no longer occasionally disappear when saved/loaded from a network
drive [23612] • Student labels should no longer disappear after save as [23644/23672] • Project with ‘.’ in their name now handled more gracefully [23720] • Remote
Storage Projects will no longer occasionally open “empty” after saving locally [23731] • Fixed crash when appending projects [23633] • Fixed crash when saving to Remote
Storage [23617] • Fixed crash when repeatedly & quickly moving pages drag & drop [23685] (Released March 10, 2010)
Version 4.6 (build 64312) Bug Fixed • Save-As causes text to vanish under student frames [23644] • The school DB is lost after save, close, re-open [23618] • Cant see
Local Projects under File > Open when Offline [23626] • No labels for the PDF exports [23630] • Need to detect missing text under panel frames and re-flow if found [23639]
• Process 503 errors in download manager [23627] • Import PSPA when FF is Offline = Nothing in ORGANIZE Tab [23643] • Empty panel projects recently saved on RS
[23649] • Cannot open a local project after save on RS [23646] (Released March 3, 2010)
Version 4.6 (build 64164) Bug Fixed • Projects load with un-linked images [23571] • Project opens as blank canvas after crash [23573] (Released February 25, 2010)
Version 4.6 (build 64120) YearbookFusion only Bugs fixed • Occasional loss of student database after save/load fixed [23528/23521] • Occasional crash when opening
project fixed [23535/23506] • Occasional Communications Error during load fixed [23549] • Occasional loss of database information from PDF render fixed [23524] • Pasted
elements now aligned with copied elements [4322] • PDF rendering of opentype now supported correctly [23514] • Featuring a teacher no longer leaves an occasional blank
frame in panel [23537] • Can now set last panel row to "edge" when featuring a teacher [23538] • Text now correctly populating manually-configured tags with database
information [23473] (Released February 23, 2010)
Version 4.6 (build 63972) Features • Rep output preferences (watermark/lowres/full/disabled) now supported 16239 • Support start page number offset in page
numbering options 18462
In Progress Features added:• Detect when proxy requires a password and respond by showing login window (we now support some proxy servers, more to come). 22661
Bugs fixed • Connection Timeouts when saving to Remote Storage fixed 23146 • Font Editor now displays font name correctly for projects from remote storage 20943 •
Projects with unusual fonts once again loop through Remote Storage correctly 22284/23302 • Failure during load from Remote Storage no longer produces resizable blank
project 23310 • Reloading the project you are currently editing in RS no longer fails oddly 23385 • Frames reporting missing images when loaded from Remote Storage fixed
23392 • Bucket contents once again survive save / quit / reload of project 23342 • Issue with broken installations after updates now fixed 23346 • Panels showing empty
frames after changes in organizer fixed 23240 • Issue with images on network drives going blurry now fixed 23416 • Projects with names containing unusual characters now
appear correctly under File > Open 22635 • Empty Gallery for some publishers fixed 23070 • Print options now appear correctly according to rep preferences 23253 •
Shortcuts to folders & network paths now available from file dialogs 23354 • Clicking ‘preview’ in email tab now works error-free from all subtabs, not just 'envelope' 23411 •
Map of clickable regions in HTML output now takes bleed into account correctly 23412 • Progress bar messages during HTML rendering now more informative 23413 •
Occasional crash fixed 23316 • Rare threading issue with overwritten properties fixed 23371 (Released February 17, 2010)
Version 4.6 (build 63740) • The Preview option into the Export tab didn't work [4737] • The dropper didn't work after clicking the export/preview button [4741] • "Out of
Memory" error when Uploading to publisher [23181] • Dragging a "left" page to first page caused it to become "left" [23210] • Dragging a page into blank space caused a
new page to be created with an odd error message [23206] • Dropping from CDROM/USB Drive didn't copy locally [23208] • Upload request references an inaccessible file
[23203] • Revert to normal frame does not refresh properly [23140] • Panel with turned off group caused a freeze [23196] • Crash leads to completely empty RS project
[23054] • Thumbnails don't update when photos dropped to canvas are never viewed at least once [23234] • Handle error 404 "file not found on remote server" more
gracefully [23214] • Add "Occlusion on/off" option per Group [23127] • Small groups with Features have odd occlusion. [23128] • Breathing pages in and out breaks all
subsequent page designs [23217] • Crash when moving a collage page down in-between panel pages [23180] • Combo edit boxes in "attributes" don't scroll, restricting input
to <20 characters [23216] • Crash after deleting Panel Pages grouped together [23258] • Resizing panel frames causes panel image to move pages, leaves embellishments
behind [23230] • Download updates in the background while users work, avoid having to wait [23250] • Moving a group to the first page causes chapters to break [23249] •
Add "Make into..." combo to allow quick setting of image type in organizer [22972] • Changing a custom attribute makes panels seem to disappear [23090] • Colored
outlines for chapters in pages hover are more clear [23028] • Crash when reflowing Panels with new chapters [23279] • Archive/Restore caused issues when restoring from
an older project [23305] (Released February 08, 2010)
Version 4.6 (build 63501) Bugs fixed • School list boxes in panel population editor are empty [22740] • Save project, reload - panels shift, and thus occlude, and reflow.
[23048] • Inserting a new page repeatably crashes YBF [23051] • Apparent deadlock when loading from remote storage [23062] • White panel frames in project pulled from
RS [23084] • Reword alarming message about unlocking projects [23091] • No data in "populate" drop downs after loading YB project [23098] • Activation dialog appears to
open offscreen [14995] • FF gets confused, goes 'ding' when you click on it [18879] • After activation, hidden window "freezes" the software [21955] • Custom page FF gets
resized without warning [22535] • Apply to all pages = crash [22655] • Auto-flip (turned on by default) breaks yearbook panels [22676] • Copy/Paste frames onto panel
pages, no reflow happens [22679] • Advanced text causes insta-crash under windows 7 [23144] • Insert project opens instead of appending [23147] • "Cont'd" text gets
added to editor box. Causes doubling of "Cont'd" text. [23137] • "Teacher Name" - Cont'd for the first page of the group [23139] • Panels lost on controlling cols/rows by the
sliders [23143] • Rendered output from v4.6 noticeably worse than v3.7 [23165] (Released January 29, 2010)
Version 4.6 (build 63326) Bugs fixed • Rows inappropriately knocked out when featuring a teacher [23058] • Clicking on a group switches to selected group panel page
[23060] • Autoselection panel features leading to problems with the panel [23064] (Released January 21, 2010)
Version 4.6 (build 63307) Features • Major speed improvements when loading/saving existing projects (more to come) • Improvements to the "Panel" bar which reacts
more intelligently • Support featured photo in header of grouped yearbook panels (e.g. teacher) [15412] • Update installer to allow totally non-admin installation [19336] •
Changes to header text not reflected in "con't" headers [22973] • Show headers even if the panels are not grouped [23006] • Headers should not be disabled if only one
group [22726] • Able to change panel grouping non-destructively [15862]
Bugs fixed • Update Loop after Installation (rare) [22488] • Knockouts frames show on rendered page [21972] • Images not showing at random on load from Remote
Storage [22948] • TIF images appear with locked aspect [22829] • Panel sets within panel sets produce corruption after re-ordering [22758] • Gallery images don't appear
when shared folder used in networked environment [22990] • PDF export fails on large projects [19762] • Non-admin User accounts cannot run FotoFusion [20347]
(Released January 20, 2010)
Version 4.6 (build 62580) Bug fixed • Form factor conformation resolved [22674] (Released December 21, 2009)
Version 4.6 (build 62460) Bug fixed • Panel updare re. form factor (Released December 15, 2009)
Version 4.6 (build 62269) Bug fixed • Column and Row settings for panels (Released December 8, 2009)
Version 4.5 (build 62295) Bug Fixes • PNG files display black on Windows 7 64 bit OS • Cached items that are in database dating previous to build 60134 are not loaded
(released December 8, 2009)
UPDATE HISTORY
195
Version 4.6 (build 61290) (Released October 28, 2009)
Version 4.6 (build 60648/60649) (Released October 1/2, 2009)
Version 4.5 (build 60134) Bug Fixes • Matte cutter overwrites original image. [20853, 20133] (Released September 10, 2009)
Version 4.5 (build 59268) Bug Fixes • Bevelled frames drop correctly [20259] (Released August 6, 2009)
Version 4.5 (build 58767) Features • User preferences option for external editor added (under Edit menu). [20104, 20108] • User preferences options for copying images
when sent to external editor added (under Edit menu). [18983] • New form factors added to manufacturer’s list (AsukaBook, Albums Unlimited, Art Leather, Blurb, Color
Portraits, Entourage, Georgia Printers, Graphistudio (US), Le Cartonnage, Picto Books, Roshan Group, Strawbridge Studios, The Icon Experience, Van Gogh School Portraits
[18830,18893, 19099, 19952, 19910, 19864, 19766, 19790, 20064] Bug Fixes • Output to file using same name as existing file now prompts with warning. [18591, 19621]
• Output to file now correctly respects rendering preferences specified by manufacturer in Form Factor [19880, 19879]. • Bleed value for cover sheet gutters now correctly
respected when rendering front/back separately.[19538] • Support for custom exif tags restored. [19346] • Matte Cutter is applied to all duplicate images. [20133] • Images
do not autoupdate after red-eye & matte application [20136, 20170] • Problem with bold/italic attributes corrected. [19954] • Deleting two instances of a frame+text now
problem-free. [20067] • Multiple images sent to external editor does not prompt to make a copy for each image. [8222] • Large form factors lists no longer delay startup.
[19094] • Manufacturer’s list sorts by product type in File > New. [18976, 19098] (Released July 15, 2009)
Version 4.5 (build 57600) Bug Fixes • Upload to Publisher - FTP error (YearbookFusion only) [19579] • Thumbnail resolution of image rendered instead of high resolution
[19616] (Released May 28, 2009)
Version 4.5 (build 57466) Bug Fixes Editing • Matte cutter works on .png files. [11312] • PNG mattes set to the correct channel. [19400] • Matte cutter respects crop and
position of image. [18981][19414] • Matte channel preference respected after reopening project [19401] Convert text to matte repaired .[17034] • Red eye removal tool
works on .png files. [12756] • Smart frames resize correctly. [13197][18173] • .gif transparency respected. [13828] • Autojumble no longer inflates images. [16286] •
Symbol fonts will render after project is saved. [18068] • Background image copied when auto-duplicated. [14003] [16274] • Mattes, fonts and tiles list will now respond to
keystrokes to find item by name. [18923] • Multi-selected small frames display handles correctly. [19166] • Image editor will restore brightness to factory defaults [19447]
Installation, Licensing, Marketplace • Installer will only run if administrator account is in use; activation will hold for all users [13145] • Uninstalling FotoFusion does not
cause issues with previously downloaded Marketplace content. [14485] • One font warning for all fonts in a projects. [16011] • Projects moved between machines will display
missing font message. [16609] Font license warning message will never show again if disabled on a project. [19365] • Missing font warning appears when older archived
project reopens. [19440] • "Download content from store" will bring entire contents down. [18838] File & Project Management • Projects opened on network will save,
reopen on other machines on network as expected (no caching). [14609][19274] • Issues related to photo caching on network projects resolved. [19172] • Various issues
with reconnecting images stored on a network resolved. [18930][18931][18932][18933][18936] • Missing images reported correctly. [19321] • Archives includes fonts.
[14894][16425] • Images edited in external editor will make image copy in same folder as original, and canvas is refreshed as expected. [18963][18972][19152][19423] •
Previously saved projects will no longer unpack when reloaded. [19086][19002] • Changing shadow options will prompt save at close. [19226] Output • Output folder is
remembered between sessions (really resolved this time!) [17386] • Rotated group of images will render to psd correctly. [19021] • Split cover pages render with front
cover, back cover in file name. [19022] • Preview rendering of a file does not require valid folder path to be specified. [19279] • .jpg files cannot be rendered without file
name specified. [19461] General • No crashes on single core machines. [18886]Print preview displays panel pages correctly [19227] • File > New will display only 10 page
thumbnails per page. [19490] • Hover layouts persist between tab switching. [14649] • Hover behaviour corrected when pinned or docked. [19325] • Color management
settings appear as button on toolbar. [19159] • Color management settings persist between sessions. [12645] • Page thumbnails refresh as expected. [19107] • Form factor
will persist between saves while running as trial. [19125] • Memory leak fixed. [19398] Yearbook • School combo box is sorted. [19003] • Accented uppercase characters do
not break database. [19465] • Add student to PSPA import will copy image to PSPA folder. [19087] • Yearbook publishers can designate master archive password for all
clients' archived projects. [19079] • Yearbook Publishers have all tabs available regardless of user preferences. [19214] • Yearbook panel pages will resave project correctly
after missing images reconnected. [19133] • Archiving issues with yearbook projects resolved. [19062, 19069] • Incomplete FTP upload issues resolved [19188, 19272] •
DPI for projects uploaded to publisher is respected. [19275] (Released May 20, 2009)
Version 4.5 (build 56280) FEATURES Form Factors Introduction of Form Factors - power tools that ensure that your layouts match specifications from album
manufacturers
• Revamped Canvas and Project settings editors [17265, 17441] • Support for user-defined Form Factors (supersedes canvas size presets) [17156, 17984] Output •
Completely revamped output file naming schemes provides sensible defaults, useful presets and complete user customization • Crop marks drawn as thin black lines over
white background for improved visibility [17517] • Improvements to Album themes in Output to the web [17697, 17698] UI • "Desktop" now appears at root of all file trees
(organizer, image hover, autocollage, etc) [3511, 16373] • Organizer now immediately reflects changes made to folders and files [3140, 11594, 17212, 17922] • Menu
system reformatted for improved usability [16851, 17803, 18752, 17303] • Inline text-based search controls added to search hover [18191]• Pages hover contextual menu
now includes "move to page..." option [18221] • Page Up/Down in multipage project controlled by Ctrl+mousewheel [17913] • Grid visibility and grid snapping exposed as
separate controls [17302] General • Set of available text tags greatly expanded and organized into hierarchical menu in text editor, output options [13151, 15678, 17383] •
User Preferences dialog now available, providing: • Toggle for Organizer's advanced search [18183] • Control over size of dropped images [16979] • Mousewheel direction
option for zoom in/out [17912] • Overlay image info includes "filename" and "filename+file extension" options [17994] • Copied objects now available in dropper after new
project created [17372] • Respect center line added to Autocollage options [17838] • Thin contrast line around frame border can now be toggled [13206, 18137] • Welcome
screen tutorial shows now shows all videos on first run [18545] Marketplace • Bundled content downloads faster [17341] • Already-downloaded content now available in
Marketplace even when offline [17440] • Clicking on content links on web pages (e.g. LumaPix.com) now launches FotoFusion and loads content [17915] • Search hover now
supports 'From Any Publisher' option [9713,16365] • Diplomas category now available [18610] Yearbook Features (available only in YearbookFusion license) • Organizer now
offers "Add Student" button to import additional images into student database [15569, 17725, 18732, 17904, 18727] • Teachers can be brought to top of yearbook panel by
pre pending space to their last name [17189, 17201, 17246, 17455] • Publishers see list of their associated schools, can choose among them when importing PSPA database
[16338] • Default form factors determined by publisher association [16893] • Publisher-specific form factors displayed for their clients only [16107] • Publisher-specific
preset searches (clip art, papers, frames) now available [16961] • Yearbook Toolbar streamlined down to single button [17885] • Panel text can be protected from changes
or unlocked for manual changes [16755] • Panel size/position can be protected from changes or unlocked for manual resizing, rotation, repositioning [17574] • Students can
now be excluded from panels (e.g. witness protection programs) [16224] • Images with empty data fields at import time are now collected into named buckets for correction
[15827] • Custom attribute sets can now be created (at import time, in Organizer, and when populating panels). [17587, 17586, 17587, 17642] • Custom text qualifiers now
supported in PSPA import [17639] • Append option at import now prevents duplicate file names in database, simplifying conflict-free reimport [18660] • School and custom
attributes now available from Text tag menu [17461] • Overlay image info now available for panel images [17594] • Publisher build includes Admin tab, giving access to rep
admin web page [18671, 18645] • YearbookFusion trial now accessible from Run As dialog [17417, 17685] FIXED BUGS Editing • Matte cutter once again available to
Enhanced users [17382, 18017] • Edge/Gutter safe zones now swapping correctly on left/right album sides [16849] • Dropper order now respected when images added to
canvas [17434] • Snapping to grid line now works with all units of measure [16493] • Smart frame dropped on top of regular frame now consistently displays as expected
[16528, 17227] • Z-order of selected frames now preserved after grouping [16575] • Mattes now auto detect alpha-rgb settings [17040, 17056] • Cover sheet now draws
gutter line even when spine width = zero [17114] • Mattes now correctly applied to existing frames when dropped on them, instead of creating new frame [17387] •
Background canvas frame now cannot be split [13444] • Mattes can now be applied to canvas correctly [17010] • Jpg file can now be dropped as canvas background if png
graphic already on same layer [17370] Output • Several PSD export issues resolved [14861, 14915, 16413, 16971, 17058, 17866, 18058] • Occasional mismatch between
render size reported on output tab and actual file now resolved [17705] • Tag with sRGB now works as expected [18501] • Several issues with Page numbering at render
time now resolved [17311, 16884] • Artifacts in PNG files at higher resolution renders have now been removed [17366] • Render options no longer default to rendering
overhang [17657, 18002] • Output to the web now creates appropriate thumbnails, info, extensions, etc. [18560, 18561, 18563, 18147, 18148, 18149] • Output to a file
now remembers last-used folder [17309, 17386] Data Management • Appending a project no longer clears current bucket contents [15662, 15465] • Buckets no longer
emptied on auto-populate [15465] • "Used" check marks now correctly shown on images on remote drives [18823 • Images located on a removed external drive now give
warning message on project load [17959] • Thumbnails in file/open dialog now updated correctly when project has been saved over [17868, 17869] • Browse for Images
remembers last visited folder, even if image is not opened [17388] • Illegal characters do not cause File > Save to fail [17510, 17850] • Occasional crashes when loading
v3.x projects fixed [18568] • Inserting a project now appends instead of replacing current project [17238, 17715] • Restoring projects (.scrap, archives) uses caches if
available [17746, 17951, 18644] • Restored archive does not require resave if no changes made [17750, 17752, 17791] • Item removed from database are now also
removed from bucket [17410] • Multiple sequential keyword search no longer crashes [16789, 16850] • Page numbering attributes now correctly reconstructed on load
[17454] General • Memory leaks fixed [17276, 18764] • Crash on single-core machines fixed [18886] • Loaded templates are unlocked during trial use [18854] • Essentials
license no longer able to create unrenderable projects by appending kit templates [14953] • Run As... now respects evaluation, not paid, license limits [14213] • Images with
auto-rotate EXIF flag no longer slow FotoFusion down [2417] • Users with passwords containing non-alphanumeric characters can now reactivate normally [17277] •
Thumbnails containing high-res png images no longer display artifacts [17373] • Various language/translation issues resolved [17041, 17525, 17864, 18051, 18046] • Email
support option now requires valid email address [17769] UI • Refresh issues with large thumbnail previews in Marketplace resolved [16709] • Toolbox no longer gets stuck in
invisible state [17169] • Start Zone no longer gets stuck in blurred-out mode [16932, 17008] • Shopping cart button now showing "unpurchased content" notification only
when necessary [17195, 17240] • dotScrap items launched on canvas no longer creating ghost frames in the Tree view [16888, 17160] Yearbook Features • Panels
sometimes hang off safe area [17666] • Publisher's build now stores list of known schools, enabling offline work [18136, 18222] • Importing new PSPA data now clears
previous imports [17108, 17274, 17352, 17353, 17355, 17630] • Restoring yearbook archive now replaces current database [17076, 17079, 17096] • Modifications to
196
UPDATE HISTORY
student database now correctly reflected when project opened by different users [16954] • Project save is now forced prior to upload to publisher [16411] • Reconnected
missing images for panel images remain reconnected when project is reloaded [17950, 18009] • Database modifications made in Trial mode persist after activation [17963] •
Changes to student information mark the current project as dirty [17180]• No longer possible to create duplicate column headings when importing PSPA files [15250] •
Turning off header at PSPA import now correctly affects number of records imported [15747] • Grades now sorted as numbers, not strings (grade 9 comes before grade 10)
[17376, 17439, 17466] • Default size of text under panel frames improved [17675, 17646] • Application of two-page spread to yearbook panel now handled more gracefully
[17967, 17968, 17969] • Projects with no PSPA database can now be uploaded to Publisher as expected [18047, 18049] • Legibility of text in Panel Wizard improved [16738,
17542] (Released April 3, 2009)
Version 4.4 (build 54352) Bug fixes • Insufficient memory error messages resolved [17218] • Uninstallation issues resolved [17356][17020] • Installer checks if
FotoFusion is running [17357] • Overlay info checkbox issue conflict resolved [17281] • Left/Right Page type functions as expected [17359] • No crash when project opened
with images on disconnected network drive [17360]• Dropping a matte or tile onto the canvas does not apply it to the canvas frame [17377] • Missing image on the quick
start resolved [17362] • JPG artifacts and bad quality render at 200dpi vs 300dpi [17366] • No crash on dragging font files over an existing text frame [17369] Yearbook
Fusion issues were also resolved in this build [17358] [17330] [17364] [17365] [17376] (Released January 12, 2009)
Version 4.4 (build 53729) New features Performance • Enormous speed improvements for search hovers (e.g. frame/paper) • Project download now much faster •
Organizer keyword entry optimized [15245] • Memory used [even] more efficiently [14192] • Font size marked as "resize to fit", 'do not exceed" optimized for performance.
[15091] • New Thumbnail/Tile/Details mode added to Organizer [15324] • Images hover [14577] • File > Open dialog [7774] Text Editor • Dragging the “T” icon in the text
toolbox interactively adjusts text size; Ctrl-dragging adjusts text border size [14365, 14608] • Frame alignment option added [13676, 13951] • Dashed outline option added
[13991] Canvas settings editor • Cover Sheet option added (configurable width for front flap / back flap / spine) [7306] • Set gutter/edge/top/bottom bleed and safe with a
single action [11605] Grid • Snapping and display now separate options [12957] • Grid color now customizable [14002] • Presets supported. [14050, 14051, 14052] Editing
• Image on background can be reassigned to canvas layer via right-mouse menu [6263] • Frames can now be grouped with an existing group [4080] • Alpha-based hit
testing on elements [13348] • Behaviour of Ctrl-A (Select all) has been modified: if item is selected, like-items are selected; it all like-items selected, then remaining items
are added to selection [13614] • Autopopulate sort options exposed in toolbar [3325] • Editor preset options renamed for clarity, and now include "apply settings to this page
/ all pages". • Keyboard accelerators added for Go To First Page (ctrl+home) and Go To Last Page (Ctrl+End) [6215] • Search results automatically swap tabs to those that
contain results [12816]• Frames can be interactively reordered by dragging the ‘Arrange’ icon in the Frame toolbox [3808] Output • ICC profile support available for PSD
output (Extreme only) [12291] Start Zone • UI unified to common interface, tabbed options • Support email form automatically adds FotoFusion installation information •
Marketplace retooled to better reflect store content • Learn and Support options added
Bug fixes Many minor issues addressed, including: • Naming a file type .jpg and choosing file type .psd in output tab no longer produces problems [4839] • PSD export will
not be reported incompatible by some versions of Photoshop [12774] • Hovers now reliably stay open when you roll over them for the first time [14945] • Autocollage now
only affects currently selected images, not entire dropper contents. • Crash when accessing folder with many auto-rotated images fixed [15063] Marketplace content •
Occasional issues with store content looking blurry now resolved [4162] • Smart frames dropped on existing frames now always apply correctly [10622] Licensing issues •
Repeated reactivation should no longer occur [14243] • Numerous issues with licensing and available features have been repaired. Vista weirdness • Stuff you simply don't
want to know about, like virtual stores and virtual registry entries, cleaned up. [15452] YearbookFusion-Exclusive Features LumaPix is pleased to announce the release of
YearbookFusion – a new version of FotoFusion designed for schools and church groups, and intended for distribution by yearbook publishers. Features include:
• PSPA CD import with support for custom fields • Customizable class panels (grids of images + text tags) • Free yearbook templates and clip art • Direct project upload to
publisher with predefined output options • Publisher-specific page sizes • Publisher-specific branding Publishers interested in distributing YearbookFusion are invited to
contact LumaPix for more detail. (Released December 17, 2008)
Version 4.3 (build 51083 & 51564) FEATURE • special release build for SEI paper+digital bundle (not web released) (Released August 29 & Sept 18, 2008)
Version 4.3 (build 50848) FIXED BUGS • 15063: Crash when accessing 'auto-flipped' images folder • 13672: UI tweaks for better display under Windows Vista (Released
August 19, 2008)
Version 4.3 (build 49690) FEATURES • License-specific "Welcome Page" • Batch printing of multi-page albums • Page thumbnails added to print dialog • Improved print
preview performance • Many improvements to general stability
FIXED BUGS • Fixed crash entering a 'space' in search field • Fixed 'out of memory' error when rendering large project (Released July 2, 2008)
Version 4.3 (build 48400) FEATURES • Email application migrated to new Share tab • Email address list can now be edited • Email address list stored in text file in C:\My
Documents\My Collages • Image overlay text is now DPI independent
FIXED BUGS • Cancelling high resolution download no longer results in blurry output • Resolved crash when inserting v3 projects through page hover (Released May 9, 2008)
Version 4.3 (build 48137) FEATURES Data Management • "Archive for public use" now available • Most Recently Used Files displayed under File menu option • Multiselected pages in Organizer can now be appended to current project (Extreme only) • "Locate Missing Images” now includes mattes • Immediate indication if project is trial
or contains unpurchased marketplace items • Number of results shown in search hovers Image Frames • Frame position, rotation and size can be locked • Lock aspect ratio is
now selection-specific, not global to all frames • Moving frames within a group does not break grouping • Blue overlay removed from Group display • Existing frames cannot
be nudged accidentally while dropping new images • Last dropped/added frame is selected automatically Text • Third party font managers now supported • Right-to-left text
(Hebrew, Arabic, etc.) now supported • New "do not exceed" text bounding option prevents text from clipping • Font licensing info displays font name • Canvas text can
convert to matte [Enhanced, Extreme only] Identification • Page Numbering now supported (Extreme only) • Pages can be renamed in page hover (Extreme only) • Page
Name option added to text tags list • Overlay Image Info added to Printing options • Opacity added to Watermark output options • Automatic cleanup of frame numbers
enabled FIXED BUGS Project Management • Tree view properly reflects all canvas elements, including grouped items • Tree options cleaned up • New keywords recognized by
organizer immediately • Sort by date works in Organizer works for Marketplace content • Autocollage wizard will not include avi files • Multiple bucket renaming in Organizer
correctly reflected in Create screen bucket hover Data Management • Saving template over itself as new project now works as expected • Memory fragmentation issue
resolved Editing • Accidental tiny frame creation prevented • Tinted png mattes behave as expected • V3 mattes supported correctly • Removing canvas image now defaults
to white, not transparent • Duplicate copies of smart frames no longer blurry • Image list "go to page" feature behaves as expected when page order, size altered • Smart
frames dropped on image will apply to image instead of creating a new frame • Frame size, position defaults are 1, not 0 • Png files set as "image" will not lose cropping
when reloaded • Picking up canvas images now behaves as expected • Canvas refresh issues after turning grid on addressed • Page thumbnail refresh issues addressed •
Frame's “show drop photo here” checkbox no longer affects auto-collage • Rotation handle now switches to yellow when Ctrl key is held • Canvas image pick-up does not
result in transparent background • Tab area now not part of scrolling hover area Undo -- The following undo errors have been fixed, among others: • matte application •
refresh issues after undoing resize • image brightness, blur following image swap • moving frame to new layer • canvas image drop • split image mosaic Output/Printing •
Email crop no longer includes overhang • PDF multi-page export with doubles separate renders as expected • Warning now appears if an image file is locked by another
software at render time • Never-visited pages of Marketplace templates now render correctly General • False “unpurchased material” error message addressed • FotoFusion
will run on Vista account without administrator status • Auto-update seen by older builds • Autocollage drop-down not as fast to react to mouse-over • Images tagged as
"ribbon" or "decoration" now behave as expected • Auto-duplicated page with one image dropped will not reproduce the image on subsequent pages • Save/Open dialog
resizes to fit on low-resolution monitor settings Trial use • Trial users have access to buckets • “Run As” Extreme will display all Extreme interface components • Trial users
running as Extreme can now resize store templates • Run As... Selection remembered between sessions (Released April 28, 2008)
Version 4.2 (build 46555) FEATURES Export/Print Improvements • Export cropping options expanded to: canvas only, canvas + bleed, canvas + bleed + overhang . • Userdefined image information overlay now available as output option (Enhanced, Extreme) • Zoom-to-fit preview of exported images. • Album preview theme added to Email and
Web options (Extreme - multi-page). • Drag&Drop images into page thumbnails to auto-collage them • Drag&Drop multiple images into page thumbnail with frames to autopopulate them Data Management • Buckets can now be renamed. • Bucket icon indicates number of contained images. • Bucket icon indicates most-recently-dropped image.
• Images imported from USB devices offer 'copy or refer' option • "Go to page where image is used" option on image thumbnails dotScrap Marketplace • List of Bundled
content now available in large clickable list Other Improvements • User-defined canvas size presets • Control-click on color chip sets it to black/white • Single page layouts
(cameos) excluded from page numbering • Snap image upright added to right-mouse list • Exif tag list sorted by name, with frequently-used at top • Frame number not
drawn over empty frames FIXED BUGS • Selection handles on multi-selected images function properly again. • Mac installations using Parallels work again. • Reconnecting
lost images finds all duplicates within a project. • Ctrl-S with hover open will save project as expected. • Compositing error on ripped smart frames fixed. • Crash when
rendering at very high res PSD output fixed. • Cached images located on photo database will reconnect after database is moved. • Uninstalled fonts can be dragged from
bucket to text frame. • Thumbnails in buckets drawn correctly. • DotScrap memory usage reduced. • Tiles dropped onto images appear in image editor tile control. • multipage email index renders correctly without needing to visit all pages first. • User watermarks not drawn on Email/published index thumbnails. • Page Segments not lost after
cancelling render. (Released February 23, 2008)
Version 4.2 (build 45888) FEATURES Gradients • Gradients are now supported as a matte type [Enhanced/Extreme] Updated UI • Search hovers now categorize store items
into premium/free/purchased/mine . • Metric measurements apply to all editors when user defines “cm” in canvas size options. • “Number of times used” count displayed in
Image lists. • Color Management: Select monitor and printer profiles plus rendering intent [Extreme][BETA]. Export/Print Improvements • Exif page numbers respect doublepage spreads. • Page number applied as text tag in double-spreads respected on title bar, output, text tags. • "Overlay image information” option overlays file name, frame
number and page number. • Printer window revamped for clarity, hinged page option added. Streamlined Workflow • Faster Autocollage now includes "add all" image option.
• Center on page in 2-page spread will center to left or right side page. • Last-selected frame used as reference frame for Alignment tools. • Grouped dotScrap items can be
copied/pasted. FIXED BUGS Network/External Drives • Issues with used checkmarks on images from external hard drives resolved. • Images on networked mapped drives
UPDATE HISTORY
197
are not copied locally. Workflow • Images edited in external editor now refresh correctly. • Image attributes can be changed in an empty frame. • Frame numbers remain
constant between sessions. • Frame handle hit testing fixed. • Multi-selected frames now stay selected as expected. • Matte cutter mattes file names displayed correctly. •
EMF, PNG mattes functionality repaired.• Edited PNG image files update as expected. • Page thumbnail refresh issues resolved. • BMP files save, reopen as expected. • Text
size unaffected by copy/paste, canvas resize. • Pinned Toolbox bugs resolved. • AutoPopulate works with images selected in Image hover. • Ungrouped “Child” frames are
selectable in tree. • Canvas grid cannot be set to 0x0. • “Apply to all pages” now reset on reloading canvas dialog. • Font licensing information appears when required. •
Check for updates returning correct build information. • Undo AutoCollage no longer removes background image. • Hovers can now move to second monitor. • Dual monitor
to single monitor setup does not leave hovers orphaned. • Tutorial video ? icon replaced with clapboard icon. • 20x10 and 24x12 presets set to be double spreads. • No
double scroll bars in Embellishments hover. • Images in Smart Frame will “undo”. Render / Output • Waiting for download at render error resolved. • Render preview can be
panned. • Exported files only use lower case file names. Archive / Restore / Project Management • “Locate missing images” applies to duplicates of images. • “Locate missing
images” cancel shuts down the search. • “Locate missing images” includes mattes. • “Locate missing images” updates every page simultaneously. • Marketplace-based
projects are moved to Backup Projects. • Recently opened projects list removed from file menu. • Un-installation removes more info from system. Marketplace • Smart frames
behave as expected when canvas size changed.•dotScrap purchasing issues resolved (UK users, "anon" logins) • Issue with Download Accelerator Pro resolved. (Released
January 26, 2008)
Version 4.1 (build 43992) Features Easier, faster, and friendlier than ever – without watering down the power • FotoFusion’s completely redesigned user interface reflects
months of user feedback and refinement.• Zoom-to-open hovers bring tools and content to your work • Floating controls can be pinned up or docked neatly against the
canvas • A new Start Zone gets you up and running fast New Tools • An all-new matte cutting tool added (Enhanced, Extreme only) • Frame alignment, distribution, and size
matching tools per your requests Vastly more powerful text editing • Inter-character tracking and Inter-line spacing now supported • Adjustable underlining and strikeout
available • Support for Opentype and Postscript fonts is standard • Discretionary and Historical Ligature support (Extreme only) Continuing Refinement of Existing tools •
Tools brought closer than ever (Autocollage, AutoPopulate on Images Hover – greatly expanded toolbox) • Rule of Thirds assist during cropping • Rotation control added to
AutoJumble • Canvas size attributes can be applied across all project pages in one click Help and Expanded Language Support • Bite-sized video tutorials at your fingertips •
German, French, Spanish, Korean, and Japanese versions now available Redesigned Data Management • Saved projects now have no dependencies on the central database;
renaming, copying and deleting projects now handled as regular Windows files • Create “All-in-one” archives including source images • A list of all images used in a project
can be exported to a text file Delivering Content To You • The promise of the dotScrap library is being fulfilled with more top-notch content, including contact sheets, albums,
and basic templates. • Content is easier to find and use than ever before. Business Development • FotoFusion "Lite" is now available for bundling with your albums, cameras,
printers, and software.
Fixed Bugs: • Fonts existing in Windows font folder as shortcuts now supported • Bold and italic text simulated when no font file is available • Exif tag editing information
updated • High-res download of content on server • Memory leaks for V3 projects resolved • Memory leaks for V4 export resolved • Single database in charge of library
queues • Project database now resaved after rbuild • AutoJumble does not resize frames • V3 project with locked text will open correctly in V4 • Undo image applied to
canvas frame now works • Windows 2000 now supported • Save As… will not allow same name as existing file • Left-side windows can no longer be reduced to 1 pixel in
width • V3 pixpacs will now open in V4 • V3 template compatibility issues with V4 resolved • multi-page "save page as template" restored (Released November 8, 2007)
Version 4.0 (build 40187) New Features: • Text frames can now be converted to mattes One-click 'overlay frame ID’ mechanism to layout print/email/export for proofing
added • Grid-line canvas option added • Added presets for albums from Hahnemuhle, Shared Ink, Asukabook • Download “smarter” with higher priority on visible search
results • Transition to Amazon S3 shared storage • Branding and ‘run as’ button added to main toolbar
Fixed Bugs: • Canvas units (cm/inches) preference now remembered after save/reload • Checkmark indicators are now preserved with project save/load • Frame IDs now
remain the same after a save/quit/restart/reload cycle (enables proofing with frame IDs)• Original file name used to attached images when published • “Clear Search” now
clears fields in Keyword Search • Gaps no longer appear in font list • Text no longer becomes italic (or bold) if you scroll through the list of fonts with the up/down arrows •
Autocollage sort order now respected when populating from dropper • Crop to trim lines now working as expected • Scraps that appear blurry when rendered now sharp • ReAutoCollage performance dramatically improved • Crash on startup resolved (Released June 2, 2007)
Version 4.0 (Build 39809) New Features: · User-created content can be deleted from the organizer · Location of database installation can be specified manually · Database
split into user metadata vs. recreatable caches · New themes for emails and published pages available · New noise mattes (search for type=matte) · Library can be filtered by
keyword · HTML themes can determine rendering resolution · Graphical enhancement to UI
Selected Fixed Bugs: · Offline rendering works again · Email UI reworked · Crop to trim not displaying images outside canvas · Menus reworked to include data management
and other changes · Editors now always open completely on-screen, even on dual monitor system · Videos display better in the Home zone · Images in dropper now taken
into account when performing an AutoCollage · Frames can be deleted from School Composite when running Enhanced · Tutorial is working again (Released May 17, 2007)
Version 4.0 (Build 39446) Features: Project archive and restore · Distressed text (mattes can be applied to text) · Multi-page projects can be sent by email · Multi-page
projects can be published to the web · Multi-monitor support - hovers react correctly outside primary display · Canvas presets can specify default processing DPI · 'Welcome'
page completely revamped · Reference segment rendering now much faster · Free Localization / translation pipeline for people that want to translate FotoFusion Selected
Fixed Bugs: · Various crashes have been resolved DRM errors after going offline now fixed · “Photo Database Error” on startup should appear infrequently, if ever · Frame
handle hit testing fixed · Unresponsive Zoom Slider fixed · ctrl-= was not copying shadow setting correctly · pages hover now appears as expected in export tab for multipage project · AutoPopulate now sorting correctly on first page · Background now renders correctly on large output · "Learning Guide" is working again · Alt-tab list now shows
FF during rendering · Menus restructured for clarity (Released May 2, 2007)
Version 4.0 (Build 38041) Addressed many issues, including: · Mosaic Split is not working properly ·Undo for mattes doesn't work ·Matte function corrupt, results in error
when uninstalling V4 ·Dupe a frame after matte to border gives a frame with matte ·Feedback: Ctrl-= changes lost after save/reload ·Canvas texture does not work all the
time ·Opening v4 clobbers v3 email ·None" tile from tile list does nothing · Font undo didn't work (Released March 5, 2007)
Version 4.0 (Build 38006) The main focus of this build was stability: many, many bugs were fixed Persist buckets with project save · Edit in Photoshop should work on
original image, not a copy · Add keyboard commands: new frame (ins), new page (Ctrl-ins), clone of new page (Ctrl-shift-ins) · 2xclick on image in organizer should preview
it · Number keys should drop photos into buckets while previewing · Selection should follow currently viewed image in the photo viewer (Released March 3, 2007)
Version 4.0 (Build 37954) addressed many issues, including: ·PDF export is wrong dpi · Copy v3 templates to v4 folder ·V3 projects on external drive not seen by V4 ·Trial
expired error appearing · Slow startup when too many fonts in fonts folder ·Don't ping server when rendering items without dotScrap content · Album Manufacturers
templates are not visible in V4 · Continuous LP5 and DRM errors · 'FF couldn't load one or more images' after saving a project · Render Issue - empty pixel at the bottom and
right of a rendered collage · Norton / firewall / offline reconnection problems · Buckets disappear when window resized · Bring back the 'browse for pictures' button · %name
%: FF transforms capital letter into lower case · multi-page PSD render causes crash, memory problem · red xs in template browser · v3.X presets don't work in v4 · Long
hang when opening certain projects/scraps · Customer has to reactivate on each startup · Multiple page Render doesn't work · Mattes not showing up in matte list · Single
pages are split in half when rendering 'double pages separate' (Released March 1, 2007) (for a complete list, see http://www.lumapix.com/forum/forum.asp?FORUM_ID=11)
Version 4.0 Version 4.0 represented a profound re-architecting of FotoFusion, with a completely new database-oriented approach to content which unlocked ecommerce,
template publishing and consumption, and partnering opportunities. Much of what made the original FotoFusion user interface so unique was preserved, with the addition of
features such as better default handling and a completely revamped organizer responding to user feedback.
Headline features included the following (availability dependent upon license type):Paper + Digital Templates: The dotScrap Alliance is a new Scrapbooking industry
consortium based around FotoFusion – including K & Company, Creative Imaginations, Daisy D’s, Westrim, KI Memories, L’il Davis, Scrapbook.com, ScrapJazz.com,
MyCliqueTV, and more. Paper kits found in retail stores that are marked with ‘dotScrap Ready’ have easily-downloaded FotoFusion templates to make the paper kits even
easier to work with. Smart content: Work with intelligent graphical objects that act the way you expect: envelopes that hold images, paper clips and pins that hold paper,
frames that can be reshaped without stretching, and multi-layer elements. Integrated online content library:Search and download from an ever-growing database of
elements, templates, and complete projects. Improved User Interface: A system of pop-up windows bring searches, image folders, and other image sources to your fingertips.
“Starting points” make it easier to begin projects with a particular project type in mind. PSD and PDF Export: In addition to JPG, PNG, TIF, BMP and GIF, FotoFusion can now
export to multi-page PDF and, if the content contains no downloaded dotScrap content, as layers in a PSD file for further work in Photoshop and other editing tools. Red Eye
Removal: Easily remove Red-Eye from pictures without relying on external tools. Default handling: Changes to frame borders, text attributes, etc can automatically update
the default settings, which are applied when new frames and text are created. Improved Autocollage: AutoCollages can be ordered by file name, file date, exif date, or
randomized. Images can be made to fit a grid, or preserve their original aspect ratios even if this leaves gaps between images.Organizer:Find your images faster with a
completely rewritten Image Organizer, with support for sorting, keywords, and direct folder access. Rate your images, attach keywords, put them into categories, and search
by any criteria. Grouping: Select several objects and group them to be manipulated as a unit, with or without direct access to the group members. Tree View: Your project
can be viewed as a tree structure, allowing you to access partially occluded objects and edit grouped objects with ease. Page Size Improvements: Project pages can now be
identified as cameo images, two-page spreads, or sides within an album. Sides have asymmetrical gutter/edge/top/bottom control over bleed and safe areas. Album page
counts take page types into account. Color Space Tagging: If you shoot Adobe RGB, FotoFusion can pass your images through and tag the results as Adobe RGB. The results
will look correct when printed and rendered as Adobe RGB images.
Version 4 is launched! Version 4 represents a major revolution, not just for the FotoFusion story, but for digital and paper scrapbooking. Pro Photographers will not be
disappointed by multiple new features designed to help improve productivity and output options. Paper + Digital Templates: The dotScrap Alliance is a new Scrapbooking
industry consortium based around FotoFusion – including K & Company, Creative Imaginations, Daisy D's, Westrim, KI Memories, L'il Davis, Scrapbook.com, ScrapJazz.com,
MyCliqueTV, and more. Paper kits found in retail stores that are marked with ‘dotScrap Ready' have easily-downloaded FotoFusion templates to make the paper kits even
198
UPDATE HISTORY
easier to work with.
Smart content: Work with intelligent graphical objects that act the way you expect: envelopes that hold images, paper clips and pins that hold paper, frames that can be
reshaped without stretching, and multi-layer elements that age and add realism to your photos. Integrated online content library: Search and download from an ever-growing
database of elements, templates, and complete projects - for everyone from scrapbookers all the way up to professional photography studios. Improved UI: A system of popup windows bring searches, image folders, and other image sources to your fingertips. “Starting points” make it easier to begin projects with a particular project type or form
factor in mind.
Red-Eye Removal: Easily remove Red-Eye from pictures without relying on external tools.
Cease of support for direct source-image composition uploading to color labs. The free trial of FotoFusion v3included the ability to upload source images and
compositions to pro color labs for output. Support for this feature ended on March 1, 2007. This change does not affect any FotoFusion users except those already making use
of the feature; users that print their own output, render flat files for use in other programs, or upload images to print bureaus using other tools are not affected by this
change. LumaPix regrets any inconvenience caused by this change. Feedback sent to support(at)LumaPix(dot)com will be carefully considered.
Version 3.7 (build 35975) Final Version 3 build issued. Color Correction Quality: Color Correction is applied before conversions to B&W. (Released December 9, 2006)
Version 3.7 (build 29421) fixes a minor bug Blur Quality: Highly-blurred images now exhibit less aliasing (Released March 11, 2006)
Version 3.7 (build 28175) has three significant changes: Features: Color profiles can be set on processed output (STUDIO only) Free Trial functionality: Emails can be sent
without watermarks from trial version Compositions can be sent to participating labs for processing from trial version (Released January 18, 2006)
Version 3.6 (build 27059) Features ο Polaroid matte added. ο Improved text rendering quality. Fixed Bugs ο Instability caused by Matrox PowerDesk fixed. (Released
December 2, 2005)
Version 3.6 (build 26688) Fixed Bugs ο Certain text fonts were not properly sized. ο Default file type when importing images was incorrect. ο Minor issue when printing
certain sized projects. (released November 17, 2005)
Version 3.6 (build 26468) Features ο Images used in current project now highlighted in organizer. ο Added new 2006 Calendar mattes. ο Text frames can be hyperlinks. ο
Info bar displayed while dropping images.
Fixed Bugs ο Quality of canvas image during editing improved. ο Sepiatone color improved to match customer feedback. ο EMF/WMF added to list of file types shown while
browsing. ο Acting on images in organizer switches to "Images" tab. (released November 8, 2005)
Version 3.5 Version 3.5 marked the renaming of our top-end product from "PRINT" to "STUDIO", reflecting this version's focus on Professional photographers: studios
producing albums and large-format output, who can benefit from direct connectivity to professional printing labs providing managed color pipelines. Features ο Direct
uploading to participating Pro Photo Labs [STUDIO only]. ο Preview window in the organizer can be resized. ο Canvas width is no longer rounded to two decimal places. ο
Added option to remove LZW compression from TIF output. ο Printer color profile support added to STANDARD and PRO. Performance ο Many speed and memory usage
improvements Fixed Bugs ο Color editing now behaves correctly with multi-selected text ο Multi-page render can now be stopped ο Page name now refreshes properly after
renaming ο Page segments now removed when user changes printer settings ο Spikes in fonts no longer appear when increasing the thickness of text outlines.
Version 3.4 Version 3.4 is a maintenance update that includes the following: ·Features ο Double-width layouts now count for 2 pages ο Rulers support metric and pixel
dimensions ο Frame number on canvas tile shown if source image is not found · Performance ο Accelerated feedback when using EXIF information on remote hard drive Fixed
Bugs ο Several crashes fixed ο Loading an old project with flipped images no long causes issues at render time ο Appending a project no longer changes the name of the
current project ο Problem with missing DLL fixed ο Leading spaces in text no longer ignored ο Dragging out a new frame while the dropper is active works again ο Web links
for images in exported collages work again ο Closing FotoFusion after AutoCollage wizard doesn't prompt for save ο Editors do not open off-screen ο Forward, back, refresh,
stop buttons in community tab once again consistent with other browsers
Version 3.3 The following new features are available in FotoFusion PRINT v3.3: · Support for multiple pages οAn entire multi-page album can now be created as a single
project ο Autocollage can now create a multi-page album automatically ο Batch Processing of all pages in a multi-page album to JPEG files is now supported · Custom EXIF
tags ο Custom EXIF tags can be used for complex frame label The following new features are available in FotoFusion PRO and PRINT v3.3: ·Midpoint Guide ο Panoramic
canvases include a center guide line for avoiding album seams The following new features are available in all versions of FotoFusion v3.3: ·AutoPopulate ο An entire template
can now be filled with images in a single click · Rotation Snapping ο Holding down the 'alt' key while rotating now snaps to increments of 45 degrees. · Image Flipping ο
Images can be now be flipped left/right and top/bottom. Settings Area ο You can now choose to work in floating toolboxes or a new docked Settings Area. · Try It First ο The
various versions of FotoFusion (STANDARD, PRO and PRINT) can now be tested prior to buying · Centralized Help ο A single starting point for help now provides a one-stop
help desk.
Version 3.2 Version 3.2 added a few minor features:·Reconnecting Images ο If you move the source images for a composition to a new location on your hard drive, you can
now reconnect them to the layout. · Greyscale Mattes ο Greyscale jpeg, bmp, gif or tif files saved in the Mattes folder can be used as mattes (black becomes transparent). Of
course PNG files with associated alpha/transparency channels, and EMF files for vector mattes, continue to work as always. · Filenames in Organizer ο Images in the organizer
now have a filename for identification
Version 3.1 Version 3.1 was a maintenance release, which included many small enhancements and fixes including the following: · FotoScraps Integration ο Layouts can be
uploaded directly to the online gallery at www.fotoscraps.com. · Printing ο The printing options were completely revamped to be easier to understand ο Scaling output to fit
onto a single page is now an option · Color Picker ο A color picker was the most frequently-requested feature addition on the support forum at LumaPix.com! ·Sparse
Autocollage and background images ο AutoCollages can now include 'gaps' that reveal an image set as the canvas background · Color Shadows ο Shadow colors can now be
set to any value · EXIF enhancements ο New EXIF tags were added, including filenames without extension (e.g. "Anna" instead of "Anna.jpg") ο Filenames now preserve their
case when displayed as EXIF text Common sense ο When processing to a file, the default file name now corresponds to the project name ο The file name is not cleared after
each preview when working in the process tab ο Frames that hang off the canvas edge are drawn with a border to make them easy to find ο Cropping is preserved when
images are swapped between two frames, or AutoCollage is pressed again. ο Double clicking on a text frame nowopens the text editor · Minor issues ο The canvas no longer
allows the user to resize it inside-out ο The canvas tile can be set at all times οBad refreshes when panning very large collages have been fixed ο The color in email
backgrounds now matches that in the create tab οThe edges on images drawn without borders are now smooth instead of jagged ο The color editor text edit fields behave
predictably ο Thumbnails for PNG frames now appear correctly when dragged to the canvas ο Splitters are now "below" all other handle
Version 3.0 Version 3.0 was a massive upgrade, with two models (STANDARD and PRO) and the most radical changes to the user interface since the first version. The PRO
version included all the following features; the standard version includes a subset: Text ο Amazing interactive text manipulation ο All truetype fonts supported ο Control over
blur, edge & fill transparency, rotation, and more ο EXIF tags for building contact sheets ο Rendered at export time (text is razor-sharp at poster size) Frame Enhancements ο
Customizable, vector-based frame mattes for jagged edges ο Sepiatone and black&white image processing ο Interactive per-image blur ο Within-frame image rotation ο
Support for presets Canvas Enhancements ο Tiled background textures with interactive control over scale & blur ο One click to make an image the canvas background ο
Support for lockable and semi-transparent layers ο Bleed and crop lines ο Interactive canvas resizing · Sharing ο User templates for html export (CSS styles, new buttons,
frames, etc). ο Customizable banners ο Customizable watermarks · User Interface ο Completely new editing mechanism - Direct manipulation of important parameters at top
level ο Slick new editor-based workflow ο Editing is interactive real time, all the t ο Selection by class for fast group selection ο Keyboard-based nudging Interop Images on
the web (such as those in Kodak ProShots? galleries) can be included directly in FotoFusion collages without an import step. ο Images can be routed through other
applications (such as Adobe Photoshop?) for editing; the updated files appear automatically in the collage when done.
Version 2.1 Version 2.1 was a maintenance version, mostly consisting of bug fixes but with the following visible enhancements: ο Sharpen on export: A pro trick to bring
out crisp detail in your images οHandles always on top: Easy access to manipulation controls no matter how complex your collage is ο Improved Shadows: FotoFusion's
shadows look even better! ο Support for SMTP Servers requiring authentication: FotoFusion can now communicate with mail servers using higher levels of security
Version 2.0 Version 2.0 was another huge step forwards from version 1.1: One-click AutoCollage: Produce amazing results effortlessly ο Drop Shadows and Frame borders:
Set the thickness, color and transparency for borders ο Interactive Color Correction: Fix gamma, brightness and contrast problems smoothly and intuitively ο Final Resolution
Preview: Preview of the final results at full resolution at any time ο Fast Photo Swapping: Switch pairs of images fast! ο Improved Printing: Margins can be set directly ο
Completely Revamped UI: Gorgeous new look ο Previewing tool: Zoom in on pictures in the image palette, image organizer, AutoCollage wizard and the collage itself ο
Pixel-dimension collages supported: Web Designers can work 'natively' at the final resolution ο
Version 1.1 Version 1.1 provided significant upgrades to the output options in version 1.0, including: ο Comprehensive support for sharing collages by e-mail: Collages
embedded directly inside the e-mail message rather than as an attachment. ο Original photos can be attached (automatically resized and compressed) ο Completely new
tool sets: Ability to publish collages as HTML web pages, Integrated FTP client to upload collages directly to a web server (can also save collages as a set of local HTML files
for further editing using FrontPage or Dreamweaver), Descriptive text for each photo which appears in e-mail or web page output; Hyperlinks from each collage photo,
enabling viewers of e-mail or web-based collages to click on photos and follow links. ο Improved printing support: Unique print pre-visualization tool shows exactly what
each page of a multi-page poster-size printout will look like.
CREDITS & DEDICATION
199
CREDITS & DEDICATION
This software is dedicated to our spouses for their unfailing support and enthusiasm. Thank you for
making this possible.
We hope you enjoy using this application as much as we enjoyed building it.
Images in the user's manual kindly provided by: David Ziser, Kent Smith, Stephen Eastwood, Richard
Esposito and the LumaPix Staff.
200
LumaPix::FotoFusion Version 5 Help
Index
-..scrap
15
-110.5
10.6
10.7
10.8
1
1
1
1
-Aactivating 1
add - image effects 54
add existing project to book manager 29
adding a chapter in book manager 29
adding empty frames 48
adding extra pages 45
adding images 48
adding images to the gallery 48
adding images to the panel 160
adding mattes 101
adding more panel frames 160
adding new pages 45
adding new staff 142
adding new students 142
adding pages 18, 45
adding papers to the Paper hover 101
adding people to the database 142
adding portraits 142
adding projects 18, 45
adding students 142
adding templates 45
adding text to a frame 80
adding text to the canvas 80
adding words 80
adding yearbook projects 18
additional pages 45
advanced mode 160
album 16, 175
album production workflow 16
album side 45
align 54
alignment 54
always copy images 36
angle 54, 91
angled frames 54
approving chapters in book manager
archive 8
archiving 8
arrange 54
arrange frames 54
arrangement 54
aspect ratio 54
assembling a yearbook 18
assigning roles 142
attaching text to an image 80
attribute set 142
auto mode 160
auto tools 94
autocollage 45, 94
autodistribute 94
autoflip 45, 94
autoflip layout 94
autojumble 94
autoknockout 160
autopopulate 94
autorotate 45
average - image effects 54
29
-Bbackground blend 54
background color 54
background fill 54
background paper 54
banners 122
batch process 107
black and white 54
blank frames 48
bleed zone 2
blending modes 54
blue handles 54
blur 54, 91
bmp 107
bold 80
book management 45
book manager 29
border color 54
border editor 54
2013 LumaPix Inc.
Index
border highlight 54
border opacity 54
border options 54
border shapes 54
border width 54
borders 132
brightness 54
Buckets 101
build history 186
-Ccalculation modes 54
candid images 48
candid page 141
candid pages 18
canvas 2
canvas background 54
canvas text 80
catalogue 101
categories 101
center X / Y 54
centered text 80
changing a portrait image 142
changing information about the students
chapters in book manager 29
circle frames 54
class composite 181
class photo 175
classroom 181
clipart 132
clipart collection 132
cloud storage 18
color - image effects 54
color blocking 54
color blocks 54
color burn - image effects 54
color dodge - image effects 54
color editor 54
color wash 54
color/tint modes 54
color-wash 54
combining yearbook projects 18
communicating with your clients 179
community 184
comparative modes 54
completing your yearbook 18
composite 181
2013 LumaPix Inc.
142
composites 175
contact sheet 175, 176
contact sheet template 176
contrast 54
contrast modes 54
convert text to matte 80
copied 54
copied images 36
copy an image 54
copying images to local cache 36
copying pages 45
copyright issues and yearbook 18
cornered frames 54
Create tab 2
creating a new book in book manager
creating an online chapter 29
creative modes - image effects 54
credits 2, 132, 199
crop 54
Ctrl-C 54
Ctrl-V 54
Ctrl-X 54
custom fields 142
custom labels 160
custom pages 160
cut 54
cut a matte 54
cut out a part of an image 54
cutout 54
-Ddarken - image effects 54
darken modes 54
darker color - image effects 54
decoration 101
decorations 132
decorative frames 54
default editor 36
default folders 15
delete an image 54
deleted 54
deleting files 8
deleting pages 45
deleting projects 8
delimiter 142
designer 175
designing a contact sheet 176
29
201
202
LumaPix::FotoFusion Version 5 Help
designing a template 111
designing your yearbook 18
diamond frames 54
difference - image effects 54
distribute 54
divided - image effects 54
do not exceed 80
dotScrap 132
downloading 1
dpi and resolution 107
dpi warning 54
drop box 48
drop photo here 54
dropbox 48
dropper 48
dropping images 48
duplicate 54
duplicated 54
duplicates 142
duplicating an image 54
duplicating pages 45
-F-
-Eediting a chapter online 29
editing images 36
editing in photoshop 36
editing information in the database 142
editing online (YearbookFusion book manager)
editing panel info 142
editing photos 36
editing text 80
editor 54
editors 2
effects 54
email 105, 122
email album 117
emailing 122
embedding images 8
embellishments 132
embellishment-type frame 54
enhanced limitations 16
essentials limitations 16
excluding people from panels 142
exclusion - image effects 54
exif info 80
export-friendly 111
external editor 36, 107
29
fade 54
fades 54
feature image 160
file management 15
file name overlay 179
fill tab 54
finalize 107
finding people in the database 142
finding projects 8
finishing a book in book manager 29
finishing your project 130
fit image 54
flat file 107
flip 54
flip layout 45
fonts 80
forum 184
FotoScraps 184
four handles 54
frame border editor 54
frame hover 54
frame number 48
frame numbers 107
frame text 80
frames 48, 54, 132
freetab 132
-Ggallery 48, 132, 184
gamma 54
gif 107
glow 91
glow - image effects 54
glyph 80
gradient 54
gradients 54
graphics 132
green lines 2
grid tool (not yearbook grid)
group 54, 181
group layout 181
grouping 160
groups 142
54
2013 LumaPix Inc.
Index
guidelines
2
-Hhandles 48, 54
hard light - image effects 54
hard mix - image effects 54
header in the first line 142
hover docks 2
hovers 2
How to save files 15
html 120
HTML custom themes 120
hue - image effects 54
-Iimage cache 36
image editor 54
image frame 54
image toolbox 91
Images hover 48
image-type frame 54
import 142
importing pspa data 142
Importing the PSPA cd 142
index - publish 120
index.txt 142
info overlay 179
inserting pages 45
inserting projects 45
inserting templates 45
inset 54
installation 1
installing 1
Interactive editing 54
invert 54
IT 1
italics 80
-Jjob titles 160
jpg 105, 107
justification 80
2013 LumaPix Inc.
-KKeyboard shortcuts
keywords 101
knockouts 160
185
-Llabel font 160
label position 160
labels 160
layers on the canvas 54
layout flipping 45
leader font 160
leader position 160
leaders 160
learning 2
left side 45
Leopard 1
license level 2
licensing 1
ligature 80
lighten - image effects 54
lighten modes 54
lighter color - image effects 54
linear burn - image effects 54
linear dodge - image effects 54
linear light - image effects 54
linked images 8
Lion 1
list of used images 179
local cache 36
local file publish 120
local printing 107
local viewr 107
locate missing images 8
lock and clip 80
lock aspect ratio 54
locked projects 8
locking frames 54
locks 8
lost files 15
lost project 8, 15
lost projects 15
LumaPix clipart 132
luminosity - image effects 54
203
204
LumaPix::FotoFusion Version 5 Help
-M-
-N-
MAC 1
Mac OS X 1, 15
make a copy of an image 54
make into 142
make previews larger 2
make thumbnails larger 2
making a bmp 107
Making a flattened file 105
making a jpg 107
making a pdf 107
making a png 107
making a psd 107
making a tif 107
making groups 160
making the grid bigger or smaller
making the teacher go to the front
Manage Custom Fields 142
management 175
managing a book 45
managing projects 15
managing your yearbook 18
manual mode 160
marketplace 132
matte 54
matte cutter 54
menu bar 2
merging frames 54
midpoint 54
mine tab 132
mirror layout 45
missing images 8
mosaic 54
Mountain Lion 1
moving files 8
moving pages 45
moving projects 8
multipage 45, 175
multi-page 175
multipage publish 120
multiply - image effects 54
multi-selected 54
My Collages 15
My Exported Collages 15
negation - image effects 54
network settings 1
networking 1
new project 2
new students 142
numbers on the frame 48
-O-
160
142
offline status 2
online album 117
online flipbook 117
online photo gallery 120
online slideshow 117
online status 2
opacity 54
open 8
open a previous version 8
open project 2
opening 8
ordering 54
ordering frame 54
ordering the panels 160
organizer 101, 142
organizing a yearbook 18
Organizing my computer 15
organizing the panel 160
organizing the panels 160
orient 54
Output to file 105
Output to web 105
oval frame 54
oval frames 54
overlay - image effects 54
overlay image info 107, 111, 179
-Ppage breaks 160
page hover 2, 18, 45
page types 2
pages hover 45
pan 54
panel hover 160
2013 LumaPix Inc.
Index
panel pages 18, 141
panel population 160
panel set grouping 160
panel text options 160
papers 132
password protection 8
pasted 54
PC 1
PDF 105, 107
phoenix - image effects 54
Photoshop 36
pin light - image effects 54
png 105, 107
polaroid frames 54
populate 160
populating 160
populating a panels 160
ports 1
premium frames 54
premium tab 132
print selected pages 111
printer page segments 111
printer setup 111
printer-friendly 111
printer-page segments 111
printing 105, 111
printing at a lab 107
printing over-sized projects 111
priority 142
pro 175
pro photo 175
process tab 107
production 16
progress monitor in book manager
project 175
project folders 15
project manager 18
project versioning 8
proof-book 94
proofing 16, 175, 179
proofs 179
properties 101
PSD 107
PSPA 142
PSPA cd 142
PSPA database 18
publish 120
publishing 120
2013 LumaPix Inc.
purchased tab
132
-Qqr code
117
-R-
29
ratings 101
reassemble multi-sided projects 111
red ! 54
red exclamation 54
red lines 2
red triangle 54
red-eye removal 54
reduce to fit 111
reflect - image effects 54
registration 1
registring 1
relink missing images 8
remote storage 8, 18
removing pages 45
render segments 111
rendering a book in book manager 29
rendering to a flat file 107
reordering pages 45
replacing a portrait image 142
resize 54
resize proportionally 54
resize to fit 80
resize your images 54
resizing 54
resizing pages 45
resolution warning 54
restore 8
restoring 8
retakes 142
RGB 54
right side 45
ripped frames 54
roles 142
rolling a project back 8
rotate 54
rotate layout 45
rotating pages 45
205
206
LumaPix::FotoFusion Version 5 Help
-Ssafe zone 2
saturation - image effects 54
save 8
save as 8
save as template 8
save page as template 45
saving projects 15
saving to a file 107
saving to remote storage 18
saving to the cloud 18
school tab 142
scrapbook 132
screen - image effects 54
search 101
search tab 101, 142
searching for graphics 132
segmenting a page 111
selected page publish 120
send to your printing company 130
sending a book to a yearbook publisher
sending proofs 179
sending to a photo finisher 107
sending to a photo lab 107
sepiatone 54
setting the text's content 80
shadow amount 91
shadow angle 91
shadow blur 91
shadow color 91
shadow editor 91
shadow glow 91
shadow inside 54, 91
shadow offset 91
shadow options 54
shadows 91
shapes 54
Share 105
share by url 117
share on cell phone 117
share on facebook 117
share on tablet 117
share on twitter 117
sharing images 48
sharing yearbook pages 18
sharing yearbook projects 18
29
sharpening 54
shopping cart 2
shortcuts 185
show all 142
show only 142
show the file name 179
simple mode 160
smart frames 54
snaps 54
Snow Leopard 1
soft light - image effects 54
soft-edge frame 54
soften 54
softness 54
software updates 186
sort tab 142
sorting 142, 160
sorting classes 160
sorting the panel 160
sources tab 101
spacing between frames 54
special effects for text 80
spell check 80
spin 54
spine 107
split cover 107
split spine 107
splitter 54
stacking 54
staff 142
staff page 160
start 2
Start tab 2
start zone 2
starting 2
students 142
submitting your project 130
subtract - image effects 54
superscript 80
system requirements 1
-Ttabs 2
tagging portraits 142
tags 80
teacher at the front 142, 160
templates 8, 16, 132
2013 LumaPix Inc.
Index
text 54, 80
text color 80
text direction 80
text editor 80
text effects 80
text fill 80
text holds image 80
text on canvas 80
text on image 80
text opacity 80
text outline 80
text shaping 80
text tags 80
text tools 80
text with a matte 80
texture blend 54
textured text 80
textures 54, 132
themes 122
tif 107
tiles 54
tilted 54
title 160
titles 80, 160
tool bar 2
toolbox 54
transferring files 8
transferring your work 107
turning off a group 160
tutorial videos 2
type 101
-Uunlocking projects 8
unsharp mask 54
update history 186
updates to FotoFusion 186, 192
updates to Version 4 192
upload to publisher 130
upload to website 120
upload to your printing company 130
uploading to a lab 107
uploading to an album maker 107
used images list 179
user preferences 36
users 184
2013 LumaPix Inc.
-VVersion 5 history 192
videos 2
vignettes 54
vignetting 54
vivid light - image effects
54
-Wwatermarks 122
web album 117
web publishing 120
wedding album templates 16
what has changed 186
what is a PSPA cd 142
where are my projects 15
Where to save files 15
Windows 15
Windows 7 1
Windows 8 1
Windows Vista 1
Windows XP 1
work flow 175
workflow 16
www.FotoScraps.com 184
www.lumapix.com/forum/ 184
-Yyearbook 181
yearbook book manager 29
yearbook clipart 132
yearbook committee organization 18
yearbook design 18
yearbook design tip 18
yearbook licensing 141
yearbook pages 141
yearbook project management 45
yearbook workflow 141
YearbookFusion 18
YearbookFusion users 181
yearvbook management 18
yellow ! 54
yellow exclamation 54
yellow handles 54
207
208
LumaPix::FotoFusion Version 5 Help
yellow triangle
54
-Zzoom
54
2013 LumaPix Inc.